Orion CVD605 User manual

Book Instrucctions
DVD PLAYER/Hi-Fi VIDEO CASSETTE RECORDER
before
CVD605
Only CD Región
DIGITAL VIDEO
2E22401A[SP] Cover 9/7/04, 5:59 PM1

2
Precautions
Thank you for purchasing this DVD/VCR.
The DVD/VCR can play back both DVD discs and Audio CDs.
• Use only discs marked with the following.
DVD
[8 cm disc/12 cm disc]
Video CDs/Audio CDs
[8 cm disc/12 cm disc]
CLASS 1
LASER PRODUCT
DIGITAL VIDEO
Important Warning
CAUTION:
A DVD/VCR IS A CLASS 1 LASER PRODUCT. HOWEVER THIS DVD/VCR USES A VISIBLE LASER BEAM
WHICH COULD CAUSE HAZARDOUS RADIATION EXPOSURE IF DIRECTED. BE SURE TO OPERATE
THE PLAYER CORRECTLY AS INSTRUCTED.
THE FOLLOWING CAUTION LABEL IS LOCATED ON THE REAR PANEL OF THE DVD/VCR.
WHEN THIS DVD/VCR IS PLUGGED INTO THE WALL OUTLET, DO NOT PLACE YOUR EYES CLOSE TO
THE OPENING OF THE DISC TRAY AND OTHER OPENINGS TO LOOK INTO THE INSIDE OF THIS DVD/
VCR.
USE OF CONTROLS OR ADJUSTMENTS OR PERFORMANCE OF PROCEDURES OTHER THAN THOSE
SPECIFIED HEREIN MAY RESULT IN HAZARDOUS RADIATION EXPOSURE.
DO NOT OPEN COVERS AND DO NOT REPAIR YOURSELF. REFER SERVICING TO QUALIFIED PER-
SONNEL.
WARNING:
TO REDUCE THE RISK OF FIRE OR ELECTRIC SHOCK, DO NOT EXPOSE THIS EQUIPMENT TO RAIN
OR MOISTURE.
TO REDUCE THE RISK OF FIRE OR ELECTRIC SHOCK, AND ANNOYING INTERFERENCE, USE THE
RECOMMENDED ACCESSORIES ONLY.
2C98710A[E](02-05) 20/1/04, 3:162

3
Precautions
Video Tape
Video Head Drum
Moisture Condensation
If the unit is suddenly moved from a cold place to a warm place, do
not operate it for two or three hours.
What is moisture condensation
When cold water is poured into a glass, for example, water vapour in
the air will condense will form on the surface of the glass. This is called
moisture condensation.
Moisture will condense on the unit in the following cases;
•When you move this unit from a cold place to a warm place.
•After heating a cold room or under extremely humid conditions.
If you experience the above conditions;
"Plug" the mains lead into an AC outlet, set the POWER button to ON
and leave at the room temperature until moisture condensation disap-
pears.
Depending on the surrounding conditions, this may take two or three hours.
•To prevent injuries do not insert your hand into the
cassette loading slot.
Watch out for toddlers who often love to imitate the
behavior of adults. In some cases, toys inserted into
the cassette loading slot have resulted in expensive
repairs.
•Do not place the unit near appliances which may
causeelectromagneticinterferencesuchasloudspeak-
ers, amplifiers, electric motors, mobile phone, etc.
Magnetic fields may affect picture or sound quality of
video recordings.
•Avoid extreme moisture and dust.
•Leave repairs to a qualified service technician.
•Avoid locations subjected to extreme heat and cold.
•Avoid placing to place the unit on any surfaces that
may be subjected to vibrations or shocks.
•Do not insert fingers or any other objects into the
cassette loading slot. Also, when cleaning the unit,
never spray cleaner or furniture wax directly on the unit
housing.
•Do not place flower vases on top or next to the unit.
Waterspilledintotheunitcouldcauseseriousdamages.
In case of water damage, do not unplug the power
cord from its wall outlet and call for qualified service
immediately.
•When you leave your home for a long period of time,
unplug the power cord for safety reasons.
•Cleaning Precautions
For cleaning the VCR, we recommend a mild soap
solution and a slightly moistened soft cloth as it is used
for furniture. To avoid electrical shocks, unplug the
power cord from its wall outlet before cleaning. Be
especially careful when cleaning plastic components.
•To protect the unit during a thunder storm, unplug the
power cord and disconnect the antenna.
2C98710A[E](02-05) 20/1/04, 3:163

4
Features
Video Cassette Recorder
•High Quality (HQ) Images
•On-Screen Displays (OSD)
•Nicam Hi-Fi Stereo Audio Re-
cording and Playback
•CATV Tuner with Hyperband
•80 Memories for presets
•Automatic TV station presetting
•30 Minutes Back-Up in case of
Power failure
•6rotary Heads (4 Video Heads
2 Hi-Fi Audio Heads)
• Long play
•Timer Recording of up to 8 Pro-
grams per Month
•One- Touch Timer Recording
(OTR)
•Video index Search System
•Slow Motion
•NTSC Video Cassette Tape Play-
back on PAL TV
•Real-Time Tape Counter with
ZERO RETURN-Function
•Auto Video Head Cleaning Sys-
tem
•Digital AUTO Tracking (ATR
Function)
•Repeat
•On-Screen Display in 5 Lan-
guages
•AV-Front input jacks
•2Scart sockets for Premiere
•CE Symbol guaranteeing
Compliance to Currently
Effective European Standards
DVD Player
•Digital Audio Jack (Coaxial)
•Multi-Language
•Multi-Angle
•Repeat Playback
•Memory/Random Playback
•Zoom
•Video Aspect Ratio
•Parental Control
•3Scenes memory
•Digital output for Dolby Digital
and DTS
•Playback of DVD, Video-CD and
Audio-CD
• PAL & NTSC DVDs playback
•A-B Repeat playback
•MP3/WMA/JPEG CD playback*
*This product incorporates copyright protection technology that is protected by method claims of certain U.S.
patents and other intellectual property rights owned by Macrovision Corporation and other rights owners.
Use of this copyright protection technology must be authorized by Macrovision Corporation or other rights
owners and is intended for home and other limited viewing uses only unless otherwise authorized by
Macrovision Corporation or other rights owners. Reverse engineering or disassembly is prohibited.
* Manufactured under license from Dolby Laboratories. “Dolby” and the double-D symbol are trademarks of
Dolby Laboratories.
*“DTS” and “DTS Digital Out” are trademarks of Digital Theater Systems, Inc.
*Unauthorized recording of copyrighted television programs, films, video cassettes and other materials may
infringe the rights of copyright owners and be contrary to copyright laws.
*Windows Media, and the Windows logo are trademarks, or registered trademarks of Microsoft Corporation in
the United States and/or other countries.
2C98710A[E](02-05) 20/1/04, 3:164

5
Contents
Precautions ......................................................2
Features ...........................................................4
Contents ...........................................................5
Parts and functions .......................................... 6
Display .............................................................7
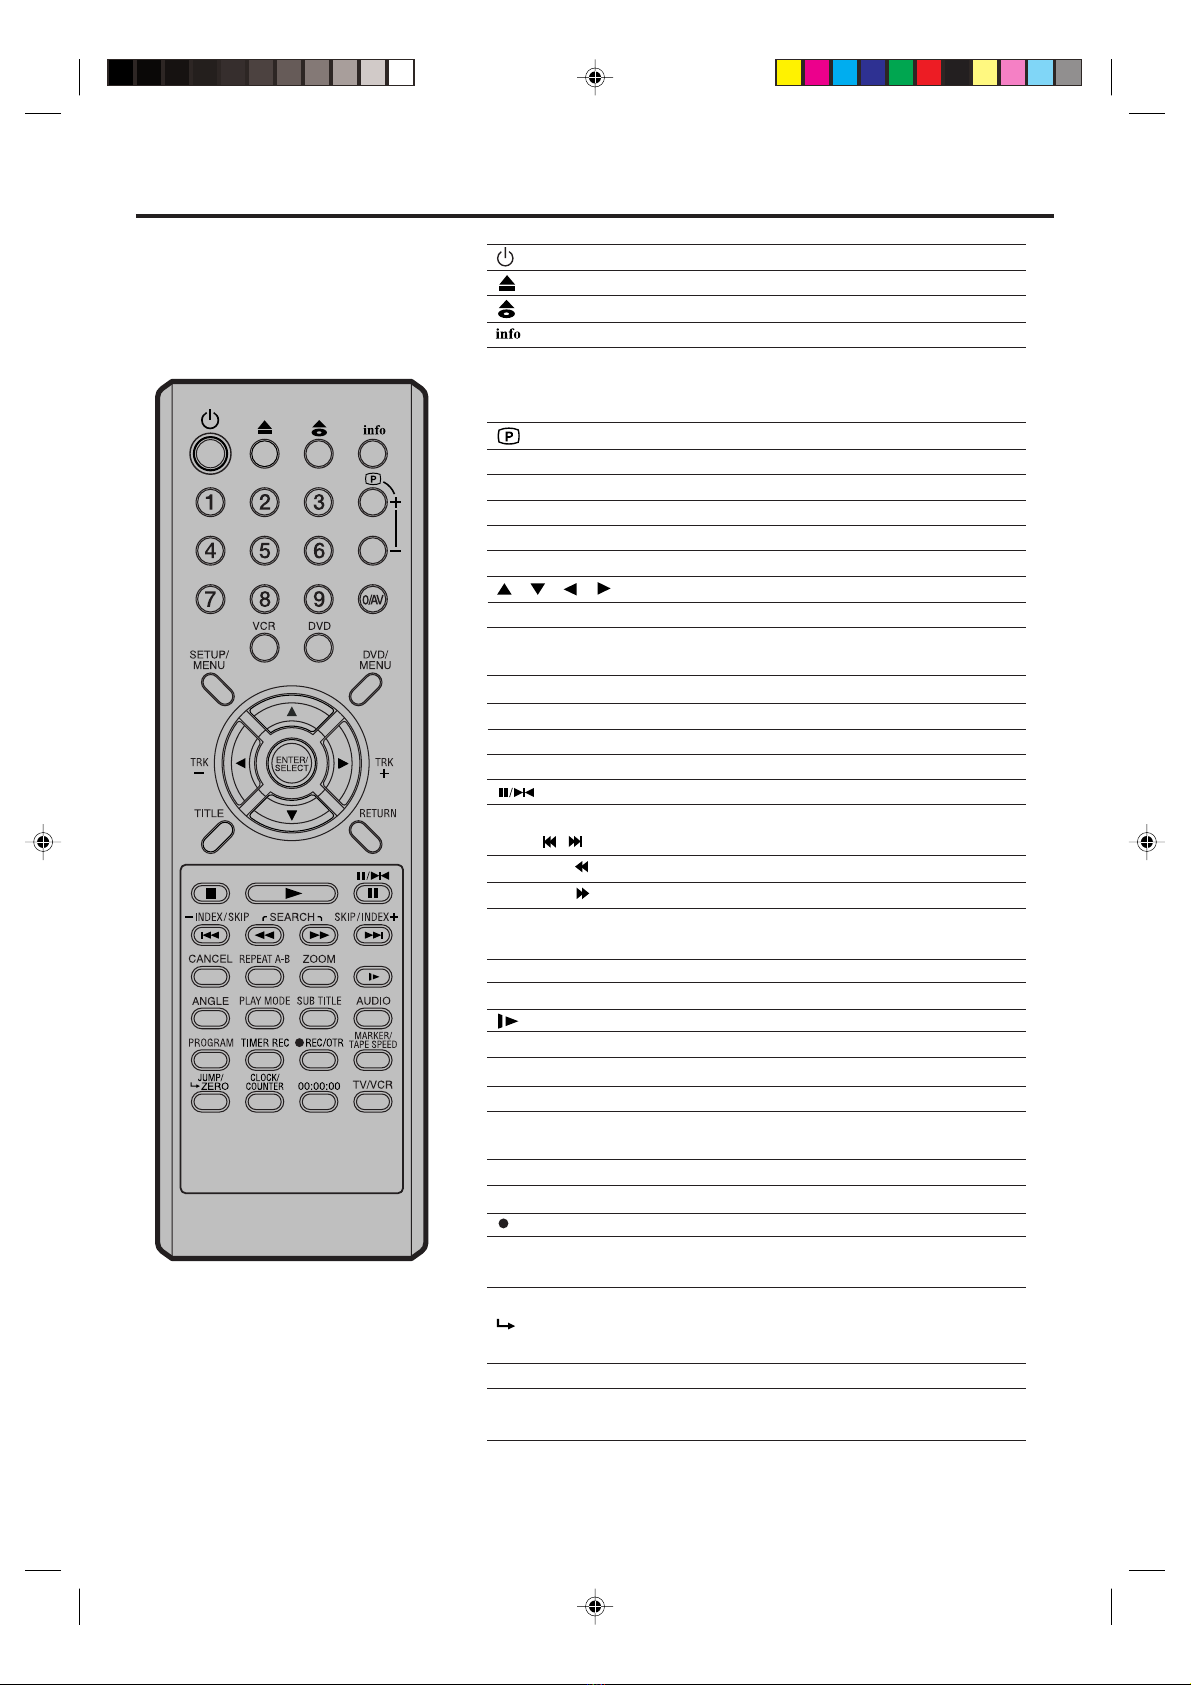
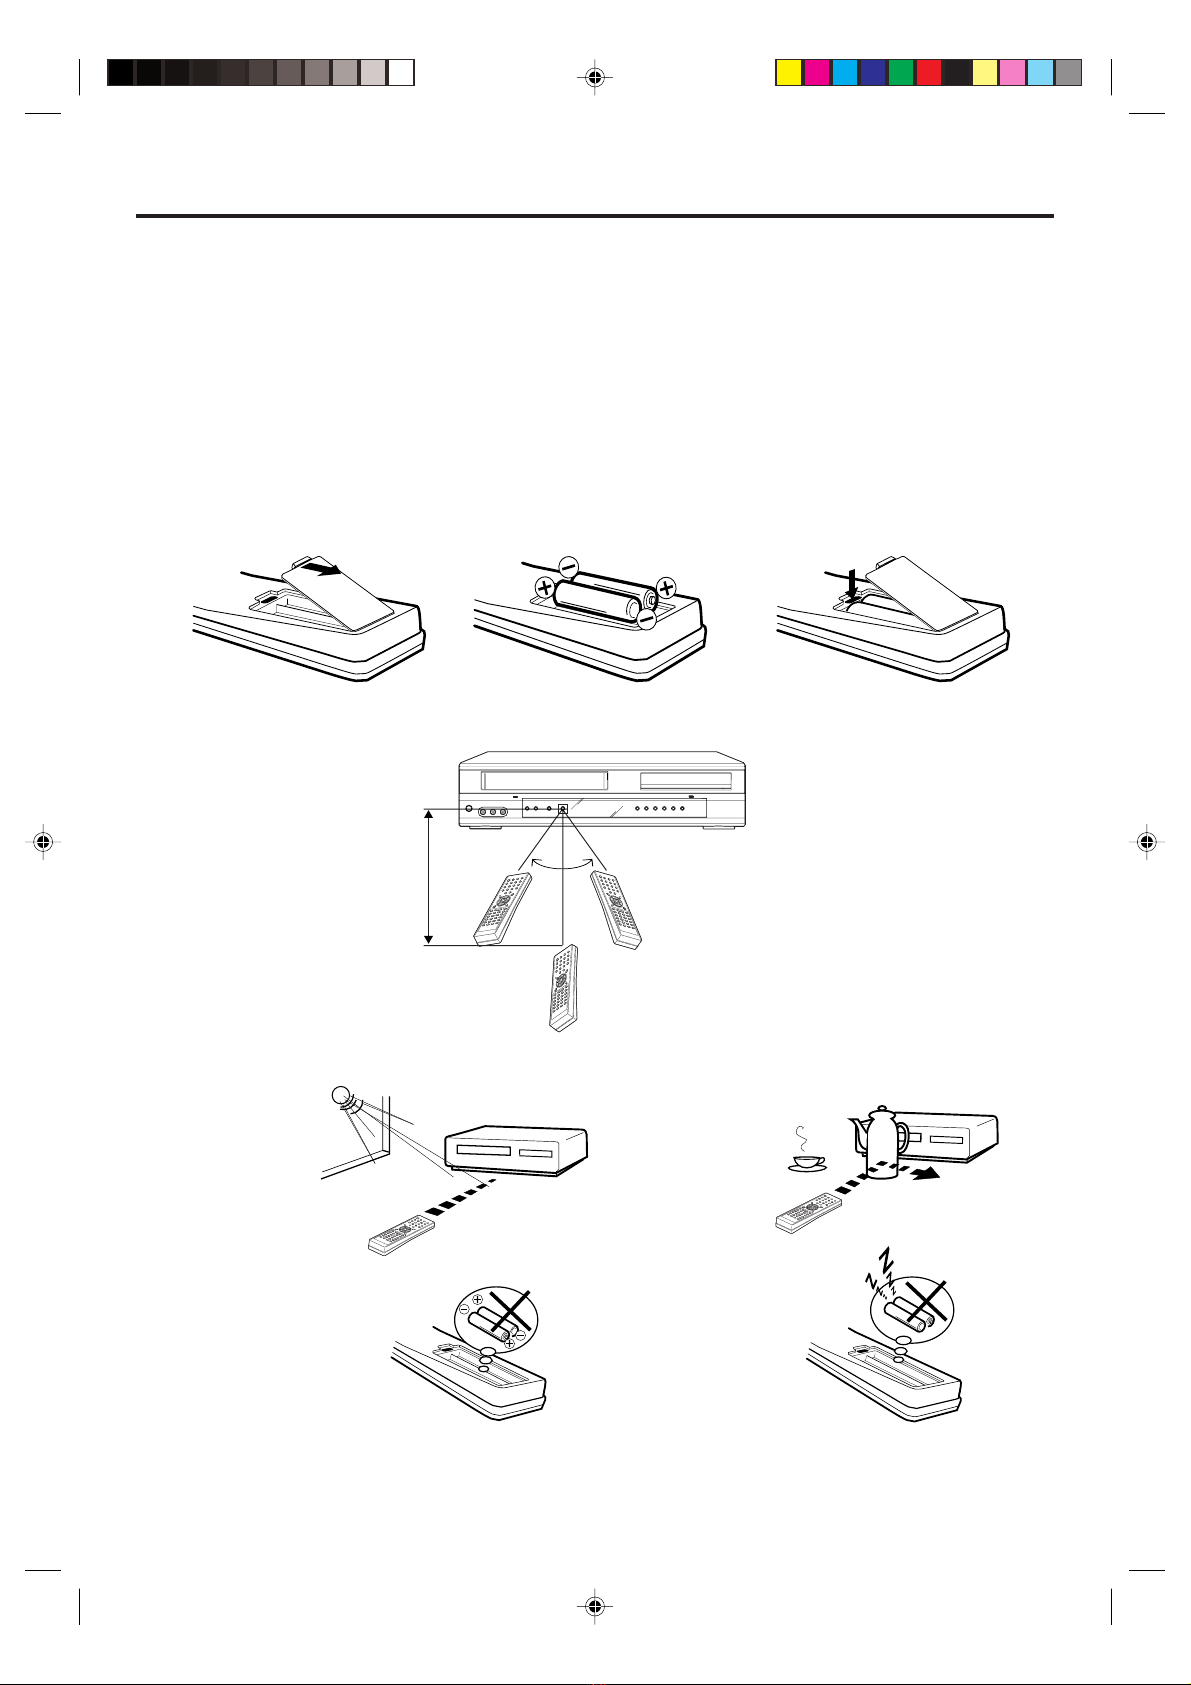
Remote control .................................................8
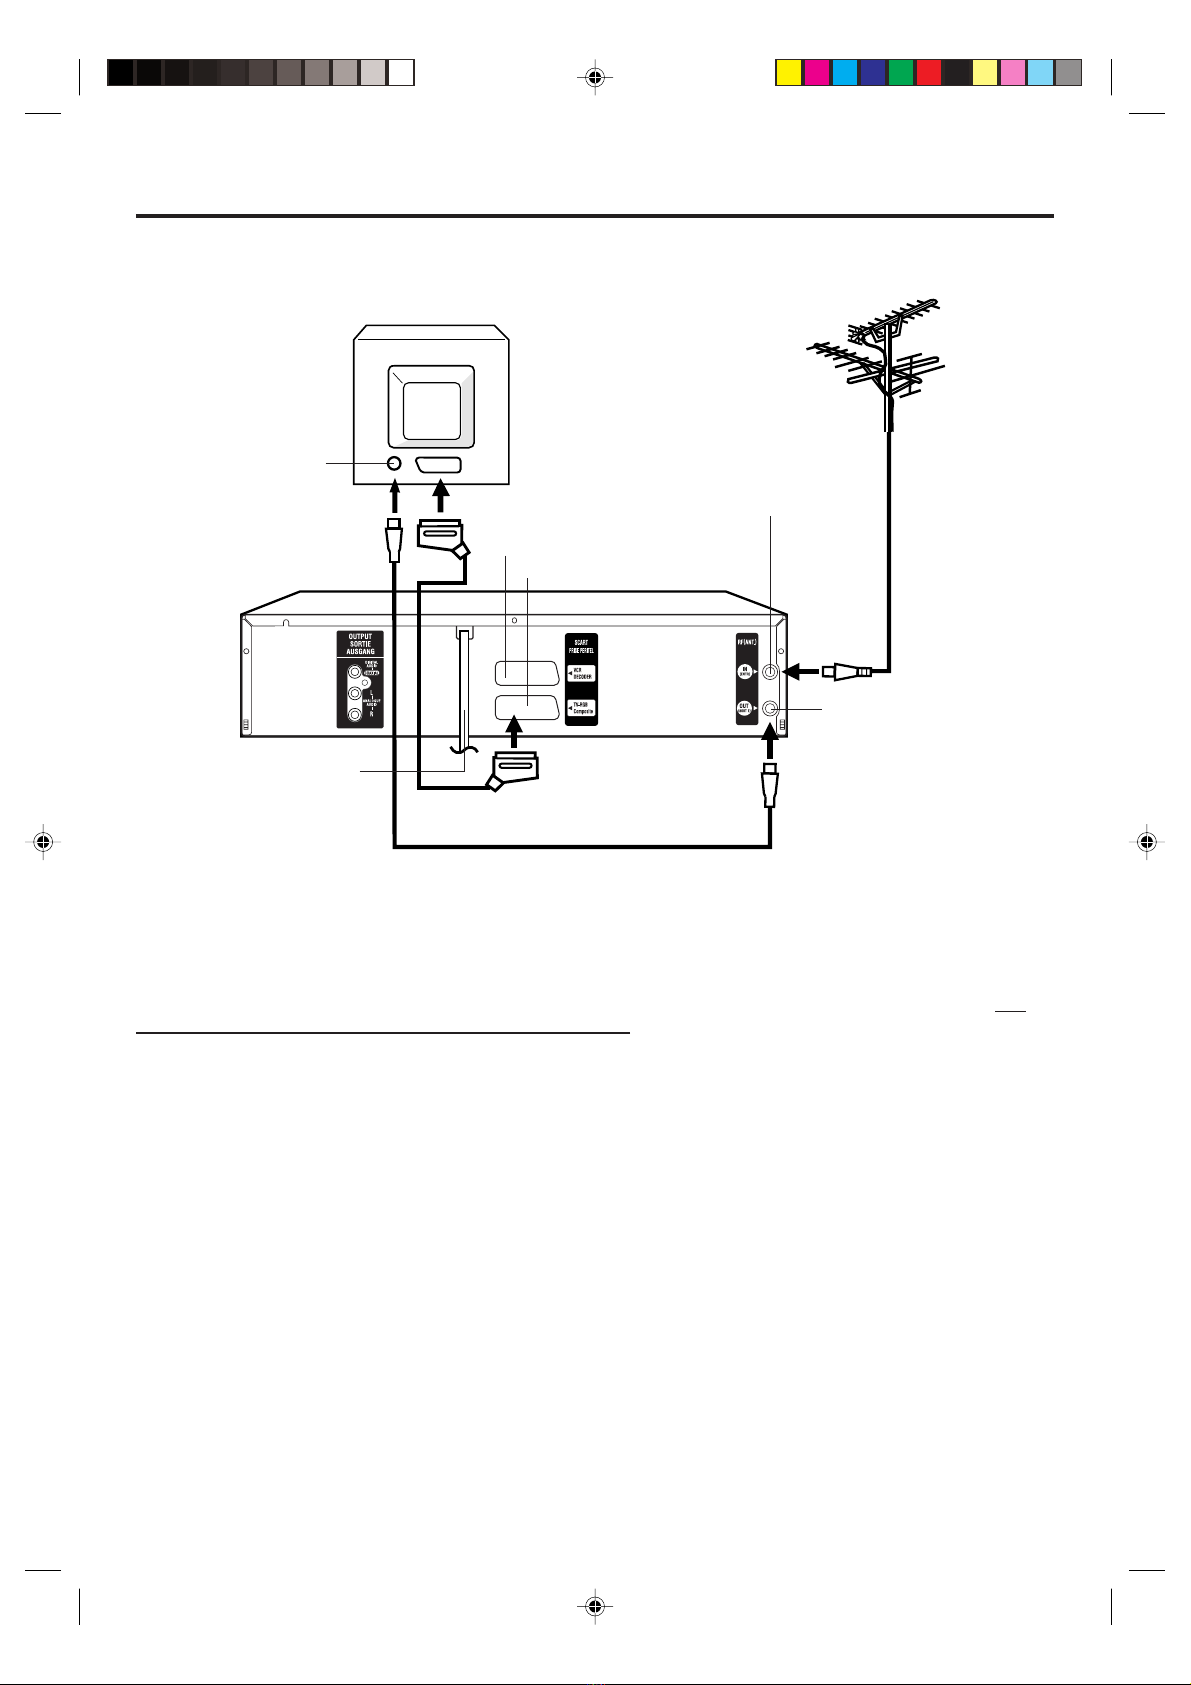
Basic connections ..........................................10
Playback connection ......................................11
Before using your unit
Recording a TV Program ............................... 28
One-Touch Timer Recording (OTR) ............... 30
Timer Recording ............................................. 31
Recording
Advanced function of VCR section
Loading and Unloading a Cassette Tape ....... 22
Cassette tape playback .................................. 23
Special playback ............................................ 24
Repeat playback ............................................ 25
Counter Display.............................................. 26
Video Index Search System ........................... 27
Tape playback operation
Setting the TV to the AV-Channel ................... 13
Setting the On-screen language .................... 14
Clock setting................................................... 15
Automatic TV station presetting ..................... 16
Mapping TV stations ...................................... 17
Manual TV station presetting ......................... 20
Setting up the VCR section
Disc ................................................................ 37
Language setup ............................................. 38
Playback procedure........................................ 39
Special playback ............................................ 40
MP3/WMA/JPEG playback ............................ 41
Setting the JPEG interval ............................... 43
Setting the Select Files .................................. 44
Zooming/Locating desired scene ................... 45
Repeat playback............................................. 46
Programme playback/Random playback (CD) 47
Marking desired scenes/Karaoke playback .... 48
Changing soundtrack language/Subtitles ....... 49
Changing angles/Title selection/DVD menu ... 50
Disc playback operation
Setting the aspect ratio of TV screen ............. 51
Setting on screen display/Disc status ............ 52
Dynamic Range Control ................................. 53
Parental control setting .................................. 54
To change the parental level .......................... 55
Temporary disabling of rating level of
DVD disc ........................................................ 56
Setting menu language .................................. 57
Setting subtitle language ................................ 58
Setting audio soundtrack language ................ 59
DVD picture signal selection .......................... 60
Table of languages ......................................... 61
Advanced function of DVD section
Problems and troubleshooting ....................... 62
Video head cleaning....................................... 63
Specifications ....................................Back cover
Additional information
NICAM/German A2 Stereo Recording
and Playback .................................................. 33
Audio Mixing ................................................... 35
Duplicating a Video Tape ................................ 36
2C98710A[E](02-05) 20/1/04, 3:165

6
SCART-socket
(for VCR/DECODER) (A2)
Parts and functions
Front
Rear AC power cord
DVD COAXIAL DIGITAL
AUDIO OUT jack
RF IN jack
DVD AUDIO (L/R) OUT jacks
RF OUT jack
SCART-socket
(for TV-RGB/Composite) (A1)
I
I
POWER
button
AUDIO (L/R)/VIDEO IN jacks(A3)
CHANNEL /
buttons
FF (Fast Forward) button
Remote sensor
VCR indicator
REW (Rewind) button
DVD indicator
REC button
PLAY button
STOP button
OPEN/CLOSE button
Disc tray
VCR/DVD mode selector button
Cassette Loading Slot
EJECT button
Display window
2C98710A[E](06-11) 20/1/04, 3:166

7
No. Display Description
VCR mode
1
2
3
4
5
6
1 2 34
6
5
Display
7
8
9
10
VCR
DVD
CD
10 : 00
01 : 00
2
A1/A2/A3
TRK
REC
CH 2
Playback (lights) / Auto resume (flashes)
Still picture
DVD disc is inserted.
CD is inserted.
Clock display (colon[ : ] flashes)
Counter display by hour/minute at VCR/DVD / by minute/second at CD
Track number display for CD
TV channel position display
External input display
Timer recording display
Video tape is in the unit
Track display for CD
Normal recording display (flashes during One-touch Timer Recording - OTR)
Note:
Some discs may be displayed wrong or e.g. chapter number, playback time, etc. may not be displayed.
78
9
10
Display window
2C98710A[E](06-11) 20/1/04, 3:167

8
Power on/off 13,14
(EJECT) Eject a cassette tape 22
(OPEN/CLOSE) Open or Close the tray 39,41,42
(CALL) Display VCR or DVD operation status 26,29,52
0-9 Direct channel selection of TV 16,28,30
Input setting 15~18,31,42,47
Enter a security code 54~56
(CHANNEL) +/– Select channel of the VCR 16,28,30
AV Scart Input or AV-Front input 32,36
VCR Select to operate VCR 14
DVD Select to operate DVD 38
SETUP/MENU
Display menu of setup 14~21,38,43,44,51~55
DVD/MENU Select menu of a DVD disc 42,50
/ / / Cursor buttons
TRK (TRACKING)
–/+ Manual tracking 24
ENTER/SELECT Enter information in the menu
Select option in the menu
TITLE Select title of a DVD disc 42,50
RETURN Remove DVD set up menu 38,43,44
3(STOP) Stop 23,28,39,41,42
1(PLAY) Playback 23,24,39,41,42
(
PAUSE/STILL
)
Still picture/Recording pause on/off 24,28,36,40
INDEX –/+ Search for the INDEX mark of a tape 27
SKIP /
Skip chapter to forward or reverse direction
40,42
SEARCH Rewind/Review playback 23,24,40
SEARCH
Fast Forward/Forward search playback
23,24,40
CANCEL Delete Timer program 32
Cancel input data in the setting mode 16,17,19,45,47,48
REPEAT A-B
Repeat playback between A and B (DVD/CD)
46
ZOOM Zoom (for DVD playback) 45
(SLOW) Slowmotion playback 24,40
ANGLE Change playback angle of a DVD disc 50
PLAY MODE Select playback mode 46,47
SUB TITLE Set Subtitle of a DVD disc 49
AUDIO Switches sound between mono and stereo 34
Change soundtrack language of DVD 48
PROGRAM Confirmation of Timer-Recording 32
TIMER REC Timer recording On/Off 32
REC/OTR Recording/OTR 28,30
MARKER Index(DVD) 48
TAPE SPEED Sets the tape speed for recording 28,30
JUMP Jump to desired scene 45
ZERO
Stop the tape when the counter reaches 00:00
26
(ZERO RETURN)
CLOCK/COUNTER
Change the front Display mode 26
00:00:00
Reset the counter to 00:00 26
(COUNTER RESET)
TV/VCR Switch to TV only at Scart connection 29
Remote control
Page
2C98710A[E](06-11) 20/1/04, 3:168

9
Remote control
123
Replace the compartment
cover.
Install two "AAA" batteries
(supplied),
paying attention to the
polarity diagram in the battery
compartment.
Open the battery compart-
ment cover in the direction of
the arrow.
How to install the batteries
Use micro batteries type UM-4 (AAA-Size).
These batteries are offered as carbon / zinc-type or as alkaline-type. You may use both, but do not mix types. The
alkaline type lasts longer compared to the carbon / zinc type but is more expensive.
Note: Flat, weak batteries will leak. Corrosive electrolyte will damage the remote control handset.
Leak proof batteries will not leak immediately when they are flat. As long as the handset is still working, there is
no danger of leakage. To prevent damage, remove the batteries if you do not use the handset for several
months.
Damage because of leakage is not covered by the guarantee.
Distance of Remote
Control Operation
Effective angle:
approx. 60°
approx.
5m
Point the remote
control directly at the
remote sensor.
If bright sunlight
directly beams
onto the unit
front.
If an obstacle is
placed between the
unit and the handset.
The remote control handset will not work properly in the following cases:
If the batteries have not
been installed according to
their polarities.
If the batteries are
weak.
2C98710A[E](06-11) 20/1/04, 3:169

10
I
Basic connections
Connect your DVD/VCR to your home's antenna and to your TV-set as shown in the illustration.
When you have finished these connections you connect your DVD/VCR to the 230 V / 50 Hz mains.
TV
AC power cord 230V/50 Hz
DVD/VCR
Antenna-Input
To Scart socket RF-Input (from
house antenna)
TV Scart Socket (A1)
RF-Output (to TV)
Antenna
Supplied Coaxial cable
In addition to the coaxial cable connection, connect also with scart cable. The picture and sound will be transmitted
best through the scart cable. In this case, the TV need not be tuned to the video recorder. The AV-channel also need
not be tuned. The video recorder switch the television to video operation through the scart cable automatically. The
stereo-playback is possible in only case through a scart cable!
Connect a TV with the Scart socket
If your TV-set does not switch to video-playback operation automatically, please
turn your TV's video switch to VIDEO position manually.
Supplied Scart cable
VCR/DECODER Scart Socket (A2)
2C98710A[E](06-11) 20/1/04, 3:1610

11
I
I
SCART-cable (not supplied)
If a Satellite Receiver is used, we recommend the following configuration:
Connection to a Satellite Receiver
Playback connection
The exact arrangement you use to interconnect various video and audio components to the DVD/VCR is dependent
on the model and features of each component. Check the Owner's Manual provided with each component for the
location of SCART socket.
Connection to a Decoder (for Premiere Programs)
Decoder
RF-Output
SCART-cable (not supplied)
Cable TV-
connection
TV-unit
SCART-cable (supplied)
DVD/VCR
To record from Satellite Receiver press "0/AV" on the remote control of DVD/VCR. "A1" will appear on the
front display. Select the desired TV-program at Satellite Receiver.
Satellite
Antenna
Satellite
Receiver
DVD/VCR
TV
SCART-cable (supplied)
Note: Make sure that AV - mode in SYSTEM SETUP - menu has been set
to DEC .
2C98710A[E](06-11) 20/1/04, 3:1611

12
I
TV
I
TV
Playback connection
Coaxial digital cable (not supplied)
AV Amplifier with
built-in various
decoder as above
DVD/VCR
To Audio (L) Input
To Audio (R) Input
AUDIO Cord (not supplied)
Stereo Amplifier
DVD/VCR
Audio (R) Output
SCART-cable (supplied)
Audio (L) Output
Coaxial digital
Audio Output SCART-Socket
(for TV-RGB/Composite)
To SCART
input
SCART-cable (supplied)
To SCART
input
SCART-Socket
(for TV-RGB/Composite)
Connect to a Stereo Amplifier with Audio Output
If your DVD/VCR is connected to a stereo amplifier, the video soundtrack can output through the loudspeakers of
the stereo system.
Connect to an AV Amplifier with built-in digital surround
If you are using an Amplifier with a built-in digital surround as follows, you can enjoy the various audio systems
such as Dolby Digital and DTS by using the Coaxial Digital Output.
Use this connection to connect an:
• AV amplifier with built-in *Dolby Digital decoder
• AV amplifier with built-in *DTS decoder
Notes:
•The COAXIAL jack is useful only for DVD section.
VHS signal is output only from the SCART-sockets, AUDIO L/R jacks and RF OUT jack.
•When you make the connections above, do not set DOLBY DIGITAL to DOLBY DIGITAL or DTS to ON on the AV
Amplifier. If you do, a loud noise will suddenly come out from the speakers, affecting your ears or causing the
speakers to be damaged.
• DTS audio will be output only from the COAXIAL output. To hear DTS audio, DTS-Decoder is necessary.
When playing DTS-encoded CDs, only noise will be heard from the speakers or analogue stereo outputs.
•Some DTS decoders which do not support DVD-DTS interface may not work properly with the unit.
2C98710A[E](12-15) 20/1/04, 3:1612

13
TEST
Setting the TV to the AV-Channel
VCR
We recommend that television and DVD/VCR are being connected with a scart cable.
In this case, the setting of AV-channel is not necessary. Picture and sound of video cassette will be transmitted to
television through the scart cable automatically. Please read the next page.
In case of no scart cable connection,
you must set the television to the AV-
channel. Pay attention to the following
notice:
A built-inTV-broadcast in DVD/VCR can
do the video playback through the sup-
plied antenna cable. This broadcast is
sent on UHF, channel 36.To receive this
broadcast, you must tune your televi-
sion to channel 36 in UHF-band.(see
step 2)
In case a broadcast has already sent
to channel 36 in your area or you con-
nect a additional equipment (e.g. Sat-
ellite receiver) with a coaxial cable
(without a scart cable), you must tune
the sending channel in DVD/VCR (see
step 3). In your television store the both
equipment (the DVD/VCR and the sat-
ellite receiver) to 2 different program
positions.
Example:Your satellite receiver is sent
to channel 36. You tune the DVD/VCR
to channel 40 (see step 3).
(If your DVD/VCR is also sent to chan-
nel 36, the interference will occur.)
In your television store the channel 36
to e.g. program position 3 and store the
channel 40 to e.g. program position 4.
Note that the program position 4 must
be suitable for video-playback espe-
cially. Please see the owner's manual
for your television. If the playback pic-
ture is often distored, you must select
the other program position for DVD/
VCR.
Preparation
•Turn on the TV.
•Make sure the power of DVD/VCR has been turned off.
Switch your television to the program position on which the
video playback is seen. Start the channel search of your
television until “TEST” appears. Store this tuning in televi-
sion like also the case of the reception for normal televi-
sion-channels you would store.
If you want to use your DVD/VCR,
switch your television to this program
position.
If there is interference in the picture (you see 2 programs
simultaneously or what is called Ghosts), change the
sending channel in DVD/VCR. To do this, go back to the
step 1. Use CHANNEL button on the DVD/VCR to change
the number next to the rF:. Then return to step 2and tune
the television newly.
3
1
2
4
Press the DVD/VCR’s (not the one on your remote con-
trol) and keep pressing it until the display shows rF:. The
number next to rF: is the channel in UHF-band to which
you must tune your TV-set.
Note:
If you receive one TV-program on channel 35, 36 or 37, the interference can be occurred to the built-in TV channel
in DVD/VCR. If you use a scart cable for the transmission of picture and sound, you can cut off the built-in TV-
program.Then the video playback through the supplied antenna cable is not possible any more. Press CHANNEL
repeatedly (at step 1) until OFF will appear.(OFF appears after 69 or before 23)
Press button to turn off the DVD/VCR.
3
TEST
1,4
2C98710A[E](12-15) 20/1/04, 3:1613

14
Setting the On-screen language
3
1
2
4
SELECT : OK: ENTER
LANGUAGE/SPRACHE/LANGUE
ENGLISH
DEUTSCH
FRANCAIS
ITALIANO
ESPANOL
LINGUA/LENGUA
Turn on your TV and select the AV-
Program position, on which you have
already set your DVD/VCR. (it will hap-
pen automatically by Scart-cable con-
nection). So you can follow up the all
setting on TV screen.
Notes:
•If the unit does not operate properly,
or No key operation (by the unit and/
or the remote control): Static elec-
tricity, etc., may affect the player's
operation. Disconnect the AC power
cord once, then connect it again.
•Both the VCR and the DVD have their
own menu option (See page 38).
•If no buttons are pressed for more than
60 seconds, the MENU screen will re-
turn to normal TV-operation automati-
cally.
Preparation:
• Press the button to turn on the DVD/VCR.
•Press VCR to select the VCR mode. (The VCR indicator will light.)
You can choose from five different languages (English, French,
German, Italian and Spanish) for the on-screen displays.
Press MENU. Press or to
select the “SINTONIZZAZIONE
SISTEMA” menu, then press
ENTER.
If you use the unit for the first
time and press MENU, instead
of the main menu screen on the
right the “LANGUAGE” set up
menu screen in step 3may ap-
pear.
Press or to select the
“LANGUAGE”option,thenpress
ENTER.
Press or to select the
desired language: English (EN-
GLISH), German (DEUTSCH) ,
French (FRANCAIS), Italian
(ITALIANO) or Spanish
(ESPANOL), then press EN-
TER.
Press MENU repeatedly until
the TV picture appears on the
screen.
REGOLAZIONE ORARIO
SINTONIZZAZIONE SISTEMA
SCELTA :
ENTRATA :
ENTER
MENU
FINE
:
LANGUAGE/SPRACHE/
LANGUE
LINGUA/LENGUA
AV2 [DEC]
REGOLAZIONE TIMER PROG
AUTO REPEAT
SINTONIZZAZIONE CANALE
SINTONIZZAZIONE SISTEMA
MENU
FINE :
SINTONIZZAZ VIDEOREG.
SCELTA :
ENTRATA : ENTER
[OFF]
2C98710A[E](12-15) 20/1/04, 3:1614

15
SYSTEM SETUP
CLOCK SET
LANGUAGE/SPRACHE/LANGUE
LINGUA/LENGUA
AV2 [DEC]
SELECT :
ENTER : ENTER
MENU
EXIT
:
4
Clock setting
2
3
1
5
6
CLOCK SET
DAY SAT
27
MONTH
YEAR
TIME
3
2004
11:30
SELECT :
SET :
OK
: ENTER
EXIT
: MENU
/ 0–9
7
VCR
Your DVD/VCR is fitted with a 24 hour
clock.
You must set the date and time for
timer recordings.
Note:
In case of a power failure, the clock will
continue to operate for another 30 min-
utes with quartz-controlled precision. To
indicate that the power failure has lasted
for an excessive period of time "--:--" will
appear on the display. In this case read-
just time and date.
Preparation:
•Turn ON the TV and set to the video input mode.
•
Press VCR to select the VCR mode. (The VCR indicator will light.)
Example: Setting the clock to "11:30" March, 27 (SAT), 2004.
Press MENU. The VCR menu screen will appear.
If the clock is not set, SYSTEM SETUP menu of step 3will appear
automatically.
Press or to select the
“SYSTEM SETUP” menu, then
press ENTER.
Press or to select the
“CLOCKSET” option, thenpress
ENTER.
Press or repeatedly or 10
number buttons until “27” ap-
pears. Then press .
Set the month,year, hour and
minute as in step 4.
Then press ENTER.
•In case of an erroneous input
press to go back to before
step and enter again.
Press MENU repeatedly until the TV picture appears on the
screen.
The clock will begin operation.
CLOCK SET
DAY MON
27
MONTH
YEAR
TIME
1
2003
0:00
SELECT :
SET :
OK
: ENTER
EXIT
: MENU
/ 0–9
2C98710A[E](12-15) 20/1/04, 3:1615

16
3
Automatic TV station presetting
2
1
4
Your DVD/VCR has one built-in tuner
to receive the broadcast. Before you
record one TV-Broadcast, you must
set and preset the whole of the broad-
casts. This DVD/VCR can preset up
to 80 broadcast.
Automatic station presetting
All stations will preset in sequence available in your area.
Preparation:
•Turn ON the TV and set to the video input mode.
• Press VCR to select the VCR mode. (The VCR indicator will light.)
Press MENU.
Press or to select
CHANNEL SETUP. Then
press ENTER.
Press or to select AUTO
TUNING.
Press ENTER.
The DVD/VCR will begin searching and setting with early stored
channel, the number is increased by one into memory all the broad-
casting channels available in you area (VHF-L, VHF-H, UHF). While
setting channels, AUTO TUNING appears. When the setting
finished, the CHANNEL MAPPING menu will appear.
Press MENU repeatedly until the TV picture appears on the
screen.
Note: To cancel skipping select the skipped channel using 10
number buttons, then press CANCEL. The channel No. dose not
blink any longer, and the channel No. now may be selected again
using (CHANNEL) +/–.
To skip a channel position
Unwanted channels can be skipped so that they cannot be called up
by pressing
(CHANNEL)
+/–. Select the 29, then press CANCEL.
This channel’s number will be flashing. That way you can cancel
further channel one after the other.
Notes:
•TV reception interference or power fail-
ure may result in Automatic station pre-
setting malfunctions. In such a case
repeat the setting procedure from the
beginning.
However, you cannot receive the nec-
essary broadcast yet, try to preset the
broadcast manually. (See page 20.)
•When the unit is in the auxiliary input
mode, you cannot preset channels.
2C98710A[E](16-21) 20/1/04, 3:1716

17
A, B, C, ... X, Y, Z 0, 1, 2, ... 7, 8, 9
–
+
/
•
1
2
3
4
5
Mapping TV stations
Preparation:
•Turn ON the TV and set to the video input mode.
• Press VCR to select the VCR mode. (The VCR indicator will
light.)
Example: MTV is assigned to station No. 10, but the code “MTV” will
not be displayed and will also not appear in the table.
Select the “CHANNEL MAPPING” in Menu-screen in the same
way as the step 1 ~ 2 on page 16. Then press ENTER.
Press / or / repeat-
edly until the station number
position now to be named will
blink.
•If you want to turn over the
page when the blinking spot is
in the left or right edge of on-
screen, press or repeat-
edly until the next page's 12
stations appears.
Press “1” of 10 number but-
tons. The first display line will
change to “CHANGE BROAD-
CAST NAME”.
Press or repeatedly until
the desired character appears.
Then press . Use or
to select the next character.
Then press . Up to four char-
acters can be used to create a
station name.The character “ ”
stands for a space.Then press
ENTER.
Each press of will change the screen display as follows.
Press MENU repeatedly until the TV picture appears on the
screen.
Changing TV station names
For a number of TV stations (such as
MTV) no name code will be displayed
because these TV stations do not
provide the necessary information.
You can enter the respective names
yourself. Moreover, unwanted station
codes can be changed by the user.
Note:
When a wrong character is entered,
press CANCEL and enter the correct
character.
2C98710A[E](16-21) 20/1/04, 3:1717

18
3
1
2
4
6
Mapping TV stations
5
!
"
"
"
"
"
#
6 BR3
POSITION
1 ARD
2 ZDF 6 9 HR3
12 TM3
3RTL
4SAT1
5 PRO 7
7 SW3
8N3
10 WDR3
11 MDR3
EXIT
MOVE :
:
: ENTER
MEN
MOVE CHANNEL
6 BR3
POSITION
1 ARD
2 ZDF 6 9 HR3
12 TM3
3RTL
4SAT1
5 PRO 7
7 SW3
8N3
10 WDR3
11 MDR3
EXIT
MOVE :
:
: ENTER
MEN
MOVE CHANNEL
6 ZDF
POSITION
1 ARD
2 BR3 6 9 HR3
12 TM3
3RTL
4SAT1
5 PRO 7
7 SW3
8N3
10 WDR3
11 MDR3
EXIT
MOVE :
:
: ENTER
MEN
MOVE CHANNEL
Reassigning TV station positions
Preparation:
•Turn ON the TV and set to the video input mode.
• Press VCR to select the VCR mode. (The VCR indicator will light.)
Example: Reassign the TV station under No. 6 to position No. 2.
Select the “CHANNEL MAPPING” in Menu-screen
in the same way as the step 1~2 on page 16. Then
press ENTER.
Press / or /
repeatedly until the TV
station to be reassigned
blinks.
Press “2” of 10 number
buttons. Then, the TV
station will be moved to
the first display line.
Press / or /
repeatedly until the po-
sition number blinks to
which the selected TV
station is to be moved,
then press ENTER.
WAIT blinks.
The data will be ordered
in the table newly.
After approx. 12 seconds
the station BR3 is set in
new position 2. The ZDF
will be extracted to the
first line.
Now to finish this pro
cedure and at the same
time set
the protruded station (ZDF) to the blank position 6,
press
MENU repeatedly until
TV-station appears.
Or you can of course select another station to set in
the protruded station(ZDF) in step 4.
Press MENU repeatedly until the TV picture appears
on the screen.
•Aposition number(6) will indicated near the protruded
station(ZDF) at the first line.
If any button is not pressed for more than 60 seconds,
this station(ZDF) will be set to this position number(6)
automatically.
2C98710A[E](16-21) 20/1/04, 3:1718

19
!
"
#
$
$
$
$
$
%
CH TUNING
AUTO TUNING
CHANNEL SETUP
CHANNEL MAPPING
SELECT :
ENTER
:
EXIT
:ENTER
MENU
4
5
1
2
3
!
"
"
"
"
"
#
Mapping TV stations
Preparation:
•Turn ON the TV and set to the video input mode.
• Press VCR to select the VCR mode. (The VCR indicator will light.)
Press MENU. Press or
to select CHANNEL SETUP.
Then press ENTER.
Press or to select CHAN-
NEL MAPPING. Then press
ENTER.
Press / or / repeat-
edly until the TV station to be
skipped blinks.
Then press CANCEL.
Thenumberbeforethe canceled
channel (e.g. 12) will be
bracketed.
Canceling the skip function:
Press / or / repeat-
edly until the skipped TV station
blinks,thenpress CANCEL.The
brackets will disappear.
Press MENU repeatedly until the TV picture appears on the
screen.
Skipping unwanted TV stations
(Skip those TV stations that are not
wanted to be selected by pressing the
CANCEL button.)
2C98710A[E](16-21) 20/1/04, 3:1719

20
CH TUNING
AUTO TUNING
CHANNEL SETUP
CHANNEL MAPPING
SELECT :
ENTER
: ENTER
MENU
EXIT
:
Manual TV station presetting
1
2
4
3
CH 1
ENTER
OK
:MENU
EXIT :
DEC OFF
SELECT :
CH 1
SEARCH : / F. TUNE :
MENU
EXIT
:
DEC OFF
The Auto CH Memory function (See
page 16) memorizes all broadcasts to
the suitable CH positions by where
you done this function.
However one broadcast may not be
memorized depend on the bad receiv-
ing condition. In case of these broad-
cast, use this tuning function.
Note:
Occasionally,theautosearchmightcatch
a weak signal and stop. If the TV station
signal is weak, you shouldn't store this
station.
In that case restart the auto search us-
ing or .
Manual station presetting
You activate the auto search function until your preferred station is
tuned in. Then you memorize this station into the chosen channel
memory. For each station you repeat this procedure.
Preparation:
•Turn ON the TV and set to the video input mode.
• Press VCR to select the VCR mode. (The VCR indicator will light.)
Example: Preset the SAT1 on program position 5.
Press MENU.
Press or to select CHAN-
NEL SETUP. Then press EN-
TER.
Press or to select CH
TUNING. Then press ENTER.
DEC OFF will blink. Press EN-
TER. DEC OFF does not blink
anymore. SEARCH will appear.
Note:
If you wish to store the PRE-
MIERE manually, the decoder
must have been connected as
on the lower of p.11.
During DEC OFF is blinking, press .
DEC ON will blink now.
Press ENTER.
appears. Only in case of receiv-
ing of the weak broadcast (drift-
ing picture), search dose not
stop. If you want to stop, press
/or / .
Press (rising frequency) or (falling frequency) once. The
search starts. It stops at each broadcast automatically (“ ”
change to “ ”). Press or repeatedly until the SAT1
2C98710A[E](16-21) 20/1/04, 3:1720
Table of contents