Orton Sentry 2.0 User manual

1
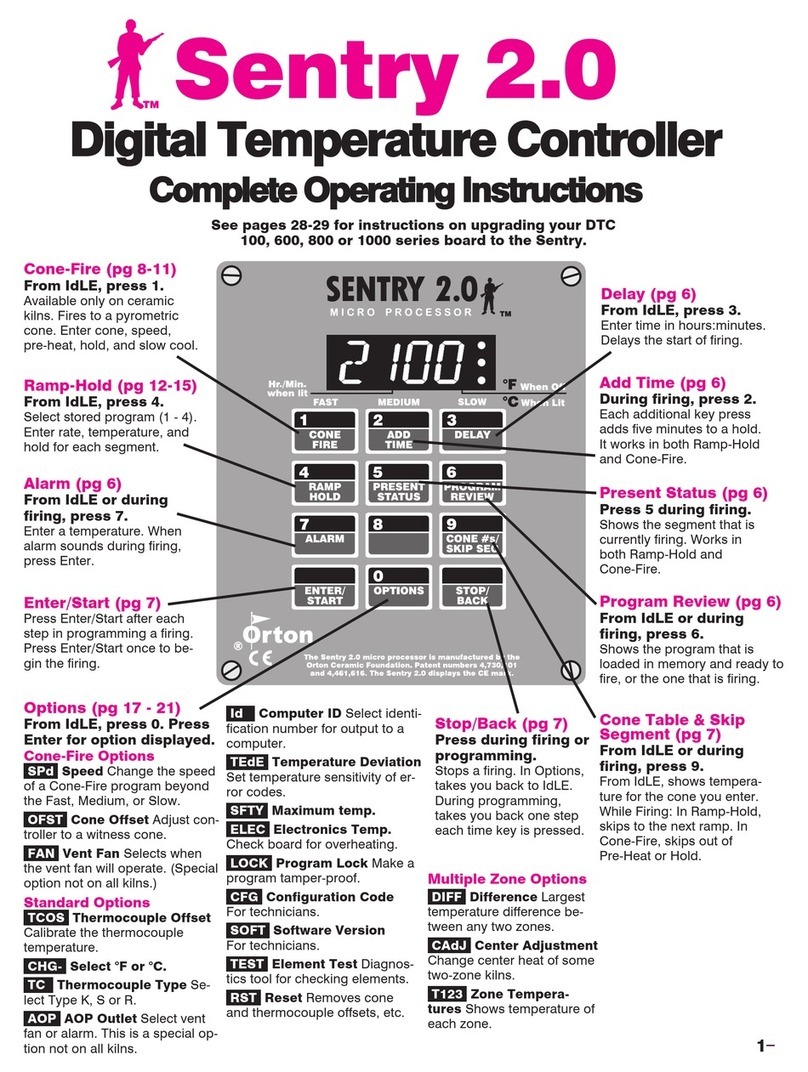
Delay (pg 10)
From IdLE, press 3.
Enter time in hours:minutes.
Delays the start of firing.
Program Review (pg 8)
From IdLE or during
firing, press 6.
Shows the program that is
loaded in memory and ready to
fire, or the one that is firing.
Skip Segment (pg 11)
During firing, press 9, then
Enter.
Skips to the next ramp.
Stop/Back (pg 6)
Press during firing or
programming.
Stops a firing. In Options,
takes you back to IdLE.
During programming,
takes you back one step
each time key is pressed.
Standard Options
(pg 13-16)
Calibrate the thermocouple
temperature.
Se-
lect Type K, S or R.
Select vent
fanoralarm.Thisisaspecialop
-
tion not on all kilns.
Select identi-
fication number for output to a
computer.
Set temperature sensitivity of
error codes.
Alarm (pg 11)
From IdLE or during
firing, press 7.
Enter a temperature. When
alarm sounds during firing,
press Enter.
Present Status (pg 11)
During firing, press 5.
Shows the segment that is cur-
rently firing.
Add Time (pg 10)
During firing, press 2.
Each additional key press
adds five minutes to a hold.
Program (pg 7, 11)
From IdLE, press 4.
Select stored program (1 - 4).
Enter rate, temperature, and
hold for each segment.
During firing, press 4.
Change the current segment
temperature. Press Enter.
Change the hold. Press En-
ter. The kiln will continue fir-
ing.
Enter/Start (pg 7)
Press Enter/Start after each
step in programming a firing.
Press Enter/Start once from
to begin the firing.
Check board for overheating.
Make a
program tamper-proof.
For
technicians.
For technicians.
Diagnos-
tics tool for checking elements.
Removes thermo-
couple offset and returns the
board to factory defaults.
Multiple Zone
Options (pg 13)
Largest
temperature difference be-
tween any two zones.
Change center heat of some
two-zone kilns.
Shows temperature of
each zone.
Common
Display
Messages
For a detailed list,
see pages 20-21.
IdLE = Ready
RA 1 = Rate
F1=Target
temperature
Hd 1 = Hold
CPLT = Fired to
completion
Sentry 2.0
Digital Temperature Controller
Complete Ramp-Hold Operating Instructions

2
Introduction
Your Sentry micro processor is our most advanced generation of digital temperature control-
lers. It is easy to use provided you read the manual.
The controller display messages are limited to four characters. For this reason, the messages
appear cryptic: IdLE instead of “Ready to begin,” CPLT instead of “Fired successfully to
completion,” RA1 instead of “Enter rate for first segment.” If at any time you are confused by
these messages, turn to Appendix A: Display Messages on page 20.
The front cover is a quick guide to most of the features on the controller. The back cover is a
quick guide to programming the controller, to be used after you have learned the program-
ming instructions on page 7.
Do not worry if you hear a clicking noise during operation. Mechanical
relays click as they turn the heating elements on and off. This is normal.
ThewarrantyonyourSentrycontrollerdoesnotcoverdamagefrom
overfiring, regardless of the circumstances. It is the operator’s responsi-
bility to make sure the kiln turns off at the end of the firing.
If you purchased the TnF 2 portable controller, you should find a TnF 2
installation instruction sheet in addition to these instructions.
Instructions for multiple-zone kilns are included in this manual on
pages 12 and 13. If you are not sure whether your kiln is multiple-zone, look into the firing
chamber. If you see two or three thermocouple tips, your kiln is multiple-zone. If you see only
one thermocouple, skip multiple-zone instructions.
Once you learn the basic features of the Sentry, you will be able to control every stage of firing.
This offers learning opportunities and convenience difficult to imagine
with a manual-controlled kiln.
Do not worry if
you hear a click-
ing noise during
operation. Me-
chanical relays
clickastheyturn
the heating ele-
ments on and off.
Do not leave the
kiln unattended,
especially near
the expected
shut-off time. Be
there to make
sure the kiln
turns off.

3
Contents
Safety . . . . . . . . . . . . . . . 4
1 Getting Started . . . . . . 5
Room Temperature
and Humidity . . . . . . . . . . . . . . . . 5
Thunder Storms and
Power Surges . . . . . . . . . . . . . . . 5
Time and Temperature Display. . 5
Operations Begin from IdLE . . . . 5
Thermocouple Inspection. . . . . . 5
Theory of Operation . . . . . . . . . . 6
2 Programming. . . . . . . . 6
The Stop/Back Key . . . . . . . . . . . 6
Correcting Entries . . . . . . . . . . . . 6
Storing User Programs . . . . . . . . 6
Firing a Stored User Program. . . 7
Rate . . . . . . . . . . . . . . . . . . . . . . . 7
Programming Steps . . . . . . . . . . 7
Hold . . . . . . . . . . . . . . . . . . . . . . . 8
Repeat Firings . . . . . . . . . . . . . . . 8
Program Review . . . . . . . . . . . . . 8
Programming a
Cooling Segment . . . . . . . . . . . . 8
CPLT . . . . . . . . . . . . . . . . . . . . . . 8
Temperature Overshoot . . . . . . . 9
AOP Fan . . . . . . . . . . . . . . . . . . . 9
A Practice Program . . . . . . . . . . . 9
3 Sample Firing
Programs . . . . . . . . . . . . 9
Heat Treating a Knife Made from
D-2 High Carbon Steel . . . . . . . 9
Glass Fusing Schedule . . . . . . 9
Glass Slumping Schedule . . . 10
4 Other Features . . . . . 10
The Add Time Key. . . . . . . . . . . 10
Delay Fire . . . . . . . . . . . . . . . . . 10
Present Status . . . . . . . . . . . . . . 11
The Alarm . . . . . . . . . . . . . . . . . 11
Skip Segment . . . . . . . . . . . . . . 11
Editing a Segment
During Firing . . . . . . . . . . . . . . . 11
5 Multiple-Zone Kilns. . 12
An Overview . . . . . . . . . . . . . . . 12
Thermocouple Failure
In a Multiple-Zone Kiln . . . . . . . 12
Power Output Lights . . . . . . . . . 12
Testing Multiple-Zone
Elements . . . . . . . . . . . . . . . . . . 12
Zone Temperature
Difference (DIFF) . . . . . . . . . . . 12
Two-Zone Kilns: Adjusting Heat in
the Center Section (CAdJ) . . . . 13
Zone Temperature
Display (T123) . . . . . . . . . . . . . 13
6 The Options Key . . . . 13
Thermocouple Offset (TCOS). . 13
Multiple-Zone
Thermocouple Offset . . . . . . . 14
Selecting °F or °C (CHG-) . . . . . 14
°F/°C Temperature
Conversion Formula. . . . . . . . 14
Thermocouple Type (TC) . . . . . 14
AOP Outlet (AOP) . . . . . . . . . . . 15
Computer ID (ID). . . . . . . . . . . . 15
Temperature Deviation (TEDE). 15
Maximum Temperature (SFTY). 15
Electronics
Temperature (ELEC) . . . . . . . . . 16
Program Lock (LOCK) . . . . . . . 16
Configuration Code (CFG) . . . . 16
Software Version (SOFT) . . . . . 16
Element Test (TEST) . . . . . . . . . 16
Reset (RST) . . . . . . . . . . . . . . . . 16
7 Error Messages. . . . . 17
FTC / Failed to Cool . . . . . . . . . 17
FTH / Failed to Heat . . . . . . . . . 17
LTdE / Low Temperature
Deviation . . . . . . . . . . . . . . . . . . 17
PF / Power Failure. . . . . . . . . . . 17
BAdP / Bad Programming . . . . 17
ETH / Electronics Too Hot . . . . 17
FAIL / Thermocouple Failure . . 17
FTL / Firing Too Long . . . . . . . . 17
HTdE / High Temperature
Deviation . . . . . . . . . . . . . . . . . . 18
PF 2 / Power Failure . . . . . . . . . 18
PF 3 / Power Failure . . . . . . . . . 18
The “LId” Display . . . . . . . . . . . 18
PLOG Error Codes . . . . . . . . . . 18
TCdE / Uneven Multiple-Zone
Temperatures . . . . . . . . . . . . . . 18
TCR / Thermocouple
Leads Reversed. . . . . . . . . . . . . 18
8 Power Failures . . . . . 19
Using Ceramic Witness Cones
After an Extended
Power Failure . . . . . . . . . . . . . . 19
When the Kiln Shuts
Off Too Soon. . . . . . . . . . . . . . . 19
Appendix A:
Display Messages . . . . 20
Appendix B:
Upgrading Instructions 22
Upgrading the DTC 100, 600, 800
& 1000 Series to the Sentry . . . 22
Appendix C:
Quick Programming. . . 24

Safety
The warranty on your Sentry controller does not cover
damage from overfiring, regardless of the circumstances. It
is the operator’s responsibility to make sure the kiln turns
off at the end of the firing.
Follow these safety rules in addition to the ones in your
kiln or furnace manual:
When the kiln is not in
use, disconnect the power
and keep the lid or door
closed. (For larger kilns
with heavy cordsets, we
recommend a power
disconnect box near the
kiln.)
Do not leave the kiln unattended, especially
near the expected shut-off time. Do not leave a
kiln turned on at your studio while you are at
home sleeping.
Wear firing safety glasses when looking into the
peephole of a hot kiln.
Do not touch hot sides of kiln or furnace. Keep
unsupervised children away.
Install your kiln or furnace at least 12 inches
from any wall or combustible surface. (See
manufacturer’s recommendation for your
model.)
Do not open lid or door until kiln or furnace has
cooled and all switches are off.
Fire only in a well-ventilated, covered and pro-
tected area away from flammable materials.
Keep cordset away from hot sides of kiln or fur-
nace.
DANGEROUS VOLTAGE! Do not touch heat-
ing elements with anything. Disconnect kiln or
furnace before servicing.
Do not operate if the controller itself is hotter
than 150°F/66°C. (See instructions on page 16
for checking board temperature.) Never allow
the firing room temperature to exceed
110°F/43°C. (Measure room temperature three
feet from the kiln.)
Stop a firing by pressing the STOP button, not
by disconnecting the power. In certain condi-
tions, the controller will interpret a power inter-
ruption as a power failure and turn the kiln back
on when you reconnect the power.
Place the kiln on the stand recommended by the
manufacturer. When a kiln is safety tested by
UL, the lab fires the kiln on the stand designed
for the kiln. Cinder blocks or bricks can inhibit
the flow of air under the kiln. They can also
change the kiln’s heating characteristics.
Place the kiln on a non-combustible surface.
Keep the kiln lid or door closed when the kiln is
not in use. This keeps dust out of the kiln. Also,
should someone turn on the kiln while you are
away, the closed lid will keep the heat safely in-
side the firing chamber.
Never place anything on the kiln lid, even when
the kiln is idle. If people become accustomed to
placing papers and other objects on the kiln,
they may forget and do that while the kiln is fir-
ing.
Remove all tripping hazards from around the
kiln. Keep the kiln’s supply cord out of traffic ar-
eas.
Avoid extension cords.
Never fire tempered glass inside a kiln. It could
explode.
Greenware, which is unfired clay, must be bone
dry before firing. Moist greenware can explode
inside the kiln, damaging the ware and the kiln.
Place a piece of greenware against the inside of
your wrist. If it feels cool, it is too wet to fire.
Store kiln shelves in a dry area. Moist shelves
can explode inside a kiln.
If you smell burn-
ing plastic, turn
the kiln off. Exam-
ine the wall outlet
and supply cord for
signs of burning.
Never place extra
insulation around
the kiln in an attempt to conserve energy. The
extra insulation can cause the wiring and the
steel case to over-heat.
4

Chapter 1
Getting Started
Room Temperature
and Humidity
It is okay to store the Sentry at sub-zero tem-
peratures. But before operating, raise the room
temperature to at least 32°F/0°C.
Note: The Sentry will register sub-zero °F/°C
temperatures. However, 32°F/0°C is the lowest
recommended operating temperature.
The circuit board is rated for 158°F/70°C
maximum operating temperature. However,
the maximum recommended temperature is
125°F/52°C. Open windows and exhaust hot air
from the room to lower temperature. (See page
16 to check circuit board temperature.)
High humidity will not adversely affect the Sentry unless
water condenses on the circuit board. In this case, do not
fire the kiln until the moisture has evaporated from the
board.
Thunder Storms and
Power Surges
Unplug the kiln when not in use, especially during thun-
der storms and in areas with frequent power surges. If the
kiln is part way through a firing when a storm begins, it may
be okay to continue the firing. When the kiln shuts off, dis-
connect the power.
CAUTION: When firing the kiln during a storm, do
not leave the kiln unattended!
Time and Temperature
Display
Center Dot: Time
A center dot appears during
time display. It separates hours
from minutes (i.e. 1 hour, 30
minutes displays as 01.30).
During temperature display, the dot disappears.
Three Dot Display
The Sentry turns on the
heating elements intermit-
tently through relays. Power
output lights appear in the
right side of the display when
the Sentry sends a signal to turn on the relay(s).
IWhen the Sentry sends a signal to
the relays, all three dots appear.
IThe top dot indicates a signal to turn
on the relay for the top section of the kiln. The bottom
dot indicates a signal to power the bottom section. Ig-
nore the center dot.
IThe top dot indicates a signal to turn
on the top section relay, the middle dot to the middle
section, and the bottom dot to the bottom section.
Single Right-Hand Dot: °C
When temperature is dis-
played in °C, a dot appears in
the lower right. In °F display, it
disappears. You can choose
between Fahrenheit and
Celsius display. See page 14.
Operations Begin from the
IdLE Display
The controller displays
when you first apply
power to the kiln. Operations
begin from . You can’t
fire the kiln until appears.
IIf you press during a firing, will appear. To
get back to , press .
IIf the display shows an error message such as in-
stead of , see pages 17 - 18.
I(firing completed) appears at the end of a firing.
To make appear, press any key.
Thermocouple Inspection
The small rod protruding into the firing chamber is the
temperature sensor, or thermocouple.
CAUTION: Bumping the thermocouple can push it
out of the firing chamber. This could cause an overfire!
The controller does not contain an alarm to detect this
type of failure. Bumping the thermocouple could also
cause it to give inaccurate
readings.
Thermocouples come in
different widths. The wider
the thermocouple, the far-
ther it should extend into the
firing chamber. A ½” - ¼”
diameter thermocouple
should extend into the firing
chamber about 1”. A 18”
thermocouple should ex-
tend into the chamber ½” -
58”. (Do not be concerned if
your thermocouple extends
into the firing chamber even further.)
Keep shelves, posts and ware 1” - 1 ½” away from the
thermocouple. Keep an extra thermocouple on hand, espe-
cially if you fire hotter than 2000°F/1093°C.
5
The controller is
packed with fea-
tures. Do not let
this intimidate
you. Become fa-
miliar with only
the features you
need; ignore the
rest.

If you are using a portable, separate controller, you will
need to install the thermocouple onto the kiln. See the sep-
arate TnF 2 installation instructions.
Theory of Operation
The temperature you are firing to is called the target
temperature. After the Sentry reaches the target tempera-
ture, it can also hold that temperature.
The Sentry fires at a controlled heating rate. The rate is
figured in degrees per hour. If you selected a rate of 100°
per hour, it would take 10 hours for the furnace to reach
1000°. Rate is similar to “miles per hour.”
In summary, the Sentry does three basic tasks:
1) It fires at a controlled heating rate, or speed, mea-
sured in degrees of temperature change per hour.
2) It fires to a target temperature.
3) It can hold the target temperature.
The Sentry fires in segments, or stages. A segment is a
given heating rate to a target temperature.Shown above is a
segment with a target temperature of 1250° and a rate of
625°, with a hold of one hour.
Heating rate is figured in degrees per hour. The recom-
mended heating rate for the material you are firing is usu-
ally available from your supplier. It also varies depending
on the thickness of the material.
To figure how long a firing segment will take, subtract
the current temperature from the target temperature and
divide the resultant temperature by the heating rate. In the
diagram above, the firing time is 1250° - 80° (room tempera-
ture) = 1170 ÷625 = 1.87 hours.
The Sentry can fire up to 18 segments per firing. One
segment is often all that is needed, though.
After the Sentry has finished firing the last segment, it
will turn off power to the kiln.
Chapter 2
Programming
Instructions
Before using your Sentry, read all of this
chapter. Have your controller in front of
you so that you can try out the keys as you
read.
The Stop/Back Key
You can stop a firing by pressing
. (The only time the key does
not work during a firing is when the alarm
sounds. Press any key besides to turn off the alarm.)
If you enter Options, you do not have to go through all
the prompts to get back out. Press to go to .
During programming, the key will take you
back one step with each key press, so it is easy to make cor-
rections.
Correcting Entries
If you enter the wrong temperature, rate, etc., while pro-
gramming, enter 0000. Then enter the correct numbers be-
fore pressing .
Storing User Programs
To program the control-
ler, must appear.
From press .The
first message you will see is
, meaning “Choose
one of your programs or en-
ter a new one.” The seg-
ments you enter will be
stored in memory. Segments
stored in memory are called
a firing schedule, or pro-
gram.
The controller can hold
four “user” programs in
memory. They stay in memory even when the power is
turned off. User programs are numbered from 1 through 4.
User program #1 can have up to 18 segments. User pro-
grams #2 - #4 can have ten segments each. You don’t have
to use all the segments available—only the number needed
per firing. Often one segment is all you will need.
When entering a program for the first time, press when
appears. Your first firing will be stored as User Pro-
gram #1.
6
When USER ap-
pears, the con-
troller is asking
you to select a
stored program.
If you have none
in memory, press
1andenteryour
first program.

Each time you store an-
other program, select the
next available number, such
as 2, at the prompt.
Selecting a user number for
a new program over-writes
any program stored there.
Write down your user
programs.
Note: For repeat firings
that you don’t want to in-
advertently change, see
Program Lock, page 16.
Firing a Stored User Program
After you enter a program and the controller returns to
, the program is in memory and ready to fire.
Selectinga differentstoredprogramtakesonlyseconds:
From press .
will appear. Enter the program number (1 -
4). Then press .
If there are no changes to the program, press .
will appear. The controller is ready to fire
your selected program. To begin firing, press
once.
Note: Use Program Review, page 8, before firing. See
also “Repeat Firings,” page 8.
Rate
A segment must include a rate, which is degrees of tem-
perature change per hour. The diagram below shows three
rates. A rate of 1000° per hour will reach 1000° in 1 hour. A
rate of 500° will reach 1000° in 2 hours. A rate of 333° will
reach 1000° in 3 hours.
If you want the furnace to fire at full speed, enter a rate
of 9999. See step #3, next column.
7
Programming Steps
Use these instructions for your first firings. Later
you may prefer “Ramp-Hold Shorthand Instruc-
tions,” page 24.
As you follow these steps, you will see values (tem-
peratures, rates, etc.) from the last firing. To use
these again, press . To program a controlled
cooling, set the segment to a lower target tempera-
ture than that of the preceding segment.
To fire without Alarm or Delay: Follow steps 1
through 7. Then press once.
Apply power to the kiln. then will
appear. (Press if does not ap-
pear.)
Press . will appear. Enter a program
number from 1 to 4.
Press . will appear. Enter firing
rate for segment 1 (temperature change per
hour: from 1° to 9999°).
Press . (or ) will appear. Enter
the target temperature of segment 1.
Press . will appear. Enter seg-
ment 1 hold time in hours/minutes (e.g. 12
hours, 30 minutes = 12.30). No hold = 00.00.
Press .If appears, and you have
an AOP receptacle on your kiln, select ON or
OFF. Press . (For more details on
AOP, see AOP option, page 15.)
Continue entering values for the segments
needed. When appears for the first seg-
ment you don’t need, press , then .
will appear. The kiln is ready to fire.
press . will appear. En-
ter alarm temperature. (Enter to turn alarm
off.) Then press . will appear.
press . will appear. Enter
delay time (i.e. 12 hours, 30 minutes = 12.30).
Then press . (Delay zeroes out after
each completed firing.) will appear.
From press
once. will appear, then kiln tempera-
ture. If a delay was programmed, will
appear, then time remaining until start. To
stop the firing at any time, press
We recommend using Program Review (page 8)
before firing. When program fires to completion,
will appear. Press . will appear.
To shut off the alarm when it sounds during a firing,
press .
Keep a record of
your stored pro-
grams and all
your firings.
Write down the
results of each
firing. This may
become invalu-
able later.

Note: In Program Review, a heating rate of 9999 is
displayed as . When a kiln is heated at full
power, it may overshoot the target temperature, espe-
cially in the lower range. To avoid this, add an extra
segment with a slower rate for the last 50 degrees of
temperature rise.
CAUTION: The Sentry includes error messages to
warn you when the kiln is at the wrong temperature.
Firing the kiln at full rate turns off some of these warn-
ings. See Temperature Deviation, page 15.
If you are not sure how fast to fire, remember an old fir-
ing adage: “When in doubt, slow it down.”
Hold
“Hold” means maintain-
ing the temperature of a seg-
ment for the length of time
you specify. Hold gives the
temperaturetimetobecome
more even throughout the
kiln. Hold can be used in ei-
ther heating-up or cool-
ing-down segments.
In programming step #5
(see boxed instructions, pre-
vious page), enter hold time. When hold is set to 99.99
hours, the Sentry will remain at that temperature indefi-
nitely until you press .
When the Sentry is in hold during a firing, the display will
alternate between time left in hold and the temperature.
Repeat Firings
To repeat the last firing, press from . The
kiln will begin firing. But first, make sure you are repeating
the correct firing by using Program Review. For repeat fir-
ings that you don’t want to inadvertently change, see “Pro-
gram Lock,” page 16.
Program Review
When you press to begin firing, the controller
will fire the program that is in active memory. Program Re-
view shows the values for that program. The program in ac-
tive memory is—
IThe program that was fired last, or
IThe program that was selected since the last firing.
Start Program Review from , or while firing, by
pressing .
Programming a
Cooling Segment
For controlled cooling, program a segment to a lower
target temperature than that of the preceding segment.
Example: You fire at a rate of 500°F per hour to 1450°F
with your first segment. You want the kiln to cool at a rate
of 100°F per hour down to 700°F. Here is how you would
program the two segments:
Rate Temp.
Segment °F/°C °F/°C Hold
1 500/277 1450/788 00.00
2 100/55 700/371 00.00
The first segment is the heating segment. The second
one is the cooling segment. The controller does not use mi-
nus numbers for cooling. Just enter a lower target tempera-
ture than that of the previous segment.
If you prop the lid or door for a fast cooling, program a
fast cooling rate for that segment. If you lower the tempera-
ture quickly by propping the lid but program a slow cooling
rate, the controller will just raise the temperature again.
Example: Some glass artists flash-cool the glass just after
it fuses. They open the door a few inches to remove heat,
then close it again. This takes the glass down rapidly
through the devitrification range. To program a flash-cool,
use a rate of 9999. This shuts off the heating elements dur-
ing that segment, allowing the kiln to cool rapidly.
Note: During fast cooling, do not open the door all the
way. Do not force-cool the kiln with a fan.
Note: See Temperature Deviation (TEDE), page 15,
for information on error
codes that may appear
during “crash” cooling.
To turn these codes off,
program a crash cooling
rate of 9999. This turns
off TEDE error codes
only for that particular
segment. The TEDE
codes still work on the
Hold and the other
segments.
Suppose you enter a cool-
ing rate that is faster than the kiln is able to cool? De-
pending on the rate you enter, you may get an alarm mes-
sage. (Press to turn off the alarm.)
CPLT Message:
Firing
Completed
When the firing has successfully completed, the Sentry
will shut off power to theelements. Then four messageswill
cycle one after the other:
(complete)
Firing time in hours and minutes
8
It is easy to pro-
gram a con-
trolled cooling.
Simply enter a
target tempera-
ture that is lower
than that of the
previous
segment.
If you repeat the
same firing pro-
gram often, use
Program Lock so
that it cannot be
inadvertently
changed. See
page 16.

The temperature reached during the last segment
The current kiln temperature
Note: If the alarm (see page 11) sounded, and then
the kiln fired to completion, you will see instead
of . Press . will appear.
Temperature Overshoot
When a kiln is heated at too fast a rate, it may overshoot
the target temperature, especially in small kilns at lower
temperatures. To avoid this, add an extra segment to slow
the firing. The segment with the slower rate should begin
approximately 40° - 60° below the target temperature.
AOP Fan
The optional AOP (auxiliary output) is a special-order
electrical receptacle mounted in the kiln’s switch box. This
receptacle can power akiln vent or external alarm. (See Op-
tions, page 15.) During programming, the prompt for the
AOP outlet is , which can be turned on or off for each
segment.
A Practice Program
To practice using the controller, we will enter a program
that includes three segments. The last segment is a cooling
segment.
Using the programming instructions on page 7, enter the
this firing schedule. Then use Program Review to check for
accuracy.
USER = 1
RA1 = 250
°F1=750
Hd 1 = 00.00
RA2 = 900
°F 2 = 1425
Hd 2 = 00.30
RA3 = 150
°F3=750
Hd 3 = 00.00
RA4 = 0000
Chapter 3
Sample Firing
Programs
These sample firing schedulesillustrate different ways to
program the Sentry. When designing a firing schedule for
materials you are unfamiliar with, or when using one of
these schedules, always test-fire samples first.
For practice, you might want to enter these programs
even though you may never actually use them.
Heat Treating a Knife Made from D-2 High
Carbon Steel Rate Temp.
Segment °F/°C °F/°C Hold
1 9999 1800/982 00.20
2 9999 400/204 00.00
3 9999 500/260 5.00
Wrap the knife blade in heat treating foil. (That is to pre-
vent carbon scale from forming on the steel.)
Set the alarm to 1800°F/982°C. Place the knife in the
kiln. Heat at FULL rate to 1800°F/982°C. When the alarm
sounds, get ready to remove the knife. After 20 minutes of
hold time, open the furnace door, remove the knife, and
leave the door half open.
CAUTION: Wear high temperature heat resistant
gloves when removing the knife blade from thefurnace.
Remove the blade from the heat treating foil. Place the
knife on knifeholders, which allow air to circulate around
the blade. Place a fan several feet from the blade. Point the
blade toward the fan so the air flows parallel to the blade
length. Cool the blade rapidly to room temperature.
CAUTION: If the air hits the blades in a sideways di-
rection, it increases the chance of warpage.
Leave the kiln door half open until the temperature
drops to 400°F/204°C. Place the knife back inside the fur-
nace. Segment 3 will heat the kiln to 500°F/260°C. Leave
the knife in the kiln for 2 hours. Remove the knife. Let it
cool to room temperature. Place it back inside the kiln for
another 2 hours. Then remove the knife. Heat treating is
finished.
Glass Fusing Firing Schedule
Rate Temp.
Segment °F/°C °F/°C Hold
1 250/138 750/398 00.00
2 900/500 1425/773 00.30
3 9999/9999 1050/565 00.00
4 150/83 750/398 00.00
9
If you fire at a
very rapid rate,
the kiln may mo-
mentarily over-
shoot the pro-
grammed target
temperature. To
avoid that, use a
slower rate.

Stained glass, 18", 2 layers, full fuse. The fusing tempera-
ture will vary depending on the brand of glass, the batch,
and even on the color. Vent the lid. Set the alarm to 500°F.
When the alarm sounds, close the lid from venting position
and insert peephole plugs.
Set the alarm again, this
time to 1350°F. When it
sounds, check the glass
through the peephole.
When the glass fuses to your
satisfaction, write down the
temperature and hold time
for future firings, and press
, (Skip Segment).
This will advance you to
segment 3, a flash cooling
segment. Lift the kiln lid
slightly or open the door ajar until the temperature drops to
1050° F. Then close the door/lid. The kiln will cool slowly
through the annealing range, then turn off.
Note: A cooling rate of 9999 (FULL) shuts off the
warning alarm (error message) that sometimes
sounds during rapid cooling. This turns off the alarm
only for that particular ramp. The alarm codes still
work on the hold and the other programmed segments.
For more details about error messages, see page 17.
Glass Slumping Firing Schedule
Rate Temp.
Segment °F/°C °F/°C Hold
1 250/138 750/398 00.00
2 900/500 1250/676 00.30
3 9999/9999 1050/565 00.00
4 150/83 750/398 00.00
Stained glass, 18", 2 fused layers, 12" circular pieces,
slumped into a bowl. Set the alarm to 500° F. When the
alarm sounds, close the lid from venting position and insert
peephole plugs.
Set the alarm again, this time to 1150° F. When it sounds,
check the glass through the peephole. When the glass
slumps into the bowl, write down the temperature and hold
time for future firings, and press , (Skip Segment).
This will advance you to segment 3, a flash cooling seg-
ment. Lift the kiln lid slightly or open the door ajar until the
temperature drops to 1050° F. Then close the door/lid. The
kiln will cool slowly through the annealing range. Then it
will turn off and cool to room temperature.
Note: A cooling rate of 9999 (FULL) shuts off the
warning alarm (error message) that sometimes
sounds during rapid cooling. This turns off the alarm
only for that particular ramp. The alarm codes still
work on the hold and the other programmed segments.
For more details about error messages, see page 17.
Chapter 4
Other Features
The Add Time Key
This key adds five minutes to a hold. It
is designed for ceramists who watch wit-
ness cones, and for glass artists who in-
spect the glass near the end of firing.
During a firing, press . , and time in hold,
will appear.
Press again. The time shown will increase by 5
minutes. In a few seconds, temperature display will
return.
Note: Add Time will add 5 minutes to hold even if no
hold had been programmed. Afterhold time displays, 5
minutes are added with each press of the key.
Delay Fire
This delays the start of the firing by the
amount of time entered. Use it to fit a fir-
ing into your schedule or to take advan-
tage of lower electric rates at night. Delay
zeroes out after each firing. Therefore, it must be pro-
grammed again for each firing.
A program must bein active memory, ready tofire.
From press . Enter delay time (i.e., 5 ½
hours = 05.30). Press .
To begin Delay, press once from .A
Delay count-down timer will appear.
Note: Press during delay to end the delay and
begin the firing. The maximum delay is 99 hours and
59 minutes.
CAUTION: For safety,
do not leave the kiln alone
during a delay or a firing.
We cannot guarantee
your kiln against
overfiring even though the
controller is automatic.
The operator assumes
full responsibility for
shutting the kiln off at the
proper time.
10
Your kiln or fur-
nace will eventu-
ally develop fine
cracks in the
firing chamber.
This is normal.
The cracks close
at high
temperatures.
“Rate” is how
many degrees per
hour the kiln will
climb in temper-
ature. (Or how
fast it cools
during a con-
trolled cooling.)

Present Status
Press during a firing to display the
current segment that is firing. Either of
the following messages will appear in
Present Status:
IRamp and segment number: The Sentry is in the
ramp part of a segment. See chart, page 6.
IHold and segment number: The Sentry is in the
hold part of a segment.
Present Status is useful when firing a program that con-
tains heating and cooling segments. Without Present Sta-
tus, it might be easy to losetrack of which segment is firing.
The Alarm
The alarm sounds when the kiln
reaches the alarm temperature you enter.
Use the alarm to alert you to check the
fusing or slumping of glass or remove a knife blade from the
furnace at the end of heat treating.
You can enter only one
alarm temperature at a time.
However, after the alarm
beeps, you can set the alarm
for another temperature, as
many times as you want,
during the firing. Entering
an alarm temperature auto-
matically erases the previ-
ous alarm temperature.
Monitoring the Alarm
from a Distance
Place an inexpensive
baby monitor near the kiln.
From another location in your building, you will be able to
hear the digital temperature alarm. You will also hear the
clicking of the relays, which would indicate that the temper-
ature is still rising in the kiln.
Setting Alarm From Idle
From , press . will appear alternating
with the last alarm temperature entered.
Enter alarm temperature. Press . will
appear. (Entering will turn the alarm off.)
Note: , as an alarm temperature, automatically
changes to the maximum temperature rating of your
controller.
When the alarm sounds, shut it off by pressing any key
except . (The key does not work while an alarm
sounds.) If the alarm sounds as soon as firing begins, it is be-
cause the alarm was set to a temperature below the current
temperature.
Setting Alarm During Firing
The alarm beeps while the kiln is firing. Press .
Enter the new temperature.
Press . The kiln will continue firing.
If you touch , enter a new temperature, and forget to
press , the controller will merely continue firing
without setting the alarm.
Note: When an alarm sounds, firing to completion
does not shut the alarm off.
Skip Segment Feature
Skip Segment works only during firing.
It jumps from the current segment to the
next one.
To skip a segment, press . will
appear, then the current segment. Press
. (If you change your mind and
don’t want to skip that segment, don’t press after
appears. Instead, press again. The firing will con-
tinue in the same segment.)
Skip Segment skips to the ramp of the next segment from
either a ramp or hold of the current segment.
Skip Segment Example
For additional examples, see Chapter 3.
IYou have pro-
grammed 1425°F for glass fusing, followed by a segment
for controlled cooling. Watching the glass through the
peephole, you notice that the glass edges have rounded
nicely. Use Skip Segment to end the firing segment and
begin the one for slow cooling.
Note: Make a note of the temperature at which the
glass fused. Program that temperature for the next fir-
ing of that type of glass.
Editing a Segment
During Firing
While the kiln is firing,
you can change the target
temperature and hold time
of the current segment.
During firing, press .
The display will show
the target temperature
of the current segment.
Use the number keys to
change the tempera-
ture. Then press
.
The display will then
show the hold time of the current segment. Change
the time, if needed, and press . The kiln will
resume firing.
11
Use the alarm to
remind you that
the kiln is getting
close to the
shut-off tempera-
ture. Always
check the kiln
before it shuts
off.
With the Add
Time button, you
can add time to a
hold. With the
editing feature,
you can change
both target tem-
perature and
hold.

Chapter 5
Multiple-Zone
Kilns
An Overview of Multiple-
Zone Firing
If you are not sure how many zones your kiln has, look
into the firing chamber. The number of thermocouple tips
indicates the number of zones.
In single-zone kilns, the Sentry measures temperature
from one location. When
the controller turns on the
heat, all the elements turn
on.
With two- and three-zone
kilns, the Sentry measures
temperature from each indi-
vidual zone. It then adjusts
the heat separately for each
zone to improve tempera-
ture uniformity.
To maintain even tem-
perature, the Sentry calcu-
lates not only temperature difference between zones, but
also length of time needed to change temperature. By care-
fully timing heat output, it maintains even temperature
with a minimal loss in firing speed.
Note: Multiple-zone kilns use the same programming
instructions as single-zone kilns.
Note: Firing a Ramp-Hold program at FULL rate
(9999) shuts off multiple- zone control for that firing.
The kiln then fires as a single-zone kiln.
Thermocouple Failure
In a Multiple-Zone Kiln
In a multiple-zone kiln, if a thermocouple fails, the firing
will continue as a single-zone kiln so long as one thermo-
couple still operates. will appear, alternating with the
thermocouple that failed (i.e. ).
Power Output Lights
The three dots on the right
of the temperature display turn
on when the controller sends a
signal to the relays.
IThe top
dot shows a signal to the relay for the top section of the
kiln. The bottom dot shows a signal to the bottom
section. Ignore the center dot.
IThe top dot indicates a signal to the
top section relay, the middle dot to the middle section,
and the bottom dot to the bottom section.
Testing Multiple-Zone
Elements
When relays or thermocouples are connected to the
wrong controller terminals, zones will show a wide temper-
ature difference. To wire the kiln properly, trace the switch
box wiring with the kiln’s wiring diagram. Also, see “Ele-
ment Test,” page 16.
Multiple-Zone Options
These options appear only on multiple-zone kilns.
Zone Temperature Difference
(DIFF)
View Maximum Temperature Spread
For a two-zone kiln, this option shows temperature dif-
ference between the zones. For a three-zone kiln, it shows
the highest temperature difference between any two zones.
If the temperature shown is larger than expected, go to op-
tion T 123 to view the temperature of each zone. (See next
page.)
Press repeatedly until appears.
Press .
The maximum difference in temperature between
any zones will display. (Example: .)
12
Look into the
firing chamber.
The number of
thermocouple
tips indicates the
number of zones.
CPLT means the
kiln has fired to
completion and
the heating ele-
ments are turned
off. To make
IdLE appear,
press any key.

Two-Zone Kilns: Adjusting
Heat in the Center Section
(CAdJ)
The Center Adjust op-
tion appears only on
two-zone kilns that contain
three relays and three banks
of elements. It does not ap-
pear on two-zone kilns with
two relays, or on three-zone.
Your kiln’s wiring diagram
will show you the number of
relays in your kiln.
The Center Adjust acts as
an infinite control switch
that adjusts heat to the cen-
ter section of the kiln. A number will display. 100 is the fac-
tory default, meaning 100% heat. You can change the set-
ting from 0 to 200. The higher the number, the more the
heat in the center section.
From ,press repeatedly until
appears.
Press . Use any number key to change the
number that appears.
Press . Press to return to .
Zone Temperature Display
(T123)
View Temperature of Each Zone
Press repeatedly until appears.
Press .
The temperature for each zone will display one after
the other, cycling for one minute. Then normal tem-
perature display will return. For example:
ITop zone:
IMiddle zone:
IBottom zone:
Chapter 6
The Options Key
The Options key gives you access to a list of features.
With each press of the Options key, you will see the display
code for the next option.
When you find the option you want to use, press
.
Use the and keys to select changes within the op-
tion.
After making a selection for an option, press
. The display code for the option you just
changed will appear. You are then ready to go to the
next option.
IIf you select a change for an option but don’t press
, the change will not go into effect.
There are two ways to get out of Options and back to
:
Press . If you are firing the kiln while in Op-
tions, pressing takes you out of Options and
back to the firing display. But it does not stop the fir-
ing.
Do nothing for 60 seconds in Options. You will auto-
maticallybe takenout of Options and back to .
Thermocouple Offset (TCOS)
Calibrate the Thermocouple(s)
The thermocouple is the rod protruding into the firing
chamber. It measures temperature. Thermocouples can
“drift” as they age, causing a shift in temperature readings.
Thermocouple Offset calibrates the controller to compen-
sate for drift.
Note: The thermocouple must protrude into the firing
chamber the correct distance: 1” for ½” - ¼”-wide
thermocouples, 12" - 58" for 18”-wide thermocouples.
Calibrating Thermocouple Offset
With a Digital Pyrometer
You can calibrate Thermocouple Offset using a cali-
brated digital pyrometer. One way to calibrate your pyrom-
eter is to take it to a heat treater or other location that has a
calibrated controller you can trust. Take a reading from a
furnace with your pyrometer. Either zero it out to match
the calibrated controller on the furnace, or write down the
temperature difference between your pyrometer and the
reliable source. Store your pyrometer. Use it only for cali-
brating controllers. Thus, it remains a reliable calibration
standard.
Note: The temperature at which you calibrated your
digital pyrometer should be the same temperature you
use to check the controller’s temperature readout. Ex-
13
The warranty
does not cover
damage from
overfiring. Please
check the kiln to
make sure it
shuts off at the
proper time.
If you keep get-
ting error codes
such as FTH or
FTC, see Tem-
perature Devia-
tion on page 15.

ample: If you took a reading from a reliable source at
2000°F, you should check your controller reading at
around 2000°F.
Mount the thermocouple of the calibrated pyrometer in
the firing chamber near the Sentry’s thermocouple. With
the Sentry on hold, compare readings between the Sentry
and the calibrated pyrometer. Adjust Thermocouple Offset
to compensate for any temperature difference between
them.
Setting Thermocouple Offset
You can enter a temperature change up to 45°F/25°C
higher or lower than the zero factory setting.
From ,press repeatedly until
appears.
Press . , or a thermocouple offset
number, will appear.
Using the and keys, enter the new offset. (See
chart below.) Press . will appear. To
return to , press .
Thermocouple Offset Settings
°F Setting °C Setting Result
C 0 C 0 No adjustment
H 1-45 H 1-25 Kiln will fire hotter
C 1-45 C 1-25 Kiln will fire cooler
Thermocouple Offset Examples
Setting Result
H 1 Kiln will fire 1° hotter
H 17 Kiln will fire 17° hotter
C 12 Kiln will fire 12° cooler
Multiple-Zone Thermocouple Offset
From ,press repeatedly until
appears.
Press . (top thermocouple) will ap-
pear.
While displays, press . The other
thermocouple(s), then , will appear with
each press of the key.
Three-zone kilns:
Two-zone kilns:
When the correct thermocouple appears, press
.
Using the and keys, enter the new offset. (See
charts above.) Press . The thermocouple
you adjusted (i.e. ) will appear. Select an-
other thermocouple, or return to by press-
ing .
Selecting °F or °C (CHG-)
The controller operates in your choice of °F or °C tem-
perature. In °C display, a lighted dot appears in the lower
right. In °F, it disappears. To switch from °F to °C or vice
versa:
From , press repeatedly until
appears.
Press . Use the and keys to select
or .
After selecting one of the above, press .
Press to return to .
°F/°C Temperature Conversion Formula
Below are formulas for converting temperature between
°F and °C. Converting a firing rate requires a different for-
mula than firing temperature:
Firing Temperature
(i.e. “Fire to 1600°F.” 1600°F = 871°C)
(°C x 1.8) +32 = °F
(°F - 32) ÷ 1.8 = °C
Firing Rate and Temperature Change
(i.e. “Fire at 200°F per hour” or “Fire 200°F hotter.” 200°F =
111°C)
°C x 1.8 = °F
°F ÷ 1.8 = °C
Thermocouple
Type (TC)
Select Type-K, -S or -R
Thermocouple
The Sentry can be used
with Type-K, -S or -R
thermocouples. If you spe-
cialize in firings above
2200°F/1204°C, you should
use the Type-S or -R.
Type-K is best suited for
temperatures below
2200°F/1204°C.
The controller cannot detect the type of thermocouple
installed in your kiln. So if you change the thermocouple to
a different type, be sure to select the new thermocouple
type in TC Option.
Note: See your kiln supplier if you are not sure about
the type of thermocouple in your kiln.
CAUTION: If you select Type-S or R, but
your kiln is wired with a Type-K, your kiln will
underfire. If you select Type-K and your kiln is wired
with a Type-S or R, your kiln will OVERFIRE. After us-
ing the Reset (RST) option (page 16), use the TC Op-
tion to select the correct thermocouple. Reset changes
the thermocouple selection to Type-S.
From ,press repeatedly until
appears.
14
If you make a
mistake during
programming,
press the
Stop/Back key.
You will go back
one step each
time you press
the key.

Press . Use the and keys to select
or .
After selecting one of the above, press . Press
to return to .
AOP Outlet (AOP)
Select Vent Fan or Alarm for the Auxiliary Output
The optional AOP (Auxiliary Output) is an electrical re-
ceptacle mounted in the kiln’s switch box. This outlet can
power a kiln vent or an external alarm, such as a bell. The
AOP is a special-order option that might not be included on
your kiln.
The choices in the AOP option:
IThis choice sends power to the AOP re-
ceptacle whenever the alarm sounds. (See Alarm, page
11.) Plug in a loud bell to alert you, from a distance, that
the kiln has reached the alarm temperature.
IUse this setting if your kiln does not have
the AOP outlet.
IDo not use FAN2.
IThis option adds a prompt for fan
( ) to each segment during programming (page 7).
From ,press repeatedly until
appears.
Press . Use the and keys to select
or .
After selecting one of the above, press . Press
to return to .
Computer ID (ID)
Enter an ID Number for Connection to a Computer
This feature is for assigning an identification number,
from 1 to 15, to the controller. It is used only for hookup to a
personal computer, which requires an optional kit.
From , press repeatedly until
appears.
Press . Use the and keys to select an ID
number from 1 to 15. Press . Press to
return to .
Temperature Deviation
(TEDE)
Adjust Temperature Sensitivity of Error Codes
The ideal temperature of a firing, at any given time, is
called the set point. During heating or cooling, the set point
changes at the rate you programmed. During a hold, the set
point remains steady.
The Sentry shows error messages when it can’t maintain
the set point. The cushion, or leeway, allowed before an er-
ror message flashes is called Temperature Deviation.
When the temperature is off by more than the Temperature
Deviation setting, the alarm sounds. Temperature Devia-
tion affects these error messages (see pages 17 - 18):
Fail to Heat
Fail to Cool
High Temperature Deviation
Low Temperature Deviation
Some people worry when , or ap-
pears. They wonder if something is wrong with the kiln.
Here are the methods to set the deviation temperature so
the alarm messages do not appear during routine firings:
Test your kiln to find its fastest firing rate and
its slowest cooling rate. Then program the controller using
rates within the range of the kiln’s heating/cooling capacity.
If your fastest heating rate is 600° per hour, enter a rate no
faster than 600°.
Set the deviation temperature to a higher
number in the TEDE Option. The higher the number, the
less likely that an alarm message will appear.
Set the deviation temperature to 0 in the
TEDE Option. Note, however, that this turns off the
HTDE alarm (page 18). Wedo not recommend a 0 setting.
Program a segment at FULL rate (9999°).
This will shut off the deviation alarms for that segment.
(However, deviation alarms will continue to work during
the hold and all other segments with slower rates.)
CAUTION: The High Temperature Deviation
(HTDE) alarm shuts off the kiln to prevent an overfire.
Entering a temperature deviation of 0 turns off this im-
portant alarm! Entering a FULL rate also turns off this
alarm for the segment with the FULL rate!
Changing the Deviation Temperature
From ,press repeatedly until
appears.
Press . Change the deviation temperature.
The higher the number, the less likely you will acti-
vate the alarms.
Press . Press to return to .
The Fail to Heat code appears during a
firing when the kiln cannot heat as fast as programmed. The
Temperature Deviation is set to 60°F. The Fail to
Heat code will appear if the temperature dips 60°F or more
below the set point.
Maximum
Temperature
(SFTY)
View the Kiln’s Maximum
Operating Temperature
From , press
repeatedly until
appears. Press
15
If your kiln fires
too hot or cold,
check the TC
Option to be sure
the correct ther-
mocouple type
has been
selected.

. The temperature displayed is the maximum oper-
ating temperature programmed in the Sentry for your kiln.
(This temperature is shown on the electrical data plate.) It
can be altered only at the factory. The controller will not
fire hotter than that temperature. Press .Press
to return to .
Electronics Temperature
(ELEC)
Check the Circuit Board Temperature
High temperatures in the switch box can damage the
controller circuit board, which is rated for 158°F/70°C max-
imum operating temperature. If necessary, exhaust hot air
from the room to lower board temperature.When firing
several kilns, position them at least three feet apart to allow
adequate air circulation.
From or while firing, press repeatedly
until appears. Press . The temperature of the
circuit board will appear. Press . Press to re-
turn to .
CAUTION: Do not operate the kiln if is the ELEC
display is above 150°C/66°C.
Program Lock (LOCK)
Make a Program Tamper-Proof
With Program Lock activated, stored programs cannot
be altered or removed from memory. Use Program Lock
for repeat firings that you don’t want to inadvertently
change.
Note: Program Lock does not save a Delay setting.
While a program is locked, you can enter a new Delay.
From ,press repeatedly until
appears.
Press . (locked) or (unlocked)
will appear.
To change the setting, press three times.
Press . Press to return to .
Configuration Code (CFG)
Information for Technicians
From , press repeatedly until
appears. Press . The factory configuration code will
appear. Press . Press to return to . The
configuration code can be changed only at the factory.
Software Version (SOFT)
From , press repeatedly until ap-
pears. Press . The software version will appear.
Press . Press to return to .
Element Test (TEST)
Test the Heating Elements and Relays
This test is useful when measuring the wall receptacle
voltage under load, and amperage with an ammeter. On a
multiple-zone kiln, the test helps determine if the relays
and thermocouples are wired to the correct zones. If you
test thermocouples with a cigarette lighter or other heat
source, use this option.
Single-Zone Kiln
From ,press repeatedly until
appears.
Press . will appear, alternating with
kiln temperature. The elements will turn on for
two minutes. Press any key to abort the test.
Multiple-Zone Kiln
From press repeatedly until
appears.
Press . will appear, alternating with
the temperature of the top zone. The elements will
turn on for two minutes. Then will appear,
with temperature for the middle zone, and
with temperature for the bottom zone. (A
two-zone kiln shows and displays
only.)
During the two-minute test, press any key to end a
zone test. The controller will then begin to test the
next zone.
AOP Outlet
After the above test, kilns equipped with the AOP outlet
will display for two minutes to test power to the
AOP outlet.
Reset (RST)
Reset the Controller to Most Factory Defaults:
Perform Only When Requested by a Technician
Reset does the following:
ISelects Type-S thermocouple.
ISelects °F.
IErases any thermocouple offset.
IErases user programs stored in memory.
IChanges Temperature Deviation (TEDE) back to the
factory setting.
CAUTION: If your kiln uses a Type-K thermocouple,
the Sentry will underfire after a reset! Use the Thermo-
couple Option (page 14) to select Type-K again.
From ,press repeatedly until
appears.
Press . Use the or key to select or
.
After selecting one of the above, press .
Press to return to .
16

Chapter 7
Error Messages
IError messages are accompanied by an alarm.
INon-interrupting messages do not stop the firing. Ter-
minating error messages do.
IFTH, FTC, HTdE and LTdE error messages are based
upon the setting in the Temperature Deviation (TEdE)
option (page 15).
Non-Interrupting
Error Messages
Press to silence the alarm. (Do not press to
silence the alarm.) The error message will remain but the
kiln will ordinarily continue firing. Even though the follow-
ing error messages appear, the kiln will continue its normal
operation. The messages are only to alert you that the kiln
could not cool or heat as fast as you had programmed. But
they will not shut off the kiln or affect the firing.
FTC / Failed to Cool
IDuring a cooling-down ramp, the programmed rate is
faster than the kiln can cool. The temperature is above
the deviation setting. (See Temperature Deviation,
page 15.) Program a slower cooling rate.
FTH / Failed to Heat
IDuring a heating-up ramp, the programmed rate is
faster than the kiln can heat. The temperature is below
the deviation setting. (See Temperature Deviation,
page 15.)
Program a slower rate. Or check for worn or burned out
elements, defective relays, low voltage and defective ther-
mocouple.
LTdE / Low Temperature
Deviation
IDuring a cooling-down ramp or a hold, the temperature
is below the deviation setting. (See Temperature Devia-
tion, page 15.)
Check for worn or burned out elements, defective relays,
low voltage and defective thermocouple.
PF / Power Failure
alternating with normal display means the power
failed during firing. After power was restored, the firing re-
sumed.
Terminating Error
Messages
and error messages turn off
the kiln and flash the following:
ITotal firing time in hours and minutes
IThe kiln shutoff temperature
IThe current kiln temperature
BAdP / Bad Programming
This message appears when a program has been entered
with 0 rate in the first segment.
ETH / Electronics Too Hot
IThe circuit board tem-
perature is above
153°F/85°C.
Open windows and use a
fantocirculateairinthe
room before firing the kiln
or furnace. If you have more
than one kiln in the room,
place them farther apart.
Never allow the firing room
temperature to exceed
110°F/43°C. (Measure room
temperature three feet away
from the kiln.)
FAIL / Thermocouple Failure
IDefective Thermocouple
IDisconnected Thermocouple Lead Wires
IDefective Board
IElectrical Noise
FTL / Firing Too Long
IThe temperature change is less than 27°F/15°C per hour
and the firing time is four hours longer than the current
segment was programmed to fire. This message can ap-
pear during heating-up
or cooling-down seg-
ments. sometimes
appears because the
cooling segment was
slower than the kiln
could naturally cool
down.
Check for worn or
burned out elements, defec-
tive relays, low voltage and
defective thermocouple.
17
If the thermo-
couple burns out
during a firing,
the controller
will shut the kiln
off and display
FAIL.
The last program
you fired remains
in active memory
until you select a
different
program.

HTdE / High Temperature
Deviation
IDuring a heating-up ramp or a hold, the temperature is
above the deviation setting. (See Temperature Devia-
tion, page 15.)
This may be caused by a temperature overshoot. See
page 9.
Check for a stuck relay.
PF 2 / Power Failure
IThe power failed. The kiln temperature was below
212°F/100°C when the power came back on.
The kiln will not resume firing.
PF 3 / Power Failure
This message appears when two conditions are met:
The power failed during the final segment of a fir-
ing and that segment’s rate was 108°F/60°C.
The temperature dropped 72°F/40°C while the
power was off.
The kiln will not resume firing.
The “LId” Display
Reasons appears in the display:
IThe kiln is equipped with the optional lid safety switch.
(The switch turns off power to the elements when the lid
or door is open.) appears in the display while the
lid is open during firing.
IOn the back of the Sentry circuit board, at the top right
side, is a small two-pin
terminal. If the connec-
tor on that terminal is
missing, will ap-
pear in the display during
firing. The elements will
not turn on. (If the
two-pin connector is
missing, you can buy an-
other from a computer
supply store.)
IThe safety lid switch is
defective or the safety
switch wire is broken.
PLOG Error Codes
A PLOG error code means the controller failed a self-di-
agnostic test. A chattering, noisy relay, low voltage, and the
wrong relay type can cause a PLOG error. The controller
will not operate while a PLOG message appears.
PLOG 11, 12 or 13 Error Codes
PLOG 11, 12, and 13 indicate that a thermocouple is
about to fail or that electrical noise is affecting the thermo-
couple.
ITry moving the thermocouple lead wires away from
nearby electrical wires and relays.
IMake sure the bare part of the leads extending from the
thermocouple are not touching the kiln case.
IReplacing the thermocouple often clears the PLOG 11,
12 or 13 code.
IIf your kiln has mercury relays, verify that noise snub-
bers (MOVs) are installed.
Clearing PLOG Error Codes
Clear the PLOG error code by pressing .
If pressing does not clear a PLOG error,
turn off power to the kiln for 10 seconds.
If the PLOG error code still appears, turn off the
power. Hold down the and keys at the
same time while you turn the power back on. This
resets the controller (see Reset option, page 16),
so you may need to reselect thermocouple type
(see TC option, page 14) and type of temperature
display (see CHG option, page 14).
After a PLOG error clears, it is okay to fire the kiln again
with close supervision. If you can’t clear the PLOG error,
return the controller to the factory.
TCdE / Uneven Multiple-Zone
Temperatures
Onamultiplezonekiln, usually means the
thermocouples and elements are improperly wired. A ther-
mocouple is turning on the elements to the wrong zone. For
instance, if the top thermocouple turns on the bottom ele-
ments, the kiln will fire out of balance. When zones are out
of balance by 180°F/100°C, will appear in the dis-
play.
Visually compare the wiring of the thermocouples, re-
lays and elements in your kiln to the kiln’s wiring diagram.
Also, use the Element Test option shown on page 16.
TCR / Thermocouple Leads
Reversed
Check that the thermocouple lead wires are connected
to the correct terminals. See your wiring diagram.
18
If the display
shows error
codesasthekiln
fires, the solu-
tion is often to
program slower
heating and cool-
ing rates.

Chapter 8
Power Failures
The Sentry handles a power failure in two ways:
After a brief power failure, the controller continues
firing as before. It shows a normal temperature dis-
play alternating with .
After an extended power failure, or
will appear. The kiln will NOT resume firing.
The kiln will remain
turned off after a power fail-
ure under these conditions:
IThe kiln will remain off if
the temperature is below
212°F/100°C when the
power comes back on.
IThe kiln will remain off if
the final segment has a
rate of 108°F/60°C and
the temperature
dropped 72°F/40°C or
more.
When the Sentry aborts a
firing after a power failure, the display will show the follow-
ing:
Ior
ITotal firing time before power failed
ITemperature at the time of power failure
ICurrent kiln temperature
To resume firing, press . The kiln will begin firing
again from its present temperature. For example, the kiln
reached 1000°F/538°C when power failed. The tempera-
ture is 800°F/426°C when you turn the kiln back on. Firing
will resume from 800°F/426°C. You need not cool the kiln
to room temperature before starting a ceramic firing over
unless you decide to use new witness cones.
When you resume firing by pressing , the control-
ler begins firing in the first segment that has a higher target
temperature than the current kiln temperature. However,
if the power failed during a ramping down (cooling) seg-
ment, the controller will resume firing from the same cool-
ing segment.
Using Ceramic Witness Cones After an
Extended Power Failure
I
Fire the ware
again. It is okay to use the same partially fired witness
cones, even if they cooled back down to room tempera-
ture. So long as the cones did not heat to within
100°F/56°C of maturity, they can be used again.
I
Fire the ware
again. If the kiln shuts off within 100°F/56°C of maturity,
and the temperature drops 50°F/28°C or more after the
kiln shuts off, do not depend on the witness cones. Once
they cool 50°F/28°C after they have been heated to
within 100°F/56°C of maturity, they will not bend prop-
erly. This is because they form a hard shell.
When the Kiln Shuts
Off Too Soon
Ceramic Firings
If the kiln fires to completion before the pyrometric wit-
ness cone bends, you can turn the kiln back on and keep fir-
ing. Simply program a hotter temperature. Then from
, press . The kiln will begin firing, taking up
where it left off.
Note: By looking at the witness cones through a peep-
hole, you will know if the kiln shuts off too soon.
If the kiln shuts off within 100°F/56°C of maturity, and
the temperature drops 50°F/28°C or more after the kiln
shuts off, do not depend on the witness cones. Once they
cool 50°F/28°C after they have been heated to within
100°F/55°C of maturity, they will not bend properly. This is
because they form a hard shell.
Wrong Thermocouple Type
If a Type-K thermocouple is installed on your kiln, but
your controller is set for Type-S, the kiln will continually
underfire by a wide margin. See page 14 to check thermo-
couple type.
19
Before entering a
program, plan it
on paper. Make a
graph and/or a
list of the rates,
target tempera-
tures and holds.
The PF display is
usually nothing
to worry about. It
means the power
failed at some
point during
firing.

20
Appendix A: Display Messages
Abort 5
The firing was stopped.
Alarm 7, 9, 11, 15, 17
ALAR appears either when you are entering an alarm tem-
perature or when the alarm is sounding during a firing. To
stop an alarm, press any key except STOP. If the alarm goes
off when you first begin firing, it is because it was set for a
lower temperature than the present temperature.
Auxiliary Output 7, 9, 15, 16, 22
The AOP option is for kilns equipped with a special-order kiln
switch box receptacle called the Auxiliary Output.
Bad Programming 17
This message appears when a firing has been programmed
with 0 rate in the first segment.
Center Adjust 13
For two-zone kilns only. This option adjusts the center sec-
tion of the kiln.
Configuration Code 16
This is an option that shows the factory configuration code
for your Sentry. This is for technicians who call the factory for
support.
Change °F / °C 14
Choose between operation in degrees F or degrees C.
Completed Firing 5, 7, 8, 12
This means the firing completed normally as programmed.
These three messages will also cycle one after the other:
firing time in hours and minutes; the temperature of the last
segment; the current kiln temperature.
Delay 7, 10, 16
DELA is a timer that starts the kiln later. Delay time appears
in hours and minutes.
or Target Temperature 7
This prompt is asking for a target temperature. The number
is to remind you which segment the temperature is for.
Temperature Difference 12
This option shows the maximum temperature spread be-
tween zones in a multiple-zone kiln.
Electronics Temperature 16
The Sentry circuit board is rated for operation at tempera-
tures up to 158°F/70°C. When the circuit board gets hotter,
the Sentry shuts off. The ELEC option shows you how hot the
circuit board is.
Message Definition Page Reference
Electronics Too Hot 17
The Sentry circuit board is too hot, so the kiln shut off.
Thermocouple Failed 12, 17
The thermocouple failed. This can be due to a broken ther-
mocouple, loose thermocouple connection on the back of
the Sentry, disconnected thermocouple wire, or a defective
controller.
Vent Fan 9, 15
The Fan option, accessed through the OPTIONS key, is for
kilns equipped with a special-order kiln switch box recepta-
cle called the Auxiliary Output.
Fan 7
If your kiln has the optional AOP outlet (for a kiln vent), the FN
prompt will appear for each segment during programming.
It is asking if you want the vent on or off for that segment.
Failed to Cool 15, 17
The kiln cannot cool as fast as the cooling that you pro-
grammed.
Failed to Heat 15, 17
The kiln cannot heat as fast as you programmed.
Firing Too Long 17
The temperature rise is less than 27°/15°C per hour and the
firing time is four hours longer than the current segment was
programmed.
Full Speed 7, 8, 12
The rate, or temperature change per hour, is maximum.
Temperature Hold 7, 9
When this message appears during programming, it is ask-
ing you if you want to hold, or maintain, the target tempera-
ture of that segment. If so, enter the length of hold time in
hours and minutes (i.e. 1 hour 20 minutes = 01.20). The
number after Hd is the segment number. Each segment in a
firing is numbered, starting with 1.
High Tempera-
ture Deviation 15, 17, 18
The temperature is above
the Temperature Devia-
tion setting in the TEDE
option.
Computer ID
15
The ID option is for con-
necting the Sentry to a
personal computer.
Message Definition Page Reference
Aprogramisa
series of steps
called segments.
Each segment
has a rate, target
temperature, and
an optional hold
time.
Other manuals for Sentry 2.0
2
Table of contents
Other Orton Temperature Controllers manuals
Popular Temperature Controllers manuals by other brands

BitronHome
BitronHome 902010/27 Quick start manual

Samwontech
Samwontech TEMP880S Instuctions for installation and use

RECKMANN
RECKMANN R14 Series operating instructions

Eden
Eden RCE10E Installation and use guide

Greenheck
Greenheck Vari-Green Control 475573 Installation, operation and maintenance manual

RKC INSTRUMENT
RKC INSTRUMENT V-TIO-B instruction manual