VORBEREITET
SEIN
WIR ZEIGEN DIR, WIE DU SICHER
UNTERWEGS BIST:
im SAFETY ACADEMY LAB
auf ortovox.com
FOTO Hansi Heckmair
AUSBILDUNG UND PRODUKTE
FÜR HÖCHSTMÖGLICHEN SCHUTZ
39
SAFETY ACADEMY GUIDE BOOK
Alpines notfAllsignAl*
Alpine emergency signAl*
Antwort*
Answer*
ALPINE SOS SIGNAL
yes
(help)
no
(help)
Air rescue
* Rufe, Lampe, Pfeife, Zeichen
* shout, light, whistles, signs
Nach der Bergung sollten Mund und
ATEMWEGE des Verschütteten von
Schnee BEFREIT und lebensrettende Maßnahmen eingeleitet werden
(ABC der Lebensrettung – Atmung, Bewusstsein, Zirkulation).
Den Verunglückten wenig bewegen und SCHONEND AUFWÄRMEN bzw. vor
weiterer Auskühlung schützen. Zur Lagerung des Verunglückten bietet sich
das windgeschützte Schaufelloch an.
Warme, zuckerhaltige FLÜSSIGKEIT zuführen.
Schonend ABTRANSPORTIEREN.
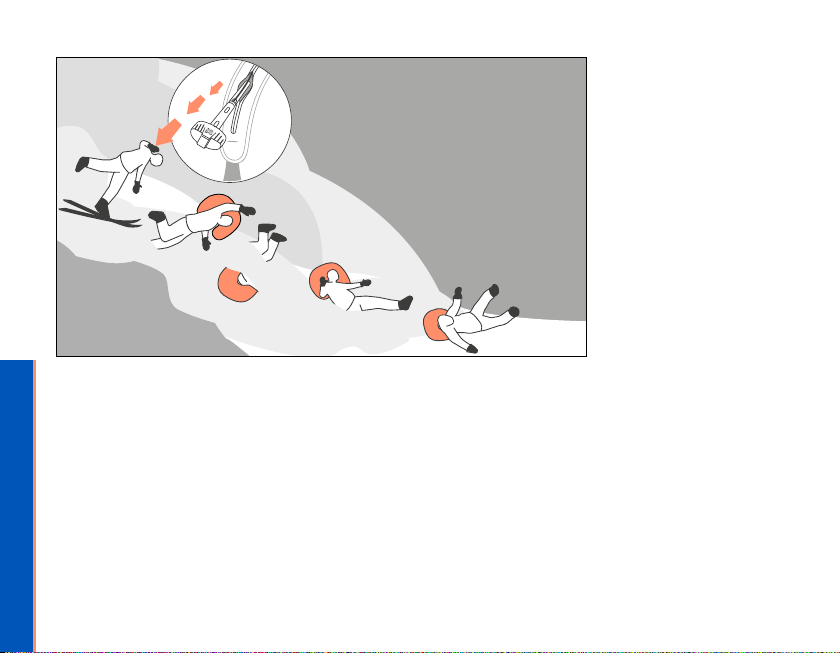
LAWINENABGANG
KAMERADENHILFE – ERSTE HILFE
NOTRUF HABE ICH EMPFANG?
Alpines notfAllsignAl*
Alpine emergency signAl*
Antwort*
Answer*
ALPINE SOS SIGNAL
yes
(help)
no
(help)
Air rescue
* Rufe, Lampe, Pfeife, Zeichen
* shout, light, whistles, signs
EURONOTRUF 112
BERGRETTUNG
Österreich 140
Italien 118
Frankreich 112
1. Handy ausschalten
2. Handy einschalten
(ohne PIN einzugeben)
3. 112 eingeben
Wird Nummer gewählt?
JA
JA
NEIN
NEIN
KEIN NOTRUF MÖGLICH!
Standort wechseln
(an Kuppen und
nahe der Zivilisation
Empfang möglich)
Erreichbarkeit sicher
stellen!
NOTRUF
ABSETZEN
Alpines notfAllsignAl*
Alpine emergency signAl*
Antwort*
Answer*
ALPINE SOS SIGNAL
yes
(help)
no
(help)
Air rescue
* Rufe, Lampe, Pfeife, Zeichen
* shout, light, whistles, signs
Alpines notfAllsignAl*
Alpine emergency signAl*
Antwort*
Answer*
ALPINE SOS SIGNAL
yes
(help)
no
(help)
Air rescue
*
Lampe, Pfeife, Zeichen
* shout, light, whistles, signs
Alpines notfAllsignAl*
Alpine emergency signAl*
Antwort*
Answer*
ALPINE SOS SIGNAL
yes
(help)
no
(help)
Air rescue
* Rufe, Lampe, Pfeife, Zeichen
* shout, light, whistles, signs
Alpines notfAllsignAl*
Alpine emergency signAl*
Antwort*
Answer*
ALPINE SOS SIGNAL
yes
(help)
no
(help)
Air rescue
* Rufe, Lampe, Pfeife, Zeichen
* shout, light, whistles, signs
SAGB_U1-U4_DE.indd 3-4 17.06.14 15:57
VORBEREITET
SEIN
WIR ZEIGEN DIR, WIE DU SICHER
UNTERWEGS BIST:
im SAFETY ACADEMY LAB
auf ortovox.com
FOTO Hansi Heckmair
AUSBILDUNG UND PRODUKTE
FÜR HÖCHSTMÖGLICHEN SCHUTZ
39
SAFETY ACADEMY GUIDE BOOK
Alpines notfAllsignAl*
Alpine emergency signAl*
Antwort*
Answer*
ALPINE SOS SIGNAL
yes
(help)
no
(help)
Air rescue
* Rufe, Lampe, Pfeife, Zeichen
* shout, light, whistles, signs
Nach der Bergung sollten Mund und ATEMWEGE des Verschütteten von
Schnee BEFREIT und lebensrettende Maßnahmen eingeleitet werden
(ABC der Lebensrettung – Atmung, Bewusstsein, Zirkulation).
Den Verunglückten wenig bewegen und SCHONEND AUFWÄRMEN bzw. vor
weiterer Auskühlung schützen. Zur Lagerung des Verunglückten bietet sich
das windgeschützte Schaufelloch an.
Warme, zuckerhaltige FLÜSSIGKEIT zuführen.
Schonend ABTRANSPORTIEREN.
LAWINENABGANG
KAMERADENHILFE – ERSTE HILFE
NOTRUF HABE ICH EMPFANG?
Alpines notfAllsignAl*
Alpine emergency signAl*
Antwort*
Answer*
ALPINE SOS SIGNAL
yes
(help)
no
(help)
Air rescue
* Rufe, Lampe, Pfeife, Zeichen
* shout, light, whistles, signs
EURONOTRUF 112
BERGRETTUNG
Bayern 112
Österreich 140
Schweiz 1414
Italien 118
Frankreich 112
Slowenien 112
USA 911
1. Handy ausschalten
2. Handy einschalten
(ohne PIN einzugeben)
3. 112 eingeben
Wird Nummer gewählt?
JA
JA
NEIN
NEIN
KEIN NOTRUF MÖGLICH!
Standort wechseln
(an Kuppen und
nahe der Zivilisation
Empfang möglich)
Erreichbarkeit sicher
stellen!
NOTRUF
ABSETZEN
Alpines notfAllsignAl*
Alpine emergency signAl*
Antwort*
Answer*
ALPINE SOS SIGNAL
yes
(help)
no
(help)
Air rescue
* Rufe, Lampe, Pfeife, Zeichen
* shout, light, whistles, signs
Alpines notfAllsignAl*
Alpine emergency signAl*
Antwort*
Answer*
ALPINE SOS SIGNAL
yes
(help)
no
(help)
Air rescue
* Rufe, Lampe, Pfeife, Zeichen
* shout, light, whistles, signs
Alpines notfAllsignAl*
Alpine emergency signAl*
Antwort*
Answer*
ALPINE SOS SIGNAL
yes
(help)
no
(help)
Air rescue
* Rufe, Lampe, Pfeife, Zeichen
* shout, light, whistles, signs
Alpines notfAllsignAl*
Alpine emergency signAl*
Antwort*
Answer*
ALPINE SOS SIGNAL
yes
(help)
no
(help)
Air rescue
* Rufe, Lampe, Pfeife, Zeichen
* shout, light, whistles, signs
SAGB_U1-U4_DE.indd 3-4 17.06.14 15:57
PHOTO Hansi Heckmair
EDUCATION AND PRODUCTS FOR
MAXIMUM PROTECTION
BEING
PREPARED
We show you how to stay safe –
in the SAFETY ADADEMY LAB
on ortovox.com
160222_SAFETY_AVABAG Manual_148x105_EN_SG.indd 1 26.09.16 15:15