OSCO JH-DC User manual

MODELJH-DC
DCBATTERYBACK-UP
JACKSHAFTINDUSTRIALDOOROPERATOR
INSTALLATIONMANUAL
January 2006, Rev. 6
OPERATORSPECIALTYCOMPANY,INC.
P.O. Box 128 • Casnovia, MI 49318
OSCO requires the use of a reversing edge or
photoelectric control for pedestrian protection on
all automatic or remotely controlled gate or door
operators.

2
JH-DC OPERATOR INSTALLATION GUIDE
GENERAL PRODUCT INFORMATION
PRODUCT APPLICATION
OSCO’s Model JH-DC jackshaft operatorwill electrically operate service doors,rolling grilles, sectional vertical-lift doors, and
sectionalhigh-lift doors(minimum 24inches ofhigh lift),via DCpower withbattery back-upcapability.
MECHANICAL FEATURES
TheModelJH-DC jackshaftoperatormaybe mountedinavariety ofpositions(seeFigure1onnext page).Theoperatormay be
equippedwith anoptional handchain hoistmechanism inaddition tobattery back-upin caseof powerfailure. Thehand chain
shouldbe pre-installedand willoperate intheverticalmountingposition. Adisconnect cableis suppliedfor engagingthehand
hoistfromthe floorlevel.ModelJH-DC jackshaftoperatorisdesigned tooperateamaximumpullof90 lbs,andisrated for15full
cyclesof operationper hourmaximum.
Themotor maybe removedwithout affectingeither thelimit switchadjustmentor optionalhand chainoperation.
A standard operator is supplied with 5 feet of #41 roller chain, a 16-tooth drive sprocket, and a 36-, 48- or 60-tooth sprocket.
Otherdrive sprocketsareavailable.
REDUCTION.Thespeedreductionisachievedbymeansofheavy-dutysprocketsandarollerchain,whichhasbeenprelubricated
at the factory.
LIMITSWITCHES.The limitswitchesareactuated byrotarymotionof ashaftdrivinga threadedlimitnutand arefullyadjustable
overawide range.
ELECTRICAL FEATURES
Thestandard operatoris wiredfor controlbyan OPEN-CLOSE-STOPpush-button stationwith constantcontacton theOPEN
and CLOSE buttons. The constant contact feature can be turned on and off via dip switch selection. The operator also can be
controlledeither openor closedby optional24 volt,three-wire radio,pull cord,or single-buttonstation.
INSTALLATION INSTRUCTIONS
PREPARATION
Unpack the carton, checking for possible damage during shipping. Damage claims must be filed with the freight carrier. The
followingparts areincluded inthe carton:
(1) ModelJH-DCOperator
(2) Spreader Arms(Optional)
(1) Cable-RetainingBracket
(1) #41 Chain,5’
(1) #41MasterLink
(1) Set Collar, 1”
(1) Hand Chain(lengthto order)
(1) Cable (lengthtoorder)
(1) of thefollowingsprockets:
Door Sprocket, 41 B 60, 1” Bore, with Key and Set Screw (size to order)
Door Sprocket, 41 B 48, 1” Bore, with Key and Set Screw (size to order)
Door Sprocket, Standard, 41 B 36, with Key and Set Screw (size to order)
(1) Key, 1/4” x 1/4” x 1”
Check to make sure that the power supply to be used is 115-volt single phase.
081203

3
JH-DCOPERATORINSTALLATIONGUIDE
FIGURE 1
FIGURE 2
1. Removedrivesprocket fromJH-DCoperator
driveshaft.
2. Slideproper doorshaft sprocketontodoor
shaft, with key inserted into key way.
3. Slidespreader armassembly ontothe door
shaft.
4. Make any necessary adjustments in
spreaderarm solower endwill slideonto
operatordriveshaft.
5. Slidedrive sprocketontodrive shaftand
tighten set screw securely.
6. Now position door shaft sprocket so it is
exactly in line with the drive sprocket and
tighten set screw securely.
7. Slide 1” shaft collar onto door shaft and
tighten.
8. Placeroller chainaround sprocketsand
attach master link.
9. Attachwall retainerbracket onto wallfor
securingdisconnect cable.
INSTRUCTIONSFORATTACHMENTOF
SPREADERARMANDDOORSPROCKET
Note: This operator is designed to operate a
maximum pull of 90 lbs, and is rated for 15 full
cycles of operation per hour maximum.
(OPTIONAL)
1-06-6

4
JH-DC OPERATOR INSTALLATION GUIDE
FIGURE 3
Becausethe chainhoist ontheModel JH-DCis centrally
located, there is no need to modify the assembly when
changingright- andleft-handinstallations.
WALL MOUNTING
Generally,the operatorshouldbeinstalledbelowthedoor
shaft(see Figure1on previouspage)and ascloseto the
door as possible. The optimum distance between the door shaft and the operator output shaft is 12-15 inches. A greater
distancecan beallowed ifconditions preventinstallation asprescribed.
1. Using the center line of the door shaft as a reference point, locate six mounting holes as shown in Figure 3 on this page.
2. Fora secureinstallation,the operatorshouldbe mountingusing1/2” throughbolts.If thewallconstruction prohibitstheuse
of through bolts, lag bolts and shields of sufficient size may be used. At this point, hand-tighten the bolts only.
DRIVE CHAIN INSTALLATION
1. Slidethe doorsprocket andkey overtheend ofdoor shaft,then slidethebearing inthe spreaderover thedoorshaft. Slide
theshaftcollar overthedoorshaft.Align thedrivesprocketon theoperatorwiththespreader arm.Tightensetscrews inboth
sprockets and shaft collars.
2. Connectthetwo sprocketswith#41 drivechain.Ifthe chainsuppliedis toolong,shortenit totheproper lengthusingachain
tool or by using a punch to drive out the necessary rivets. Lock the chain with the master link.
3. Adjust the chain so there is no more than 1/4” of slack when the chain is depressed between the sprockets.
4. Tightenall mountingbolts.
CABLE-RETAINING BRACKET
Mountthe cable-retainingbracket onthe wallat alocation nearthe free-hangingpull chain.

5
JH-DCOPERATORINSTALLATIONGUIDE
The limit nuts are not preset at the factory and must be adjusted for the height of the door the operator is installed on. The limit switches
are activated by two threaded nylon rotary limit nuts which are attached to a threaded shaft and driven by chain and sprockets. Remove
the cardboard filler before attempting to adjust the limit nuts.
With the door connected to the door operator in a mid-travel position, and the power disconnect switch turned OFF, disconnect the
operator by using the manual disconnect lever. Instructions for the manual disconnect can be found in the individual operator owner’s
guides. Once the operator has been disconnected, manually move the door by hand to within a foot of its fully open position.
Once the door is in this position, adjust the open limit nut until it activates the limit switch for open, LSO-1. Press down on the detent plate
and rotate the nut along the threaded shaft.
Once the open limit nut is set, repeat the above process for the close direction nut, (and LSC-1 limit switch).
After finishing the initial limit nut adjustments, reposition the door to approximately its center of travel. Re-engage the operator and turn
the power disconnect ON. Stand clear of any moving parts and press the OPEN button on the three-button station. If door begins to close
instead of open, stop the door. Locate the motor board in the operator control box with terminals M1 and M2 (motor leads) on it. Swap
these two wires to reverse rotation. Observe the door as it runs through a complete cycle in both directions, and adjust your limits again
if necessary. Fine levels of adjustment can also be achieved by adjusting a few teeth on the nut at a time. If the door stops in midtravel,
the open or close current sensor adjustment or the maximum run timer may need adjustment (see page 13).
LIMITNUTADJUSTMENTS
OSCO has also supplied two auxiliary limit switches that can be used to control a variety of
devices. Consult the operator wiring diagram for additional details.
The switches are rated 250VAC, 3 amps maximum.
1-06-6

6
JH-DC OPERATOR INSTALLATION GUIDE
TORQUE LIMITER ADJUSTMENTS
Beforeadjustingthe torquelimiter, makesurethedoor isingoodworking condition.Onepersonshouldbe abletomovethe door
by hand. Torque limiters are set light at the factory and must be adjusted during installation. Adjust the torque limiter tight
enoughto keepit fromslippingduring normaloperation.
To adjust the torque limiter in the Model JH-DC:
1. Loosen the jam nut.
2. To increase the output, turn the adjustment nut clockwise one flat, or 1/6 turn, at a time until desired output is obtained.
To reduce the output, turn the adjustment nut counterclockwise one flat, or 1/6 turn, at a time until desired output is
obtained.
3. Tightenthe jamnut againstthe adjustmentnut whenfinished.

7
JH-DC OPERATOR INSTALLATION GUIDE
General Specifications
1. Allwiringmustconformwithalllocalcodesandordinances.
2. All wire connections must be made with MTW or THHN
type wire, with insulation thickness of at least 1/32”.
Power Connection Specifications
1. Select the appropriate wire gauge from the chart at the
bottom of the page based on length of run. The distance
shownon thechart ismeasured infeetfrom theoperator
tothe powersource. DONOTEXCEED THEMAXIMUM
DISTANCE!These calculationshavebeenbasednostan-
dard 115 Volt supplies with a ten percent (10%) drop
allowance, taking into account motor inrush and other
operator requirements. Calculations are based on the
National Electrical Code, Article 430.
2. When large gauge wire is used, a separate junction box
(not supplied) may be needed for the operator power
connection.
Control and Accessory Specifications
1. Controlwiringmustberuninaseparateconduitfrompower
wiring.Runningthemtogethermaycauseinterferenceand
faulty signals in some accessories.
WIRINGSPECIFICATIONS
USE COPPER WIRE ONLY!
ACCESSORY WIRING
All DC Models
24VDC
*Over 350 ft. use DC power.
0-2000
14
Volts
Maximum
Distance (ft.)
Wire
Gauge
MODEL JH-DC
gniriWrewoP
stloV PH& ecnatsiDxaM lauDelgniS eriW eguaG
V511
2/1 PH
079 2451 2542 8983 0026
584 177 6221 9491 0013
2101
8
6
4
2. Allcontrol devicesare now24 Volt DC, whichcan berun
considerabledistances.
3. A three wire shielded, conductor cable is required to
connectmasterandslaveoperators.YoumustuseBelden
8760twistedpairshieldedcable(orequivalent)only,OSCO
partnumber 2500-1982,perfoot. Seepage 13for details
of this connection, as well as dip switch selection. Note:
TheSHIELD wiremust beconnected inboth masterand
slaveoperators.
Power Unit to Control Box Specifications
1. All wires running from the power unit to the control box
must be enclosed in rigid or flexible metal conduit. Wire
connectionsmustbe mechanicallyand electricallysound,
with accepted crimp type or wire nuts at the power unit
and spade terminals or stranded conductors with all
strandssolderedtogether atthe controlbox terminalstrip.
2. Wires from the control box to the power unit for motor
power(M1 andM2) mustbe minimum12 gaugewire.
3. Wires from the control box to the power unit for limit
switches must be minimum 18 gauge wire.

8
JH-DC OPERATOR INSTALLATION GUIDE
TROUBLESHOOTING
Operatorfails to start:
A. Makesure youhave poweratthemaster distributionpanel
andthat thepower hasnot beenturned off.
B. Thesecondary fuseonthe controlboardmay haveblown.
Replacethe fuse(refer tocontrolbox partsliston page23.
Motor operates, but door does not move:
A. Inoperators withtorque limitersand friction padclutches,
check for signs of slipping. You can mark the pulley and
clutchwith ayellow orwhite greasepen andwatch forthe
lines to move apart if slipping is taking place. Adjust the
torque limiter tighter if this is the problem.
B. Checkfor brokenchain orworn belts.
C. Check allsetscrews onpulleys andsprockets andtighten
them if necessary, and check for keys which may have
fallenloose fromkeyways.
Motor sounds like it is working harder than normal:
A. Make sure the door is moving freely and without binding
throughoutits entiretravel.
B. Checkthe drivechain forobstructions (ifthe operatorhas
one).
Limit switch getting out of time:
A. Checkfor propertension onalllimitchains tobesurethere
is no jumping taking place. Mark one tooth and its corre-
sponding link and run the door. If the marks have moved,
the chain is skipping.
B. Check the setscrews in the limit sprockets for tightness.
In rotary limit boxes, check the rotary limit nut for sloppi-
ness or stripped threads. Replace if necessary.
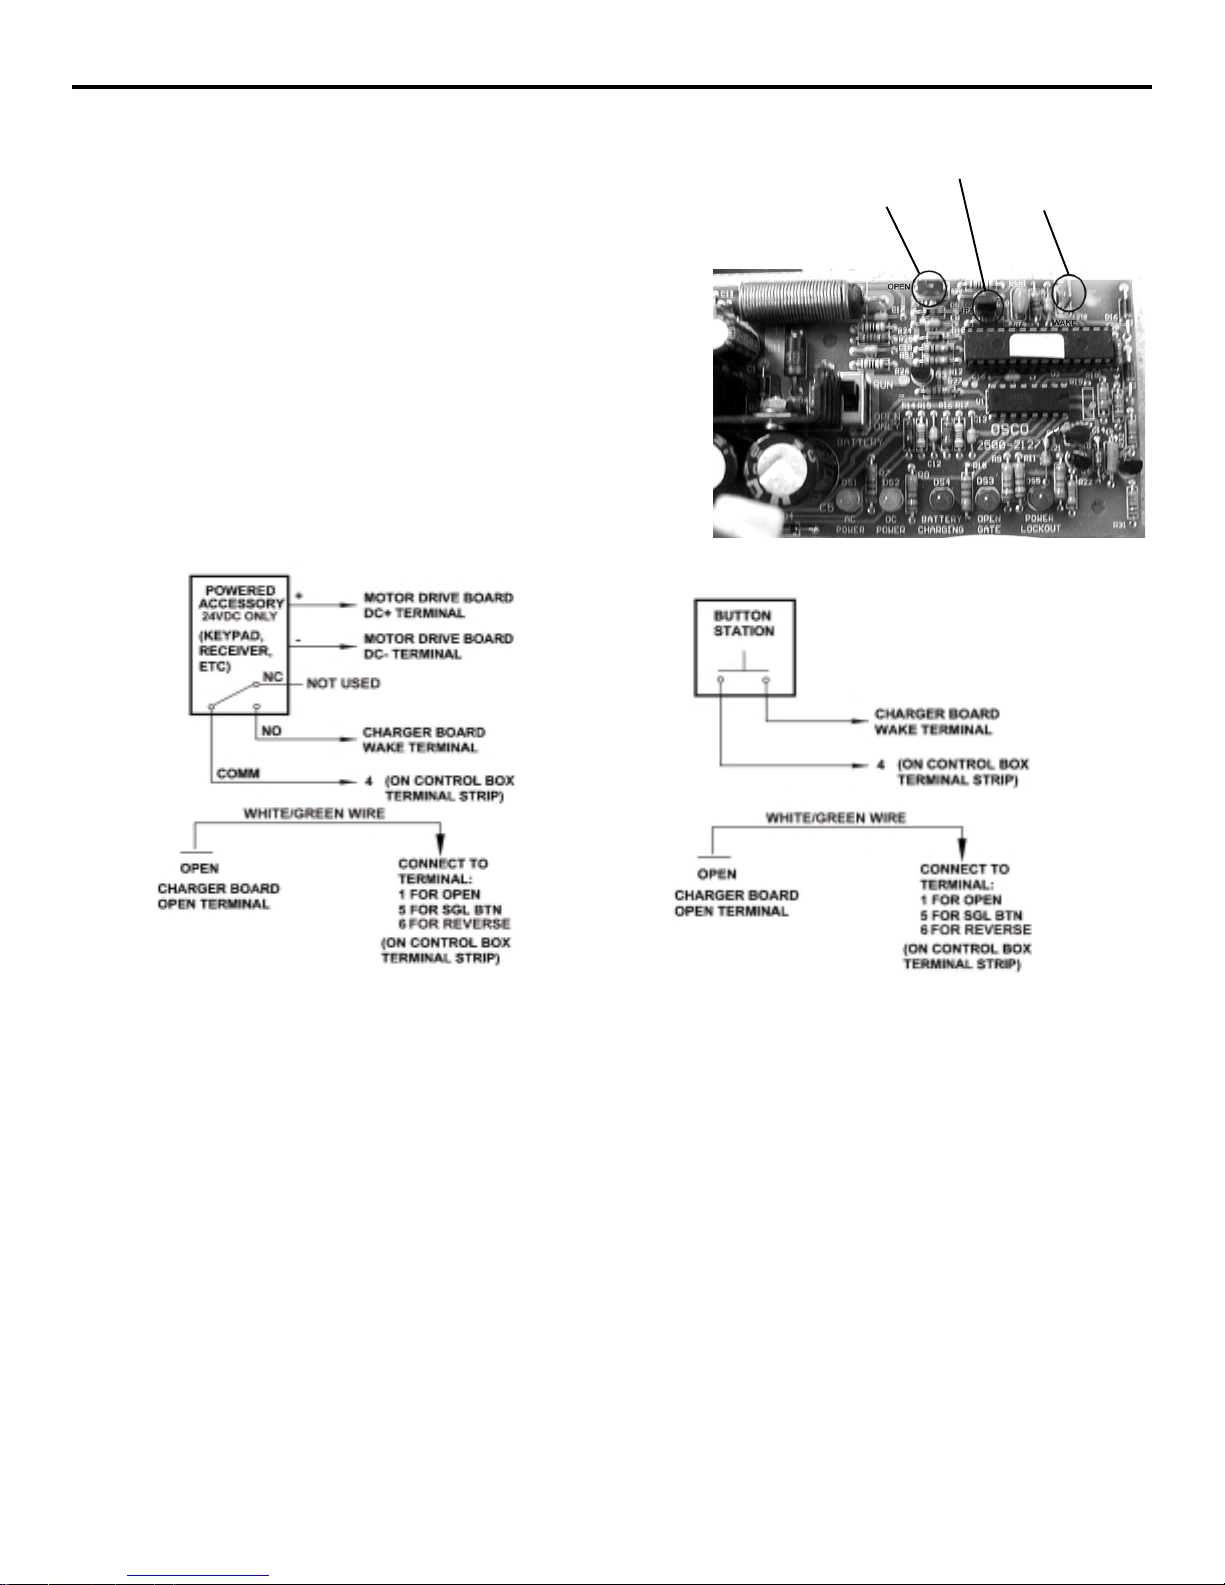
C. Check the detent plate in the limit switch box to see that
theedge ofthe detentplateis insertedintothe V-grooveof
both nylon limit nuts (see page 5).
Door stopping part way open or closed
(but no visible obstruction):
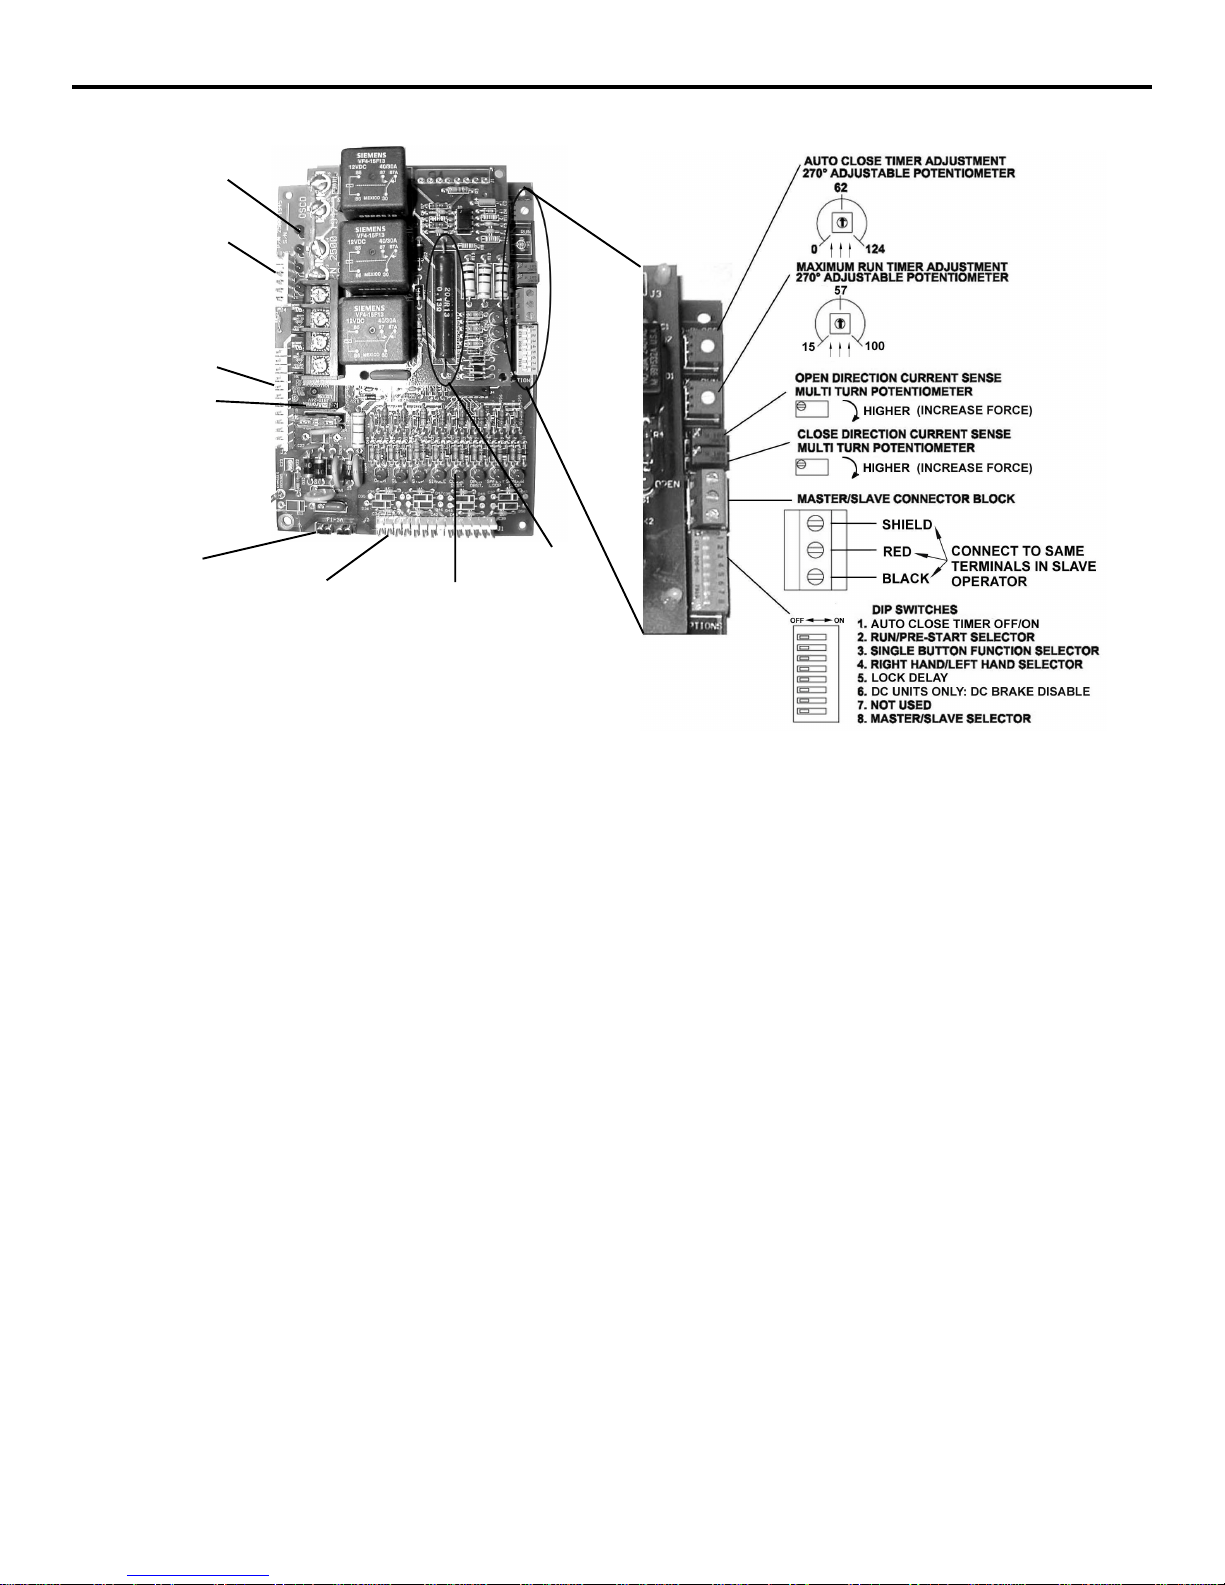
(Also see page 13 for additional information regarding
control board adjustments)
A. The control board may have received a false obstruction
input triggered by current sensing set too low. Make sure
the door moves freely through its entire travel before ad-
justing the current sensing.
B. The maximum run timer may have counted down and ex-
pired. This can be caused by having the timer set too low,
if a chain or belt is broken, or if a sprocket or pulley is
slipping. When the timer expires, the door stops and the
stop button must be pressed to reset the operator.
C. An obstruction signal from an accessory wired to the ob-
structioninput mayhave triggeredfalsely.Check thecon-
trol board for lit L.E.D. indicators for any of the following
inputs: safety, shadow, open obstruction, close obstruc-
tion, stop, etc. If any are lit when the operator should be
running, remove all devices hooked to that function and
hookthem uponeat atimeand trytorun theoperator until
theproblemdevice isfound. Referto page17 fordetailson
thecontrol boardindicators.
Doorstaying open withautomaticsystem:
A. If there are vehicle detectors in your operator which are
connected to reverse, one of your loops or loop detectors
may be sending a false signal. Disconnect the wire har-
ness by pulling harness off the loop detector and try run-
ningthe operator.
B. An opening or reversing device may be stuck or malfunc-
tioning. Try disconnecting these devices and hook them
backup oneata timeandtry runningtheoperator untilthe
malfunctioningdeviceisfound.
C. Make sure the close limit switch isn’t activated. If it is, the
operator will think the door is already closed.
HOW TO ORDER REPLACEMENT PARTS
Use the part numbers listed on the parts list pages. Contact your local OSCO dealer or distributor to order parts.
1. Supplythe modelnumber andserialnumber ofyour operator.
2. Specifythe quantityof piecesneeded andorder bypart numberand nameof part.
3. State whether to ship by freight, truck, parcel post, UPS or air express.
4. Statewhether transportationcharges areto beprepaid orcollect.
5. Specify name and address of person or company to whom parts are to be shipped.
6. Specify name and address of person or company to whom invoice is to be sent.
TechnicalService assistance is alwaysavailable atOSCO. If afterfollowing thetroubleshooting suggestions aboveand
your operator still does not function properly, contact OSCO’s Technical Service Department direct at 1-800-333-2508.

9
JH-DC OPERATOR INSTALLATION GUIDE
CONTROLandACCESSORYCONNECTIONILLUSTRATIONS

10
JH-DC OPERATOR INSTALLATION GUIDE
CONTROLandACCESSORYCONNECTIONILLUSTRATIONS

11
JH-DC OPERATOR INSTALLATION GUIDE
CONTROLandACCESSORYCONNECTIONILLUSTRATIONS

12
JH-DCOPERATORINSTALLATIONGUIDE
CONTROLandACCESSORYCONNECTIONILLUSTRATIONS
1-06-6

13
JH-DC OPERATOR INSTALLATION GUIDE
Auto Close Timer Adjustment: This 270-degree adjustable potentiometer will signal the operator to close automatically,
providednoopen, reversingorobstructionsignalsare presentfromthefully-open position.Thistimeris adjustablefrom0 to124
seconds. This feature is turned on or off using dip switch #1.
Maximum Run Timer Adjustment: This270-degree adjustablepotentiometer will signalthe operatorto stoprunning onceit
counts down, unless a limit switch is reached or an input is received first. Each time the motor starts, this timer will begin
counting. This timer is adjustable from 15 to 100 seconds. If the timer expires, the unit locks out and the stop button must be
pressedto resetthe operator.
Open Direction Current Sense Adjustment: This multi-turn potentiometer is used to calibrate the built-in current sensing
featurefor detectionof obstructionswhile runninginthe opendirection.
Close Direction Current Sense Adjustment: This multi-turn potentiometer is used to calibrate the built in current sensing
featurefor detectionof obstructionswhile runningin theclosed direction.
Master/Slave Connection Block: Thisterminal blockisused inconjunctionwith twooperators toconfiguretwo doorsto open
andclose together.
Dip Switches:
#1 This switch turns the auto close timer off/on.
#2 This switch is used in conjunction with alarms and flashing lights that may be added to the operator. When the switch is
inthe ON position,these deviceswill startapproximately twoseconds priortotheoperatorstarting. Inthe OFF position,
thedevices willonly workwhile theoperator isrunning.
#3 This switch is used in conjunction with single-button controls and radio receivers. In the ON position, successive inputs
will cause signals in the order of OPEN-STOP-CLOSE-STOP. In the OFF position, inputs will cause an OPEN signal
unless the door is fully open, in which case it will signal CLOSE.
#4 This switchwillenable momentarycontactto closewhen turnedon (asensingedge isrequiredonthe doorifyou usethis
feature).
#5 When turned ON, this switch will allow a one-second delay for solenoid locks to unlock before the motor starts.
#6 In theON position, this switch will disablethe inherent DC brake in DC operators only.In addition,theR2 brakeresistor
on the DC motor board must be cut from the board (refer to the picture above). In the OFF position, the DC brake will
function.
#7 Not used at this time.
#8 This switch will enable momentary contact to open when turned on.
CONTROLBOARDADJUSTMENTS
NOTE:DONOTFORCE270-DEGREEPOTENTIOMETERS
BEYONDTHEIRNORMALRANGEOFMOTION
ORDAMAGEMAYRESULT!
Control Board
with DC
Motor Board
DIAGNOSTIC
L.E.D.s
TERMINAL STRIP #2
CONNECTOR
TERMINAL STRIP #1
CONNECTOR
LIMIT SWITCH
CONNECTOR
LIMIT SWITCH
L.E.D.s
3A Fuse
2A Fuse R2
BRAKE
RESISTOR
081203

14
JH-DC OPERATOR INSTALLATION GUIDE
TERMINALCONNECTIONDESCRIPTIONS
TERMINALS FUNCTION DESCRIPTIONOF FUNCTION
24VAC 24VAC Provides24Volt ACpowerfor accessories.
24VACN Note: DC models will NOT have 24Volt AC power available.
24VDC+ 24VDC Provides24Volt DCpowerfor accessories.
24VDC-COMM.
1 & 4 OPEN Opensthe operator. Severalaccessories suchas buttonstations, keypads,trans-
mitters and card readers can be wired to open.
3 & 4 CLOSE Closesthe operator. Usecaution whenwiring accessoriestothese terminals.The
door must be clearly visible from the location of any accessories wired to
close.
4 & 5 KEYSWITCHOR Performsthe single-buttonfunctionwhich willalternatebetween openandclose or
open, stop and close - depending on dip switch #3. (See page 13 for details.)
2 & 4 STOP Stops the operator. If no stop button is used, a jumper is required across 2&4.
4 & 6 REVERSE Thisfunction willcause areversal whenthe dooris travelingclosed andwill travel
backto thefully openposition. Loopdetectors areoften wiredfor reverse.
4 & 50 OPEN This function works only while the operator is opening. Any signal to this function
will cause the door to stop, reverse a short distance, and then stop again. At this
time the auto close timer is disabled, and a renewed input will be required to start
the door again. Should the door be restarted and the signal occur again prior to
reaching a limit, the door will stop again, and this time will sound the emergency
alarm and lock out.
4 & 51 CLOSE Thisfunction worksexactly likethe OPENOBSTRUCTION, exceptthat itwillonly
work in the closing direction.
4 & 11 SHADOW/HOLD Thisfunction willkeep thedoor initsfully openposition whilethe signalis present.
This is typically used with a loop and loop detector to keep a door open while
vehiculartraffic ispassingthrough.
24VDC+& 60 RUN/PRE-START A 24VoltDCdevice suchas astrobe lightor alarmcanbe wiredtothese terminals.
Dependingondip switch#2,these deviceswilleitherbegin twosecondsbefore the
operator starts, or only while the motor is running. (See page 13 for details.)
OBSTRUCTION
OBSTRUCTION
SINGLE-BUTTON
You must follow all required safety precautions and instructions at all times. Review the safety brochure
included with the operator. If any pages are missing or unreadable, contact OSCO at 1-800-333-1717 to request
additional copies.
Never connect a button station within reach of the door.
Do not adjust the circuit board current sensing feature too high. It should be adjusted high enough to keep the
door from falsely triggering the sensing, but no higher than necessary for the door to operate. Do not defeat
the purpose of this function!
Although both open and close sensing is provided as an integral part of the door operator, OSCO always
recommends use of reversing edges and photo electric units.

15
JH-DC OPERATOR INSTALLATION GUIDE
CURRENTSENSINGADJUSTMENTS
Because doors vary in construction and may have different force requirements in the open and close directions to move, the
OSCO control board has separate multi-turn potentiometers for adjusting in both directions independently. The adjustment
shouldbe setlightenough tomaintain minimalforce(15-25 lbs.)shouldan obstructionoccur,but highenough tokeepthe door
movingunder normalconditions withoutinterruption.
Prior to adjustingthe operator current sensing functions,make sure thedoor moves freely in bothdirections. A badly aligned or
poorlymaintaineddoormay causefalsetriggering ofthe currentsensor.Refer topage 13 whenfollowing theinstructionsbelow.
Afactory adjustmenttool hasbeen suppliedto makethese adjustmentseasier. Thistool hasbeen tapedto thecontrol boxfor
yourconvenience. CLOSEDIRECTIONCURRENTSENSEADJUSTMENT
When the door operator leaves the factory, it has been preset for a relatively light door function and will require additional
adjustment.Begin bystarting thedoor goingclosed. Ifthe operatorstops andreverses, turnthe closedirection potentiometer
(seepage 13) oneturn higher, press the STOP button, andtry again.Repeatthis processuntil thedoor nolongercauses false
trippingof thecurrentsensor. Notethateach timethedoor operatorreverses, theSTOP buttonmustbe pressed.Next, turnthe
close direction potentiometer lower slowly while the operator is running the door closed until the door operator stops and
reverses again. From this point, turn the close direction potentiometer higher by 1 1/2 turns for all 115 Volt AC and 24 Volt DC
operators, and by 3/4 of a turn higher for all 230 Volt AC operators.
OPENDIRECTIONCURRENTSENSEADJUSTMENT
Repeatthe sameprocesswith theopen directionpotentiometerwhile runningthedoor inthe opendirection.Once thisisdone,
run the door through several complete cycles and make sure the door does not false trip in either direction.
MAXIMUM RUN TIMER ADJUSTMENT
This adjustable potentiometer sets the maximum length of time
the motor will run before shutting down. It should be configured
for the time it takes to run the door fully open or closed, plus an
additional 15 seconds. See page 13 for details.
AUTO CLOSE TIMER ADJUSTMENT
This adjustable potentiometer sets the length of time which
elapses before the door operator automatically closes the door,
from the fully open position, provided no open, reversing, or
obstruction signals are present. This feature can be turned on or
off via dip switch selection. See page 13 for details. Do not use
the auto close timer without an appropriate reversing device
installed!
MASTER/SLAVE CONNECTION
A three-wire shielded conductor cable is required to connect mas-
ter and slave operators. You must use Belden 8760 Twisted
Pair Shielded Cable (or equivalent) only – OSCO part number
2500-1982, per foot). See page 13 for details of this connection,
as well as dip switch selection. Note: The SHIELD wire should be
connected in both the master and slave operators. In addition,
you must run power to both the master and slave operators.
BATTERYBACK-UP
FOR DC MODELS ONLY
CHARGERBOARDCONFIGURATION
To set the voltage monitor, see the picture below. The RUN posi-
tion willmonitor the voltageofthebatteryonly after AC voltagehas
been interrupted. It will allow the operator to continue to function
until the batteries have dropped to 17 volts. When the batteries
have reached 17 volts, the operator will open and shut down until
AC power has been restored. In the OPEN ONLY position when
AC power has been interrupted the operator will open and shut
down until AC power is restored.
Note: If the charger board is set to open only, removing incoming
power will cause the operator to run to full open position. Turn off
power switch in operator before removing incoming power!
VOLTAGEMONITORSHOWN
ABOVEINTHE RUN POSITION
Multi-turn Potentiometer
Remember it is important not to set the adjustment
too high! Doing so will defeat the purpose of the cur-
rent sensing as an obstruction detecting feature.

16
JH-DC OPERATOR INSTALLATION GUIDE
IMPORTANTNOTESFORINSTALLATIONOFMASTER/SLAVEAPPLICATIONS
When setting up Master/Slave gate operators, it is best to make adjustments and run each operator individually. To do this,
simply:
a. SetDip Switch#4to properhand ofoperation(right-hand orleft-hand)
b. Set Dip Switch #8 as Master (off)
Runeach operatormaking currentsensing adjustmentsasnecessary,as indicatedon theControl BoardAdjustments pageof
this installation guide. When both operators have been adjusted, turn power off, then turn on Dip Switch #8 in the operator
chosenas theSlave.
Thetimer toclose andradio/single buttonbehavior areset inthe Masteroperator.
Thefollowing selectionsareset individually:
CurrentSensing
MaximumRun Timer
One-SecondLock Release
Three-SecondPre-StartWarning
Right/Left-HandSelections
CHARGERBOARD SLEEPMODE
When primary AC power is not available, the operator will continue to
operate in battery only mode if the charger board is set in its RUN mode
(see Battery Backup Charger Configuration). Accessories wired into
the operator will continue to draw power, even when the operator is not
openingor closing thegate. Thiscan dramaticallyreduce theamount of
standbytime availablefrom thebatteries.
To extend the available standby time, the charger board has a “sleep”
mode feature which will turn off power to all controls except for any that
arewiredaccordingtotheschematicsbelow.Byremovingtheblackjumper
cap JP1 located in the upper right hand corner of the charger board this
featurecan beenabled. Afterfifteen minutesof inactivity,all controlsex-
ceptthose wiredas shownbelow willturn off.Those wiredas shownwill
continueto havepowerat alltimes andwillupon activationgenerate first
a“wake” signalthat willpowerall controlsbackup, andthencreateeither
anopen signalor singlebuttonsignal, dependingonhow thewirejumper
shownbelow isconnected.
OPEN
TERMINAL WAKE
TERMINAL
JP1
JUMPERCAP
CHARGERBOARD

17
JH-DC OPERATOR INSTALLATION GUIDE
ONBOARDL.E.D.INDICATORDESCRIPTIONS
Control Board L.E.D. Indicators:
OPEN This indicator is lit when an open signal is present. This signal can come from such devices as button
stations, radio receivers, keypads and telephone entry systems.
CLOSE This indicator is lit when a closed signal is present. This signal typically comes from three-button stations.
STOP This indicator is lit when there is a break in the stop circuit. Make sure there is a stop button wired in and
workingproperly.
SINGLE This indicator is lit when a signal from a single-button station or radio receiver is present.
CLOSEOBST Thisindicator islitwhen aclose obstruction signal ispresent. Thissignalcan comefromedges andphoto
eyes which have been wired to the close obstruction inputs.
OPENOBST This indicator is lit when an open obstruction signal is present. This signal can come from edges and
photoeyes whichhave beenwired tothe openobstruction inputs.
REVERSING This indicator is lit when a reversing signal is present. This signal is generated by a loop detector wired to
the safety loop terminals.
SHADOWLOOP This indicatoris litwhen ashadow/hold open signalis present.This signalis generatedby aloop detector
wiredto theshadow loopterminals.
Theseindicators arelit whentheopen limitswitch isactivated onaright-hand operator,or thecloseswitch
on a left-hand. If this indicator is lit and the door is not in its full open/closed position, the limit may need
adjusting or the limit switch may need replacing.
These indicators are lit when the close limit switch is activated on a right-hand operator, or the open on a
left-hand. If this indicator is lit and the door is not in its full open/closed position, the limit may need
adjusting or the limit switch may need replacing.
Motor Board L.E.D. Indicators:
NONLABELED One ofthese twoindicators willbelit whenthe motoris runningthe dooropen,and theother islit whenthe
motor is running the door closed.
BRAKEREL. This indicator is lit when the brake is NOT applied.
DC Operators Only:
ACPOWER Indicates AC power is supplying the unit.
DCPOWER Indicates theoperatoris runningon batteries.
BATTERY
CHARGING Indicatesbatteries arebeing charged.Light goesout whenbatteries reach90% offullcharge.
OPENGATE Operator is in open then lockout stage.
POWER
LOCKOUT Flashes when controls/motor are in lockout mode.
LH RH
LSC-1
LSC-2
LSO-1
LSO-2
LSO-1
LSO-2
LSC-1
LSC-2
LOOP

18
JH-DC OPERATOR INSTALLATION GUIDE

19
JH-DC OPERATOR INSTALLATION GUIDE

20
JH-DC OPERATOR INSTALLATION GUIDE
Table of contents
Other OSCO Garage Door Opener manuals
Popular Garage Door Opener manuals by other brands

DITEC
DITEC CROSS30 Installation and maintenance manual

Grifco
Grifco GLD-SDO instruction manual

Mhouse
Mhouse GD1 installation instructions

Automatic Technology
Automatic Technology GDO-9v2 Enduro Gen 2 installation instructions

Chamberlain
Chamberlain Smart Garage MYQ-G0401 quick start guide

Chamberlain
Chamberlain H owner's manual