Osmo TopCutter User manual

TopCutter
User Manual

If you want to read this user
manual in a different
language, visit
osmousermanual.com
Information
Reference
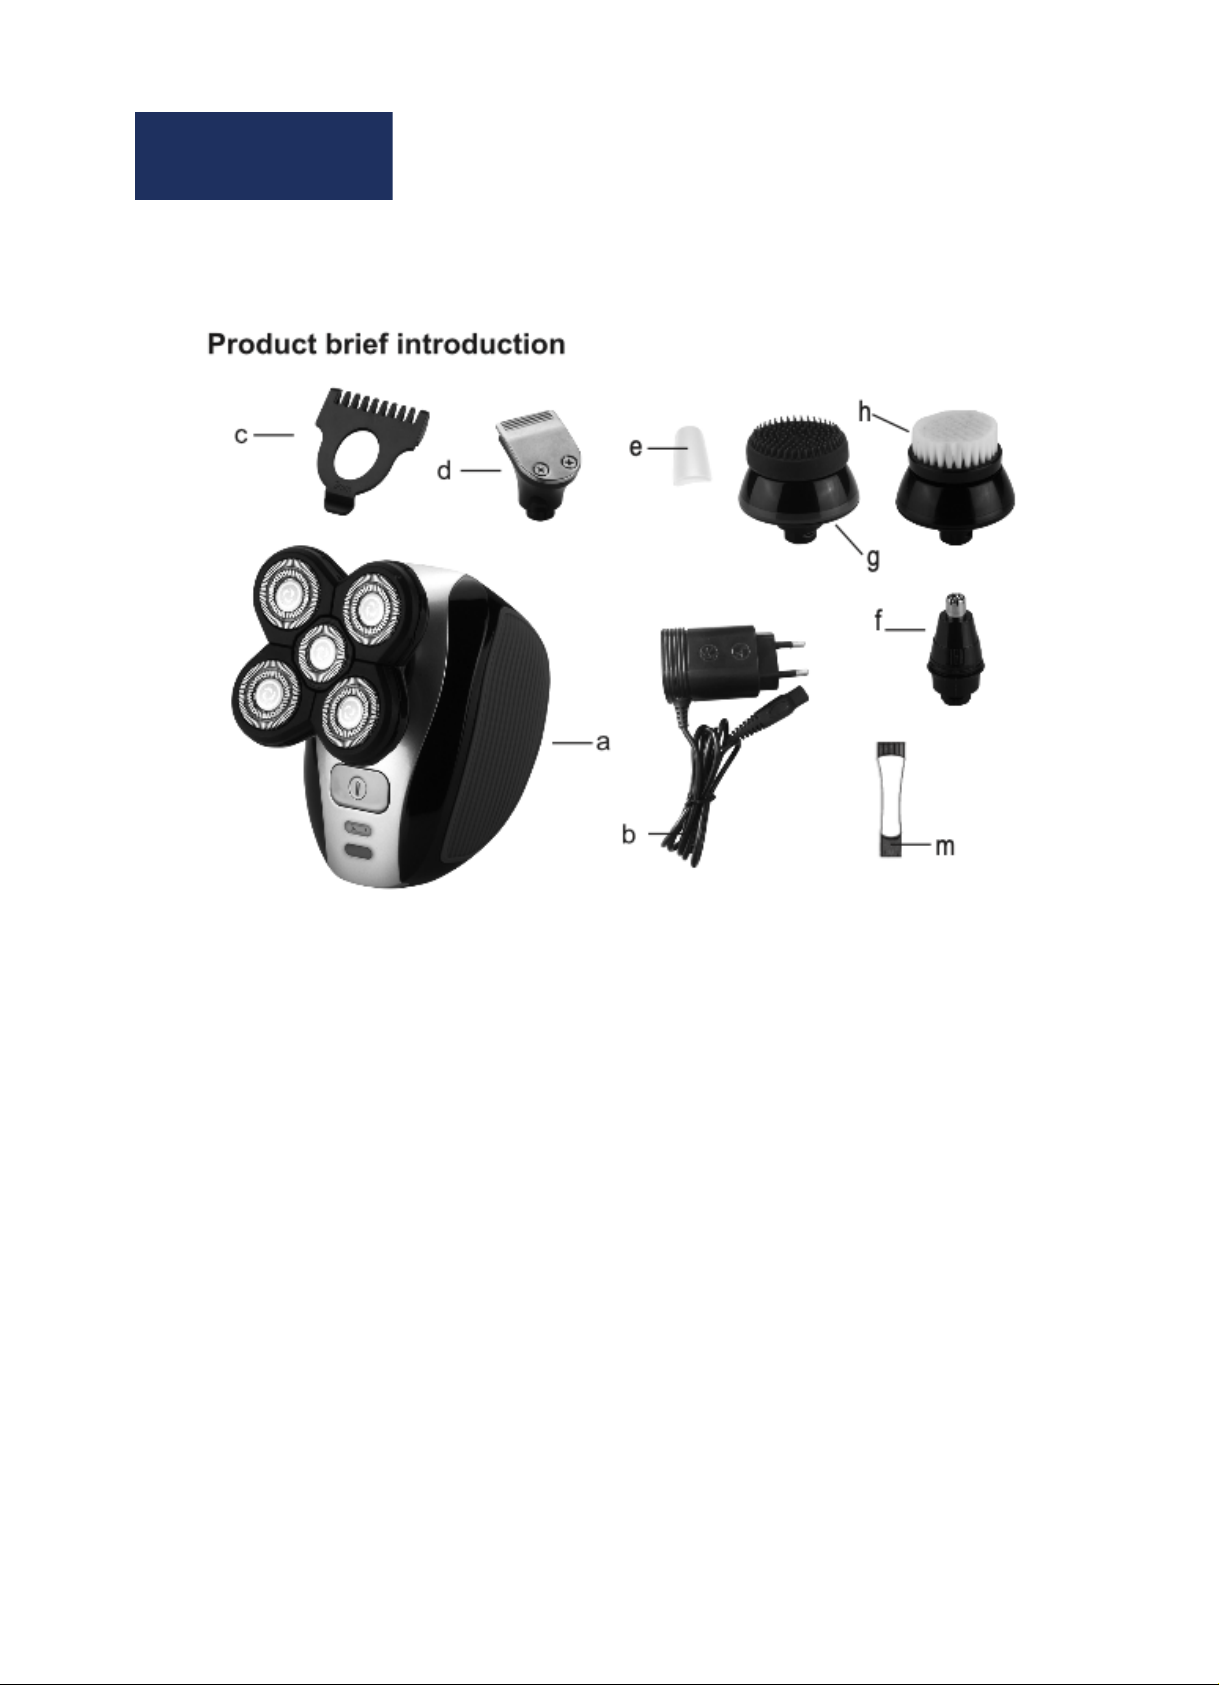
(a) Shaver. (b) Charger (c) Comb (d) precision-trimmer
(e) nose hair trimmer cover (f) nose &ear trimmer (g) soft face
sponge (h) facial cleaning brush
Notes
Before using the product please read carefully the operating and
keep properly for future references.

Information
Reference
Only the included charger can be used.
The charger can transform 220V to a safe low voltage 2.4V.
The charger includes a transformer which should not be cut
off and replaced with another plug otherwise it will lead to
serious results.
If the charger is damaged it should be replaced with a new
one with original type to avoid damage.
The three blades are made of super thin alloy. To avoid
breakage please do not press it by hand (Fig 1).
The temperature for the product's charger and storage
should not exceed 5'C - 35'C.
Make sure the charger cannot be rinsed under water. (Fig 2)
Unplug the charger before cleaning the shaver with running
water. (Fig 3)
The waterproof grade IPX7
This product cannot be used by physical distempered,
sensorially or mentally disordered, or inexperienced persons
(including children) unless they are under supervision or
instruction by people in charge of their security.
Take care of children to keep them away from this product.
Please clean inside beard if the shaver doesn't work after you
press the switch.
When the shaver is charging, the indicator light is red, when
you see 60; that means it's fully charged.
It is necessary to ensure you put protective cover on the
shaver when you travel, to protect the shaver head.
1.
2.
3.
4.
5.
6.
7.
8.
9.
10.
11.
12.
13.
14.

Charge
Insert the product charger into the shaver. (Fig
5)
Plugin the charger.
The charger indicator lights up (Fig 6)
After the full charge, unplug the charger and also
pull out the product's plug from the shaver.
It can charge with the charging base.
Make sure the product is power-off before charging.
Fast charge for 1hour. Keep use about 60minutes
after full charge. (Fig 4)
It's better for the product not to be connected to the
power supply for more than 24hrs.
1.
2.
3.
4.
5.
Press the button ON/OFF to start the shaver
Make the shaver head part move quickly on the
skin in straight lines and circles (Fig 7).
How to Use Product
Shaving
1.
2.
To ensure a better shaving effect, the shaver must be
cleaned regularly. The easiest and must sanitary way
to clean the product is to wash the shaver head part
and the whisker storeroom, each time and after
using it..

Charge
Stop the shaver (Fig 9)
Pull away the shaver heads on the side, one by
one and then rotate and pull out the middle head
in the arrow direction indicated on it.
Clean the shaver head part and the hair
storeroom for sometime with running water. (Fig
10) Make sure the inside of both the shaver and
the hair storeroom has been cleaned thoroughly.
Wash the product's surface.
Close the shaver head part and throw off surplus
water.
Open the shaver head part again and remain so
to dry up the product. (Fig 12). You can also use
the brush included to clean the hair storeroom.
1.
2.
3.
4.
5.
Do not wipe the shaver head part with a towel or
paper tissue, which may cause damages to the
shaver head.
Change the shaver head once a year to get the best shaving effect.
The shaver has a long service life if not damaged for human factors.
The damaged shaver head can only be replaced with shaver head of
this company.
Precision Trimmer Instructions
How To Use
Pull the old shaver head assembly out of the shaver.
(drawing) (Fig 13).
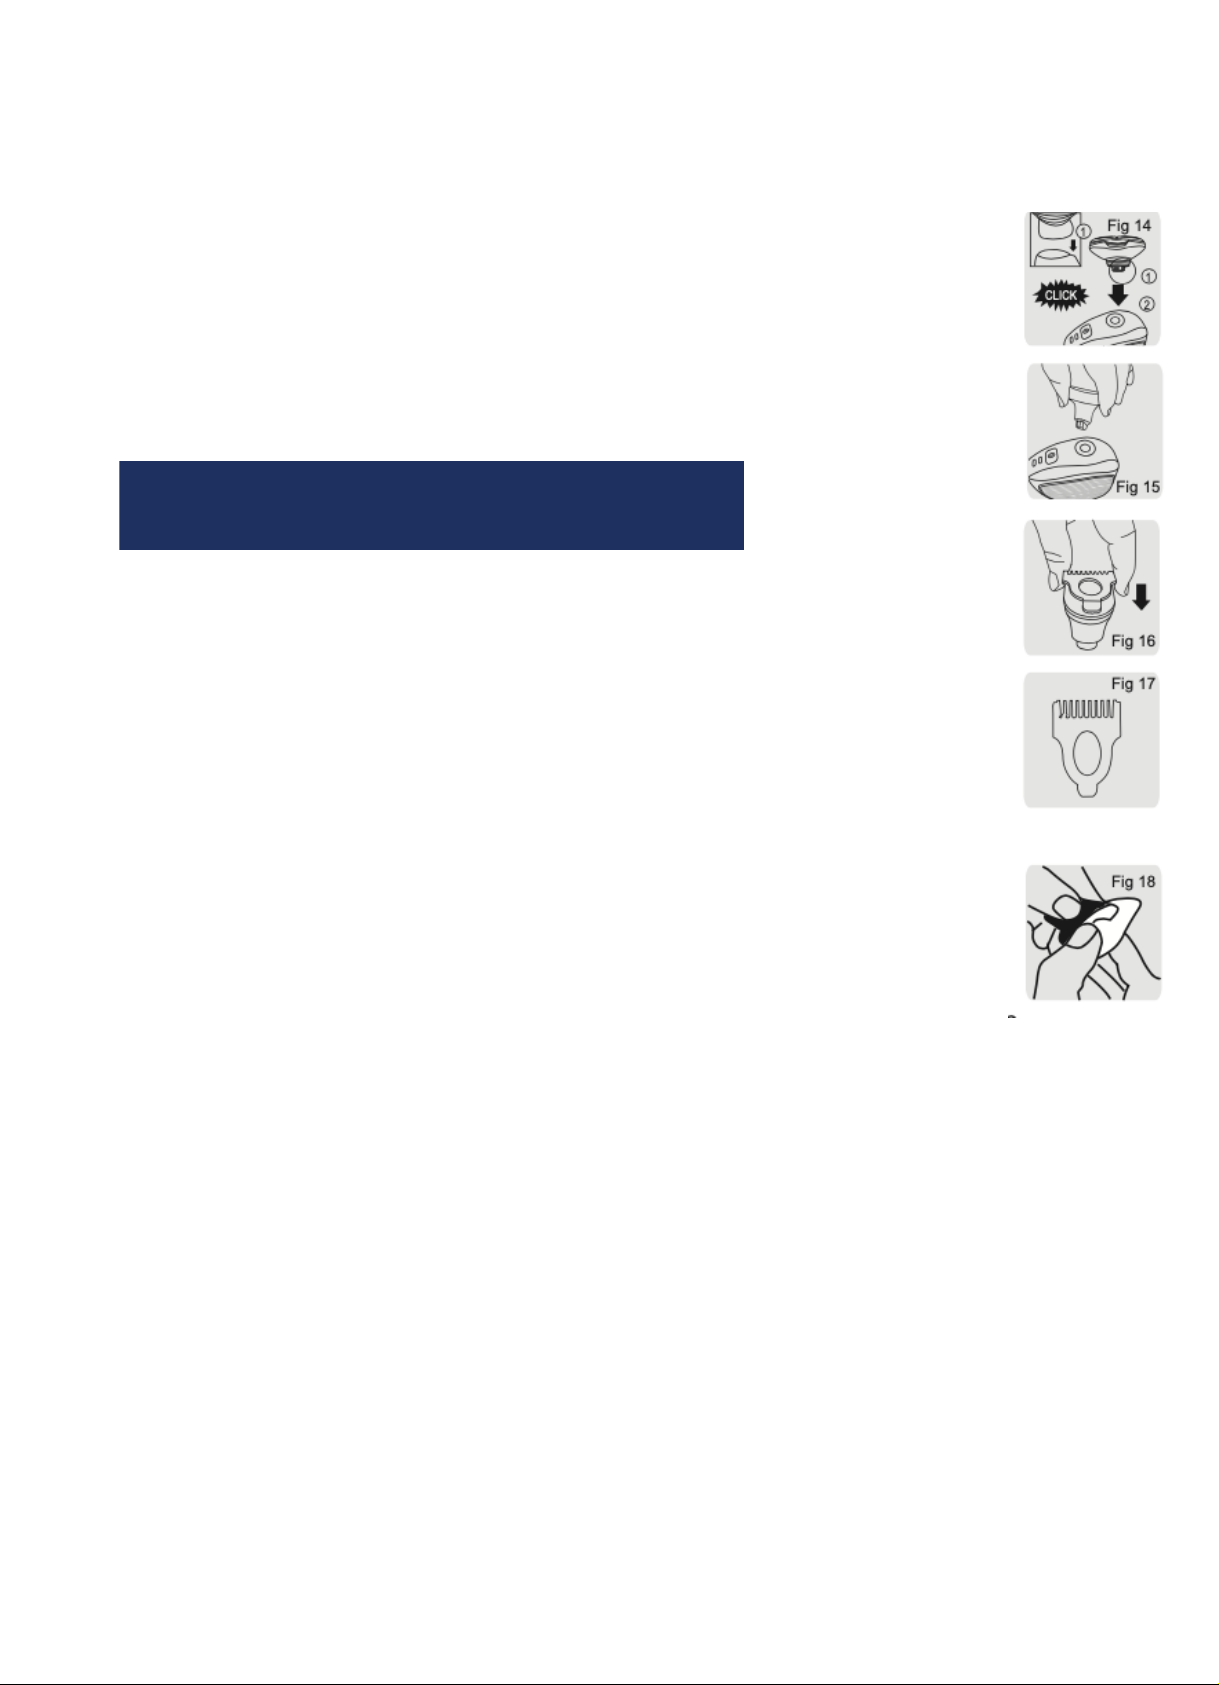
Insert the new shaver head assembly inside the groove (1)
on the shavers top and then press down the shaver head
assembly (2) to mount it on the shaver (a click will be
heard). (Fig 14)
1.
2.
Ensure that you comb your hair according to hair growth
direction before clip hair.
Put on the comb accessories to the slot both sides till you
hear the sound, make sure the comb accessories have
already fixed on both sides. (Fig 16)
The comb accessories have two length "3MM and 6MM" for
clip hair with different length. Replacing the comb
accessories directions according to length mark in the
bottom. (Fig 17). Put down the comb accessories from one
side slot to another. (Fig 18).
Open the switch, use it above the hair slowly. For good clip
effect, please use the product in a different direction from
hair growth direction.
Turn of the shaver power, remove the shaver head. Insert the
hair clipper into the slot of the top shaver.
Press down the hair clipper head part to install the shaver
body. (hear the sound like "kaca") (Fig 15)
TRIMMER
Note: Make sure your hair is clean and dry. Do not use the
product for wet hair.
1.
2.
3.
4.

Take out the precision trimmer head, use brush to clean
the trimmer or clipper, or wash the trimmer head.
Do not use abrasive alcohol, gasoline or acetone etc.
liquid to wash the product.
You should clean the product immediately after using
once.
For best using and clean effect please add some
lubricating oil every three months. The lubricate oil isn't
included in this package. You need to. purchase it
yourself.
Cleanness / Lubricate
1.
2.
3.
4.
Make sure your nose is clean.
Open the switch, put the nose trimmer towards your
inside nose, turn the nose trimmer to clip your long nose
hair (Fig 21). Do not exceed 0.5cm for nose trimmer length
inside your nose. To reduce the itch, you should put one
side of the nose trimmer tip close to your skin.
Nose Trimmer Instruction
Turn off the shaver power, remove the shaver head, insert
the nose trimmer into the slot of the top shaver. Then press
down the nose trimmer head to installed in the shaver body.
(hear a sound like "kaca") (Fig 20)
Trim Nose Hair
1.
2.
Clean outside ear, make sure no earwax.
Open the switch, then turn the trimmer tip towards
your ear to clip your long hair.
Put the trimmer tip towards your outside ear lap slowly.
(Fig 22). Do not exceed 0.5cm for trimmer tip length
inside your ear.
Clip Ear hair
1.
2.
3.
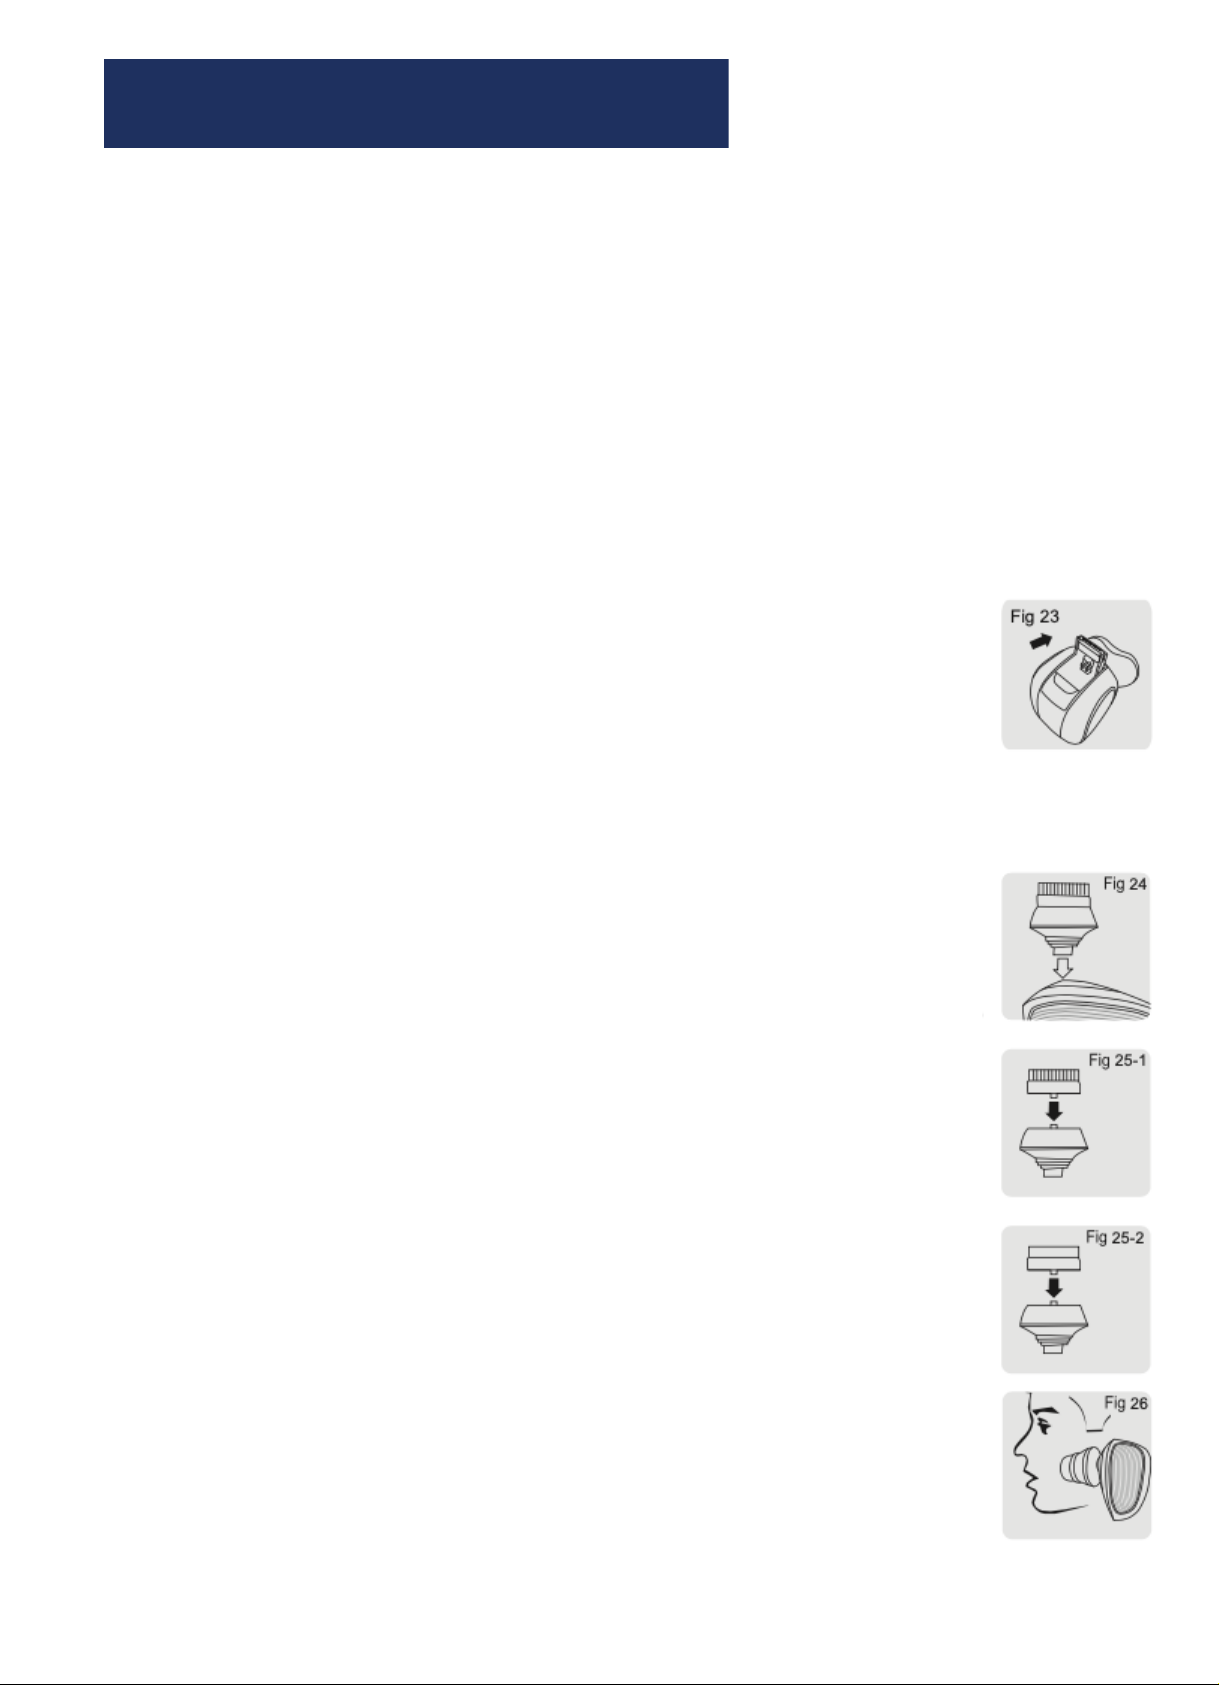
Push the slides face upwards to open the hair trimmer,
which can be started as the shaver start. (Fig 23)
Make sure the appliance is switched off and attach the
cleansing brush attachment to the appliance (fig 24).
Moisten the attachment with water. Do not the appliance
with a dry brush head, as this can irritate the skin.
Moisten your face with water and apply a cleanser to your
face.
Place the attachment on your right cheek. (Fig 26)
Switch on the appliance.
Gently move the attachment across your skin from the
nose towards the ear. Do not brush the attachment too
hard onto your skin to make sure the treatment remains
comfortable.
After approximately 20 seconds you can move the
attachment to your left cheek and this part of your face.
After approximately 20 seconds you can move the
attachment to your forehead and start cleansing this part
of your face. Gently move the attachment from left to right.
With cleansing brush, you can wash your face softly and clean.
Trimming
Used for trimming temple and moustache.
1.
Using the cleansing brush attachment
Use the rotating brush attachment with your daily cleansing
cream. The cleansing brush attachment removes oil and dirt,
contributing the healthy and oil-free-skin.
1.
2.
Note: soft face sponge and facial cleansing brush are using
the same base. (Fig 25-1-2)
Tip: Use the attachment before shaving for easier shaving and
a more hygienic shaving result.
1.
2.
3.
4.
5.
Caution: do not clean the sensitive area around your eyes.
1.
Note: we advice that you not overdo the cleansing and not
cleanse any area longer than 20 seconds.
SOFT FACE SPONGE

After the treatment, rinse and dry your face. Your face is now
ready for the next step of your daily routine.
Clean the attachment after use (See Chapter Cleansing and
maintaining)
To discard the product, please do not put it together with general
domestic rubbish heaps but hand it to the official recycle center
for environmental protection. (Fig 27)
The built in rechargeable battery contains substances which may
pollute the environment, so it must be unloaded from the product
or sent to the officially designated recycle center to be disposed
before it's discarded.
1.
2.
Accessories
The following accessories are included with the product; charger,
brush.
Environmental Protection
1.
2.
The battery should not be unloaded unless it's been used up.
Unplug the charger and also pull out the product plug from the
shaver.
Unload the battery.
1.
2.
Do not plug in the shaver again after unloading the battery.

Have any questions or need further
assistance?
Send us an email at
[email protected] and we will be
happy to help!
If you want to read this user manual in a
different language, go to osmousermanual.com


