OSOTEK HotWave 2104E.11 User manual

OSOTEK HotWave Wet Dry Vacuum User Manual •01
Manuale per l’utente dell’aspirapolvere bagnato/asciutto OSOTEK HotWave •22
Manuel d'utilisateur de l'aspirateur sec et humide OSOTEK HotWave •43
OSOTEK HotWave Nass-Trockensauger Bedienungsanleitung •65
Manual del usuario de la aspiradora en seco y húmedo OSOTEK HotWave •87
Инструкция по использованию пылесоса для сухой и влажной чистки OSOTEK HotWave •109
OSOTEK HotWave Islak Kuru Süpürge kullanım kılavuzu •131
Instrukcja obsługi odkurzacza OSOTEK HotWave do pracy na mokro i sucho •153

1
Safety Instructions
This product is for household use only. Read this manual carefully before use, and retain it for future reference.
•This appliance can be used by children aged from 8 years and above and persons with reduced physical, sensory or mental capabilities or lack of experience and knowledge
if they have been given supervision or instruction concerning use of the appliance in a safe way and understand the hazards involved. Children shall not play with the
appliance. Cleaning and user maintenance shall not be made by children without supervision.
•This appliance contains batteries that are only replaceable by skilled persons.
•The appliance is only to be used with the power supply unit provided with the appliance.
•This vacuum is for indoor use only. Do not use or install it in outdoor, industrial, or commercial environments. Do not use the base station in humid environments such as
bathrooms.
•Do not touch the plug or any part of the vacuum with wet hands.
•A hazard may occur if the appliance runs over the supply cord.
•The plug must be removed from the socket-outlet before cleaning or maintaining the appliance.
•If the power cord is damaged, it must be replaced by a special cord or assembly available from the manufacturer or its service agent.
•To reduce the risk of fire, explosion, or personal injury, check before use to make sure the lithium battery and power cord are undamaged. Do not use the vacuum if either
the lithium battery or power cord is damaged.
•The main body and the floor brush of the vacuum are electrically conductive and should not be immersed in water or other liquids.
•Clean the dirty water tank in time to avoid the decrease of suction and overheating of the motor caused by obstruction. Otherwise, the service life of the vacuum may be
affected. Do not use the vacuum if the roller brushbar, the dirty water tank, and the filter are not installed in place.
•Do not lift the vacuum when adding water to it at the base station.
•Make sure to turn off the vacuum before replacing the roller brushbar.
•Neither use the vacuum to pick up flammable or explosive liquids such as gasoline, nor other liquids such as water or toxic liquids like bleach, ammonia, and drain cleaners.
•Do not use the vacuum to clean up toner used in laser printers and copiers, as toner may cause fire or explosion.
•Do not use the vacuum to pick up smoking or burning materials such as charcoal, cigarette butts, or matches.
•Do not use the vacuum to pick up sharp or hard objects, such as glass, nails, screws, or coins, which may damage the vacuum.
•Do not use the vacuum to clean stains of thick oily substances, strong adhesives, or dyes, such as shoe polish, paints, and pigments.
•Keep hair, loose clothing, fingers, and other parts of the body away from the vacuum’s openings and moving parts.
•Do not put any object into the vacuum's openings, nor use the vacuum with any opening blocked. Keep free of dust, lint, hair, or other items which may reduce airflow.
•Do not shake the vacuum up and down or hit it violently to prevent dirty water from flowing into the motor.
•Do not lift or move the vacuum while the motor is operating, nor tilt it to one side or lay it flat to prevent dirty water from entering the motor.
•Do not place the vacuum on unstable surfaces such as chairs or tables to prevent damage or personal injury caused by its falling off. If the vacuum malfunctions because
of being knocked over or damaged, please contact the authorized service department. Never attempt to disassemble the vacuum on your own.
•Do not block the drying air outlet on the base station to avoid malfunctions.
•After washing the cleaning tray and the accessory container clean, thoroughly dry them before reinstalling them to the base station.
•After cleaning the roller brushbar, the filter, and the cleaning brush, thoroughly dry them before putting them into the accessory container to prevent odors.
•Do not rinse the base station with water.
•Use clean tap water when adding water to the water tank of the base station.

2
•Do not charge or store the vacuum near heat sources or in humid areas, such as by a radiator or in a kitchen or bathroom.
•Only use replacement parts that are approved by OSOTEK.
•Do not repair the vacuum on your own when it breaks down or has problems like electric leakage, overheating motor, making unusual sounds, overheating main body, giving
off bad odors, or weak suction.
•Please be extra careful when using the vacuum to clean stairs.
•Fire Hazard Warning: Do not apply any type of fragrance to the vacuum's filter. These types of products are known to contain flammable chemicals which may cause the
vacuum to catch fire.
•Strictly follow the instructions in this user manual to charge the vacuum at an ambient temperature of 5℃to 40℃. Improper charging may result in damage to the battery.
•Please strictly follow the instructions in this user manual when using the vacuum. Users are responsible for any loss or damage that may arise from improper use of the
vacuum.
•For detailed e-manual, please go to www.osotek.com
WARNING:
•The base station can only be used to dry the roller brushbar, the filter, and the cleaning brush of this vacuum.
•Do not use any third-party battery or power cord. Only use the A019H100CS, A019H100CS.1 base station provided with the appliance.
Precautions for Using Cleaning Solution
1. Please use the specified cleaning solution. Please use the cleaning solution as instructed to prevent any danger caused by excessive bubbles entering the motor.
2. Keep the cleaning solution out of reach of children. In case of contact with eyes, rinse immediately with plenty of water. In case of accidental ingestion, seek medical advice
immediately.
3. Please comply with local environmental regulations when disposing of the dirty water and cleaning solution.
Regulatory Compliance Information
EU Declaration of Conformity
We Beijing Shunzao Technology Co., Ltd., hereby, declare that this equipment is in compliance with the applicable Directives and European Norms, and amendments. The full text of the
EU declaration of conformity is available at the following internet address: http://www.osotek.com
WEEE Disposal and Recycling Information
All products bearing this symbol are waste electrical and electronic equipment (WEEE as in directive 2012/19/EU) which should not be mixed with unsorted household waste. Instead, you
should protect human health and the environment by handing over your waste equipment to a designated collection point for the recycling of waste electrical and electronic equipment,
appointed by the government or local authorities. Correct disposal and recycling will help prevent potential negative consequences to the environment and human health. Please contact the
installer or local authorities for more information about the location as well as terms and conditions of such collection points.
3
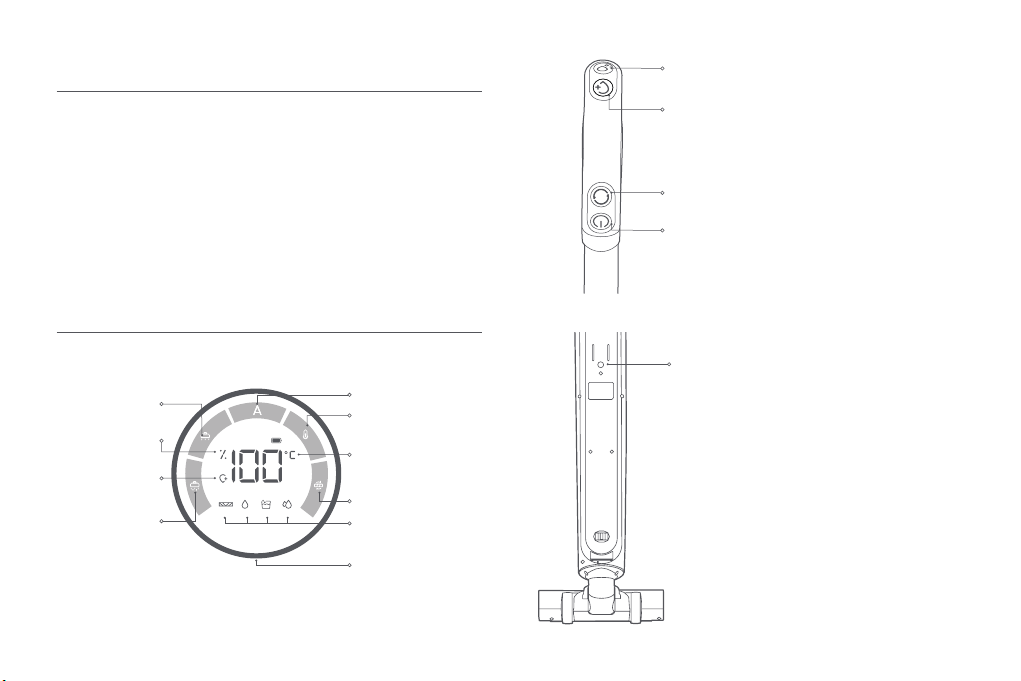
Product Overview
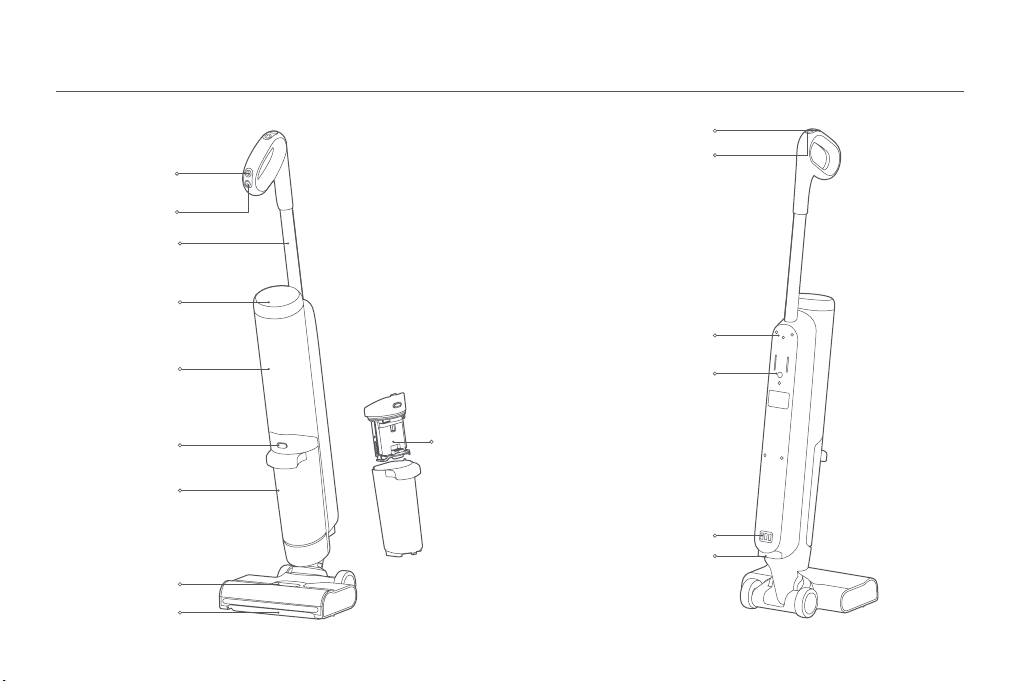
Vacuum
Voice Control Button
Handle Release Button
Water Inlet
Charging Contacts
Mode Switch Button
Power Button
Handle
Display
Clean Water Tank
(Non-detachable)
Dirty Water Tank
Release Button
Dirty Water Tank
Roller Brushbar Cover
Release Button
Floor Brush
Self-cleaning Button
Hot Water Adding Button
Dust
Compartment
4
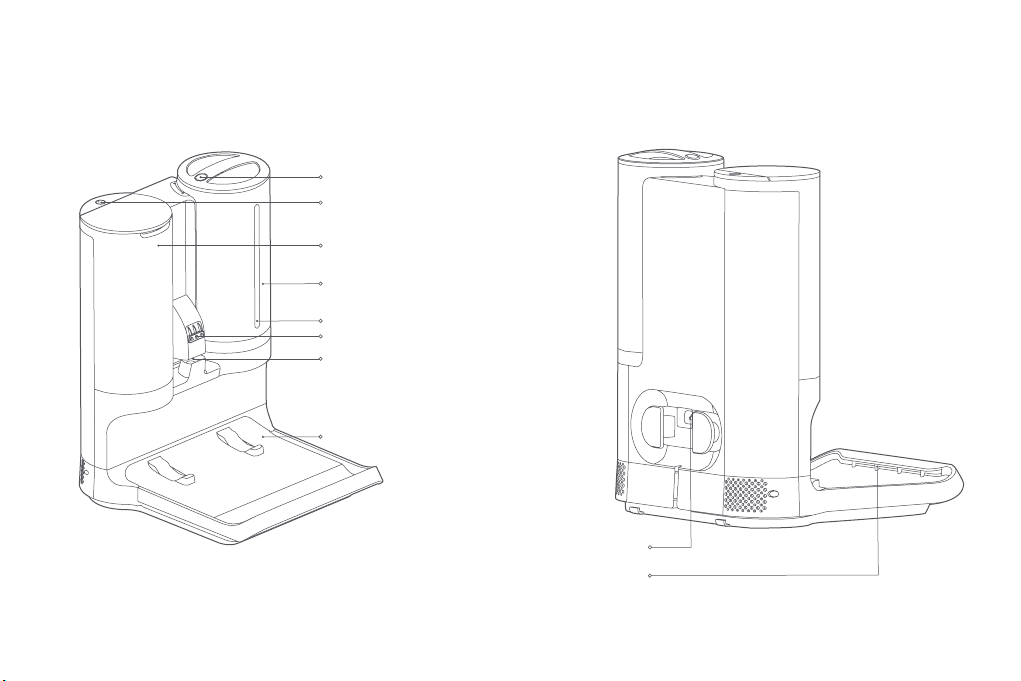
Water Tank Cover Release Button
Accessory Drying Button/LED Indicator
Charging Contacts
Accessory Compartment
(Accessory Container Included)
Water Adding Connector
Water Tank (Detachable)
Water Tank Indicator
Cleaning Tray (Detachable)
Drying Air Outlet
AC Power Cord Port
Base Station
5
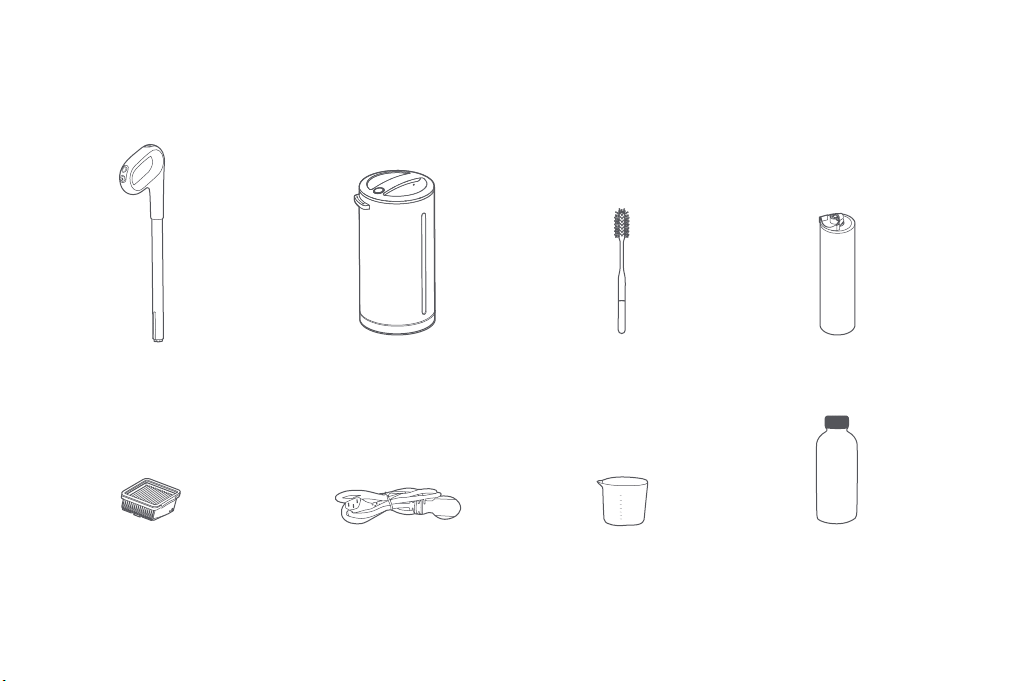
Accessory List
Note: Illustrations of product, accessories, and user interface in the user manual are for reference purposes only. Actual product and functions may vary due to product
enhancements.
Filter
(Replacement)× 1
Cleaning Brush
(Rotate the handle of the cleaning
brush to remove the blade.)
Roller Brushbar
(Replacement)× 1
Handle Water Tank
Power Cord Measuring cup Cleaning Solution
20ml
40ml
60ml
80ml
100ml
120ml
150ml
6
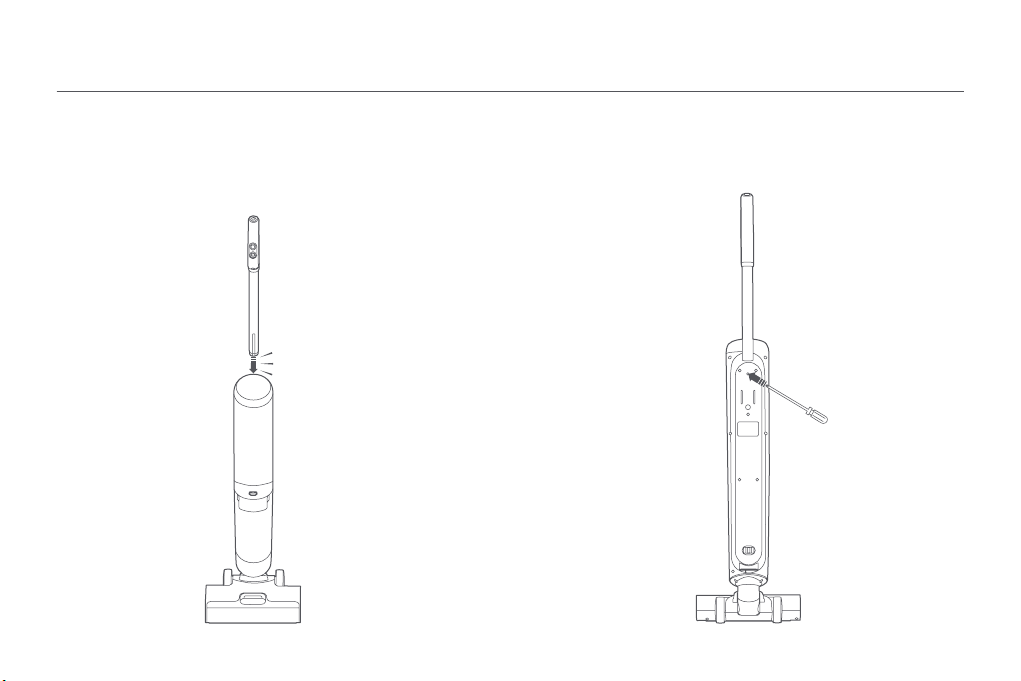
Installing the Handle
1. Insert the handle into the port on the vacuum. The handle is installed when you
hear a click. Then make sure the handle is secured in place.
2. The vacuum is in sleep mode when it is used for the first time or has not been
used for a long time (30 minutes). In this case, the vacuum will not be charged
when it is placed on the base station. You can press any button on the vacuum
to activate it.
1. To remove the handle, insert a screwdriver into the hole on the back of the
vacuum as illustrated to press the handle release button, and simultaneously
pull the handle upwards vertically.
How to Install
Click into Place
7
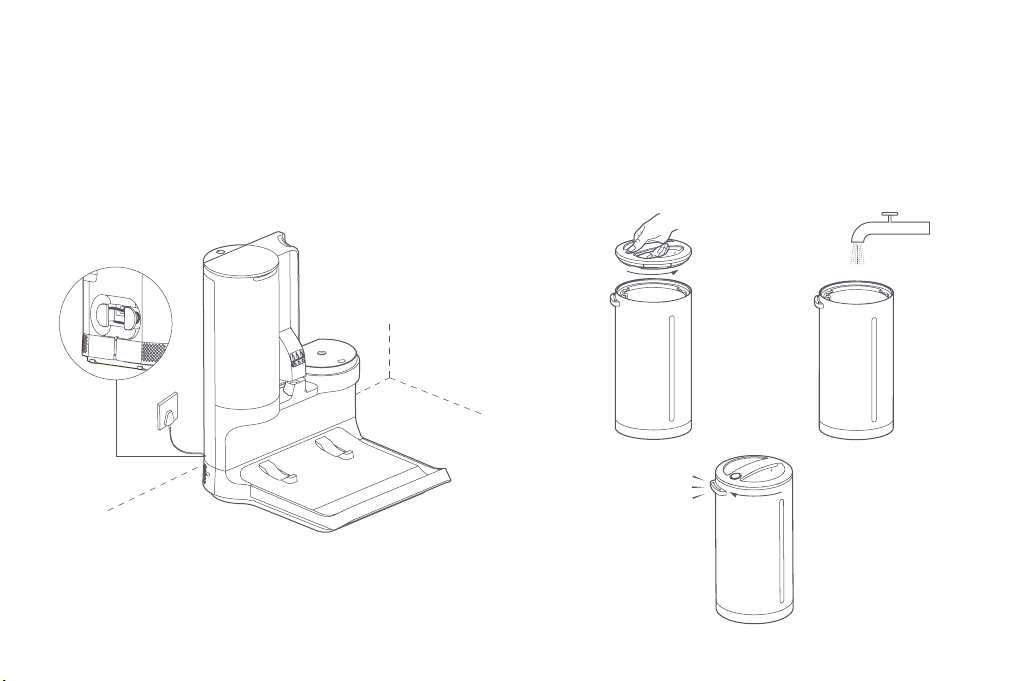
2. Press and hold the release button on the water tank cover and simultaneously
rotate the cover to open it. Then add clean tap water to the water tank and
install the cover back. It is secured in place when you hear a click.
Notes:
•Please use the special cleaning solution for this product and inject it into the
base station water tank with reference to the standard dilution ratio of the
cleaning solution.
•It is forbidden to add any liquid other than tap water and original cleaning
solution to avoid danger.
Click into Place
Installing the Base Station
1. Place the base station against a wall, and connect the power cord to it. Store
the power cord in the back of the base station.
Note:
Do not place the vacuum and the base station near heat sources or in humid
areas, such as by a radiator, in a kitchen, or in a bathroom.

8
3. Put the water tank onto the base station. Open the accessory compartment,
and place the spare roller brushbar, the spare filter, and the cleaning brush into
the compartment.
4. After the base station is powered on, place the vacuum on it to charge.
Notes:
•Fully charge the vacuum before first use and after each use. The total
charging time is about 5 hours.
•Once the vacuum is fully charged, the display will turn off after 20 seconds
and the vacuum will then enter the energy-saving mode.
•Working at the turbo mode for a prolonged period will cause the battery to
heat up, and the charging time may increase or the battery level may not
grow in a short time during charging. This is normal.
9
Charging
Battery Level Display
1. Place the vacuum on the base station, and the vacuum will begin charging. The
display will go out 20 seconds after the vacuum is fully charged.
2. The number on the display represents the current battery level in a percentage
during charging. The display will go out 20 seconds after charging is completed.
3. The vacuum cannot be charged when it is in the process of water adding, self-
cleaning, or drying.
How to Use
Display and Buttons Instructions
Error Status
Auto Mode
High-temp Mode
Water Absorbing
Mode
Turbo Mode
Water Adding
Indicator
Temperature Indicator
Self-cleaning Mode
Power Button
•Press and hold to turn on/off the vacuum.
Self-cleaning Button
•Press to start self-cleaning and drying.
Hot Water Adding Button
•Press to start adding hot water.
When adding hot water, the base station will first
pump the low-temperature water out of the vacuum,
and then start to add high-temperature water to it.
Mode Switch Button
•Cycle through the modes when the vacuum is on.
Battery Capacity
Indicator
Dirty Sensing/Working
Status/Error Status
Indicator
Voice Control Button
1. Short press this button to turn on/off the voice alerts
or adjust the volume:
Press this button to switch from voice alerts on
(default) - low volume - to voice alerts off cyclically;
2. Press & hold, and then short press this button to
change the language:
Press and hold this button for 3s to broadcast voice
alerts in the current language, that is, enabling
the language switch. Then, if no operations are
performed within 5s, the current language will be
still used; If you press the voice control button within
5s, the language will be switched to the next one. If
you perform no operation within 5s after that, the
switched language will be used, and so on.
10
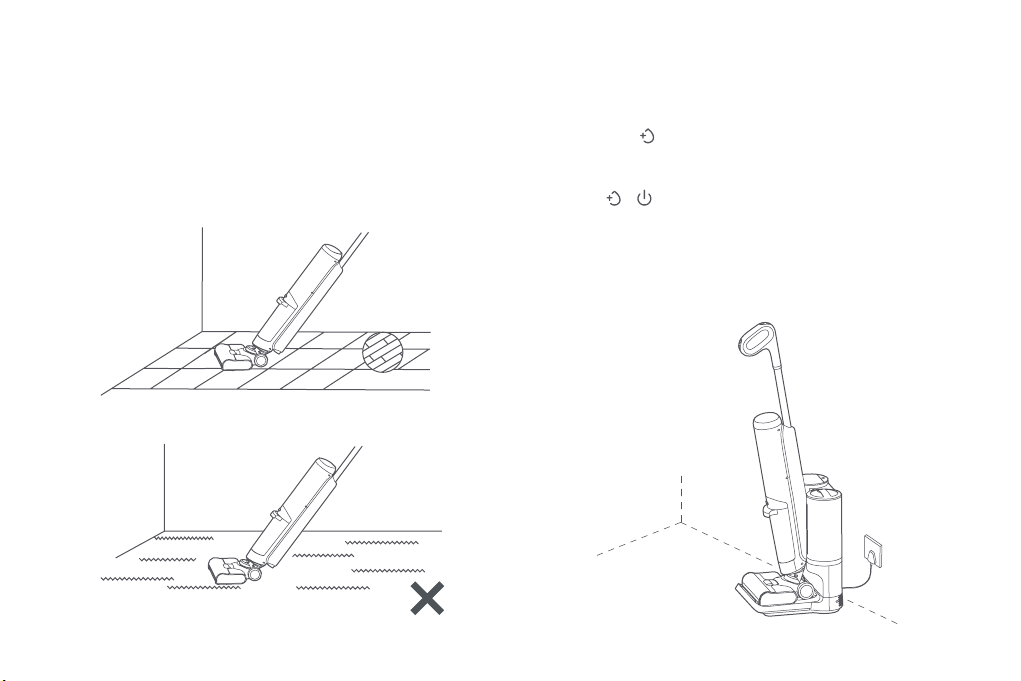
Using Scenarios
The vacuum can be used to clean different types of hard-surface flooring such as
wood, tile, and marble.
•When the vacuum is working, the number on the display represents the
temperature of water in the clean water tank.
•After adding hot water to the vacuum, the temperature of the water in the
clean water tank may be different from the temperature of the roller brushbar
surface. This is affected by the factors including operating environment, the
temperature of water in the base station's water tank, the flooring material, and
the heat loss in water pipelines.
Do not use the vacuum on fabric surfaces, such as carpets and blankets.
✖
Water Adding
•When the vacuum is placed on the base station, the room temperature mode
will be enabled and the base station will automatically add room temperature
water to the vacuum.
•Press the button to enable the high-temp mode. Once this mode is enabled,
the base station will first pump the low-temperature water out of the vacuum,
and then start to add high-temperature water to it.
•Do not remove the vacuum from the base station during water adding. Press
the button or to stop adding water.
•The water tank indicator will change its color based on the water level. White
indicates sufficient water, yellow indicates low water level, and red indicates
insufficient water.
Notes:
•Due to the nature of the heating components, the first two heating temperatures may be a
little lower. The water will be heated properly afterward.
•When heating water, the base station may make a sound similar to boiling water, which is
normal.
11
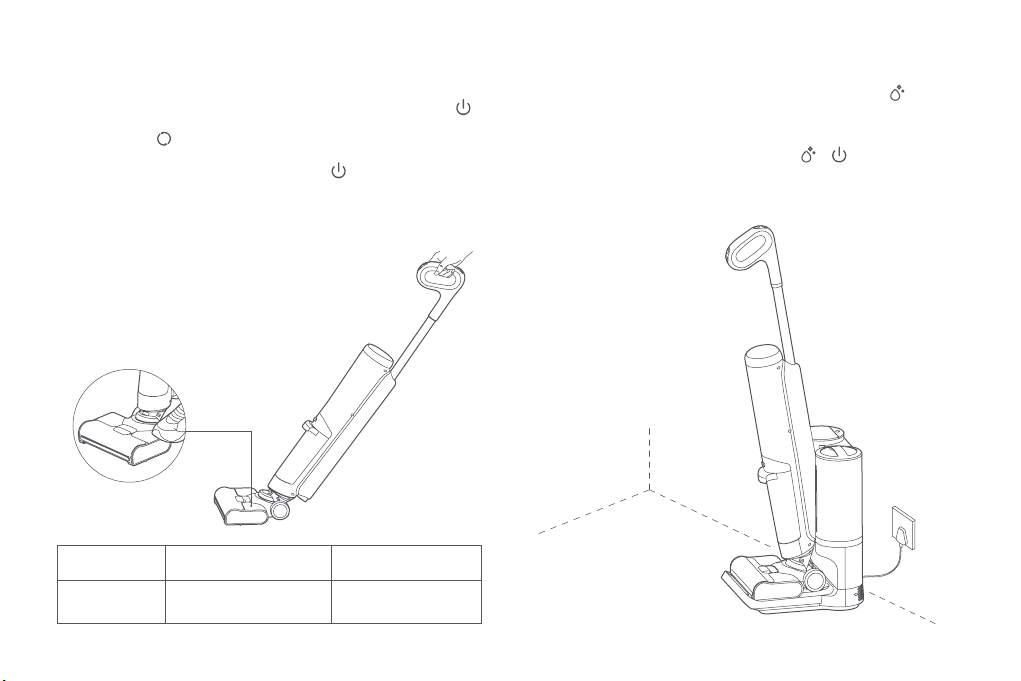
Cleaning the Floor
1. Remove the vacuum from the base station, step on the floor brush with one
foot and pull back the handle to tilt the vacuum. Press and hold the button
to turn on the vacuum.
2. Press the button to cycle through the modes of auto, water absorbing, and
turbo.
3. After using the vacuum, press and hold the button to turn off the vacuum.
To avoid residual dirty water, the vacuum will continue to run for a few econds
before turning off.
4. Put the vacuum back onto the base station properly after using it. Do not place
the vacuum against a wall to prevent it from tipping over due to improper
placement.
Auto Mode Water Absorbing Mode Turbo Mode
Daily stains
cleaning Water stains cleaning Stubborn stains cleaning
(Combined with high-temp
mode for better results)
Self-cleaning
•Place the vacuum properly on the base station and press the button to start
self-cleaning. During drying, the roller brushbar will consume the vacuum's
power to rotate and the vacuum cannot be charged. After the drying is
completed, the vacuum will automatically start charging.
•To stop self-cleaning or drying, press the button or .
Note:
Clean the dirty water tank in time after self-cleaning to prevent odors.

12
Drying the Accessories
1. Press the accessory drying button to enable/disable the accessory drying
function.
2. During drying, the LED indicator will breathe white and go out when the drying
is completed.
3. To prevent odors, clean the roller brushbar, the filter, and the cleaning brush and
thoroughly dry them before putting them back in the accessory compartment.
Note:
The accessory drying function is for drying the filter and the cleaning brush. To
dry the roller brushbar, use the drying function of the self-cleaning.
Cleaning the Dirty Water Tank
1. To remove the dirty water tank, press the release button on the dirty water tank
and simultaneously pull the dirty water tank outwards.
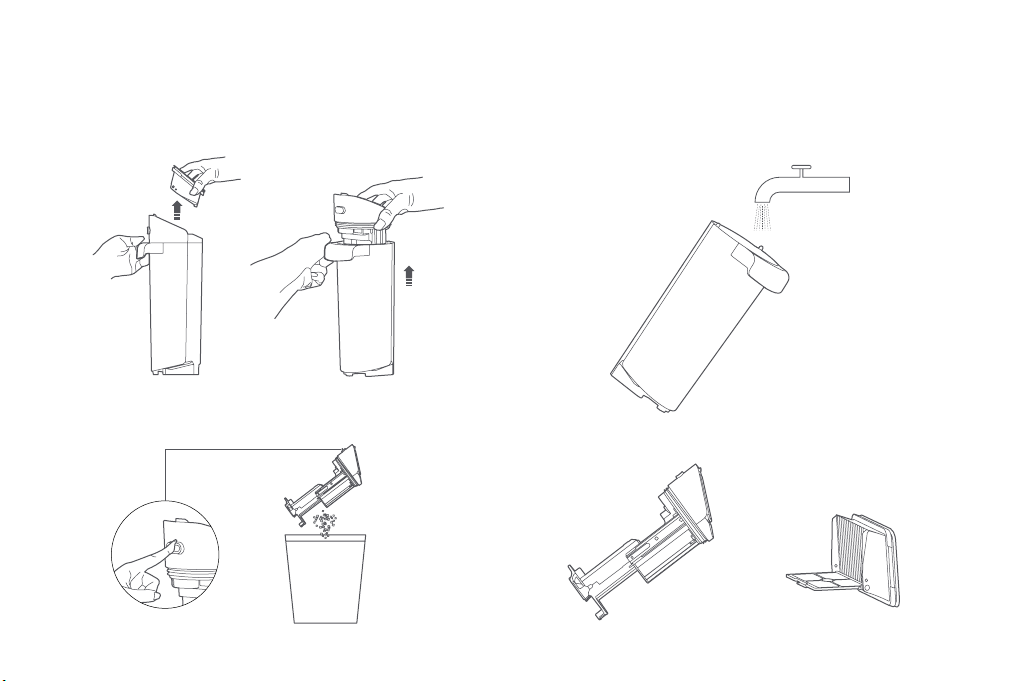
13
2. Pull the filter and the dust compartment upwards to remove them, and empty
the dirty water out of the tank.
Note:
When removing the dust compartment, do not press the dirty water tank
release button to prevent waste from falling out.
3. Press the dirty water tank release button to empty the dust compartment.
4. Rinse the dirty water tank, the dust compartment, and the filter with tap water
until they are clean.
Notes:
•Put the filter into the accessory compartment to dry it after each clean.
•The cleaning brush can be used to assist in cleaning.

14
5. Put the cleaned filter into the accessory compartment, and close the
compartment. Then press the accessory drying button to dry the filter.
6. Install the dust compartment and a dry filter, and put the dirty water tank back
into the vacuum in place.
Click into Place
15
Cleaning the Dirt Detection Sensor
1. Take out the dirty water tank, and use the cleaning brush to clean the dirt
detection sensor and the pipeline of the dirty water outlet.
Dirty Water Outlet
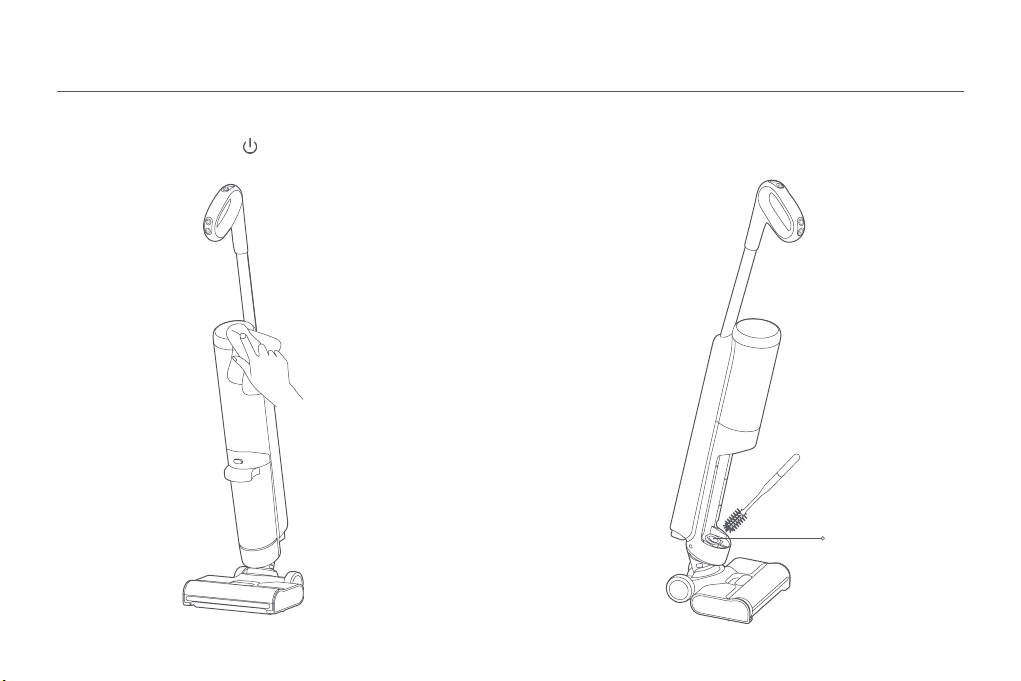
Care & Maintenance
Cleaning the Vacuum
1. Before cleaning, press the button to turn off the vacuum. Use a dry cloth or
paper towel to wipe off the dirt on the vacuum.
16
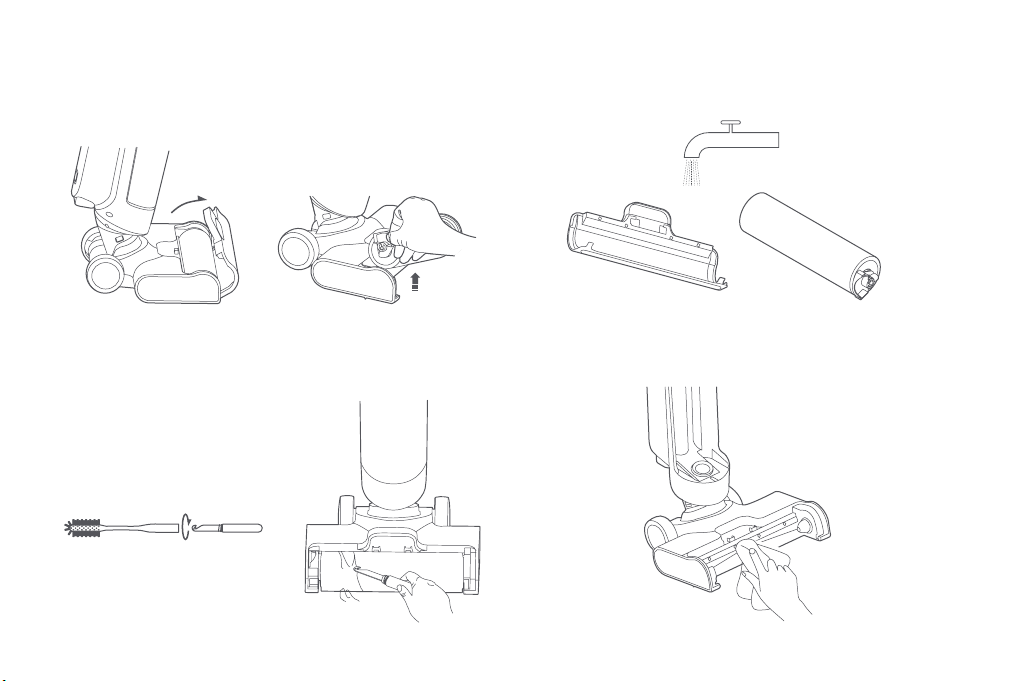
3. Use tap water to rinse the roller brushbar and its cover until they are clean.
Note:
Do not rinse the floor brush directly.
2. Rotate the handle of the cleaning brush to remove the blade. Use the blade to
cut the hair tangled on the roller brushbar.
4. Use a dry cloth or paper towel to remove the hair, dirt, and foreign objects
blocked at the suction port.
Cleaning the Floor Brush
1. Pull the roller brushbar cover release button outwards to take out the roller
brushbar cover, and remove the roller brushbar upwards.

17
5. Reinstall the roller brushbar and its cover. Cleaning the Cleaning Tray
1. Remove the cleaning tray from the base station and use tap water to rinse the
tray until it is clean.
Click into Place

18
2. Clean the accessory container under tap water with the cleaning brush until the
container is clean.
3. Thoroughly dry the accessory container and the accessories before putting
them back in the accessory compartment.
Accessory Container
Cleaning the Accessory Compartment
1. Take out all the accessories stored in the accessory compartment, and lift the
accessory container to remove it.

19
Common Issue
Error Possible Cause Solution
The vacuum does not work.
The battery is depleted. Fully charge the vacuum before use.
The battery has overheating protection. Try again after the battery temperature returns to normal.
The dirty water tank or the roller brushbar is not
installed. Properly install the dirty water tank and the roller brushbar.
The dirty water tank is full. Clean the dirty water tank and reinstall it.
The clean water tank is out of water. Put the vacuum on the base station to add water.
The floor brush or the pipeline of the dirty water
tank is blocked. Clean the floor brush and the pipeline.
The roller brushbar is clogged. Clean the roller brushbar.
The vacuum cannot be
charged.
The vacuum is working.
The vacuum cannot be charged in the process of water adding, self-
cleaning, or drying. After the process is completed, the vacuum will
automatically start charging.
The base station is not plugged in. Use the original power cord to charge the base station.
The power cord used is not original. Use the original power cord.
The vacuum is not placed properly on the base
station.
After putting the vacuum back to the base station, check the vacuum's
position to make sure it is put in place.
The vacuum has no voice
notification. The voice notification is disabled. Press and hold the voice button for three seconds to enable voice
notification.
The vacuum cannot add
water.
The base station's water tank is out of water. Add an adequate amount of tap water.
The base station is not plugged in. Use the original power cord to charge the base station.
The vacuum cannot carry
out self-cleaning.
The dirty water tank is full. Clean the dirty water tank and reinstall it.
The dirty water tank is not installed. Reinstall the dirty water tank.
The battery is low or depleted. Carry out self-cleaning when the battery level is sufficient.
This manual suits for next models
1
Table of contents
Languages:
Other OSOTEK Vacuum Cleaner manuals


