OSOTEK Horizon H200 User manual

OSOTEK Horizon Wet Dry Vacuum H200 · 01
Aspirateur sec et humide OSOTEK Horizon H200 · 20
OSOTEK Horizon Nass-Trockensauger H200 · 39
Aspirapolvere bagnato/asciutto OSOTEK Horizon H200 · 58
Aspiradora en seco y húmedo OSOTEK Horizon H200 · 77
OSOTEK Horizon Islak Kuru Süpürge H200 · 96
H200 Horizon OSOTEK שבי בוטר קבא באוש
Odkurzacz OSOTEK Horizon do pracy na mokro i sucho H200 · 134
Пылесос для сухой и влажной чистки Horizon OSOTEK H200 · 153
· 115

1
Safety Instructions
This product is for household use only. Read this manual carefully before use, and retain it for future reference.
•This appliance can be used by children aged from 8 years and above and persons with reduced physical, sensory or mental capabilities or lack of experience and knowledge if they have been given
supervision or instruction concerning use of the appliance in a safe way and understand the hazards involved. Children shall not play with the appliance. Cleaning and user maintenance shall not be made
by children without supervision.
•This appliance contains batteries that are only replaceable by skilled persons.
•The appliance is only to be used with the power supply unit provided with the appliance.
•Do not touch the plug or any part of the vacuum with wet hands.
•This vacuum is for indoor use only. Do not use or install it in outdoor, industrial, or commercial environments. Do not use the self-cleaning charging dock in humid environments such as bathrooms.
•A hazard may occur if the appliance runs over the supply cord.
•The plug must be removed from the socket-outlet before cleaning or maintaining the appliance.
•To reduce the risk of fire, explosion, or personal injury, check before use to make sure the power supply is undamaged. Do not use the vacuum if the power supply is damaged.
•Do not immerse the vacuum or the self-cleaning charging dock in water or other liquids for cleaning.
•Clean the dirty water tank in time to avoid the decrease of suction and overheating of the motor caused by obstruction. Otherwise, the service life of the vacuum may be affected. Do not use the vacuum if
the roller brushbar, the dirty water tank, and the filter are not installed in place.
•Make sure to turn off the vacuum before cleaning or replacing the roller brushbar.
•Neither use the vacuum cleaner to pick up flammable or explosive liquids such as gasoline, nor other liquids such as water or toxic liquids like bleach, ammonia, and drain cleaners.
•Do not use the vacuum to clean up toner used in laser printers and copiers, as toner may cause fire or explosion.
•Do not use the vacuum to pick up smoking or burning materials such as charcoal, cigarette butts, or matches.
•Do not use the vacuum to pick up sharp or hard objects, such as glass, nails, screws, or coins, which may damage the vacuum.
•Do not use the vacuum to clean stains of thick oily substances, strong adhesives, or dyes, such as shoe polish, paints, and pigments.
•Keep hair, loose clothing, fingers, and other parts of the body away from the vacuum’s openings and moving parts.
•Do not put any object into the vacuum's openings, nor use the vacuum with any opening blocked. Keep free of dust, lint, hair, or other items which may reduce airflow.
•Do not shake the vacuum up and down or hit it violently to prevent dirty water from flowing into the motor.
•Do not lift or move the vacuum while the motor is operating, nor tilt it to one side to prevent dirty water from entering the motor.
•Do not place the vacuum on unstable surfaces such as chairs or tables to prevent damage or personal injury caused by its falling off. If the vacuum malfunctions because of being knocked over or
damaged, please contact the authorized service department. Never attempt to disassemble the vacuum on your own.
•Do not charge or store the vacuum near heat sources or in humid areas, such as by a radiator or in a kitchen or bathroom.
•Only use replacement parts that are approved by OSOTEK.
•Do not repair the vacuum on your own when it breaks down or has problems like electric leakage, overheating motor, making unusual sounds, overheating main body, giving off bad odors, or weak suction.
•Keep the cleaning brush out of reach of children.
•Please be extra careful when using the vacuum to clean stairs.
•Do not apply any type of fragrance to the vacuum's filter. These types of products are known to contain flammable chemicals which may cause the vacuum to catch fire.
•Strictly follow the instructions in this user manual to charge the vacuum at an ambient temperature of 6°C to 40°C. Improper charging may result in damage to the battery.
•Please strictly follow the instructions in this user manual when using the vacuum. Users are responsible for any loss or damage that may arise from improper use of the vacuum.
•For detailed e-manual, please go to www.osotek.com
WARNING:
Do not use any third-party battery or power supply. Only use the BLJ24WD260090P-V power supply provided with the appliance.
2
Regulatory Compliance Information
EU Declaration of Conformity
We, Beijing Shunzao Technology Co., Ltd., hereby declare that this equipment is in compliance with the applicable Directives and European Norms, and amendments. The full text of the EU
declaration of conformity is available at the following internet address: http://www.osotek.com
WEEE Disposal and Recycling Information
All products bearing this symbol are waste electrical and electronic equipment (WEEE as in directive 2012/19/EU) which should not be mixed with unsorted household waste. Instead, you
should protect human health and the environment by handing over your waste equipment to a designated collection point for the recycling of waste electrical and electronic equipment, appointed by the
government or local authorities. Correct disposal and recycling will help prevent potential negative consequences to the environment and human health. Please contact the installer or local authorities for
more information about the location as well as terms and conditions of such collection points.
Precautions for Using Cleaning Solution
1. Please use the specified cleaning solution. Please use the cleaning solution as instructed to prevent any danger caused by excessive bubbles entering the motor.
2. Keep the cleaning solution out of reach of children. In case of contact with eyes, rinse immediately with plenty of water. In case of accidental ingestion, seek medicaladvice immediately.
3. Please comply with local environmental regulations when disposing of the dirty water and cleaning solution.

3
Product Overview
Vacuum
Handle Release Button
Auxiliary Roller
Voice Control Button
Dirty Water Tank
Release Button
Dirty Water Tank
Brush Roll Latch
Self-cleaning Button
Handle
LED Screen
Shift Button
ON/OFF Switch
Clean Water Tank
Release Button
Clean Water Tank
Brush Roll Cover
Release Button
Brush Roll
Light Guide Plate
4
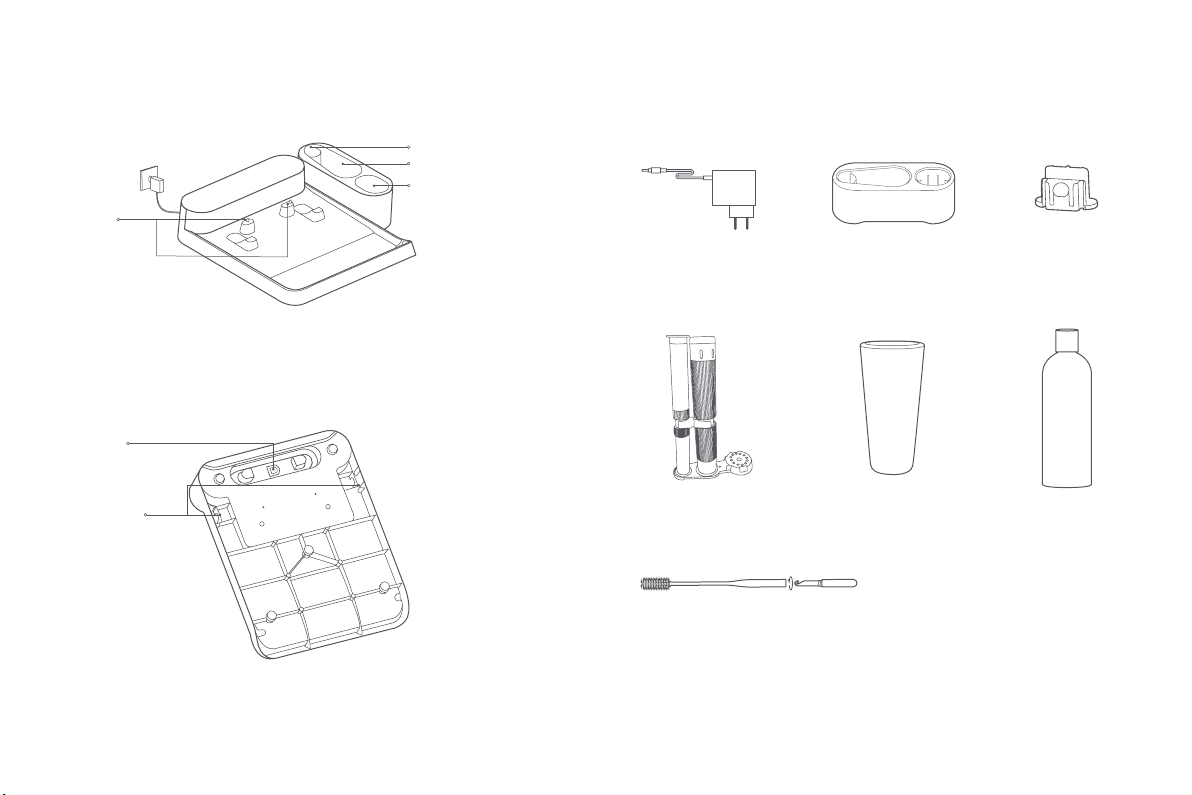
Accessories
Cleaning Tool
(Rotate its handle to remove the cutter)
Note: All pictures of products, accessories, user interface, etc. shown in the manual are for
illustration purpose only. Actual product may vary due to product updates/enhancement.
Roller Cloth
Mounting Clip
Roller Brush Holder Cleaning Solution
Self-cleaning Charging Dock
Charging
Contacts
Place Cleaning Brush Here
Place Roller Brushbar Here
Place Filter Here
Power Port
Mounting Clip
Installation Slot
Accessory ContainerPower Supply
5
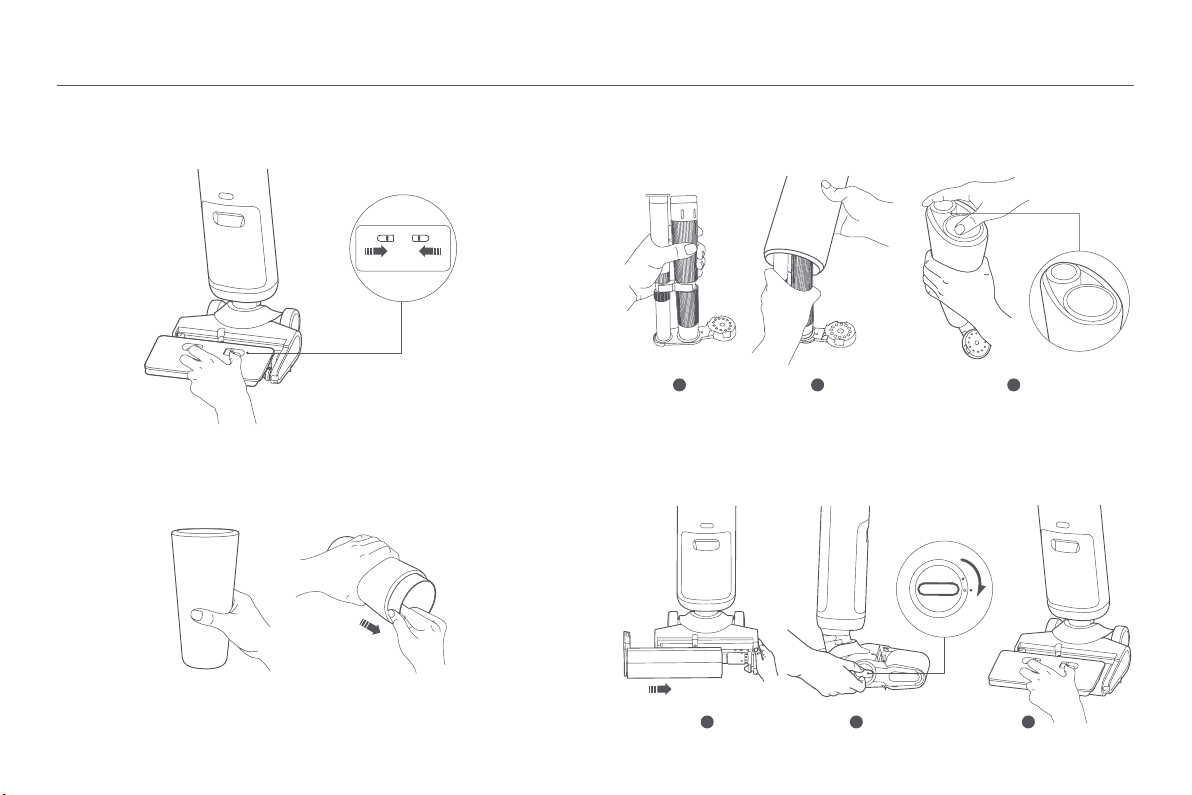
Install the Roller Brush
1. Press the two removal keys of the roller brush cover inward at the same time to remove the
roller brush cover.
2. Remove the brush protector.
4. Install the roller brush, rotate the lock to the locked position and install the roller brush cover.
Tips: When a new dry roller brush is used for the first time, it is normal for it to vibrate slightly
when it rubs against the ground. The roller brush can be used normally after it is completely wet.
31 2
3. Press the roller brush holder as shown, put the roller cloth on the roller brush holder, and press
the roller cloth firmly to install it in place.
Installation
1 32
6
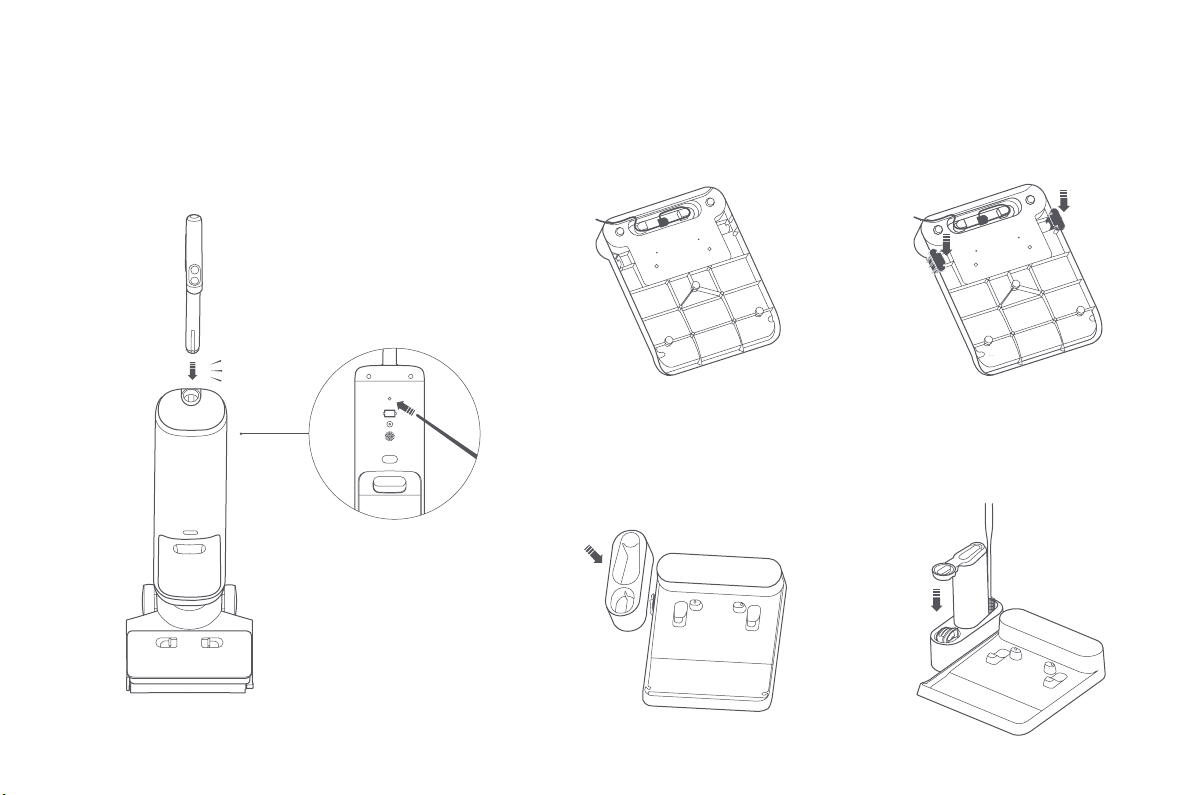
Click
Removing the Handle
Installing the Handle
Insert the handle upright into the main unit until you hear a click, which indicates that
it is locked. Then reconfirm that it is secured in place.
Removing the Handle
Use a non-sharp tool to hold down the handle release button on the back of the main
unit, while pulling the handle upright.
Installing the Self-cleaning Charging Dock
4.Storing the Accessories
The container can store the cleaning brush,
the roller brushbar, and the filter.
Note: The spare roller brushbar and
the spare filter need to be purchased
separately.
1.Installing the Power Cord
Plug the power cord into the power port at
the bottom of the self-cleaning charging
dock, then wind and store the excess power
cord.
3.Installing the Accessory Container
Install the accessory container onto the
mounting clip.
2.Installing the Mounting Clip
Install the mounting clip onto the
installation slot on either side of the bottom
of the self-cleaning charging dock.
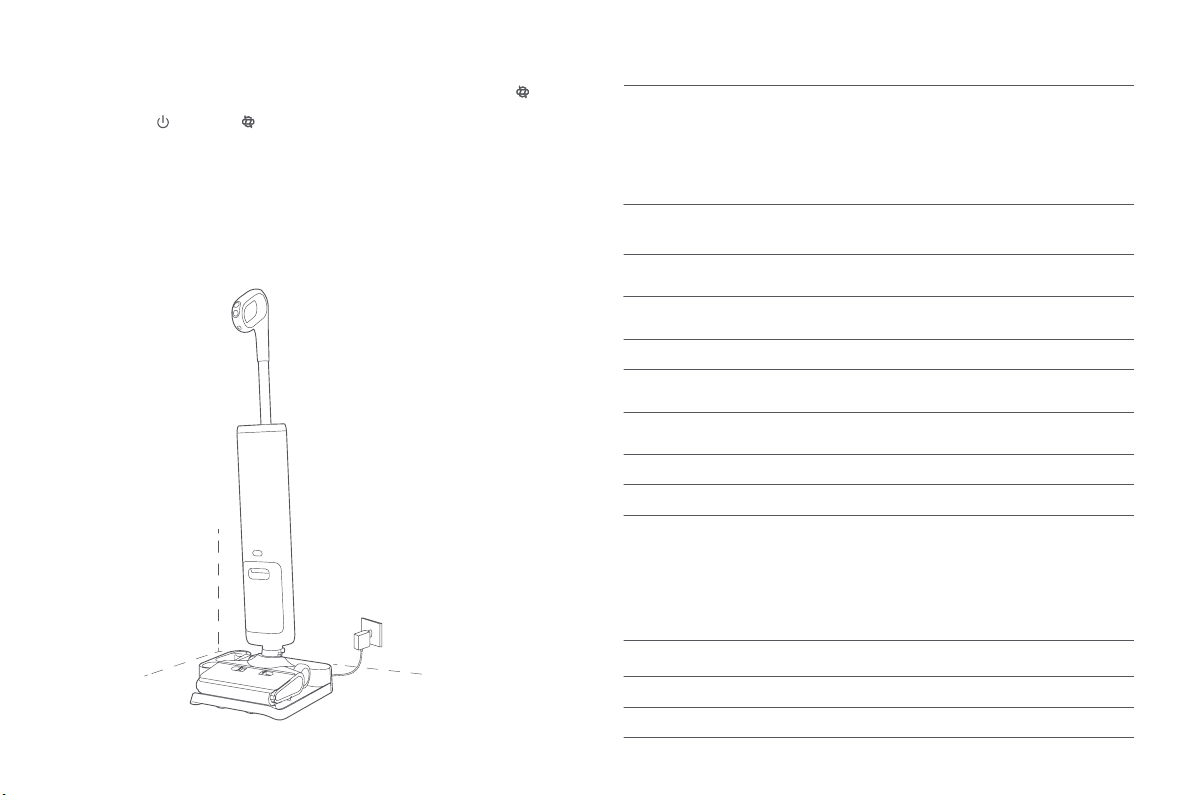
7
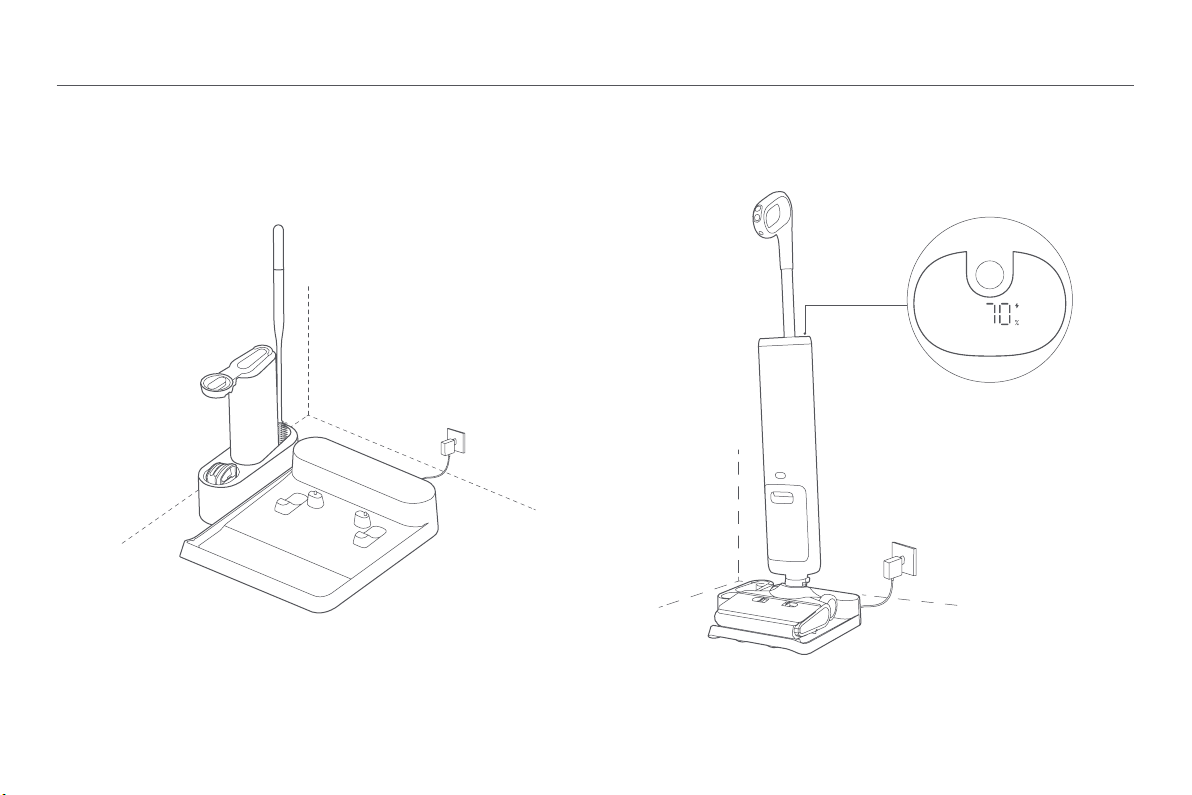
Place the self-cleaning charging dock on a flat surface and connect it to power via the power
supply.
Note:
Keep the self-cleaning charging dock away from heat sources such as radiators or humid
environments such as kitchens and bathrooms.
Connecting to an Electrical Outlet
Note:
• Please fully charge the main unit before the first use and after each use (charging time: 4-5h). The
battery may overheat after continuous use for cleaning stubborn stains. In this case, it's normal that
the charging may take longer or the battery level may remain constant in a short time.
Charging the Main Unit
After powering on the self-cleaning charging dock, align the charging electrode at the bottom of
the cleaner head with the charging electrode of the self-cleaning charging dock, and the charging
starts until you hear the "charging" voice alert.
Notes:
• The battery level is shown in numbers
on the LED screen.
• 20s after the battery is full, the LED
screen will go off.
How to use
8
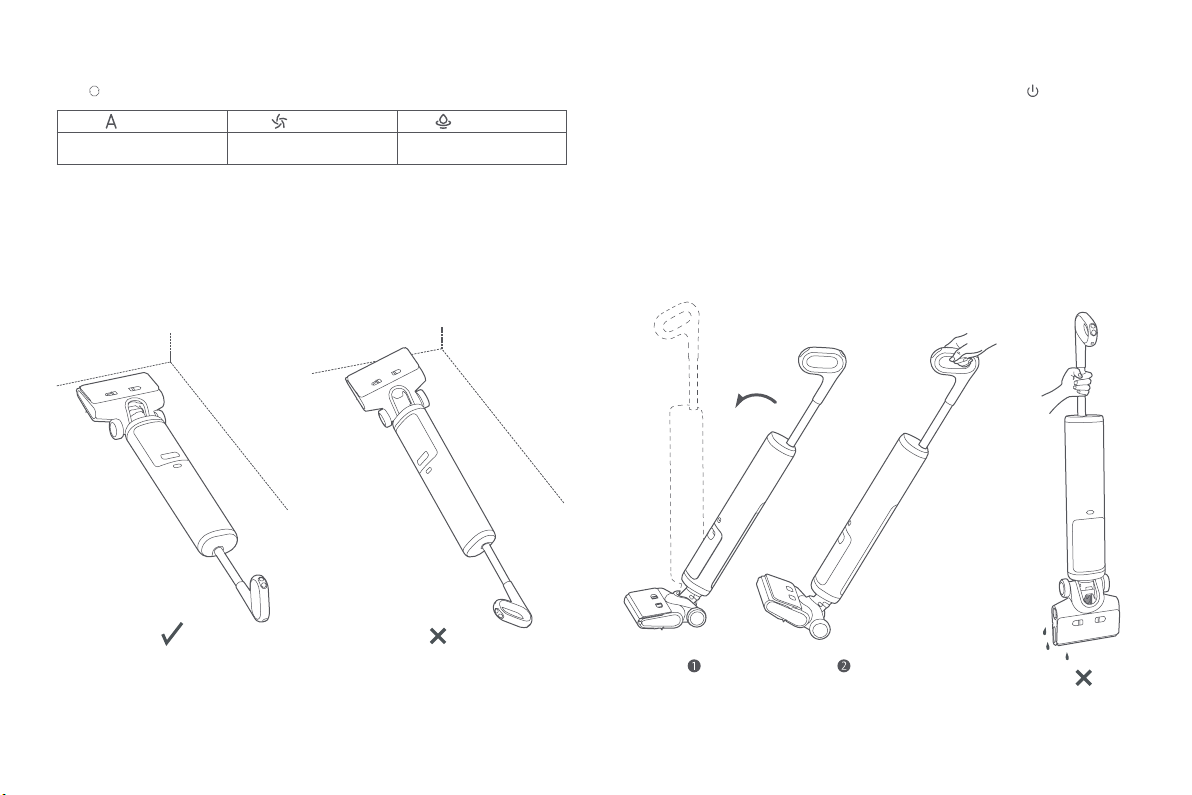
Intended Use
Note:
The cleaner head lighting is on by default when the product is turned on.
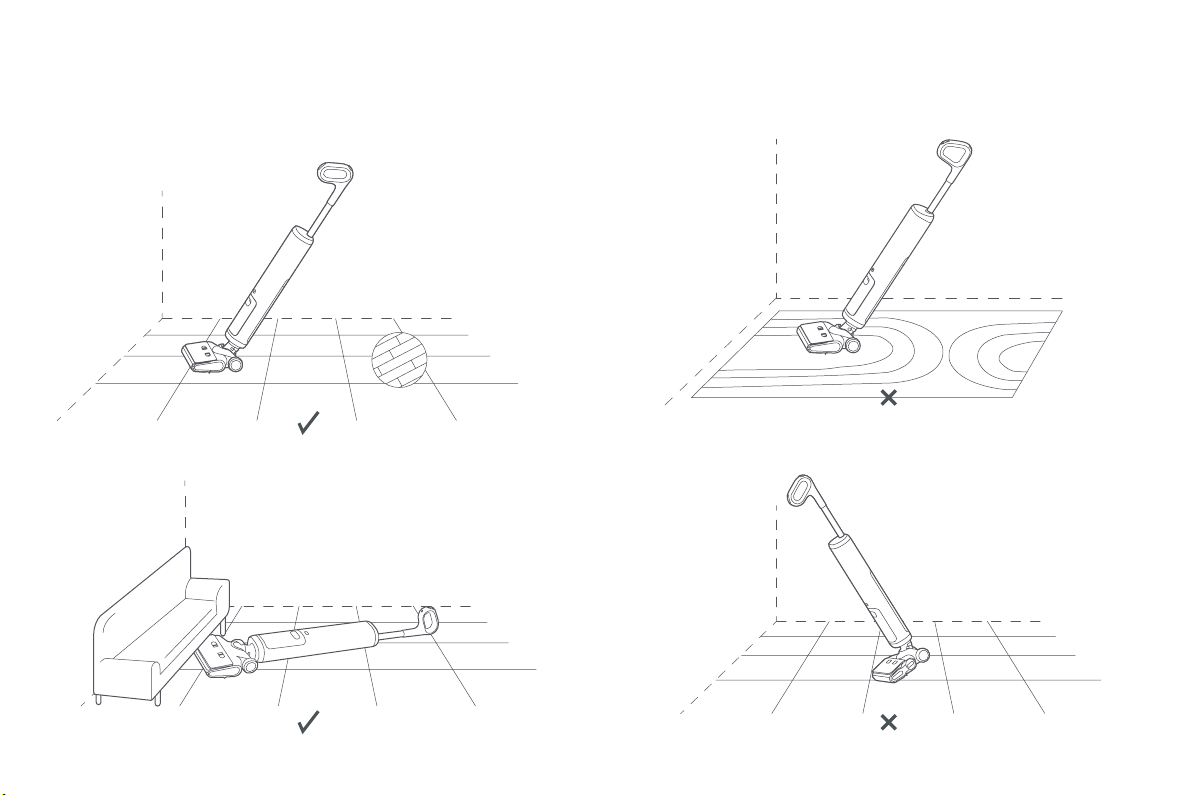
The product is designed to clean hard floor surfaces such as floor, tile and marble.
The product also works when lying flat on the floor, ideal for cleaning the floor surface below the
furniture bottom.
Caution:
Do not use it on fabrics such as carpets or blankets.
Caution:
Do not tip the product forward or shake it vigorously to prevent dirty water from flowing out.
9
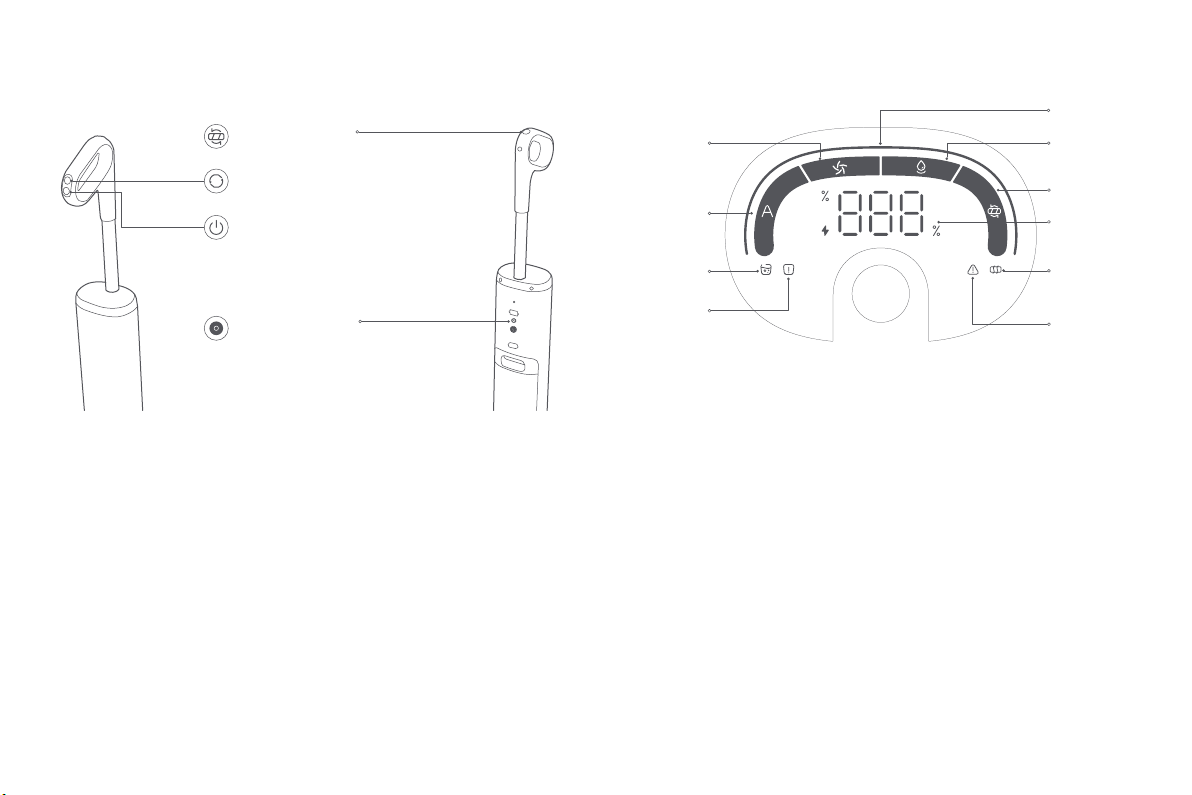
Buttons
Self-cleaning Button:
Press to enable or disable the self-cleaning.
Mode Button:
Press to switch mode during cleaning.
Power Button:
Press to turn on/off the vacuum.
Voice Control Button:
1.Short press this button to turn on/off
the voice alerts or adjust the volume:
Press this button to switch from voice
alerts on (default) - low volume - voice
alerts off cyclically;
2.Press & hold, and then short press this
button to change the language:
Press and hold this button for 3s to
broadcast voice alerts in the current
language, that is, enabling the
language switch. Then, if no operations
are performed within 5s, the current
language will be still used; If you press
the voice control button within 5s, the
language will be switched to the next
one. If you perform no operation within
5s after that, the switched language
will be used, and so on.
Auto Mode
Turbo Mode Suction
Mode
Insufficient
Water in the
Clean Water
Tank
Dirtiness/Error
Indicator
Tangled Roller
Brushbar
Self-cleaning
Mode
Battery Level
Indicator
Common Error
LED Screen
The Dirtiness/Error Indicator indicates the following information:
• Floor dirt detection
Blue (always on) – clean
Red (always on) – dirty
•
• Error status
Red (flashing 5s then stay on) – Fault
For detailed troubleshooting solutions, refer to Page 18 of the User Manual.
Dirty Water
Tank Full
10
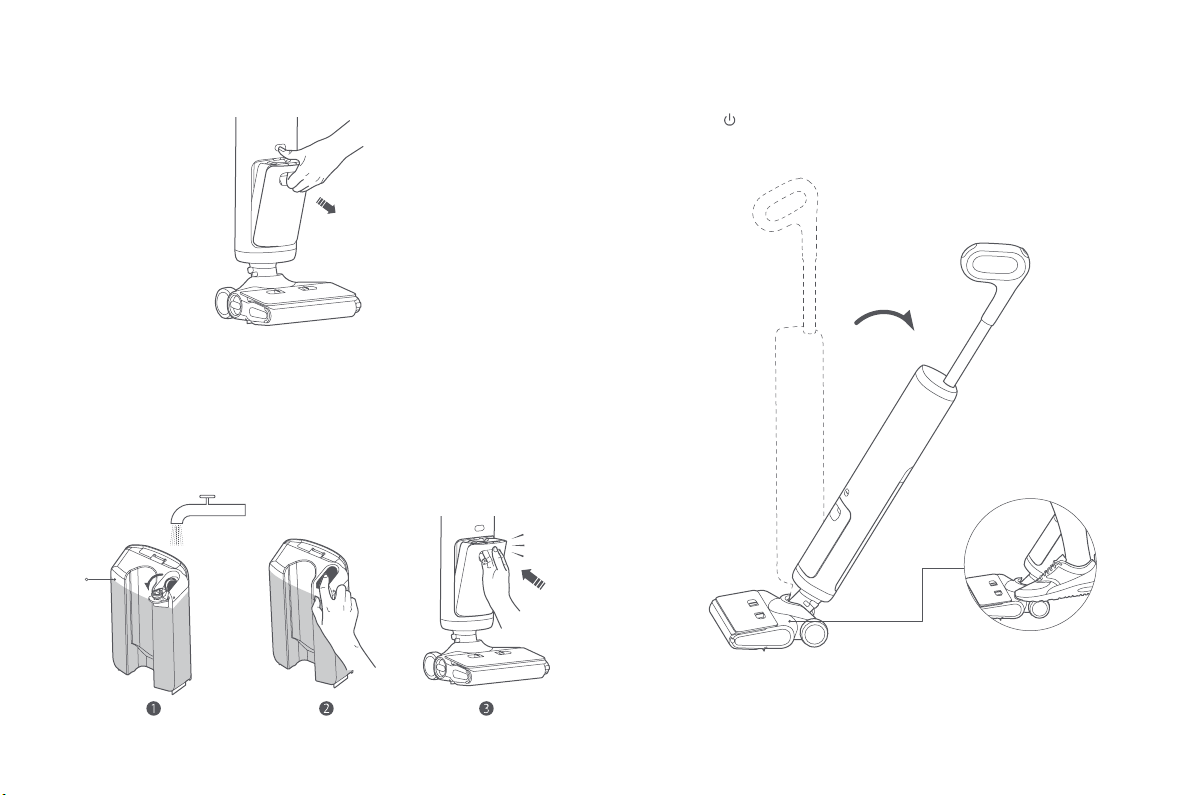
• Remove the vacuum from the self-cleaning charging dock, step on the floor brush with one foot
and pull back the handle to tilt the vacuum.
• Press the button to turn on the vacuum.
How to CleanWater Adding
1. Press the clean water tank release button, and simultaneously pull the tank out.
Click
MAX
2. Open the filling port of the clean water tank, slowly fill it with a proper amount of clean water,
and then close it.
Notes:
• You can also add an appropriate amount of officially designated cleaning solution.
• Do not add hot water, unofficial cleaning solution or disinfectants.
11
Hold the vacuum in the upright position to pause cleaning, or press the button to turn off the
vacuum. To avoid dirty water residues, the vacuum will continue running for a few seconds before
turning off. Place the vacuum back onto the self-cleaning charging dock after it completely stops
working.
When the vacuum is paused in the upright position or turned off, pull the handle backward, and
push the vacuum to the self-cleaning charging dock with the help of wheels. Then you can use the
dock for storage, charging, and self-cleaning.
Switching Modes
“ ” Auto Mode “ ”Turbo Mode “ ” Suction Mode
Daily stains cleaning Stubborn stains cleaning Water stains cleaning (do not
suck up dust)
Press to switch from Auto Mode, Turbo Mode, to Suction Mode.
CAUTION:
Do not rotate the vacuum from side to side while lying it down for cleaning to prevent the floor
brush from tilting up or dirty water from running out.
Stop Cleaning/OFF
Notes:
• Put the vacuum back onto the self-cleaning charging dock properly after using it to prevent the
vacuum from tipping over due to improper placement.
• To prevent dirty water from flowing out, do not vertically uplift the whole main unit (as shown
in the figure below).
12
• When the vacuum is charging and its battery level is equal to or more than 10%, press to
start self-cleaning.
• Press the button or the button to stop self-cleaning.
• Based on how dirty the roller brushbar is, it will take about 2 to 3 minutes for the vacuum to
complete the self-cleaning.
Notes:
• Clean the dirty water tank in time after self-cleaning to prevent odors.
• It is recommended to remove the roller brushbar after self-cleaning and place it in the accessory
container for drying to prevent odors.
• It is recommended to regularly clean parts that cannot be cleaned by self-cleaning, such as the
roller brushbar cover and the parts around the suction port.
Self-cleaning
Note:
The following recommended replacement frequencies are for reference only. Components
should be replaced promptly if damaged.
Care & Maintenance
Maintenance Frequency
Replacement Frequency
Dirty water tank components (including the dirty water tank,
the dust compartment, and the water level sensor) Clean after each use.
Clean when prompted by
relevant voice notification.
1–3 months
Clean once a week, depending
on the dirtiness.
Clean it monthly.
Clean once a week.
Self-cleaning is required after
each use.
Dirty water outlet pipeline (including the dirt
detection sensor)
Water & Air Separator
Floor brush (overall)
Roller Brushbar
Filter
Self-cleaning Charging Dock
Component
Component
Recommended
Maintenance Frequency
Recommended Replacement Frequency
6–12 months
3–6 monthsRoller Brushbar
Filter
CAUTIONS:
• Clean and maintain the relevant components when the vacuum is paused in the upright position
or turned off.
• Move the self-cleaning charging dock away before cleaning the vacuum.
13
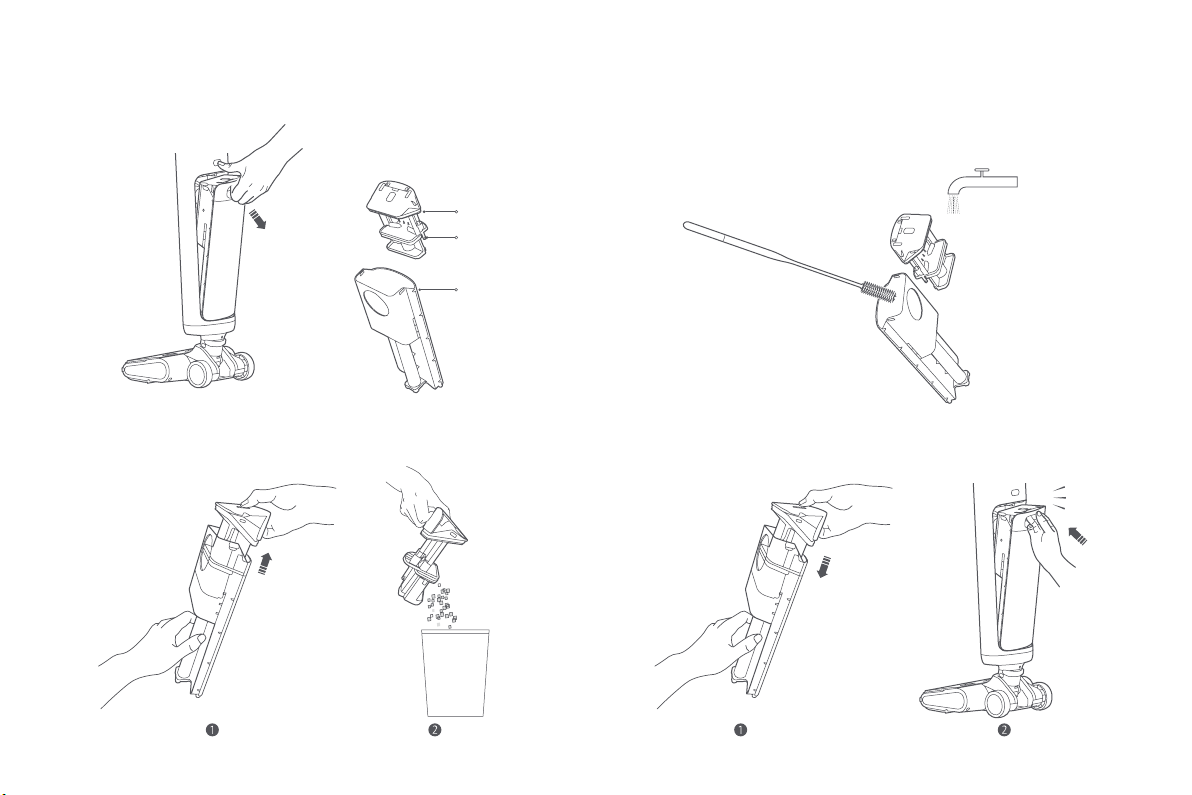
Cleaning the Dirty Water Tank
1. Press the dirty water tank release button, while pulling the tank out.
Solid Waste Bin
Full tank sensor
Dirty Water Tank
2. Hold the bottom of the dirty water tank, while pressing the button on the top of the dirty
water tank. Take out the solid waste bin upward, and empty the solid waste and dirty water
respectively.
4. Install the solid waste bin, then re-install the dirty water tank onto the main unit until you hear a
"click", which indicates it is installed in place.
Click
3. Rinse the dirty water tank and solid waste bin with tap water.
Notes:
• Use the cleaning tool for assist.
• Clean the full tank sensor frequently to avoid adhesive stains from affecting its detection
accuracy.
14
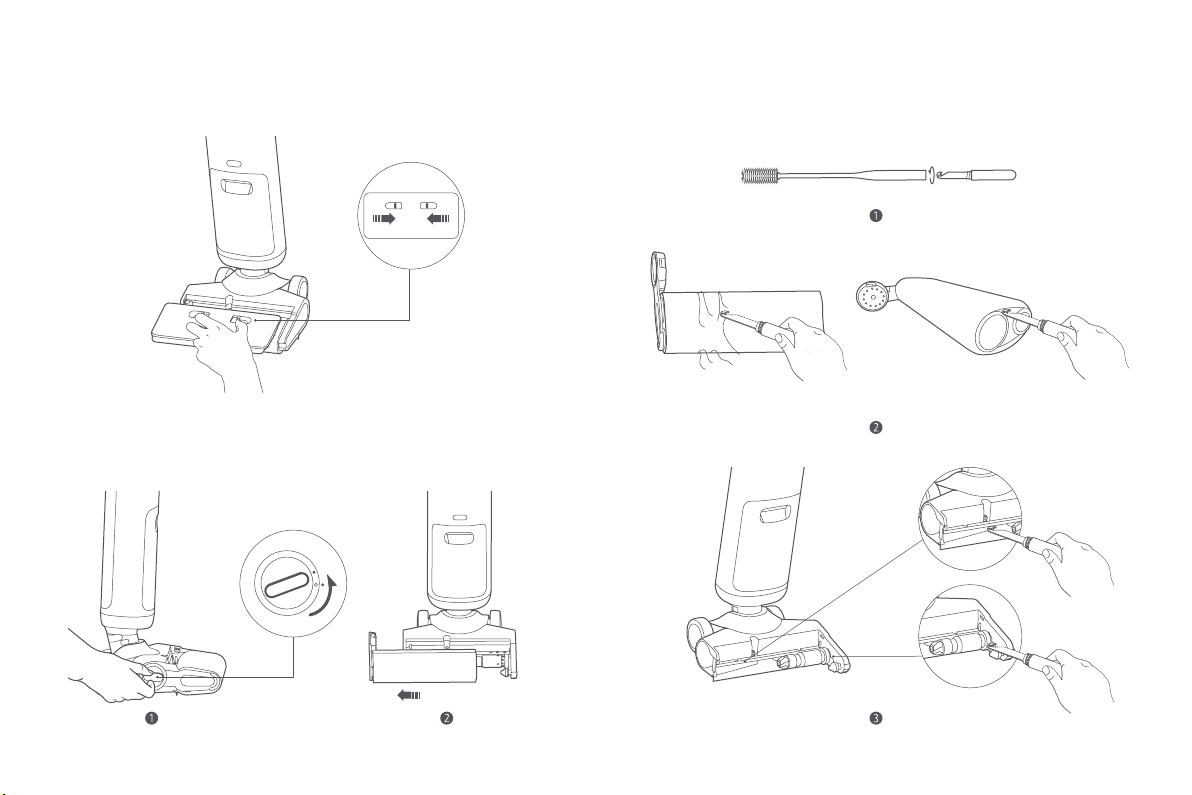
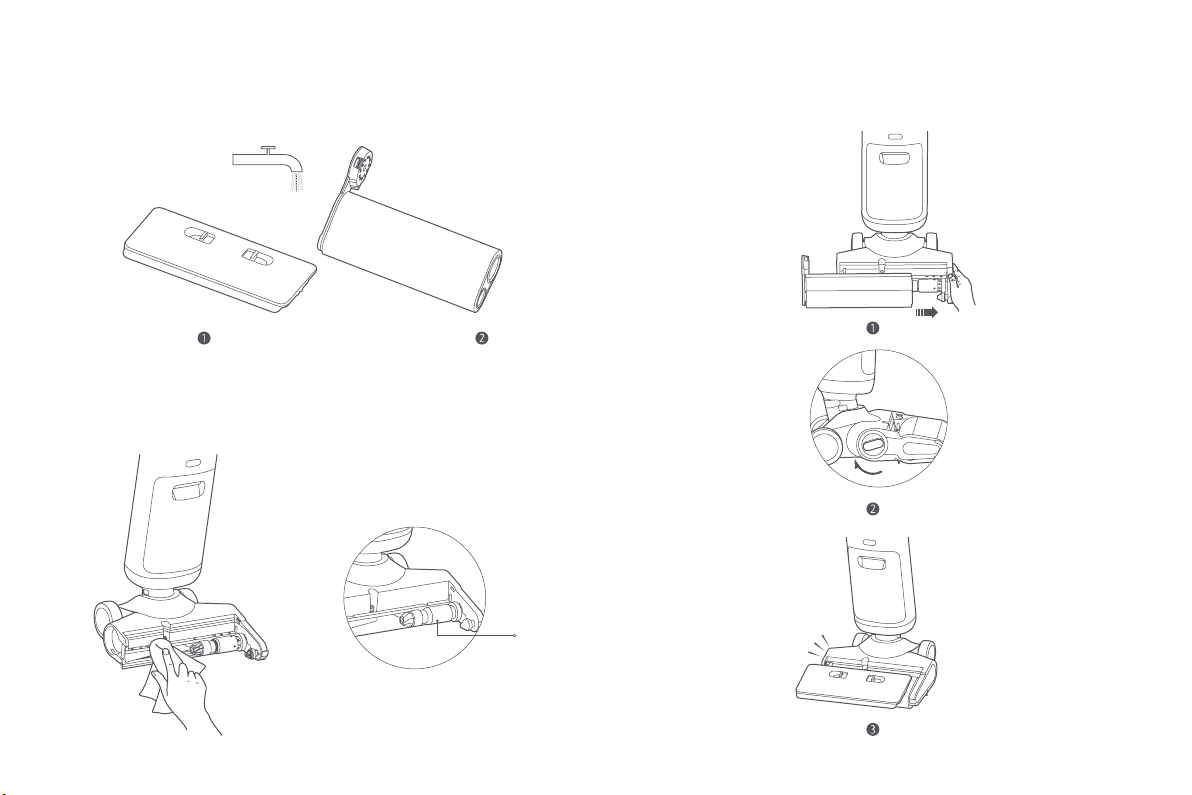
Cleaning the Floor Brush
2. Rotate the brush roll latch counterclockwise to the UNLOCKED position, and pull out the brush
roll.
3. Rotate the handle of the cleaning brush to remove the blade. Use the blade to cut the hair
tangled on the roller brushbar and the floor brush.
1. Press both roller brushbar cover release buttons inward at the same time to remove the roller
brushbar cover.
15
5. Use a dry cloth or paper towel to remove the hair, dirt, and foreign objects blocked at the suction port.
Notes:
• Do not rinse the floor brush directly.
• Do not touch the gearbox right after using the vacuum to avoid scalds.
6. Reinstall the roller brushbar and its cover in order. When reinstalling the roller brushbar cover,
align it with the mounting position, and it is secured in place when you hear a click.
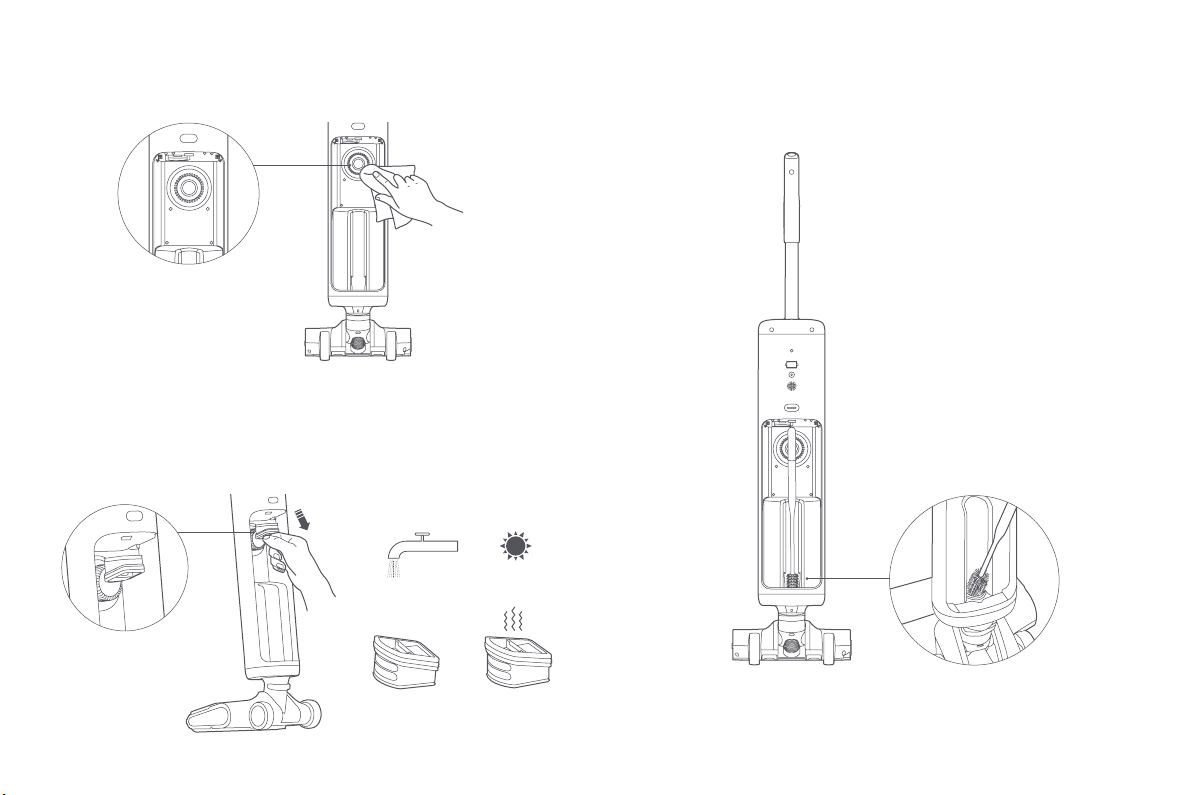
4. Use tap water to rinse the roller brushbar and its cover until they are clean, and then put them in
the accessory container for drying to prevent odors.
Note: Do not expose the roller brushbar to direct sunlight.
Gearbox Click
16
Cleaning the Water & Air Separator
It is normal to find a small amount of dirty water around the water & air separator after removing
the dirty water tank. Please wipe the dirty water away.
Cleaning the Filter
Pull out the filter from the top left corner of the dirty water tank's mounting slot as illustrated.
Rinse the filter clean under tap water, then dry it or put it in the accessory container to dry before
reinstalling to prevent odors.
Cleaning the Dirt Detection Sensor
Take out the dirty water tank, and use the cleaning brush to clean the dirt detection sensor and
the pipeline of the dirty water outlet.
17
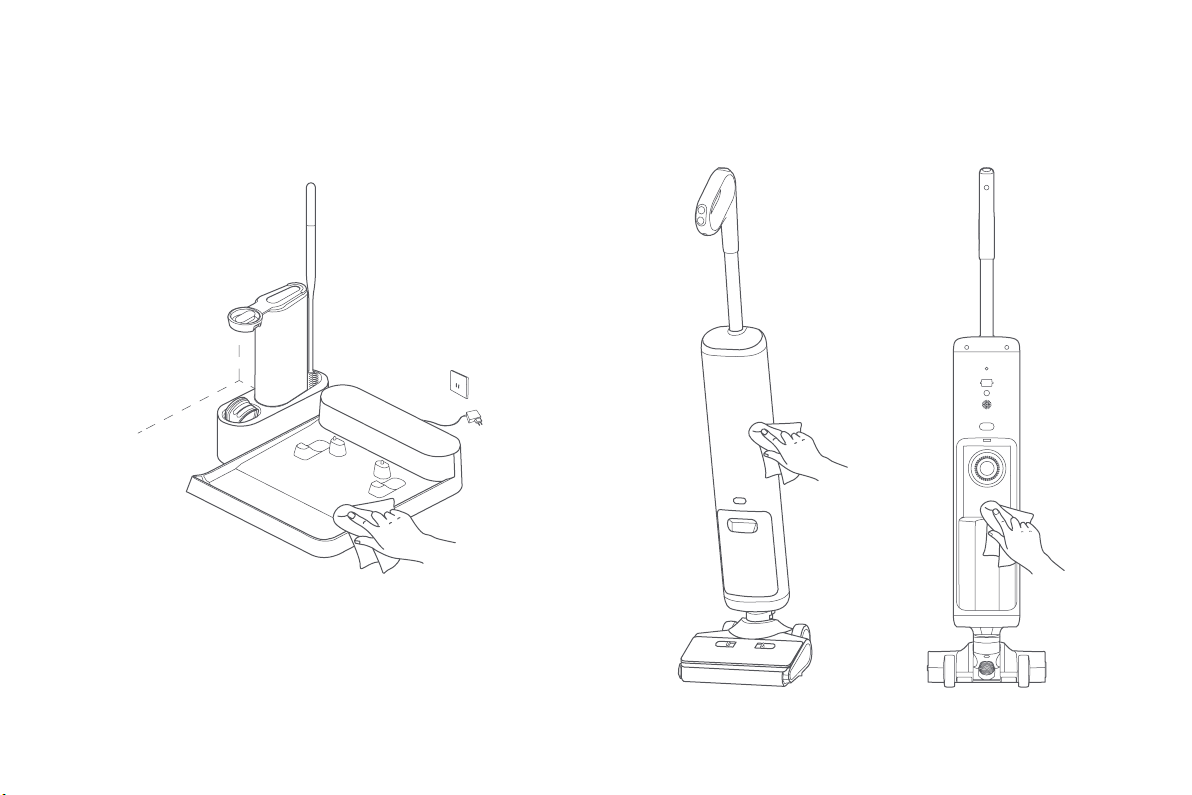
Cleaning the Vacuum
Stand the vacuum upright, and use a dry cloth or paper towel to clean the dust from the vacuum.
Cleaning the Self-cleaning Charging Dock
Disconnect the self-cleaning charging dock from the power supply before cleaning the dock.
Use a dry cloth or paper towel to clean the dust from the self-cleaning charging dock.
Note:
Do not rinse the self-cleaning charging dock directly with water to prevent short circuits.
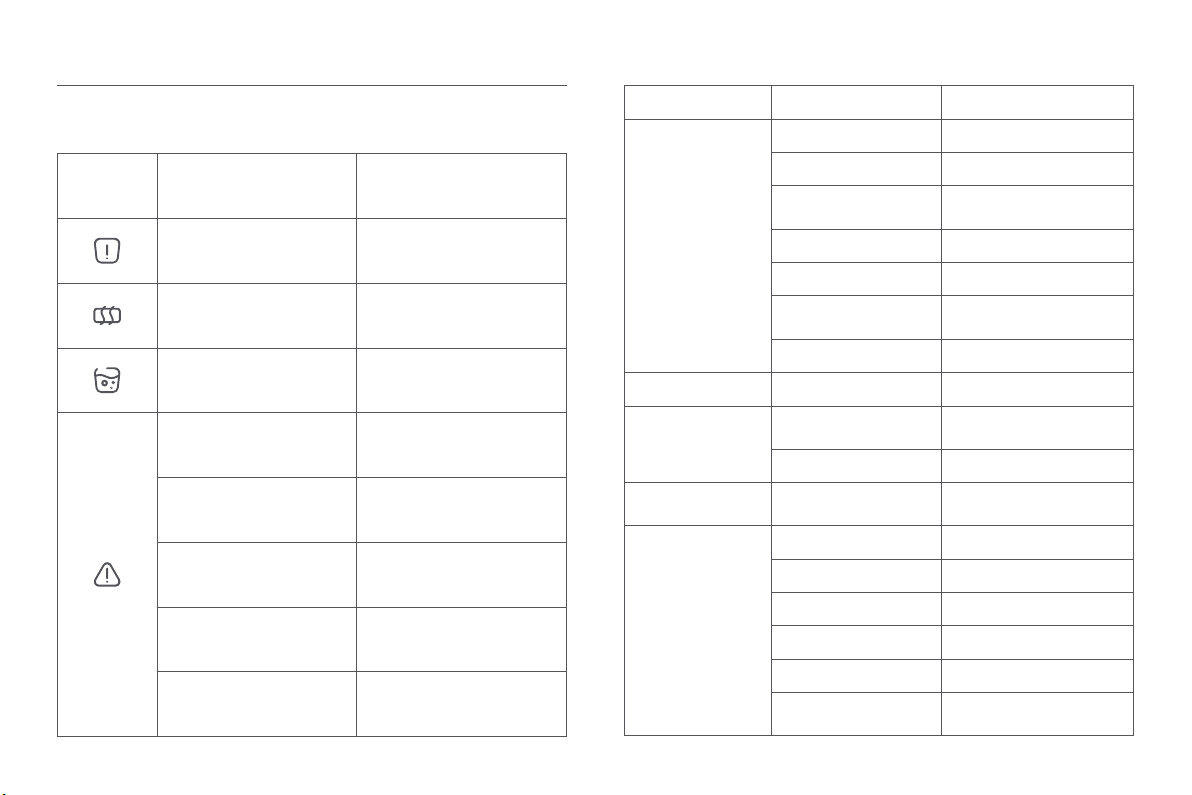
18
Error Icon Voice Notification Solution
The clean water tank is short of
water, please add water.
Add water to the clean water tank
before use.
Please check and clean the
roller brush.
Check whether the brush roll is
entangled or blocked by foreign
objects
Please clean the dirty water
tank.
Clean the dirty water tank and
reinstall it.
Re-install the dirty water tank Please re-install the dirty water
tank correctly
Reinstall the roller brushbar. Reinstall the roller brushbar
properly.
Please clean the pipes and dirty
water tank.
Check whether the suction port of
the floor brush and the pipeline of
the dirty water outlet are blocked,
and clean the dirty water tank.
The sensor is dirty, please clean
the pipeline of the vacuum. Clean the dirt detection sensor.
Fault code Contact the after-sales service
team.
Common Issue Possible Cause Solution
The vacuum does not
work.
The battery is depleted. Fully charge the vacuum before
use.
The battery has overheating
protection.
Try again after the battery
temperature returns to normal.
Clean water tank, dirty water
tank, or roller brushbar is not
installed.
Install the clean water tank/dirty
water tank/brush roll correctly
Full Dirty Water Tank Clean the dirty water tank and
reinstall it.
The clean water tank is out of
water.
Add water to the clean water tank
and reinstall the tank.
The suction port of the floor
brush or the pipeline of the
dirty water outlet is blocked.
Clean the suction port of the floor
brush and the pipeline of the dirty
water outlet.
The roller brushbar is tangled
with foreign objects. Clean the roller brushbar.
Dirty water recycling error
of the main unit The filter is not installed. Install the filter before use.
Unable to charge the main
unit
Self-cleaning charging dock
not powered on
Use the original power supply to
power the self-cleaning charging
dock
The power supply being used
is not original. Use the original power supply.
The vacuum has no voice
notification.
The voice notification is
disabled.
Press and hold the voice button
for three seconds to enable voice
notification.
The vacuum cannot carry
out self-cleaning.
The clean water tank is out of
water.
Add water to the clean water tank
and reinstall the tank.
The clean water tank is not
installed. Reinstall the clean water tank.
The dirty water tank is full. Clean the dirty water tank and
reinstall it.
The dirty water tank is not
installed. Reinstall the dirty water tank.
The battery is low or depleted. Carry out self-cleaning when the
battery level is sufficient.
Self-cleaning charging dock
not powered on
Use the original power supply to
power the self-cleaning charging
dock
Troubleshooting
The display will show an error message or a voice notification will be played when the vacuum is
not working normally, please refer to the table to find the solution. If the error cannot be solved by
the solution, please contact the after-sales service team in time.
Common Issue

19
Warrant Information
The warranty period depends on the laws of the country in which the product is sold, and the
warranty is the responsibility of the seller.
The warranty only covers defects in material or workmanship.
The repairs under warranty may only be carried out by an authorized service center.
When making a claim under the warranty, the original bill of purchase (with purchase date) must
be submitted.
The warranty will not apply in cases of:
i. Failures caused by:
1) Use of a OSOTEK product which is not in accordance with the “Usage Restrictions” in the User
Manual.
2) Use of a OSOTEK product for cleaning white ashes, sand and other non-household garbage.
3) Use of a OSOTEK product for decoration, ornament or cleaning in a commercial environment.
4) Use of a OSOTEK product for cleaning in an environment with special adsorption chemicals,
metal or other microparticles.
5) Use of a OSOTEK product in an environment with corrosive objects.
6) Use of a OSOTEK product in an improper voltage supply environment.
ii. The product you purchased is a prototype, the model or SN of which does not follow the SN
coding rule for a brand-new complete machine.
Please consult us for any unclear terms.
e-mail: [email protected]
Specifications
OSOTEK Horizon Wet Dry Vacuum H200
Name Wet and Dry Vacuum Cleaner Model WSB22E.12
Rated Voltage 21.6 V ⎓Rated Power 200 W
Charging Voltage 26.0 V ⎓Net Weight 5.3 kg
Self-cleaning Charging Dock
Name Charging Dock
Model A022H12CS Rated Input 26.0 V ⎓0.9 A
Rated Output 26.0 V ⎓0.9 A Net Weight 0.6 kg
Power Supply
Manufacturer Zhongshan Baolijin Electronic Co.,
Ltd.
Average Active
Efficiency 87.0%
Model BLJ24WD260090P-V Efficiency at Low Load
(10%) 79.2%
Input 100–240 V ~ 50/60 Hz 0.8 A No-load Power
Consumption 0.10W
Output 26.0 V ⎓0.9 A 23.4 W
Environmental Notice
The lithium-ion battery pack contains substances that are hazardous to the environment.
Before disposing of the vacuum, please first remove the battery pack, then discard, or recycle it
in accordance with local laws and regulations of the country or region it is used in.
CAUTIONS:
•Remove the entire battery pack together, and make sure not to damage the outer casing of the
battery pack to prevent short-circuiting or leakage of harmful substances.
•In the event of a battery leak, avoid contact with the liquid. If the liquid enters the eyes, rinse
with plenty of water and seek medical attention immediately.
•The battery should not be removed by non-professionals. Otherwise, it may lead to a short
circuit or other risks. It is recommended to send the product to the professional after-sales
service team or a government-approved recycling facility for removal.
Steps to Remove the Battery:
1. Use a non-sharp tool to press and hold the handle release button on the back of the vacuum,
and simultaneously pull the handle upwards vertically.
2. Remove the dirty water tank.
3. Unscrew the display assembly to remove it.
4. Remove the rear cover of the vacuum by unscrewing the bottom cover, the front cover, and the
rear cover of the vacuum.
5. Unscrew the battery pack assembly to remove it.
6. Unscrew the top and bottom covers of the battery pack assembly and remove the top cover.
7. Unscrew the battery pack assembly, and unplug the battery pack to remove it.
Table of contents
Languages:
Other OSOTEK Vacuum Cleaner manuals


