OTC DAIHEN EUROPE Almega AX Series User manual
No. 1L22440-E-7
A
X
series
INSTRUCTIONMANUAL
WELDING INTERFACE
(DIGITAL)
■Read and follow these instructions and all safety blocks carefully.
■Have only trained and qualified persons install, operate, or service this unit.
■Give this manual to the operator.
■For help, call your distributor.

Be Sure to Read Instruction Manuals Before Use
Thank you for selecting DAIHEN arc welding robot Almega series.
Almega series are the robots with high performance and various functions developed by making full use of the
latest technology. Since the knowledge of welding peculiar to a welding machine maker is applied to both
hardware and software, we are sure that each user can be fully satisfied.
In order to use the superior performance and the abundant functions safely and fully, be sure to read the
following instruction manuals including this manual and other attached documents, and understand the
knowledge of the machines, safety information, and notes thoroughly.
Instruction manuals related to the manipulator, and the robot control unit are as follows.
■AX series Standard Manuals
Instruction Manual Type Instruction
Manual No. Main Contents
INSTALLATION
1L8800A Safety precautions, installing & connecting method,
starting up, periodical inspection, solution at the time
of failure
CONTROLLER MAINTENANCE/
STANDARD CONFIGURATIONS
1L8800B Specifications of controller, explanation of each parts
and maintenance, parts list, etc.
MANIPULATOR
(
AX-MV4AP/ MV6/ MV6L/ MV16/ MG3/ MH3/ MS3
)
1L7700A
MANIPULATOR (AX-MV50) 1L7721A
MANIPULATOR (AX-MV133, MV166) 1L7722A
MANIPULATOR (AX-MV160) 1L7723A
Specifications or maintenance of manipulator, parts
list, etc.
BASIC OPERATIONS
1L8800C Explanation of manual operation, teaching, automatic
operation, file utilities, backing-up data, basic
operations of Arc/Spot welding application, etc.
REFERENCE (Built-in Tutorial)
1L8800D
Basic operations, terms, explanations of
Constants/Service menus, Details of function
command, list of short-cut code, parts replacing
procedure, trouble shooting, etc.
※This manual is not provided as the paper manual,
but is built in the robot as Help tutorial function.
EXTERNAL INPUT/OUTPUT
1L8800H Interfacing method with external control device, list of
I/O signals, start/halt the automatic operation, and
usage of software PLC, etc.
CONTROLLER MAINTENANCE
ADDENDUM
(for AXCLN1/ AXCLL1)
1L9440B
Measures for safety, transportation, installation, and
connection
Controller's specification, maintenance for each parts,
part list and others
■AX series Application Manuals
Instruction Manual Type Instruction
Manual No. Main Contents
APPLICATION MANUAL
(ARC WELDING) 1L8800F Basic settings, functions for arc welding, teaching
technic, etc.
APPLICATION MANUAL
(HANDLING) 1L8800G Basic settings, functions for handling, teaching
technic, etc.
APPLICATION MANUAL
(SPOT WELDING) 1L8800E Basic settings, functions for spot welding, teaching
technic, etc.
- 1 -

- 2 -
Instruction manuals are available other than the above for each optional function that you have purchased.
[Notes] 1. Specifications and information contained in these manuals are subject to change at any time without notice.
2. Optional hardware or software is necessary in order to use the function described as “Optional” in the manual.
3. The screen display of a teach pendant shown in the manual are described as examples, which may be different from the actual
ones.
4. Although we cautiously compiled this standard specifications to eliminate as much error as possible, we do not take any
responsibility for damages resulting from neither direct nor indirect errors.
5. The manual is a part of robot products. When transferring or selling off a robot, be sure to append the manual.
6. No part of this manual may be reproduced without permission.
7. Prohibited altering or remodeling
-Do not alter or remodel our products.
-You may get injured or have your equipment damaged because of fire, failure or malfunction caused by altering or
remodeling the product.
The warranty does not cover any altered or remodeled products.

Notice
Notes on Safety
Before installation, operation, be sure to read "Chapter 1 Points on Safety" in INSTALLATION manual and other
attached documents thoroughly and acquire all the knowledge of machines, safety information, and precautions.
Furthermore, before maintenance, inspection, and trouble scene, be sure to read CONTROLLER
MAINTENANCE manual and MANIPULATOR manual and other attached documents thoroughly and acquire all
the knowledge of machines, safety information, and precautions.
If operating machines in a wrong way, the accident resulting in various ranks of injury or death, or damage may
occur.
In order to call attention to wrong handling, the following four ranks of safety notes (“DANGER”, “WARNING”,
“CAUTION”, and “IMPORTANT”) are provided.
DANGER
Cases where a mistake made in handling is likely to cause the user to be exposed to
the danger of death or serious injury and where the degree of the urgency
(imminence) of the warning given for the danger to occur is at the high end of the
scale (including high-level danger).
- 3 -
WARNING
Cases where a mistake made in handling is likely to cause the user to be exposed to
the danger of death or serious injury.
CAUTION
Cases where a mistake made in handling is likely to cause the user to be exposed to
the danger of minor injuries or of property damage only.
The following symbol is also used for particularly important checkpoints:
IMPORTANT
This is a particularly important checkpoint.
Note that even the matters which are described as CAUTION can result in serious accident depending on the conditions.
Be sure to keep the safety notes since they describe very important matters.
The meanings of “Serious injury”, “Minor injury”, and “Damage” described above are as follows.
Serious injury :Injury which has the aftereffect by loss of eyesight, an injury, the burn (high/low
temperature), an electric shock, fracture, poisoning, etc. and that which requires
hospitalization and long-term treatment as an outpatient.
Minor injury : Injury which does not require either hospitalization or long-term treatment as an outpatient,
a burn (high temperature, low temperature), and an electric shock.
Damage : Direct and indirect damage in connection with damage of property and equipment.

Table of Contents
Table of Contents
Chapter 1 Introduction
1.1 Welding Interface (Digital).........................................................................................................................1-1
1.2 Main specifications....................................................................................................................................1-2
1.2.1 Hardware specifications.................................................................................................................1-2
1.2.2 Connectable robot controllers........................................................................................................1-2
1.2.3 Connectable welding power sources .............................................................................................1-2
1.2.4 Available functions..........................................................................................................................1-4
1.2.5 “Welding Interface (Digital) Setup” tool ..........................................................................................1-5
1.2.6 External view..................................................................................................................................1-6
1.3 Standard configuration..............................................................................................................................1-7
1.3.1 Components of Robot controller/Welding power source Peripherals............................................1-7
1.4 Welding mode lists....................................................................................................................................1-9
1.4.1 Welding mode list of Welbee Inverter M350L ................................................................................1-9
1.4.2 Welding mode list of Welbee Inverter M350 ................................................................................1-10
1.4.3 Welding mode list of Welbee Inverter M500 ................................................................................1-12
1.4.4 Welding mode list of Welbee Inverter P350.................................................................................1-13
1.4.5 Welding mode list of Welbee Inverter P500L...............................................................................1-16
Chapter 2 Connections
2.1 Connect Welding Interface (Digital)..........................................................................................................2-1
2.1.1 Installation of the Welding Interface (Digital) Board.......................................................................2-1
2.1.2 Connection of Control cable 5 (Robot controller side)...................................................................2-3
2.1.3 Connection of Control cable 5 (Welding power source side).........................................................2-4
2.1.4 Connection of Control cable 4........................................................................................................2-5
2.1.5 Connection of Workpiece side welding cable / Torch side welding cable......................................2-5
2.1.6 Connection of Gas hose.................................................................................................................2-5
2.1.7 Connection of Voltage detecting cable (workpiece side) (for WB-M350L/WB-P500L)..................2-6
2.2 Electrical connection diagram...................................................................................................................2-8
Chapter 3 Configurations
3.1 Workflow....................................................................................................................................................3-1
3.2 Configuration preparations........................................................................................................................3-3
3.2.1 "Welding Interface (Digital) Setup" tool preparations.....................................................................3-3
3.2.2 USB memory preparations.............................................................................................................3-3
3.3 Configuring the robot controller.................................................................................................................3-4
3.3.1 Registering the welding power source...........................................................................................3-4
3.3.2 Register the welding mode.............................................................................................................3-5
3.3.3 Creating a backup..........................................................................................................................3-7
3.4 Creating the setup data.............................................................................................................................3-9
3.4.1 Configuring the setup tool ..............................................................................................................3-9
3.4.2 Configuring the welding mode for the Welbee Inverter series welding power source.................3-12
3.5 Writing the setup data.............................................................................................................................3-14

Table of Contents
3.5.1 Writing the setup data onto the robot controller...........................................................................3-14
3.5.2 Writing the setup data onto Welding Interface (Digital)................................................................3-16
3.6 Check the configuration..........................................................................................................................3-17
3.7 Configuring the Welbee Inverter series welding power source ..............................................................3-18
3.7.1 The welding power source operations when a robot is connected..............................................3-18
3.7.2 The welding power source internal functions when a robot is connected ...................................3-19
3.8 Welding conditions of WB-M350L...........................................................................................................3-20
3.8.1 About the welding condition parameters......................................................................................3-20
3.8.2 Points for setting the conditions ...................................................................................................3-21
3.8.3 How the spatter adjustment parameter (APCS cond.) is used ....................................................3-22
3.8.4 About the welding constants.........................................................................................................3-24
3.9 Welding conditions of WB-M350/500......................................................................................................3-25
3.9.1 About the welding condition parameters......................................................................................3-25
3.9.2 Points for setting the conditions ...................................................................................................3-26
3.9.3 About the welding constants.........................................................................................................3-27
3.10 Welding conditions of WB-P350 ...........................................................................................................3-28
3.10.1 About the welding condition parameters....................................................................................3-28
3.10.2 Points for setting the conditions.................................................................................................3-29
3.10.3 To adjust the pulse conditions....................................................................................................3-30
3.10.4 Waveform control with DC wave pulsed welding.......................................................................3-31
3.10.5 About the welding constants.......................................................................................................3-32
3.10.6 Settgins on the Welding Power Source Side .............................................................................3-33
3.11 Welding conditions of WB-P500L..........................................................................................................3-35
3.11.1 About the welding condition parameters ....................................................................................3-35
3.11.2 Points for setting the conditions..................................................................................................3-36
3.11.3 How the spatter adjustment parameter (APCS cond.) is used...................................................3-38
3.11.4 To adjust the pulse conditions ....................................................................................................3-39
3.11.5 Waveform control with DC wave pulsed welding .......................................................................3-41
3.11.6 About the welding constants.......................................................................................................3-42
3.11.7 Settgins on the Welding Power Source Side..............................................................................3-43
Chapter 4 Maintenance
4.1 Displaying the Welding Interface (Digital) version....................................................................................4-1
4.2 List of Welding Interface (Digital) error codes...........................................................................................4-2
4.3 Errors of Welbee Inverter series welding power source...........................................................................4-4
4.3.1 Error code list.................................................................................................................................4-4
4.3.2 How to reset an error indication.....................................................................................................4-6
4.4 Notes on Scope of Warranty and Liability.................................................................................................4-7
4.4.1 The product for a warranty target...................................................................................................4-7
4.4.2 Warranty period..............................................................................................................................4-7
4.4.3 Disclaimer.......................................................................................................................................4-7
4.4.4 Limitation of liability ........................................................................................................................4-7
4.4.5 Service in Warranty Period.............................................................................................................4-8

Chapter 1 Introduction
This chapter provides a general description of Welding Interface (Digital).
1.1 Welding Interface (Digital)...........................................................................1-1
1.2 Main specifications .....................................................................................1-2
1.2.1 Hardware specifications ........................................................................1-2
1.2.2 Connectable robot controllers ...............................................................1-2
1.2.3 Connectable welding power sources ....................................................1-2
1.2.4 Available functions ................................................................................1-4
1.2.5 “Welding Interface (Digital) Setup” tool .................................................1-5
1.2.6 External view.........................................................................................1-6
1.3 Standard configuration ................................................................................1-7
1.3.1 Components of Robot controller/Welding power source Peripherals ....1-7
1.4 Welding mode lists......................................................................................1-9
1.4.1 Welding mode list of Welbee Inverter M350L........................................1-9
1.4.2 Welding mode list of Welbee Inverter M350........................................1-10
1.4.3 Welding mode list of Welbee Inverter M500........................................1-12
1.4.4 Welding mode list of Welbee Inverter P350 ........................................1-13
1.4.5 Welding mode list of Welbee Inverter P500L ......................................1-16


1.1 Welding Interface (Digital)
1-1
1.1 Welding Interface (Digital)
When "Welding Interface (Digital)" is used, the latest Welbee Inverter series welding power source can be
connected to an AXC controller using digital communication. Compared to Welding Interface (AXWF-10**) that is
connected using analog signals, many more welding parameters that are available in the Welbee Inverter series
welding power source can be controlled by the robot controller. Also, various useful functions are available, such
as the real-time monitoring of the welding current and voltage during welding.
When the interface is used, D series welding power sources shown in Table 1.2.3 that are connected to the AXC
controller can be easily replaced with Welbee Inverter series welding power sources. In this case, you only need
to adjust the welding conditions. You can continue using the existing programs and welding condition file.
Connect the Welbee Inverter series weldin
g
power source to the AXC controller
A
XC Welbee Inverter series
W
elding
Interface
(Digital)
Di
g
ital communication D series
Replace
Figure 1.1.1 Overview of Welding Interface (Digital)

1.2 Main specifications
1-2
1.2 Main specifications
The interface is installed inside the AXC controller. The main specifications are as follows.
1.2.1 Hardware specifications
Table 1.2.1 Hardware specifications
Item Specification
Product name Welding Interface (Digital)
Part number L22440A00
Input power supply (rated
voltage) DC24V ± 10%
Permissible operating
temperature range 0 to 60℃, 20 to 80% RH (no condensation)
Permissible storage
temperature range -30 to 70℃, 10 to 90% RH (no condensation)
Communication interface CAN, 2ch
USB port
1 port
For USB memory (settings, maintenance)
*Operation is not guaranteed to work with a commercially
available USB memory.
Use the USB memory (parts number L21700U00)
recommended by OTC.
1.2.2 Connectable robot controllers
The interface can be connected to an AXC controller. It cannot be used with robot controllers
other than AXC robot controllers.
1.2.3 Connectable welding power sources
When the interface is used, the Welbee Inverter series welding power sources shown in Table
1.2.2 can be connected to the AXC controller. Up to 4 Welbee Inverter series welding power
sources can be connected to the interface. These welding power sources are used by registering
them in f5 <Arc Constant> - [1 Registration of welder] on the AXC controller as the welding power
sources shown in "Configuration on the robot controller" in Table 1.2.2.
IMPORTANT
Control software that supports the interface must be installed on the Welbee
Inverter series welding power source that is connected to the interface. To
confirm whether your welding power source is supported by the interface,
check the software version of the welding power source, and then contact
OTC’s Service.
You can check the software version of the welding power source on the front
panel.
For details, see the instruction manual of your welding power source.
D series welding power sources and Welbee Inverter series welding power
sources cannot be used at the same time.

1.2 Main specifications
1-3
Table 1.2.2 Connectable welding power sources
Configuration on the robot
controller
Connectable welding power sources
W.P.S. Area
Welbee Inverter M350L (specifications for Japan)
Welbee Inverter M350L (specifications for CCC)
Welbee Inverter M350L (specifications for Asia)
DL *1 Japan
Welbee Inverter M350 (specifications for Japan)
Welbee Inverter M350 (specifications for CCC)
Welbee Inverter M350 (specifications for Asia)
DR *2 Japan
Welbee Inverter M500 (specifications for Japan)
Welbee Inverter M500 (specifications for Asia) DM *3 Japan
Welbee Inverter P350 (specifications for Japan) DP *4 Japan
Welbee Inverter P500L (specifications for Japan) DPR *5 Japan
*1 You can also use when set to DL or DL (S-2).
*2 Only when replacing an existing DM or DM(S-2) with the Welbee Inverter series, continue
using DM or DM(S-2)
*3 You can also use when set to DM or DM(S-2).
*4 Apply the welding characteristic data for a rated current 350A when WB-P350 is in
connection.
*5 Continue using DP as is only when the existing DP-500 is replaced with WB-P500L. Also,
when using WB-P500L, a rated current 500A for WB-P500L is available at the maximum
even if it is registered as DPR in the robot controller.
POINT
Welbee Inverter series welding power sources connected using the interface are
handled by the AXC controller as the D series welding power sources shown in
"Configuration on the robot controller" in Table 1.2.2 for operations and teaching.
If you replace an existing D series welding power source connected to the AXC controller with a
Welbee Inverter series welding power source as shown in Table 1.2.3, you can continue to use
the existing programs and welding condition file (however, you need to adjust the welding
conditions).
To replace using Welding Interface (AXWF-10**), you need to re-teach the arc start/end functions
(AS/AE functions) (delete and re-teach the AS/AE functions), and re-create the welding condition
file.
Table 1.2.3 Replacing the D series with the Welbee Inverter series
Welding power source before replacement Welding power source after
replacement
Welding power source Area Welding power source Area
DM350 Japan
DM350(S-2) Japan Japan
DM350 Asia
Welbee Inverter M350
Asia
Japan Japan
DM500 Asia Welbee Inverter M500 Asia
DR350 Japan Welbee Inverter M350 Japan
DL350 Japan
DL350 (S-2) Japan Welbee Inverter M350L Japan
DP350 Japan Welbee Inverter P350 Japan
DP400R Japan
DP500 Japan
Welbee Inverter P500L Japan

1.2 Main specifications
1-4
1.2.4 Available functions
Table 1.2.4 shows the functions related to welding that are available when a Welbee Inverter
series welding power source is connected to the AXC controller using the interface.
Table 1.2.4 Available welding related functions
Item Availability
Welding condition setting ○*1
TP arc monitor ○
Online changes ○
Arc monitor signal output ○
Arc retry ○
Check welding ○
User check function ○
Welding condition database ○
Welding section batch shift ○
AS function with V variable specification
(ASV, ASMV) ○
Welding characteristic data automatic
adjustment ×
Standard
functions
Arc restart ×
PC arc monitor ○
Twin synchro welding ○
Arc sensor ○
Multi-pass welding ○
Welding mode option ×
Synchro MIG/FC-MIG ×
Servo torch ×
RS control ×
Robot RS control ×
Stitch pulse welding ×
Optional
functions
Gas Saver GFC ×
○: Available
×: Not available
*1: The items that can be set as welding conditions vary depending on the combination of
the Welbee Inverter welding power sources to be connected and the welding power
sources registered in the robot controller. For details, see "Chapter 3 Configurations".
IMPORTANT
Even when a function is shown as available in the table above, it cannot be
used if the function is not supported by the connected Welbee Inverter
welding power source.
Functions not shown in the table above cannot be used.
1.2 Main specifications
1-5
1.2.5 “Welding Interface (Digital) Setup” tool
To use Welding Interface (Digital), you must configure the interface settings on your computer
using the "Welding Interface (Digital) Setup" tool. For details, see "Chapter 3 Configurations".
To use this software, your system environment must comply with Table 1.2.5.
Table 1.2.5 System Requirements
Item Specifications
Operating System (Note 1) Windows XP, Windows 7(32bit)
Model IBM PC/AT compatible PC
CPU Pentium III or higher processor (Pentium III 1 GHz or higher
is recommended)
Memory 256 MB or more
Hard disk More than 5 MB of available hard-disk space
Disc unit CD-ROM drive is mounted.
Personal
Computer
USB port (Note 2) One or more
Display 1024 768 dots or more
Required 64 MB or more
USB memory (Note 2) Recommended USB memory (1GB) for external storage:
L21700U00
Required 64 MB or more
CF card
(Required for obtaining the backup data) Recommended External storage CF (256 MB) for AXC:
L9742U00
CF card reader One or more (required for reading the backup data)
(Note 1) The product of our company develops and sells English version and Japanese version Windows as
operation guarantee target OS. Please acknowledge not guaranteeing operation on other language
versions Windows.
(Note 2) For this interface, USB memory is required when writing the setup data onto the Welding Interface
(Digital) board.
1.2 Main specifications
1-6
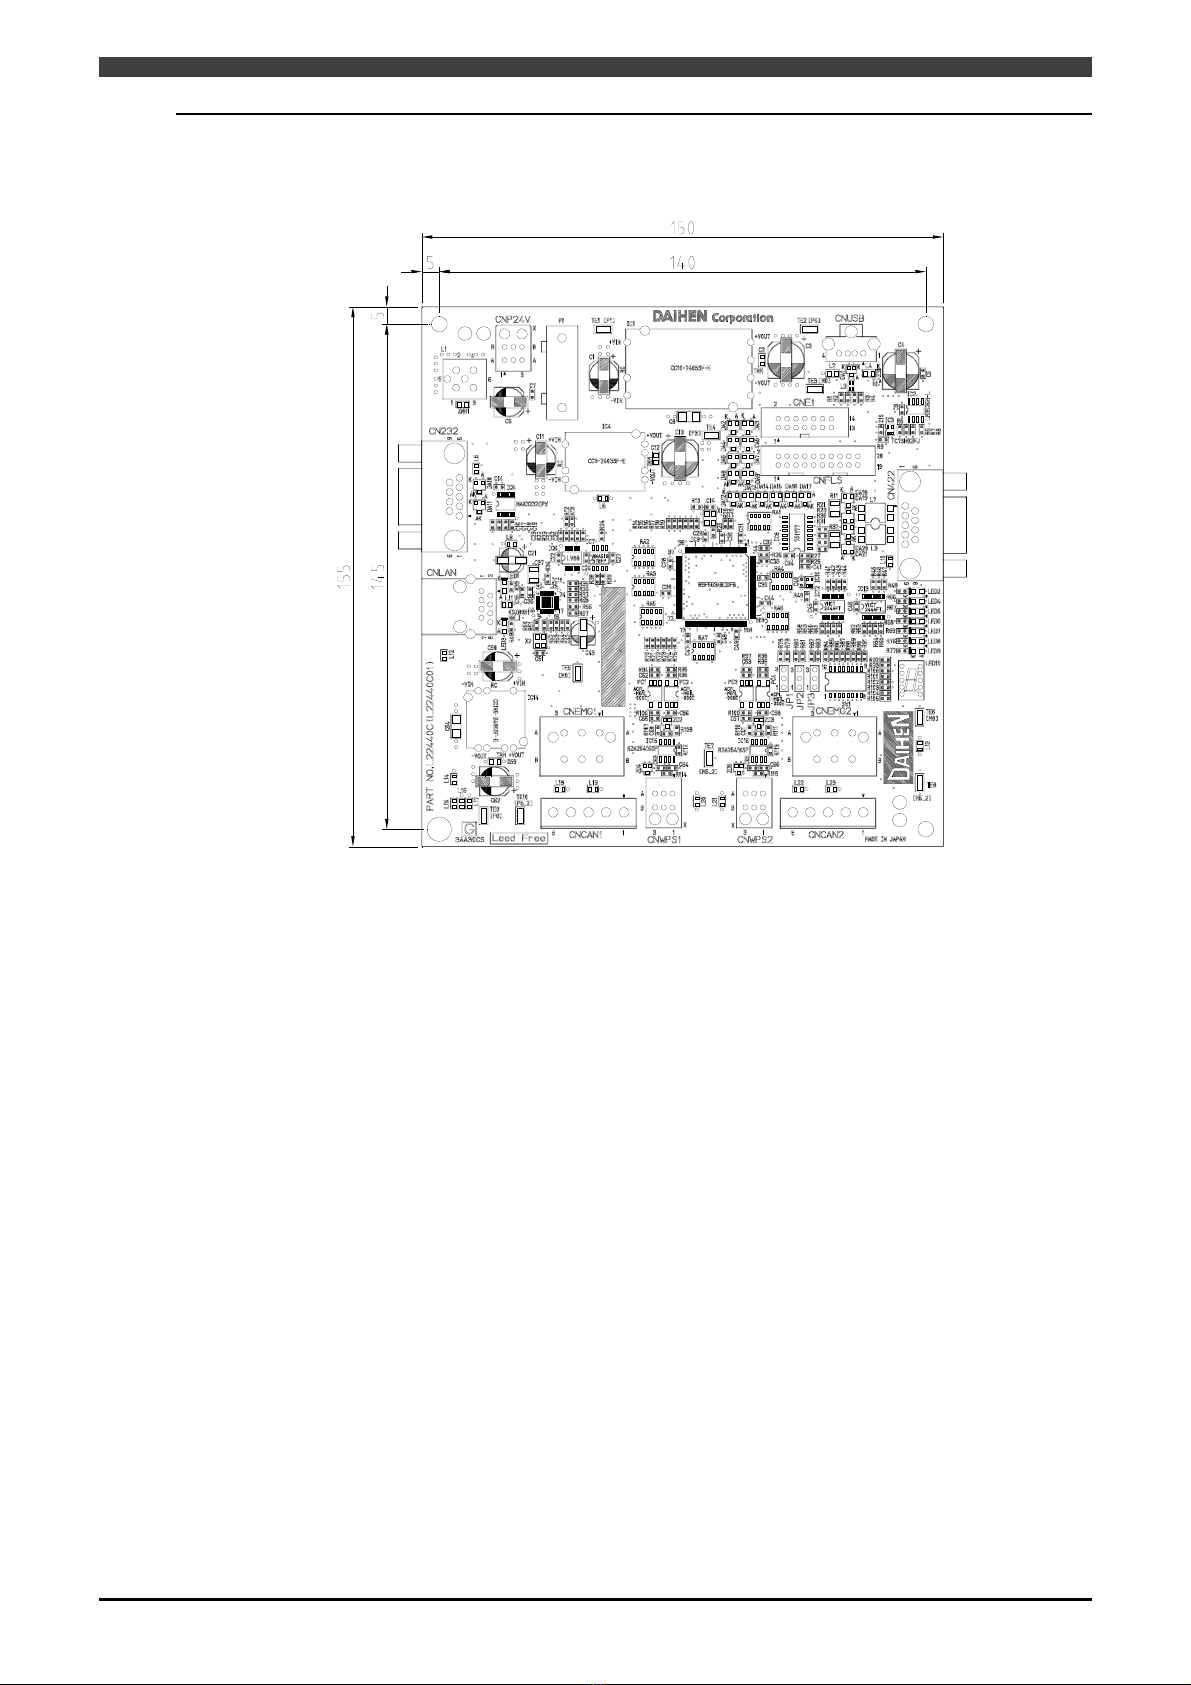
1.2.6 External view
Install the Welding Interface (Digital) board (Figure 1.2.1) inside the robot controller. For details on
the installation method, see "Chapter 2 Connections".
Unit(mm)
Figure 1.2.1 External view of Welding Interface (Digital) board

1.3 Standard configuration
1-7
1.3 Standard configuration
This section describes the standard configuration for a system that performs robot welding using Welding
Interface (Digital). For details on the basic configuration for the AX series and the optional products, see the AX
series instruction manual "Controller Maintenance Manual".
1.3.1 Components of Robot controller/Welding power source Peripherals
Table 1.3.1 Configuration
Ref.
No. Parts Name Model Type /
Part number Specifications
Welding Interface (Digital) L22440A00 Refer to Table 1.2.1
Welding Interface
(Digital) board L22440C00 Installed inside the robot controller
Fuse (F1)
2171.25MXP
(Parts number:
100-1742)
Rated 250V - 1.25A, UL, CSA, CCC certified product
Communication cable L22440E00 between Storage board and Welding Interface (Digital)
board
(1)
Power cable L22440J00 for power supply 24V
#
1 :
WB-M350
MV4AP, MV4LAP, MV6, MV6L, MV16, MG3
2 :
WB-M350
MH3, MS3
4 :
WB-M500/ WB-P500L※
MV4AP, MV4LAP, MV6, MV6L, MV16, MG3
5 :
WB-M500 / WB-P500L※
MH3, MS3
6 :
WB-M350L
MV4AP, MV4LAP, MV6, MV6L, MV16, MG3
7 :
WB-M350L
MH3, MS3
D:WB-P500L
MV4AP, MV4LAP, MV6, MV6L, MV16, MG3
E:WB-P500L
MH3, MS3
05 : Cable length 5m
10 : Cable length 10m
(2) Cable and hose AXRB-4#**
**
15 : Cable length 15m
05 : Cable length 5m
for Welbee Inverter
10 : Cable length 10m
for Welbee Inverter
(3) Control cable 5 A2RB-52**
**
15 : Cable length 15m
for Welbee Inverter
- Voltage detecting cable
(workpiece side) L9509B00(5m) L9509C00(10m), L9509D00(15m) for WB-M350L
※: When used for aluminum welding.

1.3 Standard configuration
AX-C
Welding Interface (Digital)
Control cable 5
Figure 1.3.1 Components for Peripherals of Robot controller and Welding power source
1-8

1.4 Welding mode lists
1-9
1.4 Welding mode lists
The welding modes shown below can be used with a Welbee Inverter series welding power source that is
connected to the robot controller using the interface.
1.4.1 Welding mode list of Welbee Inverter M350L
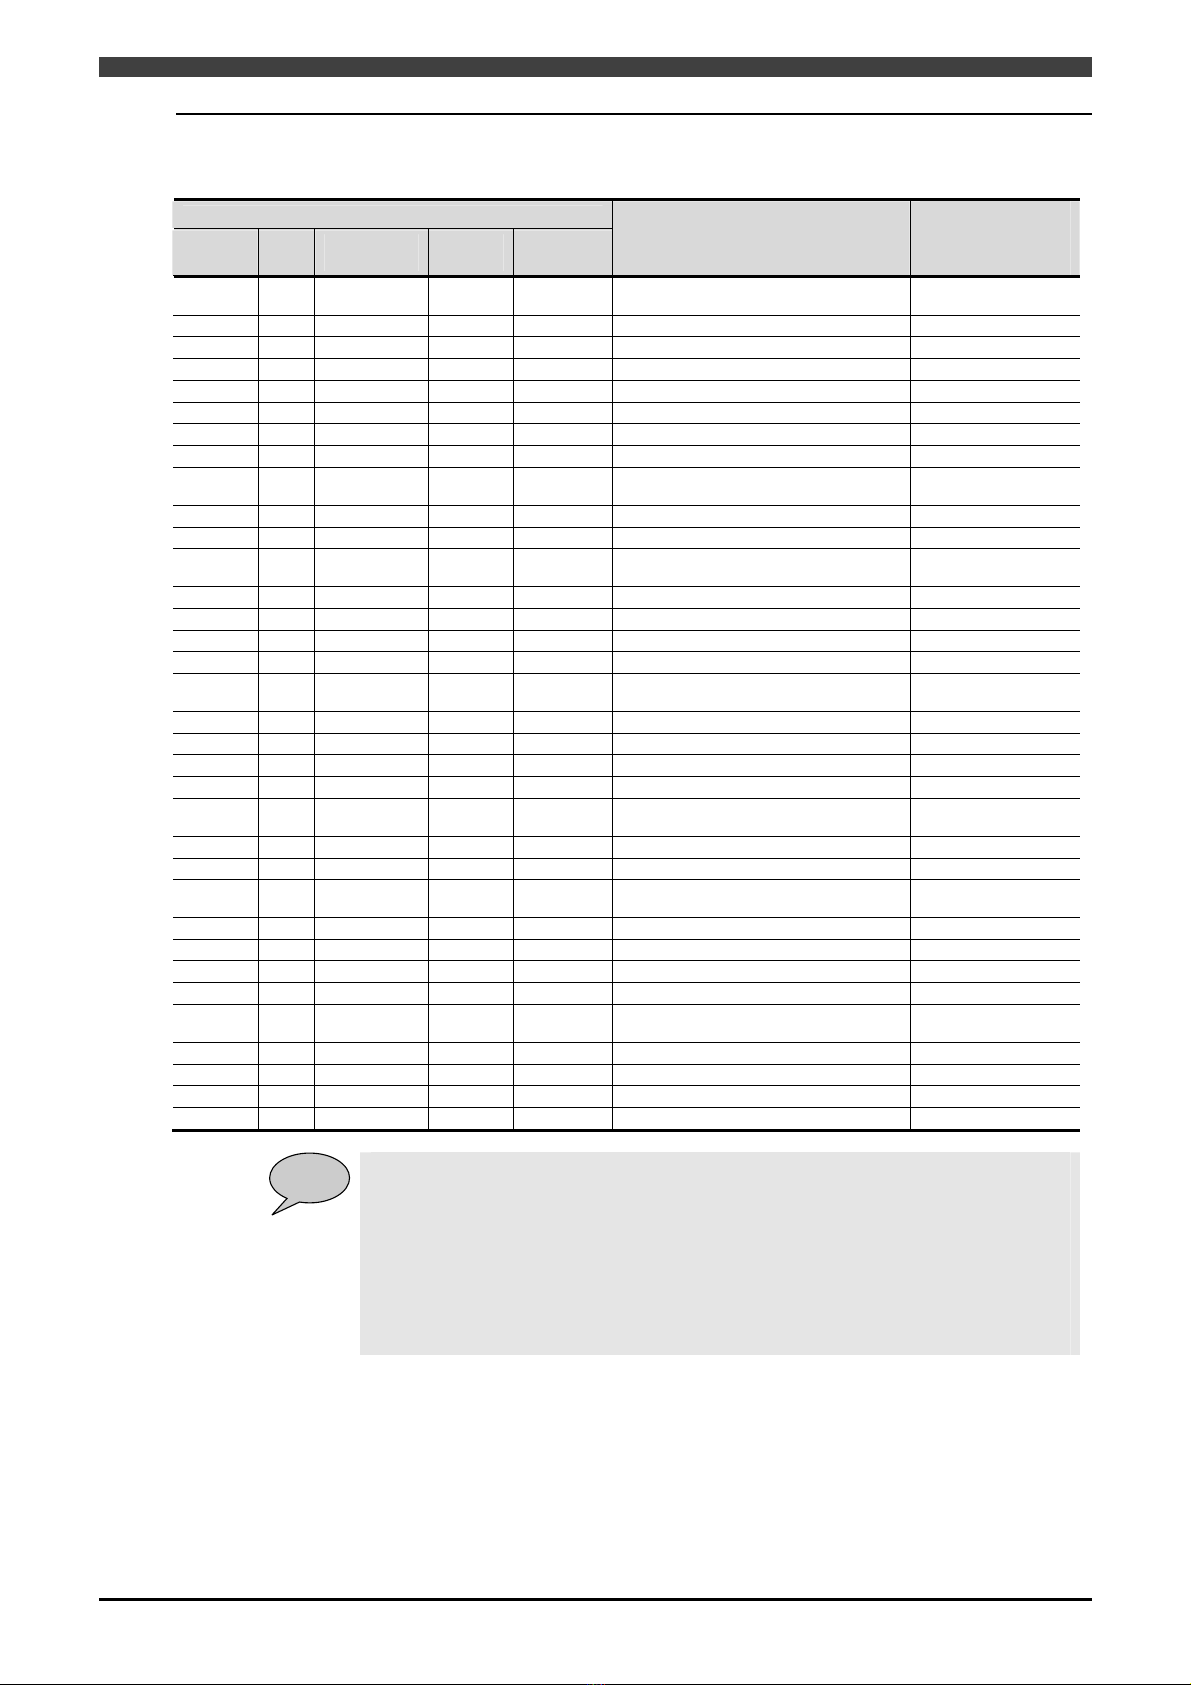
Table 1.4.1 Welbee Inverter M350L (specifications for Japan/CCC/Asia)
Welding mode
Welding
process Gas Wire material Wire
diameter
Travel
speed
Welding mode description
Notes
Number of
welding
characteristic
data in
AX21/FD11
DC CO2 Mild steel solid 0.8 Standard 350A Co2 DC φ0.8 (Low) $WTBD1719
〃〃〃0.9 〃350A Co2 DC φ0.9 (Low) $WTBD1720
〃〃〃1.0 〃350A Co2 DC φ1.0 (Low) $WTBD1721
〃〃〃1.2 〃350A Co2 DC φ1.2 (Low) $WTBD1722
〃〃Mild steel cored 1.2 〃350A Co2 DC φ1.2 (Cored) (Low) $WTBD1724
〃〃〃1.4 〃350A Co2 DC φ1.4 (Cored) (Low) $WTBD1725
〃〃SUS cored 0.9 〃350A Co2 DC φ0.9 SuS(Cored) (Low) $WTBD1729
〃〃〃1.2 〃350A Co2 DC φ1.2 SuS(Cored) (Low) $WTBD1730
〃MAG Mild steel solid 0.8 〃350A Mag DC φ0.8 (Low) $WTBD1732
〃〃〃0.9 〃350A Mag DC φ0.9 (Low) $WTBD1733
〃〃〃1.0 〃350A Mag DC φ1.0 (Low) $WTBD1734
〃〃〃1.2 〃350A Mag DC φ1.2 (Low) $WTBD1735
〃MIG SUS 0.8 〃350A Mig_4 DC φ0.8 SuS (Low) $WTBD1736
〃〃〃0.9 〃350A Mig_4 DC φ0.9 SuS (Low) $WTBD1737
〃〃〃1.0 〃350A Mig_4 DC φ1.0 SuS (Low) $WTBD1738
〃〃〃1.2 〃350A Mig_4 DC φ1.2 SuS (Low) $WTBD1739

1.4 Welding mode lists
1-10
1.4.2 Welding mode list of Welbee Inverter M350
Table 1.4.2 Welbee Inverter M350 (specifications for Japan/CCC/Asia)
Welding mode
Welding
process Gas Wire
material
Wire
diameter
Travel
speed
Welding mode description
Notes
Number of welding
characteristic data in
AX21/FD11
DC CO2
Mild steel
solid 0.8 High 350A Co2 DC φ0.8 (High) $WTBD2000
〃〃〃0.9 〃350A Co2 DC φ0.9 (High) $WTBD2001
〃〃〃1.0 〃350A Co2 DC φ1.0 (High) $WTBD2002
〃〃〃1.2 〃350A Co2 DC φ1.2 (High) $WTBD2003
〃MAG 〃0.8 〃350A Mag DC φ0.8 (High) $WTBD2004
〃〃〃0.9 〃350A Mag DC φ0.9 (High) $WTBD2005
〃〃〃1.0 〃350A Mag DC φ1.0 (High) $WTBD2006
〃〃〃1.2 〃350A Mag DC φ1.2 (High) $WTBD2007
〃MIG SUS 0.8 〃350A Mig_4 DC φ0.8 SuS (High) $WTBD2008
〃〃〃0.9 〃350A Mig_4 DC φ0.9 SuS (High) $WTBD2009
〃〃〃1.0 〃350A Mig_4 DC φ1.0 SuS (High) $WTBD2010
〃〃〃1.2 〃350A Mig_4 DC φ1.2 SuS (High) $WTBD2011
〃CO2
Mild steel
solid 0.8 Standard 350A Co2 DC φ0.8 (Low) $WTBD2012
〃〃〃0.9 〃350A Co2 DC φ0.9 (Low) $WTBD2013
〃〃〃1.0 〃350A Co2 DC φ1.0 (Low) $WTBD2014
〃〃〃1.2 〃350A Co2 DC φ1.2 (Low) $WTBD2015
〃〃Mild steel
Cored 1.2 〃350A Co2 DC φ1.2 (Cored) (Low) $WTBD2016
〃〃〃1.4 〃350A Co2 DC φ1.4 (Cored) (Low) $WTBD2017
〃〃SUS cored 0.9 〃350A Co2 DC φ0.9 SuS(Cored) (Low) $WTBD2018
〃〃〃1.2 〃350A Co2 DC φ1.2 SuS(Cored) (Low) $WTBD2019
〃MAG
Mild steel
solid 0.8 〃350A Mag DC φ0.8 (Low) $WTBD2020
〃〃〃0.9 〃350A Mag DC φ0.9 (Low) $WTBD2021
〃〃〃1.0 〃350A Mag DC φ1.0 (Low) $WTBD2022
〃〃〃1.2 〃350A Mag DC φ1.2 (Low) $WTBD2023
〃MIG SUS 0.8 〃350A Mig_4 DC φ0.8 SuS (Low) $WTBD2024
〃〃〃0.9 〃350A Mig_4 DC φ0.9 SuS (Low) $WTBD2025
〃〃〃1.0 〃350A Mig_4 DC φ1.0 SuS (Low) $WTBD2026
〃〃〃1.2 〃350A Mig_4 DC φ1.2 SuS (Low) $WTBD2027
〃CO2
Mild steel
solid 0.8 Extension
cable 350A Co2 DC φ0.8 (Low*) $WTBD2028
〃〃〃0.9 〃350A Co2 DC φ0.9 (Low*) $WTBD2029
〃〃〃1.0 〃350A Co2 DC φ1.0 (Low*) $WTBD2030
〃〃〃1.2 〃350A Co2 DC φ1.2 (Low*) $WTBD2031
〃〃Mild steel
Cored 1.2 〃350A Co2 DC φ1.2 (Cored) (Low*) $WTBD2032
〃〃〃1.4 〃350A Co2 DC φ1.4 (Cored) (Low*) $WTBD2033
〃〃SUS cored 0.9 〃350A Co2 DC φ0.9 SuS(Cored) (Low*) $WTBD2034
〃〃〃1.2 〃350A Co2 DC φ1.2 SuS(Cored) (Low*) $WTBD2035
〃MAG
Mild steel
solid 0.8 〃350A Mag DC φ0.8 (Low*) $WTBD2036
〃〃〃0.9 〃350A Mag DC φ0.9 (Low*) $WTBD2037
〃〃〃1.0 〃350A Mag DC φ1.0 (Low*) $WTBD2038
〃〃〃1.2 〃350A Mag DC φ1.2 (Low*) $WTBD2039
〃MIG SUS 0.8 〃350A Mig_4 DC φ0.8 SuS (Low*) $WTBD2040
〃〃〃0.9 〃350A Mig_4 DC φ0.9 SuS (Low*) $WTBD2041
〃〃〃1.0 〃350A Mig_4 DC φ1.0 SuS (Low*) $WTBD2042
〃〃〃1.2 〃350A Mig_4 DC φ1.2 SuS (Low*) $WTBD2043

1.4 Welding mode lists
1-11
POINT
Use welding characteristic data with a "High" Travel speed as the welding characteristic
data for Table 1.4.2. If the welding speed is low (generally, 50 cm/min or less) and the
welding is unstable, use welding characteristic data with a "Standard" Travel speed.
Welding performance may become unstable when using the extended power cable
depending on the layout condition of cables (when the total length exceeds 30m or the
cable is coiled). In that case, voltage adjustment will normally bring about stable
condition. However, use the welding characteristic data dedicated to “Extension cable”
application if the welding performance is not yet stable.
1.4 Welding mode lists
1-12
1.4.3 Welding mode list of Welbee Inverter M500
Table 1.4.3 Welbee Inverter M500 (specifications for Japan)
Welding mode
Welding
process Gas Wire
material
Wire
diameter
Travel
speed
Welding mode description
Notes
Number of welding
characteristic data in
AX21/FD11
DC CO2
Mild steel
solid 1.2 High 500A Co2 DC φ1.2 (High) $WTBD2103
〃〃〃1.4 〃500A Co2 DC φ1.4 (High) $WTBD2104
〃〃〃1.6 〃500A Co2 DC φ1.6 (High) $WTBD2105
〃MAG 〃1.2 〃500A Mag DC φ1.2 (High) $WTBD2109
〃〃〃1.4 〃500A Mag DC φ1.4 (High) $WTBD2110
〃〃〃1.6 〃500A Mag DC φ1.6 (High) $WTBD2111
〃MIG SUS 1.2 〃500A Mig_4 DC φ1.2 SuS (High) $WTBD2115
〃〃〃1.6 〃500A Mig_4 DC φ1.6 SuS (High) $WTBD2116
〃CO2
Mild steel
solid 1.2 Standard 500A Co2 DC φ1.2 (Low) $WTBD2120
〃〃〃1.4 〃500A Co2 DC φ1.4 (Low) $WTBD2121
〃〃〃1.6 〃500A Co2 DC φ1.6 (Low) $WTBD2122
〃〃Mild steel
solid 1.2 〃500A Co2 DC φ1.2 (Cored) (Low) $WTBD2124
〃〃〃1.4 〃500A Co2 DC φ1.4 (Cored) (Low) $WTBD2125
〃〃〃1.6 〃500A Co2 DC φ1.6 (Cored) (Low) $WTBD2126
〃〃SUS cored 1.2 〃500A Co2 DC φ1.2 SuS(Cored) (Low) $WTBD2127
〃〃〃1.6 〃500A Co2 DC φ1.6 SuS(Cored) (Low) $WTBD2128
〃MAG
Mild steel
solid 1.2 〃500A Mag DC φ1.2 (Low) $WTBD2132
〃〃〃1.4 〃500A Mag DC φ1.4 (Low) $WTBD2133
〃〃〃1.6 〃500A Mag DC φ1.6 (Low) $WTBD2134
〃MIG SUS 1.2 〃500A Mig_4 DC φ1.2 SuS (Low) $WTBD2138
〃〃〃1.6 〃500A Mig_4 DC φ1.6 SuS (Low) $WTBD2139
〃CO2
Mild steel
solid 1.2 Extension
cable 500A Co2 DC φ1.2 (Low*) $WTBD2140
〃〃〃1.4 〃500A Co2 DC φ1.4 (Low*) $WTBD2141
〃〃〃1.6 〃500A Co2 DC φ1.6 (Low*) $WTBD2142
〃〃Mild steel
Cored 1.2 〃500A Co2 DC φ1.2 (Cored) (Low*) $WTBD2143
〃〃〃1.4 〃500A Co2 DC φ1.4 (Cored) (Low*) $WTBD2144
〃〃〃1.6 〃500A Co2 DC φ1.6 (Cored) (Low*) $WTBD2145
〃〃SUS cored 1.2 〃500A Co2 DC φ1.2 SuS(Cored) (Low*) $WTBD2146
〃〃〃1.6 〃500A Co2 DC φ1.6 SuS(Cored) (Low*) $WTBD2147
〃MAG
Mild steel
solid 1.2 〃500A Mag DC φ1.2 (Low*) $WTBD2148
〃〃〃1.4 〃500A Mag DC φ1.4 (Low*) $WTBD2149
〃〃〃1.6 〃500A Mag DC φ1.6 (Low*) $WTBD2150
〃MIG SUS 1.2 〃500A Mig_4 DC φ1.2 SuS (Low*) $WTBD2151
〃〃〃1.6 〃500A Mig_4 DC φ1.6 SuS (Low*) $WTBD2152
POINT
Use welding characteristic data with a "High" Travel speed as the welding characteristic
data for Table 1.4.3. If the welding speed is low (generally, 50 cm/min or less) and the
welding is unstable, use welding characteristic data with a "Standard" Travel speed.
Welding performance may become unstable when using the extended power cable
depending on the layout condition of cables (when the total length exceeds 30m or the
cable is coiled). In that case, voltage adjustment will normally bring about stable
condition. However, use the welding characteristic data dedicated to “Extension cable”
application if the welding performance is not yet stable.
This manual suits for next models
1
Table of contents


