OTRONA ATTACHE Series User manual


OTRONA
ATTA<lIE
Portable
Coaputer
VALET
Guide
Version
1.0
published
by
Otrona
Corporation,
November 1982
written
by
Mike Hutmacher
CQpvright
Copyright
(c) 1982
by
Otrona
Corporation.
All
rights
reserved.
No
part
of
this
publication
may
be
reproduced,
transmitted,
transcribed,
stored
in
a
retrieval
system,
or
translated
into
any
language
or
computer
language,
in
any form
or
by
any means,
electronic,
mechanical,
magnetic,
optical,
chemical,
manual,
or
otherwise,
without
the
prior
written
permission
of
Otrona
Corporation,
4755
Walnut
St.,
Boulder,
Colorado,
80301.
Disclaimer
Otrona
Corporation
makes no
representations
or
warranties
with
respect
to
the
contents
hereof
and
especially
disclaims
any
implied
warranties
of
merchantabilities
or
fitness
for
any
particular
purpose.
Further,
Otrona
Corporation
reserves
the
right
to
revise
this
publication
and
to
make
changes
f rom
time
to
time
in
the
content
wi
thout
obliga
tion
of
otrona
Corporation
to
notify
any
person
of
such
revisions
or
changes.
Trademarks
Valet,
Charton
and
Attache
are
trademarks
of
Otrona
Corporation,
BoulderR
Colorado,
80301.
References
are
made
in
this
document
to
the
WordStar
word
processing
system,
a
registered
trademark
of
MicroPro
International
Corporation,
San
Rafael,
California,
to
the
Control
Program
for
Microprocessors
(commonly known
as
CP/M), a
trademark
of
Digital
Research
Inc.,
Pacific
Grove,
California,
to
Softcom,
a
trademark
of
The
Software
Store,
Marquette,
Michigan,
and
to
BASIC-80, a
trademark
of
Microsoft
Corporation,
Bellevue,
Washington.

Contents
I.
Introduction
Introduction
and
Functional
Overview
•••••••••••••
1-1
Valet
Functions
List
•••••••••••••••••••••••••••••
1-2
Valet
Files
••••••••••••••••••••••••••••••••••••••
1-2
II.
Set-Up
Mode
Set-Up
Mode
2-1
Time and
Date
Display
••••••••••••••••••••••••••••
2-2
Setting
the
Clock
••••••••••••••••••••••••••••••••
2-2
Screen
Brightness
Control
••••••••••••••••••••••••
2-3
Keyboard Volume
Control
••••••••••••••••••••••••••
2-3
Keyboard
Click
Sound
Control
•••••••••••••••••••••
2-3
Communications
Port
Baud
Rate
Selection
••••••••••
2-3
Printer
Port
Baud
Rate
Selection
•••••••••••••••••
2-3
Bell
Sound
Control
•••••••••••••••••••••••••••••••
2-3
Valet's
Main
Menu
••••••••••••••••••••••••••••••••
2-4
Bypassing
the
Main
Menu
••••••••••••••••••••••••••
2-4
III.
Alarms
Valet's
Alarm
Function
•••••••••••••••••••••••••••
3-1
Alarm Types
••••••••••••••••••••••••••••••••••••••
3-1
The Alarm
Menu
•••••••••••••••••••••••••••••••••••
3-2
Bypassing
the
Alarm
Menu
•••••••••••••••••••••••••
3-2
Setting
Alarms
•••••••••••••••••••••••••••••••••••
3-3
Scheduling
Messages
••••••••••••••••••••••••••••••
3-5
Scheduling
Command
Lines
•••••••••••••••••••••••••
3-5
-1-

Contents
Alanns
(continued)
Scheduling
Immediate
Command
Lines
•••••••••••••••
3-6
Answering Alarms
•••••••••••••••••••••••••••••••••
3-6
Rescheduling
and
Revising
Alarms
•••••••••••••••••
3-7
Rescheduling
Alarms
in
Advance
•••••••••••••••••••
3-8
Rescheduling
When
the
Alarm Sounds
•••••••••••••••
3-9
Cancelling
Alarms
••••••••••••••••••••••••••••••••
3-10
Using
SUBMIT
to
Chain
Commands
for
Alarms
••••••••
3-11
Using
SUBMIT
and
XSUB
to
Chain
Commands
••••••••••
3-12
IV.
Screen
Dump
Screen
Dump
-
Printing
Display
Screen
Contents
•••
4-1
Bypassing
the
Print
Menu
•••••••••••••••••••••••••
4-2
V.
Printer
Installation
Printer
Installation
for
Screen
Dump
•••••••••••••
5-1
Printer
Settings
•••••••••••••••••••••••••••••••••
5-1
Using
the
Install
Program
••••••••••••••••••••••••
5-2
Bypassing
the
Main
Menu
••••••••••••••••••••••••••
5-2
VI.
Calculator
Valet's
Calculator
Function
••••••••••••••••••••••
6-1
Activating
the
Calculator
••••••••••••••••••••••••
6-1
Bypassing
the
Main
Menu
••••••••••••••••••••••••••
6-1
Exiting
Fram
the
Calculator
••••••••••••••••••••••
6-1
Number
Keys
••••••••••••••••••••••••••••••••••••••
6-2
-2-

Contents
calculator
(continued)
Function
Keys
••••••••••••••••••••••••••••••••••••
6-2
Additional
Calculator
Keys
•••••••••••••••••••••••
6-3
The
RPN
Logic
System
•••••••••••••••••••••••••••••
6-4
The
Calculator
Display
•••••••••••••••••••••••••••
6-4
The
X and Y
Registers
••••••••••••••••••••••••••••
6-5
The
Z,
P, Q,
R,
S,
and
T
Registers
•••••••••••••••
6-7
The
Memory
Registers
•••••••••••••••••••••••••••••
6-10
Storing
Numbers
in
the
Memory
Registers
••••••••••
6-11
Recalling
Numbers
From
the
Memory
Registers
••••••
6-11
Order
of
Entry
•••••••••••••••••••••••••••••••••••
6-11
Negative
Numbers
•••••••••••••••••••••••••••••••••
6-11
Clearing
the
Current
Entry
•••••••••••••••••••••••
6-12
Overflow and Underflow
•••••••••••••••••••••••••••
6-12
Rolling
the
Stack
Up
or
Down
•••••••••••••••••••••
6-12
Recalling
the
X
Register
•••••••••••••••••••••••••
6-12
Exchanging
the
X and Y
Registers
•••••••••••••••••
6-13
Scientific
Notation
••••••••••••••••••••••••••••••
6-13
Sample
Problems
••••••••••••••••••••••••••••••••••
6-13
VII.
Glossary
•••••••••••••••••••••••••••••••••••••••••
7-1
VIII.
Index
••••••••••••••••••••••••••••••••••••••••••••
8-1
-3-

CONTENTS
Introduction
.......
.
.....
1
Valet
Functions.
..
. . . . . . . . . 2
Valet Files
IntrodllL
tiOl1
Set-Up
Mode
Alarms
Screen
Dump
Printer
Install
Calculator
Glossary
Introduction
Introduction
ADd
Functional
Oyerview
Valet
is
a
software
package
that
allows
you
to
temporarily
interrupt
a
program
to
perform
other
functions
and
then
return
directly
to
the
program
that
was
interrupted.
Valet
functions
range
from
simply
displaying
the
date
and
time
of
day
to
performing
complex
mathematical
calculations.
When
the
Valet
function
is
complete,
a
single
keystroke
returns
you
to
the
interrupted
program
•
immediately.
How
might
you
use
this?
Say
you're
working
on
a
report
using
WordStar-
Plus
and
need
to
figure
some
'percentages
for
inclusion
in
the
report.
You
can
quickly
switch
to
Valet's
calculator,
make
the
required
calculations,
and
just
as
quickly
return
to
your
report.
Continuing
with
this
example,
after
you make
the
calculations
and
return
to
WordStar-Plus,
you
could
type
in
a
table
based
on
your
calculations
and
then
use
Valet's
screen
dump
to
print
what
is
displayed
on
the
screen.
When
the
printout
is
complete,
you
can
instantly
return
to
WordStar-Plus
with
the
cursor
at
the
point
of
interruption
in
your
report,
just
as
though
you
had
never
left
the
program.
If
you
are
writing
your
report
and
also
trying
to
maintain
your
schedule,
you can
use
Valet's
alarm
function
to
schedule
alarms
that
will
sound
at
specif
ied
times
with
messages
to
remind
you
of
meetings
or
other
obligations.
Valet·s
·Set-Up
Mode·
functions
are
described
on
the
top
row
of
the
keyboard
template
and
displayed
on
the
screen
when
you
press
CTRL
and
ESC
simultaneously.
You
may
then
press
the
appropriate
number key
for
your
desired
function
or
press
ESC
again
to
return
to
what
you
were
doing
before
activating
Set-Up
Mode.
Valet·s
·Main
Menu·
functions
are
accessed
while
in
Set-Up
Mode
by
pressing
the
TAB
key.
The Main
Menu
displays
options
for
using
the
calculator,
alarms,
printer
installation,
and
screen
dump
functions.
You
can
also
bypass
this
menu and
go
directly
from
Set-up
Mode
to
the
desired
Valet
functIon.
The
interrupted
program
remains
on
the
screen
when
Valet
is
being
used.
When
you
are
finished
with
the
Valet
function,
Attache
returns
directly
to
the
interrupted
program.
1-1

Introduction
The
complete
list
of
Valet
functions
is
as
follows:
Set-up
Mode
Date
and
Time
Display
Communications
Port
Baud
Rate
Selection
Screen
Brightness
Control
Printer
Port
Baud
Rate
Selection
Keyboard Volume
Control
Bell
Sound
Control
Keyboard
Click
Sound
Control
Access
to
Valet
Main
Menu
Main
Menu
Alarm and Message
Scheduling
Screen
Dump
to
Print
Screen
Contents
Four-Function
RPN
Calculator
Printer
Installation
for
Screen
Dump
Two
Valet
files
are
included
on
the
Attache
Software
diskette.
These
files
are
named
VALET.VLI
and
PRINTER.VLl
on
the
disk.
Some
Valet
functions
require
that
these
files
are
on
the
diskette
inserted
in
Drive
A a t
all
times,
while
other
Valet
functions
w
ill
work
properly
even
if
the
files
are
not
on
the
system
diskette.
The
VALET.VLI
file
contains
programs
for
alarms,
screen
dump,
printer
install,
and
calculator.
These
programs
will
only
work
if
the
VALET.VLI
file
is
on
the
diskette
inserted
in
Drive
A.
If
an
alarm
is
scheduled
and
the
Valet.VLI
file
is
not
in
Drive
A
when
the
alarm
is
set
to
sound,
the
alarm
will
be
ignored.
However,
if
the
alarm
is
set
to
sound
when
Attache
is
turned
off,
the
alarm
will
sound
when
the
unit
is
powered
up
and
booted
with
the
VALET.VLI
file
on
the
diskette
in
Drive
&
The
PRINTER.VLI
file
provides
printer
settings
for
the
install
function.
The
calculator,
alarm,
and
screen
dump
programs
will
function
properly
even
if
PRINTER.VI,1
is
not
included
on
the
diskette
in
Drive
A.
Once a
printer
has
been
selected,
the
selection
is
inserted
in
the
screen
dump progJ:"ams
in
the
VALET.VLI
file.
PRINTER.VLl
is
not
required
again
unless
you
want
to
change
printer
selection
for
the
screen
dump.
Set-up
Mode
will
function
properly
even
if
VALET.VLI
and
PRINTER.VLI
are
not
on
the
diskette
in
Drive
A when
the
function
is
activated.
1-2
CONTENTS
Set-up
Mode
.......
.
..
..
.
Time
and
Date
Display. . .
..
2
Setting
the
Clock
Screen
Brightness.
. . . . . .
..
3
Keyboard
Volume
Keyboard Click
Comm. Baud Rate
Printer
Baud Rate
Bell
Sound
Valet's Main
Menu
..
.
....
. 4
Bypassing
the
Menu
Set
-Lip
\lo<ie
A
larm
s
Screen
Dump
Printer
Install
Calculator
Glossary
Set-Up
Mode
Set-up
Mode
controls
functions
on
the
top
row
of
the
keyboard
template,
displays
the
date
and
time,
and
provides
access
to
the
valet
Menu.
set-up
Mode
may
be
activated
at
any
time
when
the
unit
is
powered up and
CP/M
has
been
booted,
even
while
other
programs
are
being
used.
The
program
that
is
interrupted
remains
on
the
screen
while
Set-up
Mode
is
activated.
The
screen
returns
to
its
previous
function
when you
exit
from
Set-up
Mode.
Values
that
you
set
in
Set-up
Mode
remain
constant
until
you change them,
even
if
the
unit
is
powered
down
for
long
periods
of
time.
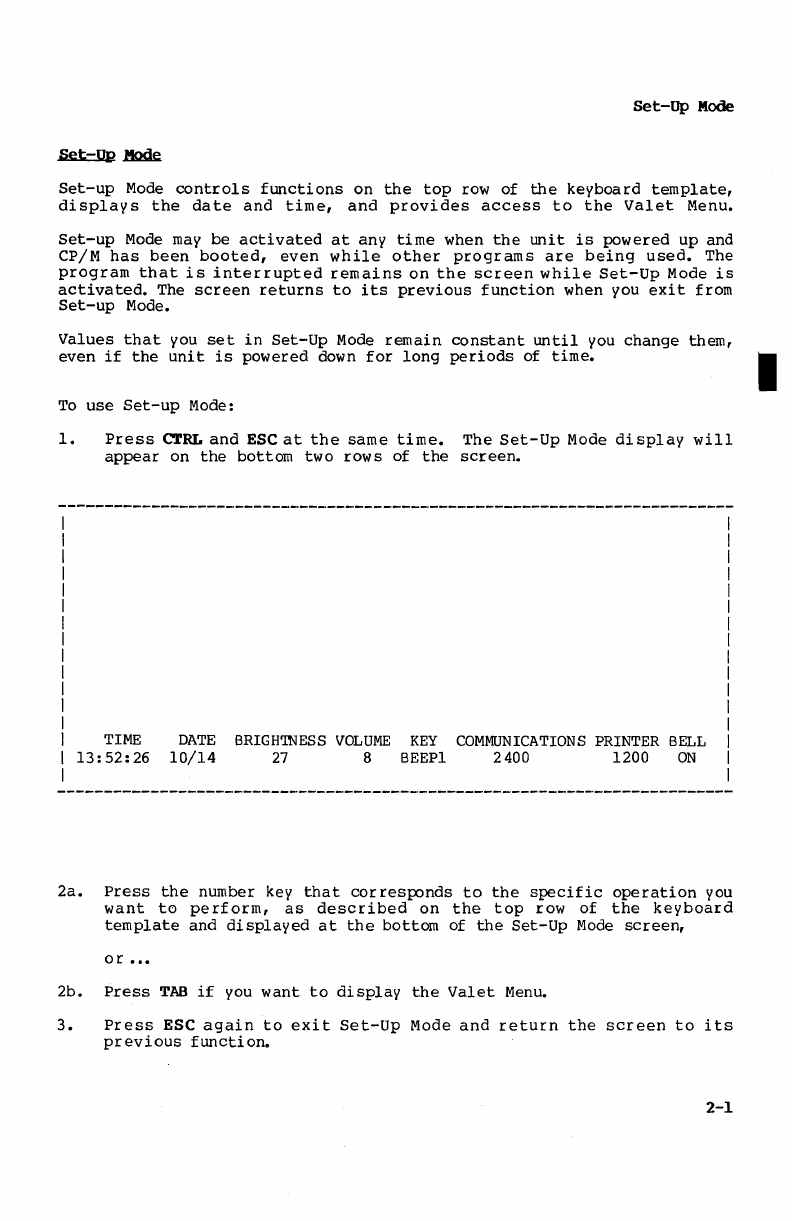
To
use
Set-up
Mode:
1.
Press
C'.rRL
and
ESC
at
the
same
time.
The
Set-Up
Mode
display
will
appear
on
the
bottom two
rows
of
the
screen.
TIME
13:
52:
26
DATE
BRIGHTNESS
VOLUME
KEY
COMMUNICATIONS
PRINTER
BELL
10/14
27
8
BEEPl
2400 1200
ON
2a.
Press
the
number key
that
corresponds
to
the
specific
operation
you
want
to
perform,
as
described
on
the
top
row
of
the
keyboard
template
and
displayed
at
the
bottom
of
the
Set-Up
Mode
screen,
or
•
••
2b.
Press
TAB
if
you
want
to
display
the
Valet
Menu.
3.
Press
ESC
again
to
exit
Set-Up
Mode
and
return
the
screen
to
its
previous
function.
2-1
I
set-Up
Mode
.'ljme
.and
J&te
Displav
The
time
and
date
are
displayed
when
Set-Up
Mode
is
activated.
Both
are
displayed
on
the
lower
left
corner
of
the
Set-Up
l10de
screen.
Time
is
shown
on
a
24-hour
clock
(in
military
hours:minutes:seconds)
where
00:00:00
==
midnight,
12:00:00
=
noon,
18:00:00
= 6
p.m.,
etc.)
The
date
is
in
month:date
format.
Press
ESC
to
exit
from
Set-Up
Mode
and
return
the
screen
to
its
previous
function.
Setting
~
~
A number
of
Valet
functions
access
the
real-time
clock,
which
is
battery
powered and
operates
even
when
Attache
is
turned
off.
The
clock
must
be
set
for
Valet
functions
to
work
correctly.
If
the
clock
is
not
set,
the
message
CLOCK
NOT
SET
will
appear
where
the
time
and
date
would
normally
appear
when
you
activate
Set-Up
Mode.
Set
or
reset
the
clock
when
necessary
by
executing
the
following:
1.
with
the
Attache
Software
diskette
inserted
in
Drive
A and
the
cursor
at
A>,
type
TIME
and
press
RETURN.
The
Time
Utility
display
will
then
appear
on
the
screen.
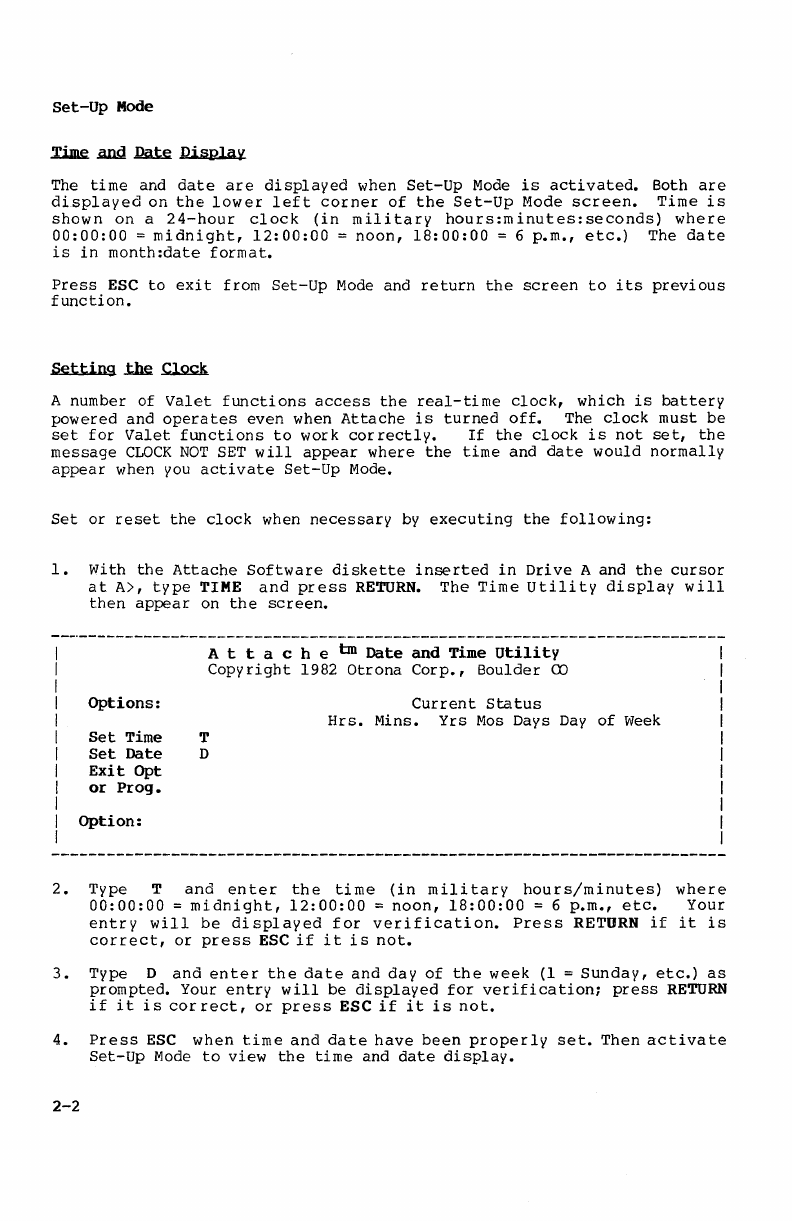
Options:
Set
Time
Set
Date
Exit
Opt
or
Prog.
Option:
A t t a c h e
tm
Date
and
Time
Utility
Copyright
1982
Otrona
Corp.,
Boulder
CO
T
D
Current
status
Hrs.
Mins. Yrs
Mos
Days
Day
of
Week
2.
Type T
and
enter
the
time
(in
military
hours/minutes)
where
00:00:00
=
midnight,
12:00:00
==
noon,
18:00:00
= 6
p.m.,
etc.
Your
entry
will
be
displayed
for
verification.
Press
RETURN
if
it
is
correct,
or
press
ESC
if
it
is
not.
3.
Type D
and
enter
the
date
and
day
of
the
week
(1
=
Sunday,
etc.)
as
prompted. Your
entry
will
be
displayed
for
verification;
press
RETURN
if
it
is
cor
rect,
or
press
ESC
if
it
is
not.
4.
Press
ESC
when
time
and
date
have
been
properly
set.
Then
activate
Set-Up
Mode
to
view
the
time
and
date
display.
2-2
Set-Up
Mode
~
Brightness
Control
To
increase
the
screen
brightness,
activate
Set-Up
Mode
and
press
1.
To
reduce
the
screen
brightness,
press
2.
Keep
pressing
for
more
or
less
brightness.
Press
ESC
to
return
to
the
previous
function.
Kevboard~
Control
To
increase
the
keyboard
click
volume,
activate
Set-up
Mode
and
press
3.,
To
reduce
the
keyboard
volume,
press
4. Keep
pressing
for
more
or
less
volUme.
Press
ESC
to
return
to
the
previous
function.
Kevboard
~
~
Control
To
change
the
keyboard
click
sound,
activate
Set-up
Mode
and
press
5.
A
different
click
w
ill
be
heard
each
time
the
key
is
pressed.
Four
different
clicks
are
available,
or
you may
turn
the
click
sound
off
altogether.
Press
ESC
to
return
to
the
previous
function.
Communications
~ ~ ~
Selection
To
change
the
baud
rate
for
the
communications
port,
activate
Set-up
Mode
and
press
6
to
increase
the
baud
rate
or
7
to
decrease
the
baud
rate.
The
setting
will
be
increased
or
decreased
by
one
increment
each
time
the
key
is
pressed.
Press
ESC
to
return
to
the
previous
function.
Baud
Rate
Selections
for
Attache
Serial
Ports
19200
9600
4800
2400
1200
600
300
150
134.5
110 7 5
Printer
~
~
~
Selection
To
change
the
baud
rate
for
the
printer
port,
activate
Set-up
Mode
and
press
8
to
increase
the
baud
rate
or
9
to
decrease
the
baud
rate.
The
setting
will
be
increased
or
decreased
by
one
increment
each
time
the
key
is
pressed.
Press
ESC
to
return
to
the
previous
function
•
.B.ell
~
Control
To
turn
the
keyboard
bell
on
or
off,
activate
set-up
Mode
and
press
O.
If
the
bell
is
set
to
off
it
w
ill
change
to
on
and
vice
ver
sa.
Press
ESC
to
return
to
the
previous
function.
2-3
•
Set-Up
Mode
Valet's
.Main
.M.eIW
Valet's
f.iain
Menu
is
di
splayed
by
acti
vati
ng
set-up
Mode
and
then
pressing
the
TAB
key.
The Main
Menu
appears
on
the
bottom
two
lines
of
the
display
and
provides
access
to
the
alarms,
calculator,
screen
dump,
and
printer
installation
programs.
As
with
Set-Up
Mode,
the
program
that
was
interrupted
remains
on
the
screen
while
Valet's
Main
Menu
and
the
related
Valet
functions
are
activated.
M A I N
II
MEN
u
II
(A)LARMS
(C)ALCULATOR
{S)CREEN
DUMP
{I)NSTALL
PRESS
ESC
TO
EXIT
Select
programs
from
the
Main
Menu
by
pressing
the
key
that
is
shown on
the
menu
in
parenthesis
for
the
function
you
wish
to
use.
For
example,
press
C
to
activate
the
calculator
fUnction
or
A
to
activate
the
alarms
function.
Exit
from
this
menu
and
return
the
screen
to
its
previous
function
by
pressing
the
ESC
key.
Bypassing
..the
1W.n
.Henu
When
you
are
familiar
with
the
options
provided
by
the
Main
Menu,
you
can
bypass
this
menu and go
directly
from
Set-Up
Mode
to
the
desired
function
by
typing
the
letter
that
would
select
your
option,
such
as
C
for
calculator
or
A
for
alarms.
For
example:
CR'l'L ESC and TAB and C
CTRL ESC and C
2-4
di
splay
s
the
Set-Up
Mode
screen,
then
the
Main
Menu
screen,
and
then
activates
the
calculator
program.
displays
the
Set-Up
Mode
screen
and
then
activates
the
calculator
program
without
displaying
the
Main
Menu
screen.

CONTENTS
The
Alarm Function .
...
. . .
Alarm Types
The
Alarm
Menu.
. . . . . . .
..
2
Bypassing Alarm Menu
Setting
Alarms.
. . . . . . . . .
..
3
Scheduling Messages
......
S
Command
Lines
Immediate
Commands
Answering Alarms. . . . . . .
..
6
Rescheduling Alarms
...
.
..
7
Cancelling Alarms. . . . . .
..
10
Chaining
Commands
.....
11
Set-Up
Mode
:
\larms
Screen
Dump
Printer
Install
Calculator
Glossary

Alarms
Valet's
~
Function
The
alarms
feature
lets
you
schedule
alarms
that
will
display
messages
or
initiate
program commands.
It's
as
simple
as
an
alarm
clock,
only
more
capable.
Each
scheduled
alarm
contains
a
message
or
command
and
a
date
and
time
for
retrieval.
When
the
scheduled
time
arrives,
a
low
beeping
tone
is
issued
three
times
by
the
computer.
You
answer
the
alarm
by
activating
Set-up
Mode,
and
the
message
or
command
is
displayed
on
the
screen.
If
you do
not
answer
the
alarm,
it
will
be
repeated
every
four
minutes
until
you
respond.
If
the
machine
happens
to
be
turned
off
when
the
scheduled
time
arrives,
the
alarm
will
be
sounded
the
next
time
the
machine
is
powered up and
CP/M
is
booted.
As
many
as
six
different
alarms
may
be
set
at
anyone
time,
and
each
•
message
or
command
can
be
up
to
58
characters
long.
When
an
alarm
sounds,
you
are
given
the
option
of
changing
the
message
or
rescheduling
the
alarm
for
another
time.
The
alarms
featUre
also
lets
you
schedule
programs
for
execution
at
a
later
time.
Commands
may
be
chained
together
using
the
SUBMIT
facility
of
CP/M,
so
the
computer
can be
inst~ucted
to
begin
working
even
while
you
are
occupied
elsewhere.
This
is
handy
for
scheduling
data
transmissions
for
"off
hours"
when
line
rates
are
lowest,
for
compiling
programs,
etc.
There
are
three
different
alarm
types
available
-Message,
Command,
and
Immediate
Command.
The
function
for
each
type
is
as
follows:
Message
C<Enand
Line
Immediate
Command
Line
allows
you
to
type
a
message
that
will
be
displayed
when
the
alarm
is
answered.
allows
you
to
type
a command
for
execution
of
a
program
or
programs
at
a
later
time,
effectively
"time
bombing"
program
initiation.
This
alarm
requires
operator
response
before
the
command
is
actually
executed,
and
also
provides
an
option
for
rescheduling
if
it
is
not
convenient
to
initiate
the
command
as
scheduled.
Note:
i·f
the
command
is
allowed
to
execute
while
another
program
is
being
used,
the
work
in
progress
is
lost.
is
the
same
as
Command
except
that
the
command
is
executed
immediately
at
the
scheduled
time
without
requiring
operator
response
and
regardless
of
the
status
of
other
programs.
If
you
are
using
another
program
when
this
alarm
sounds,
the
scheduled
command
will
be
executed
and
you
will
lose
your work
in
progress.
Use
this
option
carefully
to
avoid
losing
important
data.
3-1

Alarms
Alarm
functions
are
accessed
from
Valet's
Main
Menu
or
by
pressing
A when
Set-up
Mode
is
activated.
When
the
alarms
feature
has
been
selected,
the
Alarm
Menu
appears
on
the
bottom two
lines
of
the
screen.
As
with
all
Valet
functions,
the
program
that
was
interrupted
remains
on
the
screen
while
the
Alarm
Menu
is
displayed.
I
I
I
I
I
I
I
A L
ARM
II
(S)
ET
(R)
EVIEW
(C)
ANCEL
I I
ALARMS
IN
USE
I
I
MEN
U II
PRESS
ESC
TO
EXIT
I I I
I I
1------------------------------------------------------------------------
The Alarm
Menu
allows
you
to
set
alarms,
review
and/or
reschedule
alarms
that
have
already
been
scheduled,
or
cancel
alarms
that
are
scheduled.
The menu
also
identifies
any
of
the
six
alarms
that
are
already
activated
(Alarms
in
Use).
As
with
all
Valet
functions,
press
ESC
if
you
want
to
return
to
the
previous
menu
rather
than
proceed.
Bypassing
.the
AlJuJII
JIeml
When
you
are
familiar
with
the
options
provided
by
the
Alarm
Menu, you
can
bypass
this
menu
and
go
directly
from
Set-up
Mode
to
the
desired
function
by
typing
the
letters
that
would
activate
the
Alarm
Menu
(A)
and
your
option,
such
as
S
for
Set
or
or
R
for
Review.
For
example:
CRTL
ESC
displays
the
Set-Up
Mode
screen.
TAB
displays
the
Main
Menu.
A
displays
the
Alarm
Menu.
S
activates
the
"Set"
option
for
alarms.
Rather
than
display
each
menu, you
can
activate
the
"Set"
option
for
alarms
by
pressing
CTRL
and
ESC
simultaneously
and
then
A
and
S
in
sequence
without
waiting
for
the
menus
to
be
displayed.
3-2

Alams
Setting
.AI.acDa
To
set
an
alarm,
press
S when
the
Alarm
Menu
is
on
the
screen.
If
you
decide
not
to
schedule
any
alarms,
press
ESC
to
return
to
the
Main
Menu.
A L
ARM
I I (S)
ET
(R)
EVIEW
(C)
ANCEL
MEN
U I I
PRESS
ESC
TO
EXIT
II
II
ALARMS
IN
USE
When
the
S
option
is
selected,
the
current
time,
date,
and
available
alarms
will
be
displayed
with
a
series
of
prompts
about
the
alarm
you
are
scheduling.
ENTER ALARM NUMBER:
11:07:20
10/15
ALARMS
AVAILABLE:
1 2 3 4 5 6
PRESS
ESC
TO
EXIT
N>S
(0-12):
MY
(0-31):
BRS
(00-23):
MIN
(00-59):
Answer
these
prompts
as
instructed
on
the
next
page.
If
you make a
mistake
while
typing,
press
the
left
arrow
key
or
the
BACK
SPACE
key
to
erase
the
previous
entry
and
then
type
the
cor
rect
data.
3-3
_I
Alarms
EJfTER
ALARII
NUMBER:
TVpe
a number
from
1
to
6
from
the
list
of
available
alarms.
MOS:
(01-12):
TVpe
the
month
(1-12)
to
schedule
the
alarm
for.
DAY:
(01-31):
Tvpe
the
day
of
the
month
(1
to
31)
to
schedule
the
alarm
for.
HRS:
(00-23):
TVpe
the
hour
to
schedule
the
alarm
for
(in
military
time
where
00
=
midnight,
12
=
noon,
18
= 6pm,
etc.)
MIN:
(00-59):
TVpe
the
minute
(0
to
59)
to
schedule
the
alarm
for.
Note
that
leading
zeros
are
not
required,
and
the
cursor
moves
automatically
to
the
next
field
when
an
entry
is
made.
In
cases
where
the
number
is
also
the
first
digit
for
another
entry
(such
as
1 =
Januarv,
11
=
November),
ei
ther
use
the
leading
zero
or
use
the
RETURN
key
to
move
the
cursor
to
the
next
field.
When
the
time
and
date
for
scheduling
the
alarm
have
been
correctly
input,
your
entry
is
displayed
along
with
the
current
time
and
date.
In
addition,
you
are
prompted
to
set
the
alarm
or
exit
to
the
Alarm Menu.
ENTER
ALARM
MOS
(01-12):
DAY
(01-31):
HRS
(00-23):
MIN(00-59) :
11:08:19
10/15
(S)ET
OR
PRESS
ESC
TO
EXIT
Press
ESC
if
you
want
to
cancel
what
you've
done
so
far
and
return
to
the
Alarm
Menu,
or
press
S
to
set
the
alarm
and
proceed
to
the
next
menu
(where
you
will
identify
the
alarm
type).
After
you
set
the
alarm,
the
screen
prompts:
ENTER
ALARM TYPE:
(M)ESSAGE
(C)OMMAND
LINE
(IMM)EDIATE
COMMAND
LINE
From
this
menu,
you
define
the
type
of
alarm
to
schedule.
Instructions
for
setting
and
using
alarm
types
are
on
the
next
page.
3-4
Alarms
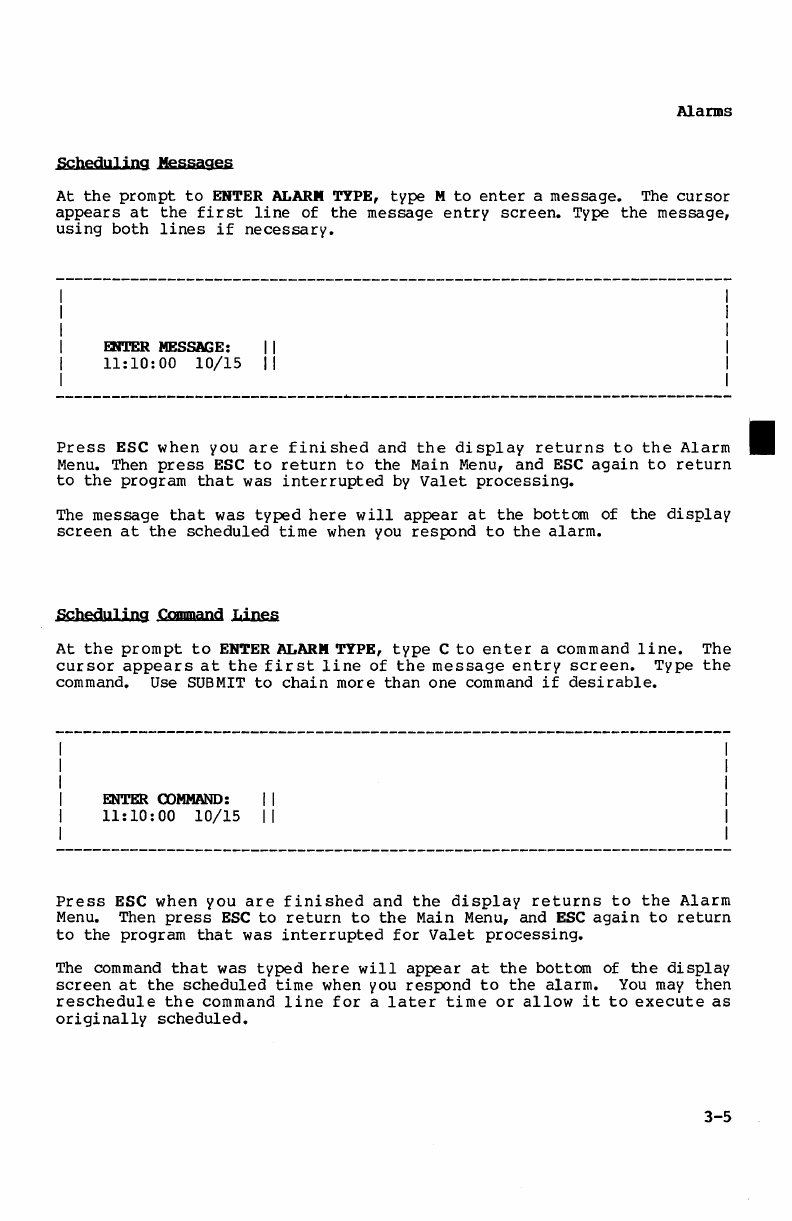
Scheduling
Messages
At
the
prompt
to
ENTER
ALARII
TYPE,
type
M
to
enter
a message.
The
cursor
appears
at
the
first
line
of
the
message
entry
screen.
TVpe
the
message,
using
both
lines
if
necessary.
mTER
MESSAGE:
II
11:10:00
10/15
II
Press
ESC
when
you
are
finished
and
the
display
returns
to
the
Alarm
Menu.
Then
press
ESC
to
return
to
the
Main
Menu,
and
ESC
again
to
return
to
the
program
that
was
interrupted
bV
Valet
processing.
The
message
that
was
typed
here
will
appear
at
the
bottom
of
the
display
screen
at
the
scheduled
time
when
you
respond
to
the
alarm.
Scheduling
cmma
nd
~
At
the
prompt
to
ENTER
ALARM
TYPE,
type
C
to
enter
a command
line.
The
cursor
appears
at
the
first
line
of
the
message
entry
screen.
Tvpe
the
command.
Use
SUBMIT
to
chain
more
than
one
command
if
desirable.
ENTER
COMMAND:
I I
11:10:00
10/15
II
Press
ESC
when you
are
finished
and
the
display
returns
to
the
Alarm
Menu.
Then
press
ESC
to
return
to
the
Main
Menu,
and
ESC
again
to
return
to
the
program
that
was
interrupted
for
Valet
processing.
The
command
that
was
typed
here
will
appear
at
the
bottom
of
the
display
screen
at
the
scheduled
time
when you
respond
to
the
alarm.
You
may
then
reschedule
the
command
line
for
a
later
time
or
allow
it
to
execute
as
originally
scheduled.
3-5
•
Table of contents
Other OTRONA Laptop manuals


