Outwater Plastics Industries Brite Light Flex User manual

120V Brite Light Flex
Warranty:
Terms and Conditions
Outwater Plastics Industries, Inc. (“Outwater”) fully warranties to the original purchaser (“Purchaser”), 120V Brite Lite Flex (“Product”) to be free from defects in materials and workmanship which
causes the Product to fail to operate in accordance with the Product’s performance specications explicitly and exclusively set forth by Outwater in Outwater’s printed or online documentation at
www.outwater.com for the expressed period of one (1) year from the original date of delivery or pick up from Outwater’s facilities, as per the Product’s specied Terms and Conditions of Sale (“Terms”).
Analogous expressed or implied Product warranties represented by third parties or resellers of the Product are not applicable and will not be honored by Outwater under any circumstances.
The Product must be ordered directly through Outwater, and as such, the Purchaser establishes full recognition and approval of Outwater’s stated Terms and Limitations of Liability (“Liability”).
Whereby Outwater’s Terms and Liabilities for the Product are subject to revision at any time without notice to the Purchaser, unless otherwise authorized by Outwater, only the Terms and Liability
presented at the time of purchase of the Product are pertinent to the Product without exception.
Outwater’s limited warranty (“Warranty”) of the Product is based on reasonable usage in accordance with the Product’s specications for appropriate lighting applications, when installed and used in
conjunction with the Product’s corresponding components, accessories and power supplies, which must be properly wired and installed together as a system for their intended use in compliance with
all instructions, building codes, the latest Underwriter Laboratory Standards of Safety, National Electric Code, Canadian Standards Association, and all other domestic and international safety agencies
that are recognized as having applicable safety requirements. The Product’s corresponding components, accessories and power supplies must be used with the Product, and in applications and in
environmental conditions within the specied operating range of the Product. Even under such use, the Product, to varying degrees, will have some amount of normal light degradation over the life
of the Product. Any use beyond the intended operation or stated conditions herein, unless authorized by Outwater in writing at the time of purchase, such as the replacement or substitution of third
party or any other manufacturer’s component(s), accessories and power supplies, extreme environmental conditions or any other unintended usage, which includes, but is not limited to conditions
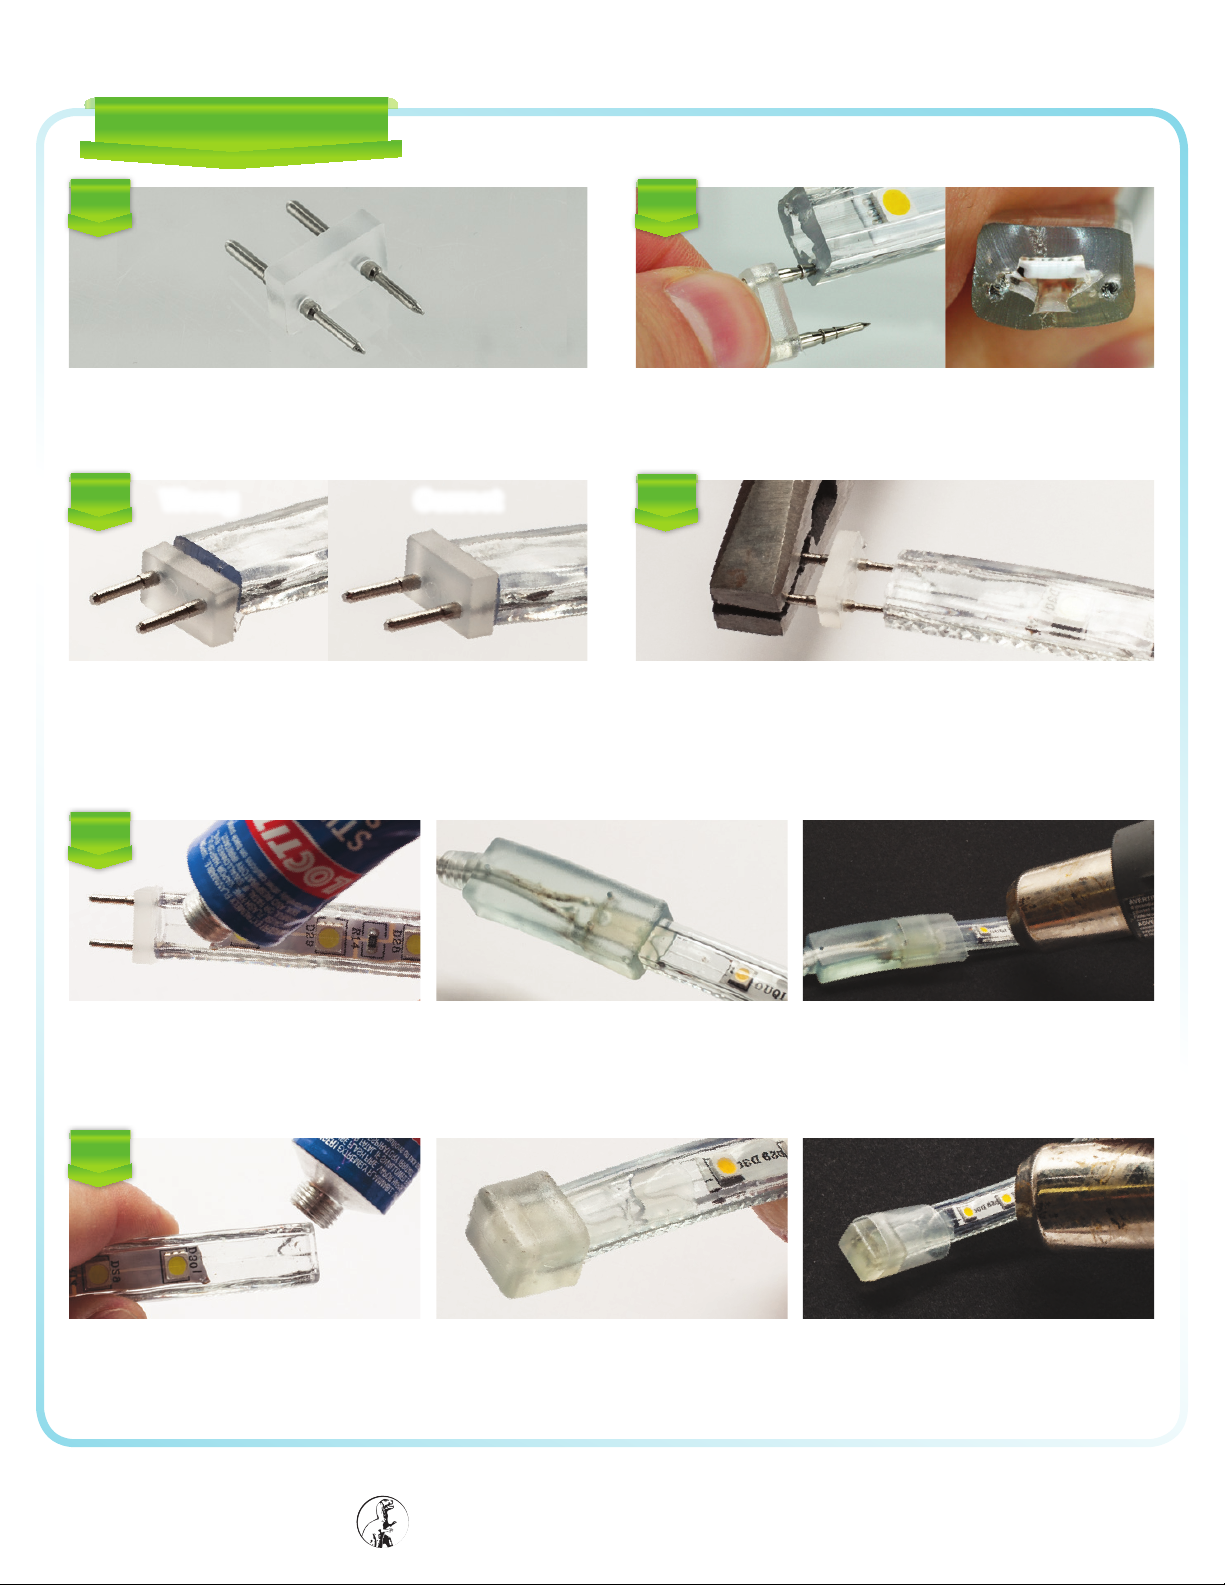
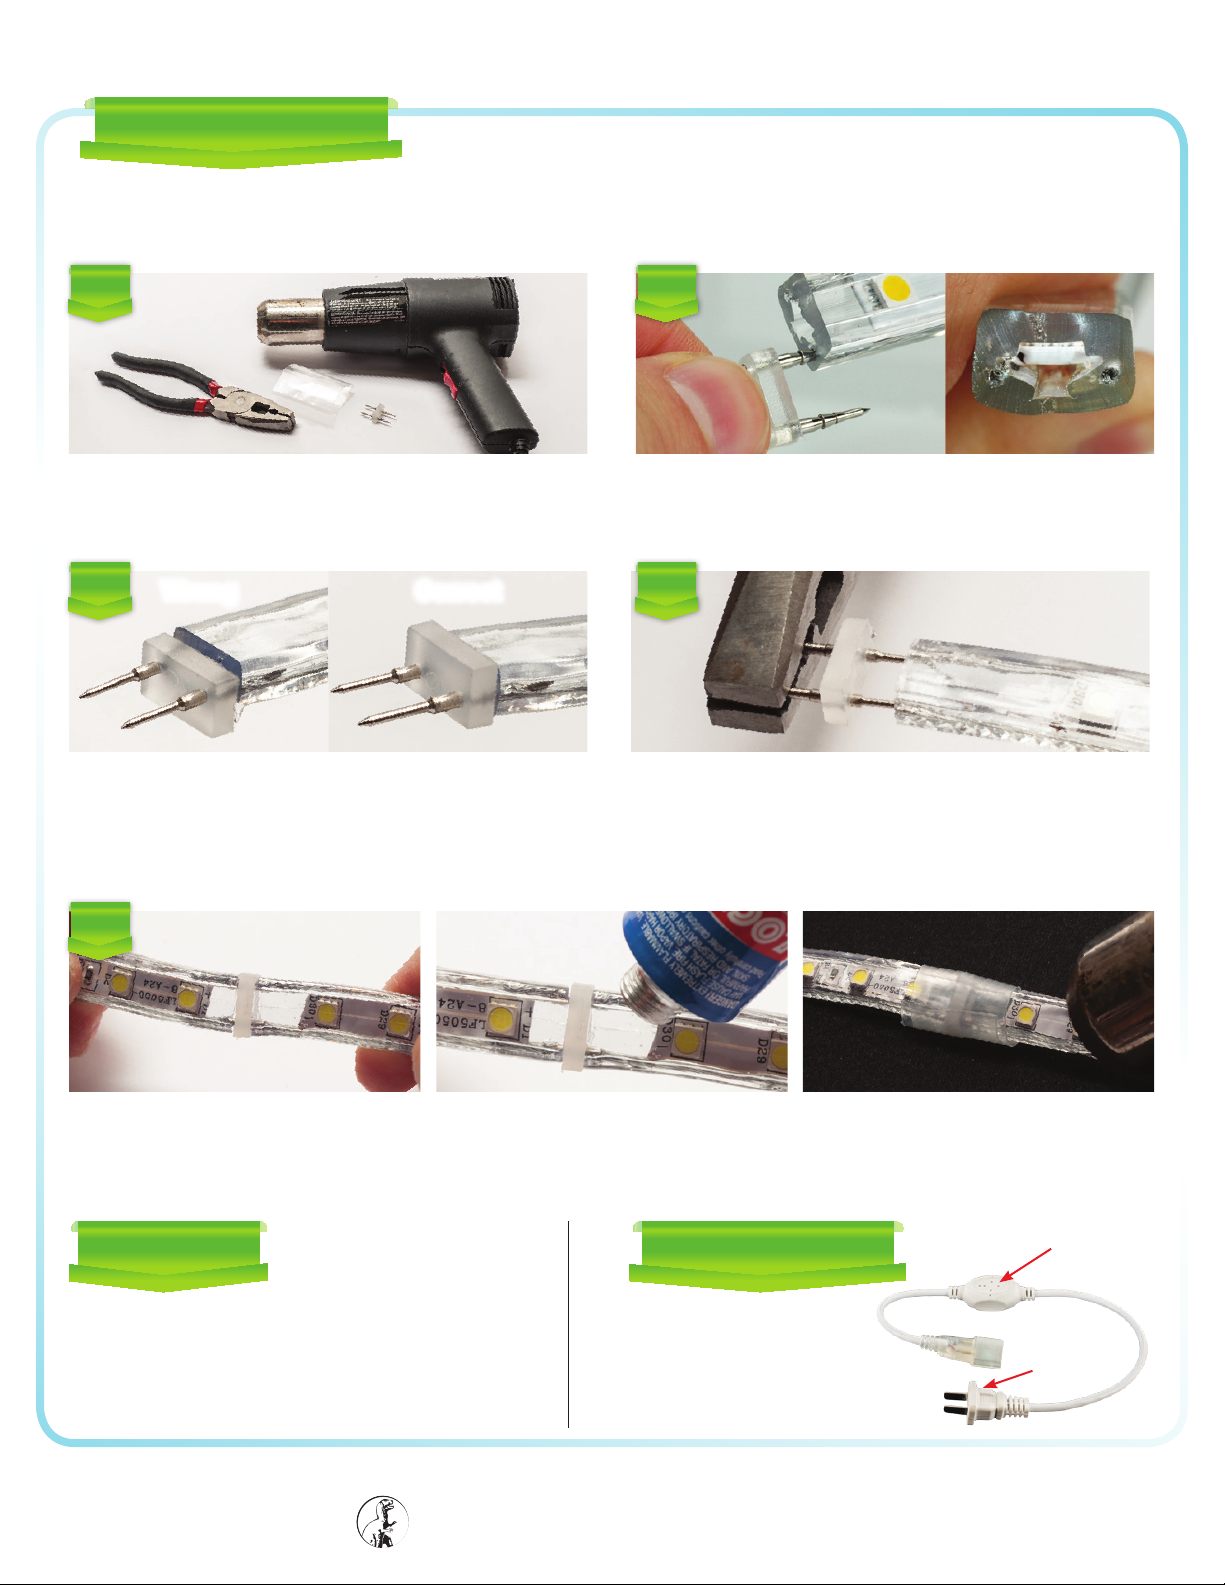
demonstrating abnormal use or stress, will void the Warranty. Product that is cut/altered/modied in any manner by any party (“Party”) will void the Warranty and cannot be returned or exchanged if
the Product were to fail to operate.
Limitation of Liability
If the Product covered by this limited Warranty is returned by the Purchaser to Outwater in compliance with Outwater’s Terms within the warranty period, and Outwater establishes to its satisfaction
that the Product has complied the Terms of the Warranty, Outwater, at its sole discretion, will provide to the Purchaser, a corresponding repair kit or replace the defective Product with either the same
or a comparable Product, should the original Product be discontinued. Under no circumstances shall Outwater be liable for any incidental or consequential loss or damage arising out of, or in any
way related to any defect in or non-performance of the Products. No warranty of merchantability or tness for a particular purpose is made or implied. Outwater shall not be responsible for any other
costs, including incurred labor related to the installation or removal of the Product, or eld support labor or loss of prots, income or revenue. Except as stated herein, there are no expressed or
implied warranties of any kind.
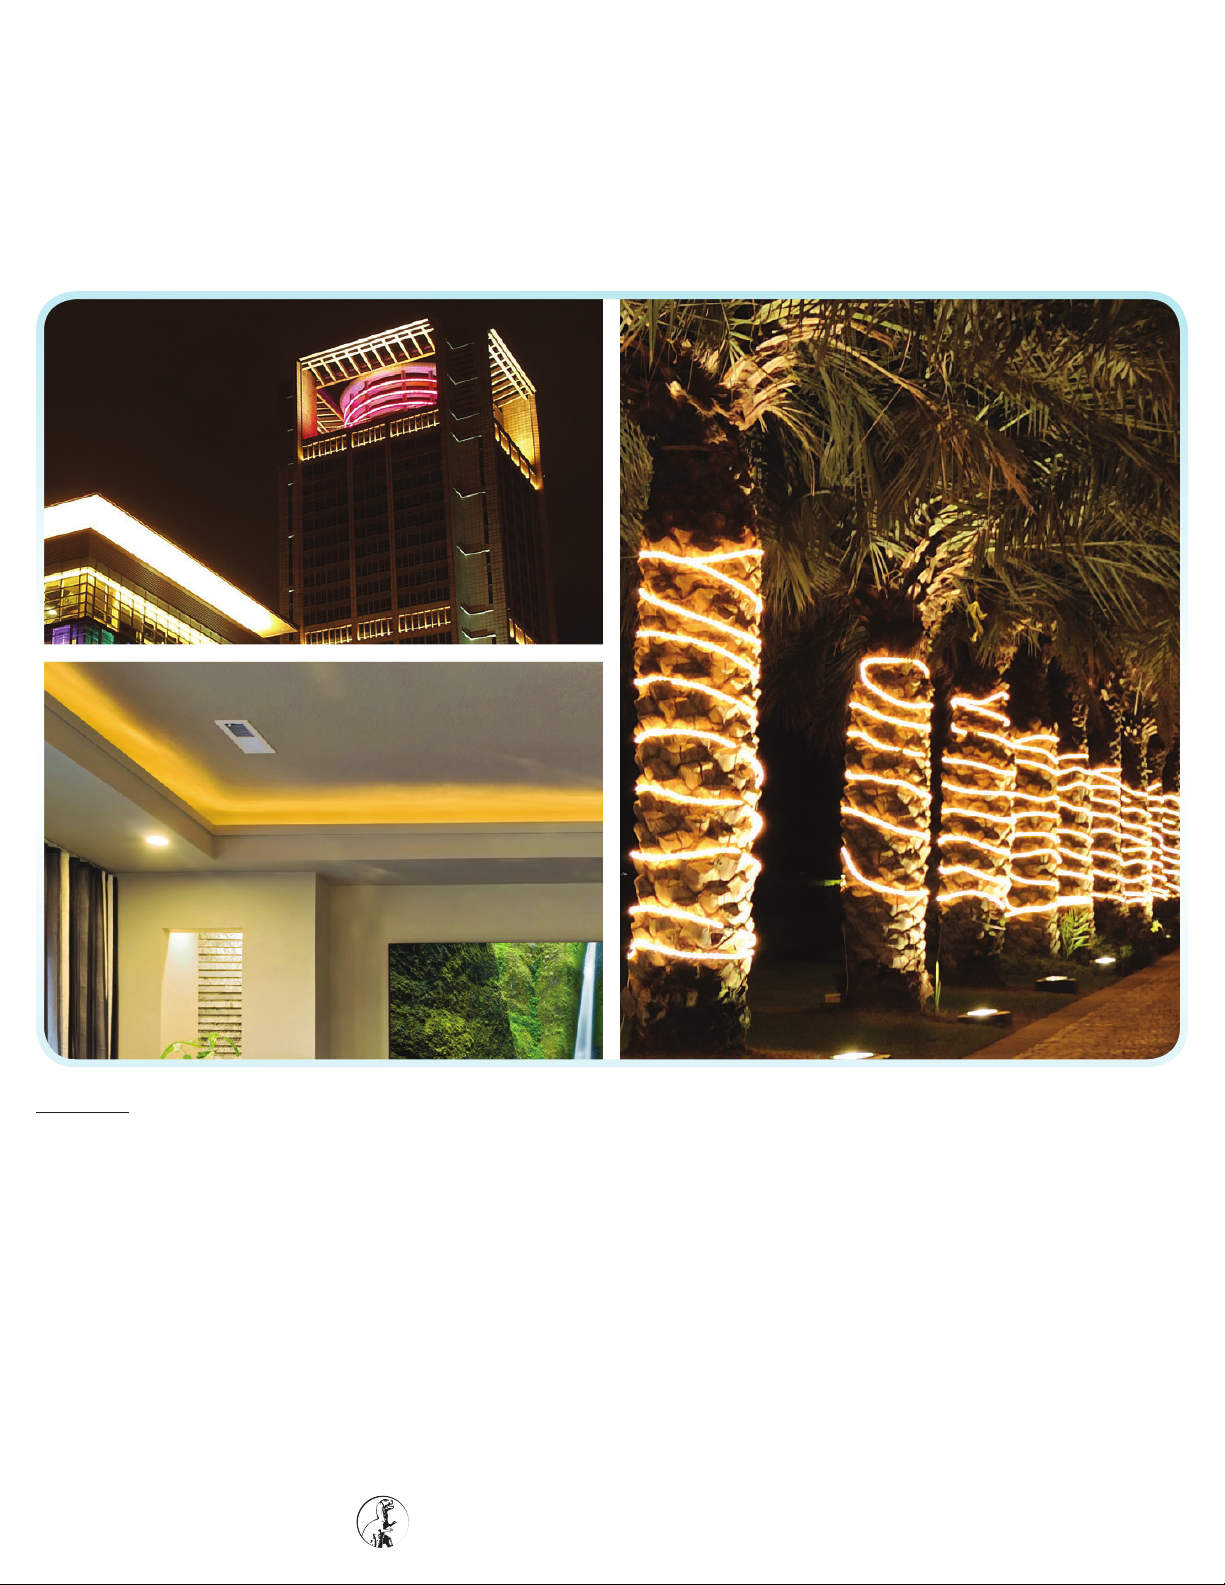
Congratulations on the purchase of Outwater’s 120V Brite Lite Flex. 120V Brite Lite Flex is designed and
manufactured to Outwater’s exacting standards from premium components to ensure optimal performance
and reliability over the course of many years if used as intended for appropriate lighting applications.
Please take the time to read the accompanying instructions before installing and using 120V Brite Lite Flex.
If you were to have any questions regarding the installation or use of 120V Brite Lite Flex, please contact
Outwater at 1-800-631-8375 or 1-201-498-8750.
Outwater Plastics Industries Inc.
1-800-631-8375 • www.outwater.com

Outwater Plastics Industries Inc.
1-800-631-8375 • www.outwater.com
Getting Started
Tool
When cutting Brite Light Flex section, use a straight edge cutter with
an anvil such as Outwater item #: CL46-25.
Hint: We are looking for a square, clean cut.
DO NOT use scissors, hand saw or utility knife to cut Brite Light Flex.
In the event of an uneven cut, do not try to repair and instead advance to the next appropriate section.
Thank you for purchasing Brite Light Flex.
To ensure proper installation, release read & follow these guide lines
1. This product has been rigorously tested and has passed our quality
control prior to shipping.
2. Test Brite Light Flex within 48 hours upon receipt to make sure no damage
occurred during shipping.
3. Important during your inspection do not leave Brite Light Flex coiled and
plugged in for more then 1-2 minutes. Excessive heat build up may
damage the electronics and shorten the life.
4. Each roll of Brite Light Flex includes a factory installed waterproof power
cord and has a 1 year limited warranty.
5. Customers wishing to cut or alter Brite Light Flex, must follow the guide lines.
Note: Cutting Brite Light Flex voids all warranty
Customers wishing to have pre cut sections please call our sales department.
Minimums and lead times apply.
Double D-Light
Standard Solid Color
Economy Solid Color
120V Brite Light Flex
Guide Lines
Important Cutting Instructions: Only cut 120V Ribbon at appropriate junctions as seen in diagram
Helpful Hint: The tendency is to cut right in the middle or straight in half instead, it is recommended to cut
closer to the nished end where you will attach an end cap. This allows more room to attach the power
cord to the next section.
The proper installation begins with a straight cut & the precise alignment of power cord to the Brite Light Flex.
Measure & Cut 120V LED Ribbon To Desired Length
Back view for cutting Front view for cutting Cut line closer to ending side
Cutting Area Cutting Area

Outwater Plastics Industries Inc.
1-800-631-8375 • www.outwater.com
Attaching The
Power Supply
Pierce a pilot hole
Hint: Piercing a pilot hole on both sides will ensure a
perfectly straight and parallel connection.
Pin Direction
Note: The pin is positioned lower to meet the power wire
in the Brite Light Flex.
With pliers securely and fully insert the sharp
pin side into Brite Light Flex
Be sure to make contact with the power wires within the
Brite Light Flex PCB Boards (LED). If pins aren’t properly
inserted it will affect operation.
Now you are ready to join the Brite Light Flex with a power cord
First apply a small bead of silicon or Locktite® PVC adhesive. Be sure to line up the pins with the holes on the power cord
and insert securely. Fully allow proper curing time for adhesive.
Hint: When using in damp environments or outdoors, we recommend you use a heat sleeve and heat gun.
Add an end cap to the following end
First apply a small bead of silicon or Locktite® PVC adhesive to securely fasten.
Fully allow proper curing time for adhesive. Test lights prior to installation.
Hint: When using in damp environments or outdoors, we recommend you use a heat sleeve and heat gun.
Locate the 2 pin connector
The connector has sharp pins on one side and round pins
on the other side.
Wrong Correct
Step:
1
Step:
3
Step:
2
Step:
4
120V Brite Light Flex
Step:
5
Step:
6

Outwater Plastics Industries Inc.
1-800-631-8375 • www.outwater.com Bulletin: 9-29-15
Special
Applications
Connecting
Cables
Hardwiring To A
Wall Switch / Dimmer
Now you are ready to join the two pieces of Brite Light Flex
First securely and fully insert the sharp pin side into the other piece of the Brite Light Flex. Then apply a small bead of
silicon or Locktite® PVC adhesive. Lastly afx the heat sleeve to the Brite Light Flex by using a heat gun.
Fully allow proper curing time for adhesive
Customers wishing to create gaps over doorways
or turns may require a connecting cable.
The installation is the same as connecting the
Brite Light Flex to a power supply.
Have your electrician
remove the 2 prong plug
and hardwire to your switch.
Note: Must not remove the inverter
Inverter
2 Prong
Plug
120V Brite Light Flex
Must use splicing kit (includes double sided
sharp pin & heat sleeve), heat gun, pair
of pliers and silicon or Locktite® PVC adhesive.
Splicing multiple pieces &/or colors: please keep in mind that you must not exceed the
maximum running length. (3528= 164’ & 5050= 82’)
Pierce a pilot hole
Hint: Piercing a pilot hole on both sides will ensure a
perfectly straight and parallel connection.
Pin Direction
Note: The pin is positioned lower to meet the power wire
in the Brite Light Flex.
Wrong Correct
With pliers securely and fully insert one of the
sharp pin side into Brite Light Flex
Be sure to make contact with the power wires within the
Brite Light Flex PCB Boards (LED). If pins aren’t properly
inserted it will affect operation.
Step:
1
Step:
3
Step:
5
Step:
2
Step:
4