Overland Storage NEO 2000e User manual

10400244-002 Jul 2013 ©2009,2013 Overland Storage, Inc. Page 1 of 4
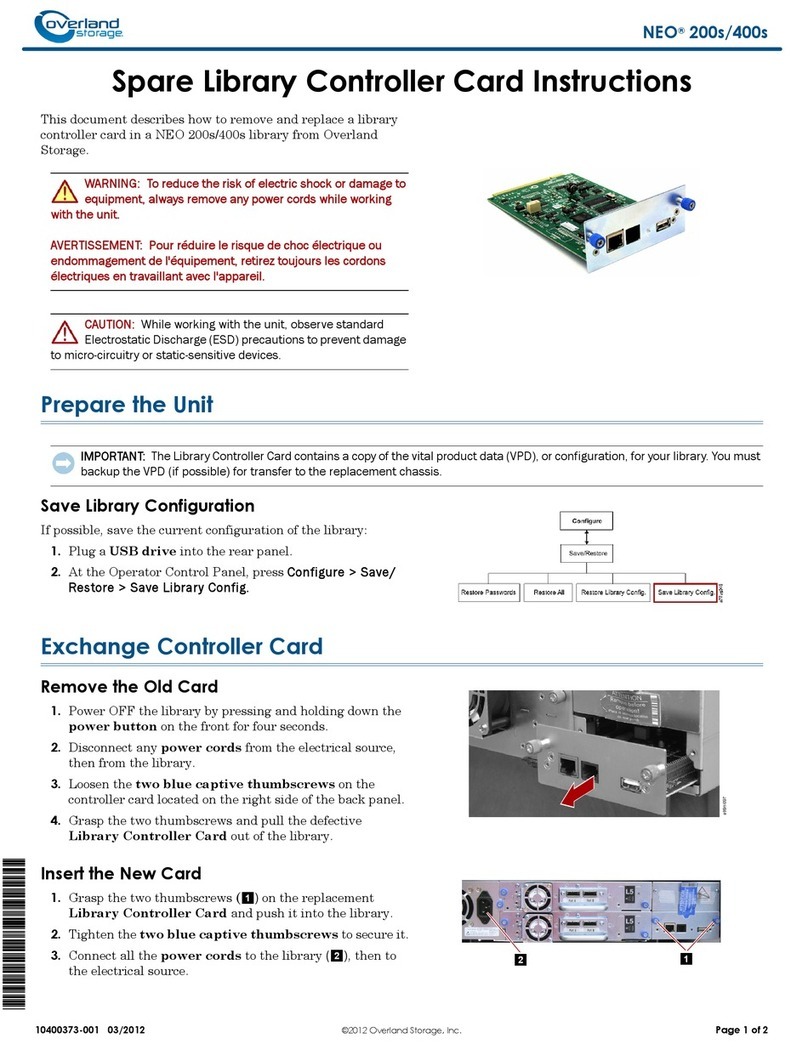
This document describes how to remove and replace the
Library Controller card in a NEO 2000e or 4000e library.
It is also used for legacy NEO libraries that have been
upgraded to an E-Series.
WARNING: To reduce the risk of electric shock or
damage to equipment, always remove any power cords
while working with the unit.
AVERTISSEMENT: Pour réduire le risque de choc
électrique ou endommagement de l'équipement, retirez
toujours les cordons électriques en travaillant avec l'appareil.
NOTE: A discharge of static electricity can damage micro-
circuitry. To help prevent Electrostatic Discharge (ESD),
observe standard ESD precautions.
Unpacking the Spare
Carefully unpack and verify that you have all the parts:
•Library Controller card
•Five (5) M4x6mm hexhead screws
•Sixteen (16) M3x6mm flathead Phillips screws
You will also need a 2.5mm (or 3/32 inch) hex driver and a
slip-joint pliers.
1. If the library is operational:
a. Exit the application software and, if necessary,
stop the software services.
b. Using the GUI (or the application software), remove
any cartridges from the drives to prevent damage.
c. Use the GUI to remove all the magazines.
IMPORTANT: If the library is non-operational, the
doors can be manually opened by pushing a stiff
wire against the releases behind the front panel.
2. Make note of the library’s IP Address. It will be used
to reconfigure the library after replacing the card.
3. Using the Web Management Interface, download the
Binary file from the History tab. This can be used as a
reference to reconfigure the library with unique
configurations.
4. Power off the library:
a. At the GUI, press
Power > OK
(at Confirm).
b. Turn the power supply switch to OFF (O).
c. Remove the power cord.
Remove Library from Rack
1. Remove all external cables.
For SCSI drives, leave the terminators attached.
2. If XpressChannel is installed, release it by loosening
the two captive screws on the back side and, for a
Master unit, unplugging the DB-15 cable.
3. To reduce weight, we recommend removing the drive
assemblies:
a. Loosen the captive thumbscrews at the top and
bottom of the drive assembly.
b. Fully supporting the assembly, pull the handle to
remove the drive assembly.
c. Place each drive assembly on an ESD surface on its
side as not to bend the tabs.
NEO®2000e/4000e
Spare Library Controller Card
Remove & Replace Instructions
Overview & Notes
Preparing the Library
Manual Release Locations
Replacing the 2000e Card

10400244-002 Jul 2013 ©2009,2013 Overland Storage, Inc. Page 2 of 4
WARNING: It is recommended that a mechanical lifter
(or at least two people) be used during rack installation
or removal to prevent injury.
AVERTISSEMENT: Pour éviter toute blessure il est
recommande qu'un monte-charge (ou deux personnes
au moins) soit utilisé lors de l'installation ou de l'enlèvement
du support.
4. Using a mechanical lifter (or two people), remove the
unit from the rack and place on a secure ESD surface.
Remove the Old Card
1. Remove front top cover:
a. Open the front doors and remove and retain the two
screws securing the front top cover.
b. Remove the cover, and set aside.
2. Remove and discard the five hexhead screws holding
the inner side rail on left side. Set the rail aside.
3. Remove the side panel:
a. Remove and discard the 14 screws on the side.
b. Remove and discard the two screws on the card
cage top left edge holding side panel.
c. Carefully swing out and lift the rear of the side
panel and lift the side panel front hook off front
panel.
You may have to work with retaining screws to
extract the side panel.
4. Using a slip-joint pliers, untwist the three metal tabs
on the card cage side.
5. Carefully swing front edge of card cage side plate out
and work the rear edge off the toggle switch on the
card. Set the plate aside.
6. Remove the old controller card.
Prepare the New Card
The replacement Library Controller card is used in
different libraries and comes with a comes with a quick-
release plate on the rear connectors. This plate is
unnecessary with the NEO 2000e and must be removed:
1. Remove the new card and place it on an ESD surface.
Hex ScrewsSide Rail
Side Panel
Card Cage Screws Hook
Hook
ScrewSide Panel
Front Panel
Untwist to Release Twist to Secure

10400244-002 Jul 2013 ©2009,2013 Overland Storage, Inc. Page 3 of 4
2. Locate the quick-release plate screws on the back
side of the card.
3. Remove and retain the two screws, and slide the
quick-release plate off the new card.
4. Using the retained screws, attach the quick-release
plate to the old card.
5. Package the old card in the ESD bag for return.
Install the New Card
1. Carefully insert the new controller card observing
ESD procedures. Ensure the plastic sleeve around the
toggle switch stays on.
2. Slide the rear of card cage side plate over the toggle
switch and insert it onto the three side tabs.
3. Gently twist the tab edges to secure the plate.
4. Reinstall the side panel:
a. With the rear angled out slightly from the library,
fasten the front hook onto the front panel.
b. Swing the rear toward the unit until all the tabs are
aligned with their respective holes.
c. Using two new M3x6mm screws, secure the card
cage top edge to the side panel.
d. Using 14 new M3x6mm screws, secure the side
panel to the library.
5. Using five new M4x6mm hexhead screws, reattach the
inner side rail.
6. Replace the front top cover:
a. Slide the cover tabs into their slots and gently set
the front top cover into place.
b. Insert the two retained screws and tighten them.
Reinstall the Library
1. Using a mechanical lifter (or two people), reinstall the
library into the rack.
2. If removed, reinstall each of the drive assemblies:
a. While fully supporting the assembly, line it up with
the open bay and slowly push it into the bay until it
seats firmly against the backplane.
b. Tighten the two captive thumbscrews.
3. Reconnect all external cables.
4. For SCSI systems, verify the terminators are still
attached to the drive housings.
5. If used, reconnect the XpressChannel and, for a
Master unit, plug in the DB-15 cable.
6. Manually open the doors and reinstall the magazines.
Continue with “Complete the Installation” on page 4.
CAUTION: The Library Controller card only functions in
the right-most slot of the Primary card cage.
1. Using a Phillips screwdriver, loosen the retaining
screws at the top and bottom of the card.
2. Push the top ejector handle up and the bottom
ejector handle down to release the card.
3. Slide the card out of the bay.
4. Carefully insert the new card into the right-most slot
and slide the card into the bay.
Resistance will be felt when the card begins to mate
with the library backplane.
5. Using the card handles, apply just enough force to seat
the card snugly into the library backplane.
6. Tighten the hold-down screws on the card.
Continue with “Complete the Installation” on page 4.
Remove These Screws
Squeeze These Points Together
Replacing the NEO 4000e Card

10400244-002 Jul 2013 ©2009,2013 Overland Storage, Inc. Page 4 of 4
Replace the Card
Legacy NEO 2000 or NEO 4000 libraries that have been
upgraded to E-Series level also use this Controller card.
Follow the same procedure for “Replacing the NEO 4000e
Card” on page 3 to replace the card in either library.
Copy E-Series Key Code
Once the new card is installed, it needs to have the
upgrade key entered to activate it. Look inside the left
door and copy the key code off the E-Series Upgrade
sticker. It is needed during the configuration steps.
Power On the Library
1. Plug in the power cord.
2. Turn the power supply switch to ON (|).
3. Press the GUI touchscreen to power on the module.
Configure the Library
NOTE: For more details about these steps, refer to the NEO
2000e/4000e User Guide.
1. Depending on the type of library module, do one of the
following:
•For a Master/Standalone module, at the GUI, press
Menu > Network
to set the IP address of the library
noted earlier to allow access to the Web Management
Interface.
If not available, to obtain the static IP address used,
contact your network administrator.
•For a Slave module, use the GUI to change it to
Slave mode, and reboot.
2. For a legacy NEO library, at the GUI, enter the full
32 digit E-Series Upgrade key through
Menu > Library
> Feature Keys
. Hyphens and spaces are ignored.
NOTE: A Master or Standalone module can also be
configured through WebTLC (Setup > Feature Key).
Wait for the reboot to complete before continuing.
3. Using the default Administrator password (“2”), log
on to Web Management Interface and reconfigure the
library and network.
If necessary, re-enter any feature key codes.
Learn Tape Drive Positions
To prevent the backup software from timing out, it is
necessary to have the library learn the bays where all the
tape drives are located.
1. At the front panel, press
Move Media
.
2. Move a tape to a drive:
a. Select a tape in a slot as the
Source
.
b. Select a tape drive as the
Destination
.
c. Press
Execute Move
.
3. Reverse the process to move the tape back to its slot.
4. Repeat Steps 2–3 for the remaining drives.
You are now ready to put the library back online and
enable the backup software to access it.
Return Old Part
1. Place the old part in the anti-static bag and put it in
the replacement part’s box.
2. Use an RMA to return the part to Overland Storage.
For return shipping details and RMA number, go to:
http://docs.overlandstorage.com/return-instructions
Replacing the Legacy NEO Library Card
Complete the Installation
Additional Help
You can get additional technical support on the Internet at http://support.overlandstorage.com, or call
1-877-654-3429 (toll-free U.S. & Canada), +44 (0) 118-9898050 (Europe), or +1 (858) 571-5555 Option 5 (International).
Other manuals for NEO 2000e
8
This manual suits for next models
1
Other Overland Storage Controllers manuals
Popular Controllers manuals by other brands

HighPoint
HighPoint RocketU 1142A Quick installation guide

RainFlo
RainFlo PC115A user manual

AMX
AMX NetLinx Integrated Controller NI-2100 Hardware reference guide

cashco
cashco DA5 Installation, operation & maintenance manual

FSIP
FSIP FS Series Instruction & installation manual

Zaber
Zaber T-CON3 user manual