OVERWATCH EH220 User manual

EH220
User Manual
Thanks for your purchasing. This camera is specially designed for video
recording and photo taking. Please read the user manual before using it.
Body Worn Video and Audio Recorder

1
Body Camera Exterior Overview

2
Item
Description
1. LCD Screen
# Show camera status like battery, storage, WIFI,
GPS, resolution and IR.
# Press power button to turn on/off LCD
backlight.
2. Charging dock
connector
Connect charging dock for charging or
connecting PC
3. Infrared Lights
Provide infrared light compensation in low light
conditions, to help camera record good quality
video with clear face view up to 10 meters
4. Camera Lens
Full HD camera
5. Light Sensor
Detect changes of light and turn on/off IR for
low-light recording automatically
6. Charging
Indicator LED
Blue: Charging Status
White: camera is fully charged
7. Status Indicator
LED
Solid Red: camera is in standby mode
Flashing Red: camera is recording video
Flash once: camera is taking photo
8. Record Button
a) Press to start video recording
b) Hold 3 seconds to stop video recording
9. Snapshot Button
a) Press to take pictures in standby mode
b) Press to take a single snapshot image while in
video recording
c) Hold 3 seconds to enable covert mode, both
voice, LED & LCD indication will be disabled,
camera will only vibrate: Start recording, vibrate
once, stop recording, vibrate twice.

3
10. USB Port
For charging or connection to PC
PS: connects to external camera, optional
11. Fn Button
a) Press to turn on/off infrared lights when
infrared lights are in manual mode.
b) When camera is in standby mode, hold 3
seconds to turn on/off WIFI.
12. Power Button
Hold 3 seconds to turn on; Hold 3 seconds to
turn off

4
How To Operate
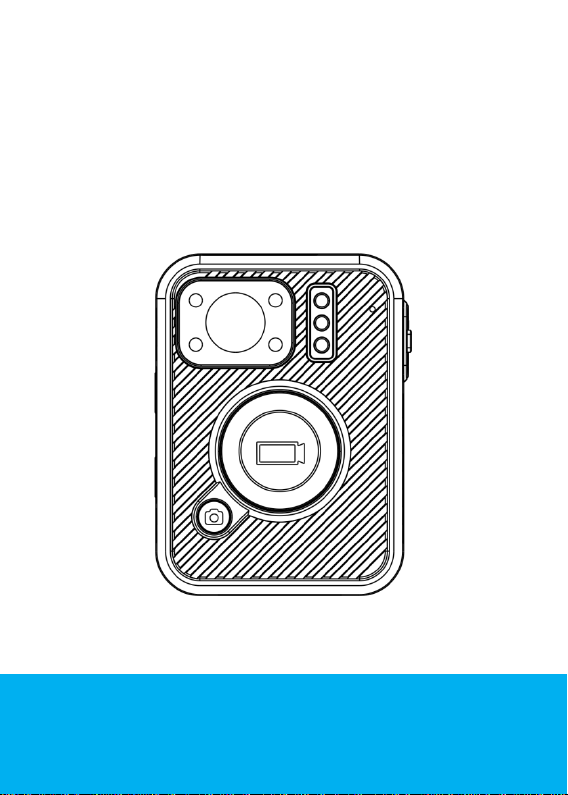
Power on/off and Standby Mode
Hold the power button for 3 seconds to turn the camera on. Camera will
enter standby mode. Hold for 3 seconds again to turn off the camera.
Video Recording
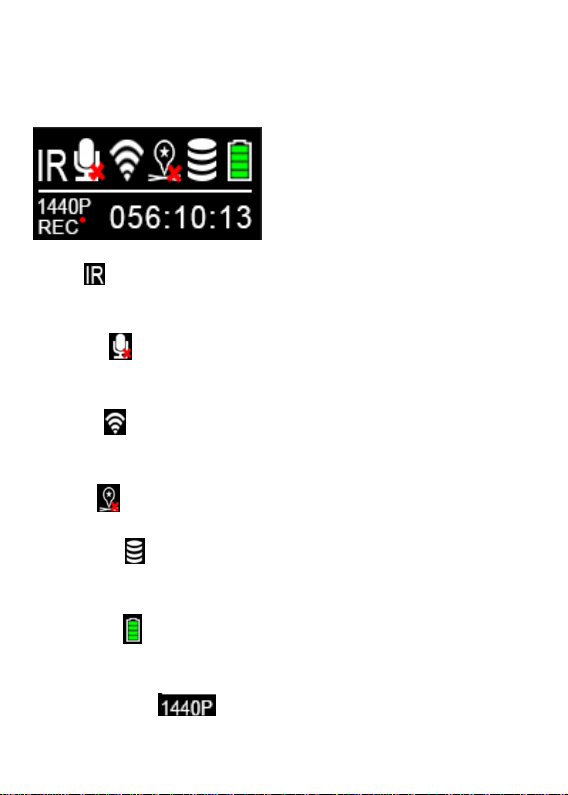
When the camera is in standby mode, press the REC button to start video
recording. It will then initiate with an audio prompt (recording start) and the
LED recording indicator will flash (red), while the camera vibrates once.
Hold for 3 seconds to stop video recording and the camera will vibrate twice
while the LED will change to a solid red colour.
Note: When the camera is powered off, hold the recording button for 3
seconds to start video recording immediately.
Snapshot
Either when the camera is in standby mode or recording video, press the
snapshot button to take a photo.
Hold the snapshot button for 3 seconds to enable covert mode, both the LED
& voice indication will be disabled. Camera recording status will be indicated
by vibration. Camera vibrates once when recording has started and vibrates
twice when recording has stopped.

5
LCD Screen
LCD screen overview:
IR icon : When the IR Infrared light has been turned on, IR icon
will turn red.
Mute icon : When the mute function is triggered, mute icon will
show a red cross.
WIFI icon : When WiFi has been turned on, WiFi icon will turn
blue.
GPS icon : When GPS has been received, GPS icon will turn green.
Storage icon : When the storage is full, it will show 4 blocks, then
one block less once storage has been used.
Battery icon : When the battery is full, it will show 4 blocks, then
one block less once battery has been used.
Resolution icon : When the resolution has been set,
resolution icon will show accordingly.

6
Video recording icon : When video recording starts, the red
dot will start flashing. When the camera is in standby mode, the red
dot will be solid red.
Recording time : The time by HHH:MM:SS indicates the
video recorded time.
LED Indication
Charging indication LED:
Blue: Charging Status
White: Camera is fully charged
Status Indicator LED:
Solid Green: Camera is in standby mode
Solid Red: Camera is in standby mode, while pre-record is set
Flashing Red: Camera is recording video
Flash red once: Camera is taking photo
Charging
Use the USB cable supplied in the box to charge the camera via the
USB port on the side, or the USB port on the charging dock where
the camera is docked.
Note: Upon receiving your body camera, it is recommended that
you fully charge the device before usage; recharge the camera
before long periods of no use.

7
Reset
RESET BUTTON is inside the USB port.
Press the RESET BUTTON when the camera freezes up or works
abnormally.
Note:
When the cameras battery level goes to 5%, it will prompt voice
alarm: LOW BATTERY, LOW BATTERY … …
When the cameras memory level descends to 200MB, the camera
will prompt a voice alarm: CARD FULL, CARD FULL … …

8
Camera Setting
1. Install BodyWornCamera.exe (download from website) in your
computer.
2. Connect the camera to computer and run BodyWornCamera.exe.
PS: Make sure the camera is not in recording mode or pre-recording
mode before connecting camera to computer. You can find
“discover device access” in the bottom after camera connects to
computer successfully.

9
3. Enter password and connect device, then click “login”.
PS: default password is 000000.
4. Synchronising date and time: click “get” and then “set”.
5. Changing Device/Police ID: enter Device/Police ID and click “set”.
6. Password setting: Enter old password, new password and confirm
password and then click “Modify”.
7. Other settings.
Click “other settings” in the bottom to get access to other settings.
After make the options of settings, click “set and return” to go back
to previous interface.

10
Setting
Description
Options
Resolution
The image resolution for video
2560×1440 30P
2304×1296 30P
1920×1080 30P
1280×720 30P
848×480 30P
Video split
time
While recording video, the camera will
automatically split its recording into files
of this length.
5 min, 15 min,
30 min
GPS/Glonass
When GPS is on, position of video will be
recorded and can be reviewed by GPS
player.
Off, On

11
Volume
The volume of camera speaker. This
affects the loudness of video playback,
audio playback, the key tone, record
warning, and any other sounds played by
camera. This doesn't affect the volume of
the recorded video or audio files
themselves.
0,3,6,9,12
Video quality
The quality of the image for video.
BEST Quality,
BETTER Quality,
NORMAL Quality
Recording
warning
When on, you will hear a voice
confirmation when you start recording.
When off, voice confirmation is disabled.
Off, On
Loop Record
When on, camera will overwrite the very
first video file with the latest video file
once its memory is full.
Off, On
Infrared
When set to manual, you need to press Fn
button to turn IR LEDs on/off. When set to
Auto, these lights will be activated
automatically based on the light
condition.
Manual, Auto
Code format
Video coding format
H.264, H.265
Pre-recording
When on, a certain time (depend on video
resolution) will be combined into the
recorded video before record button is
pressed to start recording;
When off, video start until the Record
button is pressed to start recording.
Off, On
Time Zone
Adopt local time in real time zone
-12 to +12

12
After you change the settings, click “set and return” to go back to
previous interface.
8. Review the recorded files
Press Enter U disk to mount the camera as mass storage in
computer.
PS: you will hear a sound from computer announcing camera is
under U disk mode. Then you can go to camera folder to view and
delete files.

13

14
Table of contents
Popular Accessories manuals by other brands

GE
GE ZW6305 manual

Intelbras
Intelbras IVP 4000 smart user manual

PCB Piezotronics
PCB Piezotronics M165A01 Installation and operating manual

Carefree of Colorado
Carefree of Colorado FREEDOM RM owner's manual

Primrose
Primrose Drop Arm Awning instructions

Orbit Manufacturing
Orbit Manufacturing Orbit Rain/Freeze Sensor installation instructions