Ovislink AirLive RS-1000 User manual

AirLive RS-1000
Security Bandwidth Management
User’s Manual

Contents
System 1
Admin 3
Setting 7
Date/Time 16
Language 18
Permitted IP 19
Multiple NAT 23
Hack Alert 28
Route Table 31
DHCP 35
Host Table 36
Dynamic DNS 37
Logout 42

Software Update 43
Interface 44
Address 54
LAN 55
LAN Group 59
WAN 63
WAN Group 67
Service 71
Pre-defined 72
Custom 73
Group 78
Schedule 82
QoS 87
Authentication 92
Policy 97

Outgoing 98
Incoming 105
Content Filtering 113
URL Blocking 114
General Blocking 119
Virtual Server 120
Mapped IP 122
Virtual Server 126
LOG 134
Traffic Log 135
Event Log 138
Connection Log 141
Log Backup 144
Alarm 147
Traffic Alarm 148

Event Alarm 151
Accounting Report 154
Outbound 156
Inbound 162
Statistics 168
WAN Statistics 170
Policy Statistics 171
Status 173
Interface Status 174
ARP Table 176
DHCP Clients 177
Setup Examples 178

1
System
The Security Bandwidth Manager Administration and monitoring control is set by the System
Administrator. The System Administrator can add or modify System settings and monitoring
mode. The sub Administrators can only read System settings but not modify them. In System,
the System Administrator can:
1. Add and change the sub Administrator’s names and passwords;
2. Back up all Security Bandwidth Manager settings into local files;
3. Set up alerts for Hackers invasion.
What is System?
“System” is the managing of settings such as the privileges of packets that pass through the
Security Bandwidth Manager and monitoring controls. Administrators may manage, monitor,
and configure Security Bandwidth Manager settings. All configurations are “read-only” for all
users other than the Administrator; those users are not able to change any settings for the
Security Bandwidth Manager.
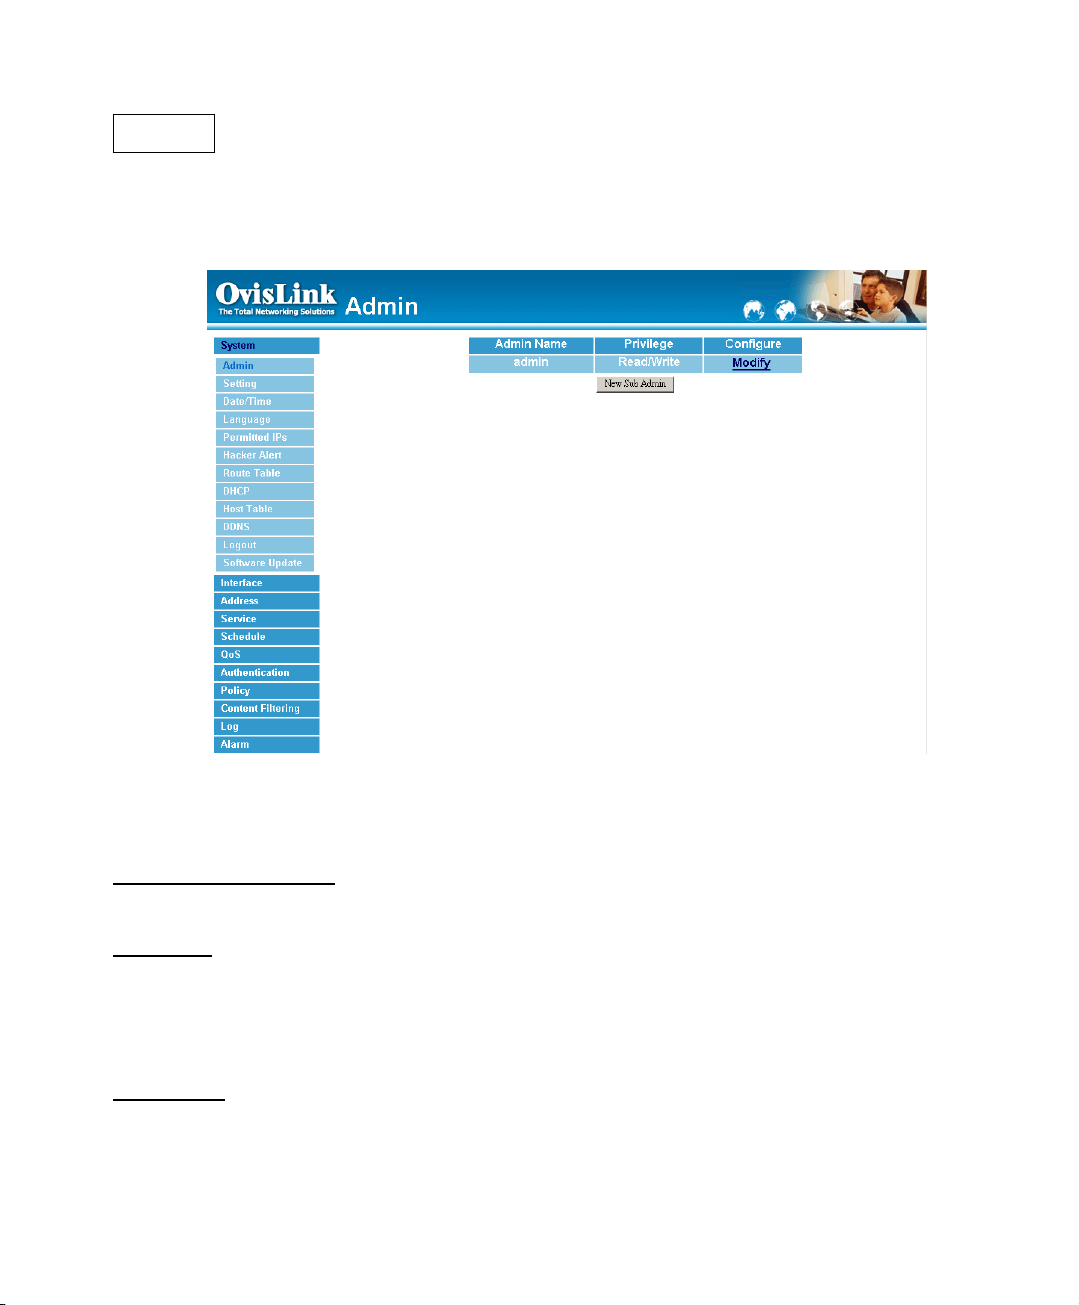
Admin: has control of user access to the Security Bandwidth Manager. He/she can
add/remove users and change passwords.
Setting: The Administrator may use this function to backup Security Bandwidth Manager
configurations and export (save) them to an “Administrator” computer or anywhere on the
network; or restore a configuration file to the device; or restore the Security Bandwidth
Manager back to default factory settings. Under Setting, the Administrator may enable
e-mail alert notification. This will alert Administrator(s) automatically whenever the Security
Bandwidth Manager has experienced unauthorized access or a network hit (hacking or
flooding). Once enabled, an IP address of a SMTP (Simple Mail Transfer protocol) Server is
required. Up to two e-mail addresses can be entered for the alert notifications.
Date/Time: This function enables the Security Bandwidth Manager to be synchronized either
with an Internet Server time or with the client computer’s clock.
Language: Both Chinese and English are supported in the Security Bandwidth Manager.

2
Multiple NAT Multiple NAT allows local port to set multiple subnet works and connect with
the Internet through different WAN IP Addresses.
Address:Enables the Administrator to authorize specific internal/external IP address(s for
Manager.
Hack Alert When abnormal conditions occur, the Security Bandwidth Manager will send an
e-mail alert to notify the Administrator, and also display warning messages in the Event
window of Alarm.
Route Table Use this function to enable the Administrator to add static routes for the
networks when the dynamic route is not efficient enough.
DHCP Administrator can configure DHCP (Dynamic Host Configuration Protocol) settings
for the LAN (LAN) network.
Dynamic DNS The Dynamic DNS (require Dynamic DNS Service) allows you to alias a
dynamic IP address to a static hostname, allowing your device to be more easily accessed by
specific name. When this function is enabled, the IP address in Dynamic DNS Server will be
automatically updated with the new IP address provided by ISP
Logout Administrator logs out the Security Bandwidth Manager. This function protects
your system while you are away.
Software Update The administrator can update the device’s software with the latest version.
Administrators may visit distributor’s web site to download the latest firmware.
Administrators may update the device firmware to optimize its performance and keep up with
the latest fixes for intruding attacks.

3
Admin
On the left hand menu, click on Setup, and then select Admin below it. The current list of
Administrator(s) shows up.
Figure1-1
Settings of the Administration table
Administrator Name: The username of Administrators for the Security Bandwidth Manager.
The user admin cannot be removed.
Privilege: The privileges of Administrators (Admin or Sub Admin)
The username of the main Administrator is Administrator with read / write privilege.
Sub Admins may be created by the Admin by clicking New Sub Admin. Sub Admins
have read only privilege.
Configure: Click Modify to change the “Sub Administrator’s” password and click Remove
to delete a “Sub Administrator.”
!!

4
Changing the Main/Sub-Administrator’s Password
Step 1. The Modify Administrator Password window will appear. Enter in the required
information:
"Password: enter original password.
"New Password: enter new password
"Confirm Password: enter the new password again.
Step 2. Click OK to confirm password change or click Cancel to cancel it.
Figure1-2

5
Adding a new Sub Administrator
Step 1. In the Add New Sub Administrator window:
"Sub Admin Name: enter the username of new Sub Admin.
"Password: enter a password for the new Sub Admin.
"Confirm Password: enter the password again.
Step 2. Click OK to add the user or click Cancel to cancel the addition.
Figure 1-3

6
Removing a Sub Administrator
Step 1. In the Administration table, locate the Administrator name you want to edit, and
click on the Remove option in the Configure field.
Step 2. The Remove confirmation pop-up box will appear. Click OK to remove that Sub
Admin or click Cancel to cancel.
Figure1-4 Remove Sub Admin

7
Settings
The Administrator may use this function to backup Security Bandwidth Manager
configurations and export (save) them to an “Administrator” computer or anywhere on the
network; or restore a configuration file to the device; or restore the Security Bandwidth
Manager back to default factory settings.
Entering the Settings window
Click Setting in the System menu to enter the Settings window. The Bandwidth Manager
Configuration settings will be shown on the screen.
Figure1-5 Setting
!!

8
Exporting Security Bandwidth Manager settings
Step 1. Under Bandwidth Manager Configuration, click on the Download button next
to Export System Settings to Client.
Step 2. When the File Download pop-up window appears, choose the destination place
to save the exported file. The Administrator may choose to rename the file if
preferred.
Figure1-6 Select the location where the exported files to be saved

9
Importing Security Bandwidth Manager settings
Under Bandwidth Manager Configuration, click on the Browse button next to Import
System Settings. When the Choose File pop-up window appears, select the file which
contains the saved Security Bandwidth Manager Settings, then click OK.
Click OK to import the file into the Security Bandwidth Manager or click Cancel to cancel
importing.
Figure1-7 Location and filename for saving imported file

10
Restoring Factory Default Settings
Step 1. Select Reset Factory Settings under Bandwidth Manager Configuration.
Click OK at the bottom-right of the screen to restore the factory settings.
Figure1-8 Select Reset Factory Settings

11
Enabling E-mail Alert Notification
Step 1. Select Enable E-mail Alert Notification under E-Mail Settings. This function
will enable the Security Bandwidth Manager to send e-mail alerts to the System
Administrator when the network is being attacked by hackers or when emergency
conditions occur.
Step 2. SMTP Server IP: Enter SMTP server’s IP address.
Step 3. E-Mail Address 1: Enter the first e-mail address to receive the alarm notification.
Step 4. E-Mail Address 2: Enter the second e-mail address to receive the alarm
notification. (Optional)
Click OK on the bottom-right of the screen to enable E-mail alert notification.
Figure1-9 Enable E-mail Alert Notification

12
Web Manager (WAN Interface) (Remote UI Manager)
The administrator can change the port number used by HTTP port anytime.
(Remote UI Manager)
Step 1. Set Web Manager (WAN Interface). The administrator can change the port
number used by HTTP port anytime.
Figure1-10 Web Manager

13
MTU (set networking packet length)
The administrator can modify the networking packet length.
Step 1. MTU Setting. Modify the networking packet length.
Figure1-11 MTU

14
To-Bandwidth Manager Packets Log
Once this function is enabled, every packet passing through the Firewall will
be recorded for the administrator to trace.
Step 1. Select this option to the device’s To-Bandwidth Manager Packets Log. Once
this function is enabled, every packet to this appliance will be recorded for system
manager to trace.
Figure1-12 Enable To Bandwidth Manager Packets Log

15
Security Bandwidth Manager Reboot
Once this function is enabled, the Security Bandwidth Manager will be rebooted.
Reboot Security Bandwidth Manager: Click Reboot.
A confirmation pop-up box will appear. Follow the confirmation pop-up box, click OK to restart
Security Bandwidth Manager or click Cancel to discard changes
Figure1-13 Reboot Security Bandwidth Manager
Other manuals for AirLive RS-1000
1
Table of contents
Popular Firewall manuals by other brands

Fortinet
Fortinet FortiGate FortiGate-1000 Administration guide

SonicWALL
SonicWALL CSa 1000 installation and replacement

PaloAlto Networks
PaloAlto Networks PA-220 Hardware reference

Cisco
Cisco RV110W quick start guide

Fortinet
Fortinet FortiGate 5001FA2-LENC Guide

IBM
IBM QRadar XGS 5200 Replacement instructions