Oweewell WMA400 User manual

DIGITAL AUDIO BABY MONITOR
ECOUTE BEBE NUMERIQUE
DİJİTAL BEBEK TELSİZİ
WMA400
USER MANUAL
EN
MODE D’EMPLOI
FR
KULLANIM KILAVUZU
TR

CONTENTS
Welcome .......................................................................................................3
Important! ....................................................................................................3
Caution .........................................................................................................4
Parts Checklist ..............................................................................................5
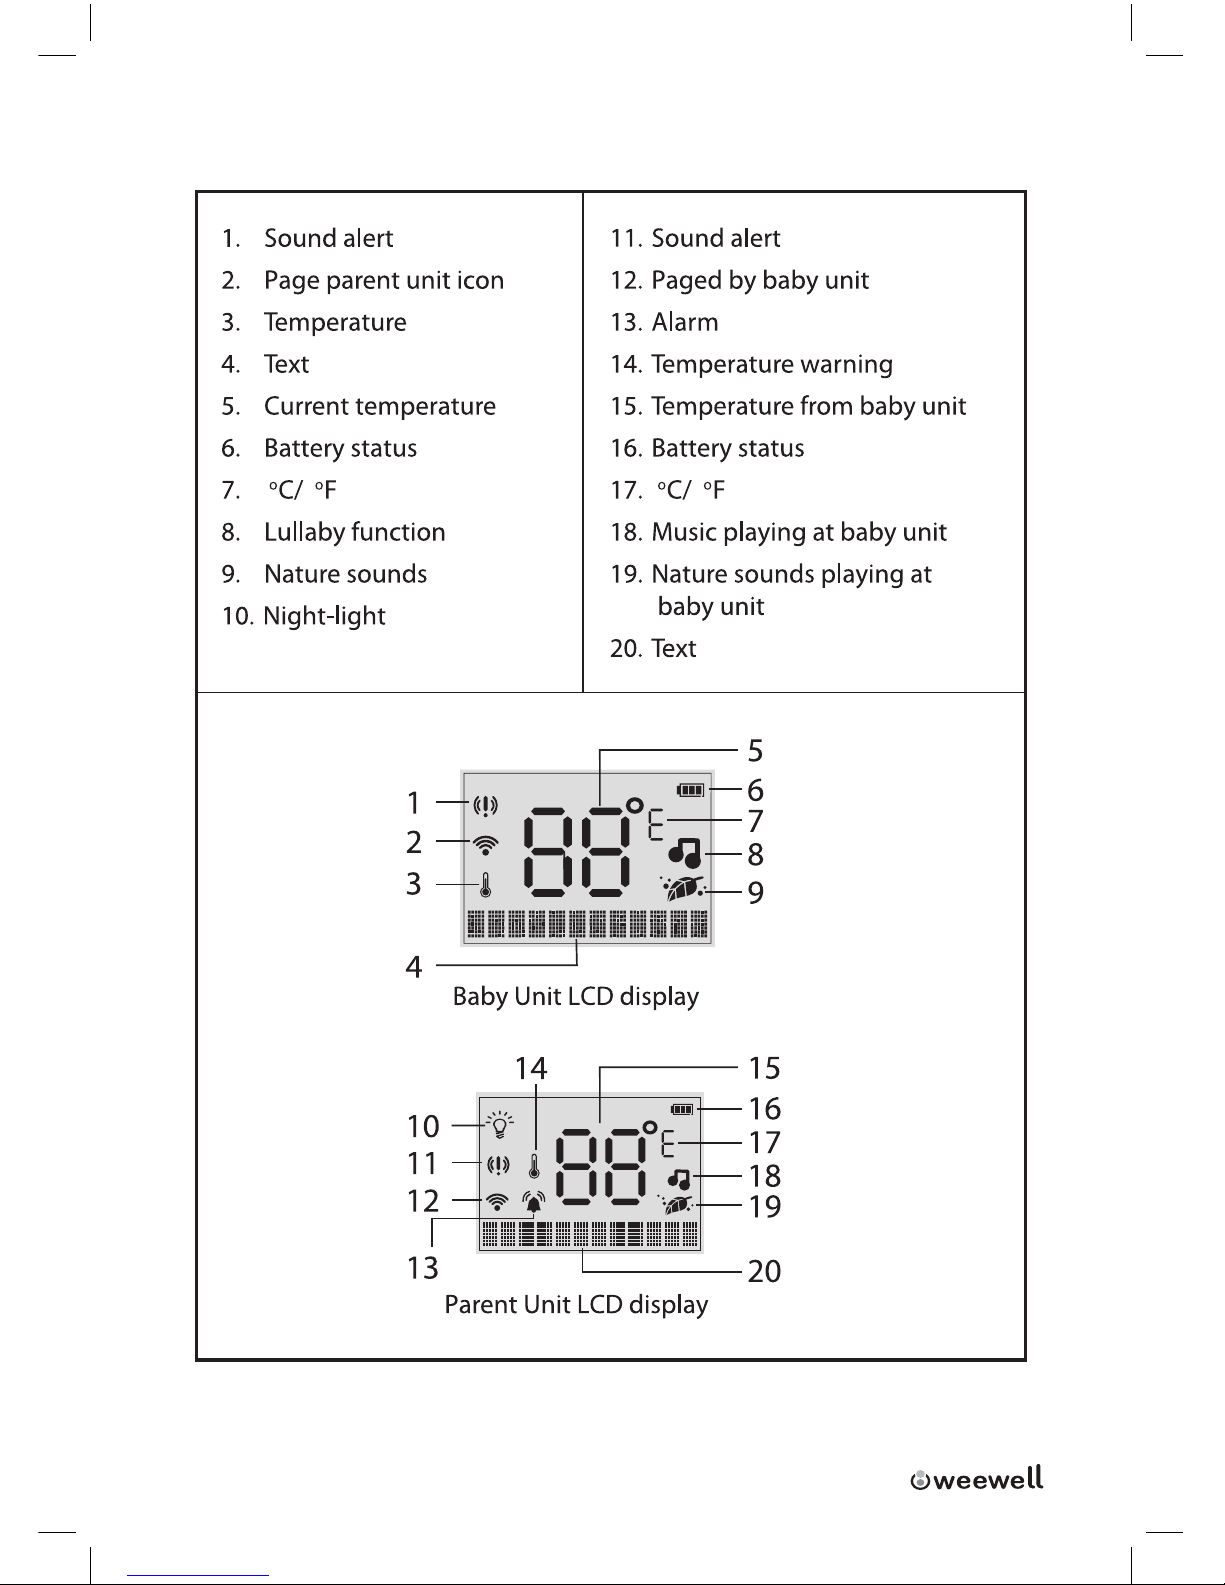
Quick Reference Guide .................................................................................6
Getting Started .............................................................................................9
Power .................................................................................................................................................9
Default Setting ............................................................................................................................. 12
Positioning and operating range .......................................................................................... 12
Baby Monitor Features ................................................................................13
Switching units on/o................................................................................................................ 13
Function Menu ............................................................................................................................. 14
Adjusting Speaker Volume ...................................................................................................... 14
Adjusting Microphone Sensitivity ......................................................................................... 15
Sound Level Lights & Sound Alert ......................................................................................... 15
Operating the Night-light ........................................................................................................ 16
Talk back Feature ......................................................................................................................... 16
Temperature Alert ....................................................................................................................... 16
Temperature range ..................................................................................................................... 17
oC/ oF ................................................................................................................................................ 17
Voice Recording, Play Back and Delete Voice Messages ............................................... 17
Line-in Feature .............................................................................................................................. 19
Time Setting .................................................................................................................................. 19
Last Nursing Time......................................................................................................................... 20
Alarm Timer ................................................................................................................................... 20
Paging the parent unit .............................................................................................................. 21
Lullaby Function .......................................................................................................................... 21
Lullaby Timer ................................................................................................................................. 23
Out of Range Alert ...................................................................................................................... 24
Appendix .....................................................................................................24
Cleaning and maintenance ..................................................................................................... 24
Storage ............................................................................................................................................ 24
Replacement ................................................................................................................................. 24
Environment ................................................................................................................................. 25
Troubleshooting .........................................................................................26
Frequently Asked Questions .....................................................................30
Assistance ....................................................................................................31
Warranty ......................................................................................................31

WMA400 USER MANUAL I 3
Welcome
ThankyouforpurchasingWeewellDigitalBabyMonitorWeewellisdedicatedto
producing caring, reliable nursery products that give parents the reassurance
they need. This Weewell Baby Monitor provides support by ensuring you can
hear your baby clearly within a long range without any distracting noise and
oers you personal settings to help keep your baby healthy and comfortable.
Important!
Read this user manual carefully before you use the appliance and save it for
the future reference.
Warning
1. This baby monitor is intended as an aid. It is not a substitute for responsible and
proper adult supervision and should not be used as such.
2. Never immerse any part of the baby monitor in water or any other liquid.
3. Never use the baby monitor in moist places or close to water.
4. Use only the adaptors supplied with the baby monitor. Incorrect adaptor polarity
or voltage can seriously damage the baby monitor.
5. Check if the voltage indicated on the adaptors of the baby unit and parent unit
correspond to the local mains voltage before you connect the appliance.
6. Only use the adaptors supplied to connect the baby unit and parent unit to the
mains. Only use the adaptor supplied to charge the parent unit.
7. The adaptors contain a transformer. Do not cut off the adaptors to replace them
with other plugs, as this will cause a hazardous situation.
8. If the adaptors are damaged, always replace them with one of the original type
in order to avoid a hazard. See chapter ‘Replacement’.
9. Where the MAINS plug or an appliance coupler is used as the disconnect device,
the disconnect device shall remain readily operable.
10. Except for the battery compartments, do not open the housing of the baby unit
or parent unit in order to prevent electric shock.
11. The appliance is not intended for use by persons (including children) with re-
duced physical, sensory or mental capabilities, or lack of experience and knowl-
edge, unless they have been given supervision or instruction concerning use of
the appliance by a person responsible for their safety.

4 IWMA400 USER MANUAL
12. Children should be supervised to ensure that they do not play with the appliance.
13. Use only the specified type of battery. The warranty will be void if incorrect bat-
teries are used. Contact and warranty information can be found on the last page
of these instructions.
14. There is a risk of explosion if the batteries are replaced by an incorrect type. Dis-
pose of used batteries according to the instructions. Use only 1.5V AA(AM-3/LR6)
size alkaline batteries for the baby unit (batteries not supplied). Use only 1.4V
AAA(AM-4/LR03) Ni-MH size rechargeable batteries for the parent unit (batteries
supplied).
15. Remove the rechargeable batteries from the unit when the product is stored for a
long time and is not in use.
16. Unplug the power adaptors before replacing batteries.
Caution
1. Use and store the appliance at a temperature between 0oC and 40oC.
2. Do not expose the baby unit or parent unit to extreme cold or heat or to direct
sunlight. Do not put the baby unit or the parent unit close to a heating source.
20cm (at least)
3. Make sure the baby unit and the adaptor cord are
always out of reach of the baby (at least _0cm away).
4. Never place the baby unit inside the baby’s cot or play-
pen.
5. Never cover the parent unit or the baby unit with any-
thing (eg. a towel or blanket).
6. Always place alkaline batteries of the correct type in the baby unit.
7. Always use the included rechargeable batteries for the parent unit to avoid a
hazard.
8. If you place the parent unit next to a transmitter or another appliance the con-
nection with the baby unit may be lost.
9. Batteries should not be exposed to excessive heat such as bright sunshine or fire.

WMA400 USER MANUAL I 5
Electromagnetic fields (EMF)
This Weewell Baby Monitor appliance complies with all standards regarding
electromagnetic elds (EMF). If handled properly and according to the
instructions in this user manual, the appliance is safe to use based on scientic
evidence available today.
Parts Checklist
Included in this package:
• User’s manual
• Babyunit •Parentunitandchargerbase
• Two adaptors
• Ni-MH Rechargeable batteries for parent unit
• Line-in cord for baby unit
LINK
LINK

6 IWMA400 USER MANUAL
Quick Reference Guide
Baby Unit

WMA400 USER MANUAL I 7
Parent Unit

8 IWMA400 USER MANUAL
LCD display

WMA400 USER MANUAL I 9
Getting Started
Power
You can use the baby unit from the mains or on alkaline batteries. Even if you
are going to use the unit from the mains, we advise you to insert alkaline
batteries. This guarantees automatic back-up in case of mains failure.
Technical specifications:
Baby unit
• 1 x AC power adaptor DC 6V/500mA (included)
• 4 x AA (AM-3/LR6), 1.5V alkaline batteries (NOT included)
Parent unit
• 1x AC power adaptor DC 6V/300mA (included)
• 1xAAA (AM-4/LR03), 1.2V, 750mAh, Ni-MH rechargeable
batteries (included)
Operation:
Baby unit
Mains operation
Insert the large adaptor into the baby unit and plug the adaptor
into a wall socket. The power-on light will light up. The baby
unit is ready for use.
Alkaline batteryoperation
1. The baby unit runs on 4 pcs 1.5V AA(AM3/LR6) batteries (not
included). Please use alkaline batteries for best performance.
2. Do NOT use rechargeable batteries, as the baby unit does
not have a charging function.
3. Put 4 x AA(AM-3/LR6), 1.5V alkaline batteries in the baby
unit. The baby unit is ready for use.

10 IWMA400 USER MANUAL
Note:
• Insert alkaline batteries into the baby unit even if it is using the mains operation,
in case of power supply failure, it will have an automatic back-up.
• There is no charging function for the baby unit.
• Note the + and – configuration inside the battery compartment is a guide for
using alkaline batteries.
Low battery indication light
1. The light will flash when the baby unit batteries are low.
2. The LCD on the baby unit will show “Low Battery”.
3. icon flashes.
Parent unit
Rechargeable batteries
1. The parent unit comes with 2 x AAA (AM4/LR03) 1.2V 750mAh
Ni-MH rechargeable batteries.
2. Charge the parent unit before you use it for the first time or
when the parent unit indicates that the battery is low (the
low battery light goes on). The parent unit starts indication
that the batteries are low 30 minutes before the batteries are
completely empty.
When charging the parent unit for the rst time switch it o and let it
charge continuously for at least 10 hours. Full charge is usually reached
after12-14 hours.
3. Insert the small adaptor into the charger, plug the adaptor
into a wall socket and place the parent unit in the charger,
the battery light will be on when charging.
4. When the batteries in the parent unit are fully charged, the
low battery light will go off. The parent unit is ready for use.

WMA400 USER MANUAL I 11
Note:
• When you charge the parent unit for the first time or after a long period of disuse,
switch it off and let it charge continuously for at least 10 hours.
• Charging normally takes 12-14hrs, but it takes longer when the parent unit is
switched on while charging. To keep the charging time as short as possible,
switch off the parent unit during charging.
• When the batteries are fully charged, the parent unit can be used cordlessly for
about 24 hrs.
• When the parent unit is not charging, the batteries gradually discharge, even
when the parent unit is switched off. Recharge them after a long period of disuse
before using.
• The operating time is 24 hours for the parent and baby units. Battery life calcula-
tion is based on 8 hours operation with 75% in stand-by.
• Do not attempt to recharge non-rechargable batteries.
Low battery indication and charging light
1. The low battery light flashes and the low battery alert tone
beeps when the parent unit batteries are low.
2. The LCD on the parent unit will show “Low Battery”.
3. icon flashes.
4. When the parent unit is charging the battery light will be on
steadily and the battery icon will scroll.
5. The light will go off and the battery icon will be full when the
parent unit batteries have sufficient charge.

12 IWMA400 USER MANUAL
Default Setting
The rst time you switch on the parent unit, it is operating with factory settings.
Adjustments can be made to suit your preferences (see corresponding
chapters for instructions).
Speaker volume setting (baby/parent unit) --- Default: level 3 (out of 5
levels)
For adjusting speaker volume .....……………...…page 16
Microphone sensitivity --- Default: level 3 (out of 5 levels)
For adjusting microphone sensitivity ....................page 16
Sound alert --- Default: o
For adjusting sound alert .....................................page 17
Operating night-light --- Default: o
For adjusting night-light .......................................page 17
Temperature alert --- Default: o
For adjusting temperature alert ...........................page 18
Temperature range --- Default: max 21 OC, min 18 OC
For adjusting temperature range ..........................page 18
Temperature scale --- Default: Celsius (Centigrade) (OC)
For adjusting temperature scale ...........................page 19
Recording messages (Rec 1 & Rec 2) --- Default: empty
For voice recording ..............................................page 19
Date & time --- Default: 2009 Jan 1, 12:00 a.m.
For adjusting date & time ....................................page 21
Alarm timer --- Default: o
For adjusting alarm timer .....................................page 22
Lullaby timer --- Default: 15 mins (Stop playing after 15 mins)
For adjusting lullaby timer ...................................page 26
Positioning and operating range
Positioning the baby monitor
Place the baby unit at least 20cm away from your baby. Place the parent unit
within the operating range of the baby unit. Make sure it is at least 20cm away
from the baby unit to avoid acoustic feedback

WMA400 USER MANUAL I 13
Operating range
The operating range of the baby monitor is 300 metres/1000 feet in open air.
Depending on the surroundings and other disturbing factors such as walls,
doors, and ceilings the range may be smaller. Indoors the operating range is
up to 50metres/150 feet.
Technical specifications:
Note:
For wet and moist materials, the range loss may be up to 100%.
Baby Monitor Features
Switching units on/off
Baby unit
1. Press and hold the on/off button for about 2 seconds to
switch on the baby unit.
2. All light indicators on the baby unit and the LCD screen will
briefly light up. There will be an opening animation and an
opening short tune.
3. Press and hold the on/off button for about 2 seconds to
switch the baby unit to standby mode
T
E
M
P
E
R
A
T
U
R
E
S
E
N
S
O
R
!

14 IWMA400 USER MANUAL
Parent unit
1. Press and hold the on/off button for about 2 seconds to
switch on the unit.
2. All light indicators on the parent unit and the LCD screen will
briefly light up with an opening animation.
3. The LINK light will flash in red as it seeks connection with the
baby unit.
4. When the connection has been established, the LINK light
will then be on continuously in green.
5. Press and hold the on/off button for about 2 seconds to
switch off the unit.
Function Menu
1. Press the MENU button on the parent unit to open the menu.
2. Press the + or - keys to scroll the menu to the next item.
3. Press the OK button to confirm a selection.
4. Press the MENU button to navigate one level up in the menu at the display or exit
the current menu.
Adjusting Speaker Volume
1. Press the volume + or – buttons on the parent or baby unit until the desired
speaker volume (five levels to adjust) for the parent unit has been reached.
2. The displays give visual feedback on the volume settings of the units:
= Parent unit volume switched o/ silent baby
monitoring
= Minimum volume
= Maximum volume
Note:
If the volume is set to a high level, the parent unit consumes more power.

WMA400 USER MANUAL I 15
Adjusting Microphone Sensitivity
You can adjust the microphone sensitivity in the parent unit menu until
the desired microphone sensitivity (ve levels to adjust) for the parent unit
has been reached. You can only change the microphone sensitivity when a
connection between the baby unit and the parent unit has been established.
i.e. when the LINK light on the parent unit lights up green continuously.
1. Select ‘Sensitivity’ in the menu with the + and – buttons.
2. Press the OK button to confirm.
3. Select the desired microphone sensitivity level for the baby unit with the + and –
buttons.
= Minimum sensitivity level
= Maximum sensitivity level
4. Press the OK button to confirm. The message ‘Saved’ will appear on the display.
Note:
• You can only adjust the microphone sensitivity in the menu of the parent unit.
• If the microphone sensitivity is set to a high level, more sounds are transmitted
and the parent unit consumes more power.
Sound Level Lights & Sound Alert
The parent unit continuously monitors the sound level in your baby’s room
and the sound level lights let you know if there is any activity. If your baby
cries, you will see the sound level lights light up on the parent unit.
1. As long as the baby unit does not detect a sound, all sound
level lights on the parent unit will remain off.
2. When the baby unit picks up a sound, one or more sound
level lights on the parent unit will go on. The number of
lights that go on is related to the volume of the sound picked
up by the baby unit.
3. For silent baby monitoring: when the baby unit picks up a high volume of sound,
the 5 sound level indicators will light-up and the parent unit will beep as a sound
alert if it is selected to ‘Alert On’ in the ‘Sound Alert’ menu.

16 IWMA400 USER MANUAL
Operating the Night-light
You can operate the night-light through the parent unit menu or by pressing
the button on the baby unit.
1. Select ‘Light’ in the menu with the + and – buttons.
2. Press the OK button to confirm.
3. Press the + or – buttons to select on or off.
4. Press the OK button to confirm.
5. You can also operate the night-light by pressing the button on the baby unit.
Talk back Feature
You can use the TALK button on the parent unit to talk to and comfort your
baby.
1. Press and hold the TALK button and talk clearly into the microphone from a
distance of approximately 15-30 cm. The green LINK light will start flashing and
the message ‘Talk’ appears on the display.
2. Release the TALK button when you have finished talking.
Temperature Alert
If the temperature alert is switched on, the parent unit beeps if the actual
room temperature exceeds the set maximum temperature or drops below the
set minimum temperature. In addition, the backlight of the parent unit display
goes on, the temperature alert symbol ashes and ‘High’ or ‘Low’ appears on
the display. If no minimum and maximum temperatures have been set, the
temperature alert is given when the room temperature drops below 18oC or
rises above 21oC as default.
1. Select ‘Temperature’ in the menu with the + and – buttons.
2. Press the OK button to confirm.
3. Select ‘Alert’ with the + and – buttons.
4. Press the OK button to confirm.
5. If the alert is off, the display shows ‘Alert On?’ Press the OK button to switch on
the alert.
If the alert is on, the display shows ‘Alert Off?’ Press the OK button to switch off
the alert.

WMA400 USER MANUAL I 17
Note:
• You can only switch the temperature alert on and off in the menu of the parent
unit.
• If the temperature alert is activated too often, reduce the set minimum tempera-
ture and/or increase the set maximum temperature.
Temperature range
You can set the temperature range (minimum and maximum temperature) for
your baby’s room.
1. Select ‘Temperature’ in the menu with the + and - buttons.
2. Press the OK button to confirm.
3. Select ‘Range’ with the + and - buttons.
4. Press the OK button to confirm.
5. Set the desired minimum temperature with the + and - buttons.
6. Press the OK button to confirm.
7. Set the desired maximum temperature with the + and - buttons.
8. Press the OK button to confirm.
oC/ oF
You can choose the format for showing the temperature.
1. Select ‘Temperature’ in the menu with the + and - buttons.
2. Press the OK button to confirm.
3. Select ‘ oC/oF’ with the + and - buttons.
4. Press the OK button to confirm.
5. If the format is Celsius ( oC), the display shows ‘Fahrenheit?’ Press the OK button
to switch the format to Fahrenheit (oF).
If the format is Fahrenheit (oF), the display shows ‘Celsius?’ Press the OK button to
switch the format to Celsius (oC).
Voice Recording, Play Back and Delete Voice
Messages
You can use the REC button on the baby unit to record your voice. The voices
can be played back to your baby in order to comfort your baby (you can also
record music or sounds).

18 IWMA400 USER MANUAL
Voice Recording
1. Press the REC button on the baby unit to open the recording
menu.
2. Press and hold the REC button on REC 1 / REC 2 to start voice
recording as REC1 / REC2.
3. Talk clearly into the microphone from a distance of approximately 15-30cm,
a beep tone will play to signify the start of the recording and play “Recording
00:0_”on the display and count the recording time.
4. Release the REC button when you have finished recording, it will end the record-
ing with 2 beep tones and flash ‘Rec. ends’.
5. The display shows ‘Saved’.
6. Repeat steps 1-4 again to overwrite the current message with a new one.
Play Back (for baby unit)
1. Press the REC button (do not hold the button).
2. Select the specific message to listen to with the + and – buttons.
3. Press the play/stop button to play or stop.
4. The recorded message will play once.
Play Back (for parent unit)
1. To playback, select ‘lullabies’ in the menu with the + and – buttons.
2. Press the OK button to confirm.
3. Select ‘Playback recorded data’.
4. Press the OK button to confirm.
5. Select the specific message to listen to with the + and – buttons.
6. Press the OK button to confirm.
7. The recorded message will play once.
Delete Voice Messages (for parent unit)
1. To delete voice messages, select ‘Delete recorded data’ in the menu with the +
and – buttons.
2. Press the OK button to confirm.
3. Select the specific message to delete with the + and – buttons.
4. Press the OK button to confirm.
5. The recorded message will be deleted and the display will show ‘Deleted’.

WMA400 USER MANUAL I 19
Line-in Feature
You can use the line-in cord included to connect the baby unit with your
mp3 player, computer etc. The baby unit acts as an amplier to play line-in
materials. (eg. Your own soothing music for baby.)
Playline-inmaterials
1. Connect the mp3 player and the baby unit with the line-in cord included.
2. Select ‘Lullabies’ in the menu with the + and - buttons.
3. Press the OK button to confirm.
4. Select ‘Line-in’.
5. Press the OK button to confirm.
6. Select ‘Line-in connected’.
7. Press the OK button to confirm.
8. Press the PLAY button on the mp3 player to start playing line-in materials.
Stopline-inmaterials
1. Press STOP on the mp3 player to start playing line-in materials.
2. Select ‘Lullabies’ in the menu with the + and - buttons.
3. Press the OK button to confirm.
4. Select ‘Line-in’.
5. Press the OK button to confirm.
6. Select ‘Line-in disconnected’.
7. Press the OK button to confirm.
Note:
To preserve battery life, it will automatically stop playing line-in materials after
entering ‘Line-in connected’ sub menu after approximately 15 minutes.
Time Setting
The Time Setting function allows you to adjust the time and hour format on
the parent unit.
1. Select ‘Date & Timer’ in the menu with the + and – buttons.
2. Press the OK button to confirm.
3. Select ‘Time’ with the + and – buttons.

20 IWMA400 USER MANUAL
4. Press the OK button to confirm
5. Press the + or – buttons to select the desired hour. Press and hold for 2 seconds to
fast forward.
6. Press the OK button to confirm the hour.
7. Press the + or – buttons to select the desired minute. Press and hold for 2 seconds
to fast forward.
8. Press the OK button to confirm the minute.
9. Press the + or – buttons to select the desired hour format (12 or 24-hour system)
10. Press the OK button to confirm the hour format.
11. The date & time will be shown on the display of the parent unit & the baby unit in
idle time and during standby mode of baby unit.
Last Nursing Time
This allows you to record your last nursing time by entering“record last nursing
time”. Parents can read the last nursing time at the same place. Only 1 time
record can be kept, old records will be replaced by new records automatically
when a new record is processed.
1. Select ‘Last Nursing Time’ in the menu with the + and – buttons.
2. Press the OK button to confirm.
3. Select ‘Record’ with the + and – buttons.
4. Press the OK button to confirm.
Alarm Timer
This allows the alarm timer time and the alarm function to be changed on the
parent unit.
Setting Alarm Timer
1. Select ‘Date & Timer’ in the menu with the + and – buttons.
2. Press the OK button to confirm.
3. Select ‘Alarm’ with the + and – buttons.
4. Press the OK button to confirm.
5. Press the + or – buttons to select the desired timer alarm time (setting from 15
minutes to 6 hours with increments of 15 minutes).
6. Press the OK button to confirm the alarm timer.
Other manuals for WMA400
1
Table of contents
Languages:
Other Oweewell Baby Monitor manuals