OWIM 275195 User manual

IAN 275195
TEMPERATURSTATION
Bedienungs- und Sicherheitshinweise
VEJRSTATION
Brugs- og sikkerhedsanvisninger
STATION MÉTÉO
Instructions d‘utilisation et consignes de sécurité
TEMPERATUURSTATION
Bedienings- en veiligheidsinstructies
TEMPERATURE STATION
Operation and Safety Notes
TEMPERATURE STATION

GB/IE Operation and
Safety Notes Page 5
DK Brugs- og
sikkerhedsanvisninger Side 26
FR/BE Instructions d‘utilisation et
consignes de sécurité Page 47
NL/BE Bedienings- en
veiligheidsinstructies Pagina 71
DE/AT/CH Bedienungs- und
Sicherheitshinweise Seite 93

A
10
13
12
17
24
11
B
27 26
14 9
2
5
15
8
16
231822 21 19 20
25
1
3467

D29
C
28
30
32 31

5GB/IE
Introduction......................................... Page 6
Proper use............................................. Page 6
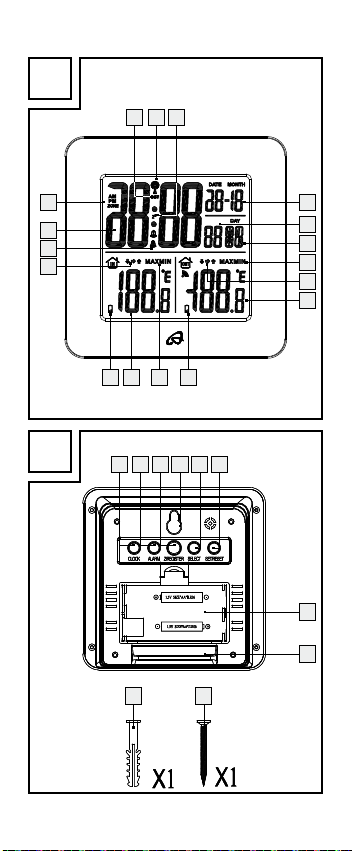
Description of parts and features ........ Page 6
Technical data ...................................... Page 8
Safety ..................................................... Page 9
General safety information .................. Page 9
Safety instructions for batteries............ Page 10
Before initial use............................... Page 11
General information............................. Page 11
Preparing to use the outdoor sensor ... Page 12
Preparing the temperature station
for use.................................................... Page 12
Temperature station.............................. Page 15
External sensor...................................... Page 15
Setting the language/time zone /
time/date manually............................. Page 15
Displaying summer time ....................... Page 17
Calling up the time zone...................... Page 17
Setting the alarm time........................... Page 18
Calling up the alarm times................... Page 18
Switching the alarm on/off................. Page 18
Using the snooze button ...................... Page 19
Displaying temperature........................ Page 20
Calling up the minimum/maximum
values .................................................... Page 20
Displaying temperature trends............. Page 21
Battery state display............................. Page 21
Replacing the batteries......................... Page 21
Troubleshooting................................ Page 21
Cleaning and maintenance......... Page 23
Disposal................................................. Page 23
Declaration of conformity ........... Page 24
Warranty.............................................. Page 25

6 GB/IE
Temperature station
Introduction
We congratulate you on the purchase of your
new device. You have chosen a high quality
product. The instructions for use are part of
the product. They contain important information
concerning safety, use and disposal. Before
using the product, please familiarise yourself
with all of the safety information
and instructions
for use. Only use the unit as de
scribed and for
the specified applications. If you pass the
product on to anyone else, please ensure that
you also pass on all the documentation with it.
Proper use
The temperature station displays the indoor
and outdoor temperatures in Celsius (°C) or
Fahrenheit (°F) and their maximum and mini-
mum values. The temperature station also
displays the time in 12/ 24-hour clock modes
and the date. In addition, the temperature sta-
tion has an alarm function. The device is not
intended for commercial use.
Description of parts
and features
LC display
1Temperature trend (outdoor temperature)
2Outdoor temperature
3symbol (outdoor sensor)

7GB/IE
4MAX- / MIN display for indoor
temperature
5Temperature trend (indoor temperature)
6Indoor temperature
7symbol (temperature station)
8Time
9ZZsymbol (snooze function)
10 Seconds display
11 symbol
12 Day of the week display
13 Date display (day/ month)
14 DST display (summer time)
15 / symbol (Alarm 1/Alarm 2)
16 2nd time zone (ZONE)
17 MAX-/MIN display (outdoor temperature)
Temperature station
18 ZZ/REGISTER button (snooze function/
REGISTER)
19 SELECT button
20 SET/ RESET button
21 ALARM button
22 CLOCK button
23 Hanging slot
24 Battery compartment
25 Stand
26 Screw (ø 3mm)
27 Dowel (ø 7.7mm)
Outdoor sensor
28 Control LED
29 Hanging slot
30 Battery compartment

8 GB/IE
31 Screw (ø 3mm)
32 Dowel (ø 7.7mm)
Technical data
Temperature station:
Temperature
measurement range: 0– + 50°C
+32– +122 °F
Note: If the temperature is ≤0°C (32 °F),
the LC display shows “LL.L”. If the temperature
is ≥50°C (122°F), the LC display shows
“HH.H”.
Temperature interval: 0.1°C
Radio signal: DCF
Batteries: 2 x AA 1.
5V
(included)
Outdoor sensor:
Temperature
measurement range: –20°C– +60°C
–4°F – +140°F
Note: If the temperature is ≤–20°C
(–4°F), the LC display shows “LL.L”. If the
temperature is ≥60°C (140°F), the LC dis-
play shows “HH.H”.
HF transmission signal: 433 MHz
HF transmission range: max. 30 metres
(in open area)
Batteries: 2 x AA 1.
5V
(included)
Protection class: IPX3

9GB/IE
Safety
YOU SHOULD STORE ALL SAFETY INFOR-
MATION AND INSTRUCTIONS IN A SAFE
PLACE IN CASE YOU NEED TO REFER TO
THEM AGAIN IN THE FUTURE!
General safety
information
This appliance can be used by children
aged from 8 years and above and per-
sons with reduced physical, sensory or
mental capabilities or lack of experience
and knowledge if they have been given
supervision or instruction concerning use
of the appliance in a safe way and un-
derstand the hazards involved. Children
shall not play with the appliance. Clean-
ing and user maintenance shall not be
made by children without supervision.
Do not expose the device to an extremely
high electromagnetic field. This may im-
pair the correct functioning of the device.
Please note that the guarantee does not
cover damage caused by incorrect han-
dling, non-compliance with the operating
instructions or interference with the device
by unauthorised individuals.

10 GB/IE
Safety instructions
for batteries
DANGER TO LIFE!
Batteries can be swallowed, which may
represent a danger to life. If a battery
has been swallowed, medical help is
required immediately.
Remove the batteries from the device if
they are not going to be used for a pro-
longed period.
CAUTION! DANGER OF
EXPLOSION! Never recharge
batteries which are not
rechargeable.
When inserting the batteries, ensure the
correct polarity! This is shown in the bat-
tery compartments.
Remove spent batteries immediately from
the device. There is an increased danger
of leaks!
Keep batteries away from children do not
throw the batteries in the fire, short-circuit
them or take them apart.
Always replace all the batteries at once.
Use batteries of the same type only. Oth-
erwise there is a risk of an explosion.
If the batteries have leaked inside your
device, you should remove them immedi-
ately in order to prevent damage to the
device!
Avoid contact with the skin, eyes and mu-
cous membranes. Any parts of the body

11GB/IE
coming into contact with battery acid
should be rinsed off with copious amounts
of water and/or a doctor contacted if
necessary!
Before initial use
Put the batteries first into the outdoor
sensor, then into the temperature
station.
Note: Before initial use, remove the protective
film from the device display.
General information
CAUTION! When choosing where to
position the temperature station, make sure
that it is not exposed to direct sunlight, vibra-
tions, dust, heat, cold or moisture. Do not place
the temperature station or external sensor near
to heat sources, e.g. radiators, as this may re-
sult in damage to the instruments.
Place the temperature station on the ac-
companying stand 25.
Please ensure that neighbouring devices
are not operated at the same frequency
of 433MHz. Such devices may cause
interference to the radio connection.
Do not place the devices next to or on
metal plates. Otherwise the quality of ra-
dio wave transmission may be reduced.

12 GB/IE
Radio signal (DCF):
The DCF signal (time signal transmitter) is
made up of time pulses transmitted from one
of the highest precision clocks in the world
close to Frankfurt/Main in Germany – it var-
ies by 1 second in 1million years.
In ideal conditions, your temperature station
can pick up this signal over a distance of up
to approx. 1,500km around Frankfurt / Main.
Preparing to use
the outdoor sensor
Inserting the batteries:
Remove the battery compartment cover
from the back of the outdoor sensor.
Insert two 1.
5V
batteries (AA) (in-
cluded) into the battery compartment 30 .
Note: Make sure you fit the batteries the
right way round (polarity). This is shown
in the battery compartment (see. fig D).
The outdoor sensor is now ready for use
and the control LED 28 illuminates briefly.
Close the battery compartment cover.
If this does not work, carry out a restart,
if necessary. To do this, press and keep
pressed the ZZ/REGISTER button 18 .
Preparing the temperature
station for use
Inserting the batteries:
Open the battery compartment 24 on the
back of the temperature station.

13GB/IE
Insert two 1.5V batteries (AA) (in-
cluded) into the battery compartment.
Note: Make sure you fit the batteries the
right way round (polarity). This is shown
on the battery compartment (see. fig B).
Close the battery compartment cover.
Connecting the temperature station
with
the outdoor sensor and the DCF
radio signal:
After the batteries have been inserted, the
temperature station attempts to establish a
connection with the outdoor sensor. This pro-
cess can take a few minutes. The symbol
flashes. Once the device has successfully con-
nected to the external sensor, the symbol
stops flashing and the temperature is shown
in the LC display.
Note: If the temperature station does not
receive the signal from the outdoor sensor
within 3 minutes, the temperature station
automatically starts with the reception of the
radio time signal.
After successful reception of the outdoor sen-
sor signal or after 3 minutes, the temperature
station starts with the reception of the radio
time signal. This process can take up to 5 min-
utes and is indicated in the LC display by the
flashing symbol 11 .
After successful reception of the DCF radio
signal, the symbol is displayed continuously
in the LC display.

14 GB/IE
Note: Do not move the temperature station
while it is receiving the signal. Otherwise this
could interfere with reception.If synchronisation
is not possible when the temperature station
is being first set up, try changing the location
(e.g. place the temperature station near to a
window).
Reception may be considerably reduced by
obstructions (e.g. concrete walls) or sources
of interference (e.g. other electrical devices).
If the reception of the radio signal continues
to be interrupted, you can set the time and
date manually (see “Setting the language/
time zone/time/ date manually”).
Mounting the temperature station
and/or the outdoor sensor on a wall:
Note: You will require an electric drill and a
crosshead screwdriver for this step.
CAUTION! DANGER TO LIFE, RISK
OF INJURY AND MATERIAL DAMAGE!
Read the operating and safety instructions for
your drill carefully.
DANGER TO LIFE!
Take care that you do not hit electricity, gas
or water lines when you drill into the wall. If
necessary, check with a pipe and cable de-
tector before drilling.

15GB/IE
Temperature station
Mark the position of the hole (ø approx.
7.7mm) on the wall.
Drill the hole with an electric drill.
Insert the dowel 27 into the drilled hole.
Using a crosshead screwdriver, screw the
screw 26 into the dowel.
Hang the temperature station by placing
the hanger 23 on the screw.
External sensor
Mark the position of the hole (ø approx.
7.7mm) on the wall.
Drill the hole with an electric drill.
Insert the dowel 32 into the drilled hole.
Using a crosshead screwdriver, screw the
screw 31 into the dowel.
Hang the external sensor by placing the
hanger 29 on the screw.
Note: Ensure that the external sensor does
not come into contact with water or direct
sunlight. Electronic devices may adversely
affect the wireless signal reception.
Setting the language/ time
zone/time/date manually
The reception of DCF radio signal where the
temperature station has been positioned may
become degraded or interrupted. If this hap-
pens you can set the device manually.
1. Press and hold down the CLOCK button
22
for about 3 seconds.

16 GB/IE
2. Press the SET/RESET button 20 to switch
between the 12- and 24-hour clock dis-
play modes.
3. Press the CLOCK button to confirm your
settings. The language option flashes.
Tip: If you press and hold down the SET/
RESET button, you accelerate the process
and reach the desired value more quickly.
This quicker method can also be used for
making the following settings. If during
a period of 30seconds no buttons are
pressed, the LC display returns automati-
cally to the default display.
4. Press the SET/RESET button to set the
desired language (GE = German,
FR = French, SP = Spanish, IT = Italian,
EN = English).
5. Press the CLOCK button to confirm your
settings. The time zone display flashes.
6. Press the SET/RESET button to set the
desired time zone for time zone 2 (–12
hours to +12hours).
Note: Should you be in a country in
which the DCF signal can be received but
the time is different to your current local
time, you can use the time zone setting to
have the clock display your current local
time. If you find yourself in a country in
which, for example, the local time is an
hour ahead of Central European Time
(CET), you set the time zone to +01. The
clock is now still controlled by DCF but
shows the time as one hour ahead of

17GB/IE
CET. If you wish to know what the time is
in the USA for example, then simply by
setting the time zone value to e.g. –10
you will obtain the current local time in
Los Angeles etc.
7. Press the CLOCK button to confirm your
settings. The hour display flashes.
8. Press the SET/RESET button to set the
desired value.
9. Press the CLOCK button to confirm your
settings.
10. Repeat steps 6 and 7 to set the values for,
minutes, seconds 10 , year and date 13
(day/ month).
Note: The seconds display can only be
reset to 00.
11. After this, the LC display returns to the de-
fault display.
Displaying summer time
Summer time is indicated by the DST symbol 14
in
the LC display. The temperature station
au-
tomatically detects from the DCF radio signal
whether it is summer time or not.
Calling up the time zone
The default display shows the time zone ac-
cording to the information provided by the
DCF signal.
Press the CLOCK button 22 . The time
zone 16 appears in the LC display.

18 GB/IE
Press the CLOCK button again to return
to the default display.
Setting the alarm time
You can set two different alarm times.
1. Press and hold down the ALARM button
21 for about 3 seconds.
Note: If an alarm time has been set be-
fore, then that previously set alarm time
appears in the LC display. If not, then the
display shows 0:00 or AM 12:00.
2. The hour display flashes. Press the SET/
RESET button 20 to set the desired value.
3. Press the ALARM button to confirm your
settings. The minute display flashes.
4. Press the SET/RESET button to set the de-
sired value.
5. Press the ALARM button to confirm your
settings.
6. Repeat steps 2 to 5 to set the time for
Alarm 2.
Calling up the alarm times
Press ALARM button 21 once or twice to
call up the set time for Alarm 1 or Alarm
2 respectively.
Press the ALARM button again to return
to the default display.
Switching the alarm on/off
Press the SET/ RESET button 20 once to
activate Alarm 1. Press the SET/RESET

19GB/IE
button twice to activate Alarm 2. Press the
SET/ RESET button three times to activate
Alarm1 and Alarm 2.
Note: The symbol or appears in the
LC display.
The alarm signal sounds as soon as the
set alarm time is reached. The alarm sig-
nal ceases automatically after a period
of 2minutes.
Press the ALARM button 21 to switch off
the alarm signal before it switches off au-
tomatically.
Note: The alarm signal sounds every
day at the set time.
Press the SET/ RESET button three times
to deactivate Alarm 1. Press the SET/
RESET button twice to deactivate Alarm
2. Press the SET/ RESET button once to
deactivate Alarm 1 and Alarm 2.
Using the snooze button
Press the ZZ/REGISTER button 18 while
the alarm signal is sounding to activate
the snooze function.
The alarm signal is silenced and the dis-
plays or and ZZflash.
The alarm signal sounds again after ap-
prox. 5 minutes.
Press the SELECT button 19 to deactivate
the snooze function.

20 GB/IE
Displaying temperature
The LC display shows the indoor temperature
6and the outdoor temperature 2.
Press and hold down the SELECT button
19 for approx. 3 seconds. The °C dis-
play flashes.
Press the SET/ RESET button 20 to switch
between the °C (Celsius) and °F (Fahr-
enheit) temperature scales.
Press the SELECT button to confirm your
settings.
Calling up the minimum/
maximum values
The temperature station stores the maximum
and minimum values of the outdoor sensor
and of the temperature station itself.
Press the SELECT button 19 to display the
maximum values of the indoor and out-
door temperature.
Press the SELECT button again to display
the minimum values of the indoor and
outdoor temperature.
Press the SET/ RESET button 20 while the
maximum and minimum values, are being
displayed to reset the values.
Press the SELECT button, to return to the
default display.
This manual suits for next models
2
Table of contents
Languages:
Other OWIM Weather Station manuals