OWIM HG01106A User manual

IAN 114324
RADIO-CONTROLLED WEATHER STATION
IAN 275901
RADIO-CONTROLLED
WEATHER STATION
Operation and Safety Notes
BEZDRÁTOVÁ METEOSTANICE
Pokyny pro obsluhu a bezpečnostní pokyny
METEOSTANICA
Pokyny pre obsluhu a bezpečnostné pokyny
RADIJSKO VODENA
VREMENSKA POSTAJA
Navodila za upravljanje in varnostna opozorila
RÁDIÓVEZÉRELT
IDŐJÁRÁS-ÁLLOMÁS
Kezelési és biztonsági utalások
FUNK-WETTERSTATION
Bedienungs- und Sicherheitshinweise

GB Operation and Safety Notes Page 5
HU Kezelési és biztonsági utalások Oldal 28
SI Navodila za upravljanje in varnostna opozorila Stran 52
CZ Pokyny pro obsluhu a bezpečnostní pokyny Strana 76
SK Pokyny pre obsluhu a bezpečnostné pokyny Strana 99
DE/AT / CH Bedienungs- und Sicherheitshinweise Seite 123

A
1 2
13 14 15 16
6
5
17 18 19 20
3 4
1 32
13
17 18 19
20
6
5
14 15 16
4
HG01106A/
HG01106B
HG01106C/
HG01106D

11
B25 109
11
8

C
22
21
23
24
21
22
23
24
HG01106A/HG01106B
HG01106C/
HG01106D

5
7
7
D
9
12
HG01106A/
HG01106B
HG01106C/
HG01106D
26
27
28
26
27
28
29
9
5
29
12

E
2
HG01106A/
HG01106B
HG01106C/
HG01106D
2

5GB
Introduction ..........................................................................................Page 6
Intended use .........................................................................................Page 6
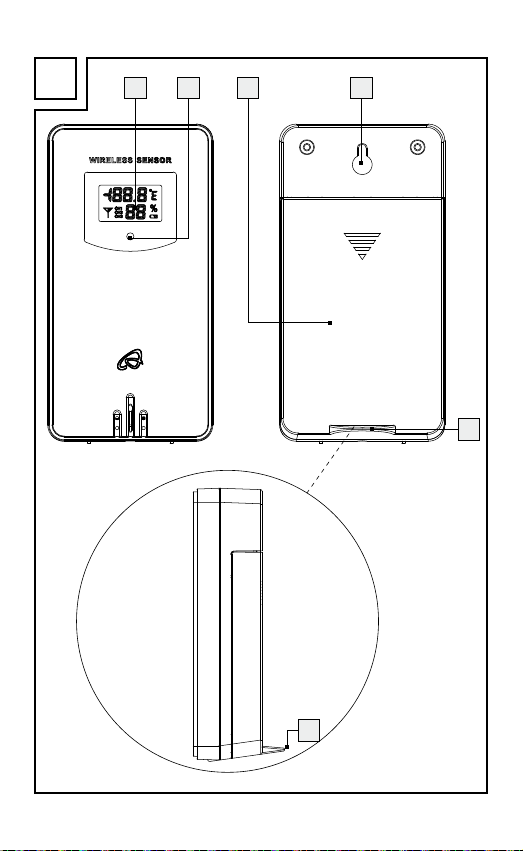
Parts description....................................................................................Page 6
Technical Data......................................................................................Page 7
Scope of delivery..................................................................................Page 8
General safety instructions ............................................................Page 8
Battery safety information.............................................................Page 9
Start-up...................................................................................................Page 10
Setting up the devices ..........................................................................Page 11
Starting the outdoor sensor/ changing batteries................................Page 11
Starting the base station/ changing batteries ....................................Page 11
The DCF signal (time transmitter).........................................................Page 12
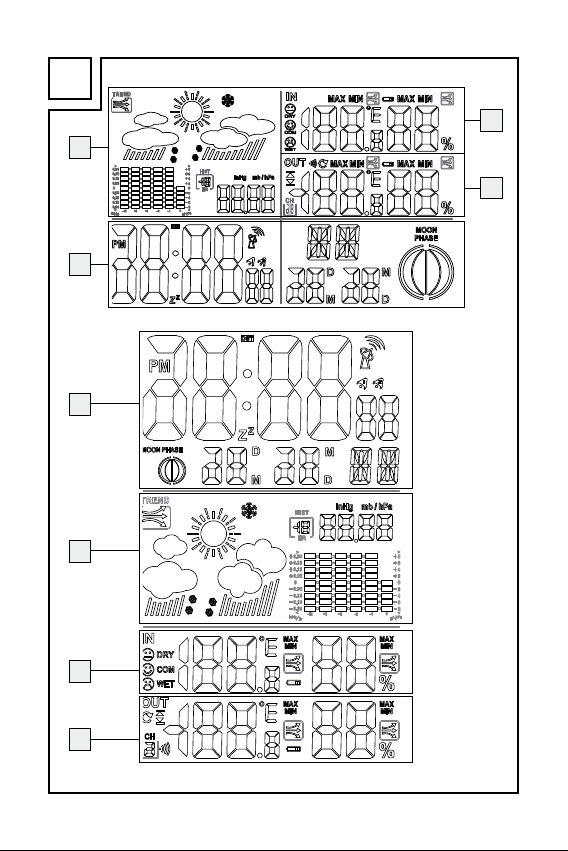
Information in base mode..............................................................Page 13
The clock field.......................................................................................Page 13
The barometric pressure field...............................................................Page 15
The indoor temperature field................................................................Page 16
The outdoor temperature field .............................................................Page 17
Settings...................................................................................................Page 19
Basic settings.........................................................................................Page 19
Temperature alarm ...............................................................................Page 21
Activating the temperature alarm ........................................................Page 21
Alarm.....................................................................................................Page 22
Accessing stored data..........................................................................Page 23
Manually activating signal reception ........................................Page 24
Activating DCF signal reception..........................................................Page 24
Activating reception from the outdoor sensor.....................................Page 24
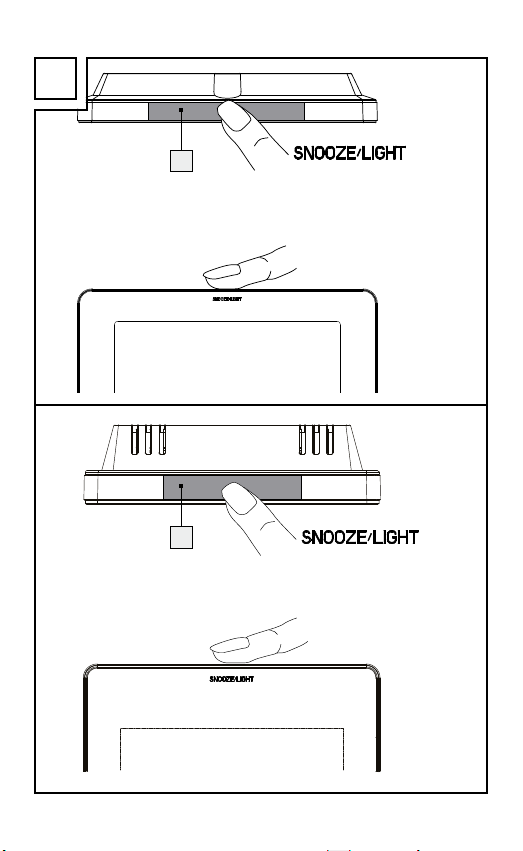
Background lighting .............................................................................Page 24
Troubleshooting..................................................................................Page 25
Cleaning and Care..............................................................................Page 25
Disposal..................................................................................................Page 26
Declaration of Conformity..............................................................Page 26
Warranty ...............................................................................................Page 27

6 GB
Radio-controlled weather station
Introduction
We congratulate you on the purchase of your new product. You have
chosen a high quality product. The instructions for use are part of the
product. They contain important information concerning safety, use
and disposal. Before using the product, please familiarise yourself
with all of the safety information and instructions for use. Only use the
unit as described and for the specified applications. If you pass the
product on to anyone else, please ensure that you also pass on all
the documentation with it.
Intended use
This radio-controlled weather station displays the indoor and outdoor
temperature, indoor and outdoor humidity, and barometric pressure.
It features a radio-controlled clock and several alarm functions. The
probable weather trend is calculated based on data collected. The
product is not intended for commercial use.
Parts description
Base station
1Display
2SNOOZE-/LIGHT field
3Keypad
4Base station eyebolt
5Battery compartment cover
6Stand
7Battery compartment
Outdoor sensor
8Signal LED
9Battery compartment cover
10 Outdoor sensor eyebolt
11 Outdoor sensor stand
12 Outdoor sensor battery
compartment

7GB
Keypad
13 SET-/HISTORY button
14 UP button
15 DOWN-/ button
16 ALARM-/SET button
17 CH button
18 ALERT button
19 MEM button
20 °C/°F button
Display
21 Clock field
22 Barometric pressure field
23 Indoor temperature field
24 Outdoor temperature field
25 Outdoor sensor display
Outdoor sensor buttons next to battery compartment
26 °C/°F button
27 TX button (Channel reset
button)
28 Channel selector switch
Optional power supply
29 Mains adapter
Technical Data
Base station:
Temperature measurement range: 0°C to 50°C
32°F to 122°F
Humidity measurement range: 20% to 95%
Radio-controlled clock: DCF77
Batteries: 2 x LR06 (UM-3), 1.5V (size AA)
Barometric pressure
measurement range: 850hPa to 1050hPa
25.1 inHg to 31.1 inHg

8 GB
Mains adapter:
Input: 230–240V~50Hz, 50mA
Output: 4.5V , 150mA
Model: HX0180450150D2E
Protection class:
TÜV/GS tested.
Outdoor sensor:
Temperature measurement range: -20°C to +50°C
-4.0°F to + 122°F
Humidity measurement range: 20% to 95%
Data transmission frequency: 433MHz
Wireless range: max. 100m (open area)
Batteries: 2 x LR06 (UM-3), 1.5V (size AA)
Protection class: IPX4
Scope of delivery
1 Weather station
1 Outdoor sensor
4 Batteries, type LR06, 1.5V
1 Mains adapter
1 Set of operating instructions
General safety instructions
Before using the product, please familiarise yourself with all of the
safety information and instructions for use! When passing this product
on to others, please also include all the documents!

9GB
This product may be used by children age 8 years and
up, and persons with reduced physical, sensory or
mental capacity or lacking experience and knowledge,
when supervised or instructed on the safe use of the product and
the associated risks. Children should not be allowed to play with
the appliance. Cleaning and user maintenance should not be
performed by children without supervision.
Do not use the device if it is damaged.
Do not expose the base station to moisture or direct sunlight.
Before using the product, ensure that the available mains voltage
corresponds with the operating voltage required for the mains
supply (230–240V∼, 50Hz).
Before using the product, verify the product and the mains supply
and the cable connection aren‘t damaged! Never operate a
damaged device!
The appliance must be plugged into an easily accessible socket
so it can easily be unplugged in the event of an emergency.
This product does not contain any parts that can be serviced by
the user. The LEDs cannot be exchanged.
The product is only suited for use with the included mains adapter
(model no. HX0180450150D2E).
To switch the product off completely, unplug the power adapter
from the socket.
Battery safety information
DANGER TO LIFE! Batteries are not intended
for children. If accidentally swallowed seek immediate medical
attention!
CAUTION! EXPLOSION HAZARD! Never re-
charge non-rechargeable batteries, short-circuit and/
or open batteries!

10 GB
Never throw batteries into fire or water!
Do not exert mechanical loads to batteries!
Risk of battery leakage
In the event of a battery leak, immediately remove it from the
device to prevent damage!
Avoid contact with the skin, eyes and mucous membranes! In the
event of contact with battery acid, thoroughly flush the affected area
with plenty of clean water and seek immediate medical attention!
Only use the same type of batteries! Do not mix used and new
batteries!
Avoid extreme environmental conditions and temperatures as they
may affect batteries e.g. above radiators!
Remove the batteries from the device if they have not been used
for a long period!
Risk of equipment damage
Only use the specified battery type!
When inserting the battery ensure the correct polarity! This is shown
in the battery compartment!
If necessary, clean the battery and device contacts before insert-
ing the battery!
Promptly remove drained batteries from the product!
Start-up
Note: First insert the batteries in the outdoor sensor, then the weather
station.

11GB
Setting up the devices
ATTENTION: First start the outdoor sensor, then the base station.
If possible, do not expose the outdoor sensor or base station to
direct sunlight.
The base station can be hung by the eyebolt 4or flip out the
stand 6to place it on a horizontal, level surface.
Starting the outdoor sensor/
changing batteries
Open the battery compartment 12 on the back of the outdoor
sensor by sliding the battery cover 9in the direction of the arrow.
When changing batteries first remove the old batteries.
Insert the new batteries, type LR06, in the battery compartment 12 .
Check the polarity of the battery during insertion. This is indicated
in the battery compartment.
Close the battery cover.
The signal LED 8at the front of the outdoor sensor will briefly
light up. The signal LED will then flash about twice a minute,
indicating wireless transmission.
Starting the base station/changing batteries
Open the battery cover 5at the back of the base station by
pulling up on the tab at the bottom of the battery compartment.
When changing batteries first remove the old batteries.
Insert the new batteries, type LR06, in the battery compartment 7.
Check the polarity of the battery during insertion. This is indicated
in the battery compartment.

12 GB
Close the battery cover.
The display 1will briefly light up and run a brief check of all
display elements.
Alternatively, first remove the batteries from the battery compartment.
Plug the low voltage plug of the mains adapter 29 into the low
voltage jack in the base station and plug the mains adapter into
an easily accessible outlet. The display will permanently light up
and run a brief check of all display elements.
The outdoor temperature field 24 will show an animation of the
reception symbol , indicating the base station is searching for
the signal from the outdoor sensor.
If no outdoor temperature is displayed after 3 minutes,the base
station will stop searching. The animation of the reception symbol
will turn off and the outdoor temperature field will show --._ °C and
--._ %. Most likely, the signal cannot be received due to structural
factors, reinforced concrete walls, the brickwork being too solid,
or the distance between the units. After finding a better location for
the outdoor sensor, reception will need to be restarted.
Press and hold the CH button 17 at the back of the base station
for 3 seconds until the reception signal becomes animated again.
The weather station will automatically start receiving the DCF
radio signal, regardless if signal from the outdoor sensor was
received or not. The clock field 21 will show an animated radio
tower icon , indicating the receiver for the DCF signal is starting
to receive the time.
The DCF signal (time transmitter)
The DCF signal (German time transmission station) consists of time
impulses emitted by one of the most accurate clocks in the world,
located near Frankfurt /Main, Germany.

13GB
In ideal conditions, your weather station can pick up this signal over a
distance of up to approx. 1500km around Frankfurt/Main.
If the signal is detected the clock display 21 will show the current
Central European Time, date and day of the week. A static radio
tower signal appears. For more details please refer to section
Basic settings.
If the attempts to receive a signal fail the base station will stop
attempting to receive a signal after 7 minutes and the radio tower
signal will disappear. For information on how to resolve this issue
please refer to chapter Troubleshooting.
You may reactivate reception by pressing and holding the
DOWN-/ button 15 for three seconds until an radio tower
signal in the clock display 21 becomes animated.
You also have the option to set the time manually. For more
details please refer to section Basic settings.
Once the base station has received the signal from the outdoor sensor
and the DCF signal, it enters base mode.
In base mode the base station will display the following information:
Information in base mode
The clock field 21
Time:
The time will be displayed in 24 hour
format according to the default settings.
When selecting 12 hour mode in basic
settings, the time from 12:00 o‘clock in
the afternoon until 11:59 o‘clock at night will show PM (Latin for
“post meridiem“ = afternoon) in front of the time.

14 GB
During Daylight Saving Time DST will appear at the top between the
hour and minute. This display is only functional when receiving the
DCF signal.
Date and day:
To the left of the ab-
breviation D (Day) the
date of the current day
appears, and to the left of the abbreviation M (month) the date of the
current month. On the right the abbreviation for the current day of the
week appears. The default language for this abbreviation is German,
but can be changed. Please refer to section Basic settings.
The radio tower symbol:
The radio tower symbol indicates successful reception of the
DCF signal. The weather station synchronises its internal
clock with the time station every night. During synchronisation
this symbol will flash. If reception was successful the symbol will be
static until the next reception cycle.
The lunar phase:
The current lunar phase is indicated as follows:
The portion of the moon not illuminated will be dark in
the display.

15GB
The barometric pressure field 22
Barometric pressure display:
At the top right is the barometric
pressure at the time shown in the HIST
field (history).
If LLL (or LL.LL when setting the unit
inHg), the display range is below
850hPa (25.1 inHg), if HHH (or
HH.HH), it is above.
By default the current barometric pressure (HIST = 0) is shown in the
unit mb (millibar) or hPa (hectopascal). However, the display can also
be set to the uncommon unit inHg (inch of mercury). Please refer to
section Basic settings.
The bar graph shows a graphic of the barometric pressure 0, 1, 2, 3,
6 and 12 hours ago.
The barometric pressure trend:
The trend will appear as rising (or dropping), when the
barometric pressure changes by 2 hPa (= 0.06 inHg) or
more within an hour and will maintain the direction for one
hour even without any further change.
The weather forecast:
The weather station calculates a weather forecast for about the next
12 hours based on the barometric pressure trend. Of course this fore-
cast can‘t compare to that of professional weather services supported
by satellites and high performance computers, but merely provides an
approximate indication of current developments.

16 GB
Available graphic forecasts are:
slightly cloudy sunny cloudy rainy snow
The indoor temperature field 23
The indoor temperature:
The indoor temperature measured by the base
station is displayed with indexing up to a tenth
of a degree. The temperature unit °C (for de-
grees Celsius) appears at the top right. The
temperature unit can also be set to the now uncommon unit °F (de-
grees Fahrenheit). To change to this unit press the °C/F button 20 . If
LL.L appears, it is below the measurement range of 0 °C to 50 °C (or
32 °F to 122 °F), when HH.H appears it is above.
The relative humidity:
This displays the relative humidity to which the
base station is exposed.
The temperature- or humidity trend:
The trend will appear as rising (or dropping), when the
temperature changes by 2 °C (= 3.6 °F) or more within
an hour and will maintain the direction for one hour even
without any further change. The humidity trend will respond accord-
ingly with a change of 2 % in humidity.

17GB
Indoor climate rating:
Based on the indoor humidity and temperature the weather station
will rate the indoor climate using the following key:
DRY humidity below 40%
COMFORT humidity between 40 and 70%,
and a temperature range between 20°C–28°C
(68°F–82.4°F).
WET humidity higher than 70%
When the indoor temperature is outside the 20°C–28°C range no
indoor climate rating will appear.
Low battery:
If the battery symbol appears the batteries in the base
station should be replaced as soon as possible. Please
refer to the instructions in section Starting the base station/
changing batteries.
The outdoor temperature field 24
The outdoor temperature:
The outdoor temperature is displayed with in-
dexing up to a tenth of a degree. The tempera-
ture unit °C (for degrees Celsius) appears at
the top right. The temperature unit can also be
set to the now uncommon unit °F (degrees Fahrenheit).
To change to this unit press the °C/F button 20 .
If LL.L appears, it is below the measurement range of -20°C to
50°C (or - 4 °F to 122 °F), when HH.H appears it is above.
This manual suits for next models
3
Table of contents
Languages:
Other OWIM Weather Station manuals
Popular Weather Station manuals by other brands

Urban Green Energy
Urban Green Energy UGE Operation manual

La Crosse Technology
La Crosse Technology WA-1030U owner's manual

ZENIQ
ZENIQ WS360 user manual

La Crosse Technology
La Crosse Technology WS-2814U-IT Operation manual

La Crosse Technology
La Crosse Technology WS6205 instruction manual

TFA
TFA 35.1087 instruction manual

Perel
Perel WC222 user manual

Sencor
Sencor SWS 9898 user manual

Oregon Scientific
Oregon Scientific WMR86A user manual

Nielsen-Kellerman
Nielsen-Kellerman Kestrel 3000 instruction manual

La Crosse Technology
La Crosse Technology WS-2810U Operation manual

HoMedics
HoMedics EnviraStation DWS-400 Instruction manual and warranty information