OXYLANE GEONAUTE On channel 700 User manual

réf. notice : 1615.373
ENHU FRRU ESRO DESK ITCSAR NLSV PTBG PLTR


1
EN
EN TABLE OF CONTENTS
1 PRECAUTIONS FOR USE.......................................................................................2
2 DESCRIPTION .......................................................................................................3
3 GETTING STARTED...............................................................................................4
3.1 Using the batteries ..............................................................................................................................4
3.1.1 Inserting the batteries.....................................................................................................................................4
3.1.2 Charging the batteries ....................................................................................................................................4
3.1.3 Recycling the batteries ...................................................................................................................................5
3.2 Installing / removing the belt clip ......................................................................................................5
4 TRANSMITTING AND RECEIVING ........................................................................6
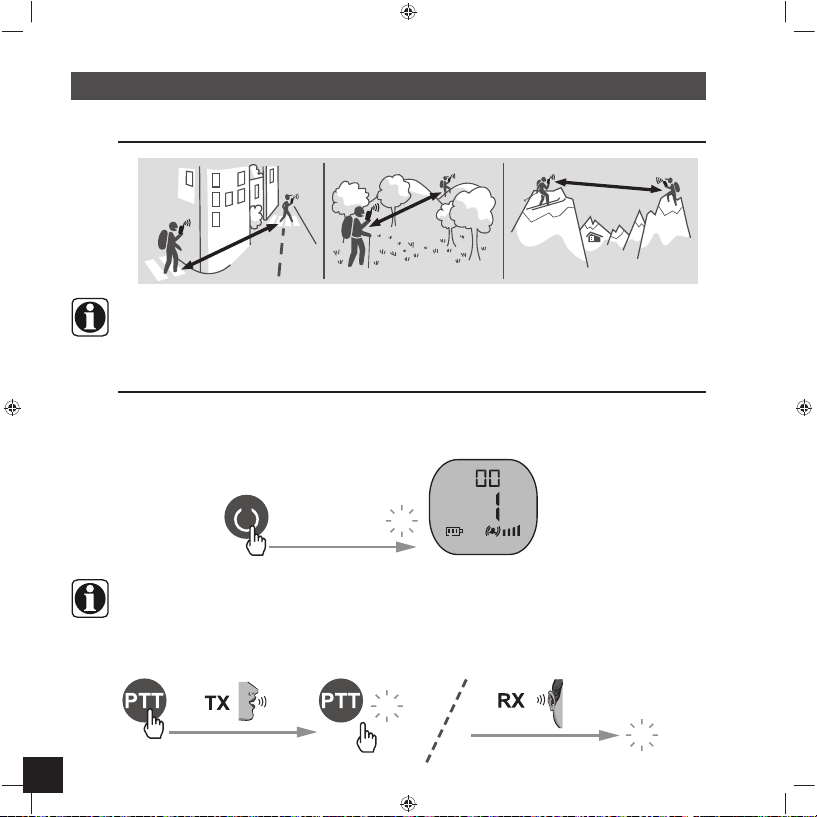
4.1 Transmission range.............................................................................................................................6
4.2 Switching on the device......................................................................................................................6
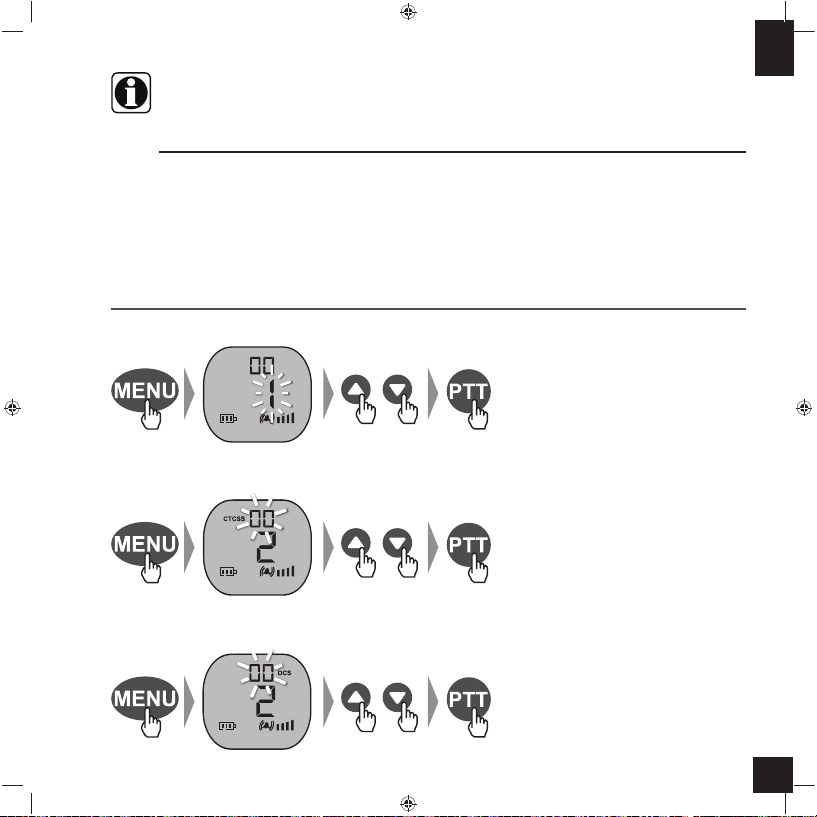
&RQ¿JXULQJWKHFKDQQHO .....................................................................................................................7
4.3.1 Setting the channel.........................................................................................................................................7
4.3.2 Channel monitoring.........................................................................................................................................8
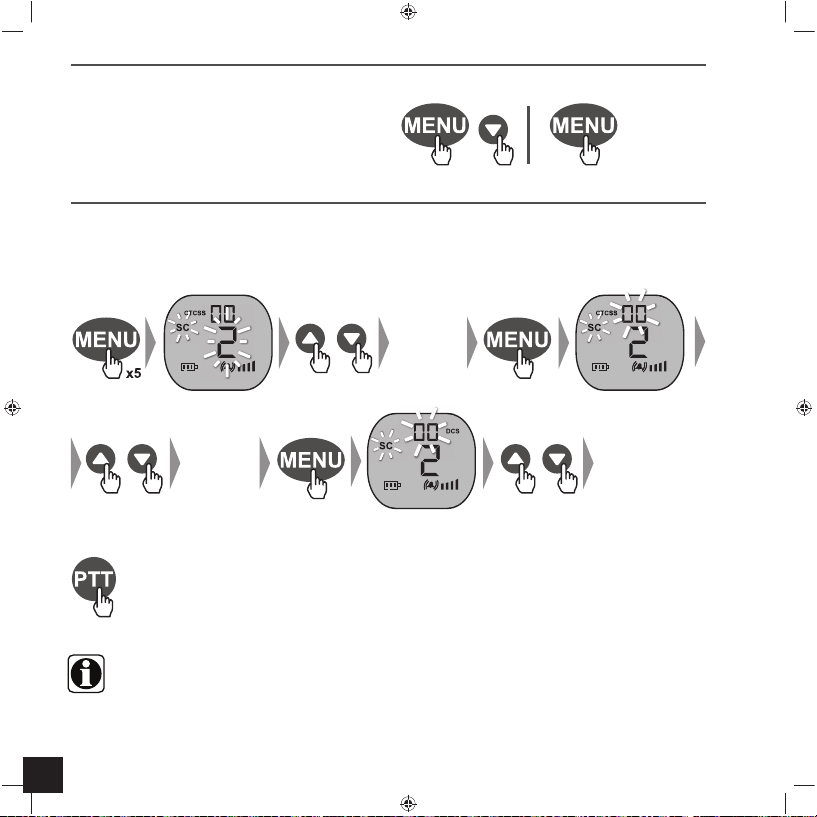
4.3.3 Scan function: channel scanning....................................................................................................................8
4.3.4 DCM function: Simultaneous monitoring of 2 channels .................................................................................9
$GMXVWLQJWKHVRXQGV........................................................................................................................ 10
4.4.1 Listening and ringer volume .........................................................................................................................10
4.4.2 End of transmission beep: Roger Beep........................................................................................................10
4.4.3 Button press beep.........................................................................................................................................10
4.4.4 Melody...........................................................................................................................................................10
&DOOIXQFWLRQ ....................................................................................................................................... 11
9R[IXQFWLRQ ....................................................................................................................................... 11
4.7 Lock / Unlock...................................................................................................................................... 11
4.8 Switching the device off ..................................................................................................................12
5 ACCESSORIES.....................................................................................................12
5.1 Using the earpiece kit .......................................................................................................................12
5.2 Installing the elastic strap ................................................................................................................12
6 TECHNICAL CHARACTERISTICS .......................................................................13
6SHFL¿FDWLRQV ....................................................................................................................................13
&KDQQHOIUHTXHQF\WDEOH................................................................................................................... 13
7 CE DECLARATION OF CONFORMITY .................................................................13
8 WARRANTY ......................................................................................................... 14
9 CONTACT US.......................................................................................................14

2
1 PRECAUTIONS FOR USE
Please read the owner's manual carefully before use. Please keep the owner's manual for the entire
life of the product.
To reduce radio frequency exposure when using the device, keep it at least 5 cm away from your face.
Do not allow babies or young children to get near the devices.
Never use a walkie-talkie with a damaged antenna. If the antenna is in contact with the skin, mild burns
may result.
When using the device in a vehicle, do not leave it in the area above an airbag or in the airbag deployment
area because it can be propelled with great force and cause serious injury to the vehicle occupants if
the airbag is deployed.
The devices are designed to be used in temperatures ranging from -10°C to +50°C inclusive.
If the devices are used in low temperatures, you must use batteries capable of standing up well to low
temperatures. Preferably use lithium or NiMH rechargeable batteries as alkaline and zinc batteries
perform very badly in low temperatures.
Do not use the devices or change the batteries in an explosive atmosphere. The antenna or batteries
can produce micro-sparks or static electricity which can set off explosions causing serious injury and
even death.
Never use the device outside during a storm.
Do not use the device in the rain.
If the device gets wet, switch it off and remove the battery. Dry the battery compartment and leave the
cover open for a few hours. Do not use the device until it is completely dry.
Do not dismantle the product. This will void the warranty and could cause damage or loss of watertightness.
Clean the product with a soft, moist cloth or a compressed air canister. Never use detergents as they
could cause damage to the materials. Do not rub the screen with anything that might scratch it.
Remove the batteries before storing the device for a prolonged period.

3
EN
2 DESCRIPTION
Antenna
PTT button
(Push-To-Talk)
(see p.6)
ON/OFF button
(see p. 6 et 12)
MINUS button
Microphone
Jacks: Charger (see p.
4)
Jacks: Earphones/
microphone (see p. 12)
CALL button
(see p. 11)
MENU button
PLUS button
LCD screen
Loudspeaker
Scan function activated
CTCSS sub-channel in use
Signal transmitted
Keypad locked
Battery charge
level
DCM function activated
Channel Number
DCS sub-channel in use
Sub-channel number
(CTCSS or DCS)
Vibrating call signal activated
Audible call signal activated
Sound volume level
Vox function activated
Signal received

4
3 GETTING STARTED
3.1 Using the batteries
The batteries come ready installed when the product is purchased. Remove the protective strip located
on the back of the device to free up the battery contacts.
If the belt clip is installed,
remove it (see p. 5)
clic
1
2
Observe the correct direction when inserting
the batteries. Incorrect polarity can damage the
batteries and the device.
When charging the device, use the rechargeable batteries supplied with the original pack. If the
batteries have to be changed, use 1.2V, 600 mAh NiMH AAA (LR03) type batteries.
Do not attempt to recharge non-rechargeable batteries.
Make sure that the battery compartment is correctly in place before charging the batteries.
3.1.1 Inserting the batteries
3.1.2 Charging the batteries
%DWWHU\FKDUJHOHYHO
High battery
charge level
Medium battery
charge level
Low battery charge
level
bip
bip Battery charged
down

5
EN
%DWWHU\FKDUJLQJWLPHLVDSSUR[LPDWHO\KRXUVZKHQFRPSOHWHO\ÀDWDQGKRXUVZKHQQHZ
When the device is charging, no communication is possible.
To extend the time between recharges and prolong the life of the batteries, they should be discharged
completely, then fully recharged once a month.
Turn the device off before charging the batteries (see p. 12).
3.1.3 5HF\FOLQJWKHEDWWHULHV
Do not leave spent batteries in the device as they may leak and cause damage to device's internal circuits.
The 'crossed-out dustbin' symbol indicates that this product and the batteries it contains cannot be disposed of with
KRXVHKROGZDVWH7KH\DUHVXEMHFWWRVSHFL¿FVRUWLQJ7KHSURGXFWDQGEDWWHULHVPXVWEHUHF\FOHG
at a collection point at end of life. Recycling your electronic waste protects the environment and your
health.
3.2 Installing / removing the belt clip
The batteries must only be charged with the battery charger and holder provided.
clic
1
2
INSERTING REMOVING
USING THE CHARGER DIRECTLY USING THE HOLDER

6
4 TRANSMITTING AND RECEIVING
4.1 Transmission range
2,5 KM
1 KM
10 KM
4.2 Switching on the device
With the On channel 700, you can communicate with another On channel 700 unit or any other transmitter / receiver
using the PMR 446 standard (excluding DCS codes, see p. 7). In conference mode, the On channel 500 can
also communicate with an unlimited number of PMR 446 devices.
To optimise the transmission range, there should be as few obstacles as possible (including users) in
the imaginary line drawn between the two devices.
Interference can occur if you use the devices less than 1.5 m apart.
All the devices must be set to the same channel and CTCSS or DCS code for them to communicate
with each other (see p. 7).
Communication takes place in alternate mode: if another device is
transmitting, you must wait for the end of its transmission before transmitting. Similarly, communications
cannot be received during transmission or when the Call function is active (see p. 11).
bip
bip
Press and hold
bip
Press and hold
Standby screen

7
EN
4.3 &RQÀJXULQJWKHFKDQQHO
7KH2QFKDQQHOFDQFRPPXQLFDWHRYHURQHRIDYDLODEOHFKDQQHOV(DFKFKDQQHOFDQDOVREHFRQ¿JXUHG
with one of 38 CTCSS (Continuous Tone Coded Squelch System) codes or one of the 83 digital DCS (Digital Code
Squelch) codes. Only conversations with PMR 446 devices set to the same channel and CTCSS code or the same
FKDQQHODQG'&6FRGHDUHSRVVLEOHDQGDOORWKHUFRQYHUVDWLRQVDUH¿OWHUHGRXW
By using DCS codes, you can reduce interference (background noise), but they can only be used with other
*HRQDXWH2QFKDQQHOGHYLFHV$GHYLFHFRQ¿JXUHGZLWKDGLJLWDO'&6FRGHFDQQRWFRPPXQLFDWHZLWKD
GHYLFHFRQ¿JXUHGZLWKDQDQDORJXH&7&66FRGH
4.3.1 Setting the channel
SETTING THE CTCSS CODE
SETTING THE DCS CODE
x2
x3
Choose 1 to 8
or
or
or
Choose 0 to 38
Choose 0 to 83
,IQREXWWRQVDUHSUHVVHGIRUVHFRQGVZKHQFRQ¿JXULQJWKHGHYLFHWKHVWDQGE\VFUHHQZLOOEHGLVSOD\HG
automatically and any changes made will be saved.
When the CTCSS or DCS code is
VHWWRWKH&7&66RU'&6¿OWHULV
switched off and all conversations on
the chosen channel can be heard.
When using the same channel but
a different CTCSS or DCS code or
with CTCSS or DCS deactivated
(i.e. set to 0), you can listen to the
transmissions even though you
cannot hear your own.
When a DCS code is set, the CTCSS
code is deactivated.
When a CTCSS code is set, the DCS
code is deactivated.

8
4.3.3 6FDQIXQFWLRQFKDQQHOVFDQQLQJ
With this function you can scan all 8 channels, 38 CTCSS codes and 83 DCS codes to identify which ones are
being used by your correspondents.
You can enter CTCSS or DCS code scanning directly by pressing the MENU button once (for CTCSS)
or twice (for DCS) after the 1st screen.
When the device detects a signal, scanning stops and the unit communicates on the channel in question.
Scanning is automatically restarted a few seconds after signal reception stops.
4.3.2 Channel monitoring
and
or
or or
VLPXOWDQHRXVO\
Activate
Activate
With this function you can listen to all signals (even
the weakest) on the channel that you are using
(regardless of any CTCSS or DCS code you may
have selected).
Deactivate
Deactivate
8 channels
Signal
detected
Signal
detected
Signal
detected
38 CTCSS codes
83 DCS codes

9
EN
4.3.4 '&0IXQFWLRQ6LPXOWDQHRXVPRQLWRULQJRIFKDQQHOV
With this function you can monitor two channels at the same time. The device continuously monitors the primary
channel (the channel set in the standard way, see p. 7) and the secondary channel (the channel chosen when
the DCM function is activated, see below).
As soon as the device detects a signal on one of the two channels, the device will remain on the channel in question
for at least 5 seconds, after which continuous scanning resumes.
If you press the PTT button during reception, the device will transmit on the channel in question.
If you press the PTT button when no signal is received, transmission will take place on the primary channel.
Choose 1 to 8
or
Activate
Choose Of
or
Deactivate
or or
Choose 0 to 38 Choose 0 to 83
Channel CTCSS code
DCS code

10
4.4.3 %XWWRQSUHVVEHHS
The Button Press Beep is the sound emitted when a button is pressed. The beep can be activated or deactivated.
Choose On or Of
or
x11
x8
Choose 1 to 5
or
4.4.4 0HORG\
4.4 $GMXVWLQJWKHVRXQGV
4.4.1 /LVWHQLQJDQGULQJHUYROXPH
Increase 5HGXFH
4.4.2 (QGRIWUDQVPLVVLRQEHHS5RJHU%HHS
The Roger Beep is the tone the units emit every time the PTT button is released. The beep can be activated or
deactivated.
Choose On or Of
or
x10

11
EN
You can change the melody see p. 10.
9R[IXQFWLRQ
With the Vox function you can activate a transmission just by making a detectable sound (without pressing the PTT
button). You can set 4 levels of sensitivity: Of = deactivated, 1 = low sensitivity, 2 = medium sensitivity, 3 = high
sensitivity.
x4
Choose 1 to 3 or Of
or
Choose 1 to 3
or
&DOOIXQFWLRQ
The CALL function rings and/or vibrates all the devices using the same channel and CTCSS or DCS code for 2
seconds.
x9
1Ringer + Vibrate
2Ringer
3Vibrate
4.7 Lock / Unlock
Press and hold
for 3 seconds

12
5 ACCESSORIES
5.1 Using the earpiece kit
5.2 Installing the elastic strap
When the earphone kit is installed, the microphone
and loudspeaker are deactivated.
bip
Press and hold
1
1
2
4.8 Switching the device off
bip
Press and hold
We recommend that you switch off the device when not in use to prevent the batteries from running down
completely.

13
EN
6 TECHNICAL CHARACTERISTICS
6.1 6SHFLÀFDWLRQV
Available channels 8 channels
&7&66VXEFKDQQHO 38 for each channel
'&6VXEFKDQQHO 83 for each channel
2XWSXWSRZHU7; 0.5 W
Range Up to 10 Km
7 CE DECLARATION OF CONFORMITY
Oxylane hereby declares that the On channel 700 device complies with the essential requirements and other
relevant provisions of Directive 1999/5/CE
Oxylane hereby declares that the On channel 700 device complies with the essential requirements and other
relevant provisions of Directive 2006/95/CE.
Compliance with these required conditions is expressed by the marking:
The CE declaration of conformity is available via the following link:
https://www.geonaute.com/en/ec-declaration-conformity
6.2 &KDQQHOIUHTXHQF\WDEOH
Channel )UHTXHQF\0+]
1446.00625
2446.01875
3446.03125
4446.04375
Channel )UHTXHQF\0+]
5446.05625
6446.06875
7446.08125
8446.09375

14
8 WARRANTY
Oxylane guarantees to the initial purchaser of this product that it is free from material or manufacturing defects.
This product is guaranteed for two years from the date of purchase. Please ensure that you keep the invoice as
proof of purchase.
The guarantee does not cover:
Damage resulting from misuse, from a failure to respect the precautions for use, from accidents, from
improper maintenance or from commercial use of the product.
Damage resulting from repairs carried out by persons not authorised by Oxylane.
Batteries or casings which are cracked or broken or which show signs of impacts.
The elastic strap, which is subject to wear and tear.
During the warranty period, the item will either be repaired free of charge by an authorised repair service or replaced
free of charge (depending on the distributor).
9 CONTACT US
We would like to hear your views on the quality, features and use of our products at: ZZZJHRQDXWHFRP
:HZLOOUHSO\DVVRRQDVSRVVLEOH

1
FR
FR SOMMAIRE
1 PRÉCAUTIONS D’EMPLOI .....................................................................................2
2 DESCRIPTION .......................................................................................................3
3 PRÉPARATION AVANT UTILISATION ...................................................................4
3.1 Utilisation des batteries......................................................................................................................4
3.1.1 Installation des batteries.................................................................................................................................4
3.1.2 Chargement des batteries ..............................................................................................................................4
3.1.3 Recyclage des batteries .................................................................................................................................5
3.2 Installation / désinstallation du clip de ceinture..............................................................................5
4 ÉMISSION ET RÉCEPTION....................................................................................6
4.1 Portée de transmission.......................................................................................................................6
4.2 Mise en marche....................................................................................................................................6
&RQ¿JXUDWLRQGXFDQDO .......................................................................................................................7
4.3.1 Réglage du canal............................................................................................................................................7
4.3.2 Monitorage du canal .......................................................................................................................................8
4.3.3 Fonction SCAN : balayage des canaux..........................................................................................................8
4.3.4 Fonction DCM : Monitorage simultané de 2 canaux......................................................................................9
5pJODJHVGXVRQ................................................................................................................................10
4.4.1 Volume d’écoute et de sonnerie ...................................................................................................................10
%LSGH¿QGHWUDQVPLVVLRQ©5RJHUELSª......................................................................................................10
4.4.3 Bip des touches ............................................................................................................................................10
4.4.4 Mélodie .........................................................................................................................................................10
4.5 Fonction «Call» .................................................................................................................................. 11
4.6 Fonction «Vox» .................................................................................................................................. 11
9HUURXLOODJH'pYHUURXLOODJH............................................................................................................ 11
4.8 Arrêt de l’appareil .............................................................................................................................12
5 ACCESSOIRES.....................................................................................................12
5.1 Utilisation du kit oreillette ................................................................................................................12
,QVWDOODWLRQGHODGUDJRQQH............................................................................................................... 12
6 CARACTÉRISTIQUES TECHNIQUES ..................................................................13
6SpFL¿FDWLRQV ....................................................................................................................................13
6.2 Tableau de fréquences des différents canaux...............................................................................13
7 DÉCLARATION DE CONFORMITÉ CE .................................................................13
8 GARANTIE ...........................................................................................................14
9 CONTACTEZ-NOUS .............................................................................................14

2
1 PRÉCAUTIONS D’EMPLOI
Lire attentivement la notice avant utilisation. Conserver la notice pendant toute la durée de vie du produit.
Pour réduire l’exposition à la fréquence radio pendant l’utilisation de l’appareil, le maintenir à au moins
5 cm du visage.
Empêcher les bébés et les jeunes enfants de s’approcher des appareils.
Ne jamais utiliser un talkie-walkie avec une antenne endommagée. Si l’antenne entre en contact avec
la peau, il peut survenir des brûlures légères.
Dans un véhicule, ne pas laisser l’appareil dans la zone au-dessus d’un airbag ou dans la zone de
déploiement de l’airbag, car si ce dernier est activé, l’appareil pourrait être propulsé avec une force
importante et causer une blessure grave aux occupants du véhicule.
Les appareils sont prévus pour être utilisés à des températures comprises entre -10°C et 50°C.
Une utilisation dans des milieux froids nécessite l’utilisation de batteries résistant bien aux basses
températures. Utiliser de préférence des batteries lithium ou des batteries rechargeables NiMH, les
batteries alcalines et les batteries salines résistent très mal aux basses températures.
Ne pas utiliser les appareils et ne pas changer les batteries dans une atmosphère explosive. L’antenne
ou les batteries peuvent produire des micro-étincelles ou de l’électricité statique qui occasionneraient
des explosions provoquant des blessures sévères et même la mort.
Ne jamais utiliser l’appareil à l’extérieur pendant un orage.
Ne pas utiliser l‘appareil sous la pluie.
Si l’appareil est mouillé, l’éteindre et enlever la batterie. Sécher le compartiment de la batterie et laisser
le couvercle ouvert pendant quelques heures. Ne pas utiliser l’appareil tant qu’il n’est pas complètement
sec.
Ne pas démonter le produit. Cela entraînerait l’annulation de la garantie et risquerait de causer des
dommages ou la perte de l’étanchéité.
Nettoyer le produit avec un chiffon doux et humide ou une bombe d’air comprimé. Ne pas utiliser de
détergents, ils risquent d’endommager ses matériaux. Ne pas frotter l’écran avec des instruments
susceptibles d’occasionner des rayures.
Enlever les batteries avant un stockage prolongé de l’appareil.

3
FR
2 DESCRIPTION
Antenne
Touche PTT
©3XVK7R7DONª
YRLUS
Touche ON/OFF
YRLUSHW
Touche MOINS
Microphone
Connectique : Chargeur
YRLUS
Connectique : Écouteurs/
PLFURSKRQHYRLUS
Touche CALL
YRLUS
Touche MENU
Touche PLUS
Écran LCD
Haut-parleur
Fonction Scan activée
Sous-canal CTCSS utilisé
Signal transmis
Clavier verrouillé
Niveau de charge
de la batterie
Fonction DCM activée
Numéro de canal
Sous-canal DCS utilisé
Numéro de sous-canal
&7&66RX'&6
Signal d’appel vibrant activé
Signal d’appel sonore activé
Niveau du volume sonore
Fonction Vox activée
Signal reçu

4
3 PRÉPARATION AVANT UTILISATION
3.1 Utilisation des batteries
Lors de l’achat du produit, les batteries sont déjà installées dans l’appareil. Retirer alors la languette de
protection située au dos de l’appareil pour libérer le contact des batteries.
S’il est installé, retirer le
FOLSFHLQWXUHYRLUS
clic
1
2
Respecter l’orientation des batteries lors de leur
installation. Une polarisation incorrecte peut
endommager les batteries et l’appareil.
Lors de la mise en charge de l’appareil, utiliser les batteries rechargeables fournies dans le pack initial.
Si les batteries doivent être changées, utiliser des batteries rechargeables de type AAA (LR03) 1,2V
NiMH 600mAh.
Ne pas essayer de recharger des batteries non-rechargeables.
S’assurer que le couvercle du compartiment de la batterie est correctement mis en place pour charger
les batteries.
3.1.1 Installation des batteries
3.1.2 &KDUJHPHQWGHVEDWWHULHV
1LYHDX[GHFKDUJHGHVEDWWHULHV
Haut Moyen Bas
bip
bip Déchargées
Table of contents