OYPLA DIY 3577 User manual

User Manual
USER MANUAL Model No: 3577
Paint Sprayer

Make sure all fastenings are tightly in place and that everything is in order before
using the product. This should be checked periodically by an adult.
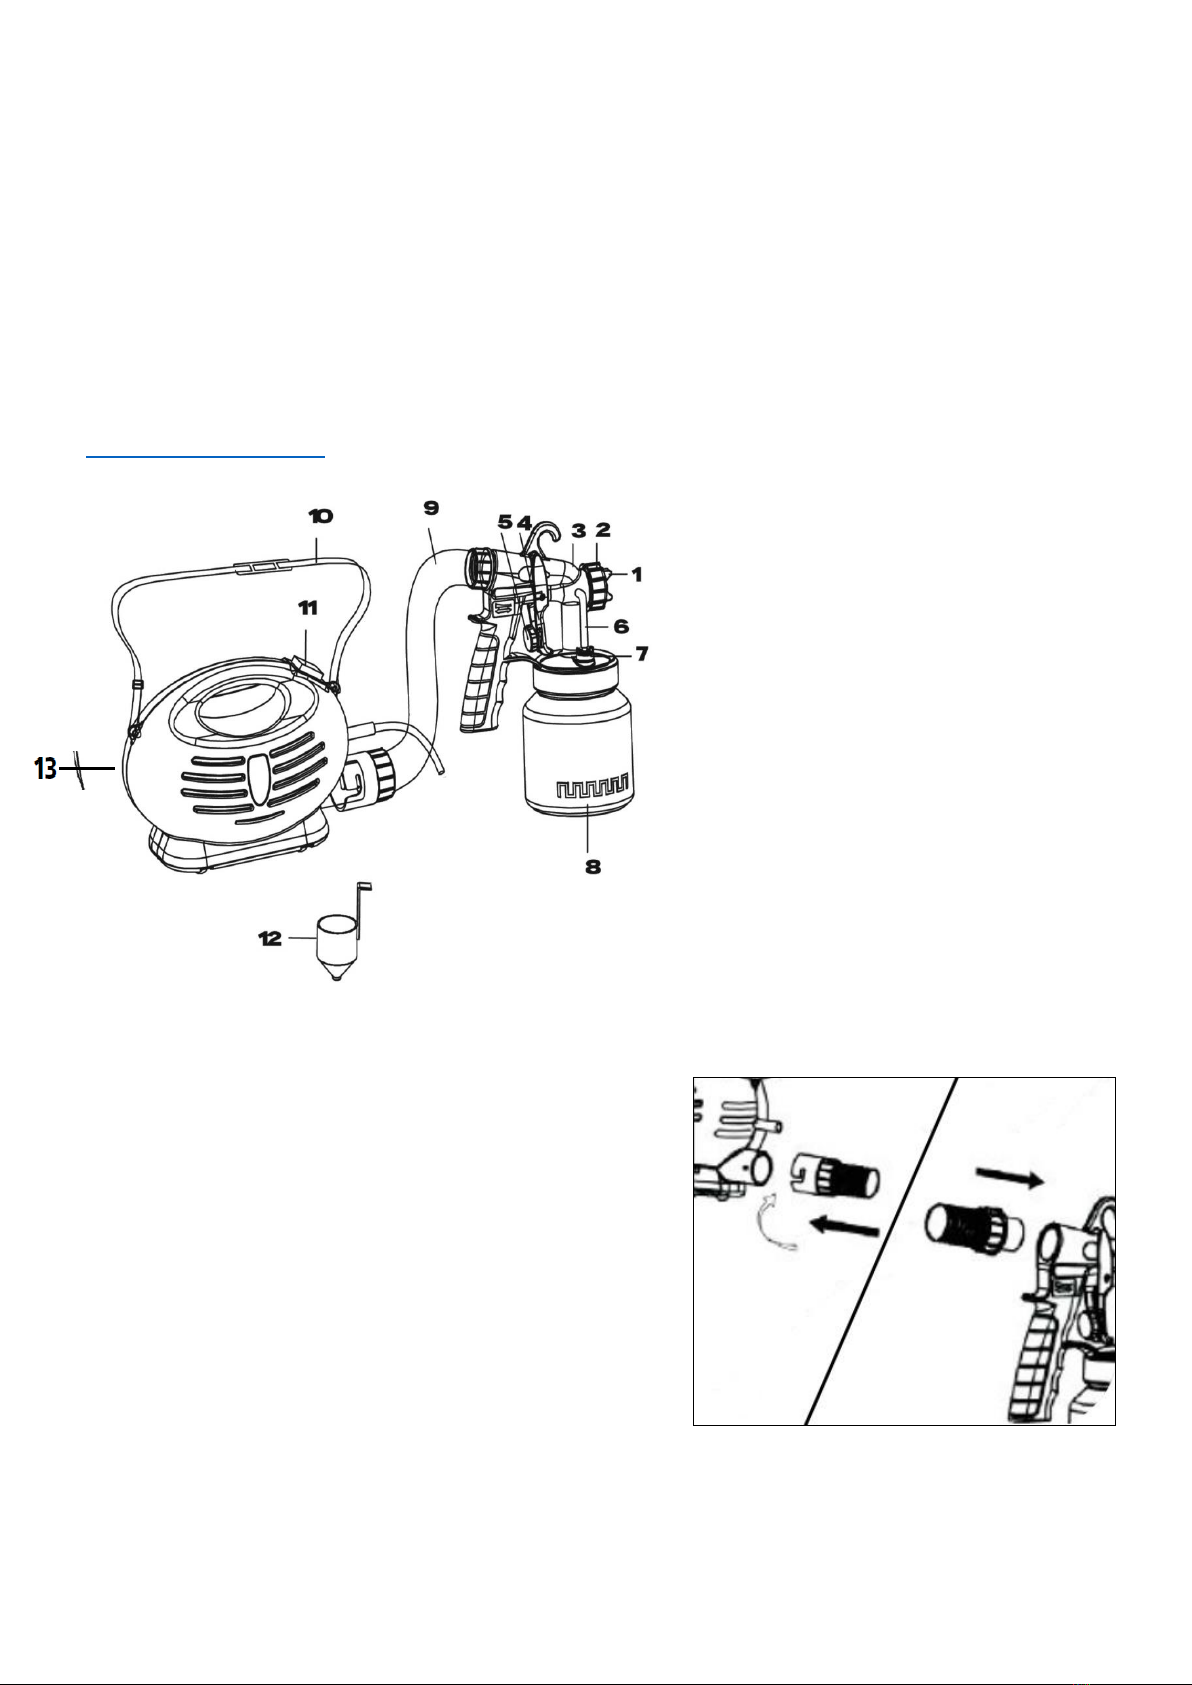
Do not discard any of the packaging until you have checked that you have all of the
parts and fittings required.
Do not carry out alterations or modifications to this product.
This product is not a toy, and is only to be used for its designated purpose.
Close supervision is needed when appliance is near children.
Always unplug the product when not in use.
The product should only be connected to a 230 V AC, 50 Hz electrical outlet.
Never move the product by pulling on the lead.
Inspect the mains lead regularly. Never use the product if the mains lead or plug
has been damaged in any way.
Ensure the work area is kept well lit, well ventilated and clean & tidy at all times.
Do not use near flammable or explosive liquids, gases or powders or naked flames.
Avoid contact with earthed surfaces.
Check for damage before each use. Do not use if any part, including the power
cable, is damaged.
When spraying outdoors, only use extension cables rated for outdoor use.
Keep dry at all times. Do not get wet.
Always wear a protective mask, safety goggles, gloves, ear protection and suitable
clothing and footwear for decorating during use. Paint fumes can be harmful.
For domestic use only.
If the product is damaged or has any defects, please contact [email protected]
Safety Instructions
Notice: Ensure you read and fully understand instructions before use
While every attempt is made to ensure the highest degree of protection in all equipment, we cannot
guarantee freedom from injury. The user assumes all risk of injury due to use. All merchandise is sold
on this condition, which no representative of the company can waive or change.
USER MANUAL Model No: 3577

USER MANUAL Model No: 3577
Assembly Instructions
Parts List:
Please check you have all parts below before attempting to assemble this product.
If you are missing any of the below parts, please contact Oypla customer services:
1. Air cap
2. Union nut
3. Sprayer
4. Trigger
5. Regulator screw
6. Air flow tube
7. Suction tube
8. Sprayer bottle
9. Hose
10. Shoulder strap
11. On/Off Switch
12. Funnel
13. Air Pump
①
1. Attach the hose to the air pump, ensuring the
nodule on the side of the air pump housing is
aligned with the recess in the hose fitting and
twist clockwise to secure.
2. Push or twist the spray head onto the other end
of the hose, ensuring it is fitted securely. See fig.
1
3. Attach the shoulder strap to either end of the
paint gun, ensuring the clips are securely
fastened.

Operating Instructions
- Preparing Materials
The paint gun can be used to spray paint, lacquer or varnish.
First measure the viscosity of the paint by dipping the funnel into the paint until it is full of paint
and timing how long it takes to drain out of the funnel, see recommended viscosity table below:
Substance
Funnel Drain Time
Water-based paint, emulsion
25-50 seconds
Enamel paint, water-based or solvent-based
coloured lacquer
45-50 seconds
Primers
45-50 seconds
Varnish, wood coating, oil, disinfectants,
colouring agent
Do not dilute
Note: The above table should be used as an approximate guide only. Always follow the
manufacturer’s instructions supplied with the substance
The paint gun can be used with substances with a funnel drain time of 25-50 seconds. Some
paints may require diluting slightly until they reach this viscosity.
Initially dilute the paint with a thinner by 10% and stir well to mix.
If the diluted paint still does not have the required viscosity, dilute by a further 5% and repeat
until the desired viscosity is reached.
②
-Spraying
Depending on the angle at which you are spraying, and
whether the surface is horizontal or vertical, adjust the
suction tube to the desired position to ensure it is pointing
towards the section of the container that is lowest during
use. See fig. 2
Fill the container with paint.
Ensure that all surfaces that are not to be sprayed, e.g.
screws, screw threads, skirting boards, wall sockets, etc.
are covered
Ensure the surface to be sprayed is completely clean and
even before spraying. Pre-treat the surface before
spraying if necessary.
Always test on a piece of cardboard or an inconspicuous
area before proceeding.
Always move the arm and not the wrist when spraying to
ensure an even distance is kept from the target area,
typically between 5-15cm.
Move the paint gun evenly to ensure an even coating.
USER MANUAL Model No: 3577

USER MANUAL Model No: 3577
④
⑤
③
-Spray Settings
There are three spray settings, see fig. 3:
A. Vertical flat jet- used for horizontal
surfaces
B. Horizontal flat jet- used for vertical
surfaces
C. Circular jet- used for edges, corners and
hard to reach places
To adjust the spray setting, turn the
screw anti-clockwise approximately
two rotations. Twist the air cap to
the desired setting and tighten the
screw. See fig.4
To adjust the volume of paint
sprayed, adjust the regulator screw
on the trigger handle. Turn anti-
clockwise to reduce the volume
sprayed and clockwise to increase.
See fig.5
CLEANING
Always switch off at the mains and unplug before cleaning.
Unscrew the sprayer bottle and empty contents back into their original container. Clean the
sprayer bottle and the suction tube with a brush. Clean the air vent.
Pour water or solvent into the sprayer bottle, screw it back onto the paint gun and plug into the
mains. Turn the paint gun on and spray the solvent or water into a container or onto a cloth.
Turn off and unplug from the mains. Remove and empty the sprayer bottle.
Pull out the suction tube and nozzle joint to clean.
Remove the air flow tube from the from the paint gun and unscrew the valve. Remove the
membrane and clean all parts carefully before replacing.
Remove the air cap and nozzle by unscrewing the union nut. Clean the air cap, nozzle and nozzle
joint with a brush and solvent or water.
Clean the outside of the spray gun with a damp cloth and solvent if necessary.
Do not use sharp or pointed metal objects to clean the paint gun.

Environmental Protection
Products bearing the symbol shown below means that used electrical and electronic equipment (WEEE) should not be mixed with general
household waste. For proper treatment, recovery and recycling, please take this product(s) to designated collection points where it will be
accepted free of charge. Disposing of this product correctly will help save valuable resources and prevent any potential negative effects on
human health and the environment, which could otherwise arise from inappropriate waste handling. Please contact your local authority for
further details of your nearest designated collection point. Penalties may be applicable for incorrect disposal of this waste, in accordance with
your national legislation.
Imported by Oypla.com LLP, Uxbridge, UB8 2FX
USER MANUAL Model No: 3577
Table of contents