OYSTA Rio User manual

USER
GUIDE
Version: Nov 2022

Getting to know
your Oysta Rio
Lanyard
hole
LED
lights
Microphone
SOS button
CALL
button
SILENT
mode
button
LED
SOS button
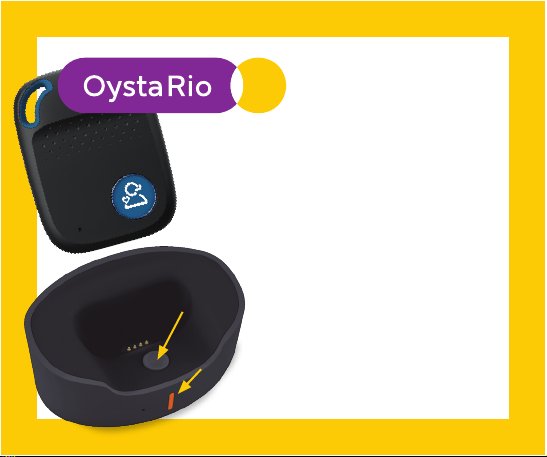
Setting up &
daily charging
If the RED LED light blinks quickly,
your battery charge is low. It the RED
LED blinks slowly, your battery is
charging.
If the RED LED light is solid, it is fully
charged.
Connect the USB cable to the charging cradle,
plug in the AC adaptor and place the device in
the cradle with the SOS button facing forward
as shown.
The cradle LED light will glow when charging
and turn solid when fully charged.
NOTE: Charge your device
daily for at least 3 hours.
Device
Cradle

To turn device on
Press CALL button for
1 second.
ALL LEDs will flash
rapidly to show it is on.
Turning your
device on

Establishing a
mobile signal
Observe the GREEN LED
Single Flash every 3 seconds means you have a
Stable mobile signal
Double Flash every 3 seconds means the device
Has data connection

Getting a GPS
location x
Please take the device outside (or at least near a window)
so that the satellites can get a location fix. It may take a few
minutes to get a location fix.
Observe the BLUE LED
Single Flash every 3 seconds means NO location fix
Double Flash every 3 seconds means Acquired location fix

Activating SOS for
emergency support
If you need help PRESS the SOS button for 3-4
seconds. A voice will say:
“Please wait, dialing for assistance”
This means an SOS alarm being raised.
How to STOP an SOS
If you don’t need help, simply press
the SOS button again once within
10 seconds. The SOS call will be
cancelled.
SOS
button

Making a call from
your Oysta Rio
PRESS the CALL button
for 3 seconds.
You will hear a BEEP as it dials
your preset number.
To end the call, PRESS the
SOS button once.
Turn volume
up and
down using
these two
buttons
p
q

Charge – Keep your device charged; when using
the device for the first time, please fully charge the
battery for around 3+ hours. When battery levels
fall below 20% it will send a low battery warning
message.
Clean – Keep the device clean but don’t clean with
chemicals or detergents. Just wipe with a dry cloth.
Carry – Keep your device with you so you have full
cloak of care.
Important notes, care
& maintenance

Optional
OystaCare button
The OystaCare button connects to the Oysta Rio via Bluetooth;
if the button is within 50 metres of the Oysta Rio device, it can be
pressed to activate an SOS alert.
This is ideal for those who don’t want to carry the Oysta Rio
device around the home but still have the reassurance of help at
hand if they need it.
Other OYSTA GPS manuals


