Pacific Scientific 5170 User manual

Manual UN-01-260
Rev. G
Pacific Scientific OECO
All rights reserved.

Table of Contents
Section -1 Introduction
UNDERSTANDING FLUX DENSITY..................................... 1-1
MEASUREMENT OF FLUX DENSITY .................................. 1-2
PRODUCT DESCRIPTION .................................................... 1-4
APPLICATIONS ..................................................................... 1-4
Section - 2 Specifications
SPECIFICATIONS ................................................................. 2-1
MODEL 5170 / 5180 SPECIFICATIONS ................................ 2-2
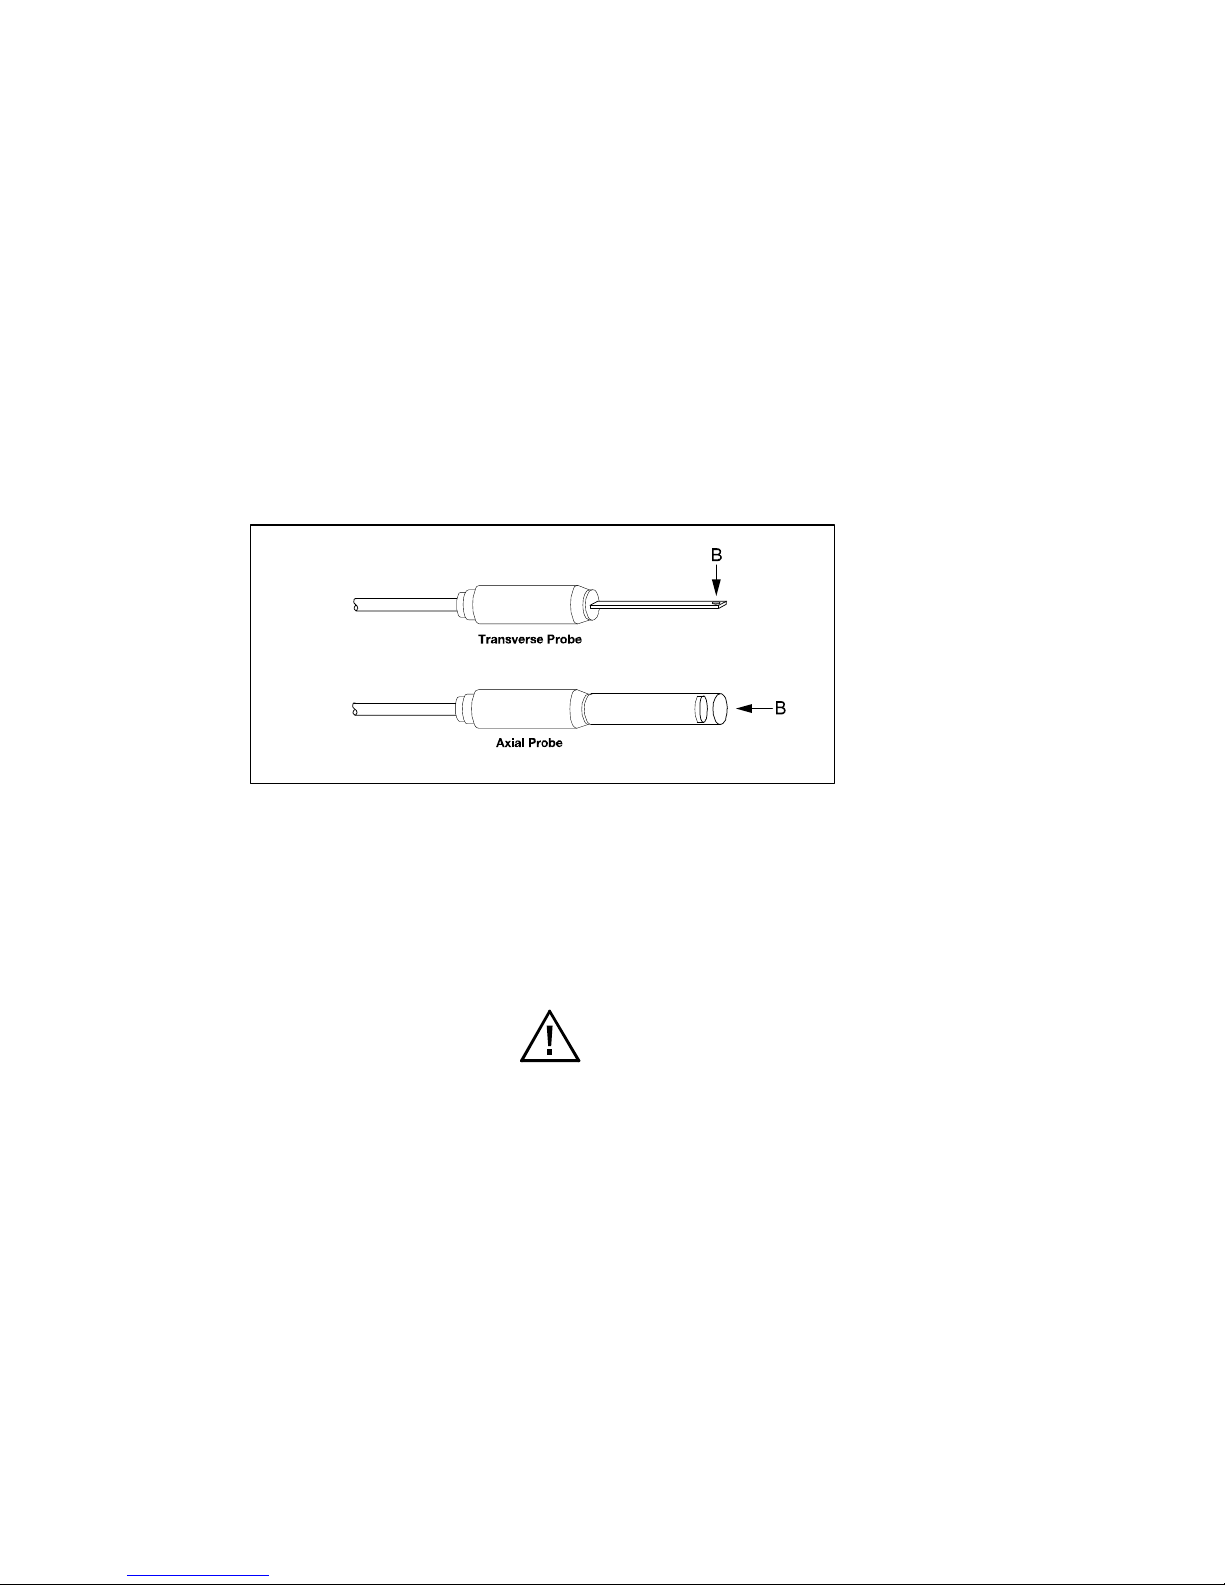
STANDARD TRANSVERSE PROBE ..................................... 2-3
STANDARD AXIAL PROBE ................................................... 2-4
LOW FIELD AXIAL PROBE ................................................... 2-5
ZERO FLUX CHAMBER ........................................................ 2-6
Section - 3 Operating Instructions
OPERATOR SAFETY ............................................................ 3-1
OPERATING FEATURES ...................................................... 3-2
INSTRUMENT PREPARATION ............................................. 3-3
POWER-UP ............................................................................ 3-4
POWER-UP SETTINGS ......................................................... 3-5
LOW BATTERY CONDITION ................................................. 3-6
OVERRANGE CONDITION .................................................. 3-6
AC OR DC MEASUREMENT SELECTION ............................ 3-6
UNITS OF MEASUREMENT SELECTION ............................ 3-6
RANGE SELECTION ............................................................. 3-7
HOLD MODE SELECTION .................................................... 3-8
MIN / MAX HOLD USAGE ..................................................... 3-9
PEAK HOLD USAGE ............................................................. 3-9
ZERO FUNCTION .................................................................. 3-10
AUTOMATIC ZERO FUNCTION ............................................ 3-11
MANUAL ZERO FUNCTION .................................................. 3-12
RELATIVE MODE .................................................................. 3-13
AUTOMATIC RELATIVE MODE ............................................ 3-14
MANUAL RELATIVE MODE .................................................. 3-15
ANALOG OUTPUT FUNCTION ............................................. 3-16
ANALOG OUTPUT USAGE ................................................... 3-17
SOURCES OF MEASUREMENT ERRORS .......................... 3-19
MORE DETAILS ON AC MODE OPERATION ...................... 3-20
MORE DETAILS ON DC MODE OPERATION ...................... 3-21
Section - 4 Remote Operation
USB INTERFACE CONNECTION …......................………… 4-1
REMOTE COMMAND STANDARDS …………....................….. 4-1
COMMAND FORMAT ……..............................……………...….. 4-1
ERROR BUFFER …………................................…………….….. 4-2
STATUS REGISTERS ……........................................…….....… 4-2
INFORMATION FOR REMOTE OPERATION …....................... 4-3
OTHER GENERAL 5180 FILE INFORMATION ….................… 4-4
STATUS BYTE AND REQUEST FOR SERVICE (RQS) …....… 4-5
STANDARD EVENT REGISTER ………................................… 4-7
MEASUREMENT EVENT REGISTER ……............................… 4-8
OPERATION EVENT REGISTER ……...................................… 4-8
QUESTIONABLE EVENT REGISTER …..........................…….. 4-8
“COMMON” COMMAND SYNTAX ……..........................……… 4-9
“COMMON” COMMANDS ……….......................................…… 4-10
SCPI COMMAND SYNTAX ……......................................…….. 4-12
SCPI COMMANDS …………...........................................……… 4-13
ERROR MESSAGES AND COMMANDS …..................………. 4-15
STATUS COMMANDS ……....................………….……….…… 4-16
MODE COMMANDS……….....................................……………. 4-17
RANGE COMMANDS …….......................................…...……… 4-18
HOLD COMMANDS ………...........................................……..… 4-19
ZERO COMMAND …………...............................................…… 4-20
RELATIVE COMMANDS ………..................................………… 4-20
MEASUREMENT COMMAND ….............................…………… 4-20
ANALOG OUTPUT COMMAND …....................................……. 4-21
OPERATION COMPLETE STATUS .......................................... 4-22
MODEL 5100 ERROR CODES ….........................................…. 4-23
WARRANTY
N
O
TI
C
E:
See Pages 3-1 and 3-2 for
SAFETY instructions
p
rior to first use !

List of Tables
Table 4-1 Common Command Summary................... 4-10
Table 4-2 SCPI Command Summary......................... 4-13
List of Illustrations
Figure 1-1 Flux Lines of a Permanent Magnet........................ 1-1
Figure 1-2 Hall Generator........................................................ 1-2
Figure 1-3 Hall Probe Configurations...................................... 1-3
Figure 2-1 Standard Transverse Probe.................................. 2-3
Figure 2-2 Standard Axial Probe............................................. 2-4
Figure 2-3 Low Field Axial Probe............................................ 2-5
Figure 2-4 Zero Flux Chamber................................................ 2-6
Figure 3-1 Auxiliary Power Connector Warnings.................... 3-1
Figure 3-2 Probe Electrical Warning........................................ 3-1
Figure 3-3 Operating Features................................................ 3-2
Figure 3-4 Battery Installation.................................................. 3-3
Figure 3-5 Probe Connection................................................... 3-3
Figure 3-6 Power-Up Display................................................... 3-4
Figure 3-7 Missing Probe Indication........................................ 3-4
Figure 3-8 Low Battery Indication............................................ 3-6
Figure 3-9 Overrange Indication ............................................. 3-6
Figure 3-10 MODE (AC-DC) Function....................................... 3-6
Figure 3-11 UNITS Function...................................................... 3-6
Figure 3-12 RANGE Function.................................................... 3-7
Figure 3-13 HOLD Function....................................................... 3-8
Figure 3-14 Automatic ZERO Function...................................... 3-11
Figure 3-15 Manual ZERO Function.......................................... 3-12
Figure 3-17 Automatic RELATIVE Function.............................. 3-14
Figure 3-18 Manual RELATIVE Function.................................. 3-15
Figure 3-19 OUTPUT Function.................................................. 3-16
Figure 3-20 Analog Output Display............................................ 3-17
Figure 3-21 Adjusting the DC Offset of the Analog Output....... 3-18
Figure 3-22 Probe Output versus Flux Angle............................ 3-19
Figure 3-23 Probe Output versus Distance............................... 3-19
Figure 3-24 Flux Density Variations in a Magnet...................... 3-20
Figure 4-3 Condition, Event and Enable registers.................. 4-5
Figure 4-4 Status Byte and Enable registers.......................... 4-5
Figure 4-5 Standard Event register......................................... 4-7
Figure 4-6 Measurement Event register.................................. 4-8
Figure 4-7 Operation Event register........................................ 4-8
Figure 4-8 Questionable Event register................................... 4-8

Statement regarding improvements to 5100 Series Gaussmeters
The 5100 Series Gauss / Tesla Meters now have improved AC performance and several operational
improvements as a result of new DSP and microcontroller firmware.
Customers with meters manufactured prior to June 2007 and firmware versions below r2.00 and d2.00
should review this manual for changes in specifications. Certain operational sequences have been
made more intuitive and require fewer keystrokes. Refer to the appropriate section of the Operator’s
Manual for details.
Summary of changes:
• Auto Relative now toggles On/Off with just 2 keystrokes.
• Settings for "HOLD" and "Probe Zero" are no longer retained when powered on/off. This often lead to
the false appearance that the meter was malfunctioning in previous firmware versions.
• Analog Output now automatically applies optimum filtering to the signal, therefore the options of "LO"
and "HI" have been removed and it is simply an On/Off selection.
• Peak Hold has been greatly improved with a shorter acquisition time.
USB Hub Compatibility
Like many USB devices on the market such as printers and digital cameras, operation of the 5180
with a USB hub may be problematic. It is recommended that customers wishing to make use of the
remote operation capabilities of the 5180 make a direct connection to their computer USB port and not
use a hub. Operation with a hub is not recommended.

Section 1
Introduction
UNDERSTANDING FLUX DENSITY
Magnetic fields surrounding permanent magnets or electrical conductors can be visualized as a collection of magnetic flux lines? Lines of
force existing in the material that is being subjected to a magnetizing influence. Unlike light, which travels away from its source
indefinitely, magnetic flux lines must eventually return to the source. Thus all magnetic sources are said to have two poles. Flux lines are
said to emanate from the “north” pole and return to the “south” pole, as depicted in Figure 1-1.
One line of flux in the CGS measurement system is called a maxwell (M), but the weber (W), which is 108 lines, is more commonly used.
Flux density, also called magnetic induction, is the number of flux lines passing through a given area. It is commonly assigned the symbol
“B” in scientific documents. In the CGS system a gauss (G) is one line of flux passing through a 1 cm area. The more commonly used
term is the tesla (T), which is 10,000 lines per cm . Thus
1 tesla = 10,000 gauss
1 gauss = 0.0001 tesla
Magnetic field strength is a measure of force produced by an electric current or a permanent magnet. It is the ability to induce a magnetic
field “B”. It is commonly assigned the symbol “H” in scientific documents. The unit of “H” in the CGS system is an oersted
(Oe), but the ampere/meter (Am) is more commonly used. The relationship is
1 oersted = 79.6 ampere/meter
1 ampere/meter = 0.01256 oersted
It is important to know that magnetic field strength and magnetic flux density are not the same. Magnetic field strength deals with the
physical characteristics of magnetic materials whereas flux density does not. The only time the two are considered equal is in free space
(air). Only in free space is the following relationship true:
1 G = 1 Oe = 0.0001 T = 79.6 Am
Figure 1-1
Flux Lines of a Permanent Magnet
1-1

Section 1
Introduction
MEASUREMENT OF FLUX DENSITY
A device commonly used to measure flux density is the Hall generator. A Hall generator is a thin slice of a semiconductor material to which
four leads are attached at the midpoint of each edge, as shown in Figure 1-2.
A constant current (Ic) is forced through the material. In a zero magnetic field there is no voltage difference between the other two edges.
When flux lines pass through the material the path of the current bends closer to one edge, creating a voltage difference known as the Hall
voltage (Vh). In an ideal Hall generator there is a linear relationship between the number of flux lines passing through the material (flux
density) and the Hall voltage.
The Hall voltage is also a function of the direction in which the flux lines pass through the material, producing a positive voltage in one direction
and a negative voltage in the other. If the same number of flux lines pass through the material in either direction, the net result is zero volts.
This sensitivity to flux direction makes it possible to measure both static (dc) and alternating (ac) magnetic fields.
The Hall voltage is also a function of the angle at which the flux lines pass through the material. The greatest Hall voltage occurs when the flux
lines pass perpendicularly through the material. Otherwise the output is related to the cosine of the difference between 90º and the actual
angle.
Figure 1-2
Hall Generator
1-2

The sensitive area of the Hall generator is generally defined as the largest circular area within the actual slice of the material. This
active area can range in size from 0.2 mm (0.008”) to 19 mm (0.75”) in diameter. Often the Hall generator assembly is too fragile to
use by itself so it is often mounted in a protective tube and terminated with a flexible cable and a connector. This assembly, known
as a Hall probe, is generally provided in two configurations:
In “transverse” probes the Hall generator is mounted in a thin, flat stem whereas in “axial” probes the Hall generator is mounted in a
cylindrical stem. The axis of sensitivity is the primary difference, as shown by “B” in Figure 1-3. Generally transverse probes are
used to make measurements between two magnetic poles such as those in audio speakers, electric motors and imaging machines.
Axial probes are often used to measure the magnetic field along the axis of a coil, solenoid or traveling wave tube. Either probe can
be used where there are few physical space limitations, such as in geomagnetic or electromagnetic interference surveys.
Figure 1-3
Hall Probe Configurations
Handle the Hall probe with care. Do not bend the stem
or apply pressure to the probe tip as damage may
result. Use the protective cover when the probe is not
in use.
1-3

PRODUCT DESCRIPTION
The MODEL 5170 / 5180 GAUSS / TESLAMETER is a portable instrument that utilizes a Hall probe to measure magnetic flux density in
terms of gauss, tesla or ampere/meter. The measurement range is from 0.01 mT (0.1 G or 0.01 kA/m) to 3.000T (30.00 kG or 2388 kA/m)
for the 5180, and 2.000T (20.00 kG or 1592 kA/m) for the 5170. The instrument is capable of measuring static (DC) and alternating (AC)
magnetic fields.
The MODEL 5170 / 5180 consists of a palmsized meter and various detachable Hall probes. The meter operates on 4 standard
AA 1.5 volt alkaline batteries or can be operated with an external ACtoDC power supply. A retractable stand allows the meter to stand
upright on a flat surface. The large display is visible at considerable distances. The instrument is easily configured using a keypad.
Three measurement ranges can be selected or the meter can automatically select the best range based on the present flux density being
measured. A “zero” function allows the user to remove undesirable readings from nearby magnetic fields (including earth’s) or false
readings caused by initial electrical offsets in the probe and meter. Included is a “zero flux chamber” which allows the probe to be shielded
from external magnetic fields during this operation. Another feature called “relative mode” allows large flux readings to be suppressed so
that small variations within the larger field can be observed directly. Both the “zero” and “relative” adjustments can be made manually or
automatically.
Other features include three “hold” modes, allowing either the arithmetic maximum, minimum or instantaneous peak values to be held
indefinitely until reset by the user. An analog signal is available from a standard BNC (5180 only) connector that is representative of the
magnetic flux density signal and is calibrated to 3 volts full scale in dc mode or 3 Vrms in AC mode. This output can be connected to a
voltmeter, oscilloscope, recorder or external analog to digital converter.
The meter can be fully configured and flux density readings acquired from a remote computer or PLC using the USB communications port.
(5180)
The meter, probes and accessories are protected when not in use by a sturdy carrying case.
APPLICATIONS
• Sorting or performing incoming inspection on permanent magnets, particularly multipole magnets.
• Testing audio speaker magnet assemblies, electric motor armatures and stators, transformer lamination stacks, cut toroidal cores, coils,
and solenoids.
• Determining the location of stray fields around medical diagnostic equipment.
• Determining sources of electromagnetic interference.
• Locating flaws in welded joints.
• Inspection of ferrous materials.
• Field mapping.
• Inspection of magnetic recording heads.
1-4

Section 2
Specifications
1 G
300 G
3 kG
30 kG
1 mG
0.1 G
1.0 G
10 G
S
p
ecifications continued on next
p
a
g
e
5180
5170
Ranges: Ultra Low Probe
Low
Mid
High
Resolution: Ultra Low Probe
Low
Mid
High
1 G
200 G
2 kG
20 kG
1 mG
0.1 G
1.0 G
10 G
2-1

Regulatory Information:
Compliance was demonstrated to the following specifications as listed in the
official Journal of the European Communities:
EN 61326-1:1997+A1:1998 Electrical equipment for measurement, control
and laboratory use EMC requirements
Immunity:
IEC 61000-4-2 Electrostatic Discharge (ESD)
IEC 61000-4-3 Electromagnetic Field (RF)
Emissions:
EN 55022 Class B Radiated and conducted emissions
Communications Port:
Format: Universal Serial Bus (USB)
Lines supported: Transmit, receive, common.
Connector type: Mini USB Type B
Cable length: 3 m (9.8 ft.) maximum
Standards supported: IEEE-1987.2, SCPI-1991
SPECIFICATIONS, MODEL 5170 & 5180 GAUSS / TESLAMETER without probe, 23 ±3ºC, RH <85%
Battery Type: 1.5V AA (x4)
Battery Life: 20 hours typical, alkaline batteries
Auxilliary Power: +5 Vdc, 300 mA (Regulated)
Auxilliary Power Connector: Standard 2.5mm I.D. / 5.5mm
O.D. connector. Center post is (+) polarity.
Analog Output Connector: BNC
Operating Temperature: 0 to +50ºC (+32 to +122ºF)
Storage Temperature: -25 to +70ºC (-13 to +158ºF)
Meter Dimensions: Length: 17.5 cm (6.9 in)
Width: 9.9 cm (3.9 in)
Height: 3.6 cm (1.4 in)
Weight: Meter w/batteries: 400 g (14 oz.)
Shipping: 1.59 kg (3 lb., 8 oz.)
Probe accuracy must be added to meter accuracy to determine
overall accurac
y
{2} additional ±8 mV tolerance for signals
< 4% of lowest ran
g
e and >2kHz
DC MODE Low Range:
Mid & High Ranges:
AC MODE : (for sinewave >6G or 0.6mT) {2}
10 - 20Hz
20 - 5000Hz
Analog output -3dB point is approximately 22kHz
Delay Time: 30µs
Sample Rate: 8µs with variable moving average filtering
Risetime: DC Mode = 250µs DC peak hold = 60µs
AC Mode and AC Peak Hold; from 30µs to 2ms depending on freq.
0.75 + 6
0.50 + 5
3.00 + 8
2.50 + 5
ACCURACY, Analog Output of Model 5180 (±% of Reading ± mV)
{1} additional ±8 counts tolerance for signals
<
4% of lowest r
ange and
>
2kHz
DC MODE, Low Range: 1.25 + 4 0.8 + 4
Mid & High Ranges: 1.00 + 3 0.6 + 3
AC MODE (for sinewave >6G or 0.6mT) {1}
10 - 20 Hz 3.50 + 8 3.0 + 8
20 - 20,000 Hz : 2.50 + 5 2.0 + 5
20kHz to 25kHz
(
1x axial
p
robe onl
y)
N/A 3.0 + 5
5170 5180
Warmup Time To Rated Accuracy:
Min / Max Hold Acquisition Time:
Peak Hold Acquisition Time:
Analog Output Scaling:
Analog Output Noise:
Analog Output Load:
5 minutes
DC mode: 100 ms typical
AC mode: 700 ms at 10 Hz
to 500 ms at 300 Hz
250 ms at 300 - 4000 Hz
100 ms > 4kHz
DC or AC mode: 128 µs minimum
DC mode: ± 3 Vdc
AC mode: 3 Vrms
(Hi- Range) 1.5mV rms
(Mid- Range) 4.5mV rms
(Low- Range) 15.5mV rms
10 kOhm min, 100 pF max.
Accuracy Change with Temperature (not including
probe)
0-20ºC and 26-50ºC (typical)
Low Range: ±0.25% + 3.0 counts / ºC
Mid & High Ranges: ±0.02% + 0.2 counts / ºC
2-2

STANDARD TRANSVERSE PROBE
Model Number: (5180): STD18-0404
(5170): STH17-0404
Frequency Bandwidth: (5180): 0 to 20 kHz
(5170): 0 to 10 kHz
Offset change with Temperature: ±300 mG / ºC (typical)
Accuracy change with Temperature: -0.05%/ºC (typical)
Operating Temperature Range: 0 to +75ºC (+32 to +167°F)
Storage Temperature Range: -25 to +75ºC (-13 to +167°F)
Note: Due to continuous process improvement, specifications are subject to change without notice.
** Prior to late 2006Transverse Probe Stems were rigid glass epoxy, .150 x .040”.
Polypro-
pylene
**see note
Model
STD18-0402 2”
STD18-0404 4”
STH17-0402 2”
STH17-0402 4”
HTH17-0604 4”
HTD18-0604 4”
STB1X-0201 1”
Material
A
± 0.063” BCCorrected
Linearit
y
Sensitivity
A
ctive Area Operating
Tem
p
. Ran
g
eFrequency
Res
p
onse
Temp. stability (typ)
Zero Calibrate
D
0.025"
DIA (NOM)
1X
DC to 20kHz
DC to 10kHz
DC to 10kHz
DC to 20kHz
DC only
±0.200
Gauss /ºC
0.158”
±.004
0.180”
±.004
.050”
±.005
0.045”
±.004
0.060”
+.000
-.004
.020”
MAX
0.0335”
(NOM)
0.030”
(NOM)
ALUMINUM
3003
¾FH
KAPTON
0.5%/30kG
1.0%/20kG
1.0%/20kG
0.5%/30kG
1.0%/10kG
0.015"
DIA (NOM)
±0.030
Gauss/ºC
(typical)
0 to +75ºC
(32 to 167°F)
-0.05
% /ºC
(typical)
-0.1% /ºC
Figure 2-1
Standard Transverse Probe 2-3

DIAMETER
4.3 ±0.3 mm
(0.170" ±0.010")
STANDARD AXIAL PROBE
Model Number: (5180): SAD18-1904
(5170): SAH17-1904
Flux Density Range: (5180): 0 to ±30 kG (0 to 3 T)
(5170): 0 to ±20 kG (0 to 2 T)
Corrected Linearity: (5180): ±0.5% to ±30kG
(5170): ±1.0% to ±20kG
Frequency Bandwidth: (5180): 0 to 25 kHz
(5170): 0 to 10 kHz
Offset change with Temperature: ±300 mG / ºC (typical)
Accuracy change with Temperature: -0.05% / ºC (typical)
Operating Temperature Range: 0 to +75ºC (+32 to +167°F)
Storage Temperature Range: -25 to +75ºC (-13 to +167°F)
5180 gaussmeter probes
SAD18-1904 4" Axial Probe
SAD18-1902 2" Axial Probe
5170 gaussmeter probes
SAH17-1904 4" Axial Probe
SAH17-1902 2" Axial Probe
ACTIVE AREA
DIAMETER
0.4 mm (0.015")
NOMINAL
Figure 2-2
Standard Axial Probe
CABLE
LENGTH
1.524 m (5')
SENSOR LOCATION
0.25 mm (0.010")
NOMINAL
1.831" NOMINAL
101.6 ±1.6 mm
(4.000" ±0.063")
53.3 ±6.3 mm
(2.10" ±0.25")
.492" NOMINAL
.350” ±.010
2-4
STEM MATERIAL
RIGID PHENOLIC
DIAMETER
(0.187" ±0.006")

LOW FIELD AXIAL PROBE
Model Number: MOS51-3204
Flux Density Range: ±1G (100•T) DC or peak AC
Corrected Linearity: ±0.75% of Reading
Frequency Bandwidth: 0 to 700 Hz (-3dB)
Offset change with Temperature: ±0.02mG / ºC (typical)
Accuracy change with Temperature: 0.001 % / ºC (typical)
Operating Temperature Range: 0 to +75ºC (+32 to +167°F)
Storage Temperature Range: -25 to +75ºC (-13 to +167°F)
Figure 2-3
Low Field Axial Probe
2-5

ZERO FLUX CHAMBER
MODEL NUMBER: YA111
CAVITY DIMENSIONS:
Length: 50.8 mm (2”)
Diameter: 8.7 mm (0.343”)
ATTENUATION: 80 dB to 30 mT (300 G)
PURPOSE: To shield the probe from external magnetic fields during the ZERO or RELATIVE operations.
Figure 2-4
2-6

Section 3
Operating Instructions
OPERATOR SAFETY
This symbol appears on the instrument and probe. It
refers the operator to additional information contained in
this instruction manual, also identified by the same
symbol.
Batteries contain ferrous materials that are attracted
to magnetic fields. Be careful when operating the
instrument near large magnetic fields, as it may
move without warning
Do not connect the auxiliary power connector to an AC
power source. Do not exceed 5 Vdc regulated. Do not
reverse polarity. Use only a regulated AC to DC power
supply certified for country of use.
Figure 3-1
Auxiliary Power Connector Warnings
Do not allow the probe to come in contact with any
voltage source greater than 30 Vrms or 60 Vdc
Figure 3-2
Probe Electrical Warning
3-1

OPERATING FEATURES
Display. Liquid crystal display (LCD).
Auto Zero. To select AUTO ZERO operation, press the ZERO pushbutton. Unit automatically returns to normal
operation.
Manual Zero. To select MANUAL ZERO operation, press the SHIFT pushbutton followed by the ZERO
pushbutton. Use the LEFT (3) and RIGHT (4) arrow pushbuttons to select digit. Use the UP (5) and DOWN (6)
arrow pushbuttons to make fine adjustments as needed. Press the RESET pushbutton to clear the offset value.
Press the SHIFT pushbutton followed by the ZERO pushbutton to return to normal operation.
Auto Relative.* To select AUTO RELATIVE operation, press the RELATIVE pushbutton. Unit automatically
returns to normal operation. AUTO RELATIVE automatically turns the relative offset ON. Push again to turn OFF.
Manual Relative.* To select MANUAL RELATIVE operation, press the SHIFT pushbutton followed by the
RELATIVE pushbutton. Press the LEFT (3) arrow pushbutton to turn offset ON. Press the RIGHT (4) arrow
pushbutton to turn offset OFF. Use the LEFT (3) and RIGHT (4) arrow pushbuttons to select digit. Use the UP (5)
and DOWN (6) arrow pushbuttons to make fine adjustments as needed. Press the RESET pushbutton to clear
the offset value. Press the SHIFT pushbutton followed by the RELATIVE pushbutton to return to normal
operation.
Auto Range. To select AUTO RANGE operation, press the SHIFT pushbutton followed by the RANGE
pushbutton. Press the SHIFT pushbutton followed by the RANGE pushbutton to exit Auto Range mode.
Manual Range. To select MANUAL RANGE operation, press the RANGE pushbutton. Press the UP (5) and
DOWN (6) arrow pushbuttons to select ranges. Press the RANGE pushbutton to return to normal operation.
Units. To select UNITS, press the SHIFT pushbutton followed by the LEFT (3) arrow pushbutton. Press the UP
(5) and DOWN (6) arrow pushbuttons to select flux density readings in gauss, tesla or ampmeters. Press the
SHIFT pushbutton followed by the LEFT (3) pushbutton to return to normal operation.
Hold. To select the HOLD operation, press the SHIFT pushbutton followed by the RESET pushbutton. Press the
LEFT (3) and RIGHT (4) arrow pushbuttons to select between MIN HOLD, MAX HOLD, PEAK HOLD*, and
HOLD
OFF. In any mode press the RESET pushbutton to clear the held reading. Press the SHIFT pushbutton followed
by the RESET pushbutton to return to normal operation.
AC/DC. To select either AC or DC mode, press the SHIFT pushbutton followed RIGHT (4) arrow pushbutton.
Analog Output.*To enable and disable ANALOG OUTPUT operation, press the SHIFT pushbutton followed by
the UP (5) arrow pushbutton.
ON/OFF. Press the ON/OFF pushbutton to power the unit ON. To turn the unit OFF, press the ON/OFF
pushbutton for 3 seconds.
SLEEP MODE. This feature turns unit the OFF after one hour of inactivity (i.e. user input, remote commands
etc.)
Press the SHIFT pushbutton followed by the ON/OFF pushbutton to enable and disable this feature. The battery
symbol and either ON or OFF will flash to indicate the state that has been selected.
FIRMWARE VERSION. The firmware versions for the microcontroller and DSP may be displayed by pressing
RESET for more than 1 second while in any normal operating mode. For example: r2.00 d2.00.
*5180 Model only
Figure 3-3
Operating Features
3-2

INSTRUMENT PREPARATION
1) With the power switch turned off apply pressure to the battery compartment cover at the point shown in Figure 3-4. Slide the cover open
and remove.
2) Install four AA 1.5V alkaline batteries. The battery compartment is designed to indicate the battery polarity. Reinstall the battery
compartment cover.
3) If using an AC to DC power supply, review Figure 3-1 for safety notes and the SPECIFICATIONS section for voltage and current ratings.
4) Install the probe by matching the keyway in the connector to that in the mating socket in the meter. The connector will lock in place when
fully installed. To disconnect, pull on the body of the connector, not the cable!
Figure 3-4
Battery Installaltion
Figure 3-5
Probe Connection
4 AA 1.5V Batteries
USB ANALOG
OUTPUT POWER PROBE
3-3

POWER-UP
Press the POWER switch. There will be a momentary audible beep and all display segments will appear on the display.
The instrument will conduct a self test before measurements begin. If a problem is detected the phrase “Err” will appear
on the display followed by a 3 digit code. The circuitry that failed will be retested and the error code will appear after
each failure. This process will continue indefinitely or until the circuitry passes the test. A condition in which a circuit fails
and then passes should not be ignored because it indicates an intermittent problem that should be corrected.
If the self test is successful the meter will perform a self calibration. During this phase the meter will display a calibration
sequence "CALX" message. Calibration will halt if there is no probe connected. Until the probe is connected the phrase
“Err” will appear accompanied by a flashing “PROBE” annunciator as shown in Figure 3-7.
Per the SPECIFICATIONS section, allow 15 minutes warmup time for rated accuracy.
The most common errors displayed are a result of damage to the sensing element located in the tip of the probe. A
damaged sensing element can result in the following error codes: E064 and E067.
Figure 3-6
Missing Probe Indication Figure 3-7
PowerUp Display
3-4

POWER-UP SETTINGS
The meter permanently saves certain aspects of the instrument’s setup and restores
them the next time the meter is turned on. The conditions that are saved are:
RANGE setting (including AUTO range)
MODE (AC or DC)
UNITS of measure (gauss, tesla or amperemeter)
OUTPUT function
Other aspects are not saved and default to these conditions:
RELATIVE mode (turned OFF)
RELATIVE value (set to 0)
ZERO mode (inactive)
HOLD mode (turned OFF)
3-5

Figure 3-11
UNITS Function
Figure 3-8
Low Battery Indication
Figure 3-9
Overrange Indication
Figure 3-10
MODE (AC/DC) Function
LOW BATTERY CONDITION
The meter is designed to use four standard AA 1.5V alkaline batteries . When the battery
voltage becomes too low the battery symbol on the display will flash, as shown in Figure 3-8.
Replace the batteries or use an external AC to DC power supply.
Instrument specifications are not guaranteed when a low battery condition exists!
OVERRANGE CONDITION
If the magnitude of the magnetic flux density exceeds the limit of the selected range the meter
will display a flashing value of “2999” (gauss or tesla mode) or “2387” (ampere meter mode).
The next highest range should be selected. If already on the highest range then the flux
density is too great to be measured with this instrument.
AC OR DC MEASUREMENT SELECTION
The meter is capable of measuring either static (DC) or alternating (AC) magnetic fields. To
choose the desired mode Press the SHIFT pushbutton followed by the right (4) arrow to select
AC or DC on the display. The DC and AC mode is discussed in more detail later in this
section. This setting is saved and will be restored the next time the meter is turned on.
UNITS OF MEASUREMENT SELECTION
The meter is capable of providing flux density measurements in terms of gauss (G), tesla (T)
or ampere/meters (A/m). To choose the desired units, Press the SHIFT pushbutton followed
by the left (3) arrow pushbutton. Press the up (5) and down (6) arrow pushbuttons to select G,
T or Am on the display. This setting is saved and will be restored the next time the meter is
turned on.
3-6
This manual suits for next models
1
Table of contents
Popular Measuring Instrument manuals by other brands

Unit
Unit UTR2810E Series user manual

Challenger Optics
Challenger Optics CO-OLS-MP012 operating manual

Challenger Optics
Challenger Optics CO-OPM-10 operating manual

red lion
red lion CUB4i user manual

S.E. International
S.E. International Sei Inspector USB Operation manual

Pro's Kit
Pro's Kit MT-4617LED user manual