Pacific Sun Kore 7th User manual

Kore 7th
Ultimate dosing station
User Manual
ver. 3.0
Android interface
www.Pacific-Sun.eu

Page 2
Kore 7th Manual / kHLab Edition
Table of Contents
1. Introduction......................................................................................... 4
1.1. Product Information and Features .............................................................................. 4
1.2. The Kore 7th / kHLab Edition Package....................................................................... 4
1.3. The Kore 7th / kHLab Device Features........................................................................5
1.4. kHLab Device Technical Specifications ......................................................................5
2. Kore 7th / kHLab Device installation .................................................. 6
2.1. Proper device setup and installation ...........................................................................6
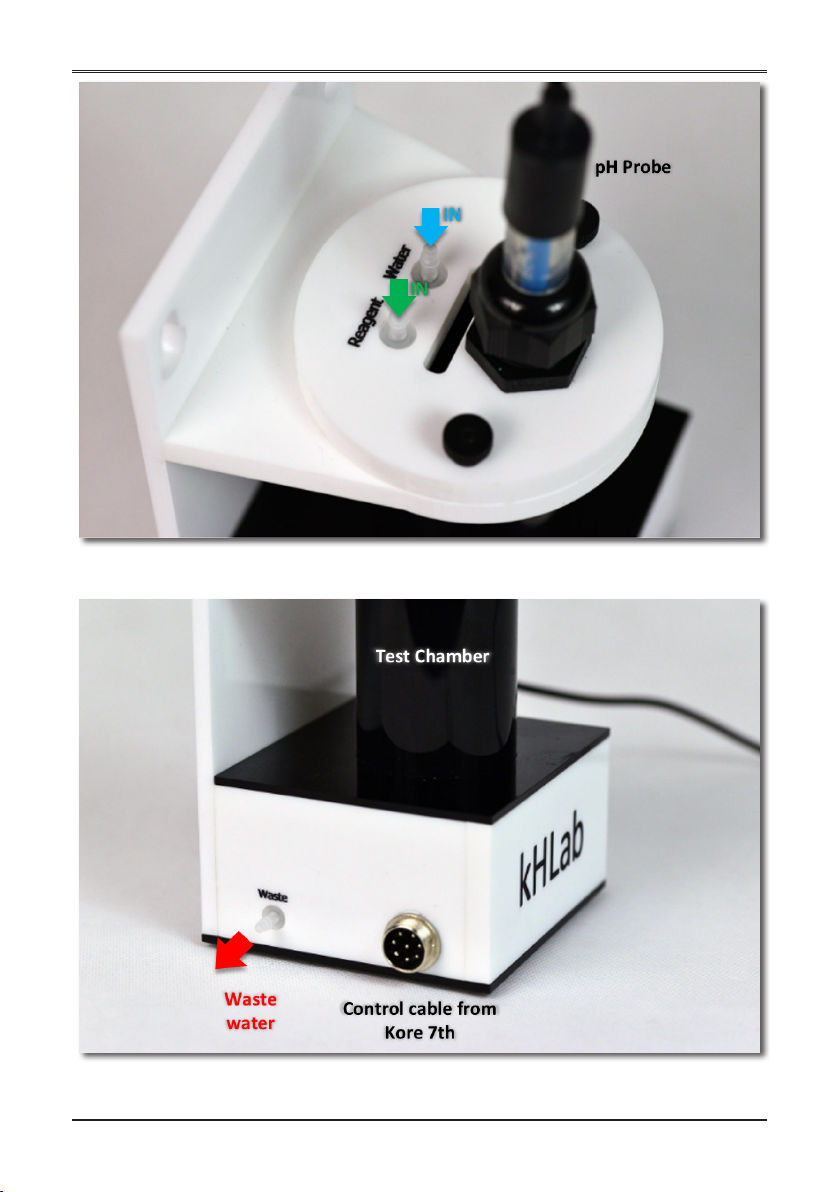
2.2. Kore 7th Connection Ports ...........................................................................................6
2.3. Tubing and cables connection...................................................................................10
3. Kore 7th Wi-Fi Communication Network Setup................................12
3.1. Kore 7th Wi-Fi Network Protection Setup .................................................................12
3.2. Connect Kore 7th to your Internal Wi-Fi Home Network..........................................17
3.3. Kore 7th IP Address Forwarding Setup......................................................................21
3.4. Kore 7th Virtual Serial Port Installation and Setup ................................................... 24
4. Kore 7th Desktop/Laptop Application Installation...........................31
4.1. MS Windows Application Installation ........................................................................31
5. Starting the Kore 7th Windows Application ....................................36
5.1. Open and Start Windows Application ...................................................................... 36
5.2. Connection ................................................................................................................. 38
5.3. Dose settings..............................................................................................................40
5.4. Advanced Dose...........................................................................................................41
5.5. Manual Control / Calibration...................................................................................... 42
5.6. Liquid Setup................................................................................................................44
5.7. ATO / Temp config...................................................................................................... 45
5.8. AWC ............................................................................................................................46
5.9. pH ports ......................................................................................................................48
5.10. kHLab.......................................................................................................................... 49
5.11. dKH chart.................................................................................................................... 50
5.12. System.........................................................................................................................51
6. Kore 7th Smart Phone Application Installation ...............................53
6.1. Android Application Installation ................................................................................ 53
7. Starting the Kore 7th Android Application ......................................54
7.1. Open the Android Application................................................................................... 54
8. kHLab Pumps Calibration and Accuracy Check..............................56
8.1. Calibration Using the Calibration/Measuring Cylinder............................................ 56
8.2. Calibration With Precise Digital Scale and Stand/Holder........................................ 56
8.3. Starting the Channel #1 Calibration Process (Water Sample)................................ 58

Page 3
Kore 7th Manual / kHLab Edition
8.4. Checking Water Sample (Channel #1) Accuracy..................................................... 59
8.5. Starting the Channel #3 Calibration Process (Waste Water).................................. 59
8.6. Checking Waste Water (Channel #3) Accuracy .......................................................61
8.7. Starting the Channel #2 Calibration Process (Reagent)..........................................61
8.8. Checking Reagent Solution (Channel #2) Accuracy............................................... 62
9. pH Probe Setup, Maintenance and Calibration ...............................63
9.1. Initial pH Probe Calibration Procedure - First Use After Purchase ......................... 64
9.2. Calibration Procedure With pH 4.0 Solution............................................................ 65
9.3. Calibration Procedure With pH 7.0 Solution............................................................. 65
10. kHLab Magnetic Stirrer Preparation ................................................66
11. Reagent Solution Preparation..........................................................66
12. Device Working Modes ..................................................................... 67
12.1. Monitoring Mode........................................................................................................ 67
12.2. Control Mode.............................................................................................................. 67
13. Alkalinity Test Intervals ....................................................................68
14. Device Working Stages.....................................................................68
a) Initial Flush.........................................................................................................68
b) Emptying flask (Cylinder).................................................................................68
c) Microflush..........................................................................................................68
d) EMV Stabilize ....................................................................................................68
e) Preparing for Standby ......................................................................................68
15. Carbonate Solution Preparation ......................................................69
16. Parallel Calibration............................................................................69
17. Kore 7th Software and Firmware Upgrade ...................................... 70
18. Troubleshooting.................................................................................77

Page 4
Kore 7th Manual / kHLab Edition
1. Introduction
Congratulations on your Purchase!
The Pacific Sun Kore 7th dosing station and kHLab module are made with the highest
quality materials, and are built to last, helping you to take your reef to the next level!
The Pacific Sun Research and Development team is continuously testing, developing
and releasing new products with new features.
This document serves to cover the basics of the Kore 7th dosing station and the kHLab
module. Details will be made available about additional new products and features as they
are released.
For questions, please contact us at
service@pacific-sun.eu
.
1.1. Product Information and Features
Why the Kore 7th/kHLab was developed?
The kHLab module automatically measures seawater alkalinity in the reef aquarium and
maintains the KH set value by automatically controlled Kore 7th doser pumps performance.
What distinguishes Kore 7th dosing station and kHLab from the competition’s products
is that it regulates the dosing of Alkalinity Additive solution (Sodium Bicarbonate or
Carbonate) as well as Calcium (Ca) and Magnesium (Mg) fluids and Mineral Salt.
Another important feature of kHLab/Kore 7th is ability to control external calcium
reactors by controlling CO dosing into the reactor chamber.
The Kore 7th/kHLab device and device performance should be monitored and serviced
on a regular basis. This includes service activities such as regular pH probe calibration (in
4.0pH and 7.0pH solutions) and checking the dosing efficiency of channels #1 and #2 as
these can have a big impact on accuracy and proper device operation.
An incorrect and/or unstable alkalinity level or sudden and/or accidental alkalinity level
changes in the aquarium water can significantly affect the condition/life of demanding
corals such as SPS which are becoming increasing popular in home aquariums. A correctly
configured and programmed device will quickly became a necessary tool for the aquarist in
maintaining alkalinity at a proper and stable level.
1.2. The Kore 7th / kHLab Edition Package
The Kore 7th / kHLab includes:
• Kore 7th dosing station
• 12V/2A Power supply (USA/EU/AUS)
• High Quality Lab Grade pH Probe
• Wi-Fi antenna for Kore 7th dosing station
• Connection tubings for kHLab
• 4.0pH and 7.0pH Calibration Fluids
• 2x500ml Concentrated Reagent for Alkalinity tests. (1 liter allows to prepare 5 liters
ready for use reagent solution and 1 liter allows for about 100 tests).
• kHLab module with control connection cable
• Precise Digital Scale with calibration holder/stand for very precise fluids calibration
• Dedicated calibration/measuring cylinder
• Syringes and precise dosing applicator tips
• Magnetic stirring bar/pellet (inside kHLab module cylindrical chamber)

Page 5
Kore 7th Manual / kHLab Edition
1.3. The Kore 7th / kHLab Device Features
The kHLab has an ability to measure alkalinity with lab grade accuracy. It can provide
KH measurement values with 0.1 dKH accuracy. It’s a minimal confirmed resolution during
continuous device function. In the case of performing tests manually (in a small time
intervals) resolution can be greater.
1.4. kHLab Device Technical Specifications
‒ Systematic error ISO: ±0.03ml
‒ Numeric division: 0.05ml
‒ Random error: ≤ 0.05ml
‒ Alkalinity range: 5 to 15dKH
‒ Resolution: 0.1 dKH
‒ Device can work in two modes:
1. Monitoring mode
2. Control mode
‒ kHLab module dimensions: L105 x D95 x H172 mm (L4-1/8 x D3-3/4 x H6-3/4
in) – w/out pH probe
‒ Kore 7th dimensions: L510 x D120 x H50 mm (L20-1/8 x D4-3/4 x H2 in)
Monitoring (passive) and Control (active) modes:
1. Monitoring mode
During this Monitoring mode the device measures Alkalinity level and registers
all the values in memory and displays them on doser LCD screen. It makes no
adjustments to Alkalinity level.
2. Control mode
During Control mode device automatically adjusts and maintain the
amount of dosing fluids in channels 4/5/6/7 (Alk/Ca/Mg/Mineral Salt) to control
Alkalinity level. Channels are simultaneously controlled (at the same time).

Page 6
Kore 7th Manual / kHLab Edition
2. Kore 7th / kHLab Device installation
2.1. Proper device setup and installation
For optimum performance, the height difference between the kHLab device and the
water level surface from where the device will take the water sample for testing should NOT
exceed about 50-60cm (20-24”) and connection tubing length between kHLab module
and Kore 7th doser should NOT exceed 100cm (59”).
The kHLab device can be mounted directly on a wall with the supplied wall mount, or it
can operate sitting on a flat surface.
Kore 7th Ultimate Wi-Fi dosing station
2.2. Kore 7th Connection Ports
Kore 7th Dosing Station back panel

Page 7
Kore 7th Manual / kHLab Edition
USB Port for Firmware upgrade.
DC pump Port for DC pump (ATO refill pump).
Optical sensor Connection port for optical sensor (used for ATO/AWC).
Temp sensor Digital temperature sensor port.
Floating sensors port Not used in newest version of software/firmware and designed
for future applications.
Antenna port External Wi-Fi antenna port. Required for proper work!
Reset button Hardware reset switch (short push generate reset signal to
main CPU).
Power supply port Required 12V 1A/2A power supply with 2.1mm plug.
kHLab Digital I/O port Used for connection kHLab Module or Magnetic Stirrer, DC
AWC pump etc.
pH #1 Connection port for pH probe nr 1 (kHLab module).
pH #2 Connection port for pH probe nr 2 (Calcium Reactor).
Important!
1. Make sure that a water mixing magnetic stirrer bar/pellet is put inside
kHLab module test cylindrical chamber.
2. Make sure to connect silicone tubing properly to individual Kore 7th
dosing pumps:
– Pump nr 1 - supplies watersample (aquarium water) to kHLab
test chamber. Do NOT exceed 100cm (39”) length between the
place of taking test water and the kHLab device.
– Pump nr 2 - supplies reagent solution for testing. Try to place
the reagent solution bottle as close as possible to the doser and
at a similar level.
– Pump nr 3 - removes waste water (tested water) from the
kHLab test chamber. This water can be drained to aquarium (we
suggest near the pump sucking in water to the protein skimmer).
The length of the silicone tubing from the pump outlet should not
exceed 150cm (59”).
3. Make sure to connect the control cable between the kHLab device
and the Kore 7th dosing station.

Page 8
Kore 7th Manual / kHLab Edition
Pumps with connectors facing DOWN
Note:
Pumps heads can function with all connectors facing UP or DOWN.
Pumps with connectors facing UP

Page 9
Kore 7th Manual / kHLab Edition
kHLab module – top view
kHLab module – side view

Page 10
Kore 7th Manual / kHLab Edition
2.3. Tubing and cables connection
Kore 7th and kHLab connection setup examples

Page 11
Kore 7th Manual / kHLab Edition
Connector 1 OUT – Test Water sample outlet to the kHLab module - using a silicone
tubing, connect to the Water port at the top of the kHLab module.
Connector 2 IN – Test Water sample inlet from the sump - connect the silicone tubing
to the acrylic tubing holder and make sure the tubing end is always under water, including
during aquarium maintenance or any aquarium service work when the main return pump
is OFF.
Connector 3 OUT – Reagent Solution outlet to kHLab module - connect to kHLab top
connector with label “Reagent”.
Connector 4 IN – Reagent Solution inlet - connect to the container/bottle with reagent
solution - make sure that the silicone tubing END is right at the container/bottle bottom and
NEVER exposed to air. Make sure that the container/bottle is never empty.
Connector 5 OUT – Waste Water (tested) outlet from kHLab mode - connect silicone
tubing and place to the sump close to the skimmer pump inlet. Do not slide in the tubing to
the skimmer pump inlet.
Connector 6 IN – Waste Water (tested) outlet from the kHLab module - connects the
kHLab module to connector with label “Waste”.

Page 12
Kore 7th Manual / kHLab Edition
1. Find your Kore7th doser on your
Wi-Fi network list devices and click
Connect to this network.
Click Connect to the Kore 7th Wi-
Fi Network.
2. Connecting to the Kore 7th
Wi-Fi Network.
3. Open your Internet Browser
(Chrome, Firefox, Safari, IE or other)
and type the Kore7th doser Wi-Fi
network IP address 192.168.4.1
into the address field.
If you are using IE, you might want to
add http:// to the address else IE may
show an error.
You should enter and see Kore 7th
Wi-Fi network setup page like on this
picture.
3. Kore 7th Wi-Fi Communication Network Setup
3.1. Kore 7th Wi-Fi Network Protection Setup

Page 13
Kore 7th Manual / kHLab Edition
4
1
2
3
WiFi Soft-AP Configuration
Soft-AP-AP SSID allows to change the name of your doser Wi- Fi network name.
Soft-AP Password allows to setup password for Kore7th Wi-Fi network access.
Soft-AP Auth Mode allows to change authentication mode (Wi-Fi network
Encryption).
Change Soft-AP settings allows to save settings.
5. Navigate to WiFi Soft-AP Tab to setup/change your WiFi settings.
You should see the following Configuration options:
1
2
3
4

Page 14
Kore 7th Manual / kHLab Edition
6. You can change the Kore7th
doser Wi-Fi network name to your
preferred name in the Sof-AP SSID
field.
Note:
You can leave the default manufacture
name.
7. Setup password to secure your
Kore7th doser Wi-Fi network in the
Sof-AP Password field.
Important!
Password must be at least 8
characters long with capital letters
and special characters.
Protect this Wi-Fi network with a
STRONG password!
8. Change the Authentication/
Encryption Mode from OPEN to
WPA_WPA2_PSK.

Page 15
Kore 7th Manual / kHLab Edition
9. Save all settings
Click Change Soft-AP settings!
All the settings will be saved.
Now you can close your Internet
Browser.
Your computer will be disconnected
from this Kore7th doser Wi-Fi
network.
10. Navigate back to your
Wi-Fi network list, select your
Kore7th doser Wi-Fi network and
click Connect
11. Type your Kore7th doser Wi-Fi
network password in the Security
key field.
Next Click OK

Page 16
Kore 7th Manual / kHLab Edition
12. You should see:
Connecting to your Kore 7th ….
13. Now you are Connected to your
Secure Kore 7th Doser WiFi network.
Important!
You should see the Security Type:
WPA2-PSK.
If NOT, you have to go back to the
Kore 7th doser WiFi network
settings web browser page and
repeat the above steps.

Page 17
Kore 7th Manual / kHLab Edition
3.2. Connect Kore 7th to your Internal Wi-Fi Home Network
1. Open the Kore 7th Wi-Fi network
setup.
Open your Internet Browser (Chrome,
Firefox, Safari, IE or other) and type
the Kore7th doser WiFi network IP
address 192.168.4.1 into the address
field.
If you are using IE, you might want to
add http:// to the address else IE may
show an error.
You should enter and see again the
Kore 7th Wi-Fi network setup page
like on this picture.
2. Go to WiFi Station settings.
Under WiFi Association you should
see Scanning for available home WiFi
networks.
Start Scanning if didn’t start.
3. Select your Home WiFi network
under Network SSID.
Type in your Home WiFi network in
the password field under the WiFi
password, if applicable.
Next Click Connect!

Page 18
Kore 7th Manual / kHLab Edition
4. Wait until is Connected.
You should notice Connecting ... on
the top of the window.
5. The Connection is completed.
Now your Kore 7th doser is connecter
to your Home WiFi network on
a new IP address, for example:
192.168.1.227.
Note:
Your IP address can be different. This
is just an example.
Most likely each network setup will give
a different IP address.
Take a note of this NEW IP address
(your Kore7th dising stattion IP).
6. Now connect to your Home WiFi
network.
Find your Home WiFi network on
your WiFi network list devices and click
Connect to this network.

Page 19
Kore 7th Manual / kHLab Edition
7. If necessary, type in your Home WiFi
network password in the Security key
field.
Next Click OK
8. Connecting to your Home WiFi
network ….
9. Now you are Connected to your
Secure Home WiFi network.
10. Open again your Internet Browser
(Chrome, Firefox, Safari, IE or other)
and type the Kore7th doser NEW
IP address 192.168.1.227 into the
address field.
If you are using IE, you might want to
add http:// to the address else IE may
show an error.
You should enter and see Kore 7th
Wi-Fi network setup page like on this
picture.

Page 20
Kore 7th Manual / kHLab Edition
11. Make sure that the DHCP option
is Turned OFF on the Kore 7th dosing
station. This will make your Kore
7th doser current network settings
permanent. They won’t change after
reboot, power OFF/ON.
Go to WiFi Station settings and scroll
down to Special Settings.
Select option: Static IP
Under Static IP address specify
your NEW Kore 7th IP address:
192.168.1.227
Click Change!
Important!
When using Static IP your Kore7t IP
address will NOT change after doser or
home router restart.
Important!
Take a note of your Kore 7th doser’s IP address. It’s necessary for later
router configuration. This is how your Kore 7th is identified on your home
network.
In this example Kore 7th home [Private/Internal IP] address is
192.168.1.227
Other manuals for Kore 7th
2
Table of contents