PAIDI Swing User manual

2
PAIDI
DEU Gebrauchsanweisung ................................... 4
ENG Instructions for Use ....................................... 6
FRA Mode d‘emploi ............................................... 8
ITA Istruzioni per l‘uso ........................................10
NLD Gebruiksaanwijzing .................................... 12
HRV Upute za upotrebu ...................................... 14
„Swing“

3
PAIDI
„Swing“
Fig. 2 a
Fig. 2 b
Fig. 2 c
Fig. 2 d
Fig. 4a
Fig. 4b
Fig. 3
3.2

4
PAIDI
Allgemeines
Bestimmungsgemäßer Gebrauch:
Verwendungszweck:
Arbeitsplatzleuchte - Arbeitsplatzleuchten sind
Leuchten für eine Einzelplatzbeleuchtung und
werden zusätzlich zu einer allgemeinen Beleuch-
tung verwendet.
Einsatzort:
Ausschließlich für trockene und nicht explosions-
gefährdete Räume.
Betriebsart:
Die Leuchte ist ausgelegt für Dauerbetrieb.
Sicherheitshinweise:
Die Leuchte darf nur in trockenen und nicht
explosionsgefährdeten Räumen betrieben
werden!
Bei Leuchten der Schutzklasse II ist darauf
zu achten, dass deren Metallteile nicht
andere, am Schutzleiter liegende, Metallteile
berühren.
Beschädigte Anschlussleitung sofort von der
Stromversorgung trennen und vom Hersteller
oder von einer Elektro-Fachkraft ersetzen lassen.
Eine defekte Blende muss ersetzt werden, bevor
die Leuchte wieder in Betrieb genommen wird.
Montage
Die Leuchte muss mittels Tischklemme oder
Tischfuß standsicher positioniert werden.
Andere als die vom Hersteller vorgeschlagenen
Befestigungen sind vom Anwender auf Zuver-
lässigkeit zu prüfen!
Inbetriebnahme
Vor Inbetriebnahme ist zu überprüfen, ob die
Anschlussspannung mit der auf dem Leistungs-
schild angegebenen Nennspannung und Fre-
quenz übereinstimmt.
Bedienung
Die Leuchte wird über den Wippschalter am
Leuchtenkopf ein- und ausgeschaltet.
Positionieren der Leuchte
Die Leuchte ist dann richtig positioniert, wenn sie
nur die Arbeitsfläche ausleuchtet. Das Licht darf
nicht in die Augen des Benutzers oder auf den
Bildschirm strahlen (siehe Fig. 2 a bis 2 d, Seite 3).
Mit der Schraube 3.2 kann die Friktion nach Ein-
setzen der Leuchte eingestellt werden.
Nachstellen der Gelenke
Die Gelenke sind einstellbar. Jedes Gelenk wird
so eingestellt, dass die Leuchte einerseits leicht
beweglich ist, andererseits aber das Gelenk in
der gewünschten Einstellung verharrt.
Wartung und Reparatur
Vor Wartungs- und Reparaturarbeiten ist die
Leuchte vom Netz zu trennen! Die Arbeiten
dürfen nur von einem ausgebildeten Elektro-
Fachmann ausgeführt werden!
Als Ersatzteile dürfen nur vom Hersteller freige-
gebene Teile verwendet werden.
Achtung,
Begleitpapiere beachten!
VDE-Zulassung
CE-Konformitätskennzeichen
Gerät der Schutzklasse II
(Schutzisolierung)
Abkürzungen und Symbole:
Entsorgungshinweis
beachten!
Gebrauchsanweisung „Swing“
DEU

5
PAIDI
Der Hersteller kann nicht für Schäden verantwortlich gemacht werden, die infolge der
Nutzung abweichend vom bestimmungsgemäßen Gebrauch oder der Nichtbeachtung
von Sicherheitshinweisen und Warnungen verursacht werden.
Gebrauchsanweisung „Swing“
DEU
Lampenwechsel
a) Leuchte spannungslos machen (Stecker
abziehen).
b) Mit einem Schraubendreher die transparente
Blende herausheben (siehe Fig. 4a , Seite 3).
c) Defekte Lampe aus Sockel ziehen (siehe Fig.
4b, Seite 3).
d) Neue Lampe einsetzen.
e) Transparente Blende wieder einsetzen.
Achtung! Es dürfen nur die vom Hersteller
zugelassenen Lampentypen verwendet werden
(siehe „Technische Daten“).
Pflege
Hinweis: Das regelmäßige Reinigen der
transparenten Blende garantiert eine höhere
Lichtausbeute.
Zur Reinigung der Geräteteile verwenden Sie ein
mit normalem Haushaltsreiniger getränktesTuch.
Beachten Sie bei den verwendeten Mitteln die
Verträglichkeit mit Lacken und Kunststoffen.
Hinweis: Zur Reinigung dürfen auf keinen
Fall konzentrierte Desinfektions- oder Lö-
sungsmittel oder alkoholartige Flüssigkeiten
verwendet werden. Schäden durch chemische
Agenzien, wie z.B. ungeeignete Reinigungs-
mittel, fallen nicht in die Verantwortung des
Herstellers.
Entsorgung
Führen Sie das Gerät am Ende seiner Le-
bensdauer den zur Verfügung stehenden
Rückgabe- und Sammelsystemen zu.
Defekte Leuchtstofflampen müssen als Sonder-
müll entsorgt werden.
Technische Daten
Klassifikation
Schutzklasse II
Schutzart IP 20
Anschlusswerte
Nennspannung 230 V AC
Frequenzbereich 50 Hz
Leistungsaufnahme ca. 15 W
Leistungsfaktor 0,4
Abmessungen
Leuchtenkörper ca. 303 x 66 x 59 mm
Lampenbestückung
Kompakt-Leuchtstofflampe 11 Watt
Vorschaltgerät im Gerätestecker eingebaut.

6
PAIDI
General information
Designated use:
Intended purpose:
Workplace light - workplace lights are lights in-
tended to illuminate a single workplace and are
used in addition to a general lighting equipment.
Place of use:
Only in dry rooms not subject to the risk of
explosion.
Operating mode:
The light is designed for continuous operation.
Attention,
observe accompanying documents!
VDE approval
CE conformity mark
Protection class II
(Protective insulation)
Abbreviations and symbols:
Observe the disposal instructions!
Instructions for Use „Swing“
ENG
Mounting
The light must be positioned safely by means
of a table clamp or a table base.
The user has to verify the reliability when
using mounting elements which have not been
approved by the manufacturer!
Putting into operation
Before putting the light into operation the user
has to check whether mains voltage and voltage
and frequency specified on the rating plate are
identical.
Operation
The light is switched on and off with a rocker
switch at the light head.
Positioning the light
The position of the light is correct, if it only il-
luminates the working surface. The light must
not shine into the eyes of the user or on to the
screen (see fig. 2 a to fig. 2 d on page 3).
With the screw 3.2 the friction can be adjusted
after attaching the luminaire.
Adjusting the articulation joints
The joints are adjustable. The joints should be
positioned so that the light is on the one hand
easily moveable and on the other hand the
position of the articulation joint adjusted by the
user is maintained.
Maintenance and repair
Disconnect the light from the mains before
carrying out any maintenance or repair work!
This work must be carried out by a qualified
electrician!
As replacement parts only use parts approved
by the manufacturer!
Safety instructions:
The light may only be operated in dry rooms not
subject to the risk of explosion!
In case of lights with protection class II,
please watch out that its metal parts do
not touch other metal parts lying at the PE wire.
Disconnect the damaged connecting cable im-
mediately from the power supply and have it
replaced by the manufacturer or by a qualified
electrician.
A defective lens must be replaced before the
light is put back into operation.

7
PAIDI
The manufacturer cannot be held liable for damage caused if the light is used for
purposes other than the intended purpose or if safety instructions and warnings
are ignored.
Changing the lamp
a) Disconnect the light from the mains (plug
connector).
b) Lift the transparent lens with a screw driver
(see fig. 4a on page 3)
c) Pull the old lamp out of the socket (see fig.
4b on page 3).
d) Insert new lamp.
e) Re-insert the transparent lens.
Attention! Only use lamp types approved by the
manufacturer (see „Technical data“).
Instructions for Use „Swing“
ENG
Care
Note: Clean the transparent shade regularly to
ensure maximum brightness.
Please use a cloth impregnated with a normal
household cleaning agent to clean the lamp
components.
Please ensure that the cleaning agents used are
compatible with paints and plastics.
Note: For cleaning purposes never use con-
centrated disinfectants or solvents or alcoho-
lic liquids. The manufacturer cannot be held
liable for damages caused by chemical agents
such as improper cleaning agents.
Disposal
Return the unit at the end of its service life
to the available recycling systems.
Defective fluorescent lamps must be
disposed of as special waste.
Technical data
Classification
Protection class II
Protection type IP 20
Connection values
Nominal voltage 230 V AC
Frequency range 50 Hz
Power consumption approx. 15 W
Power factor 0,4
Dimensions
Light body 303 x 66 x 59 mm
Fitted with
Compact fluorescent lamp 11 Watt
Ballast unit integrated into the device connector.

8
PAIDI
Attention,
observer la documentation !
Homologation VDE
Sigle de conformité CE
Appareil de classe de protection II
(double isolation)
Abréviations et symboles :
Observer les instructions d‘élimination !
Généralités
Utilisation conforme à l’emploi prévu :
Application :
Luminaire pour poste de travail - les luminaires
pour poste de travail sont des luminaires conçus
pour l’éclairage d’un poste de travail individuel
et sont utilisées en complément d’un éclairage
général.
Lieu d’application :
Le luminaire ne doit être utilisé que dans des
pièces sèches et exemptes de risques d’explo-
sion.
Type de fonctionnement :
Le luminaire est conçu pour le fonctionnement
en service continu.
Consignes de sécurité :
Le luminaire ne doit être utilisé que dans
des pièces sèches et exemptes de risques
d‘explosion !
Les luminaires de la classe de protection II
doivent être disposées de façon à ce que
leurs parties métalliques ne soient pas
en contact avec d‘autres éléments métalliques
reliés à la terre.
Déconnecter le câble de raccordement endom-
magé immédiatement de l’alimentation en cou-
rant et faire remplacer le câble par le fabricant
ou par un électricien qualifié formé.
Un cache défectueux doit être remplacé avant
de remettre le luminaire en service.
Mode d‘emploi „Swing“
FRA
Montage
Le luminaire doit être positionnée de façon fixe
sur la surface de travail au moyen d‘une pince
de table ou d‘un pied de table.
Des dispositifs de fixation autres que ceux pro-
posés par le constructeur doivent être vérifiés
par l‘utilisateur de leur fiabilité!
Mise en service
Avant la mise en service, s‘assurer que la tension
de réseau correspond à la tension nominale et à
la fréquence indiquées sur la plaque signalétique.
Utilisation
L‘interrupteur basculant se trouvant sur la tête
du luminaire permet d‘allumer et d‘éteindre le
luminaire.
Positionnement du luminaire
Le luminaire est positionné correctement
lorsqu‘il n‘éclaire que le plan de travail. La lumière
ne doit pas éblouir l‘utilisateur ou se refléter sur
l‘écran (voir fig. 2 a à 2 d sur la page 3).
La vis 3.2 permet de régler la friction après la
mise en place du luminaire.
Réajustage des articulations
Les articulations sont réglables. Chaque arti-
culation doit être réglée de façon à ce que le
luminaire puisse être déplacé facilement tout en
étant suffisamment résistant pour être immobi-
lisé dans la position de réglage désirée.
Maintenance et réparation
Déconnecter le luminaire du secteur avant
toute opération de maintenance ou de répa-
ration! Les travaux ne doivent être effectués que
par un électricien qualifié !
Seul l‘emploi de pièces de rechange agréées par
le fabricant est autorisé.

9
PAIDI
Le fabricant décline toute responsabilité pour les dommages qui résulteraient d‘une
utilisation non conforme à l‘emploi prévu, ou du non-respect des consignes de sé-
curité et des avertissements.
Changement de tube
a) Débrancher le luminaire (retirer la fiche).
b) Retirer la plaque de protection des sources
au moyen d‘un tournevis (voir ill. 4a, page 3).
c) Retirer le tube usagé de la douille (voir ill. 4b
sur page 3).
d) Introduire le tube neuf dans de la douille.
e) Remettre la plaque de protection transpa-
rente.
Attention ! Seul l‘emploi de tubes agréés par
le fabricant est autorisé (voir „Charactéristiques
techniques“).
Mode d‘emploi „Swing“
FRA
Caractéristiques techniques
Classification
Classe de protection II
Indice de protection IP 20
Puissance connectée
Tension nominale 230 V AC
Gamme des frequences 50 Hz
Puissance absorbeé env. 15 W
Facteur de puissance 0,4
Dimensions
Corps de luminaire 303 x 66 x 59 mm
Equipement
Tube fluorescent compact 11 W
Le ballast est intégré dans la fiche.
Elimination des déchets
A la fin de sa durée de vie, veuillez retour-
ner l‘appareil à un organisme de recyclage
et de collecte.
Les tubes fluorescents défectueux doivent être
éliminés en tant que déchets spéciaux.
Entretien
Note : Un nettoyage régulier de la plaque de
protection transparente assure un meilleur ren-
dement lumineux.
Pour nettoyer les éléments du luminaire, utiliser
un chiffon imbibé d’un produit ménager usuel.
Assurez-vous que les produits utilisés sont
compatibles avec les laques et les plastiques.
Note : N’utiliser en aucun cas des solvants
ou des produits de désinfection concentrés
ou tout autre produit à base d’alcool pour
nettoyer l’appareil. Le fabricant décline toute
responsabilité concernant les dommages
provoqués par des agents chimiques tels
que des produits de nettoyage inappropriés.

10
PAIDI
Avvertenze per la sicurezza:
L’apparecchio d’illuminazione deve essere uti-
lizzato esclusivamente in locali asciutti e non
soggetti a pericolo d’esplosione!
Per gli apparecchi d’illuminazione della
classe di protezione II occorre assi-
curare che le relative componenti metalli-
che non tocchino altre componenti metal-
liche situate sul conduttore di protezione.
Interrompere immediatamente l’alimentazione
elettrica del cavo di collegamento danneggiato
e far sostituire il cavo dal costruttore o da un
elettricista specializzato.
Un vetro difettoso deve essere sostituito prima
di rimettere in funzione l’apparecchio d’illumi-
nazione.
Attenzione: osservare la documenzaio-
ne fornita in dotazione!
Omologazione VDE
Contrassegno di conformità CE
Apparecchio della classe di protezione
II (isolamento di protezione)
Abbreviazioni e simboli:
Osservare le istruzioni per lo
smaltimento!
Dati generali
Uso conforme allo scopo d’impiego
previsto:
Scopo d’impiego:
Apparecchio d´illuminazione per posto di lavoro
- gli l´apparecchi d´illuminazione per il posto di
lavoro sono previsti per l’illuminazione dei posti
singoli e vengono usati in aggiunta all’illumina-
zione generale.
Luogo d’impiego:
Esclusivamente per locali asciutti e non soggetti a
pericolo d’esplosione.
Tipo di funzionamento:
L’apparecchio d’illuminazione è predisposto al
funzionamento continuo.
Istruzioni per l‘uso „Swing“
ITA
Montaggio
L‘apparecchio d’illuminazione deve essere posi-
zionato in modo stabile mediante morsetto da
tavolo o piede di tavolo.
Fissaggi diversi da quelli proposti dal costruttore
vanno controllati dall’utente per quanto concerne
la loro affidabilità!
Messa in funzione
Prima della messa in funzione occorre verificare
se la tensione di collegamento corrisponde alla
tensione nominale ed alla frequenza indicate sulla
targhetta della potenza.
Operazione
L’apparecchio d’illuminazione viene inserito e
disinserito mediante l’interruttore a bilanciere
sulla testa dell’apparecchio.
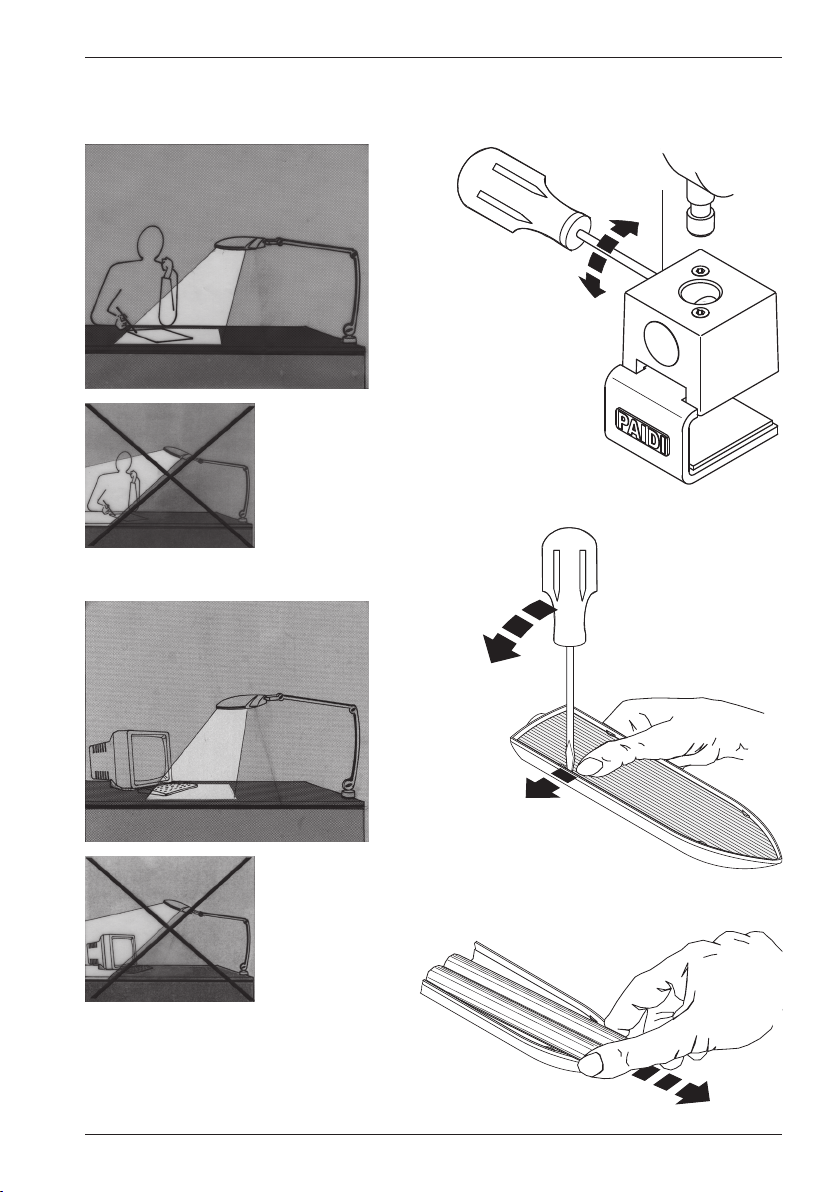
Posizionamento
L’apparecchio è posizionata in modo corretto,
solo se illumina l’area operativa. La luce non deve
essere diretta verso gli occhi dell’utente o verso
lo schermo (vedi fig. da 2a a 2d sulla pag. 3).
Con la vite 3.2 può essere impostata la frizione
dopo l’inserimento dell’apparecchio d’illumina-
zione.
Impostazione delle articolazioni
Le articolazioni sono regolabili. Ciascuna artico-
lazione viene impostata in modo tale che l’appa-
recchio d’illuminazione sia da un lato facilmente
spostabile, dall’altro l’articolazione rimanga fissa
nella posizione d’impostazione desiderata.
Manutenzione e riparazione
Precedentemente ai lavori di manutenzione e
di riparazione l’apparecchio d’illuminazione va
separato dalla rete! Le relative operazioni vanno
effettuate esclusivamente da un elettricista
specializzato!
Si devono usare solo parti di ricambio esclusiva-
mente autorizzati dal costruttore.

11
PAIDI
Il costruttore non può rispondere di danni risultanti da un impiego diverso dall‘uti-
lizzo conforme allo scopo d’impiego previsto o dalla non osservanza delle avver-
tenze di sicurezza e degli avvertimenti.
Sostituzione delle lampada
a) Togliere la tensione dalla lampada (estrarre la
spina);
b) sollevare il diffusore trasparente usando un
cacciavite (vedi fig. 4a pag. 3);
c) estrarre la lampada bruciata dallo zoccolo
(vedi fig. 4b, pag. 3);
d) montare la lampada nuova;
e) rimontare il diffusore trasparente.
Attenzione! Usare solo i tipi di lampade permes-
si dal costruttore (vedi „Dati tecnici“).
Istruzioni per l‘uso „Swing“
ITA
Smaltimento
Alla fine della sua durata utile, smaltire
l‘apparecchio consegnandolo ai sistemi
di raccolta e riciclaggio disponibili.
Le lampade fluorescenti guaste vanno smaltite
come rifiuti speciali.
Cura
Avvertenza: Pulendo il diaframma trasparente
ad intervalli regolari si assicura un maggiore
rendimento luminoso.
Per la pulizia delle parti dell’apparecchio di illumi-
nazione fare uso di un panno imbevuto di normale
detergente domestico.
Assicurarsi che i prodotti utilizzati siano compati-
bili con le vernici e con i materiali sintetici.
Attenzione: Per la pulizia non devono assolu-
tamente essere usate sostanze disinfettanti
o solventi concentrate o liquidi contenenti
alcool. Il costruttore non risponde dei danni
provocati da agenti chimici, come p. es. de-
tergenti inappropriati.
Dati tecnici
Classificazione
Classe di protezione II
Tipo di protezione IP 20
Valori d’ alimentazione
Tensione nominale 230 V AC
Campo di frequenza 50 Hz
Potenza assorbita circa 15 W
Fattore di potenza 0,4
Dimensioni
Corpo della lampada 303 x 66 x 59 mm
Dotazione lampada
Lampada fluorescente compatta 11 W
L’alimentatore è integrato nella spina dell’ap-
parecchio.

12
PAIDI
Algemene informatie
Gebruik volgens de voorschriften:
Gebruiksdoel:
Bureaulamp - Bureaulampen zijn lampen voor
een individuele verlichting van de werkplek en
worden naast een algemene verlichting gebruikt.
Plaats van gebruik:
Uitsluitend geschikt voor droge ruimtes zonder
explosiegevaar.
Werkwijze:
De lamp is bedoeld voor continubedrijf.
Veiligheidsaanwijzingen:
De lamp mag alleen worden gebruikt in droge
ruimtes zonder ontploffingsgevaar!
Bij lampen van beschermingsklasse II
moet erop worden gelet, dat hun me-
talen delen niet in aanraking komen met an-
dere metalen delen die aan de aarddraad liggen.
Beschadigde aansluitleiding onmiddellijk los-
koppelen van de stroomvoorziening en laten
vervangen door de fabrikant of door een elek-
trotechnicus.
Een defecte afdekplaat moet worden vervangen
voordat de lamp weer in gebruik wordt gesteld.
Attentie,
Begeleidende papieren in acht nemen!
VDE-goedkeuring
CE-conformiteitsmarkering
Toestel van beschermingsklasse II
(beschermende isolering)
Afkortingen en symbolen:
Verwijderingsaanwijzingen
in acht nemen!
Gebruiksaanwijzing „Swing“
NLD
Montage
De lamp moet standvast worden gepositioneerd
door middel van een tafelklem of tafelvoet.
Andere bevestigingen als die, die door de fabri-
kant voorgesteld zijn, moeten door de gebruiker
worden gecontroleerd op hun betrouwbaarheid!
Ingebruikname
Voor de ingebruikname moet worden gecontro-
leerd of de aansluitspanning overeenstemt met
de nominale spanning en frequentie die vermeld
staan op het typeplaatje.
Bediening
De lamp wordt in- en uitgeschakeld met de tui-
melschakelaar aan de kop van de lamp.
Positioneren van de lamp
De lamp is dan correct gepositioneerd als ze al-
leen het werkvlak verlicht. Het licht macht niet in
de ogen van de gebruiker of op het beeldscherm
stralen (zie fig. 2 a tot 2 d op pagina 3).
Met schroef 3.2 kan de frictie na het plaatsen
van de lamp worden ingesteld.
Bijstellen van de scharnieren
De scharnieren kunnen worden ingesteld. Elke
scharnier wordt zo ingesteld dat de lamp aan de
ene kant makkelijk te bewegen is maar aan de
andere kant de scharnier op de gewenste stand
blijft staan.
Onderhoud en reparatie
Voor onderhouds- en reparatiewerkzaamhe-
den moet de lamp van het stroomnet worden
losgekoppeld! De werkzaamheden mogen
alleen worden uitgevoerd door een geschoolde
elektro-technicus!
Als reserveonderdelen mogen alleen onderde-
len worden gebruikt die door de fabrikant zijn
vrijgegeven.

13
PAIDI
De fabrikant kan niet verantwoordelijk worden gesteld voor schade die wordt veroor-
zaakt door onjuist gebruik of door het niet in acht nemen van veiligheidsaanwijzingen
en waarschuwingen.
Lamp vervangen
a) Lamp spanningsloos maken (stekker eruit
trekken).
b) Met een schroevendraaier de transparante
afdekking eruit tillen (zie fig. 4a op pagina 3).
c) Defecte lamp uit sokkel trekken (zie fig. 4b
op pagina 3).
d) Nieuwe lamp erin zetten.
e) Transparante afdekking er weer in doen.
Attentie! Alleen lamptypen die door de fabrikant
zijn toegestaan mogen worden gebruikt (zie
„Technische gegevens“).
Gebruiksaanwijzing „Swing“
NLD
Verwijdering
Breng het apparaat aan het einde van
zijn levensduur naar de ter beschikking
staande retour- en inzamelsystemen.
Defecte fluorescentielampen moeten naar het
KCA worden gebracht.
Onderhoud
Opmerking: Het regelmatig reinigen van de
doorzichtige afdekking garandeert een beter
lichtrendement.
Voor de reiniging van de lamponderdelen neemt
u een doek die gedrenkt is in een normaal huis-
houdreinigingsmiddel.
Let bij de gebruikte reinigingsmiddelen op de
verdraagzaamheid met lakken en kunststoffen.
Opmerking:Voor de reiniging mogen in geen
geval geconcentreerde desinfectie- of oplos-
middelen worden gebruikt. Beschadigingen
door chemische agenten, zoals bijvoorbeeld
ongeschikte reinigingsmiddelen, vallen niet
onder de verantwoordelijkheid van de pro-
ducent.
Technische gegevens
Classificatie
Beschermingsklasse II
Veiligheidsklasse IP 20
Aansluitwaarden
Nominale spanning 230 V AC
Frequentiegebied 50 Hz
Opgenomen vermogen ca. 15 W
Vermogensfactor 0,4
Afmetingen
Lampen ca. 303 x 66 x 59 mm
Lampuitrusting
Compacte fluorescentielamp 11 Watt
Voorschakelapparaat ingebouwd in stekker.

14
PAIDI
Općenito
Upotreba sukladno namjeni:
Svrha korištenja:
Radna svjetiljka – Radne svjetiljke namijenje-
ne su za osvjetljavanje pojedinačnog mjesta,
a služe i za općenito osvjetljavanje.
Mjesto upotrebe:
Isključivo za suhe i neeksplozivne prostorije.
Način rada:
Svjetiljka je dizajnirana za neprekinut rad.
Sigurnosne napomene:
Svjetiljka se smije koristiti samo u suhim i
neeksplozivnim prostorijama!
Pri upotrebi svjetiljki zaštitne klase II po-
trebno je voditi računa o tome da metalni
dijelovi svjetiljke ne dotiču druge metalne
dijelove koji se nalaze na zaštitnom vodiču.
Oštećeni priključni vod odmah isključite iz
izvora napajanja i dajte proizvođaču ili elek-
tričaru da ga zamijeni.
Oštećeni zaslon potrebno je zamijeniti prije
ponovnog uključivanja svjetiljke.
Pozor
Obratite pažnju na popratne papire!
Dozvola udruge VDE (njemačke Udru-
ge za elektrotehniku, elektroničke
i informacijske tehnologije)
CE oznaka sukladnosti
Uređaj zaštitne klase II
(zaštitna izolacija)
Kratice i simboli:
Pripazite na napomenu o
zbrinjavanju!
Montaža
Svjetiljku je potrebno čvrsto postaviti pomoću
stolne stezaljke ili stolnog stalka.
Korisnik mora provjeriti pouzdanost drugih
načina pričvršćenja koje je predložio proi-
zvođač!
Puštanje u rad
Prije korištenja potrebno je provjeriti odgova-
ra li priključni napon nazivnom naponu i fre-
kvenciji koji su navedeni na natpisnoj pločici.
Rukovanje
Svjetiljka se uključuje i isključuje putem pre-
kidača na glavi svjetiljke.
Postavljanje svjetiljke
Svjetiljka je ispravno postavljena ako osvjet-
ljava samo radnu površinu. Svjetlo ne smije
zračiti u oči korisnika ili na zaslon (pogledajte
slike od 2a do 2d na 3. stranici).
Frikcija se može prilagoditi nakon postavljanja
svjetiljke pomoću vijka 3.2.
Podešavanje zglobova
Zglobovi su podesivi. Svaki se zglob namje-
šta tako da je svjetiljka s jedne strane lako
pokretljiva, a s druge strane zglob ostaje
nepomično u željenom položaju.
Održavanje i popravci
Prije radova održavanja i popravaka isklju-
čite svjetiljku iz izvora napajanja! Radove
smije izvoditi samo stručno osposobljen
električar !
Dopušteno je koristiti samo one zamjenske
dijelove koje je odobrio proizvođač.
Upute za upotrebu“Swing”
HRV

15
PAIDI
Proizvođač se ne može smatrati odgovornim za štete nastale uslijed korištenja
koje nije u skladu s namjenom upotrebe ili za štete uzrokovane nepridržavanjem
sigurnosnih napomena i upozorenja.
Zamjena žarulje
a) Isključite svjetiljku iz izvora napajanja
(izvucite utikač).
b) Podignite prozirni zaslon pomoću odvijača
(pogledajte sliku 4a na 3. stranici).
c) Izvadite pokvarenu žarulju iz grla (pogle-
dajte sliku 4b na 3. stranici).
d) Stavite novu žarulju.
e) Ponovno namjestite prozirni zaslon.
Pozor! Dopušteno je koristiti samo vrste ža-
rulja koje je odobrio proizvođač (pogledajte
"Tehničke podatke").
Upute za upotrebu“Swing”
HRV
Zbrinjavanje
Po isteku vijeka trajanja odnesite
uređaj u lokalnu tvrtku za povrat i
zbrinjavanje otpada.
Pokvarene fluorescentne žarulje potrebno je
zbrinuti kao poseban otpad.
Održavanje
Napomena: redovito čišćenje prozirnog za-
slona jamči dulji radni vijek svjetiljke.
Za čišćenje dijelova uređaja koristite krpu na-
topljenu uobičajenim sredstvom za čišćenje
u kućanstvu.
Pri odabiru sredstva obratite pozornost na
otpornost lakova i umjetnih materijala.
Napomena: za čišćenje se ni u kojem slu-
čaju ne smiju koristiti koncentrirana dezin-
fekcijska sredstva, razrjeđivači ni tekućine
koje sadrže alkohol. Proizvođač ne snosi
odgovornost za oštećenja uzrokovana
kemijskim agensima, npr. neprikladnim
sredstvima za čišćenje.
Tehnički podaci
Klasifikacija
Zaštitna klasa II
Vrsta zaštite IP 20
Priključne vrijednosti
Nazivni napon 230 V AC
Frekvencijsko područje 50 Hz
Potrošnja struje približno 15 W
Faktor snage 0,4
Dimenzije
Stup svjetiljke približno 303 x 66 x 59 mm
Oprema za svjetiljku
Kompaktna fluorescentna žarulja 11 W
Predsklopni uređaj ugrađen u utikač uređaja.

16
PAIDI„Swing“
Best.-Nr. 405 084 801 - © copyright H.Waldmann GmbH & Co. KG - nB / 03.2015 -TB - Änderungen vorbehalten - Printed in Germany
Ausgabe: 09.03.2015
Herbert Waldmann GmbH & Co. KG
Peter-Henlein-Straße 5
D-78056 Villingen-Schwenningen
Telefon +49 (0) 77 20 / 601 - 0
Telefax +49 (0) 77 20 / 601 - 290
www.waldmann.com
info@waldmann.com
Table of contents
Languages:
Other PAIDI Lighting Equipment manuals