Palermo B075BLNP86 User manual

PolPhr,@
Smart Camera Guide
Oo\'Vq- 7at7
A5c$: h#'tr\LpPgb
Read and understand this safety awareness and
jnstruction manual thoroughly before using your
camera, and keep it forfuturc reference.
lf you would like to watch video setup:
lphone: httpr/tinyurl.com/iphonsetup
Android I http J/tinyurl.com/Droiodsetup

Please contact us at [email protected] or
call us at (252)-316-0108 if you would like to set up a
complimenlary consullation to set up your camera or
if you have any questions.
e!ggsg_!g!q Camera works best on normal2.4
GHz WFI and does not support 5G HD WFl. All 5c
HD WFI systems can run both 2.4cHz or scHz.
Please Turn OFF 5qhz. Wi-Fi on vou Modem
or camera will NOT connect.
TO RESET CAMERAfoT any reason during setup: Use
included pin to place into RESET hole (see photo below).
Be sure to hold the reset butlon for at least 10
seconds until vou hear a I'chi.chinq" sound. (Please
nole: if after 1 minute vou do not hear the "di. di. di"
noise reoeat the above instructions bv holdinq the
rest for l0 seconds until vou hear the "chi-chinq"
noise.)
IOS Phone & Android Phonei Go to Apple App
Store/Google Play Store and download either YYP2P App
or YOOSEE App.

YYP2P/YOOSEE Smarucell Phone Step 'l:
Open YYP2P / YOOSEE App on your mobile device.
Tap on the RegiEter button to get to the next screen.
I
Do not use a phone number to reglsier, only email
addresses are used in the United States.
Once you have successfully registered, you will be
redirected to Account login to enter your password.
6 1,
_-_
C.
Please contact us at !EEgZ9!S!pgKDgMi!,99
YYP2PrYOOSEE Smarucell Phone Step 2:
Add Device by tapping "+" in top right hand corner of your
screen.
Click Smartlink to add device automatically to your WlFl
or wired connection.
Note: You will need to have your camera plugged
in at this point. (lt you had already plugged in your
camera from the start and it stopped beeping, you
will need to reset camera. Please refer to reset
instructions on page l)
After plugging in your camera, lights will cone an, lights
will go oft, the camem will make a clicking sound and then
staft beeping. The camera will beep for about 5 minutes if
you have not set it up by then it wi stop beeping. lfthis
happens please just reset it to get it back into setup phase.
90!r,l

-
-
r:
To connect to WlFl, tap connect via WFl, enter your WlFl
password, and tap next step.
Note: To connect with Ethernet Cable, tap use wired
connection and follow the prompts.
YYP2P/YOOSEE Setup lnstructions Step:3
- Continue WFI setuo:
Enter your WlFl password, and tap next step.
While camera is beeping, tap Hear connection cue tone.
Keep phone and camera at a 30cm distance and tap next
step.
WWru
I
Connection usually takes no more than 20-30 seconds.
Once connected you will automatically be taken to the
\(o)l
E]
.q"a'"
\/Lj'
3

Perfecting information screen. Enter the default codes
(name the camera "exampler Camera 1" & passwordil23),
then tap save in the top right corner of your screen.
call us at (252).316.0108 if you would like to set up a
. complimentary consultation to set up your camera
or iI you have any questions.
Click on the Chinese writing in the grey box on the left side
of your screen, You will see "Offline" in a gray box
" Please clicUtap gray box to bring camera online. Click
OK to access the microphone and enjoy your camera.
You should be all set and enioying your camera. lf you
were setting this camera up through Ethernet cord
please continue wilh instructions below.
fP... l

Please contact us at 4AMz9!g!ppq@g jtgilgg!! or
call us at (252)-316-0108 if you would like to set up a
complimentary consultation to set up your camera or
if you have any questions.
Continue: Ethernet Connection:
Unplug and re-plug your camera from the electrical outlet
so it can reload. When the camera starts beeping, connect
your Ethernet cable to your router and the back of your
camera. Once the Ethernet cable is plugged in, the
beeping will stop and there will be a green and yellow light
coming out of the back of the camera from the Ethernet
cable and a dim yellow light in the front of the camera
(Netvvork lndicator light).
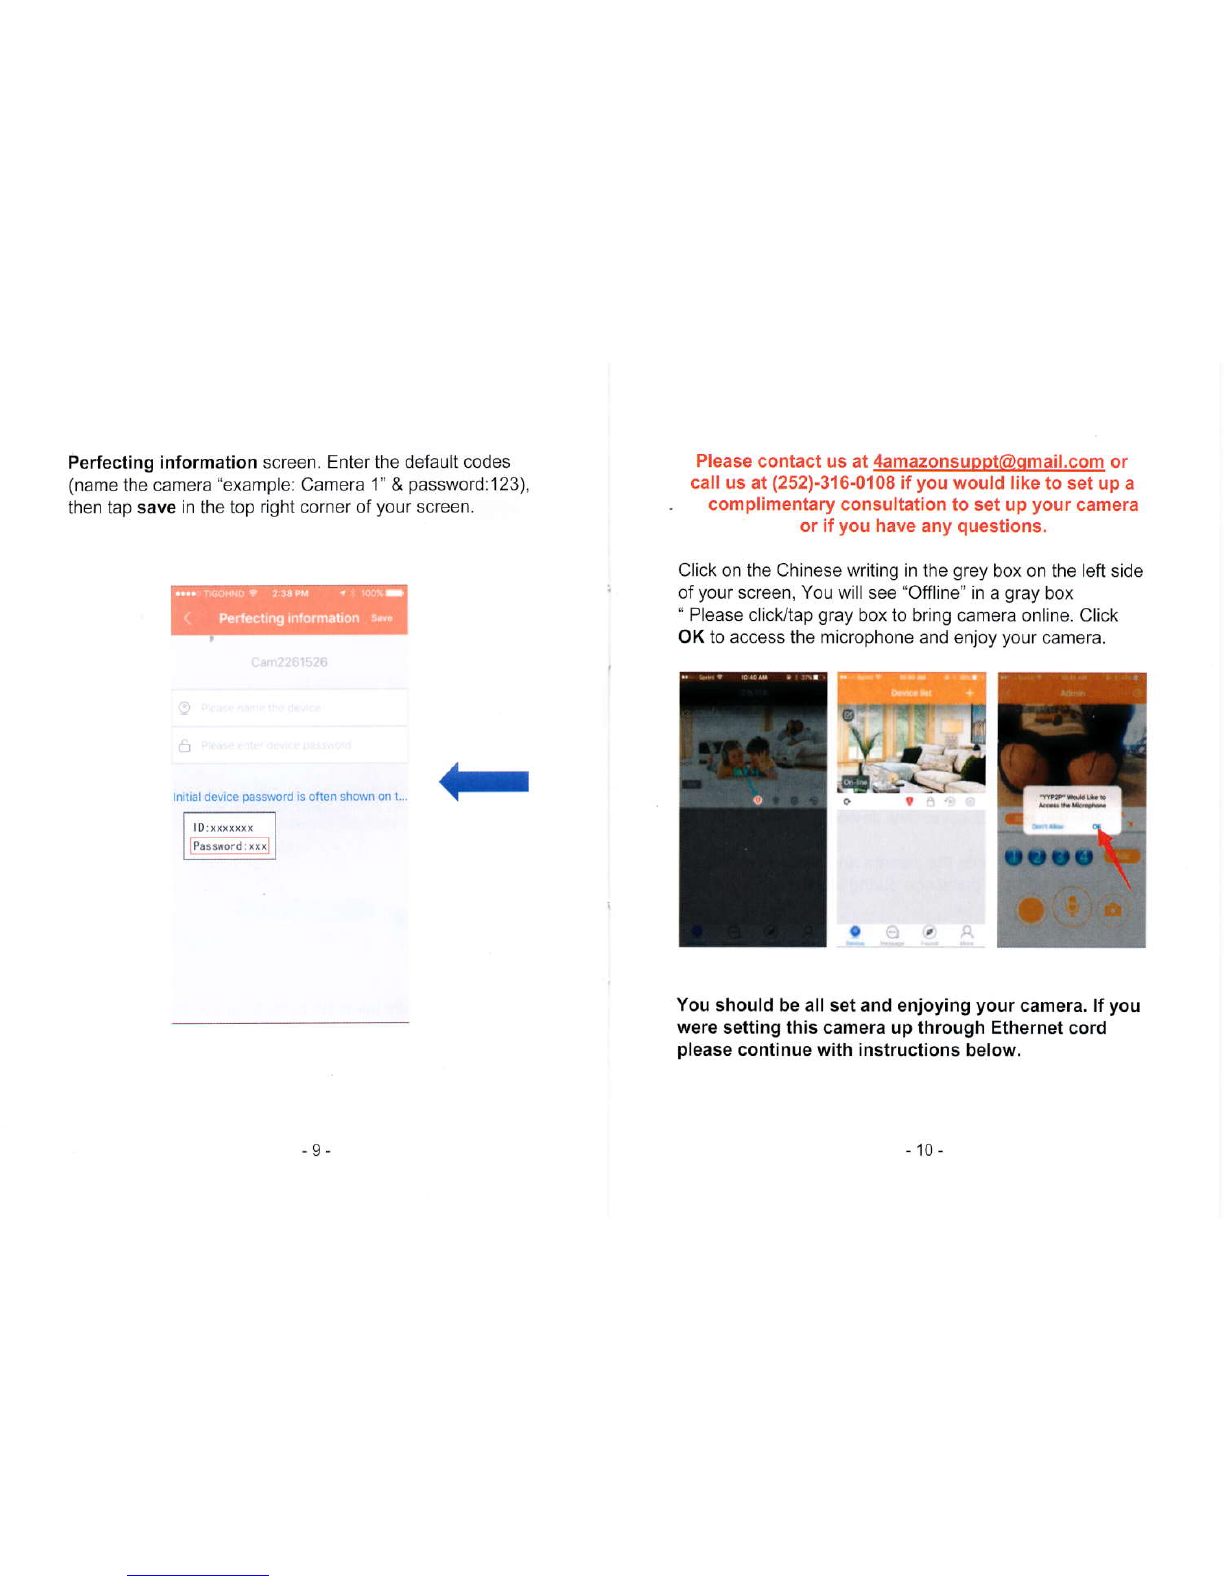
Login to your app, on the device list screen you will see
highlighted in blue (discover new device). Click on it.
Click the (+)sign, name the camera and enter passcode
(use default name & passcode during initial setup).
Tap on the Chinese writing in the grey box on ihe left side
of your screen, wait for it to say "online", and tap. Click OK
to access the microphone.
Transfer lrom Ethernet to W|FI
Tap the gear icon(settinqs) at top riqht corner of screen.
Tap nehro.k settings.
On the next screen, Do Not Click On wlFl.
Find your network in the llst of networks.
Tap on your network and Confirm the change.
Put in your WlFl password and confirm.
Wait for the green /blue checkmark to appear on your
network.
Next,
Tap the arrow at the top left of screen to go back (2x).
You want to be back on the picture screen.
Make sure you still have live view, if not tap the screen.
Disconnect Ethernet cable and enjoy your camera.

Usaqe TiDs when usinq with a smart phone:
Tap the camera image to connect. lf it times out, wait one
second and tap again. This may happen several times
depending on your internet speed.
Double tap the camera image to use full screen.
To move the camera position. slide your finger either left to
riOht or up to down and vice versa.
To zoom, slide two fingers moving out in opposite
directions
l,4uting: Tap the sound button and there will be an "X'
when muted and "))))'when not muted.
To speak, hold the microphone button then speak into the
smart phone. When finished speaking, release the button.
To take a photo, tap the camera button.
Activate Motion Detection Sensor Alarm: Go to the
settings icon located between the camera and information
icons. Click the settings icon then tap Alarm setlings and
set. On this same screen you can also set the camera to
take photos.
g.gEpslqsqup:
Notei You must first set up your camera on your smart
phone since the camera needs to be connected to your
WlFl for this.
'1. Turn on your computer.
2. Enter "!,wv1lv.yoosee.co" in the browser.
Yoosee web page:
:.e" t?" G)
""#-"
**-*"*"-".,"-':H];',"
Click on C[,4S for PC, and the Apple lcon for Mac.

Once you select your choice, the download will begin.
Click on file: cmssetup.exe and click Next.
T
Click Next again.
Wdm€ lo th€ cMscri€nl LO.o 27
.*t::E (d

Click lnstall.
..."",*-*q
Click Finish.
T
@::-', --
CdndoUng lh€ Cirsclsl I 0 0 27
.B Tii;-'l d

Depending on yo!r software and antivirus, you may
receive a warning. Please click Allow access as the
program is safe.
3. You will be prompted to set the username and
password, and add the camera.
-Use the default codes - User name: admin, and Password:
00000000
The user name and password for remote access is same
as the mobile APP.
Select your Language and click OK.

Right click Device List and add device Note: For "Cl\4S" support to add a device by LAN search,
you can also manually enter the 3C lD and password to
.add the camera.
Locate your 7-digit 3C lD on the bottom ofthe camera.
Enter this and the default password "123". Cl ck OK.
Your carrera picture will appear and you can adjust angles
by using the 4 compass arrows.
It..Ft
si6nd6rd deinnion

DEEEISEIEEAS.ETIIIG,:
Note: Only some models support this function.
The camera needs sel earning (coding)to match the
wireless sensor (door magnet, smoke detector, PIR etc.)
with the same frequency (433[,4) to set up the wireless
alarm system.
Example: Seiting'the Door magnet to Channel 1 of the
defense area: Hall.
Click the name of the Device on the mobile APP. When
the Playback / Settings / Edit l\,4enu pops up, enter the
submenu step by step Setting, Defense Area, Hall, 1,
and select "'1".
Trigger the door magnet then tap OK to trigger the
wireless sensorto code. lt will show "operation
successful" if it has been properly coded. lf it shows
"operation failed", repeat the process.
After coding is successful, go back to Settings to access
Alarm Seftings.
On'receive alarm message", arm the alarm for the
camera. Once the door magnet has been triggered, the
camera will send alarm to the Mobile APP.
9tE4E-e99rrC.:
Access to the Defense Area, select the Channel which
- needs clearing.
Click the red icon on the right side and confirm to clear the
coding.
ALARM SETTING:
There are two methods to arm the alarm:
1. Press the Coded lR learning remote conkoller (the
lock button) to arm the alarm.
2. Click the Lock icon on the right side of the Device
name on the mobile APP (Yoosee).
After arming the alarm, the camera will send the alarm
signal to the APP when any alarm is triggered and send
the captured picture to the alarm push email address.
Set the Alarm push lD/Alarm push Email:
Click the Device name on the APP, wait for the Playback /
Settings / Edil menu to pop up, then access the Setting /
Alarm setting submenu. ln the Receive alarm message
area under alarm push Email, input the email address
where you want to receive alarm messages.
uqL!.9L-9EIEgI!.9!l
Take the same steps as above to set the alarm. Then
set the Motion Detection to On. The camera willthen
send alarm messages once there is any motion or
change in the monitoring location.

SUZZi
Take the same steps as above to set the alarm. Then
set the BUZZ to On. The camera wil start Buzzing until
it is disarmed manually.
DEVICE UPDATE:
Click the Device name on the APP. wait for the Playback /
Settings / Edit menu to pop up, then access the Setting /
device setup submenu- lt will show the latest version and
conlirn if you leed to update to a rewer version.
@or
call us at (252)316-018 if you would like to set up a
complimentary consultation to set up your camera or
if you have any questions.
FACTORY SETTING RESET:
Resetting your camera will clear all the settings, including
the WIF&oDqection, saved passwords, Alarm settings,
Defense area settinos, etc.
To reset the device: llerqigsqREsElbst!9!]hqbl!!
the bottom of ihe camera. Use the Din Drovided and insert
it into the RESET hole. Press and hold the RESET button
for at least 10 seconds until vou hear a "chi-chinq" noise.
After you hear the "di, di, di" sound, press for another 3
seconds until you hear one "P1U..." sound. Allthe
indicators will turn on to siqnal a successful RESET.

TROUBLESHOOTING - Q&A
Q: Cannot get camera lo connect, receiving an error m€ssage
during lhe connection process.
A: Make sure you are connecled to a 2.4GHz wireless router,
Camera does not support 5G HD WlFl (all 5G HD WFI
systems can run both 2.4GHz or 5GHz.) Then uninslall and
re nstall lhe app and while the camera is plugged in, follow lhe
FACTORY SETTING RESET inslruct ons and start over. There is
no need to create a new account, s mply choose 'og in" rather
lhan ' reg istel' in Step 3 and use the log in previously creaied.
Q: Added camera device by wi-Fi, but APP didn't discover
A: Please confrm that the mobile phone and camera are
connected to the same LAN (one rouler), and check ifthe
Network indicatorofthe camera is ON. lfthe camera and ihe
mobile device are not on the same LAN, please iry to add the
device raanually.
Q: ln the Device list, the Device is "Offline".
A: Please check if the camera is connected to the network. Check
flhe nd calor is on and make sure the router is working well.
Q: I get a "wrong password" message when I try to access
the camera monitoring status on the APP.
A: Please check iflhe remole monitorng password has been
entered coffectly when adding lhe camera dev ce to the APP. lf
it's not correct tap lhe device name to access lhe
Playback/Setting/Edir menu and tap Edit to input the right
password. lf you forgot lhe password, RESET the camera to
recover to Factory Default setlinqs
Q: When trying to Playback a recording, I cannot find the
-A: Firsl check ifthe TF card is defeciive. lf it is fine, then check
the search time for the recorded file. A so make sure lhe camera
system time has not been changed by mistake.
OrCannol rccord or cannot overwrite the data automatically
when TF card is full.
A Format the TF card on your compulerfirst and then nsertthe
TF card into the camera. lfthe blue light is not ON, lhe TF card is
defective and musl be rep aces
Q WFI Camera cannot connect to Wi-Fi
A l\,4ake sure the Wi-Fi password s correci The camera doesn't
support 5G, so please make sure lhe mobie is connected io a
2.4GHz WIF network.
Q Cannot set WlFl.
A P ease check if Allocation un t size is less than 16KB while
formatting the TF card on your computer. The parameier sho!ld
be above 16KB for the process to work correclly.
Q lforgot my passrvord.
A RESET the camera lo recover lo Factory Default setlings.
QrCannot record with TF card.
A P ease make sure lo Format the TF card via lhe OSD menu
step in Settings / Slorage settings before recording. lf the TF
card stillcan't record or can't showlhe TF card capacily after
formalting, try fomatling the card on your computer frst and try
again. lf it slill doesn t work, the TF card is defeclive and must be
replaced.
-27 - 28

PACKING LIST
Camera
Power Adapter
Ethernet Cable
Bracket
Screws Package
Manual
Reset Pin