Palmer RM-10 User manual

Thank you for purchasing an in-line refractometer. This instruction manual is designed to
guide you to understand the functions and characteristics of the sensor. Before using the
instrument, please read this manual carefully to ensure safe and correct use. Please keep this
manual for future reference.
In-line Refractometer
Instruction Manual
RM-10、RM-20

1. Working principle 3
2. Typical application 4
3. Structural design 4
4. Technical specifications 5
5. Safety precautions and instructions for use 5
6. Product accessories and wiring definition 7
7. Installation Precautions 7
8. Operation instructions 9
9. Maintenance and troubleshooting 11
10. Relation graph between concentration value and refractive index 11
Contents

1. Working Principle
In-line Refractometer Instruction Manual
The in-line refractometer is composed of a light source, Prism, a light receiver and a signal
modulation circuit. The light source emits a stable light signal through the prism to contact
the measured medium, and the corresponding refractive index is generated by the concen-
tration of the measured medium. The optical device calculates the refractive index of the
collected refracted light source to obtain the corresponding concentration through the data
algorithm. Since the concentration is affected by temperature, the internal temperature
calibration is adopted to reduce the influence of temperature drift.
3
Water-based solutions
Light source Light source
refraction
acceptance
Light source
Refraction
Acceptance
Output Signal
Water-based solutions
Light source
refraction acceptance
Light source
Prism

1
2
6
5
2. Typical application
Food Industry Beverage
industry
Fruit and jam
processing
Starch sweetener Sugar and
sweeteners
Water-based
solutions
4
3
4
3. Structural design
In-line Refractometer Instruction Manual

4. Technical specifications
Measure range:
Output :
Power:
Display menu:
Working Temperature:
Accuracy:
Protection grade:
Max Pressure:
High and low limit settings
Wetted parts material:
RM-10 ( 0-15%) ,RM-20 ( 0-50%)
4-20mA , RS485
DC12~24V
Brix (%), Temperature (T), Refractive index(nD)
10℃~60℃
±0.3%
IP65
2Mpa
Buttons can be set
Prism: sapphire, Prism stage: SS304 , SS316L (can be customized)
Safety precautions
5. Safety precautions and instructions for use
Please read this manual carefully, and fully understand the functions and operations of each part of the
instrument before use, and check whether each part of the instrument is working properly before use.
Perform necessary inspections and parameter adjustments according to the instruction manual.
√
x
x
OFF
OFF
√
5
In-line Refractometer Instruction Manual
When measuring substances harmful to the
human body, please take care of protective
measures
If the instrument starts to overheat, smoke or
emit an unusual smell, turn off the power
immediately
Do not disassemble or modify this instrument
Do not measure corrosive media
Do not put water or samples to all parts other
than the surface of the prism
When not in use for a long time, please turn
off the power

instructions for use
2000m
10~60℃
Use the instrument at an altitude
of less than 2000 meters (altitude)
Use this instrument indoors;
The operating environment
temperature is between 10℃~60℃;
Do not suddenly change the
ambient temperature of the
instrument;
Do not use the instrument
in a place with a lot of dust and
strong vibration;
Do not place the instrument
in a humid place;
Do not put heavy objects on
the instrument;
Do not install the instrument
in direct sunlight or near a heating
source;
Do not install in dusty or
exposed to corrosive gas
environment;
When installing, please pay
special attention to avoid strong
impact on the instrument.
6
In-line Refractometer Instruction Manual

24V Power + ,
Red
24V Power - ,
Black
2. 4-20mA-
Black
3. RS485-
Green
4. RS485+
Yellow
1. 4-20mA+
Red
Plug wiring definition
6. Product and accessories packing list
2-pins plug for unit power
(24VDC)
4-pins plug for output
( 4-20mA )
6-pins plug for output
( Modbus-TCP RS485)
7
1 2 4 5
Instrucation manual
Main unit 3Two-pins plug
mating cable
Four-pins plug
mating cable
Six-pins plug
mating cable
6O-Ring 6Clamp band 6Pass certificatation
7. Installation Precautions
1. The installation form of this product is a hoop quick-installation type;
2. When installing, please pay special attention not to scratch the prism and probe;
3. When installing, please pay special attention to avoid strong impact on the instrument;
4. When installing, please pay special attention not to miss the sealing ring;
5. Ensure that the cable is correctly connected to the port;
6. The power can be turned on only after the product is installed;
7. Installation method, installation method of cleaning device.
In-line Refractometer Instruction Manual
Pass
Ethernet Tx- ,
Yellow
Ethernet Tx- ,
Green Ethernet Rx- ,
Black
Ethernet Rx+ ,
Red

Normal curve pipe
Small curve pipe Neck to increase flow rate pipe
>1.5m/s
Mounting type 2: Large pipeline and container installation
Big pipeDigester with scraper and steam Container
8
Mounting type 1: Compact small pipe installation
Cleaning device installation
In-line Refractometer Instruction Manual
3”Clamp band1.5" Clamp mounting
1.5" Clamp mounting
3”Clamp Intelligent cleaning device
O-Ring
In-line Brix
O-Ring
Reciprocating mobile cleaning wipe head
Set
Intercalation
time
Running
time
min
sec
Start Stop

Button definition
Menu (Menu) Return (ESC) Up (∧) Down (∨). Menu is equivalent to the confirmation key, and the ESC
exit key can be single-pressed or long-pressed to move up (∧) down (∨)
8. Operation instructions
menu type First level menu Second level menu
No.
Measurement interval 4,6,8,101
Calibrate 0 Calibration 0 returns to the main page
successfully, EE0 is displayed if it fails
2
Brix corresponding to the upper limit of
20mA in the current 4~20mA Default value depend on the measurement range
3
Decimal places 0,1,2
4
Display temperature, refractive index or
polling display
1=temperature, 2=refractive index,
3=polling display
5
Mode-S measurement stability 1, 2, 3, 4, 5 total 5 gears
6
Temperature correction in units of 0.1 Increase or decrease by 0.1
7
Brix corresponding to the lower limit 4mA
in the current 4-20mA Default 0%
8
Temperature 4-20mA upper limit 1 as the unit
Increase or decrease the upper limit of the solution 4-20mA output
by 1. When the temperature value is greater than or equal to the
upper limit, the output is 20mA, and the value range is -10-130
9
Temperature 4-20mA lower limit 1 as the unit Increment or decrement the lower limit of the 4-20mA output of the
solution by 1, when the temperature value ≥the upper limit, the
output 4mA, the value range is -10-130
10
Menu structure
step1 step2 step3 step4 step5
Menu
Menu
ESC
Return
(∧)
Up
(∨)
Down
9
>>> >>> >>> >>>
In-line Refractometer Instruction Manual
Connect the
power to RM ,
the measure-
ment starts
Calibrate 0 with
distilled water (
The factory
Settings of the
product have
been validated )
Install well our
RM on the
location that
needs to be
measure .
When the
sample flows
into the prism
surface
Measurement
starts , brix (%)
value and current
temperature T will
be displayed .
In the measurement interface, press Menu to enter the first level menu, and ESC to return to the measurement
interface. Under the first level menu, you can use the up and down keys to select the corresponding options. When
you press Menu, you will enter the second level menu. The up and down keys will adjust the corresponding options.
After adjustment, press Menu to save the settings and return to the first level menu. After adjustment, press ESC
to not save and Return to the first level menu.
10
menu type
No.
The alarm high limit is 1 as the unit When the measured concentration exceeds the high limit, the
display flashes quickly, and the value range is 0-100 When the
setting value is greater than 95, it is equivalent to turning off
thealarm output
11
Alarm low limit 1 as unit
Increase or decrease by 1 when the measured concentration is
lower than the low limit, display Slow flashing, when the set
value is less than 0, it is equivalent to turning off the alarm
output
12
Device ID address Default is 1
The default is 1.0
13
Reset
Display concentration magnification
* only display the concentration magnification , output no
Return to the main page after successful reset,
display EE1 on failure
14
15
In-line Refractometer Instruction Manual
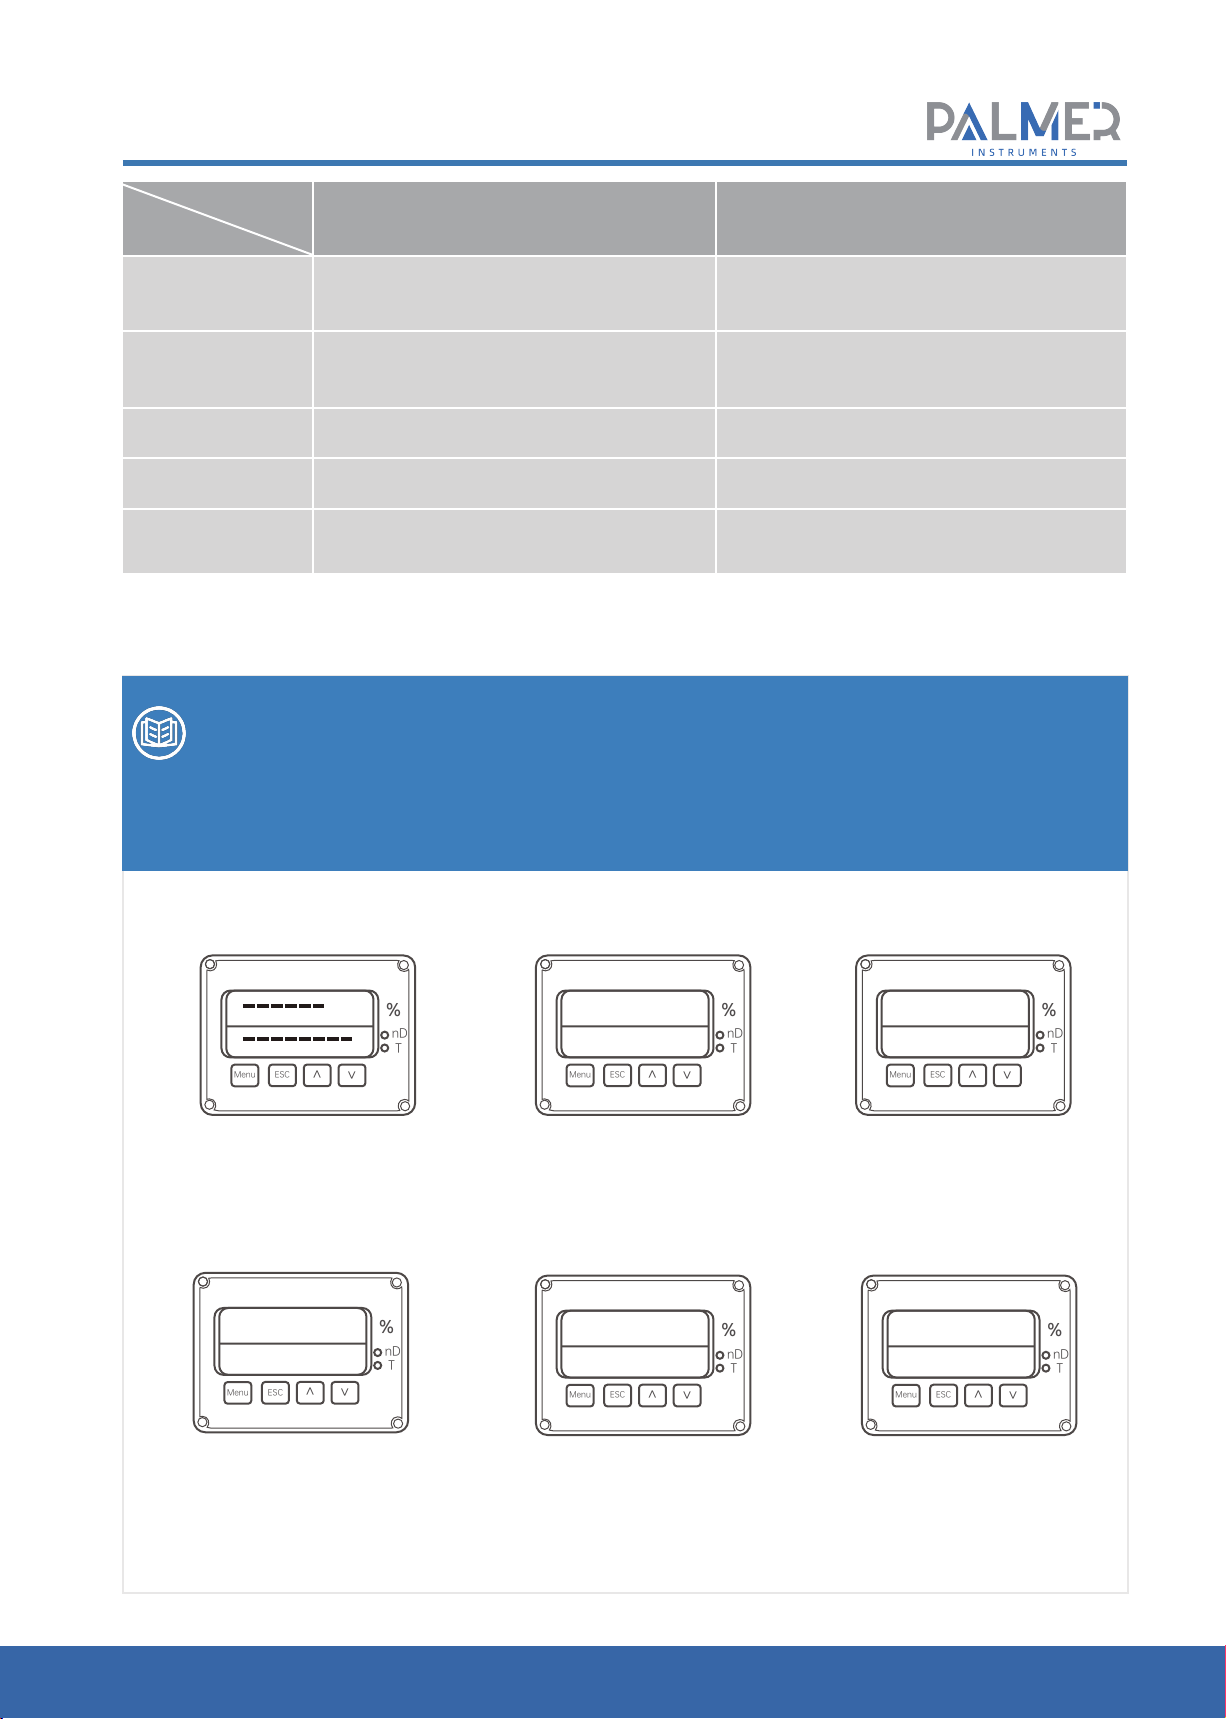
Menu ^
^
ESC
%
nD
T
Menu ^
^
ESC
%
nD
T
nD & T polling display
You can choose to display only T
or nD or both through the menu.
Normal measurement display
***(Current Brix)
T(Current Temperature)
***
T
LLLL
T
Menu ^
^
ESC
%
nD
T
Calibration 0 failure display EE0
EE0
T
Boot display
Menu ^
^
ESC
%
nD
T
Menu ^
^
ESC
%
nD
T
Menu ^
^
ESC
%
nD
T
Brix exceeds the measuring rangeNo solution display
T (Current Temperaure) T (Current Temperaure)
LLLL
T
HHHH
T
First level menu Second level menu
This manual suits for next models
1
Table of contents
Other Palmer Measuring Instrument manuals


