Panacom S50 Series User manual

Pg. 1

Pg. 2

Pg. 3
SP-3350 STAGE SOUND PORTABLE SPEAKER
User’s Guide
Thank you for purchasing Panacom’s SP-3350.
Please read the manual carefully before operating.
PRECAUTIONS
In order to prevent operating problems or serious damage to the device,
please comply with the following remarks.
1. Hold the electric outlet while pulling out the plug. Do not pull the wire.
2. Operating audio appliances should be kept away from heating sources.
3. Do not attempt to x or revise the circuits.
4. Do not touch the internal parts, otherwise electric shock or serious damage
might occur.
5. Place this speaker in a ventilated dry condition with about 20mm of space
around other surfaces for heat dispersion.
WARNING: Do not expose this appliance to rain or moisture or liquids.
SPECIFICATIONS
-Wireless BT connection
-Led lights eects
-USB/SD card
-FM Radio
-Equalizer
-Remote Control
-Microphone input
-Guitar input
-50w power output
-Tweeter with light
-Subwoofer Unit: 10´´
-AUX in
-Wheels
-Retractable Handle

Pg. 4
TOP PANEL
1. Display Screen: LED display screen.
2. Bass Knob: Use this knob to adjust the bass levels.
3. Treble Knob: Use this knob to adjust the treble.
4. Master Volume Knob: Use this knob to adjust the master volume.
5. Next Track: in USB/SD Card/Wireless BT Connection mode, press this
button to go to the next track and press and hold this button for a few
seconds to increase the Input Volume. In FM mode, press this button to
go to the next stored radio station.
6. 5+ Button: in USB/SD Card mode, press this button to select tracks > 5.
In FM mode, press this button when selecting stored radio stations > 5.
For example, in order to switch to the 6th stored radio station, press “1”
and then press “5+” to choose radio station number 6. In USB/SD Card
mode, to select the 23rd track, press “3” and then press “5+” 4 times to
choose track number 23. If you want to switch to the 101st track, press

Pg. 5
“1” and then press “ 5+” 20 times, or press“5+”2 times and then press “1”.
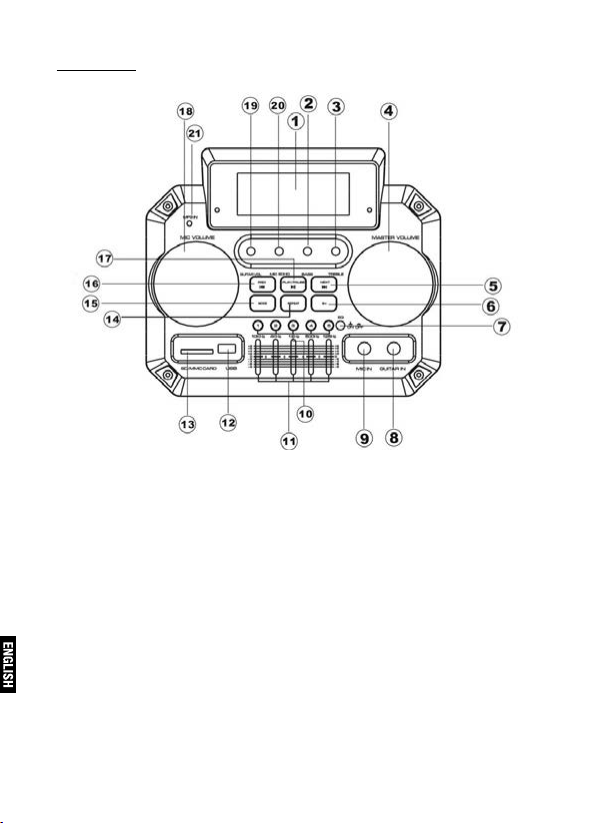
7. EQ Button: Press this button to turn the equalizer ON/ OFF.The equalizer
sliders will only aect the audio if the EQ Button is turned ON.
8. Guitar Input
9. Microphone Input
10. 1-5 Buttons: Press the 1-5 buttons to switch to the corresponding
tracks in USB/SD Card mode. Press the 1-5 buttons to switch to the
corresponding stored radio station in FM mode.
11. Equalizer Sliders: Use the sliders to increase or decrease frequencies.
The equalizer sliders will only aect the audio if the EQ Button is turned ON.
12. USB Input: Insert your USB ash drive into this slot.
13. SD Card Input: Insert your SD Card into this slot.
14. Repeat Button: in USB/SD Card mode, press this button to select
whether to repeat the current track or to repeat all tracks.
15. Mode Selector Button: When there is a USB or SD Card inserted into
the unit, press this button to select any of the following input modes:
USB/SD/AUX/FM/Wireless BT Connection. When there is NO USB or SD
Card inserted into the unit, press this button to select any of the following
input modes: AUX/FM/Wireless BT Connection.
16. Previous Track: in USB/SD Card/Wireless BT Connection mode, press
this button to go to the previous track and press and hold to decrease the
volume. In FM mode, press this button to go to the previous radio station.
In Wireless BT Connection/AUX mode, press and hold this button for a
few seconds to decrease the Input Volume.
17. FM Auto Scan & Play/Pause Button: in FM mode, press this button to
automatically scan for radio stations and press it again to stop scanning.
The unit will store any available radio stations. In USB/SD Card/Wireless
BT Connection mode, press this button to pause, press it again to resume
play.
18. Microphone Volume Knob: Use this knob to adjust the volume of the
microphone.
19. Guitar Volume Knob: Use this knob to adjust the volume of the guitar.
20. Microphone Echo Knob: Use this knob to adjust the echo of the
microphone.
21. MP3 IN: it is possible to connect: DVD player, CD player, Cellphone, etc.

Pg. 6

Pg. 7
REAR PANEL
1. Audio Input: it is possible to connect: DVD player, CD player, Cellphone, etc.
2. Power Supply: use only the power cord that comes with the unit.
Please ensure that the speaker is turned o before connecting or
disconnecting the power cord.
3. FM Antenna
4. LED Light Power Switch: The LED light will turn on when the unit
is turned on and the LED light will turn o when the unit is turned o.
5. Power Switch: Before the unit is turned on, ensure that all of the
level controls are turned down completely. Only once the unit is turned
on, you should slowly begin to raise volume levels.
WIRELESS BT CONNECTION
A. Press the MODE button to enter Wireless BT Connection mode.
B. Ensure that the Wireless BT Connection is activated on your mobile device
and search for“SP-3350”.
C. Once found, select“SP-3350”and wait for connection.
D. Once the device and unit are connected, the unit will emit a noise and the
unit’s screen will display“BLUE”.
E. You can now play music from your Wireless BT Connection device.

Pg. 8

Pg. 9
REMOTE CONTROL
1. Standby Button: Press this button to select standby.
2. Mode Selector Button: When there is NO USB or SD Card inserted into
the unit, press this button to select any of the following input modes:
AUX/FM/Wireless BT connection. When there is a USB or SD Card inserted
into the unit, press this button to select any of the following input modes:
USB/SD/AUX/FM/Wireless BT connection.
3. Mute Button: Press this button to select mute and press it again to
resume play.
4. VOL+: Press and hold down this button for a few second to increase
the volume.
5. CH+: Press this button to go the next track in USB/SD Card/Wireless BT
connection mode or go to next radio station in FM mode.
6. CH-: Press this button to go the previous track in USB/SD Card/Wireless
BT connection mode or go to previous stored radio station in FM mode.
7. VOL-: Press and hold down this button for a few second to decrease
the volume.
8. E/R (EQ Button): Press this button to select EQ function.
9. STOP Button: Press this button one time to stop the music and press the
pause/play button to resume play in USB/SD Card.
10. FM Audio Scan & Play/Pause Button: When in FM mode, press this
button to automatically scan for radio stations. The unit will store any
available radio stations. Press it again to stop scanning. If in USB/SD Card/
Wireless BT connection mode, press this button to pause, press it again
to resume play.
11. Repeat Button: When in USB/SD Card mode, press this button to select
whether to repeat the current track or to repeat all tracks.
12. 0-9 Button: Press this button to select tracks in USB/SD Card. Press this
button to select stored radio stations in FM mode.

Pg. 10

Pg. 11
SP-3350 PARLANTE PORTATIL STAGE SOUND User’s Guide
Gracias por comprar el Panacom SP-3350.
Por favor lea este manual cuidadosamente previo al uso.
PRECAUCIÓN
Con el n de evitar problemas de funcionamiento o daños graves en el dis-
positivo, cumpla con las siguientes observaciones.
1.Tome la toma de la corriente eléctrica mientras tira el enchufe. No tire
del cable.
2. Los aparatos de audio en funcionamiento deben mantenerse lejos de
fuentes de calor.
3. No intente reparar o revisar los circuitos.
4. No toque las partes internas, de lo contrario podrían producirse descar-
gas eléctricas o daños graves.
5. Coloque este altavoz en una condición seca y ventilada, con alrededor de
20 mm de espacio alrededor de otras supercies para la dispersión de calor.
ADVERTENCIA: No exponga este aparato a la lluvia ni a la humedad o lí-
quidos.
ESPECIFICACIONES
-Conexión inalámbrica BT
-Efecto de luces led
-USB/Tarjeta SD
-Radio FM
-Ecualizador
-Control Remoto
-Entrada para micrófono
-Entrada para guitarra
-50w potencia de salida
-Tweeter con luz
-Subwoofer: 10´´
-Entrada AUX
-Ruedas
-Manija Retráctil

Pg. 12
PANEL FRONTAL
1. Pantalla de visualización LED
2. Rueda de bajos: utilizar esta rueda para ajustar los bajos del volumen.
3. Rueda de altos: utilizar esta rueda para ajustar los altos del volumen.
4. Rueda maestra de volumen: utilizar esta rueda para ajustar el volumen
5. Pista Siguiente: En modo USB/Tarjeta SD/Conexión Inalámbrica BT, pre-
sionar este botón para ir a la pista siguiente. Para aumentar el volumen, pre-
sionar y sostener el botón brevemente. En modo FM, presionar este botón
para ir a la estación de radio siguiente.
6. Botón 5+: En modo USB/Tarjeta SD, presionar este botón para seleccionar
las pistas de número mayor a 5. En modo FM, presionar este botón para se-
leccionar estaciones de radio de número mayor a 5.
Ej1: Para seleccionar la estación de radio número 6, presionar 1 y luego pre-
sionar el botón 5+. Ej2: Para seleccionar la pista número 23 de la tarjeta USB,
presionar 3 y luego presionar 5 veces el botón 5+. Ej3: Para seleccionar la pista

Pg. 13
número 101, se puede presionar 1 y luego presionar 20 veces el botón 5+, o
bien, presionar 2 veces el botón 5+ y luego presionar 1.
7. Botón Ecualizador: Presionar ON (encender)/OFF (apagar) para encender
o apagar el ecualizador. Siempre que el ecualizador se encuentre apagado,
el volumen no se verá afectado por los niveles de los deslizadores del ecual-
izador. Sin embargo, una vez que el ecualizador se encuentre encendido, el
volumen sí se verá afectado por los deslizadores del ecualizador.
8. Entrada de guitarra.
9. Entrada de micrófono.
10. Botones 1-5: presionar los botones para seleccionar las pitas o las estacio-
nes de radio correspondientes.
11. Deslizadores del Ecualizador: Utilizar los deslizadores para aumentar o
disminuir las respectivas frecuencias. Los niveles de los deslizadores del ecu-
alizador afectarán al volumen únicamente si el Botón Ecualizador se encuen-
tra encendido.
12. Entrada USB: insertar la memoria USB en la entrada USB.
13. Entrada de Tarjeta SD: insertar la Tarjeta SD en la entrada de la Tarjeta SD.
14. Botón de Repetición: presionar este botón para repetir la pista que se está
reproduciendo, o para repetir todas las pistas.
15. Botón para Seleccionar los Modos: En el caso de haber insertado una tar-
jeta SD/USB. En caso de no haber insertado una tarjeta SD o USB, seleccionar
modo AUX/FM/Conexión Inalámbrica BT.
16.Seleccionar modo USB/SD/AUX/FM/Conexión Inalámbrica BT Pista Ante-
rior: En modo USB/Tarjeta SD/Conexión Inalámbrica BT, presionar este botón
para ir a la pista anterior. Para disminuir el volumen, presionar y sostener el botón
brevemente. En modo FM, presionar este botón para ir a la estación de radio
anterior.
17. Botón de exploración automático para FM y de encendido/apagado: pre-
sionar este botón para explorar automáticamente las estaciones de radio y
presionar nuevamente para frenar la exploración. La unidad va a guardar to-
das las estaciones de radio disponibles.
En modo USB/SD/Conexión Inalámbrica BT, presionar este botón para frenar
la reproducción y presionar nuevamente para resumir.
18. Rueda del volumen del micrófono: rueda para ajustar el volumen del micrófono.
19.Rueda del volumen de la guitarra: rueda para ajustar el volumen de la guitarra.
20. Rueda del eco del micrófono: rueda para ajustar el eco del micrófono.
21. Entrada MP3.

Pg. 14

Pg. 15
PANEL TRASERO
1. Entrada de audio: para salidas de audio de reproductor de DVD, repro-
ductor de CD, etc.
2. Fuente de energía: utilizar únicamente el cable que viene incluido con
la unidad y asegurarse de apagar el parlante antes de conectarlo.
3. Antena FM
4. Interruptor con luz LED: Cuando la unidad se encuentre encendida,
la luz se encenderá. Cuando la unidad se encuentre apagada, la luz se
apagará.
5. Interruptor de encendido y apagado: asegurarse de tener todos los
controles bajos para poder encender la unidad. Es posible empezar a
subir los controles una vez que la unidad se encuentre encendida.
CONEXIÓN INALÁMBRICA BT
A. Presionar el boton de MODO para accede al modo Conexión Inalámbrica BT.
B. Asegurarse de tener activado Conexión Inalámbrica BT en su disposi-
tivo móvil.
C. Una vez que encuentra la opción: SP-3350, seleccionarlo y esperar la conexión.
D. Una vez que la conexión haya sido exitosa, la unidad emitirá una señal
sonora y la pantalla de visualización mostrara BLUE.
E. Puede comenzar a reproducir la música.

Pg. 16

Pg. 17
CONTROL REMOTO
1. Botón Standby: Presionar este botón para seleccionar standby.
2. Botón para Seleccionar los Modos: En el caso de no haber insertado una tar-
jeta SD o USB en la unidad, presionar este botón para seleccionar cualquiera de
los siguientes modos: AUX/FM/Conexión Inalámbrica BT. En el caso de haber in-
sertado una tarjeta SD o USB en la unidad, presionar este botón para seleccionar
cualquiera de los siguientes modos: USB/SD/AUX/FM/Conexión Inalámbrica BT.
3. Botón Mute: Presionar este botón para silenciar y presionarlo nueva-
mente para volver a reproducir.
4. VOL+: Presionar y mantener presionado este botón por unos segundos
para aumentar el volumen.
5. CH+: Presionar este botón para ir al siguiente track en los modos USB/
SD/Conexión Inalámbrica BT o para ir a la siguiente frecuencia en el modo
FM.
6. CH-: Presionar este botón para ir al track previo en los modos USB/SD/
Conexión Inalámbrica BT o para ir a la frecuencia previa en el modo FM.
7. VOL-: Presionar y mantener presionado este botón por unos segundos
para reducir el volumen.
8. E/R (Botón EQ): Presionar ese botón para seleccionar la función ecual-
izador.
9. Botón STOP: Presionar este botón una vez para parar la música y pre-
sionar el botón pausa/play para volver a reproducir en USB/SD.
10. Botón FM Audio Scan y Play/Pausa: En el modo FM, presionar este
botón para escanear automáticamente estaciones de radio. La unidad
almacenará todas las estaciones de radio disponibles. Presionar nueva-
mente para detener el escaneo. En el modo USB/SD/Conexión inalám-
brica BT, presionar este botón para pausar, y presionar nuevamente para
volver a reproducir.
11. Botón repetir: En el modo USB/SD, presionar este botón si desea repe-
tir el track actual o para repetir todos los tracks.
12. Botón 0-9: Presionar este botón para seleccionar tracks en el modo
USB/SD. Presionar este botón para seleccionar las radios almacenadas en
el modo FM.

Pg. 18
INTERNATIONAL WARRANTY
Terms and Conditions
1. PANACOM warrants the operation of this product to be free from any
manufacturing and/or material defect for a period of 6 months from the
date of purchase by the user.
2.This warranty is limited to the repair and/or replacement of this product,
according to our own criterion, free of charge within the stipulated term
and it does not extend to consequential or incidental damages to other
products that may be used with this unit.
3. The warranty shall be voided in the following cases: a) repair or attempt
to repair by third parties not authorized by the company. b) in case of
performing any type of cut in connection cables, plugs, connectors, or
other adapters dierent from the original ones provided by the company.
4. To make this warranty eective, you shall contact the Authorized
Service Center of your country and they shall carry out the pertinent
procedure; said information is available at www.panacom.com. In order
to start the necessary procedure to get said warranty, you shall hand in
the Original Purchase Invoice where the purchase date, dealer name and
product identication shall be stated clearly.
5. Transportation, freight, stay and/or insurance expenses, if any, are not
covered by this warranty.

Pg. 19
GARANTIA INTERNACIONAL
Términos y Condiciones
1. PANACOM garantiza el funcionamiento de este producto ante cualquier
defecto de fabricación y/o vicio de material por el término de 6 meses conta-
do a partir de la fecha de compra por parte del usuario.
2. Esta garantía se limita a la reparación y/o reemplazo de este producto,
a nuestro criterio, sin cargo alguno dentro del plazo de vigencia y no se
extiende a daños concecuentes o incidentales hacia otros productos que
fueran utilizados con esta unidad.
3. La garantía queda anulada ante: a) reparación o intento de reparación
por terceros no autorizados por la compañía. b) en el caso de realizar
cualquier tipo de corte de los cables de conexión, chas, conectores, u
otros adaptadores distintos de los originales de fábrica.
4. Para hacer valer esta garantía se deberá remitir al centro de servicios
autorizado de su país quienes gestionarán la misma, dicha información se
encuentra www.panacom.com. Para gestionar dicha garantía deberá pre-
sentar la Factura Original de compra en la cual deberá constar claramente
la fecha de compra, nombre del comercio e indenticación del producto.
5. No quedan cubiertos por esta garantía gastos de traslado, ete, estadía,
y/o seguro si los hubiera.

Pg. 20
RAZÓN SOCIAL LOCALIDAD DOMICILIO TELÉFONO
COMPANY LOCALITY ADDRESS PHONE
CIUDAD DE BUENOS AIRES
SERVICIO POST VENTA 0810-888-7262
PROVINCIA DE BUENOS AIRES
TAURO ELECTRÓNICA Santa Teresita Av 41 Nº 688 02246-52-0932
TOSHIMAR Mar del Plata Bolivar 3056 0223-494-0723
SERVICE DE LA COSTA San Nicolás Brown 113 03461-42-3916
SPEED SERVICE La Plata Calle 66 Nº 1165 ½ 0221-457-5873
entre 18 y 19 / 356-4572
TAURO ELECTRÓNICA Mar de Ajo Catamarca 14 02257-42-1750
TAURO ELECTRÓNICA Dolores Cramer 199 02245-44-4300
TECNISERVICE Bahía Blanca Angel Brunel 877 0291-454-5460
CITTA SERVICE Bahía Blanca H. Irigoyen 176 0291-4520881/4515010
PROVINCIA DE CÓRDOBA
RAUL GARCÍA Córdoba Bº Gral Paz Eufrasio Loza 411 0351-452-1807
JUAN MARTÍNVALSECCHI Río Cuarto Dinkeldein 598 0358-464-7731
STONE BICYCLE Córdoba Av Pueyrredón 1616 0351-156-568959
ALCARAZ JUAN San Francisco Liniers 851/53 03564-437-114
PROVINCIA DE CORRIENTES
SERVITEC ELECTRONICA Corrientes Cabo de Hornos 3745 0379-4414026
B° 3 de Abril
PROVINCIA DE CHACO
ELECTRONICA DANY Roque Sanz Peña Padre Mustacchio 276 03644-423751
PROVINCIA DE ENTRE RIOS
VALENTE HNOS Paraná Av.de las Americas 2580 0343-4350390
ELECTRO SERVICE Concordia Urnilarrain 340/42 0345-421-4473/4230659
ELECTRO DAN Gualeguaychu San josé 492 03446-15-311-715
esq GuidoSpano
PROVINCIA DE FORMOSA
ELECTR.THOMPSON S.R.L Formosa Territorios Nac. 1064 03704-430805
PROVINCIA DE JUJUY
TECNOTRONIC S.S. de Jujuy CerroAguilar 629 Bº Lujan 0388-4256125
PROVINCIA DE LA RIOJA
EGA ELECTRONICA La Rioja MalvinasArgentinas y Pje1 03822-155-38901
TECHNICAL SERVICES / SERVICIO TECNICO
This manual suits for next models
1
Table of contents
Languages:
Other Panacom Speakers System manuals