manuals.online logo
Brands
  1. Home
  2. •
  3. Brands
  4. •
  5. Panasonic
  6. •
  7. Digital Camera
  8. •
  9. Panasonic Lumix DMC-ZS7 User manual

Panasonic Lumix DMC-ZS7 User manual

Operating instructions
for advanced features
Digital Camera
Model No. DMC-ZS7
DMC-ZS6
DMC-ZS5
Before connecting, operating or adjusting this product,
please read the instructions completely.
VQT2R20
Using[SCENEMODE]enablesyoutotakepictureswithoptimumsettings(exposure,
coloring,etc.) for given scenes.
Zoom lever
[DISPLAY] [MENU/SET]
==To take motion pictures
(472)
[] Registering commonly used
scenes
[MY SCN MODE] _ (-+71)
[MY SCENE MODE] (471)
Set to O
Set to SCN
Select and set the scene
(Press [MENU/SET] and then press _-, if
scene menu is not displayed)
@Scene menu
_;_;_I__(_ _--Zoom lever can
_J also be used to
switch to next
_ _@@ _:ii screen.
To see descr pt on of each scene:
Select the scene, and press the
[DISPLAY] button.
®Selecting a Scene Mode inappropriate for the actual scene may affect the coloring of
your picture.
® Following [REC] menu settings will be automatically adjusted and cannot be selected
manually (available settings vary according to scene setting).
[iNTELLIGENT ISO], [SENSITiViTY], [METERING MODE], [I.EXPOSURE], [MIN.
SHTR SPEED], [I.RESOLUTION], [COLOR EFFECT], [PICT.ADJ.]
®White Balance can only be set in the next scene. (Setting is restored to [AWB] when
scene is changed.)
[PORTRAIT], [SOFT SKIN], [TRANSFORM], [SELF PORTRAIT], [PANORAMAASSIST]
(First picture only), [SPORTS], [BABY], [PET], [HIGH SENS.], [HI-SPEED BURST],
[PIN HOLE], [HIGH DYNAMIC], [PHOTO FRAME], [UNDERWATER] (fine adjustment
only)
®The types of flash available (448) vary according to the scene. The Scene Mode flash
setting is reset to the default setting when the Scene Mode is changed.
®Guidelines displayed in gray in [NIGHT PORTRAIT], [NIGHT SCENERY], [STARRY
SKY], and [FIREWORKS] Scene Modes. 61
Taking picWres according to the scene
[SCENE MODE[ (Continued)
Recording Mode: _
• [AF MODE] default setting is ,_,:
(Face Detection).
D
[PORTRAmT]
[SOFT
SKIN]
B
[TRANSFORM]
[]
[SELF
PORTRAIT]
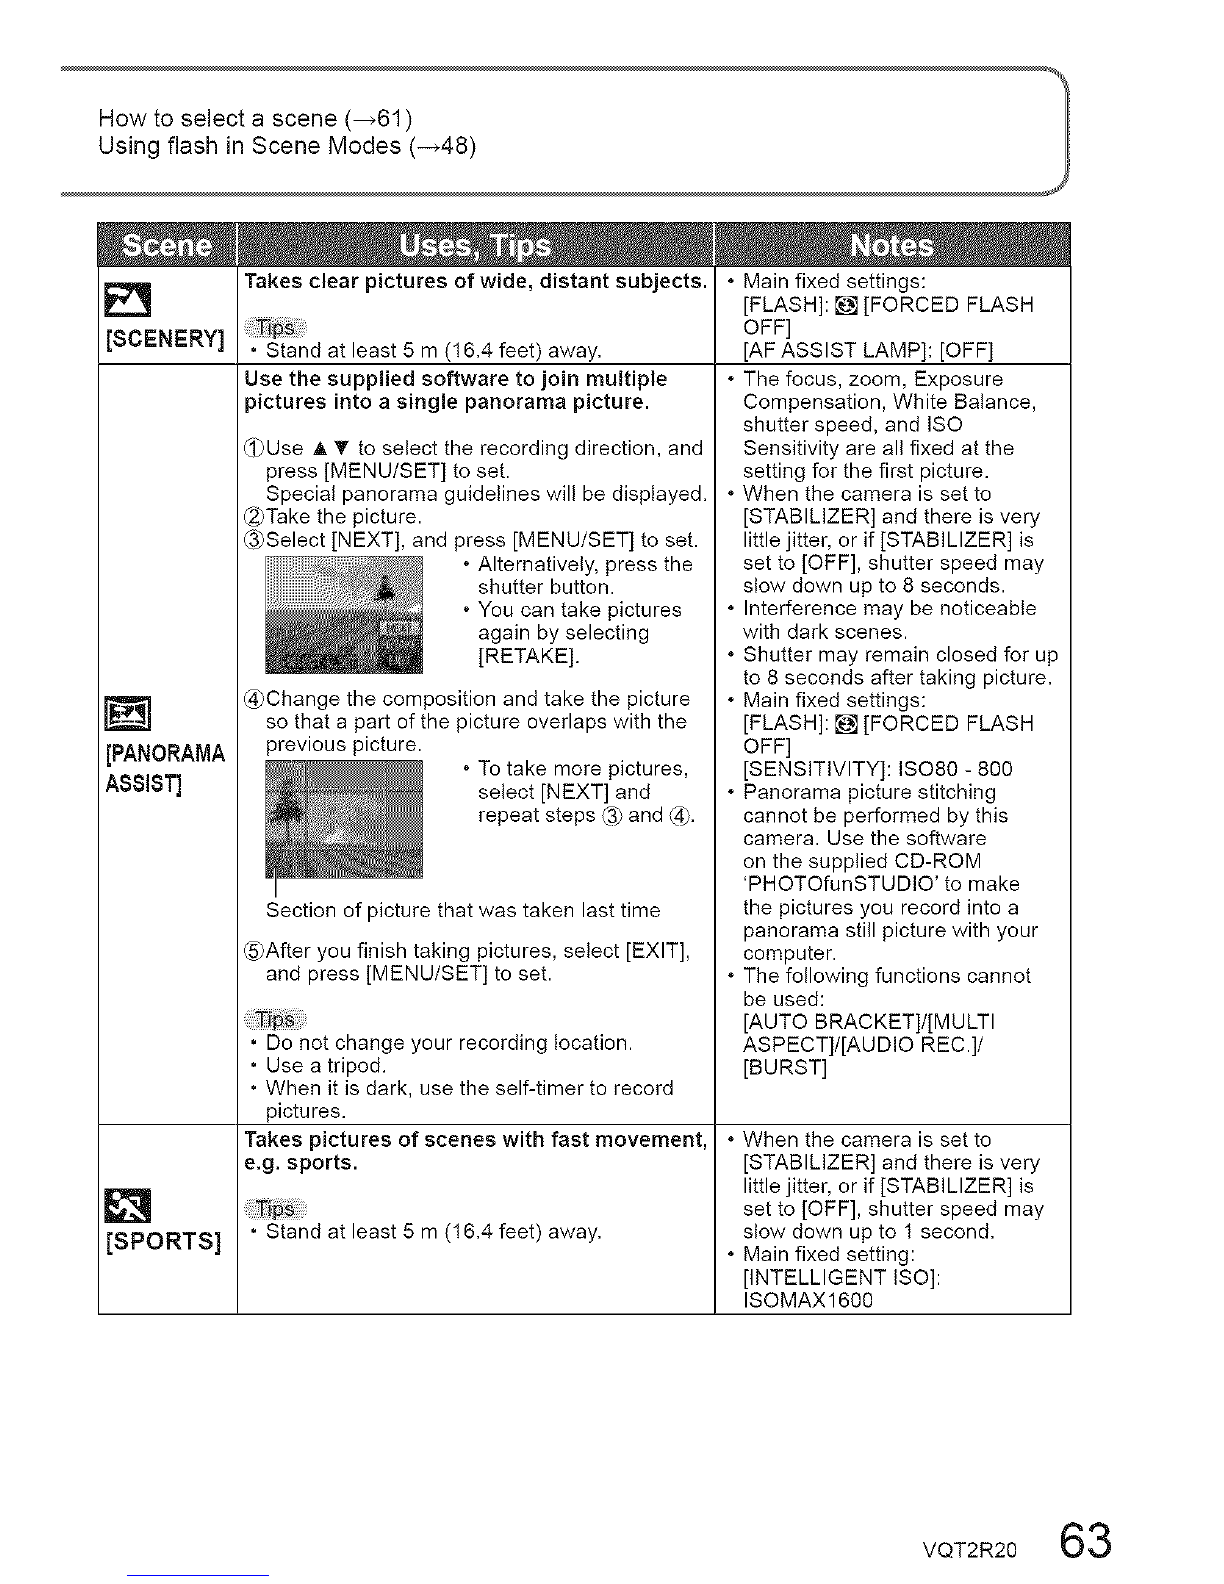
Improves the skin tone of subjects for a
healthier appearance in bright daylight
conditions,
• Stand as close as possible to subject,
• Zoom: As telescopic as possible (T side)
Smoothes skin colors in bright, outdoor
daylight conditions (portraits from chest
upwards).
• Stand as close as possible to subject,
• Zoom: As telescopic as possible (T side)
Changes the appearance of the subject by
stretching the length or width.
_Use A T to select the Transform level, and
press [MENU/SET] to set.
• The settings can also
be changed in the
Quick menu. (_112)
_)Take the picture.
• This function can be used for personal use
only, and is not to be used for unauthorized
commercial purposes or commercial gain,
which would represent a copyright issue.
• Do not use in ways that violate public order
and decency or defame or slander others.
• Do not use in ways that harm the subject.
Take pictures of yourself,
• Press shutter button halfway _ self-timer
indicator illuminates _ press shutter button
fully _ review
(if self-timer indicator flashes, focus is not
correctly aligned)
• Focus: 30 cm - 1.2 m (0.99 - 3.94 feet)
(Max. W)
• Do not use zoom (harder to focus).
(Zoom moved to max. W automatically)
• 2-second self-timer recommended.
• Clarity of effect may vary
depending on brightness.
• [AF MODE] default setting is ,_&:
(Face Detection),
• If a part of the background etc,
is a color close to skin color, this
part is also smoothed,
• When taking a picture, a process
is performed that improves the
skin appearance,
• The picture quality becomes
slightly lower,
• [PICTURE SIZE] will be fixed
according to the ]ASPECT
RATIO] setting, as detailed below,
_:3M
_:2,5M
• The following__nction is fixed:
[QUALITY]: _ (Standard)
• [AF MODE] default setting is ,_,:
(Face Detection),
• Face Detection may not work
as effectively when using ]SLIM
HIGH] or [STRETCH HIGH],
• The following functions cannot
be used:
Extended Optical Zoom/[DIGITAL
ZOOM]/[AUTO BRACKET]/
[MULTI ASPECT]/[BU RST]
• To take pictures with audio (7106)
(self-timer indicator illuminated
during recording)
• Main fixed settings:
[ZOOM RESUME]: [OFF]
[SELFTIMER]: [OFF]/[2SEC,]
[STABILIZER]: [MODE 2]
[AF ASSIST LAMP]: [OFF]
• [AF MODE] default setting is :_e:
(Face Detection),
2VQT2R20
[SCENERY]
[PANORAMA
ASSIST]
[SPORTS]
Takes clear pictures of wide, distant subjects.
• Stand at least 5 m (16.4 feet) away.
Use the supplied software to join multiple
3ictures into a single panorama picture.
_Use A T to select the recording direction, and
press [MENU/SET] to set.
Special panorama guidelines will be displayed.
@Take the picture.
_Select [NEXT], and press [MENU/SET] to set.
_ t i _. Alternatively, press the
shutter button.
.You can take pictures
again by selecting
[RETAKE].
@Change the composition and take the picture
so that a part of the picture overlaps with the
previous picture. .To take more pictures,
select [NEXT] and
repeat steps _3_and @.
Section of picture that was taken last time
(_)After you finish taking pictures, select [EXIT],
and press [MENU/SET] to set.
• Do not change your recording location.
• Use a tripod.
• When it is dark, use the self-timer to record
pictures.
Takes pictures of scenes with fast movement,
e.g. sports.
• Stand at least 5 m (16.4 feet) away.
.Main fixed settings:
[FLASH]: [] [FORCED FLASH
OFF]
[AF ASSIST LAMP]: [OFF]
.The focus, zoom, Exposure
Compensation, White Balance,
shutter speed, and ISO
Sensitivity are all fixed at the
setting for the first picture.
.When the camera is set to
[STABILIZER] and there is very
little jitter, or if [STABILIZER] is
set to [OFF], shutter speed may
stow down up to 8 seconds.
.Interference may be noticeable
with dark scenes.
.Shutter may remain closed for up
to 8 seconds after taking picture.
.Main fixed settings:
[FLASH]: [] [FORCED FLASH
OFF]
[SENSITIVITY]: ISO80 - 800
.Panorama picture stitching
cannot be performed by this
camera. Use the software
on the supplied CD-ROM
'PHOTOfunSTUDIO' to make
the pictures you record into a
panorama still picture with your
computer.
.The following functions cannot
be used:
[AUTO BRACKET]/[MULTI
ASPECT]/[AUDIO REC.]/
[BURST]
.When the camera is set to
[STABILIZER] and there is very
little jitter, or if [STABILIZER] is
set to [OFF], shutter speed may
slow down up to 1 second.
.Main fixed setting:
[INTELLIGENT ISO]:
ISOMAX1600
VQT2R20 63
Taking picWres according to the scene
[SCENE MODE[ (Continued)
Recording Mode: _
Takes pictures of people and nightseapes
with close to actual brightness.
[NIGHT
PORTRAIT]
m
[NIGHT
SCENERY]
[FOOD]
[]
[PARTY]
• Use flash.
• Subject should not move.
• Tripod, self-timer recommended.
• Stand at least 1.5 m (4.92 feet) away at the
Wide end (wide-angle)
• Focus: Max. W: 60 cm (1.97 feet) - 5 m (16.4 feet)
Max. T: 1.2 m (3.94 feet) - 5 m (16.4 feet)
Takes clear pictures of night scenes,
, Stand at least 5 m (16.4 feet) away.
, Tripod, self-timer recommended
Takes natural-looking pictures of food,
• Focus (same as macro recording)
Max. W: 3 cm (0.10 feet) and above
Max. T: 1 m (3.28 feet) and above
(5 xto8 xis2mto_)
Brighten subjects and background in
3ictures of indoor events, such as weddings,
, Stand approx. 1.5 m (4.92 feet) away.
, Zoom: Wide (W side)
, Use flash.
, Tripod, self-timer recommended.
•When the camera is set to
[STABILIZER] and there is very
little jitter, or if [STABILIZER] is
set to [OFF], shutter speed may
slow down up to 1 second (or up
to 8 seconds if flash is set to []
(Forced Flash Off)),
•Interference may be noticeable
with dark scenes,
•Shutter may remain closed for 8
seconds after taking picture,
•Main fixed setting:
[PRE AF]: [OFF]
•[AF MODE] default setting is ,_:
(Face Detection),
•When the camera is set to
[STABILIZER] and there is very
little jitter, or if [STABILIZER] is
set to [OFF], shutter speed may
slow down up to 8 seconds,
•Interference may be noticeable
with dark scenes,
•Shutter may remain closed for up
to 8 seconds after taking picture,
•Main fixed settings:
[FLASH]: [] ]FORCED FLASH
OFF]
[SENSITIVITY]: ISO80 - 800
[PRE AF]: [OFF]
[AF ASSIST LAMP]: [OFF]
•[AF MODE] default setting is ,_,:
(Face Detection).
4VQT2R20
D
[CANDLE
MGHT]
[BABY]
[PET]
Brings out the atmosphere of a candleJit
room.
Tips
• Focus (same as macro recording)
Max. W: 3 cm (0.10 feet) and above
Max. T: 1 m (3.28 feet) and above
(5 xto8 xis2mto =)
• Do not use flash.
• Tripod, self-timer recommended.
Uses weak flash to bring out skin colors.
• To record age and name
([BABY1] and [BABY2] can be set separately.)
i_ii_:¸ _
(_)Select [AGE] or [NAME] with A _r, press _,
select [SET], and press [MENU/SET].
_2_Setthe birthday and name.
Age: Set birthday with A • 4 _, and press
[MENU/SET].
Name: (See 'Entering Text': (_113))
_3)Press [MENU/SET].
• Make sure [AGE] and [NAME] are [ON] before
taking a picture.
• To reset: Select [RESET] from [SETUP] menu.
• Focus (same as macro recording)
Max. W: 3 cm (0.10 feet) and above
Max. T: 1 m (3.28 feet) and above
(5 xto8 xis2mto =)
Records pet's age and name when taking
_ictures.
• Same as for [BABY]
Takes clear pictures of scenes such as
sunsets,
[SUNSET]
.When the camera is set to
[STABILIZER] and there is very
little jitter, or if [STABILIZER] is
set to [OFF], shutter speed may
slow down up to 1 second.
.[AF MODE] default setting is :A:
(Face Detection).
.Age and name wilt be displayed
for approx. 5 seconds after
setting this mode.
.When the camera is set to
[STABILIZER] and there is very
little jitter, or if [STABILIZER] is
set to [OFF], shutter speed may
stow down up to 1 second.
.Age display format depends on
[LANGUAGE] setting.
.[AGE] and [NAME] print setting
can be made on your computer
using the supplied CD-ROM
'PHOTOfunSTUDIO'. Text may
also be stamped onto the still
picture using [TEXT STAMP]
(--_t28).
.Date of birth will be displayed as
[0 month 0 day].
.Main fixed setting:
[INTELLIGENT ISO]:
ISOMAX1600
.[AF MODE] default setting is :A_
(Face Detection).
.When the camera is set to
[STABILIZER] and there is very
little jitter, or if [STABILIZER] is
set to [OFF], shutter speed may
slow down up to 1 second.
.Default settings are as follows.
[AF MODE]: _ (AF Tracking)
[AF ASSIST LAMP]: [OFF]
.Refer to [BABY] for other notes
and fixed functions.
.Main fixed settings:
[FLASH]: [] [FORCED FLASH
OFF]
[AF ASSIST LAMP]: [OFF]
VQT2R20 65
Taking picWres according to the scene
[SCENE MODE[ (Continued)
Recording Mode: _
HiGH
SENS.]
HkSPEED
BURST]
Prevents blurring of subject in dark, indoor
conditions.
Select the aspect ratio and the picture size with
A • and press [MENU/SET].
• Focus (same as macro recording)
Max. W: 3 cm (0.10 feet) and above
Max. T: 1 m (3.28 feet) and above
(5 xto8 xis2mto=)
Takes pictures of rapid movement or a
decisive moment,
_Use A T to select [SPEED PRIORITY] or [IMAGE
PRIORITY], and press [MENU/SET] to set.
_Select the aspect ratio and the picture size
with A Tand press [MENU/SET].
_3)Take pictures. (Hold shutter button)
Still pictures are taken continuously while the
shutter button is pressed fully.
[SPEED Approx. 10 pictures/
Maximum PRIORITY]sec
speed* [IMAGE
PRIORITY1 Approx. 6 pictures/sec
Built-in Approx. 15 or more
Number of memory
recordable
)ictures* Card Approx. 15 to 100
(The maximum is 100).
* The burst speed and number of recordable
pictures change according to the recording
conditions or types of cards.
, Focus (same as macro recording)
Max. W: 3 cm (0.10 feet) and above
Max. T: 1 m (3.28 feet) and above
(5 xto8 xis2mto_)
•Pictures may appear slightly
grainy due to high sensitivity.
• Main fixed settings:
[QUALITY]: _ (Standard)
[SENSITIVITY]: ISO1600 - 6400
[I.RESOLUTION]: [ON]
• The following functions cannot
be used:
Extended Optical Zoom/[DIGITAL
ZOOM]/[MULTI ASPECT]
• The number of burst recording
pictures increases immediately
after formatting.
• The picture quality becomes
slightly lower.
• Main fixed settings:
]FLASH]: _ [FORCED FLASH
OFF]
]QUALITY]: _ (Standard)
]SENSITIVITY]:
Speed priority ISO200 - 1600
Image priority ISO500 - 800
[I.RESOLUTION]: [ON]
•The focus, zoom, exposure,
White Balance, shutter speed
and ISO Sensitivity are fixed to
the settings for the first picture.
• The following functions cannot
be used:
Extended Optical Zoom/[DIGITAL
ZOOM]/[AUTO BRACKET]/
]MULTI ASPECT]/[SELFTIME R]/
]AUDIO REC.]/[BU RST]
• If recording is repeated,
depending on the usage
conditions, there may be a delay
before the camera takes pictures
again.
6 VQT2R20
[FLASH
BURST]
m
[STARRY
SKY]
Enables continuous recording in dim
locations,
_Use _.Tto select the picture size and aspect
ratio, and press [MENU/SET] to set.
_8_ _ _ _...................
C_Take pictures (Hold shutter button).
Still pictures are taken continuously while the
shutter button is held down.
Number of continuous shots: Max. 5
• Use within the effective range of the flash.
(_48)
• Focus (same as macro recording)
Max. W: 3 cm (0.10 feet) and above
Max. T: 1 m (3.28 feet) and above
(5xto8xis2mto=)
Takes clear pictures of starry skies or dark
subjects.
• Shutter speed settings
_l_Select with A T, and press [MENU/SET].
_!_:_,_,_, ............ "The number of
_ seconds can be
changed with Quick
.........: _c, ............... menu. (--_112)
.The picture quality becomes
slightly lower.
.Main fixed settings:
[FLASH]: Jim [FORCED FLASH
ON]
[QUALITY]: _ (Standard)
[INTELLIGENT ISO]:
ISOMAX 3200
[I.RESOLUTION]: [OFF]
.The focus, zoom, Exposure
Compensation, shutter speed,
and ISO Sensitivity are all fixed at
the setting for the first picture.
.Shutter speed is 1/30 - 1/2000
second.
.The following functions cannot
be used:
Extended Optical Zoom/[DIGITAL
ZOOM]/[AUTO BRACKET]/
[MULTI ASPECT]/[BURST]/
[AUDIO REC.]
.For details about flash (--_48)
.Main fixed settings:
[FLASH]: _ [FORCED FLASH
OFF]
[SENSITIVITY]: ISO80
[PRE AF]: [OFF]
[STABILIZER]: [OFF]
.The following functions cannot
be used:
[EXPOSURE]/[AUTO BRACKET]/
[MULTI ASPECT]/[BURST]/
@Press shutter button.
[AUDIO REC.]
begins
• Set longer shutter speeds for darker
conditions.
• Always use a tripod.
• Self-timer recommended.
• Do not move the camera until the countdown
(above) has ended.
(Countdown for processing is redisplayed
afterwards)
VQT2R20 67
Taking pictures according to the scene
[SCENE MODE] (Continued)
Recording Mode: _
Takes clear pictures of fireworks in the night
sky.
m
[FIREWORKS]
• Stand at least 10 m (32.8 feet) away.
• Tripod recommended.
Brings out the clear blues of the sky and the
sea without darkening subject.
[BEACH]
D Brings out the natural color of snow in ski
slope and mountain scenes.
[SNOW] Takes pictures of the view from aircraft
windows,
[AERIAL
PHOTO]
• Angle the camera towards areas of contrasting
colors when aligning the focus.
• Check that the interior of the aircraft is not
reflected in the window.
• Stand at least 5 m (16.4 feet) away.
Darkens the area around the screen for a
retro effect,
[]
[PIN
HOLE]
• Focus (same as macro recording)
Max. W: 3 cm (0.10 feet) and above
Max. T: 1 m (3.28 feet) and above
(5 xto8 xis2mto=)
• Shutter speed can be set to 1/4
second or 2 seconds (if there is
a little jitter or if Optical Image
Stabilizer is ]OFF]). (when not
using Exposure Compensation)
• Main fixed settings:
[FLASH]: _ [FORCED FLASH
OFF]
[SENSITIVITY]: ISO80
[PRE AF]: [OFF]
[AF ASSIST LAMP]: [OFF]
•[AF MODE] default setting is ,_:
(Face Detection).
• Do not touch camera with wet
hands.
• Beware of sand and sea water.
• Battery life is reduced in lower air
temperatures.
• Main fixed settings:
[FLASH]: L'_ [FORCED FLASH
OFF]
[AF ASSIST LAMP]: ]OFF]
• Turn the camera off when
taking off or landing.
• When using the camera, follow
all instructions from the cabin
crew.
• The Face Detection function
(799) may not work properly in
the darkened area around the
screen.
•[I.RESOLUTION] is fixed to
[OFF].
• The following functions cannot
be used:
Extended Optical Zoom/
[DIGITAL ZOOM]/[AUTO
BRACKET]/[MU LTI ASPECT]/
[BURST]
8 VQT2R20
[FILM
GRAIN]
[NIGH
DYNAMIC]
Produces black and white pictures with a
grainy texture.
Tips
•Focus (same as macro recording)
Max. W: 3 cm (0.10 feet) and above
Max. T: 1 m (3.28 feet) and above
(5 xto8 xis2mto =)
Reduces over- and underexposure when
recording into the light and in night scenes.
Use A _ to select the effect and press
[MENU/SET].
ct emphasizing
• You can also change the settings in the Quick
menu. (_112)
• Focus (same as macro recording)
Max. W: 3 cm (0.10 feet) and above
Max. T: 1 m (3.28 feet) and above
(5xto8xis2mto=)
.Main fixed settings:
[SENSITIVITY]: ISO1600
.The following functions cannot
be used:
[DIGITAL ZOOM]/[AUTO
BRACKET]/[MULTI ASPECT]/
[BURST]
When the camera is set to
[STABILIZER] and there is very
little jitter, or if [STABILIZER] is
set to [OFF], shutter speed may
slow down up to 8 seconds.
The following function is fixed:
[SENSITIVITY]: 400
.Depending on recording
conditions, the correction effect
may not work.
.After recording, the shutter may
stay closed (up to 8 seconds) to
process the signal. This is not a
defect.
.Because dark areas are
corrected to be lighter, there may
be more noticeable noise on the
LCD screen than with ordinary
recording.
VQT2R20 69
[PHOTO
FRAME]
D
[UNDERWATER]
A frame is superimposed over the image.
Press 4 _- to select the frame, and then press
[MENU/SET].
_ _¢_:_ _:_i ................
Achieve natural colors under water.
, For fast moving subjects, align with the AF
area and press _1 (AF Lock).
(Press 4 again to release.)
, If the zoom is operated after AF Lock is set,
the AF Lock setting will be canceled and must
be set again.
, AF Lock cannot be set if [AF MODE] is set
to ['F4_].
• Adjust red and blue levels with 'White Balance
fine adjustment' (_98).
• Focus (same as macro recording)
Max. W: 3 cm (0.10 feet) and above
Max. T: 1 m (3.28 feet) and above
(5 xto8 xis2mto_)
•The recording pixel level is 2 M
(E_).
• The following function is fixed:
[AUTO REVIEW]: [2 SEC.]
• The color of the frame displayed
on the screen may differ slightly
from the color of the frame on the
still picture that is recorded.
• Guide lines cannot be displayed.
• The following functions are not
available.
Extended Optical Zoom/[DIGITAL
ZOOM]/[AUTO BRACKET]/
[MULTI ASPECT]/[BU RST]
• Always use marine case
(optional).
• Positioning is not possible
underwater, because the GPS
signals cannot reach the camera.
• Self-timer: Cannot be used
0VQT2R20
You can register a commonly used Scene Mode in MS1MS2 (MSfor ) on the mode
dial.
After the settings are made, pictures can be taken in the preset Scene Mode by simply
setting the mode dial to MS1MS2 (MSfor ).
Zoom lever
[DISPLAY]
[MENU/SET]
==Taking pictures in
registered Scene Modes
Set the mode dial to MS1MS2 (MS
for ), and take a picture.
• Functions, tips for each scene
(462- 70)
mChanging registered Scene
Modes
Performthe registration operation
again
==Taking motion pictures
(472)
Set to O
Set to MSI/MS2(MSfor )
@ @
DMC-ZS7 DMC-ZS6 If you have already
MS1 DMC-ZS5 registered in My
MS2 MS Scene Mode, it
is displayed as a
registered scene.
_ Select and set the scene
(Press [MENU/SET], select _, and then
press I_, if the scene menu is not displayed.)
@Scene menu
_. !_./:__:s zoom lever
can also be used
toswitch tothe
"4_ next screen.
To see a description of a scene:
Select the scene, and press [DISPLAY],
_MSIand MS2
Both represent the same function. Frequently-used scenes can be preset to each
position so that you can quickly and easily switch to the desired Scene Mode.
_For details on the preset scenes, see the pages on Scene Modes.
_lf recording settings are reset by [RESET] in the [SETUP] menu, the preset Scene
Modes are cleared.
VQT2R20 71
Taking motion pictures
Re_ordingMode:_ _ _ _ _ @_
Enables motion pictures to be recorded with (stereo) audio. (Recording with muted sound
is not possible.) Zoom can also be used during recording.
Zoom lever Set to I_1
Set to a position other than t_
Microphon{
(Do riot cover
with your finger)
mAbout the motion picture
recording screen
Remaining recordingtime (approx.)
[REC MODE] (-q08)/
[REC I (_108)
Press to start recording
There is no halfway pressing
operation.
Recording is started after switching to
the motion picture recording screen.
Switching motion picture Motion picture recording
mode_ screen
_Actual screen displayed may vary according
to [REC MODE].
[CONTINUOUS AF] (_109)
Elapsed recording time
IlChanging motion picture
settings
(4108)
You can also use zoom while recording
motion pictures.
• The zoom speed will be slower than normal.
Also, the zoom speed changes according to
the zoom range.
•When using zoom while recording motion
pictures, it may take some time to focus.
Press the motion picture button
again to end recording
IIPlaying back motion Switching still picture Still picture recording
pictures mode screen
(_115)
72 VQT2 R20 I For the operating procedures for the DMC-ZS6/DMC-ZS5 (_76) ]
[] Motion picture recording format ([REC MODE])
The camera can be changed between motion picture recording formats ([REC MODE])
when recording.
REC MODE] Mode can be set from the motion picture recording menu. (4108)
Motion picture I
recording format Features
([REC MODE]) '
[AVCHD Lite(GPS .Can record high-definition motion pictures.
REC)] _1 .Can record high-definition motion pictures longer than [MOTION JPEG]
on cards of the same size.
[AVCHD Lite] _1 .Pictures can be played back by inserting the card in an AVCHD-
compatible device. _2
[MOTION JPEG] .You can record high-definition motion pictures or small QVGA size
motion pictures, etc, by changing picture quality settings.
.Recorded motion pictures can be played back with 'QuickTime' on a
PC, etc.
oContinuous recording time is available until the motion picture data
volume reached 2 GB. To continue recording, press the motion picture
button and begin recording again.
_1 When the term "AVCHD Lite motion picture" is used in this manual, it means a motion picture
recorded in [AVCHD Lite(GPS REC)] or [AVCHD Lite].
_2 Correct playback may not be possible with some compatible devices. Also, motion pictures
recorded in [AVCHD Lite(GPS REC)] cannot be played back with Panasonic digital cameras
(LUMIX) compatible with AVCHD (Lite) recording that were sold in or before 2009.
• When [GPS SETTING] is [ON] or _s, the location name information from the start of
recording is recorded on motion pictures that are recorded in [AVCHD Lite(GPS REC)] or
[MOTION JPEG]. (When positioning succeeds and location name information is acquired)
[]Recording motion pictures in I[_
The camera automatically detects the scene to record motion pictures with optimal
settings.
When scene does not _ PORTRAIT] LOW LIGHT]
correspond to any on the rght. _ [i SCENERY] _ [i MACRO]
• If brightness or other conditions change during recording, the Scene Mode will be
changed automatically.
• In E] mode, focus and exposure will be set according to the face detected.
• In will be selected for nightscapes and other dark scenes. Flash cannot be used with
this mode.
• If conditions do not allow scenes to be detected easily (435).
• If the camera does not select your desired Scene Mode, choosing an appropriate
mode manually is recommended.
• The following menu options in the [MOTION PICTURE] menu can be set:
.[REC MODE] .[REC QUALITY]
• The following functions are fixed:
.[DIGITAL ZOOM]: [OFF] • [WIND CUT]: [OFF]
[WHITE BALANCE]: [AWB] • [AF MODE]: :_: (Face Detection) _ • [CONTINUOUS AF]: [ON]
[] 1-area-focusing turns on when faces cannot be detected.
• [I.EXPOSURE] is activated automatically based on the conditions.
VQT2R20 73
Taking motion pictures (Cont n.÷d)
[]Recording motion pictures in [] _ [] [_
Records a motion picture at your preferred settings.
• Aperture and shutter speed are automatically set.
• The Recording Mode icon changes to _.
[] Recording motion pictures in _[1 [_
Records a motion picture at the optimum settings for the selected scene.
• Some scenes are switched to the following scenes:
[BABY] D (Portrait motion picture)
[NIGHT PORTRAIT], [NIGHT SCENERY], [STARRY SKY] _ (Low light motion picture)
[PANORAMA ASSIST], [SPORTS], [PET], [HI-SPEED
BURST], [FLASH BURST], [FIREWORKS], [PHOTO FRAME] Normal motion picture
• [I.EXPOSURE] isactivated automatically, based on conditions depending on the
Scene Mode.
• The following items cannot be set in some Scene Modes:
, [WHITE BALANCE] •[DIGITAL ZOOM]
[]Recording motion pictures in
Records motion pictures in registered Recording Mode.
For details (4174)
[AVCH D Lite(GPS
REC)]/[AVCHD Lite]
[MOTION JPEG]
[GSH]/[SH]
[GH]/[H]
[GL]/[L]
[HD]
[WVGA]
[VGA]
[QVGA]
Approx. 15 min
Approx. 20 min
Approx. 29 min
8 min 20 s
20 min 50 s
21 min 40 s
lh
® Press [DISPLAY] before recording to display the recordable time in
the current Recording Mode and the picture quality,
Available recording time
74VQT2 R20 I For the operatin,q procedures for the DMC-ZS6/DMC-ZS5 (_76) ]
®Forinformation on the available recording time (-474)
*_Using a card of SD speed 'Class 4'_ or above is recommended for recording motion pictures
in [AVCHD Lite(GPS REC)]/[AVCHD Lite].
Using acard of SD speed 'Class 6'_ or above is recommended for recording motion pictures
in 'MOTION JPEG'.
The SD speed class is a speed rating for continuous writing.
*_Depending on the type of card, a card access message may appear for a while after recording a
motion picture. This is not a defect.
_ If data is repeatedly recorded and deleted, the total available recording time on the SD card may be
reduced. To restore the original capacity, use the camera to format the SD card. Be sure to save all
important data to your computer or other media before formatting, as all data saved to the card will
be erased.
® Immediately release the motion picture button after pressing it.
_ Sounds of camera operations, such as zoom movement and beeps may be recorded.
_,[STABILIZER] is fixed at [MODE 1] regardless of the setting before motion picture recording.
®To fix the focus setting, set [CONTINUOUS AF] to [OFF].
_The following functions are not available:
Extended Optical Zoom, flash, [FACE RECOG.], [ROTATE DISP.] for pictures taken vertically.
_ Recording automatically ends when there is no more available space. For certain memory cards,
recording may end while in progress.
*_The screen can become narrower in motion pictures compared to still pictures. Also, if the Aspect
Ratio is different for still pictures and motion pictures, the angle of view will change when starting to
record a motion picture. The recordable area is displayed by setting [REC AREA] (_24) to [ON].
*_If Extended Optical Zoom was used before pressing the motion picture button, these settings will be
cleared, and the recordable area will be larger.
®[QVGA] in [REC QUALITY) (--_108) can only be recorded to the built-in memory.
® Fast-moving subjects in motion pictures may appear blurred during playback.
*_Depending on the environment when recording motion pictures, the screen may turn black for an
instant or noise may be recorded because of static electricity, electromagnetic waves, etc.
*_It may not be possible to play back motion pictures recorded in [MOTION JPEG] on Panasonic
digital cameras (LUMIX) _.(Motion pictures recorded on Panasonic digital cameras (LUMIX) can be
played back on this camera.)
_Applies to LUMIX cameras sold through December 2008 and some sold in 2009 (FS, LS series).
*_When recording motion pictures, it is recommended to use a sufficiently charged battery or an AC
adaptor (optional) and DC coupler (optional).
*_When recording motion pictures using an AC adaptor, if you unplug the AC adaptor or a power
outage occurs, power to the camera is cut, and the motion picture in progress is no longer recorded.
VQT2R2075
Taking motion pictures MOT ONP CTURE]Modo
Recording Mode:
This records motion pictures with audio, (Recording with muted sound is not possible.
Sound recording is monaural or stereo .) Zoom can also be used during
recording.
Microphone Set to _11
(Do not cover with
your finger)
Set the mode dial to
_ Start recording
÷
Press halfway Press fully
(adjust the focus) (start recording)
Remaining recording time (approx.)
You can also use zoom while recording motion
pictures.
• The zoom speed will be slower than normal.
Also, the zoom speed changes according to
the zoom range.
• When using zoom while recording motion
pictures, it may take some time to focus.
End recording
Press fully
Elapsed recording time (approx.)
®For information on the available recording time (--_176)
® Depending on the type of card used, a card-access display may appear for a while after motion
picture recording. This does not indicate a problem.
® Immediately release the shutter button after pressing it all the way.
® Easy zoom cannot be used while recording a motion picture.
®The following functions are not available.
Extended Optical Zoom, flash, [FACE RECOG.] and ]ROTATE DISP.] for still pictures taken vertically.
® Sounds of camera operations, such as zoom movement and beeps may be recorded.
® In [AF MODE], [] (1-area-focusing)is fixed:
®In [STABILIZER], [MODE 1] is fixed.
®To fix the focus setting, set [CONTINUOUS AF] to [OFF]
®When there is no space left to store the motion picture, recording automatically ends. Additionally,
recording in progress may be stopped, depending on the card used.
® Depending on the motion picture recording environment, static electricity or electromagnetic waves
may cause the screen to go black momentary or noise to be recorded.
7 6 VQT2 R20 I For the operatin,q procedures for the DMC-ZS7 (_72) ]
Changingthemotionpicturesize•Whenrecordingamotionpicture,useacardratedwith
anSDspeedclass_1of'Class6'orhigher•
•1SDspeedclassreferstoaspecificationforsustainedwritespeeds•
Display the [REC] menu _ Select the desired picture
quality
Select [REC_;_:QUALITY] ._;,.
[HD] 1280 x 720 pixels
[WVGA] 848 x 480 pixels
[VGA] 640 x 480 pixels
[QVGA] _2 320 x 240 pixels
_ Close the menu
30 fps
16:9
4:3
*2[QVGA] is fixed when recording to built-in memory•
*_When recording motion pictures, it is recommended to use a sufficiently charged battery or an AC
adaptor (optional) and DC coupler (optional)•
*_When recording motion pictures using an AC adaptor, if you unplug the AC adaptor or a power
outage occurs, power to the camera is cut, and the motion picture in progress is no longer recorded•
*_If you attempt to play motion pictures recorded with the camera on other devices, playback may not
be possible, or the picture or sound quality may be poor. Additionally, incorrect recording information
may be indicated.
*_Motion pictures recorded with the camera cannot be played on Panasonic LUMIX digital cameras
sold before July 2008. (However, motion pictures recorded with LUMIX digital cameras sold before
this date can be played on this camera.)
*_It may not be possible to play back motion pictures recorded in [MOTION JPEG] on Panasonic
digital cameras (LUMIX)R (Motion pictures recorded on Panasonic digital cameras (LUMIX) can be
played back on this camera•)
_ Applies to LUMIX cameras sold through December 2008 and some sold in 2009 (FS, LS series)
VOT2R2077
Recording with the Face Recognition function
[FACE RECOGJ
RecordingMode:
To enable the Face Recognition function, register a face picture (-_79), or set the
automatic registration of face pictures (482) to [ON]. (The Face Recognition function is
not enabled at the time of purchase.)
==How the Face Recognition function works
During recording
• The camera recognizes a registered face and adjusts focus
and exposure
• When registered faces that have set names are recognized,
the names are displayed (up to 3 people)
• When [AUTO REGISTRATION] is [ON], faces that have
been recorded many times are recognized and the
registration screen is displayed
During playback
• The name and age are displayed (if information is registered)
• During recording, the names that have been set for the recognized faces are
displayed (up to 3 people)
• Only pictures of the selected registered people are played back ([CATEGORY PLAY])
_.[AF MODE] is fixed to rA: (Face Detection).
®When Burst is performed, recording information relating to Face Recognition is put only
on the first picture.
® if you press the shutter button halfway, then point the camera at a different subject and
record, recording information for a different person may be put on the picture.
® Face Recognition does not work in the following cases:
[CLIPBOARD] Mode, motion picture recording, Scene Modes [TRANSFORM],
[PANORAMAASSIST], [NIGHT SCENERY], [FOOD], [HI-SPEED BURST], [FLASH
BURST], [STARRY SKY], [FIREWORKS], [AERIAL PHOTO], [FILM GRAIN],
[UNDERWATER]
® Face Recognition searches for faces similar to those registered, but there is no
guarantee it will always recognize these faces.
® Face Recognition works by looking at certain facial characteristics and as a result takes
longer than ordinary Face Detection.
® Even if Face Recognition information is registered, pictures recorded when the name is
[OFF] are not categorized for Face Recognition in [CATEGORY PLAY].
® Even if Face Recognition information is changed (481), Face Recognition
information for previously recorded pictures is not changed.
For example, if a name is changed, pictures recorded before the change are not
categorized for Face Recognition in [CATEGORY PLAY].
®To change name information for pictures already recorded, perform a [REPLACE] (4136)
in [FACE REC EDIT].
8 VQT2R20
Up to 6 people's face pictures can be registered along with such information as name and
birth date.
You can facilitate Face Recognition by the way you register faces: for example, register
multiple face pictures of the same person (up to 3 pictures in one registration).
[] Recording tips when registering face pictures
• Make sure the subject's eyes are open and mouth closed; have the subject face the
camera directly, and make sure the outline of the face, the eyes and eyebrows are
not hidden by hair.
• Make sure there are no heavy shadows on the face. (During registration, the flash is
not used).
[] If the camera seems to have difficulty recognizing faces when recording
• Register additional pictures of the same person's face, indoors and outdoors or with
different expressions or angles.
• Register additional pictures at the place you are recording.
• Change the [SENSITIVITY] settings.
•if a registered person is no longer recognized, re-register that person.
_in some cases, the camera cannot recognize or incorrectly recognizes even registered
people depending on their expression or the environment.
• The eyes or eyebrows are hidden by hair
• The subject is not facing the camera directly
• The subject's eyes are closed
• The subject is dark or lit from a vertical angle
• The subject is facing up or down
• It is extremely bright or dark
• The image of the subject is too small
• The subject's facial features have changed with age
• The subject's expression is very different
• The subject's entire face is not in the screen
• The subject has very similar facial features as a family member, etc.
• There is little shadow on the face
• The subject is moving rapidly
• The photographer is jittering
• Digital Zoom is being used
• The subject's face is hidden by sunglasses, eyeglasses reflecting light, hair, a hat, etc.
vo 2R2079

Other manuals for Lumix DMC-ZS7

4

This manual suits for next models

2

Other Panasonic Digital Camera manuals

Panasonic Lumix G G1 User manual

Panasonic

Panasonic Lumix G G1 User manual

Panasonic LUMIX DMC-LS2PP User manual

Panasonic

Panasonic LUMIX DMC-LS2PP User manual

Panasonic DMC-TS20K Installation and service instructions

Panasonic

Panasonic DMC-TS20K Installation and service instructions

Panasonic Lumix DMC-F2 User manual

Panasonic

Panasonic Lumix DMC-F2 User manual

Panasonic Lumix DMC-FH4 User manual

Panasonic

Panasonic Lumix DMC-FH4 User manual

Panasonic DMCLS70 - DIGITAL STILL CAMERA Instruction Manual

Panasonic

Panasonic DMCLS70 - DIGITAL STILL CAMERA Instruction Manual

Panasonic CoolShot KXL-600A User manual

Panasonic

Panasonic CoolShot KXL-600A User manual

Panasonic Lumix DMC-ZR3 User manual

Panasonic

Panasonic Lumix DMC-ZR3 User manual

Panasonic Lumix DMC-LX1EG-K User manual

Panasonic

Panasonic Lumix DMC-LX1EG-K User manual

Panasonic Lumix DMC-FZ1000 Installation and service instructions

Panasonic

Panasonic Lumix DMC-FZ1000 Installation and service instructions

Panasonic Lumix DMC-GF7W Technical specifications

Panasonic

Panasonic Lumix DMC-GF7W Technical specifications

Panasonic Lumix DMC-S3 Installation and service instructions

Panasonic

Panasonic Lumix DMC-S3 Installation and service instructions

Panasonic DMC-TZ35 User manual

Panasonic

Panasonic DMC-TZ35 User manual

Panasonic BM-ET330 User manual

Panasonic

Panasonic BM-ET330 User manual

Panasonic Lumix DMC-GX8WC Technical specifications

Panasonic

Panasonic Lumix DMC-GX8WC Technical specifications

Panasonic Lumix DMC-LS85 User manual

Panasonic

Panasonic Lumix DMC-LS85 User manual

Panasonic LUMIX DMC-LX2 User manual

Panasonic

Panasonic LUMIX DMC-LX2 User manual

Panasonic Lumix DMC-ZS8 Installation and service instructions

Panasonic

Panasonic Lumix DMC-ZS8 Installation and service instructions

Panasonic Lumix DMC-TS5D User manual

Panasonic

Panasonic Lumix DMC-TS5D User manual

Panasonic Lumix DMC-LX3 User manual

Panasonic

Panasonic Lumix DMC-LX3 User manual

Panasonic Lumix DMC-FX500P User manual

Panasonic

Panasonic Lumix DMC-FX500P User manual

Panasonic LUMIX DMC-FZ38 User manual

Panasonic

Panasonic LUMIX DMC-FZ38 User manual

Panasonic HC-VX980EG User manual

Panasonic

Panasonic HC-VX980EG User manual

Panasonic Lumix VQT0U23 User manual

Panasonic

Panasonic Lumix VQT0U23 User manual

Popular Digital Camera manuals by other brands

Canon A720 1S user guide

Canon

Canon A720 1S user guide

Imi Tech AMAZON2 Series User's operation manual

Imi Tech

Imi Tech AMAZON2 Series User's operation manual

Sony Cyber-shot DSC-HX50 instruction & operation manual

Sony

Sony Cyber-shot DSC-HX50 instruction & operation manual

Leica M5 instructions

Leica

Leica M5 instructions

Sionyx Aurora user manual

Sionyx

Sionyx Aurora user manual

Samsung VLUU ST95 user manual

Samsung

Samsung VLUU ST95 user manual

Sony Cyber-shot DSC-W125 instruction manual

Sony

Sony Cyber-shot DSC-W125 instruction manual

Sony DSC-W830 Help guide

Sony

Sony DSC-W830 Help guide

Avaya XT Flex Quick setup guide

Avaya

Avaya XT Flex Quick setup guide

Poly Studio P Series user guide

Poly

Poly Studio P Series user guide

FujiFilm FinePix S9000 owner's manual

FujiFilm

FujiFilm FinePix S9000 owner's manual

Nikon Coolpix A1000 quick start guide

Nikon

Nikon Coolpix A1000 quick start guide

GE C1440W Bruksanvisning

GE

GE C1440W Bruksanvisning

Leica D-LUX instructions

Leica

Leica D-LUX instructions

Olympus VG-160 user manual

Olympus

Olympus VG-160 user manual

Sony Cyber-shot DSC-TX200 instruction manual

Sony

Sony Cyber-shot DSC-TX200 instruction manual

Samsung FlatFOTO 2.0 user manual

Samsung

Samsung FlatFOTO 2.0 user manual

SHARE PSDK 102S V2 user manual

SHARE

SHARE PSDK 102S V2 user manual

manuals.online logo
manuals.online logoBrands
  • About & Mission
  • Contact us
  • Privacy Policy
  • Terms and Conditions

Copyright 2025 Manuals.Online. All Rights Reserved.