Paralenz Vaquita User manual

Quick Start
Guide
www.paralenz.com

The Vaquita
The Vaquita camera is a great addition to your dive,
no matter what kind of diver you are.
GPS & WIFI antenna
Activation switch
Lens
2

3
End cap
USB-C port
SD-card reader
Display
Selector ring

Getting started
Here we present some of the things you need to know, to safely get
started with your brand new Paralenz camera.
The first thing to know about the Vaquita camera is; how to take of the
protective end cap for charging or handling the SD-card.
As pictured on the illustrations above, you need to pull back the “collar”
on the end cap, to get it off. While holding this back, you will be able to
pull off the end cap.
Pull back and hold
The end cap
4

5
SD-Card
Remove the end cap and insert a
micro SD-card. It must be a
Sandisk card with class U3 or V30.
Select the power icon on the selector ring and hold the activation
switch for 4 sec. To turn off again hold for 4 sec. while on Power mode.
Turn on camera
A capacity of 32 GB or more is recommended. A full memory card is as
useful as no memory card! Make sure to empty the SD-card after each
export.
Hold 4 sec.
or
The same mechanism is used when you put the end-cap back on. Pull
back the “collar”, push it back on.

Select mode
Turn the selector ring so the icon of your
desired mode is facing upwards. You can
choose between the following; Power, Snap,
Video, Custom I, Custom II, Settings, Dive
Logs, and Location.
Battery & charging
Use an USB-C to USB-A charger that can deliver 2.1A for fast charging.
Make sure the battery is charged before you enter the water. Maintain
the camera battery by charging it every second month, if not in use.
Make sure to always have the latest firmware installed on the camera.
Firmware updates are made through the Paralenz App or manually
downloaded from our website.
Latest update
6

Unlock your camera’s full potential with the free Paralenz App. Access
and organize your dive footage in the media library and dive log, edit your
recordings smoothly, and share your highlights with other Ocean lovers
and marine scientists worldwide.
The Paralenz App
Dives
m
8.12:46 PM
November 6, 2019
m
19.13:46 PM
October 5, 2019
m
12.83:46 PM
September 21, 2019
m
18.611:25 AM
September 21, 2019
m
9.5
3:46 PM
December 5, 2018
m
1 7. 53:46 PM
October 5, 2019
9:41
8
6
15
The Ocean Base
9:41
The free Paralenz App makes downloading, sharing and viewing your
photos and recordings easy. Download the app via App Store or Google
Play. The app will guide you through the connection process. Note that
you can also update the camera firmware through the app.
Camera firmware updates
Firmware updates are made through the Paralenz App. The app will give a
notification when a new update is available.
7

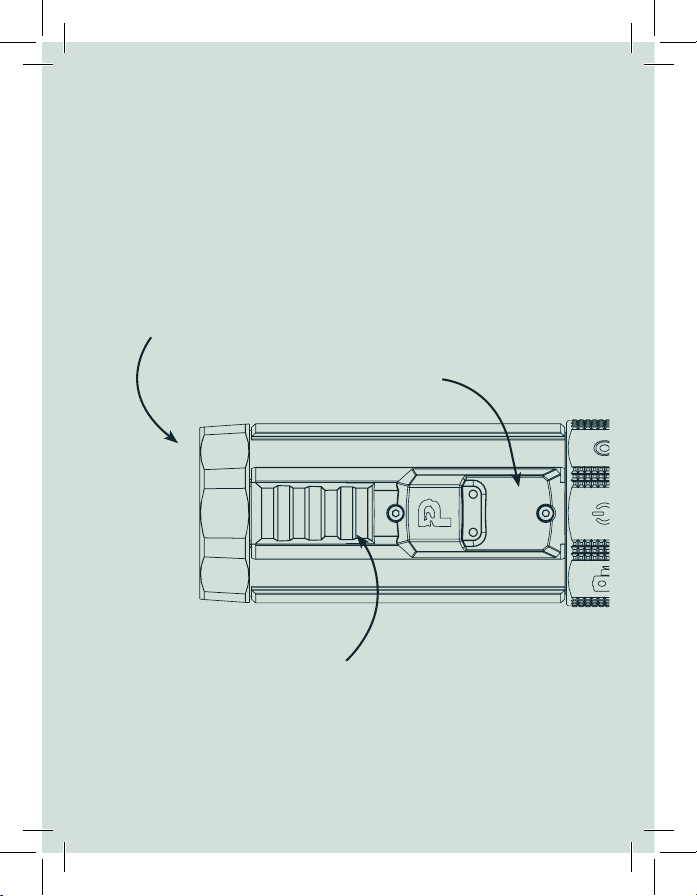
To take pictures select the photo & snap record icon on the
selector ring, and the camera will confirm with vibration.
Click once on the activation switch to take a photo. If you want
to record a short video hold the activation switch. As long as
you are holding it, you record video. Release the switch to end
recording.
For each custom icon, you can choose a custom mode setting
(it is done under the respective Custom menu in the settings).
You can choose between: Timelapse, Burst, Slow Motion, Video,
and Snap.
• Timelapse works by taking pictures at a set interval resulting
in a video where time seem to move faster.
• Burst works by continiously shooting photos in quick
succession.
Video
Snap
Custom I & Custom II
To record a video select the video mode on the selector ring,
and the camera will confirm with vibration. To start recording
hold the activation switch for 1 sec. To stop recording hold for
1 sec.
Camera features
The camera features spoken about here, are the seven icons on the
selector ring.
8
/

In the settings you can change resolution, frames per second,
turn Wi-Fi on/off and choose your custom mode. Click one to
move to the next menu point. Hold it to enter and confirm. See
the Main Manual for more information.
Settings
In this mode you can view your dives and their corresponding
data, arranged by date. You can either view the dive highlights by
holding the button and selecting ‘Dive Info’, or view an animation
of the entire dive by choosing ‘View Dive’.
Dive log
Locks your dive position - for more information see the Main
Manual.
Location
• Slow Motion is operated like Video, but the videos recorded
will be in Slow Motion. This mode restricts the maximum
resolution of the video.
• Video is operated like the regular Video mode, but with
custom settings
• Snap Record is operated like the regular Snap Record mode,
but with custom settings.
9

All waters looks murky with a dirty lens! Make sure your lens is clean and
has no scratches. To clean the lens, wipe it with a soft, lint-free cloth. You
can use Eyeglass Cleaning Fluid – but do not use strong solvents such as
benzene or alcohol.
Check that the o-rings have not been stretched and that they do not have
any cuts, tears and dirt (hair, dust). To lubricate the o-rings apply a thin
layer of grease and run them through your fingers while gently rubbing
the grease into the o-ring (do not use spray lubricant or petroleum based
grease).
Maintenance
The triple o-rings are tested to 250 m/820 ft./26 ATM. , so as long as you
properly maintain the o-rings and don’t open the camera below water you
should be fine. Remember to put on the end cap correctly.
We recommend to rinse the camera in fresh, warm water, while working
the ring and switch. Also - no solvents/chemicals should be used while
cleaning. If sand grains should get stuck underneath the magnetic
switches please contact our support for instructions.
Cleaning the camera
How do I prevent the camera from flooding?
Cleaning the o-rings
Cleaning the lens
10

Here you see at which depth the different colors gets absorbed
– red is the first color to disappear.
What is DCC?
DCC stands for Depth Color Correction and is a digital version of a color
filter, which are normally made from plastic and placed in front of your
camera lens, to remove the green or blue taint in your videos.
DCC is controlled by the pressure sensor. Every second it adjusts the
strength of the color correction to match the depth you are at. It cannot
add colors that are not present, but it can make better use of the colors
that are.
DCC
Depth Color Correction
~5m
~10m
~20m
~30m
~60m
How to use DCC?
When using DCC instead of a plastic color filter, the footage will have
better colors and be sharper and brighter.
11

DCC has two settings – blue or green:
Use blue for blue water
Use green for green water
Use blue for blue water. Use green for green water.
Toggle DCC on/off by clicking three times on the activation switch while in
power- or video-mode. Choose blue or green in DCC settings.
Video recorded with DCC off
(WB 5000K).
Video recorded with DCC on.
How to activate DCC?
IMPORTANT: Do not use dive lights together with the DCC
– this will discolor the image.
12

To toggle between the WB (when diving with lights) and the DCC (when
diving without lights), click the activation switch fast 3 times. The display
will show which mode is active. You will also be able to see which mode is
active in the standby screen.
How to activate WB?
IMPORTANT: For the best results use the WB only when you
dive with lights on.
WB stands for White Balance, which adjusts the color temperature.
Color temperature is measured in Kelvin (K) and ranges from the warm
orange glow of a match 1500K to the light on a clear day with a blue sky
10.000K.
What is WB?
WB - white balance
2700K 3000K 3500K 4100K 5000K 7500K 10000K
13

If you notice something out of the ordinary, please contact our support at
Often, we can give you simple, guided instructions on how to fix smaller
problems yourself. However, there might be cases where we would need
you to send your camera to us, so we can have a look and fix it here.
Check your camera in advance of your next dive!
What should I do if I notice something is not working?
Before your next dive
IMPORTANT: Don’t open up your camera and try to fix it
yourself without guidance from our support team. Unguided
maintenance can lead to broken parts, which can further
lead to the camera flooding on your next trip.
14
• Does your camera turn on and off without problems? Sweet.
• Do the selector ring and the activation switch move effortlessly? Great.
• Can you do a short recording and snap a picture wihout any issuse?
Awesome.
• Does that recording look fine without any disturbances in the image
quality? Perfect.
• Have you updated your camera with the newest firmware and updated
your Paralenz App? Congrats, your camera is ready!
This is why it is important that you check your camera in advance of your
next trip, so we can make sure to handle the repair and shipment of your
camera on time.

When overheated the camera will shot down!
Working temperature
Battery is recommended to be charged at room temperature
Battery precautions
Warnings
15
The Vaquita camera is primarily made for underwater use. If the camera
is used above water there is a risk of it overheating which will result in the
camera shutting down until the temperature is stabilized.
The battery should be used in a temperature range from 14° to 104° F
(-10° to 40° C). Use of the battery in an environment above 104° F (40°
C) can lead to a fire or explosion. Use of the battery below 14° F (-10° C)
can lead to permanent damage.
DO NOT charge the battery until it cools down to near room temperature.
Charging the battery outside of the temperature range of 41° to 104° F (5
to 40°C) may lead to leakage, overheating, or battery damage.
• Avoid replacement with a battery of an incorrect type.
• Don’t dispose of a battery into fire or a hot oven, or mechanically
crushing or cutting of the battery.
• Don’t leave the battery in an extremely high temperature environment.
• Avoid the battery being subject to extremely low air pressure.

16
Warning: Changes or modifications to this unit not expressly approved by
the party responsible for compliance could void the user’s authority to
operate the equipment.
NOTE: This equipment has been tested and found to comply with the limits
for a Class B digital device, pursuant to Part 15 of the FCC Rules. These
limits are designed to provide reasonable protection against harmful
interference in a residential installation. This equipment generates, uses
and can radiate radio frequency energy and, if not installed and used in
accordance with the instructions, may cause harmful interference to radio
communications.
However, there is no guarantee that interference will not occur in a
particular installation. If this equipment does cause harmful interference
to radio or television reception, which can be determined by turning the
equipment off and on, the user is encouraged to try to correct the
interference by one or more of the following measures:
• Reorient or relocate the receiving antenna.
• Increase the separation between the equipment and receiver.
• Connect the equipment into an outlet on a circuit different from that
to which the receiver is connected.
• Consult the dealer or an experienced radio/TV technician for help
The device must not be co-located or operating in conjunction with any
other antenna or transmitter.
This device complies with Part 15 of the FCC Rules. Operation is subject
to the following two conditions : (1) this device may not cause harmful
interference, and (2) this device must accept any interference received,
including interference that may cause undesired operation.
This device complies with FCC’s radiation exposure limits set forth for an
uncontrolled environment.
FCC Statement

17
This device complies with RSS247 of Industry Canada. Cet appareil se
conforme à RSS247 de Canada d’Industrie. This device complies with
Industry Canada license-exempt RSS standard(s). Operation is subject to
the following two conditions: (1) this device may not cause interference,
and (2) this device must accept any interference, including interference
that may cause undesired operation of the device. appareils radio exempts
de licence. Son fonctionnement est sujet aux deux conditions suivantes:
(1) le dispositif ne doit pas produire de brouillage prejudiciable, et (2
ce dispositif doit accepter tout brouillage recu, y compris un brouillage
susceptible de provoquer un fonctionnement indesirable.
The device must not be co-located or operating in conjunction with any
other antenna or transmitter.
Radiation Exposure Statement: The product comply with the Canada
portableRF exposure limit set forth for an uncontrolled environment and
are safe for intended operation as described in this manual.
Déclaration d’exposition aux radiations : Le produit est conforme aux
limites d’expossition pour les appareils portableRF pour les Etats-Unis et
le Canada établies pour un environnement non contrôlé.
This device complies with FCC and ICradiation exposure limits set forth for
an uncontrolled environment.
Cet appareil est conforme aux limites d’exposition aux rayonnements de la
FCC et de l’ICétablies pour un incontrôlé environnement.
IC Statement

This device meets the government’s requirements for exposure to radio
waves. This device is designed and manufactured not to exceed the
emission limits for exposure to radio frequency (RF) energy set by the
Federal Communications Commission of the U.S. Government.
The exposure standard for wireless devices employs a unit of measure-
ment known as the Specific Absorption Rate, or SAR. The SAR limit set
by the FCC is 1.6 W/kg. Tests for SAR are conducted using standard
operating positions accepted by the FCC with the device transmitting at its
highest certified power level in all tested frequency bands.
Although the SAR is determined at the highest certified power level, the
actual SAR level of the device while operating can be well below the
maximum value. This is because the device is designed to operate at
multiple power levels so as to use only the poser required to reach the
network.
In general, the closer you are to a wireless base station antenna, the lower
the power output. While there may be differences between the SAR levels
of various devices and at various positions, they all meet the
government requirement.
SAR

Join Paralenz World on Facebook
Designed & developed in
Denmark - tested all over
the world
The feedback and requests we recieve from divers and other Ocean lovers
all over the world is the basis of every improvements we make. Whether it
is deciding to add a camera feature, changing the packaging or
developing a new accessory, our product developement is guided by you.
We at Paralenz love the enthusiasm and commitment in the diving
community. This is why we have made the Paralenz World Facebook group
for you to share your dives, get tips and tricks, and connect with us and
other Paralenz users.
Recycling
This product bears the selective sorting symbol for
Waste electrical and electronics equipment (WEEE).
This means that this product must be handled
pursuant to European directive 2012/19/EU in order
to be recycled or dismantled to minimize its impact
on the environment. User has the choice to give
the product to a competent recycling organization
or to the retailer when he buys a new electrical or
electronic equipment.

The entire Quick Start Guide
can be found here:
support.paralenz.com
Other manuals for Vaquita
1
Table of contents
Other Paralenz Digital Camera manuals