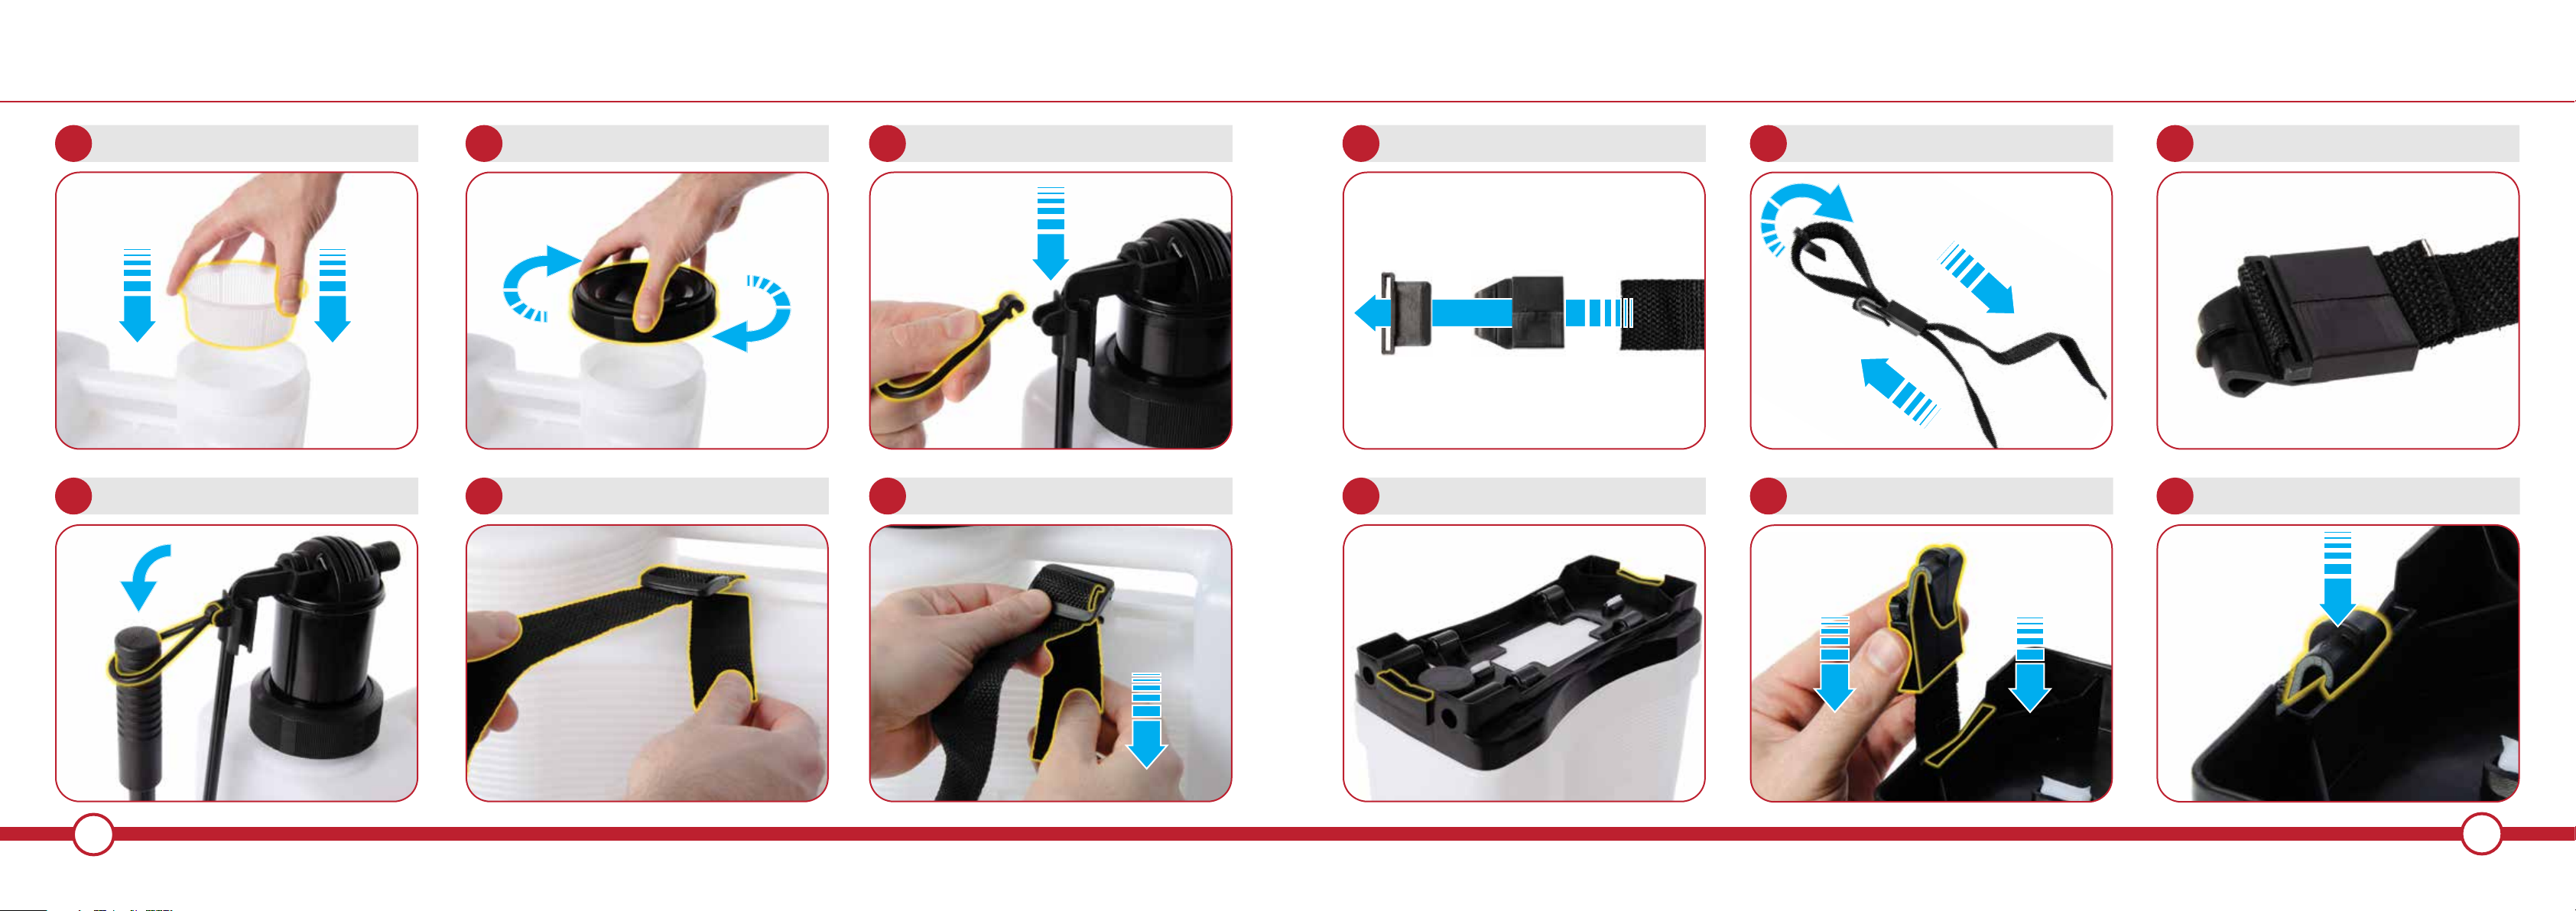
ParkerBrand PGPS-016 User manual

BACKPACK SPRAYER
OWNERS MANUAL
PGPS-016, 020

3
HEALTH & SAFETY INFORMATION ........................................................................... 4-5
TECHNICAL DESCRIPTION .............................................................................................. 6-7
PRODUCT DESCRIPTION .................................................................................................. 8
NOZZLES ........................................................................................................................................ 9
ASSEMBLY ..................................................................................................................................... 10-13
OPERATION & USE ................................................................................................................. 14-15
MAINTENANCE .......................................................................................................................... 16-17
TROUBLESHOOTING/TECHNICAL SPECIFICATION ................................... 18
GUARANTEE ................................................................................................................................ 19
2
INTRODUCTION CONTENTS
This manual has been produced by Parker Products Ltd. and should be kept with the
product and referenced for operation, maintenance and troubleshooting.
This manual contains an overall description of the product, together with all the
necessary information for using the product correctly and safely. It is highly
recommended that this manual is read prior to any operation or maintenance of this product.
The safety precautions and warnings are to ensure your safety and protect you from harm or
damage to the product.
All photographs and drawings in this manual are supplied by Parker Products Ltd. to help you
with the operation and maintenance of the product. The information contained in this manual
was accurate at the time of production, however Parker Products Ltd. may make modifications to
the product without notification.

4 5
WORK AREA
• ALWAYS use in a well ventilated area.
• ALWAYS use the appropriate safety equipment.
• NEVER use in the vicinity of other people, children or animals.
• READ these safety instructions before using the equipment.
• DO NOT operate the sprayer while persons
(especially children) or animals are in close vicinity.
The operator is responsible for any damage or harm
to third parties.
• When using plant protection equipment and while
working with plant protection chemicals of any kind,
always observe the safety precautions prescribed
by the chemical manufacturer. The operator is to
observe personal safety regulations (Safety
Clothing).
• Heavily dilute (approx. 1:10) surplus spray fluid left
over after treatment of field or garden, and spray the
solution over the area you have already treated.
• After every use and especially after the end of the
spraying season, clean and flush the sprayer, tank
as well as all parts which come in contact with
chemicals.
• Residues of plant protection chemicals may lead to
corrosion and damage of the sprayer.
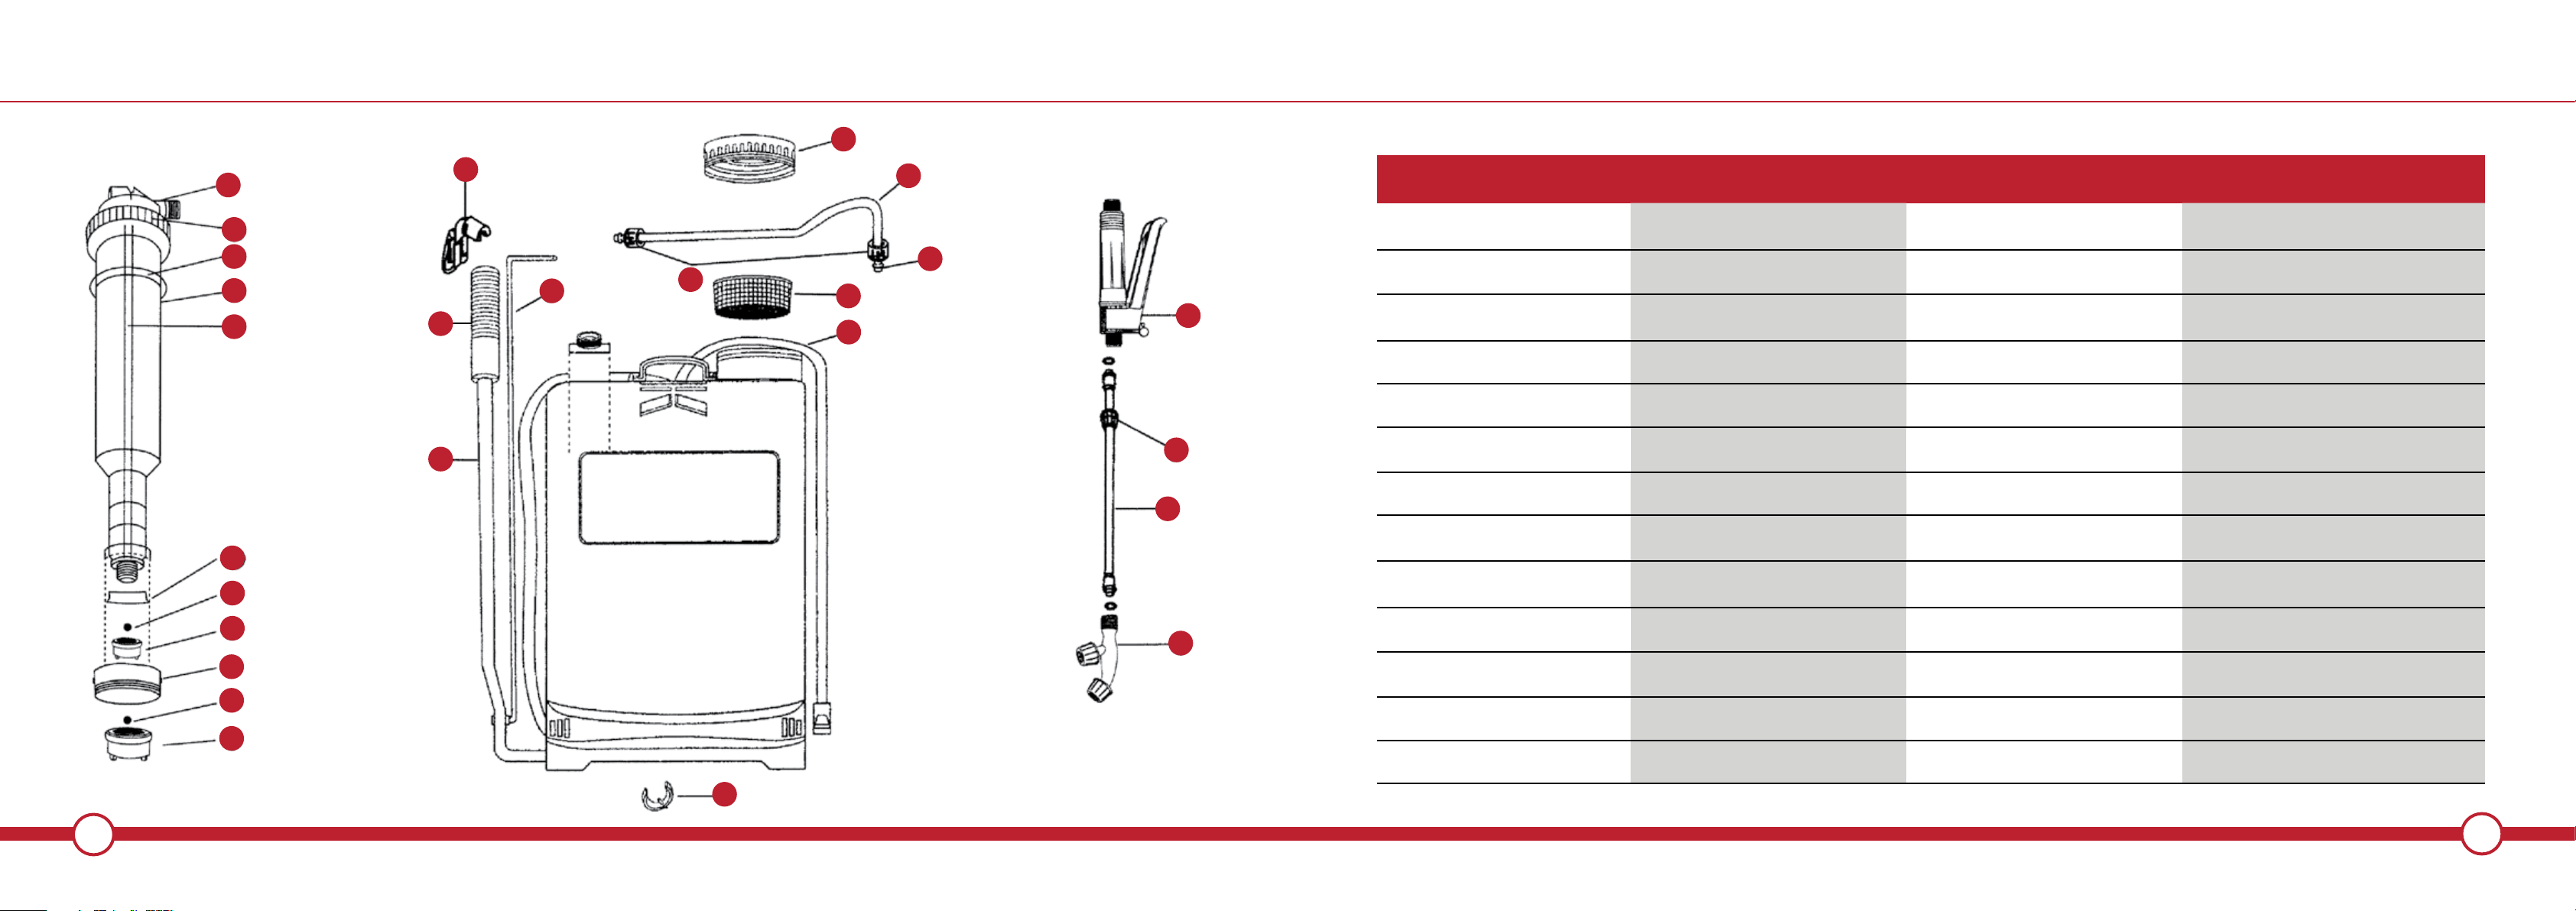
• Clean and service wear parts such as nozzles,
filters, gaskets and seals.
• NEVER clean nozzles with hard objects.
• ALWAYS use original parts. Damaged parts should be
replaced without delay.
• ALWAYS release all pressure in the tank or spray line
before commencing service or maintenance work
on the machine.
HEALTH & SAFETY INFORMATION
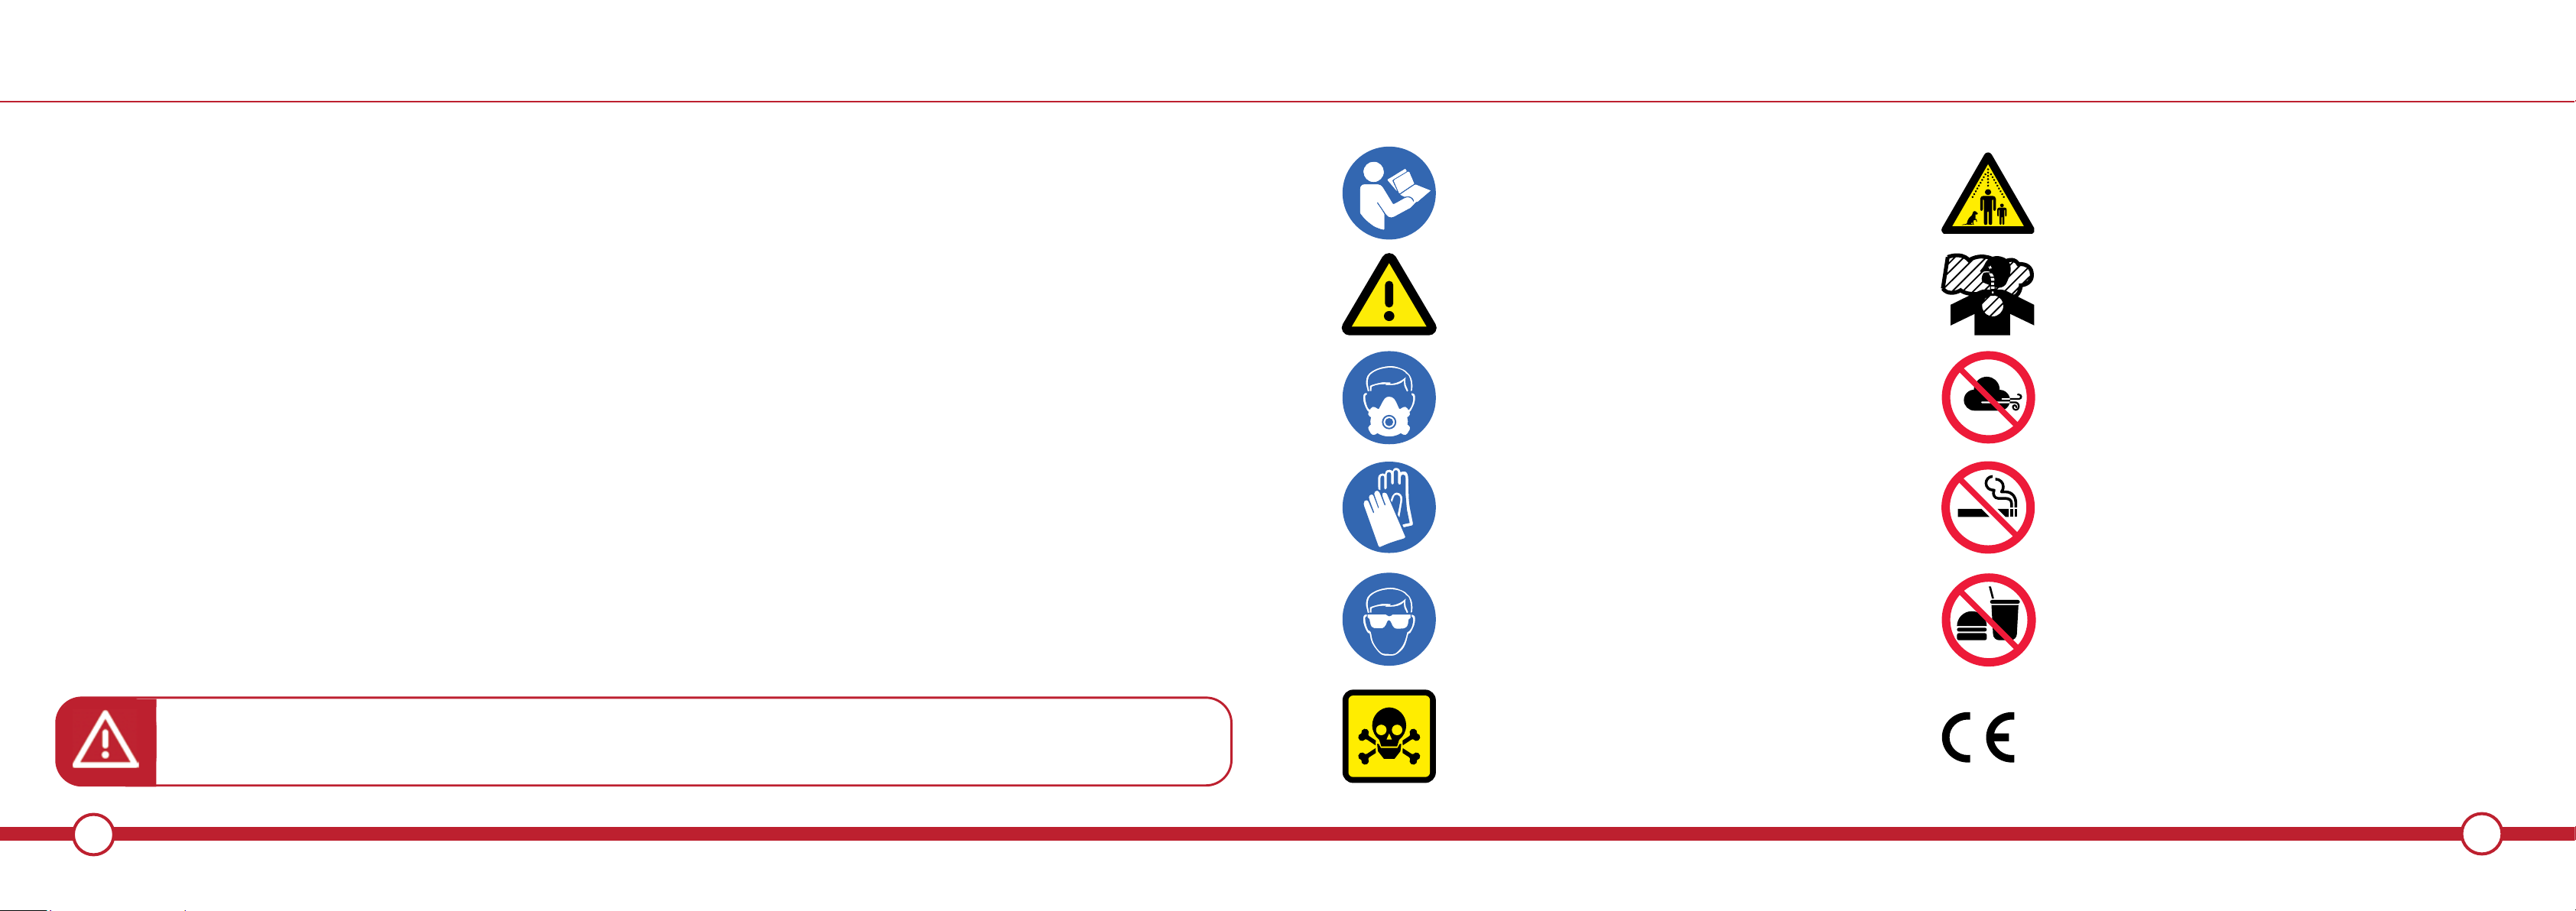
WARNING - To reduce the risk of injury,
user must read instruction manual.
This symbol, before a safety comment, indicates a
PRECAUTION, a WARNING or a DANGER. Ignoring
this warning can lead to an accident for yourself or for
others. To limit the risk of injury, fire, or electrocution
always apply the recommendations indicated.
WARNING! Chemicals contain toxic substances.
Do not use the sprayer in closed or poorly ventilated areas.
CONFORMS TO CURRENT SAFETY STANDARDS
WARNING! Do not use in windy conditions.
EYE PROTECTION Approved eye protection
should be worn at all times during operation.
GLOVES Gloves should be worn where appropriate.
RESPIRATOR A Breathing respirator should be worn
at all time whilst in use.
WARNING! Do not smoke whilst in use.
WARNING! Do not eat or drink whilst in use.
POISONOUS FUMES Do not use the sprayer in an
enclosed space.
KEEP BY STANDERS AWAY Including children and animals.
WARNING! To reduce the risk of injury, user must read instruction manual thoroughly.
WARNING! Always use the appropriate safety equipment in a well ventilated area.
WARNING! Never use in the vicinity of other people, children or animals.

6 7
TECHNICAL DESCRIPTION TECHNICAL DESCRIPTION
PGPS-016/020 PARTS INDEX
1SPRAY NOZZLE 14 AIR CHAMBER HOSE OUTLET
2SPRAY LANCE 15 AIR CHAMBER CAP
3SPRAY LANCE NUT 16 FELT SEALING WASHER
4TRIGGER VALVE 17 AIR CHAMBER
5STRAP 18 WATER OUTLET TUBE
6FI LTER 19 BOWL
7HOSE VALVE 20 SEALING BALL
8HOSE 21 WATER OUTLET VALVE
9HOSE NUT 22 PUMP
10 CONTAINER CAP 23 SEALING BALL
11 PUMP LEVER CLAMP 24 WATER INLET VALVE
12 CONNECTING ROD 25 PUMP LEVER RETAINING CLIP
13 PUMP LEVER 26 PUMP LEVER HANDLE
14
15
16
17
18
19
20
21
22
23
24
4
3
2
1
10
8
7
6
5
25
13
12
11
9
26

8 9
INTRODUCTION
The PGPS-016/020 knapsack manual sprayer is an economic, safe
and eicient sprayer newly developed by ParkerBrand. The
construction and design is unique to us and it is produced with
ergonomics in mind. This ensures comfort for the user and
responsive and even spraying. Ideal for applying pesticides,
fertilizers and chemicals for controlling weeds and pests in crops,
flowers and gardens. The Sprayer is also suitable for the sanitizing
of livestock and poultry houses, epidemic control and sanitation of
public places.
PRODUCT COMPONENTS
The machine is composed of:
(A) Liquid Container
(B) Pump & Air Chamber
(C) Spraying System (including rubber hose and components,
Trigger Valve, Lance and various nozzles)
(D) Operation arm & Components
(E) Backpack Harness
FEATURES
1. The spray tank is ergonomically designed to fit the contour of the
human back comfortably. It is user-friendly, easy to operate and
assemble and disassemble.
2. Abuilt-in pump and air chamber fixed to the container.
3. Various spray heads can be fitted for use in dierent tasks,
to achieve a wide range of spray coverage. This particular unit
comes with 3 varying spray nozzles.
4. The product is constructed in materials that are resistant to acid
alkalinity and corrosion. The machine is sealed hermetically
and is very durable.
NOZZLES
PRODUCT DESCRIPTION
Upon opening the box of your new PGPS-016/020 please check all the parts conform to the parts index. Then assemble the machine as required.
The sprayer is supplied with a selection of 3 nozzles which are suitable for the majority of spraying tasks.
1CONICAL NOZZLE 2DUAL CONICAL NOZZLE 34 HOLE ADJUSTABLE NOZZLE
Cone nozzles produce a solid cone shaped
spray pattern with a round impact area;
these nozzles ensure a precise uniformed
distribution of liquids throughout the entire
circular impact area.
The Dual Cone nozzles produce two solid
cone shaped spray patterns with a round
impact area; this nozzle covers a larger
area than the standard Cone Nozzle.
The four hole adjustable nozzle gives a finer
spray as opposed to a jet, fan or conical
spray nozzle but over a larger area than a
standard single hole nozzle.

10 11
ASSEMBLY
ASSEMBLY
1FIT PUMP LEVER 2FIT RETAINING CLIP 1ATTACH HANDLE TO PUMP LEVER
3
4ATTACH CONNECTING ROD 5SECURE CONNECTING ROD 6ATTACH HOSE TO AIR CHAMBER
7SECURE HOSE TO AIR CHAMBER TRIGGER VALVE
89ATTACH HOSE TO TRIGGER
10 SECURE HOSE TO TRIGGER 11 ATTACH LANCE TO TRIGGER 12 ATTACH NOZZLE TO LANCE

12 13
28
ASSEMBLY
ASSEMBLY
13 FIT TANK FILTER 14 FIT TANK LID 15 FIT PUMP LEVER CLAMP
16 SECURE HANDLE THREAD STRAP THROUGH LOOP
22 23 THREAD STRAP THROUGH BUCKLE
24 THREAD STRAP THROUGH HOOK 25 THREAD STRAP THROUGH CLIP 26 LOCATE CLIP INTO HOOK
STRAP HOOK LOCATING SLOTS 29 STRAP HOOK 30 LOCATE HOOK INTO SLOT

14 15
FILLING
When filling the spray tank always use the filter
provided with the machine and observe the total filling
process.
Avoid a direct connection between water hose and
spray tank.
Spray Chemical must not reach the water mains.
When filling ensure that no spray chemicals will
contaminate the environment or water mains network.
Avoid any overflow from the tank and any contamination of
public waterways, drainage and water channels.
SPRAYING
Prime the pump with a few up and down strokes of the
pump lever.
By squeezing the shut-o trigger valve,
liquid will be forced through the spray nozzle.
When the shut-o trigger valve is released, the spray will stop.
VOLUME OF SPRAY SOLUTIONS
• ALWAYS prepare spray solution according to the instructions
provided by the chemical manufacturer.
• ONLY prepare as much solution as is required for the job.
• ALWAYS ensure that no spray chemicals will contaminate the
environment or water mains network.
Medium Volume Guide for Plant Protection:
• Ground Plants 0.3 - 0.5 ltr. for 10 m2
• Espalier trees, pencil bushes 0.5 - 1.0 ltr. per plant
• Taller bush trees 2.0 ltr. per plant.
• Older, free standing trees 3.0 - 5.0 ltr. per tree
• Small Shrubs 1.0 - 1.5 ltr. for 10 m2
PREPARING SPRAY SOLUTION
Prepare solution outside, never within living areas,
stables or storage areas for foodstu.
Prepare solution with powder chemicals in a separate
container.
Mix well and then transfer to sprayer tank.
If necessary, the solution can be re-agitated in the tank
by stirring with the spray tube.
With liquid plant protection chemicals (if full tank is
required), fill sprayer tank 1/4 full with water, add pre-diluted
chemical and then add remaining water as required.
When applying organic spray solutions please filter the
solution as or before pouring into the spray tank.
OPERATION & USE
OPERATION & USE
WARNING! Always observe the Safety Notes provided by the chemical manufacturer.
WARNING! Use appropriate safety equipment when preparing chemicals.
WARNING! Ensure spray chemicals do not reach the water mains.
WARNING! Ensure that no spray chemicals will contaminate the environment or water mains network.
WARNING! Avoid any overflow from the tank and any contamination of public waterways, drainage and water channels.

16 17
CLEANING THE FILTER IN THE SPRAYER HANDLE
• Unscrew the union nut and pull the hose with filter out of the
sprayer handle.
• Rinse the filter under running water and reattach the sprayer
handle.
CLEANING THE PUMP
• lf the pump does not provide pressure after cleaning your
backpack sprayer you must also clean the pump.
• Push out the locking ring (using a screwdriver, for example) and
pull the joint rod out of the pump.
• Unscrew the union ring and pull out the pump.
• Inspect the pump O-ring and install a new O-ring if necessary.
• Pull out the inner part of the pump and the gasket.
• Clean all pump parts and gaskets with water (and detergent).
Reassemble the pump in the reserve order.
STORAGE
• Even though the tank is manufactured from UV stabilized
material we recommend that the unit is protected from direct
sunlight and stored in a dry room, away from children and
animals.
• Do not keep in areas subject to frost, always drain all the liquid
from tank, pressure tank and hoses.
• Please always use ParkerBrand replacement parts available from
parkerbrand.com.
GENERAL MAINTENANCE
• Regularly check the spray tank.
• Regularly check spray line and connectors.
• Clean all filters and check for any damage, To protect piston,
cylinder and piston collar from impurities in the spray solution,
an additional filter is fitted on the inlet side of the pressure tank.
This filter can be cleaned by vigorously shaking the tank when
flushing it.
• After disassembly of pump components or after replacing the
piston collar, use water resistant grease to lubricate the piston
and the collar.
• At least once a year clean pump thoroughly, re-grease or
lubricate all moving parts.
After every spraying operation, the Sprayer should be cleaned
to avoid corrosion of internal parts and blockages of the nozzles
caused by chemicals. In addition, proper cleaning can also avoid
the risk of contaminating other chemical agents being sprayed in
future operations that may bring harm to plants and crops.
CLEANING THE BACKPACK SPRAYER
• Press the trigger on the sprayer handle to release the pressure
remaining through the lance.
• Unscrew tank cap, if the outside of the cap is dirty, thoroughly
clean the area around the thread and thread O-ring
• Clean the inlet filter and tank cap in clean water.
• Empty the tank and fill with clean water (with detergent added to
the water if necessary).
• Spray the water out of the backpack sprayer until the tank is
empty (This cleans the nozzle and valves).
• Leave the backpack sprayer open and allow it to dry.
• Clean the outer surface of the Sprayer with a wet cloth.
• The tank strainer can be removed for cleaning.
MAINTENANCE
MAINTENANCE
WARNING! When assembling and servicing, carefully insert the pump piston without forcing, so as not to damage the gasket.
WARNING! Use appropriate safety equipment when carrying out any maintenance.

18 19
GUARANTEE
TROUBLESHOOTING/TECHNICAL SPECIFICATION
PROBLEM POSSIBLE CAUSE SOLUTION
LEAKING/NOT SPRAYING CORRECTLY Air chamber cap is damaged or not tightened suiciently. Replace Air chamber cap or tighten.
VIBRATING IN OPERATION/NOT SPRAYING The spray nozzle or filter is blocked. Clean filter/Nozzle. Lube moving parts.
LOW PRESSURE Worn bowl or sealing ball. Replace bowl/Sealing ball.
NO PRESSURE Sealing ball missing/worn. Replace sealing ball.
If this does not solve your problem, please contact the ParkerBrand customer service department 01507 499198.
PGPS-016/020 TECHNICAL SPECIFICATIONS
Type Knapsack
Operation Pressure (MPA) 0.2 - 0.3
Operation travel (mm) 60 - 80
Bowl Diameter (mm) 40
Net Weight (Kg) 2.8 - 3.0
Parker Products Ltd Guarantees the product against defective material or damage for period of 12
months from the date of purchase. A proof of purchase must be provided with the product.
In case of any fault please return the product to Parker Products Ltd or an authorised repair agent.
If any fault is caused by defective materials or quality of build, repair will be carried out free of charge.
However, this guarantee does not apply in the case of normal wear and tear, nor any damage caused
by misuse, accident or any repair from an unauthorised agency.
NOTE: In order for you to eect this guarantee you must provide proof of purchase in the form of a
dated receipt or invoice within a 12 month period of purchase. If repairs are outside of the warranty
period a quote will be made accordingly.
Parker Products Limited

PGPS-016, 020
Rev 1.0April 2021
This manual suits for next models
1
Table of contents