Parkwood KXer-Single User manual

Page 1
Using the Parkwood Instruments KXer-Single Paddle
Parkwood Instruments
2626 Parkwood Drive
Speedway, IN 46224
Makers of Innovative Keys,
Paddles, and Bugs
Web Address:
http://wb9lpu.googlepages.com
eMail Address:
Introduction -
The popularity of the Elecraft KX-1®QRP transceiver has led to the
design of keyer paddles designed specifically to fit this potent little rig. The
Parkwood KXer-Single is a non-iambic plug-in paddle that fits onto the KX-1
without any modification to the rig. It gives the portable operator a tiny paddle
with the feel of a full-sized one. For operation separate from the KX-1, or for
use with other rigs, there is an optional compact brass base. An iambic
version, the KXer, is also available.
Attachment to the KX-1 –
The parts of the clamping mechanism are shown below. They consist
KXer-Single Manual 4
11/4/2008

Page 2
of a short 6-32 threaded stud that screws into the KX-1 and is gripped by the
KXer paddle, a flat clamp with a “tooth” that engages the lower edge of the
front panel, and upper and lower 4-40 plastic-capped screws to fasten the
parts together. The assembly steps are shown below.
KXer-Single Manual 4
A. Shows the proper
orientation of the bottom
clamp. (Note – paddle is
upside-down.)
B. The clamp in position,
with the “tooth” in proper
orientation.
C. The bottom clamp
engaged with the KX-1
case.
D. With all screws
tightened, the paddle is
secured to the KX-1 case
and is ready for
ad
j
ustment.
To begin the attachment, thread the
6-32 stud into the hole on the front of
the KX-1. Make it “finger-tight” only,
to avoid damage. Using the short 4-
40 screw with the nylon washer,
loosely attach the clamp, with the
tooth up, to the bottom of the KXer.
Insert the phone plug into the KX-1
and allow the stud to pass into the
hole in the front of the KXer. Holding
the KXer to the front of the rig,
temporarily tighten the upper clamp
screw to hold the stud.
Position the tooth of the clamp to
engage the lower front of the case of
the rig. Tighten the lower clamp
screw. Test the attachment for
“wobble” and re-adjust the upper and
lower screws as necessary.
11/4/2008

Page 3
Adjustment of Paddle Travel –
The dot and dash travel of the lever is controlled by the contact screw
settings. The knurled lock nuts on these screws control the travel of each
direction separately. To adjust the travel, loosen the lock nuts and turn the
plastic-capped screws in or out to produce the desired travel limits. Secure
adjustment by “snugging” the locknuts against the contact support pillars.
There is a spring washer in this space to maintain the adjustment without
requiring too much tightening. Test the adjustment by keying the transceiver
(with a proper output load applied!).
The paddle tension is set at a comfortable value, but may be changed
to suit your individual touch. This adjustment is described in the Notes
section of this manual.
Assembling the Stand-Alone Base –
The accessory base permits operation with the KX-1 and other rigs via
a cable attachment. The assembly steps are shown below.
Part A. The long legs will thread into holes in the angled facets at the rear of
the base. Take care to align the leg perpendicular to the surface of the metal
so that the threads will engage properly. The short leg screws into the
beveled face at the front of the base. Part B. The assembled base has a
short screw near the front to align the clamp. Pass the long mounting screw
through the smooth hole, where it will serve to mount the paddle.
KXer-Single Manual 4
11/4/2008

Page 4
Part C. Remove the short screw holding the clamp to the bottom of the KXer,
and stow it in the threaded hole in the rear of the base. Place the clamp on
the base with the head of the short screw entering the round hole of the
clamp and pass the long screw through the base and then through elongated
hole in the clamp. Then thread the long screw into the lower hole (the clamp
mounting hole) and tighten it, being sure that the KXer is aligned with the long
axis of the base. Part D. The KXer mounted on its base. The phone plug is
available to make connection with the rig or a keyer via a stereo phone cable.
Unscrew the 6-32 stud from the KX-1 and store it in the hole in the front of the
KXer, using the upper clamp screw to retain it.
The KXer connected
via a stereo cable. The
weight of the key,
along with the plastic
feet, should be
sufficient to keep it in
one place during
keying. Note – the
paddle is wired so that
the tip of the phone
plug is for ‘dits’ and the
ring is for ‘dahs’; the
barrel is ground.
Packing it Away –
The KXer can be left attached to the base for storage. Unscrew the
legs from their operating position. Stow the long legs in the holes in the front
of the base. These holes are threaded at their bottoms so that the legs can
be retained. Avoid tightening the stored legs excessively. The front leg can
be left in place or threaded into the rear hole. Use a free 4-40 hole to hold
the short bottom clamp screw.
KXer-Single Manual 4
11/4/2008

Page 5
Notes –
Contact cleaning. If the key has been left out in the rain or on the
beach (what a shame!), the contacts may need cleaning. The contacts
(which are stainless steel-on-brass) can be cleaned by inserting a strip of
typing paper between the contacts, closing them, and pulling the paper out.
Repeat as necessary to restore normal operation.
Paddle tension. The paddle tension is fixed by the choice of the springs
that are attached to the paddle lever.
The key is supplied in the high-tension configuration, which provides an
operating force that provides a good trade-off between stability and speed.
Lower tension can be provided by changing the anchor points of the springs
on the lever. The views below show the mechanical arrangements in
question.
KXer-Single Manual 4
11/4/2008

Page 6
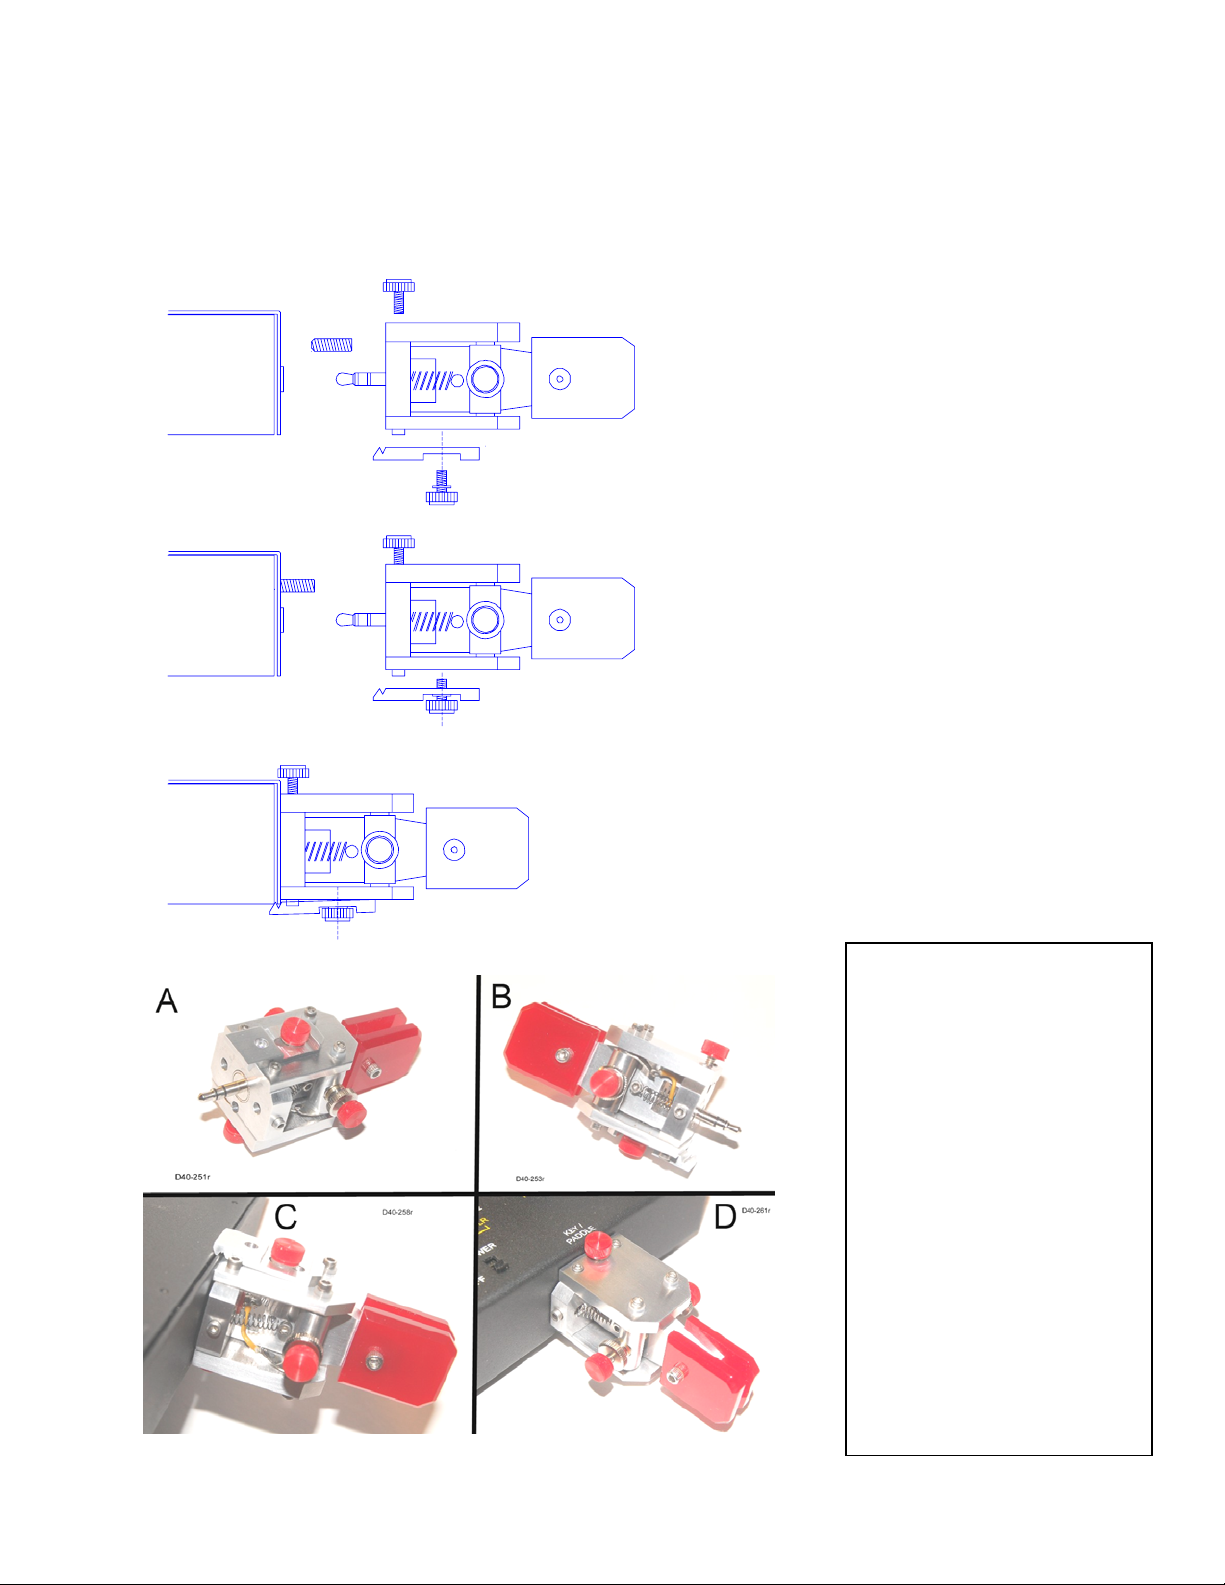
Note that there are two sets of holes in the lever. In the low-tension position,
the forward hole (farthest from the plastic paddles) on either side is used, with
3/8” screws providing the anchor points. In the high-tension position, the rear
set of holes is used, along with shorter anchor screws (to avoid interference
with the contact pillars). Please note that the paddle does NOT need to be
taken apart to change the tension – the photos above, showing the top plate
removed, are for illustration only.
To change to the lower-tension setting, use a 5/64” allen wrench
(supplied) and remove the screw in the lever that holds the end of the spring,
taking care not to let things fly apart. Replace this screw with the other (3/8”,
supplied), threading it through the loop on the end of the spring; turn it
halfway (1/8”) into the forward hole. Repeat this operation on the other side,
turning the screw in until it butts against the opposite screw – this will lock
both of them in place. Both springs must be changed, or the lever will stay to
one side.
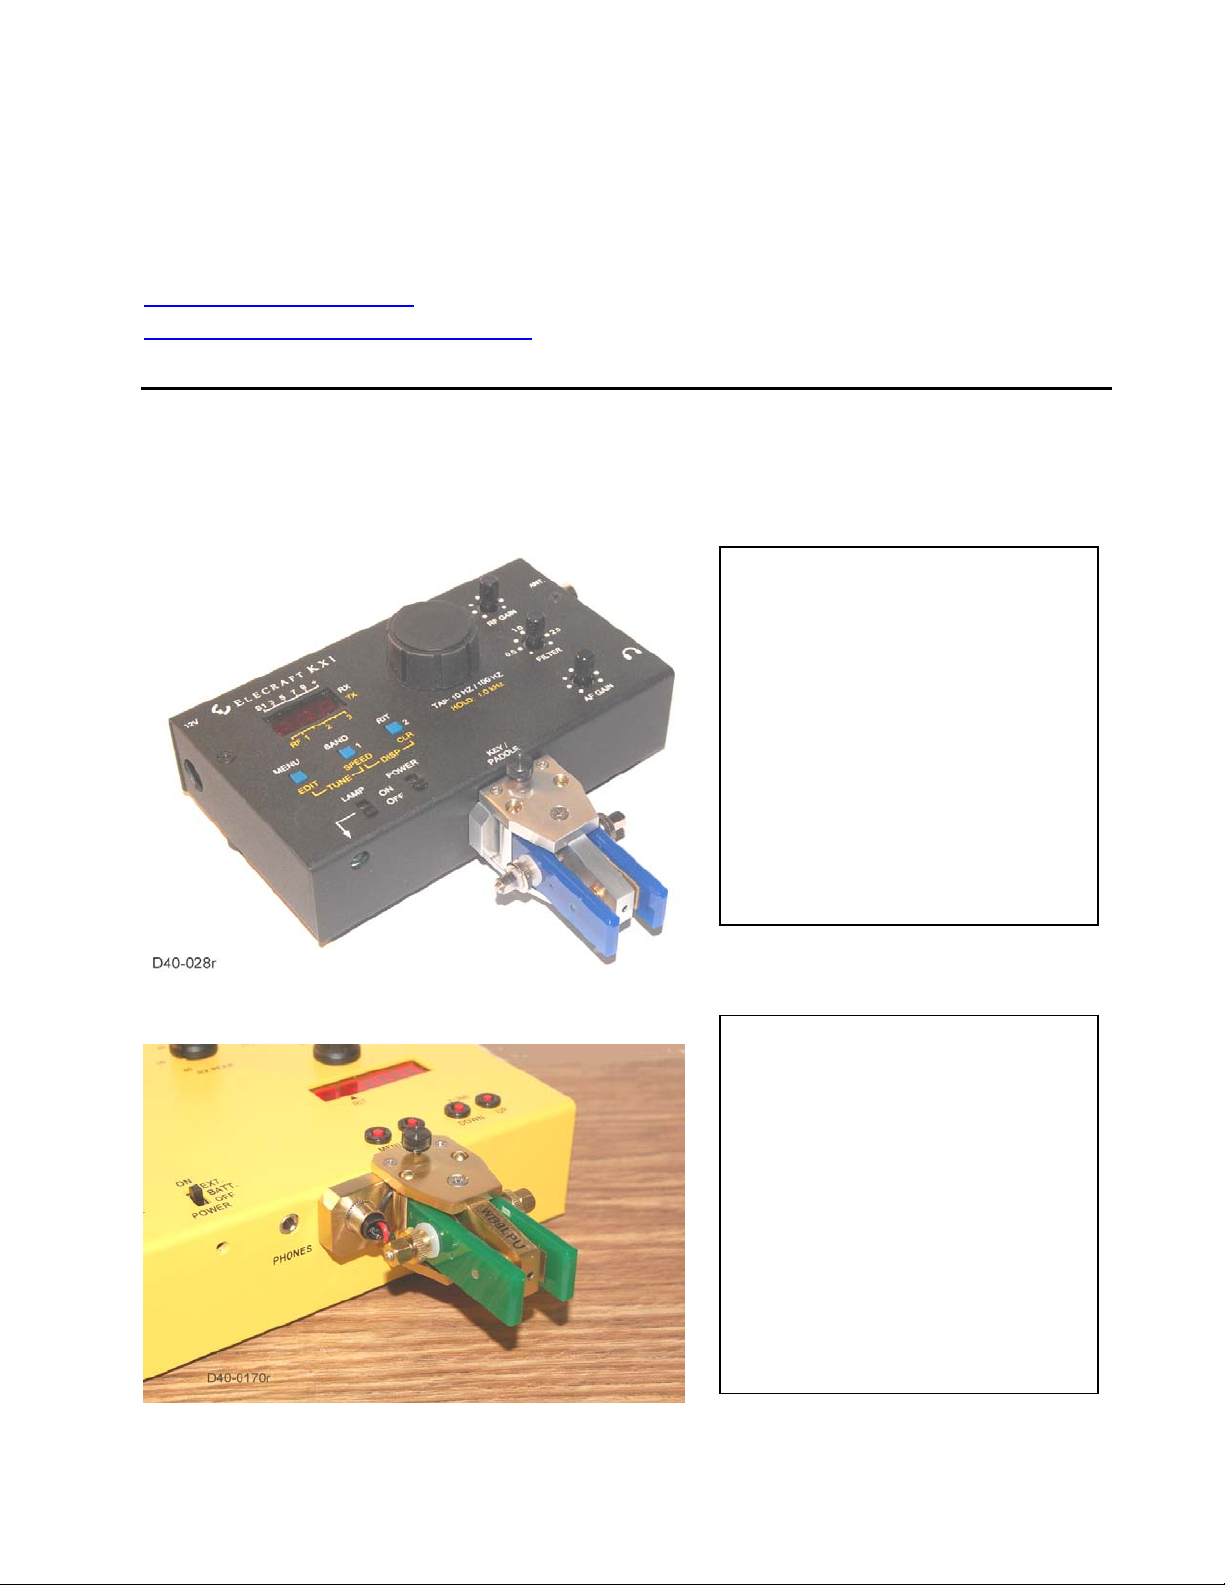
There are some trade-offs in the tension settings. With the higher
setting, the center position will be more positive and there will be less
overshoot. This translates to a higher keying speed – at high tension, the key
has been operated reliably at 25 wpm (my personal limit!). At the lower
setting, the keying touch is lighter, but you may have to increase the contact
spacing to compensate for possible overshoot of the center position.
Other Information –
The KXer’s are made individually and with great care. They are rugged
and well suited to outdoor operation. If there are any defects in materials and
workmanship within one year of purchase, the unit will be repaired at no cost.
For damage arising from accidents, etc., please contact me to find out what
can be done to make things right.
Because radio amateurs are an inventive group of people, clever ideas
can pop up anywhere. I welcome all suggestions for improvement of the
KXer-Single (or complaints about its operation). By the same token, as ideas
occur to me, they may be incorporated into future versions of the KXer and
related instruments.
Please enjoy your KXer, and I wish you many happy QRP QSO’s.
72/73 de Rich, WB9LPU
KXer-Single Manual 4
11/4/2008

Page 7
Richard A. Meiss, Ph.D., WB9LPU
Parkwood Instruments
2626 Parkwood Drive
Speedway, IN 46224
http://wb9lpu.googlepages.com
Other keys for QRP (and QRO) use from Parkwood Instruments.
The KXer-Iambic is a
small paddle that also fits
onto the Elecraft KX-1
transceiver. It uses brass
ball-pivots on the levers,
and paddle tension is
supplied by rare-earth
magnets. As with the KXer-
single, it is available with a
stand-alone base for use
with other rigs.
A similar iambic paddle is
also available for the
Hendricks (QRP-Kits) PFR-
3 transceiver. Its method of
attachment is different, but
the paddle action is the
same, and it also can be
used with a portable stand-
alone base. A non-iambic
version has also been
constructed.
KXer-Single Manual 4
11/4/2008
This manual suits for next models
1
Table of contents