INSTALLATION
Gas connection
Caution!
The cooker should only be connected to a
gas supply of the particular type that the
appliance is manufactured to function with.
Information about the type of gas that the
cooker has been adapted to by the factory
is shown on the rear panel.
This appliance is suitable for connection with rigid
pipe or flexible hose. The isolating manual shut-off
valve connection point must be accessible when
the appliance is installed.
Natural Gas: the supplied regulator must be fitted
to the appliance inlet connection. Gas pressure must
be adjusted to 1.0 kPa when approximately 50%
of the burnersare on high flame, the appliance test
point is located on the regulator.
LPG: the supplied test point adaptor must be fitted
to the appliance inlet connection. Gas pressure must
be adjusted to 2.75 kPa, the appliance test point
is located on the test point adaptor.
Suitable for connection with a flexible hose assembly.
The flexible hose assembly must be certified to
AS/NZS 1869 class B or D, be of appropriate internal
diameter for the total gasconsumption, be kept as
short as possible (not exceeding 1200mm), must
not be in contact with the floor or any hot or sharp
surfaces. The hose assembly must not be subject
.noitamrofedrogniknik,noisarba,niartsot
Gas leakage and operation of the appliance must
be tested by the installer before leaving. Check all
For minor adjustment and fault finding refer to
page 25 If this appliance cannot be adjusted to
perform correctly. Refer to the warranty card for
service & parts contact information. Where the
●Install the cooktop
Remove the crown caps and burner
crowns from the oven, and arrange
them on the cooktop as per the earlier
diagram entitled. Description of the
Caution!
The crown cap and burner cap must be tightly
installed to ensure that the gas flame burns
as intended. if the flame fails to ignite, it may
be because these components have been
To fit the rear panel/splashback,slide the
10
appliance! These components will fit
together neatly when correctly installed.
lugs on the bottom of the panel into the
with screws provided.
matching slots on rear of stove and fix
burner flames are blue in colour, stable and
with no appreciable yellow tipping, carbon
deposition, lifting, floating, lighting back or
completely ignite at both high low flame settings
objectionable odour. Test burners individually and
in combination.
data plate is obscured by cabinetry when the cooker
is in the installed position, place the supplied
duplicate data plate to a suitable adjacent surface
or within the instruction manual for future reference.
incorrectly installed.
11
INSTALLATION
On completion of the cooker installation,
the tightness of all connections should be
.paoshtiwretawgniylppa.g.e,dekcehc
Do not use fire to check tightness.
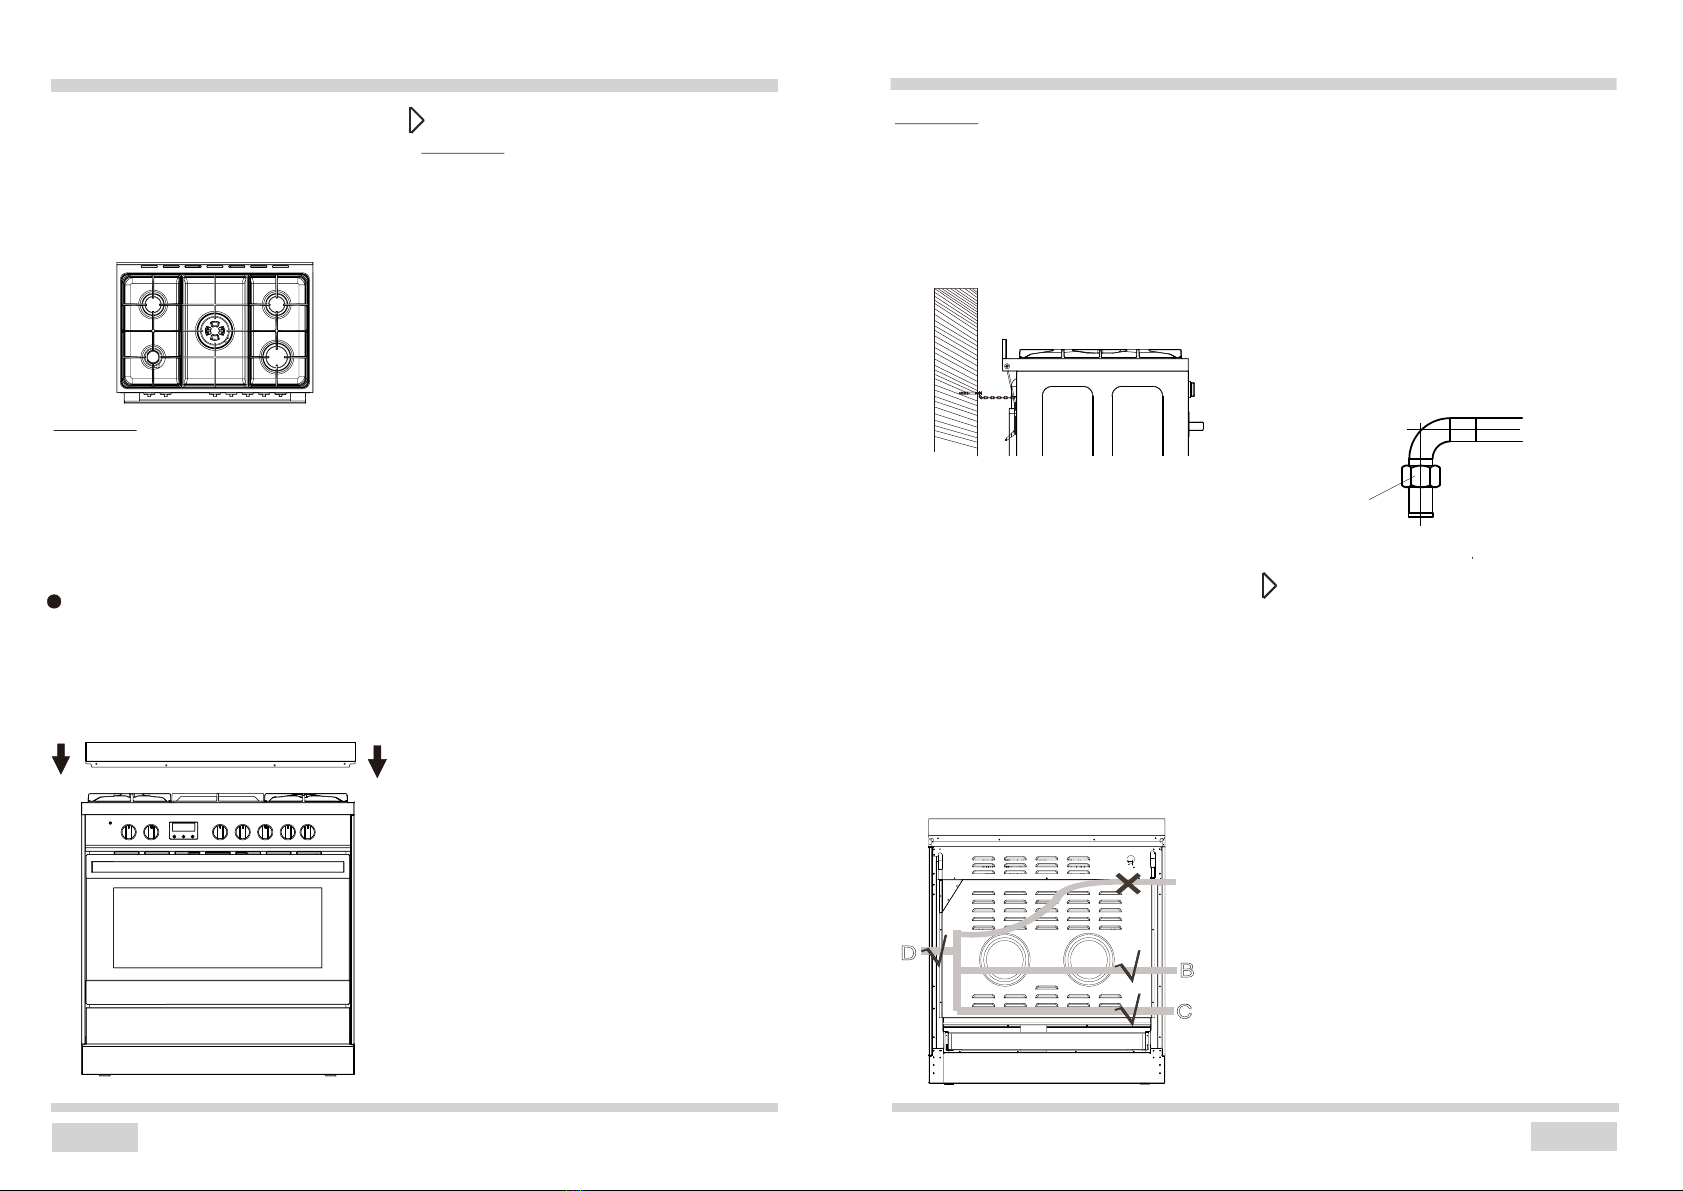
Anti tilt chains are located at the rear of the
llawehtotderucesebtsumdnaecnailppa
behind the appliance to prevent accidental
tipping/tilting. The chain length must be as
short as practicable to avoid appliance tilting
Flexible hose connection
Beginning of operation
In case the appliance is connected by
means of a flexible hose, the position A of
the hose is not permissible.
In case the connection hose is made of
metal, position A is permissible.
Start using the appliance in accordance
with the instructions for use.
i
Caution!
forward and also diagonal to avoid appliance
moving sideways.
Fix the cooker to the back wallwith
2 chains
Lit up all burners and check the stability of
the flame with high and low setting. Adjust
air intake if necessary. After that, take time
and explain the operation and control of
the appliance to the user and read with him
the instructions for use.
Liquefied gas connection
Adapting the cooker to
another type of gas
This operation may only be carried out by
an appropriately authorised fitter.
The cooker is supplied with natural gas
(NG 1.0kpa).If the cooker is to be supplied
with differs from the gas provided
for the
cooker by the manufacturer, burner nozzles
must be exchanged and the flame needs to
be adjusted.
In order to adapt the cooker to burn a
different type of gas, you should:
●Exchange nozzles (see tables below),
●
●
Adjust the “economical” flame.
If you need to replace the natural gas
(NG 1.0kpa) , please contact
the service center.
ccording to NG install instruction:
se M7sleeve to replace LPG nozzle to be NG nozzle
djust NG pressure,ignite to check burner minimum
ame status,adjusting damping hole till flame is stable.
A
B
C
D
9 Connection R 1/2
9