English 4
Installation
Note: We advise our customers to have the Parrot
ASTEROID fitted by a professional.
Safety instructions
Turn the ignition of f bef ore installing the Parrot
ASTEROID.
Install the Parrot ASTEROID only on v ehicles
with a 12 V battery .
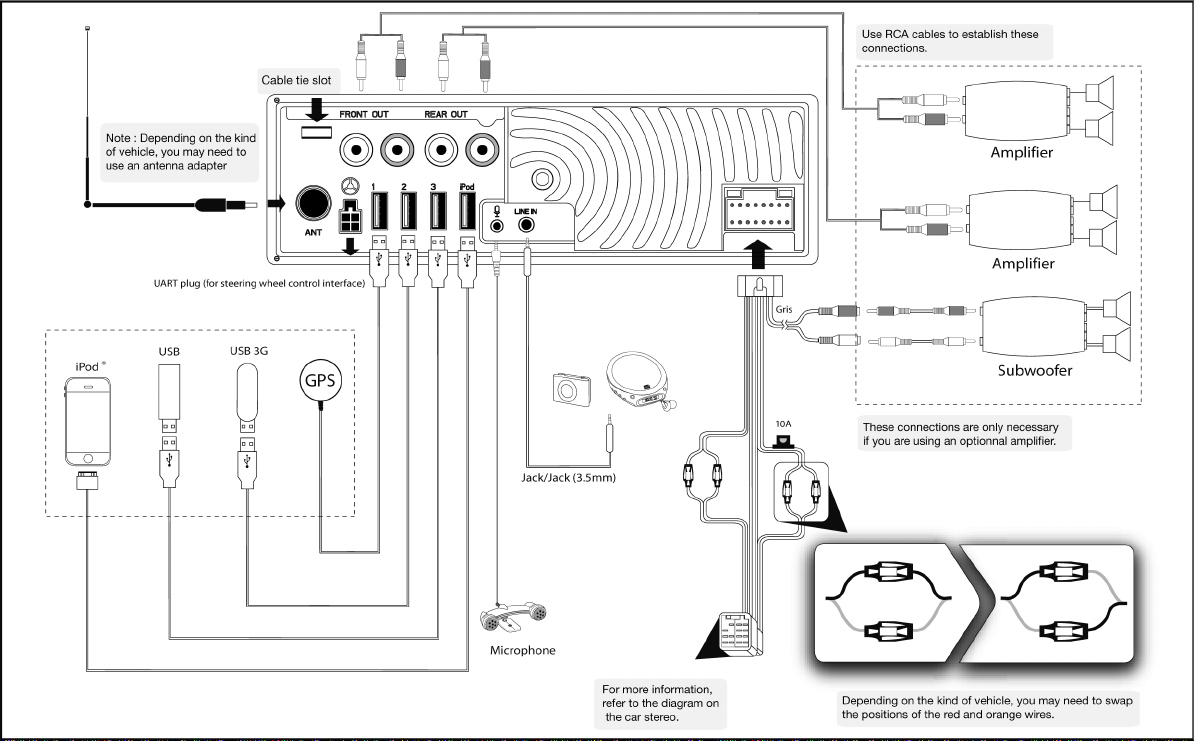
Place all cables away from hot places (heater
outlet) and mov ing parts (gear shif t, seat
rails...).
Before you begin
Remov e y our car stereo f rom y our v ehicle. Y ou
may need release key s to do so.
Try to connect the audio and power connectors
of the Parrot ASTEROID to the connectors of
y our v ehicle. If this connection is impossible,
y ou hav e to obtain an ISO adapter bef ore
installing the Parrot ASTEROID.
Compare the Parrot ASTEROID antenna
connector to the antenna connector of y our
v ehicle. If an adapter is necessary , contact y our
local car audio specialist. Make sure y ou also
supply power to y our antenna if it is amplif ied.
Power to the antenna can be supplied using the
Parrot ASTEROID ISO cable.
Installing the car stereo
1. Insert the cage and f ix it into the dashboard using
the bracket mounting tab.
2. Access the v ehicles car stereo wiring harness
f rom behind the dashboard.
3. Connect the audio and power connectors of the
Parrot ASTEROID to the ones of y our v ehicle.
4. Check the wiring (as explained in the Final check
section).
5. Install the audio cables (as explained in the
Installing the cables section).
6. Install the double microphone (as explained in the
Installing the microphone section)
7. Slide the car stereo into the Parrot ASTEROID
cage and install the faceplate.
Final check
Once all the connections are made, turn the
ignition on then off to perform the installation
test. The "Goodby e" message must be
display ed.
If it is not the case, it is necessary to swap the
positions of the red and y ellow wires. Indeed, the
red wire of the power cable must be connected to
the 12V ignition, the yellow wire to the permanent
12V and the black wire to the ground. This can be
done simply by rev ersing both f use holders
located on the Parrot wiring.
Installing the cables
Connect the iPod / iPhone®, USB, Jack cables
and the GPS dongle to the Parrot ASTEROID.
We recommend y ou connect all audio cables to
the Parrot ASTEROID even if y ou do not plan on
using them. Route the audio cables to a suitable
location in your v ehicle such as the glov e box or
arm rest compartment. It may be necessary to
drill a hole in y our dashboard to do so. Avoid
using USB extension cables.
Make sure y ou connect the iPod / iPhone cable
to its specific USB port. "iPod" is written abov e
it.
Use the double-sided tape to stick the GPS
dongle to y our dashboard. Once y ou hav e stuck
the dongle to the dashboard, wait f or
approximately 2 hours to make sure the
adhesive tape adheres well.
To guarantee an optimal reception quality we
recommend y ou do not connect y our internet
USB key 3G on the Parrot ASTEROID directly :
use the USB cable to install y our dev ice on the
dashboard (or any other open area).
Use the provided cable ties to make sure the
cables are well f ixed to the car stereo. Insert one
of the cable ties into the slot in the top left of
the back of the car stereo (ref er to the diagram).