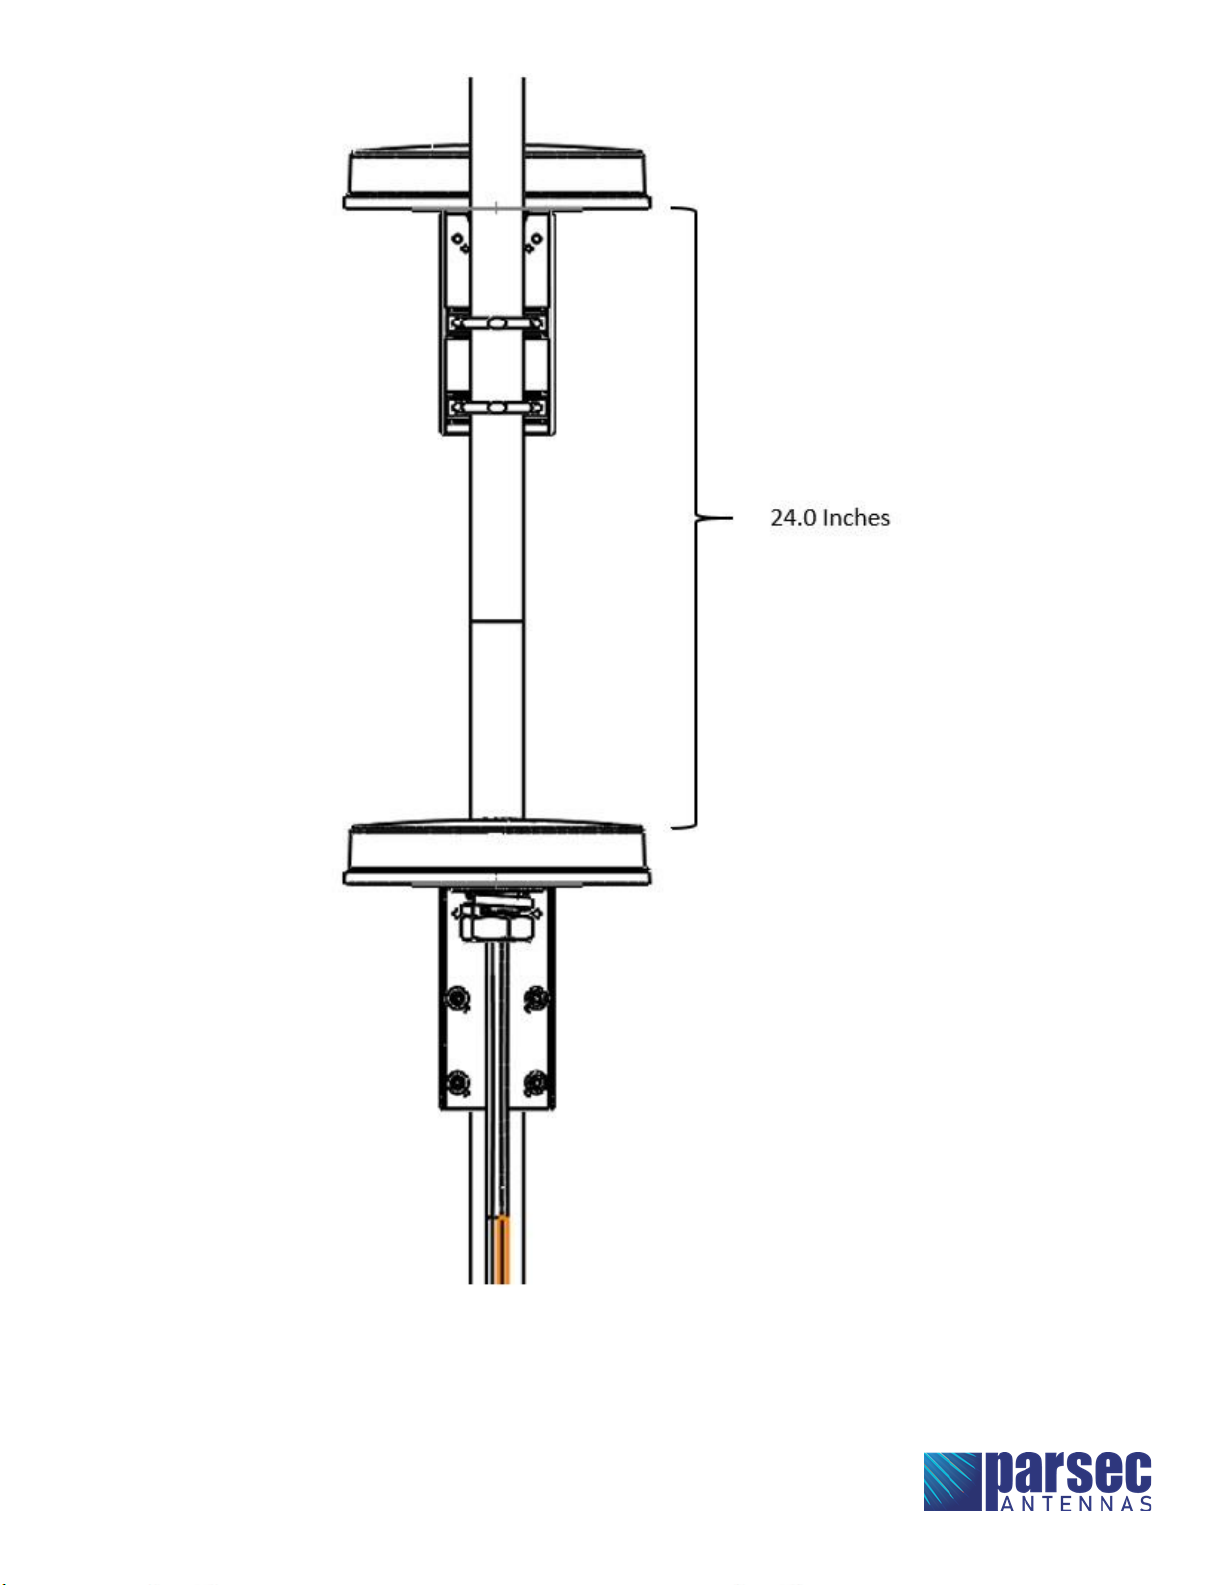
Parsec Antennas Husky Series User manual

Required Tools & Accessories
Hammer / Rubber Mallet
Drill and 0.1 IN Drill Bit
Phillips Screwdriver
1.5 IN Hole Saw
SMA Wrench
Mounting Instructions
Antenna Mounting Location Directions
When selecting the location of an antenna, consider the following factors:
1. Conductive Panel –The ground plane is a part of the antenna. If
no ground plane/metal surface is used, the antenna may
radiate in undesirable locations and may also result in bad
return loss and poor efficiency.
Parsec suggests using a 20” x 20” ground plane for all our mobile
antennas (PTA0587) for best performance. If this much space is
not available, use a ground plane/metal surface large enough such that it is at least 5 inches from
each side of the antenna.
2. Antenna Directionality –the direction of the signal is limited
by the directionality of the antenna.
Omni-directional antennas provide a 360-degree horizontal
radiation pattern, allowing for coverage in all directions
horizontally with varying degrees of vertical coverage.
When selecting the location of an omni-directional antenna,
ensure that the antenna can be mounted in the proper
orientation relative to the horizontal plane.
3. Signal Path Loss –signal strength is greatly affected by the
materials that the signal passes through.
Severe signal loss can be caused by concrete and brick walls. Metals can absorb and/or reflect the
signal, affecting the signal path. For best antenna performance, select an antenna location with
minimal obstructions between the antenna and the signal source(s).
4. Reflection & Diffraction –the signal will bounce off certain materials and bend around obstacles.
For best antenna performance, the antenna should be installed in a location where the signal path
is not interfered with by materials like Low E glass, Metal, Tinted glass, etc., that reflect RF Energy.
HUSKY
Installation Instructions

5. Interference –electrical devices and appliances interfere with
the antenna’s signal.
Electrical devices and appliances, such as refrigerators,
microwaves, AC units, and cameras, can cause
electromagnetic interference with the antenna signal.
Select a location that is as far as possible from electrical
devices and appliances and minimizes the amount of such
devices between the antenna and the signal source(s). For
best antenna performance, install antennas as far away as
possible from each other and other devices. In general,
separate antennas by at least 24 inches (61 cm).
6. Cable Loss –signal strength is lost as RF waves travel through
cables.
The longer the cable, the more electrical energy is lost as heat and the higher the signal loss.
Therefore, it is best to select a location for the antenna that allows the cables to be as short as
possible and still reach the router.
The size of the cable also affects cable loss; coaxial cables with higher center conductor diameters
have less cable loss compared to thinner coaxial cables.
It is critical to avoid bending coaxial cables sharply to avoid shearing of the Aluminum foil shield,
which can result in a significant or complete loss of antenna functionality.
Coaxial cables should not be bent sharply; they have a minimum bend radius which varies
depending on the size of cable.
Hardware Accessories
Accessory
Part Number
Pole mount bracket Husky cut out (makes antenna a fixed application)
PTA0149H
Pole Mount Bracket, Marine Grade, White
PTA0149H-MG-W
Pole Mount B Bracket, Marine Grade, Black
PTA0149H-MG-B
Pole Mount Bracket, Horizontal Truss Mounting
PTA0149H-F
Pole Mount Bracket, Heavy Duty, High Vibration
PTA0721
Wall Mount Bracket
PTA0149H-W
Roof Mount Kit- Gasket, Nut, Washer
PTA0610
Replacement Magnets for Magnetic Boot
PTA0212-2
Replacement Rooftop Gasket
PTA0187
3M Double Sided Adhesive Gasket
PTA0187
Hardware Kit for 1.5” Shaft- Nut & Washer
PTA0761
1.5” Star Washer
PTA0257
Ground plane with adhesive back, 20in x 20in, can be cut to size
PTA0587
Lightning Arrester- SMA (F) to SMA (F)
PTA0476
Lightning Arrester- N(F) to N(M)
PTA0736
SMA Wrench, Key Chain
PRA0194
Service: Cable Sleeving (priced per ft)
Cable Sleeving
*Lightning Arrestors are recommended for outdoor installations

Roof Mounting Instructions
Preparing the Hole
1. After selecting the location to mount the Antenna,
mask the mounting location to avoid paint
damage. Mark the hole center with ink or scribed
cross hairs.
2. Use a center punch to make a dimple on the
marked location to avoid drill bits from walking
across the sheet metal. Use a Twist drill of
diameter about 0.1” and drill a pilot hole. Using a
1.5” diameter sheet metal hole saw, drill the hole.
3. The hole saw will cut the required diameter hole with less risk of stretching and distorting the vehicle
surface.
4. Clean up any metal shavings around the mounting location.
Mounting the Antenna
1. Feed the coaxial cables from the antenna
through the hole from the outside surface to the
inside surface and thread the entire length of
the cable through the hole.
2. Clean debris off the vehicle surface and then
mark the desired antenna orientation by
placing the antenna flat on the vehicle surface.
3. Lift the antenna and remove the protective
backing from the underside of the antenna and
place the antenna back in the desired position. Apply downward pressure on the antenna to stick it
to the panel. This step is optional if you plan to mount the antenna magnetically.
4. To avoid the gap between the antenna and panel, it is
recommended to use neutral cure silicon sealant around the base of
the mounting boot to fully compress the antenna to the mounting
panel.
5. A split flat washer and a split hex nut are provided in the kit for easy
installation.
(Star washer is optional and not supplied. Part Number: PTA0251)
6. On the inside of the vehicle, thread the flat washer over the cable,
followed by star washer (if applicable) and then hex nut.
7. Slide the washers and nut to the threaded flange of the antenna and tighten the hex nut until
antenna compresses flat with the surface of the
vehicle.

Magnetic Mount Instructions
1. Select a mounting location. The magnetic mount can be placed on ferromagnetic surfaces, such as
iron, steel, and nickel. The antenna should be as far away as possible (at least 18”) from other roof-
mounted devices such as light bars and other antennas to avoid de-tuning or interference issues.
2. Place the antenna on the mounting surface. Check that all magnetic feet are touching the surface.
Adjust the height of the magnetic feet by rotating the feet. If the surface is curved, adjust the
magnets heights using washer.
Magnetic Mount removal & change to Roof Mount Instructions
1. Using a Phillips screwdriver, remove the Qty. 6: PTA0164 Screws securing the Magnetic Mount to the
antenna.
2. Remove the magnetic mount and thread the cables out of the mount.
3. Thread the Roof Mount Gasket through the entire length of the cables and remove the protective
backing from the underside of the gasket.
4. Install the gasket to the antenna and follow the Roof Mounting Instructions for mounting the
antenna.

Pole Mounting Instructions
Installing the Pole Mount Bracket
Note: Make sure there are no metal obstructions above the antenna. Mount the antenna at the top of the
pole for best performance.
1. Select a mounting location on a pole with a diameter between 1.5” and 2.5”. Ensure that the pole is
vertical, stable, and rigid.
2. Install the pole mount bracket onto the pole with the provided hardware. Around the pole, insert the
V-bolt through the clamp saddle then through the pole mount bracket. Fasten the V-bolts with flat
washers, lock washers, and nuts. Ensure that at least 1” of the pole extends above the upper clamp
saddle.
3. Tighten the 4 nuts until finger tight, making sure equal lengths of thread extend past the nuts.
Mounting the Antenna on the Pole Mount Bracket
1. Feed the coaxial cables from the antenna through the hole in the bracket. Thread the entire length
of cable through the hole.
2. Remove the backing from the adhesive pad on the underside of the antenna and place the antenna
on the bracket. Apply downward pressure on the antenna to ensure strong adhesion.
3. Fasten the antenna on to the bracket by threading the washers and nut through the cable. Fasten
the hex nut such that the lock washer compresses flat with the washer surface.

Routing the Cables
1. Route the cables from the antenna to the router, maintaining
a minimum bend radius of 1.5.” Avoid sharp bends. Run the
cables adjacent to existing wiring.
2. Clamp the cables to the mast at about 3 inches away from
the bracket. If long cables are used, secure the cable to the
mast using zip ties, Velcro, or tape.
3. Waterproof the RF connectors using electrical tape or heat
shrink tube, if required.
Cable Connection Instructions
1. Use a canned air and/ or isopropyl alcohol to clean all the connectors to ensure that there Is no
dust in the terminals.
2. Connect the antenna cables to the router. Use the table below for reference; different routers may
have different terminal names. Use a 5/16” wrench to carefully tighten the connectors on the cables
to the router terminals. It is recommended to use a 5 in.-lb. torque wrench to prevent
overtightening.
Note: Do not apply more than 5 in.-lbs. of torque to SMA Connectors.
Note: Do not apply more than 9.7 in.-lbs. of torque to N Connectors.
S. No
Cable From Antenna
Connector on Router
1
CELL 1
MAIN0
2
CELL 2
AUX0
3
CELL 3
GPS
4
CELL 4
AUX1
5
GPS
GPS
6
WIFI 1
2.4/5GHz, LEFT GOLD
7
WIFI 2
2.4/5GHz, RIGHT GOLD
8
WIFI 3
2.4/5GHz, LEFT GOLD
9
WIFI 4
2.4/5GHz, RIGHT GOLD
10
WIFI 5
2.4/5GHz, LEFT SILVER
11
WIFI 6
2.4/5GHz, RIGHT SILVER
For best MIMO performance use the following in pairs:
CELL 1 & CELL 2
CELL 3 & CELL 4
WIFI 1 & WIFI 2
WIFI 3 & WIFI 4
WIFI 5 & WIFI 6

Installing Multiple Antennas
Multiple Antenna Pole Mounting
Make sure the two antennas are mounted 18-24in apart on the pole. Properly secure the cables to the mast.
Cable Connections for Multiple Antenna
.
S. No
Cable From Antenna
Connector on Router
1
CELL 1
MAIN0
2
CELL 2
AUX0
3
CELL 3
MAIN1
4
CELL 4
AUX1
5
GPS
GPS
6
WIFI 1
2.4/5GHz, LEFT GOLD
7
WIFI 2
2.4/5GHz, RIGHT
GOLD
8
WIFI 3
2.4/5GHz, LEFT GOLD
9
WIFI 4
2.4/5GHz, RIGHT
GOLD
10
WIFI 5
2.4/5GHz, LEFT SILVER
11
WIFI 6
2.4/5GHz, RIGHT
SILVER
S. No
Cable From Antenna
Connector on Router
12
CELL 1
MAIN0
13
CELL 2
AUX0
14
CELL 3
MAIN1
15
CELL 4
AUX1
16
GPS
GPS
17
WIFI 1
2.4/5GHz, LEFT GOLD
18
WIFI 2
2.4/5GHz, RIGHT
GOLD
19
WIFI 3
2.4/5GHz, LEFT GOLD
20
WIFI 4
2.4/5GHz, RIGHT
GOLD
21
WIFI 5
2.4/5GHz, LEFT SILVER
22
WIFI 6
2.4/5GHz, RIGHT
SILVER

Multiple Husky Antennas Mounted

Commission and Testing
Check each coaxial cable connector and confirm that it cannot be easily loosened. Visually inspect the
coaxial cables to ensure that they are not sharply bent and are sufficiently secured and supported
between the antenna and the router.
Use a cellular device’s built-in diagnostics to confirm the RSSI is higher than -75dB. Confirm the cellular
connection supports communications at required data rates.
Connect the GPS/GNNS cable to the GPS/GNNS receiver and check for satellite acquisition.
Connect the cellular/LTE & WLAN/Wi-Fi cables to the router and stow any unused coaxial cables to avoid
damage.
CAUTION
To comply with FCC RF Exposure requirements in section 1.1310 of the FCC Rules,
antennas used with this device must be installed to provide a separation distance of at
least 20 cm from all persons to satisfy RF exposure compliance.
DO NOT
•Operate the transmitter when someone is within 20 cm of the antenna
•Install the antenna or mast assembly on a windy day
•Install the mast close to power lines as it can cause serious injuries or death
WARNING
Watch out for overhead power lines. Check the distance to power lines before beginning
installation.
WARNING
This document gives detailed instructions to install an antenna to the best of our
knowledge. This document is for general information only. It cannot be used for a
warranty. Parsec Technologies Inc. will not accept any liability for any damage caused
by an antenna due to unknown variables.
Last Revised: 08.07.2023
Table of contents
Other Parsec Antennas Antenna manuals

Parsec Antennas
Parsec Antennas Chinook User manual

Parsec Antennas
Parsec Antennas AKITA LITE User manual

Parsec Antennas
Parsec Antennas BERNESE MOUNTAIN DOG G2 User manual

Parsec Antennas
Parsec Antennas AUSTRALIAN SHEPHERD User manual

Parsec Antennas
Parsec Antennas Pointer User manual

Parsec Antennas
Parsec Antennas BLOODHOUND R19D User manual

Parsec Antennas
Parsec Antennas Falcon Series User manual

Parsec Antennas
Parsec Antennas K9 User manual