patura EBL20-12027 User manual

Montageanleitung / Instructions de montage
Installation Instructions / Montagehandleiding
Indicaciones de montaje
Ref. 150201
Automatikladegerät 2,7 A
Chargeur automatique 2,7 A / Automatic Battery Charger 2.7 A / Automatische oplader 2,7 A /
Cargador de baterías automático 2.7 A
1x Automatikladegerät
Lieferumfang:
Bezeichnung
1x Automatikladegerät
1
Sehr geehrter Kunde,
vielen Dank für Ihr entgegengebrachtes Vertrauen. Sie haben einen der leistungsstärksten, kompaktesten und zuver-
lässigsten Automatik–Lader in dieser Klasse erworben.
Bitte lesen Sie diese Bedienungsanleitung sorgfältig durch, bevor Sie dieses Gerät in Betrieb nehmen.
ACHTUNG!!! Wichtige Sicherheitshinweise!
- Dieses Gerät gehört nicht in Kinderhände! Vorsicht Lebensgefahr!
- Der Betrieb unter widrigen Umgebungsbedingungen ist unter allen Umständen zu vermeiden!
Widrige Umgebungsbedingungen sind:
Umgebungstemperaturen über 50°C, brennbare Gase, Lösungsmittel, Dämpfe, Staub, Luftfeuchtigkeit über
80 % rel., sowie Nässe.
- Das Gerät darf nur in trockenen und geschlossenen Räumen betrieben werden.
- Wenn anzunehmen ist, dass ein gefahrloser Betrieb nicht mehr möglich ist, so ist das Gerät unverzüglich außer
Betrieb zu setzen und gegen unbeabsichtigten Betrieb zu sichern.
Ein gefahrloser Betrieb ist nicht mehr anzunehmen:
wenn das Gerät keine Funktion mehr zeigt,
sichtbare Beschädigungen aufweist,
bei Transportbeschädigungen,
nach Lagerung unter ungünstigen Verhältnissen.
- Service und Reparatur
Servicearbeiten und Reparaturen dürfen nur von autorisiertem Fachpersonal durchgeführt werden.
- Der bestimmungsgemäße Einsatz des Gerätes umfasst ausschließlich das Laden von 12 V Bleiakkus.
1
00 49 93 72
94 74 – 0
DAT CH

Montageanleitung / Instructions de montage
Installation Instructions / Montagehandleiding
Indicaciones de montaje
Funktionsbeschreibung
Im Gegensatz zu Ladegeräten mit W-Kennlinie, erfolgt bei diesem Gerät die Ladung mit Konstantstrom. Dadurch
erfolgt die Ladung erheblich schneller, da Batterien bis zum Ladeende mit dem max. Strom geladen werden.
Außerdem werden die Akkus zu 100% geladen.
Kontrolliertes Gasen ist dabei erwünscht, da es das Bilden von Sulfatschichten erheblich beeinflusst und somit das
Akkuleben verlängert.
Ladeprinzip:
Bis zu einer Spannung von 14,70 V wird der Akku mit dem max. Strom geladen. Danach wechselt das Gerät in
den „Timer Modus“ und die Batterie wird 2 Std. mit stetig sinkendem Strom geladen. Nach ca. 2 Std. wechselt
das Gerät automatisch in den „Stand–By–Modus“ und die Erhaltungsladung mit 13,80 V wird eingeleitet. Dies
verdeutlicht die nachfolgende Graphik.
Das Gerät ist auch zum Laden von KfZ- und Blei–Gel–Batterien geeignet.
Selbstverständlich ist das Gerät kurzschluss- und verpolungssicher.
LED Anzeigen
rot: Sobald ein Akku angeschlossen wird, lädt das Gerät mit maximalem Strom
gelb: Timer–Modus: Die Akkuspannung hat 14,70 V erreicht. Es wird ca. 2 Std. mit stetig
sinkendem Ladestrom geladen – siehe Diagramm
grün: Der Ladevorgang ist abgeschlossen und das Gerät befindet sich im Modus „Erhaltungsladung“
13,80 V / Akku voll
Achtung: Der „gelbe“ Timer-Modus kann durch Ausschalten des Netzschalters (ca. 15 Sekunden), und wieder
Einschalten des Netzschalters, erneut gestartet werden. Es erfolgt eine erneute Nachladezeit von ca. 2 Std. mit
14,7 Volt. (Pflegeladung nach langer Standzeit, oder vorangegangener kurzer Tiefentladung der Batterie.)
Betriebshinweise
Zum Ladeende (Akku voll) leuchtet die grüne LED.
Es können Akkus verschiedener Kapazitäten geladen werden, bei größeren Akkus verlängert sich die Ladezeit, bei
kleineren wird diese verkürzt.
Zum Laden selbst spielt es keine Rolle, ob der Akku nur teilweise oder vollständig entladen ist.
Der Akku kann auch dauernd am Ladegerät angeschlossen bleiben, die Umgebungstemperatur sollte dabei ca.
20 – 25°C nicht über- und unterschreiten.
Wird der Akku versehentlich falsch gepolt an das Ladegerät angeschlossen, so wird der Ladestrom abgeschaltet.
Constant Current Mode
Konstantstromladung Timer
Mode
Standby Mode
Erhaltungsladung
Time
Zeit
Charge Current/Ladestrom
Battery Voltage
Batterie-Ladespannung
Spannung (V)
Strom (A)
Strom (A)
7.5/15
7.0/14
6.5/13
6.0/12
5.5/11
1 h
Ladediagramm: Spannungsangabe bei 12 Volt Akkus

Montageanleitung / Instructions de montage
Installation Instructions / Montagehandleiding
Indicaciones de montaje
Bedienung des Gerätes
1. Anschluss an den Akku: Schließen Sie die rote Anschlussklemme des Ladegerätes am Pluspol (+) des Akkus
und die schwarze Anschlussklemme am Minuspol (–) des Akkus an.
2. Anschluss Netzkabel : Verbinden Sie das Ladegerät mit dem 230 V Ac Netz (Steckdose)
Das Gerät ist kurzzeitig kurzschlussfest! Länger andauernde Kurzschlüsse (länger als eine Minute) müssen auf
jeden Fall vermieden werden, da ansonsten der Trafo oder die Leistungselektronik überlastet wird.
Achtung !!!
- Beim Laden von Akkus unbedingt auf polrichtigen Anschluss des Akkus achten.
- Um Schäden an den Akkus zu vermeiden, ist unbedingt darauf zu achten, dass die Akkus niemals tiefentladen
werden.
- Sorgen Sie während des Ladevorgangs für ausreichende Belüftung des Raumes.
- Öffnen Sie die Zellstopfen des Bleiakkus.
- Prüfen Sie vor dem Laden den Säurestand des Bleiakkus.
- Prüfen Sie bei längerer Ladung auch zwischendurch den Säurestand.
- Vermeiden Sie grundsätzlich offenes Feuer, offenes Licht und Funken in der Nähe der gerade zu ladenden Akkus
(Explosionsgefahr durch Knallgas).
- Beachten Sie unbedingt die Ladehinweise der jeweiligen Akkuhersteller (meist am Akku aufgedruckt).
Störung
Ist anzunehmen, dass ein gefahrloser Berieb nicht mehr möglich ist, so ist das Gerät außer Betrieb zu setzen und
gegen unbeabsichtigten Betrieb zu sichern.
Das trifft zu, wenn das Gerät sichtbare Beschädigungen aufweist,
wenn das Gerät nicht mehr funktionsfähig ist,
wenn Teile des Gerätes lose oder locker sind,
wenn die Verbindungsleitungen sichtbare Schäden aufweisen.
Falls das Gerät repariert werden muss, dürfen nur Originalersatzteile verwendet werden!
Die Verwendung abweichender Ersatzteile kann zu ernsthaften Sach- und Personenschäden führen! Eine Reparatur
des Gerätes darf nur vom Fachmann durchgeführt werden!
Sollte das Gerät einmal ausfallen, empfehlen wir das Gerät zur Reparatur an uns einzusenden.
Technische Daten
Ladegerätetyp EBL20 - 12027
Ladekennlinie IUoU
Netzanschluss 230V AC, 50 Hz
Akku-Nennspannung 12V
max. Ladestrom 2,7A
U1 mit Nachladung 2h 14,7 V
U2 - Erhaltungsladung 13,8V

Montageanleitung / Instructions de montage
Installation Instructions / Montagehandleiding
Indicaciones de montaje
Ref. 150201
Chargeur automatique 2,7 A
1x Chargeur automatique 2,7 A
Contenu de la livraison :
Description
1x Chargeur automatique 2,7 A
1
Très cher client,
merci beaucoup pour la confiance que vous nous accordez. Vous avez acquis l‘un des chargeurs automatiques les
plus performants, les plus compacts et les plus fiables de cette catégorie.
Veuillez lire ce mode d‘emploi attentivement avant de mettre l‘appareil en service.
Attention !!! Précautions importantes de sécurité !
- Tenir hors de portée des enfants ! Danger mortel !
- L‘exposition de l‘appareil à un environnement ambiant défavorable doit être absolument évitée !
Ces conditions défavorables sont :
une température ambiante supérieure à 50 °C, l‘exposition à du gaz inflammable, à des solvants, à la vapeur ou
bien à la poussière ou encore à l‘humidité, tout comme à une humidité atmosphérique dépassant les 80%.
- L‘appareil ne doit être utilisé que dans des espaces secs et fermés.
- Si l‘on estime qu‘une mise en marche sécurisée n‘est plus possible, l‘appareil doit être mis hors service et il convient
d‘empêcher tout remise en marche involontaire.
Un fonctionnement sécurisé n‘est plus assuré si :
l‘appareil ne montre plus d‘activité apparente, des dégradations visibles peuvent être constatées, le transport a
occasionné des dommages, après des conditions de stockage inadéquates.
Service et réparation
Tout travail de révision ou de réparation doit être effectué uniquement par du personnel autorisé.
L‘utilisation conforme de l‘appareil comprend l‘utilisation de batterie au plomb 12V exclusivement.
Automatikladegerät 2,7 A / Automatic Battery Charger 2.7 A / Automatische oplader 2,7 A /
Cargador de baterías automático 2.7 A
1
00 49 93 72
94 74 – 243
FR

Montageanleitung / Instructions de montage
Installation Instructions / Montagehandleiding
Indicaciones de montaje
Fonctionnement
Contrairement aux chargeurs à la courbe caractéristique en W, cet appareil permet un chargement en courant
continu. La recharge est ainsi beaucoup plus rapide car la charge du courant est maximale jusqu‘au bout. Les
batteries sont ainsi chargées à 100%.
Le contrôle du gaz est souhaitable car il affecte de manière significative la formation de couches de sulfate et
prolonge ainsi la durée de vie de la batterie.
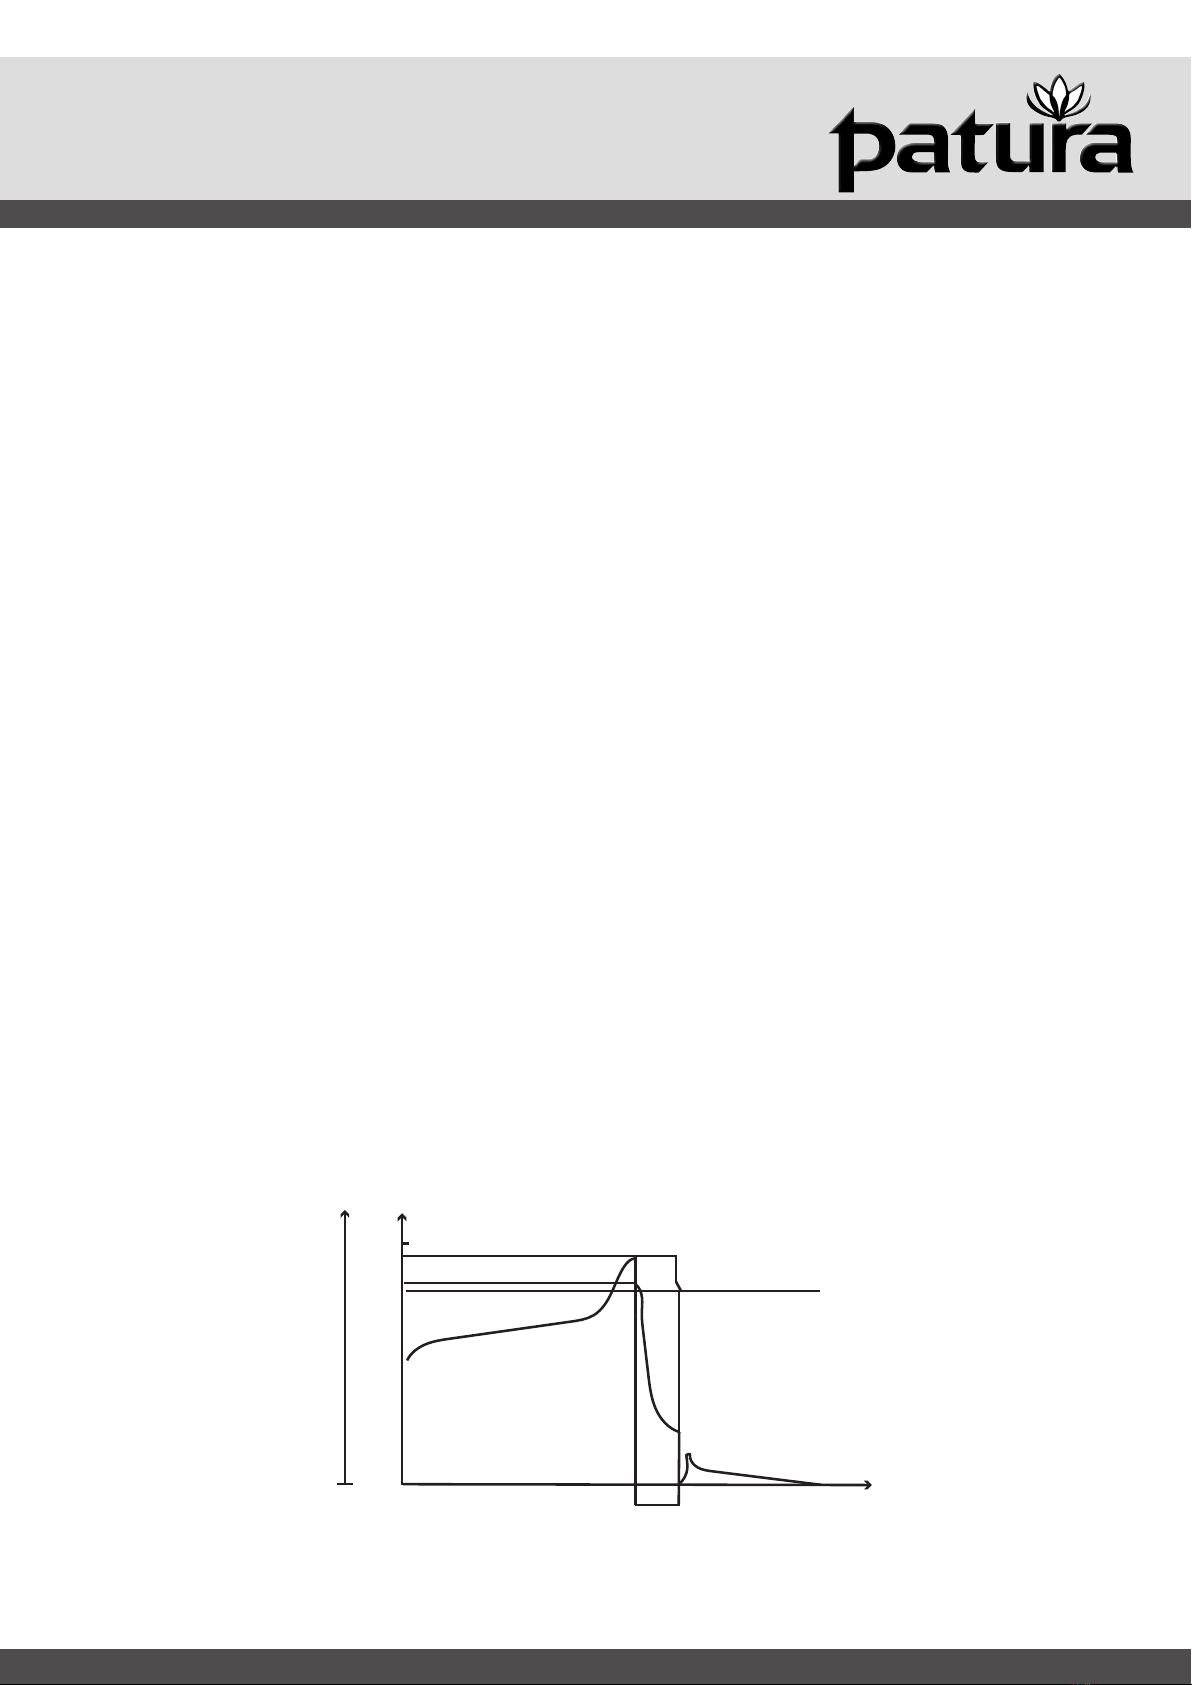
Principe de charge
Jusqu‘à une tension de 14,70 V, la batterie est chargée au courant maximal. Ensuite, l‘appareil passe en „mode
minuterie“ et la batterie est chargée pendant 2 heures avec un courant décroissant. Au bout de 2 heures environ,
l‘appareil passe automatiquement en „mode veille“ et passe en charge d‘entretien de 13,80 V. Ceci est illustré
par le graphique suivant.
L‘appareil convient également pour charger des batteries de voiture et des batteries au plomb.
L‘appareil est bien entendu protégé contre les courts-circuits et l‘inversion de polarité.
Signal LED
Rouge: Dès qu‘une batterie est connectée, celle-ci se charge au courant maximal.
Jaune: Mode minuterie: la tension de la batterie a atteint 14,70V. Elle se charge alors pendant environ
2 heures avec un courant de charge qui diminue constamment (voir le diagramme).
Vert: Le processus de charge est terminé et l‘appareil atteint mode „charge d‘entretien“ à 13, 80 V
Attention : Le mode jaune de minuterie peut être redémarré en éteignant l‘interrupteur d‘alimentation pendant
environ 15 secondes, puis en le rallumant.
La batterie se recharge en général à 14,7 V en deux heures environ. (Durée de chargement après une longue
durée de vie ou après une décharge brève et profonde de la batterie.)
Indications de fonctionnement
À la fin de la charge (batterie pleine), le voyant vert s‘allume.
Des batteries de différentes capacités peuvent être chargées : le temps de chargement est plus long avec les
grosses batteries et plus court avec les plus petites.
Pour le chargement lui-même, que la batterie ne soit que partiellement ou complètement déchargée n‘a pas
d‘importance.
La batterie peut également rester connectée en permanence au chargeur, la température ambiante ne doit
cependant pas dépasser 20 - 25 °C.
Si la batterie est accidentellement connectée au chargeur avec une polarisation incorrecte, le courant de charge
se désactive.
Charge courant constant
Mode
minuterie
Recharge lente Temps
Courant de charge
Voltage de la batterie
Tension de charge de la batterie
Tension (V)
Courant (A)
Courant (A)
7.5/15
7.0/14
6.5/13
6.0/12
5.5/11
1 h
Diagramme de charge: Indication de tension pour batteries 12 Volts

Montageanleitung / Instructions de montage
Installation Instructions / Montagehandleiding
Indicaciones de montaje
Fonctionnement de l‘appareil
1. Connexion à la batterie: connectez la borne rouge du chargeur au pôle positif (+) de la batterie et la borne
noire au pôle négatif (-) de la batterie.
2. Branchement du cordon d‘alimentation: branchez le chargeur sur une prise secteur 230 V.
L‘appareil est protégé contre les court-circuits ! Cependant les court-circuits prolongés (plus d‘une minute)
doivent être dans tous les cas évités, car le transformateur ou l‘électronique seront surchargés.
Attention !!!
- Lors du chargement de batteries, assurez-vous que celles-ci soient correctement connectées.
- Pour éviter d’endommager les batteries, il est essentiel de ne jamais les décharger à 100%.
- Assurez une ventilation suffisante de la pièce pendant la charge.
- Ouvrez les bouchons anti-fuite des batteries en plomb.
- Vérifiez le niveau d‘acide de la batterie au plomb avant la charge.
- Vérifier le niveau d‘acide de temps en temps en cas de charge prolongée.
- Evitez tout risque de feu, de lumière et d‘étincelles à proximité des piles rechargeables (risque d‘explosion dû
aux gaz détonnants).
- Il est essentiel de respecter les instructions de chargement du fabricant de la batterie (généralement imprimées
sur la batterie).
Anomalies et panne
Si l‘on estime qu‘une mise en marche sécurisée n‘est plus possible, l‘appareil doit être mis hors service et il
convient d‘empêcher tout remise en marche involontaire.
Cela s‘applique: si des dégradations visibles peuvent être constatées,
si l‘appareil n‘est plus en état de fonctionnement,
si des pièces de l‘appareil sont détachées ou dessérées,
si les câbles de liaison sont endommagés.
Si l‘appareil doit être réparé, seules des pièces de rechange d‘origine peuvent être utilisées !
L‘utilisation de pièces de rechange différentes peut entraîner des dommages matériels et corporels graves !
L‘appareil ne peut être réparé que par un spécialiste !
En cas de défaillance de l‘appareil, nous vous recommandons de nous l‘envoyer pour réparation.
Données techniques
Type de chargeur EBL20 - 12027
Courbe caractéristique de charge IUoU
Alimentation secteur 230V AC, 50 Hz
Tension nominale 12V
Courant max. de charge 2,7A
Tension après chargement 2h 14,7 V
Charge d‘entretien 13,8V

Montageanleitung / Instructions de montage
Installation Instructions / Montagehandleiding
Indicaciones de montaje
Ref. 150201
Automatic Battery Charger 2.7 A
1x Automatic Battery Charger 2.7 A
Included in delivery:
Description
1x Automatic Battery Charger 2.7 A
1
Dear valued customer,
Thank you very much for your trust in our products. You have one of the most powerful, compact, and reliable
automatic loaders in its class.
Please read this manual carefully before using this unit.
ATTENTION! Important safety instructions.
- This device should not be handed over to children! CAUTION: Danger to Life!
- Operation under adverse environmental conditions must be avoided under all circumstances!
Adverse environmental conditions include:
Ambient temperatures above 50°C, flammable gases, solvents, vapors, dust, humidity above 80% rel. and moisture.
- The device may only be operated in dry and closed rooms.
- If it can be assumed that safe operation is no longer possible, the device must be taken out of operation
immediately and protected against unintentional operation.
Safe operation can no longer be assumed when:
The device no longer shows any function,
has visible damage,
in the event of transport damage,
or after storage under unfavorable conditions.
- Service and repair:
Service work and repairs may only be carried out by authorized specialist personnel.
- The intended use of the device exclusively includes the following charging of 12V lead batteries.
Automatikladegerät 2,7 A / Chargeur automatique 2,7 A / Automatische oplader 2,7 A /
Cargador de baterías automático 2.7 A
1
00 49 93 72
94 74 – 0
GB

Montageanleitung / Instructions de montage
Installation Instructions / Montagehandleiding
Indicaciones de montaje
Functional description:
In contrast to chargers with W-characteristic curve, this device charges with constant current. This makes charging
considerably faster, as batteries are charged with a constant current until the end of charging.
The max. current can be charged. In addition, the batteries are charged to 100%.
Controlled gassing is desirable as it has a considerable effect on the formation of sulphate layers and thus
prolongs the battery life.
Charging principle:
Up to a voltage of 14.70 V, the battery is charged with the maximum current. After that, the unit enters the
„Timer Mode“ and the battery is charged for 2 hours at a continuously decreasing current.
After approx. 2 hours, the unit automatically switches to the „Stand-by Mode“ and the trickle charging at 13.80 V
is initiated. This is illustrated in the following diagram. The device is also suitable for charging automotive and
lead-gel batteries. Of course, the device is short-circuit and reverse polarity protected.
LED displays:
Red: As soon as a rechargeable battery is connected, the device charges with maximum current.
Yellow: Timer mode, the battery voltage has reached 14.70 V. Approx. 2 hrs. is used with continuous charge
current (See diagram.)
Green: The charging process is complete and the device switches to „Trickle Charging“ mode 13.80 V
Attention: The „yellow“ timer mode can be switched off by switching off the main switch for approx. 15 seconds,
and then switch on the power switch again.
A new recharging time of approx. 2 hours with 14.7 V takes place. (Level charging after long-service life, or
previous short deep discharge of the battery.)
Operating Instructions:
When the battery is fully charged, the green LED lights up. Batteries of different capacities can be charged, larger
batteries extend the life of the battery. Loading time, with smaller ones, this is shortened. For charging itself, it does
not matter whether the battery is only partially or completely discharged. The battery can also remain permanent-
ly connected to the charger. The ambient temperature should not exceed or fall short of approx. 20 - 25 °C.
If the battery is inadvertently connected to the charger with the wrong polarity, the charging current switches off.
Constant Current Mode
Timer
Mode
Standby Mode Time
Charge Current
Battery Voltage
Voltage (V)
Current (A)
Current (A)
7.5/15
7.0/14
6.5/13
6.0/12
5.5/11
1 h
Charging diagram: Voltage indication at 12 Volt batteries

Montageanleitung / Instructions de montage
Installation Instructions / Montagehandleiding
Indicaciones de montaje
Operation of the device:
1. Connection to the battery: Close the red terminal of the charger to the positive terminal ( + ) of the battery and
the black terminal at the negative terminal ( - ) of the battery.
2. Connection to main cable: Connect the charger to the 230 V Ac mains (socket). The device is short-circuit
proof! Longer lasting short-circuits (longer than one minute) must be avoided in any case, as otherwise the
transformer or the power electronics is overloaded.
Attention!
- When charging batteries, make sure that the polarity of the battery is correct.
- In order to avoid damage to the batteries, it is essential to ensure that the batteries are never deep discharged
(more than 100% discharged).
- Ensure sufficient ventilation of the room during the charging process.
- Open the cell plugs of the lead acid battery.
- Check the acid level of the lead acid battery before charging.
- If charging for a longer period, also check the acid level occasionally.
- Always avoid open fire, open light, and sparks in the vicinity of the straight batteries to be charged
(Danger of explosion due to oxyhydrogen gas.)
- It is imperative that you observe the charging instructions of the respective battery manufacturer
(Mostly imprinted on the battery.)
Malfunction:
If it can be assumed that safe operation is no longer possible, the device must be taken out of service and secu-
red against unintentional operation.
This applies under the following circumstances: - If the device shows visible damage.
- If the device is no longer functional.
- If parts of the device are loose or missing.
- If the connecting lines show visible damage.
If the device has to be repaired, only original spare parts may be used! The use of different spare parts can lead
to serious damage to property and personal injury!
If the device should fail, we recommend that you send your device for repair to us.
Technical Data:
Charger type: EBL20 - 12027
Charging characteristic: IUoU
Mains connection: 230V AC, 50 Hz
Nominal battery voltage: 12V
Max. charging current: 2.7A
U1 with recharging: 14.7V
U2 - Float charge 13.8V

Montageanleitung / Instructions de montage
Installation Instructions / Montagehandleiding
Indicaciones de montaje
Ref. 150201
Automatische oplader 2,7 A
Automatikladegerät 2,7 A / Chargeur automatique 2,7 A / Automatic Battery Charger 2.7 A /
Cargador de baterías automático 2.7 A
1x Automatische oplader
Pakketinhoud:
Beschrijving
1x Automatische oplader
1
Beste klant,
Hartelijk dank voor uw vertrouwen in ons product. U hebt een van de meest krachtige, compacte en betrouwbare
automatische opladers in zijn klasse aangeschaft.
Lees deze gebruiksaanwijzing zorgvuldig door voordat u dit apparaat in gebruik neemt.
LET OP!!! Belangrijke veiligheidsinstructies!
- Dit apparaat moet uit de buurt van kinderen gehouden worden! Voorzichtig: levensgevaar!
- Het gebruik bij ongunstige omgevingsfactoren moet te allen tijde worden vermeden!
Ongunstige omgevingsfactoren zijn:
Omgevingstemperaturen boven 50°C, brandbare gassen, oplosmiddelen, dampen, stof, rel. luchtvochtigheid boven
80% en nattigheid.
- Het apparaat mag alleen in droge en gesloten ruimten worden gebruikt.
- Als het aannemelijk is dat een veilig gebruik niet meer mogelijk is, dan moet het apparaat onmiddellijk uit bedrijf
worden genomen en tegen onbedoeld gebruik worden beveiligd.
Er kan niet langer worden uitgegaan van een veilige werking:
als het apparaat geen functie meer vertoont,
zichtbare beschadigingen heeft, in geval van transportschade,
na opslag onder ongunstige omstandigheden.
- Service en reparatie
Servicewerkzaamheden en reparaties mogen alleen door geautoriseerde vakkrachten worden uitgevoerd.
- Het beoogde gebruik van het apparaat omvat alleen het opladen van 12 V loodaccu‘s.
1
00 49 93 72
94 74 – 244
NL

Montageanleitung / Instructions de montage
Installation Instructions / Montagehandleiding
Indicaciones de montaje
Beschrijving van de werking
In tegenstelling tot acculaders met een W-karakteristiek wordt dit apparaat geladen met constante stroom.
Hierdoor gaat het laden aanzienlijk sneller omdat de accu‘s tot het einde van het laden met de maximale stroom
worden opgeladen. Bovendien worden de accu‘s voor 100% opgeladen.
Gecontroleerde ontgassing is daarbij wenselijk, omdat het een aanzienlijke invloed heeft op de vorming van sul-
faatlagen en zo de levensduur van de accu‘s verlengt.
Oplaadprincipe:
Tot een spanning van 14,70 V wordt de accu met de maximale stroomsterkte geladen. Daarna schakelt het appa-
raat over naar de “timer modus” en wordt de accu 2 uur lang opgeladen met een gestaag afnemende strooms-
terkte. Na ca. 2 uur schakelt het apparaat automatisch over naar de “stand-by-modus” en start de druppellading
met 13,80 V. Dit wordt verduidelijkt in onderstaande grafiek. Het apparaat is ook geschikt voor het opladen van
auto- en lood-gelaccu‘s. Uiteraard is het apparaat beveiligd tegen kortsluiting en ompoling.
LED-indicaties
Rood: Zodra een batterij wordt aangesloten, laadt het apparaat met maximale stroomsterkte
Geel: Timer–modus: De accuspanning heeft 14,70 V bereikt. De lading gebeurt ca. 2 uur lang met een
gestaag afnemende laadstroom - zie diagram
Groen: Het laadproces is voltooid en het apparaat bevindt zich in de modus “druppellading” 13,80 V
Let op: door de stroomschakelaar ca. 15 seconden uit te schakelen en weer in te schakelen kan de “gele” timer-
modus opnieuw worden gestart. Er volgt een nieuwe laadtijd van ca. 2 uur met 14,7 volt. (Onderhoudsladen na
een lange periode van stilstand, of na voorafgaande korte diepe ontlading van de accu.)
Gebruiksinstructies
Als het laden klaar is (accu vol) brandt de groene LED.
Er kunnen accu‘s met verschillende capaciteiten kunnen worden opgeladen, bij grotere accu‘s wordt de laadtijd
langer, bij kleinere accu‘s is deze korter.
Voor het laden zelf is het niet van belang of de accu slechts gedeeltelijk of volledig ontladen is.
De accu kan ook permanent op de acculader aangesloten blijven, daarbij mag de omgevingstemperatuur niet
hoger of lager zijn dan 20 - 25°C.
Wordt de accu per ongeluk met de verkeerde polariteit op de lader aangesloten, dan schakelt de laadstroom uit.
Constant Current Mode
Constante stroom Timer
Mode
Standby Mode
Druppellading
Time
Tijd
Charge Current/Laadstroom
Battery Voltage
Accu-laadspanning
Spanning (V)
Stroom(A)
Stromsterkte (A)
7.5/15
7.0/14
6.5/13
6.0/12
5.5/11
1 h
Oplaadgrafiek: spanningsinformatie bij 12 volt accu‘s

Montageanleitung / Instructions de montage
Installation Instructions / Montagehandleiding
Indicaciones de montaje
Bediening van het apparaat
1. Aansluiting op de accu: Sluit de rode aansluitklem van de lader aan op de pluspool (+) van de accu en de
zwarte aansluitklem op de minpool (-) van de accu.
2. Aansluiting voedingskabel: Sluit de lader aan op het 230 V AC-net (stopcontact)
Het apparaat is korte tijd kortsluitbestendig! Langer durende kortsluitingen (langer dan een minuut) moeten in alle
gevallen worden vermeden, anders wordt de trafo of de vermogenselektronica overbelast.
Let op!!!
- Zorg ervoor dat u bij het laden van de accu met de juiste polariteit aansluit.
- Om schade aan de accu‘s te voorkomen is het van essentieel belang dat de accu‘s nooit meer dan 100% diep
ontladen worden.
- Zorg tijdens het laadproces voor voldoende ventilatie van de ruimte.
- Open de celdoppen van de loodaccu.
- Controleer het zuurniveau van de loodaccu alvorens deze op te laden.
- Controleer bij langer laden het zuurniveau ook tussendoor.
- Vermijd altijd vuur, open vlammen en vonken in de buurt van de accu‘s die worden opgeladen (explosiegevaar
door knalgas).
- Houd u strikt aan de oplaadinstructies van de desbetreffende accufabrikant (welke meestal op de accu is
gedrukt).
Storing
Als het aannemelijk is dat een veilig gebruik niet langer mogelijk is, dan moet het apparaat uit bedrijf worden
genomen en tegen onbedoeld gebruik worden beveiligd.
Dat is aan de orde als het apparaat zichtbare beschadigingen vertoont,
als het apparaat niet meer functioneert,
als delen van het apparaat los zitten,
als de aansluitdraden zichtbare schade vertonen.
Indien het apparaat gerepareerd moet worden, dan mogen alleen originele reserveonderdelen gebruikt worden!
Het gebruik van afwijkende reserveonderdelen kan leiden tot ernstige materiële schade en persoonlijke
letselschade! Reparatie van het apparaat mag alleen door een specialist worden uitgevoerd!
Mocht het apparaat defect raken, dan raden wij u aan het ter reparatie naar ons terug te sturen.
Technische gegevens
Type lader EBL20 - 12027
Laadkarakteristiek IUoU
Netaansluiting 230V AC, 50 Hz
Nominale accuspanning 12V
max. laadstroom 2,7A
U1 met herlading 2h 14,7 V
U2 - druppellading 13,8V

Montageanleitung / Instructions de montage
Installation Instructions / Montagehandleiding
Indicaciones de montaje
Ref. 150201
Cargador automático 2.7 A
1x Cargador automático 2.7 A
Contenido:
Description
1x Cargador automático 2.7 A
1
Estimado cliente,
muchas gracias por la confianza depositada en nosotros.
Ha adquirido uno de los cargadores automáticos más eficientes, compactos y fiables de esta categoría.
Lea detenidamente estas instrucciones de funcionamiento antes de usar el apparato.
¡Precauciones de seguridad!
¡Mantener fuera del alcance de los niños! Peligro de muerte
Debe evitarse toda exposición del aparato a un entorno desfavorable:
por ejemplo, una temperatura ambiente superior a 50 °C, la exposición a gases inflamables, disolventes, vapor o
al polvo o a la humedad, así como a la humedad atmosférica superior al 80%.
El cargador sólo debe usarse en áreas secas y cerradas.
Si se considera que ya no es posible un funcionamiento seguro, no se debe usar más el aparato y hay que evitar
una nueva puesta en marcha involuntaria.
Un funcionamiento seguro ya no está garantizado:
si el dispositivo no muestra ninguna actividad aparente, si se pueden observar daños visibles, si el transporte ha
causado daños, o después de condiciones de almacenamiento inadecuadas.
Servicio y reparación
Cualquier trabajo de mantenimiento o reparación debe ser realizado únicamente por una persona autorizada.
El uso previsto del dispositivo incluye el uso de baterías de plomo-ácido de 12 V solamente.
Cantidad
Automatikladegerät 2,7 A / Chargeur automatique 2,7 A / Automatic Battery Charger 2.7 A /
Automatische oplader 2,7 A
1
00 49 93 72
94 74 – 243
ES

Montageanleitung / Instructions de montage
Installation Instructions / Montagehandleiding
Indicaciones de montaje
Funcionamiento
A diferencia de los cargadores con una curva característica en W, este cargador permite la carga con corriente
continua. La recarga es mucho más rápida porque la carga actual es máxima hasta el final. Por lo tanto, las
baterías están cargadas al 100%.
El control de gases es deseable porque afecta significativamente la formación de capas de sulfato y prolonga la
vida útil de la batería.
Principio de carga
Hasta una tensión de 14.70 V, la batería se carga hasta la corriente máxima. A continuación, el aparato cambia
al „modo temporizador“ y la batería se carga durante 2 horas con una corriente decreciente. Después, el dispo-
sitivo cambia automáticamente al „modo de espera“ y a la carga de mantenimiento de 13.80 V.
Ver la ilustración más abajo.
El cargador también puede cargar baterías de coche y baterías de plomo-ácido.
Por supuesto, el dispositivo está protegido contra cortocircuitos y polaridad inversa.
Indicador LED
Rojo: En cuanto se conecta una batería, ésta se carga a la corriente máxima.
Amarillo: Modo temporizador: la tensión de la batería ha alcanzado los 14.70 V. A continuación, se carga
alrededor de 2 horas con una corriente de carga en constante disminución (ver diagrama).
Verde: El proceso de carga ha finalizado y la unidad alcanza el modo de „carga de mantenimiento“ a
13.80 V.
Cuidado: El modo temporizador amarillo se puede reiniciar desconectando el interruptor de alimentación
durante unos 15 segundos, y luego volver a encenderlo.
La batería se recarga generalmente a 14.7 V en aproximadamente dos horas. (Tiempo de carga después de un
largo periodo de tiempo o después de una descarga corta y profunda de la batería.)
Funcionamiento
Al final de la carga (batería llena), el LED verde se enciende. Se pueden cargar baterías de diferentes capacida-
des: el tiempo de carga es mayor con baterías grandes y más corto con las más pequeñas.
Para la carga propiamente dicha, el hecho de que la batería esté parcialmente o totalmente descargada no tiene
importancia. La batería también puede permanecer conectada al cargador, la temperatura ambiente no debe
superar los 20-25 °C.
Si la batería se conecta accidentalmente al cargador con polarización incorrecta, la corriente de carga se desac-
tiva sola.
Carga de corriente
continua Modo
temporizador
Recarga lenta Tiempo
Corriente de carga
Voltaje de la batería
Tensión de carga de la batería
Tensión (V)
Corriente (A)
Corriente (A)
7.5/15
7.0/14
6.5/13
6.0/12
5.5/11
1 h
Diagrama de carga: indicación de tensión para baterías 12V

Montageanleitung / Instructions de montage
Installation Instructions / Montagehandleiding
Indicaciones de montaje
Funcionamiento del dispositivo
1. Conexión a la batería: conecte el borne rojo del cargador al borne positivo (+) de la batería y el borne negro
al borne negativo (-) de la batería.
2. Conexión del cable de alimentación: Conecte el cargador a una toma de corriente de 230 V.
El aparato está protegido contra cortocircuitos! No obstante, los cortocircuitos prolongados (más de un
minuto) deben evitarse siempre, ya que el transformador o la electrónica se sobrecargarán.
¡IMPORTANTE!
- Cuando cargue las baterías, asegúrese de que estén correctamente conectadas.
- Para evitar dañar las baterías, es esencial no descargarlas nunca al 100%.
- Asegúrese de que el lugar esté bien ventilado durante la carga.
- Abra los tapones herméticos de las baterías de plomo.
- Compruebe el nivel de ácido de la batería de plomo-ácido antes de cargarla.
- Compruebe el nivel de ácido de vez en cuando en caso de una carga prolongada.
- Evite cualquier riesgo de incendio, luz y chispas cerca de las baterías recargables (riesgo de explosión debido
a los gases detonantes).
- Es esencial cumplir con las instrucciones de carga del fabricante de la batería (figuran generalmente en la batería).
Fallos
Si se considera que ya no es posible un funcionamiento seguro, se debe apagar la unidad y sustituirla para
evitar cualquier uso involuntario.
Esto se aplica: si se observan daños visibles,
si el dispositivo ya no funciona,
si partes del dispositivo están sueltas o aflojadas,
si los cables de conexión están dañados.
En caso de reparación, sólo se pueden utilizar piezas de recambio originales.
El uso de diferentes piezas de repuesto puede causar graves daños materiales y personales.
¡El aparato sólo puede ser reparado por un especialista!
En caso de fallo del aparato, le recomendamos que nos lo envíe para su reparación.
Datos técnicos
Tipo de cargador EBL20 - 12027
Curva característica de carga IUoU
Alimentación eléctrica 230V AC, 50 Hz
Voltaje nominal 12V
Voltaje nominal 2.7A
Voltaje tras una carga de 2h 14.7 V
Carga de mantenimiento 13.8V

Montageanleitung / Instructions de montage
Installation Instructions / Montagehandleiding
Indicaciones de montaje
PATURA KG • Germany Tel. 00 49 93 72 94 74 – 0 www.patura.com
Mainblick 1 • 63925 Laudenbach Fax 00 49 93 72 94 74 – 29 info@patura.com
ZANL-150201-A2
200326
This manual suits for next models
1
Table of contents
Languages: