Sierra wave Power Station 9652 User manual
Power Station
(5000mAh)
OPERATING INSTRUCTIONS
TECHNICAL INFORMATION
SPECIFICATIONS
SOLAR PANEL 1-watt monocrystalline
5V DC, 200mAh
POWER STATION BATTERY Lithium Poly, 3.7V/5000mAh (18.5Wh)
CHARGE PROTECTION Overcharge, over discharge, overload protection
and short circuit protection
POWER STATION INPUT 5V DC/1.5A
POWER STATION OUTPUT 5V 1A
5V 2A (high speed)
OPERATING TEMPERATURE 32° – 120°F (0° – 49°C)
WEIGHT 8 oz. (227g)
DIMENSIONS 6” x 4” x 0.7” (152 x 102 x 17.53 mm)
ACCESSORIES INCLUDED Multifunction USB Cable
• Standard USB tip
• Micro USB tip
• iPhone® Lightening tip
• iPhone® 32-pin tip
Carabineer clip
CHARGING & OPERATING TIMES Estimate only. Actual times depend on available
sunshine, Power Bank battery level, and device
battery condition.
Charge 5000mAh Power Station Solar collector, up to 25 hours
USB, 6-8 hours
Recharge portable electronic
devices from a fully charged
5000mAh Power Station
iPhone 6, up to 3 times,
Galaxy 5, up to 2 times
Tablets will charge up to 25% of battery capacity
depending on model and size
Aervoe Industries, Inc.
Gardnerville, NV 89410 • (800) 227-0196
9652inst CS:5/15
Sierra Wave is a registered trademark of Aervoe Industries, Inc.
RoHS
COMPLIANT
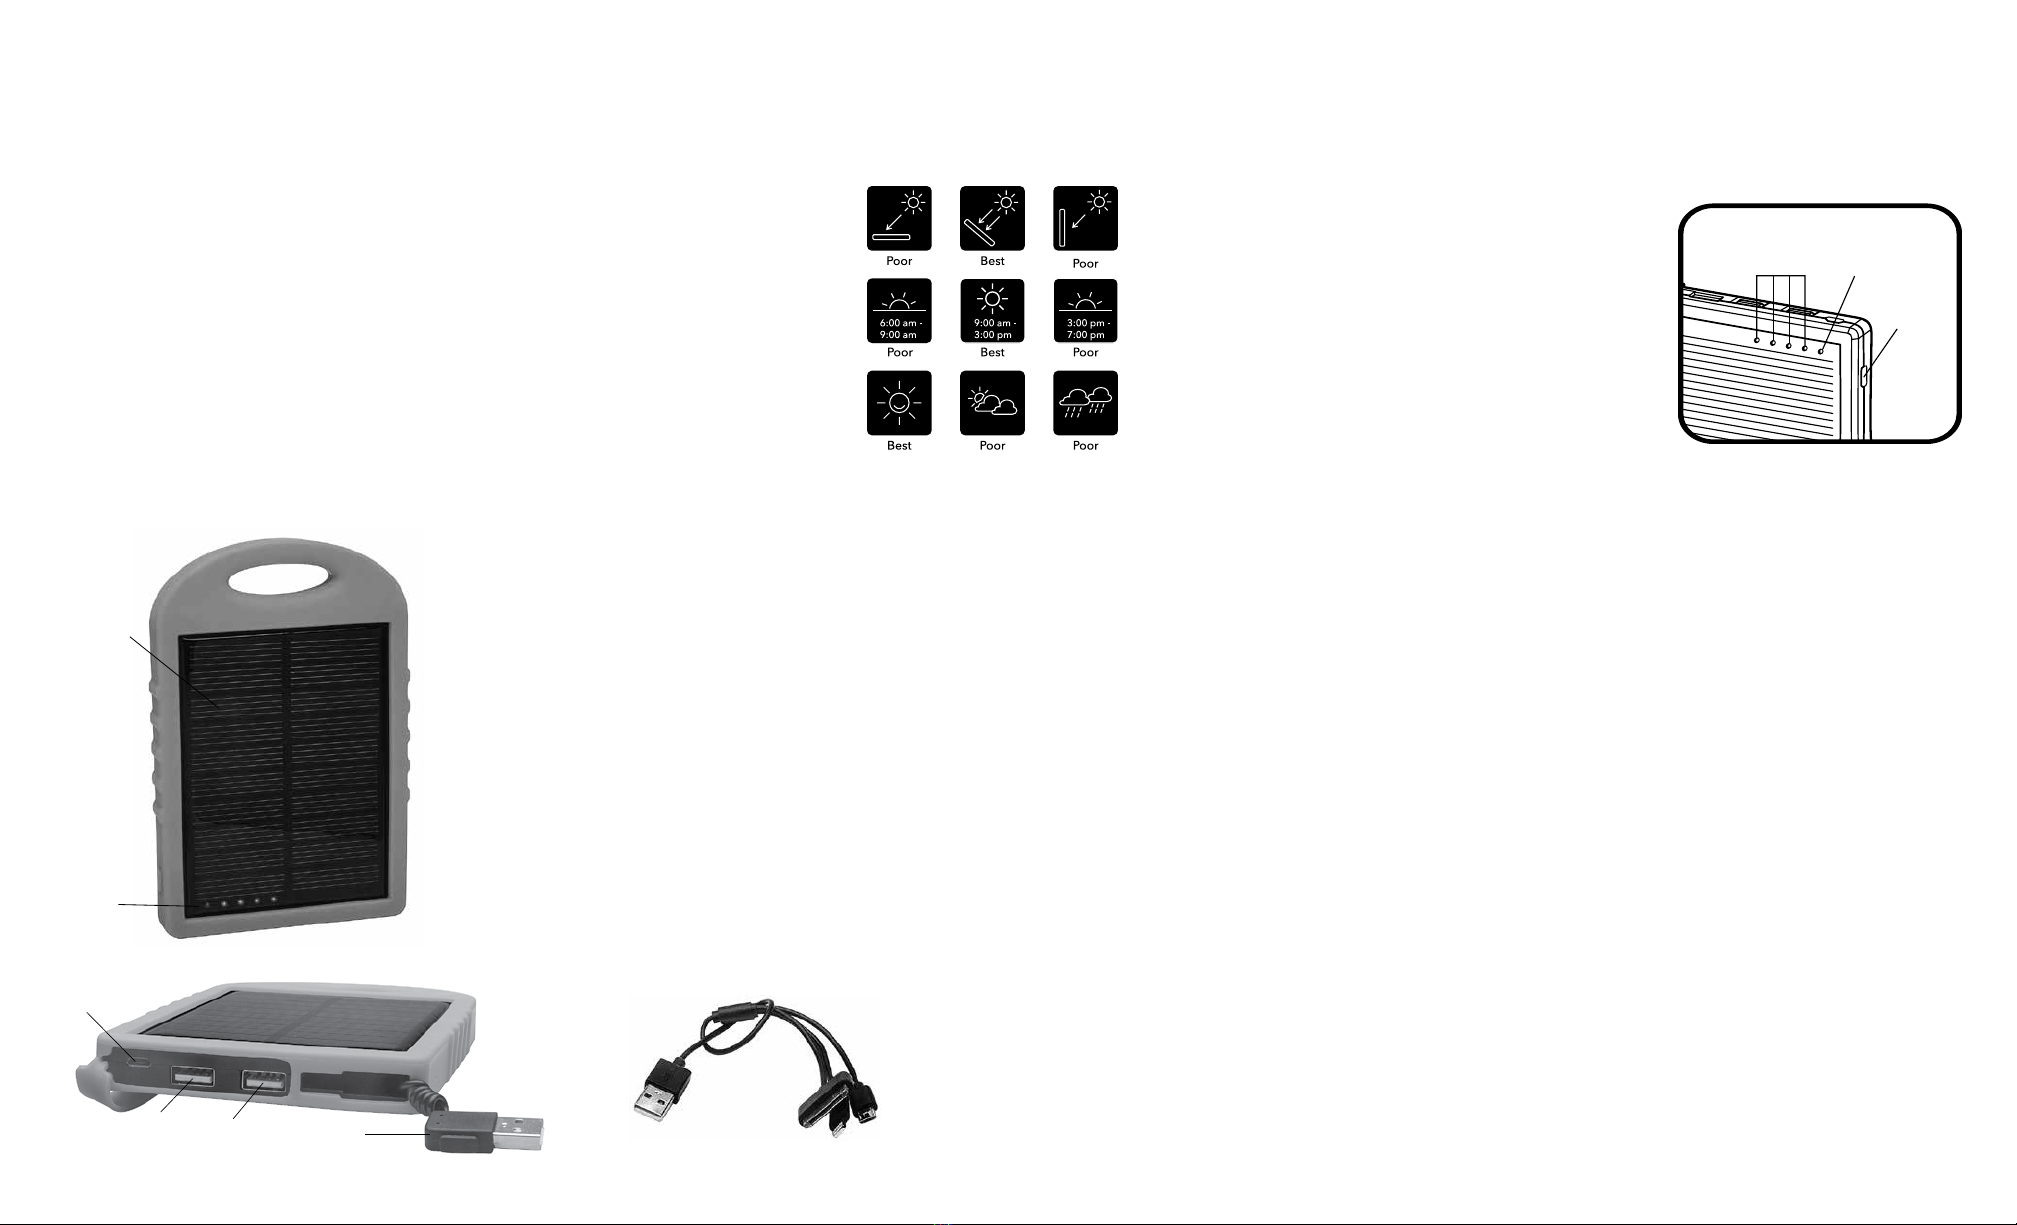
Solar Collector
LED Charging
Indicators
BATTERY CAPACITY METER & INDICATOR LIGHTS
1. Red/Blue LED = Red when solar or photovoltaic light is available
Blue when the POWER/METER button is pushed. It will go off after 30
seconds.
2. Green LEDs. Press the POWER/METER button to check the status of charging.
• 1 green LED = <25% capacity
• 2 green LEDs = <50% capacity
• 3 green LEDs = <75% capacity
• 4 green LEDs = 100% capacity
TROUBLESHOOTING
Warning: To avoid shock, injury or damage to the unit, do not disassemble the Power Station.
The warranty will be void if you do so. Contact Aervoe Industries, Inc. for assistance.
1. The Power Station is not charging from the solar collector or auxiliary USB power source
• If solar charging, make sure there is bright sun and it is angled toward the sun.
Reference the solar use guide above for positioning information.
• Make sure all connectors are attached securely
2. Your device is not charging properly when connected to the Power Station.
• Make sure all connectors are attached securely
• Verify that your device specifications are compatible with this unit
Sierra Wave®Power Station (5000mAh) #9652
This rugged 5000mAh Power Station keeps portable electronics charged using USB power
ports. It can be charged with the built-in solar panel or through any USB power connection.
120V AC or 12V DC charging is also possible when using a wall or vehicle charging plugs (not
included).
IMPORTANT SAFEGUARDS
Warning: to reduce the risk of electric shock or damage to this product, please read the
following.
• Read all instructions before operating and keep for later reference
• Administer close supervision when using around children
• Do not store in direct sunlight, on hot surfaces, or in temperatures over 140°F, such as a
hot vehicle
• Do not submerge this unit or any accessories in liquid. This unit is weather resistant but
not waterproof.
• Do not drop, crush, or puncture
• Protect the solar panel from scratches and dust
• Do not use in flammable or explosive areas
• Discontinue use if electronic components or accessories are damaged. To avoid risk of
shock, injury and damage to the unit, do not disassemble. Warranty is void if anyone
other than an authorized Aervoe Service Center associate performs any repair. Contact
Aervoe for assistance.
• Recharge at least every 3 months to keep the battery conditioned
• Includes built-in overcharge, over discharge, and short circuit protection
PARTS IDENTIFICATION
CHARGING THE POWER STATION
Built-in Solar Collector
1. Place the POWER STATION outdoors with the SOLAR COLLECTOR facing the sun. The
rate of charge will vary based on available solar energy, location, and time of day.
2. Battery capacity may be monitored using the LED CHARGING INDICATORS on the Power
Station.
USB Power Sources
Plug into any power source that offers 5V USB including computers, vehicles, or detachable
AC wall or 12V vehicle charger (not included).
1. Option #1: Pull out the built-in USB adapter cable and plug it into any USB power source.
2. Option #2: Connect the micro USB tip on the included MULTIFUNCTION USB CABLE into
the MICRO USB DC IN port. Connect the standard USB plug into any USB power source.
3. Battery capacity may be monitored using the LED charging indicators on the POWER
STATION.
CHARGING DEVICES
The Multifunction USB Cable includes the iPhone® Lightning tip, 32-pin iPhone® tip, and
a micro USB tip to charge most portable electronics. You can use any device specific USB
charging adapter.
Charging through the Power Station
1. The Power Station can be used to charge devices using either the 1A USB port or 2A
USB port. The 2A port provides a higher rate of charge and should be used to charge
tablets.
2. Connect the standard USB plug on the MULTIFUNCTION USB CABLE to the 1A or 2A
USB output ports and the other end to your device using the appropriate tip.
3. Both USB ports may be used at the same time.
4. Battery capacity may be monitored using the LED charging indicators on the POWER
STATION.
Battery Meter
Green LEDs Red/Blue
LED
Power/Meter
Button
DC IN
(Micro USB)
1A USB 2A USB Built-In
USB Input
Multifunction USB Cable
Standard USB iPhone
32-pin iPhone
Lightning
Micro
USB
Table of contents


