Pawbo Crunchy PPC-PF01 User manual
FCC Radiation Exposure Statement:
This equipment complies with FCC radiation exposure limits set forth for an
uncontrolled environment. This equipment should be installed and operated
with minimum distance 20cm between the radiator & your body.
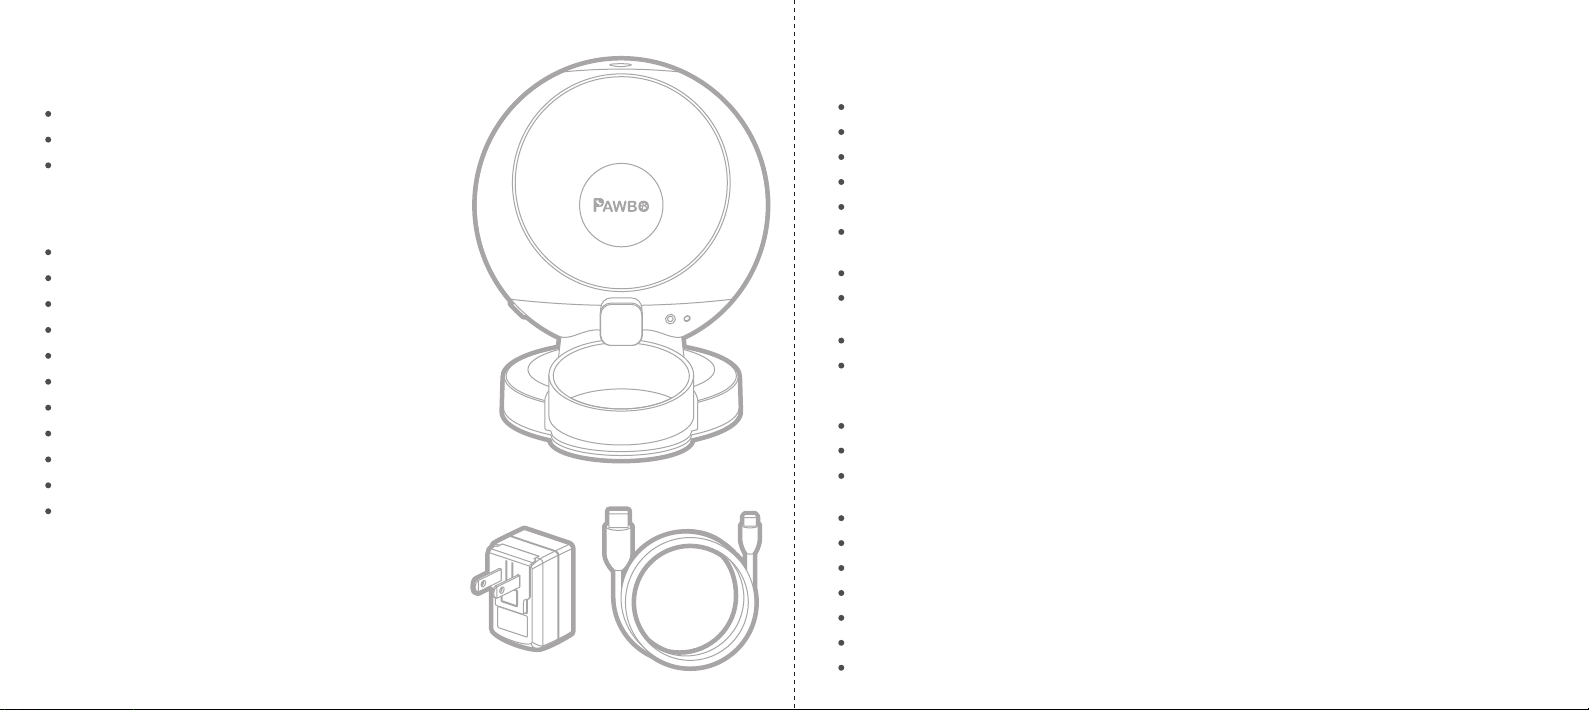
PPC-PF01

Crunchy (Lid / Bowl / Desiccant)
Micro USB cable
Adapter
Capacity: 6 L
Bowl Capacity: 120 g (4.23 oz)
Button: Feeding, Reset, Power, Bluetooth
LED: Power (Red), Bluetooth (Blue), Wi-Fi (White)
Weight Sensor: Hopper x 4, Bowl x 1
Wi-Fi: 2.4G (802.11 b/g/n)
Bluetooth: v4.2 BR/EDR and BLE with BLE Beacon
Adapter: 5V / 2A
Speaker: 8Ω / 1W
Dimensions (W x H x L): 361 x 422 x 328 mm/14.2 x 16.6 x 12.9 in
Weight: 2.3 kg / 5.1 lbs
Smart phone with:
iOS 8.0 or above, or
Android 4.4 or above
Do NOT place any foreign objects in Crunchy.
Do NOT use Crunchy outdoors. Crunchy is for indoor household use only.
Do NOT use an appliance for anything other than its intended use.
Do NOT allow children to play or around Crunchy.
Do NOT disassemble Crunchy other than components as instructed in this guide.
Do NOT install or store Crunchy in the environment where it is exposed to weather or temperatures
below -20°C (-4°F).
The base should NOT be submerged in water at any time, as this may damage the electronic components.
Do NOT use Crunchy with puppies, kittens, dogs or cats not able to reach the food tray or with any physical
disability.
Do NOT operate any appliance with a damaged power cord or plug, malfunction or it has been damaged.
Call the Customer Center immediately for further instructions.
Do NOT allow pets to chew on or swallow any parts. If you are concerned about the power cord, purchase a
cord conduit (a hard plastic protector) to protect the power cord.
Do NOT attempt to repair Crunchy by yourself.
Important Safety Information
If an extension cord is necessary, an extension cord with a proper rating should be used.
Do NOT use pet feeder for anything other than intended use. Using attachments not recommended or sold
by the manufacturer may cause an unsafe condition.
Do NOT lift Crunchy by lid, hopper, bowl or bowl holder. Lift and carry Crunchy using both hands on the
hopper base, while keeping unit in upright position.
For dry food only. DO NOT use wet, canned or moist food.
To avoid tripping, always position power cord out of the way of foot traffic.
If the plug of this device gets wet, turn off the electricity to that wall outlet. Do not attempt to unplug.
Examine this appliance after installation. Do not plug in if there is water on the power cord or plug.
To reduce the risk of injury, close supervision is necessary when an appliance is used by or near children.
If using power cord, do not place power cord or plug in water or other liquids.
Dispose of all packaging materials properly. Some items may be packed in polybags; these bags could
cause suffocation; keep away from children and pets.
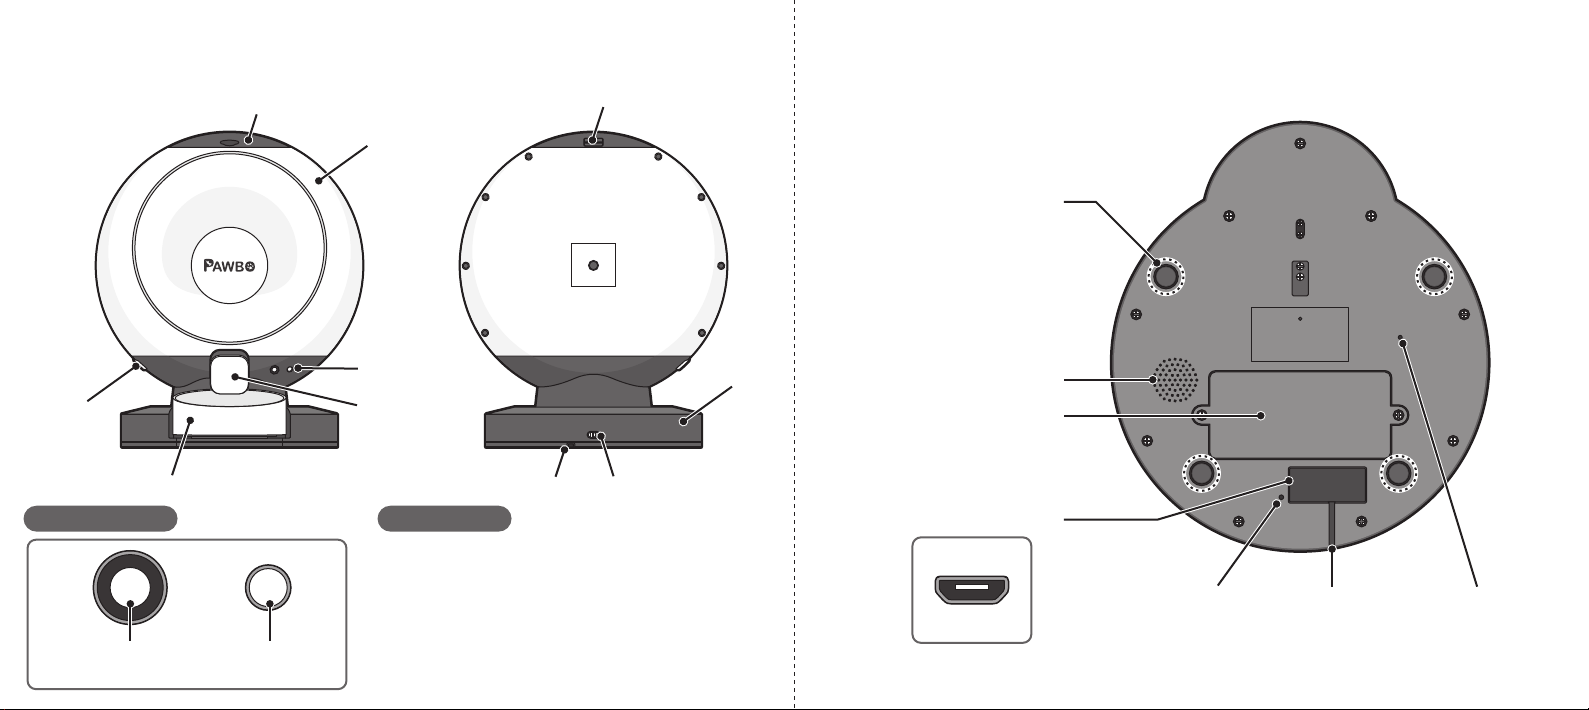
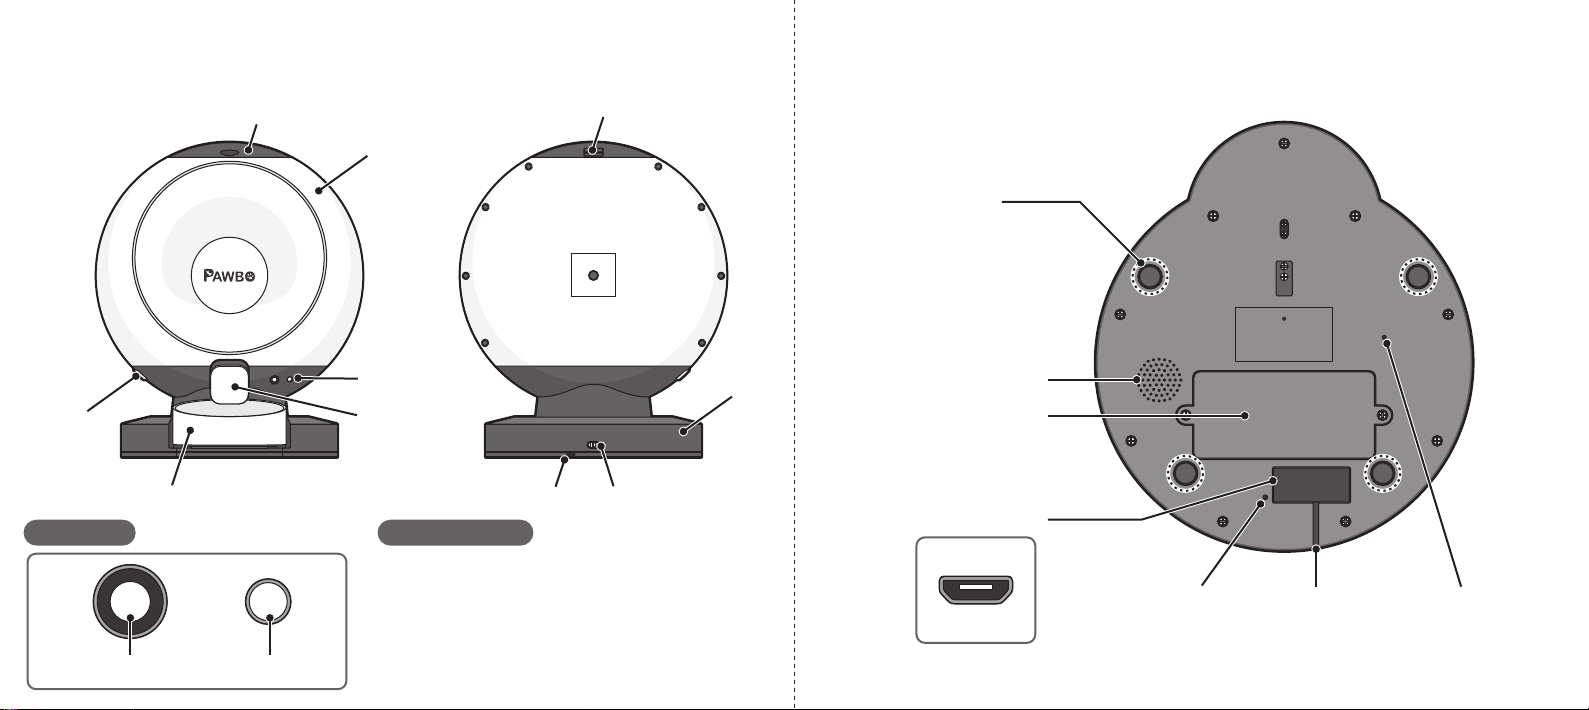
Cable GuidePower LED
Battery Cover
Speaker
Foot Pad / Weight Sensor
Reset Button
Micro USB Connector
Control Panel LED Status
Lid Release Latch
Lid (with Desiccant Chamber)
Hopper
Release
Button
Hopper
Base
Bowl Cable Guide Power Switch
Control Panel
Food Chute
Feeding Button / LED Bluetooth
Button
Blinking blue: Booting / Bluetooth status / Pairing
Solid blue: Bluetooth connected
Blinking white: Configuring Wi-Fi access
Solid white: Wi-Fi enabled
Blinking red: Reseting
Solid red: Fault detected
Foot pads are precision
weight sensors.
If severe shaking or excessive
pressure is applied to Crunchy,
it is recommended to empty
the hopper and re-calibrate.
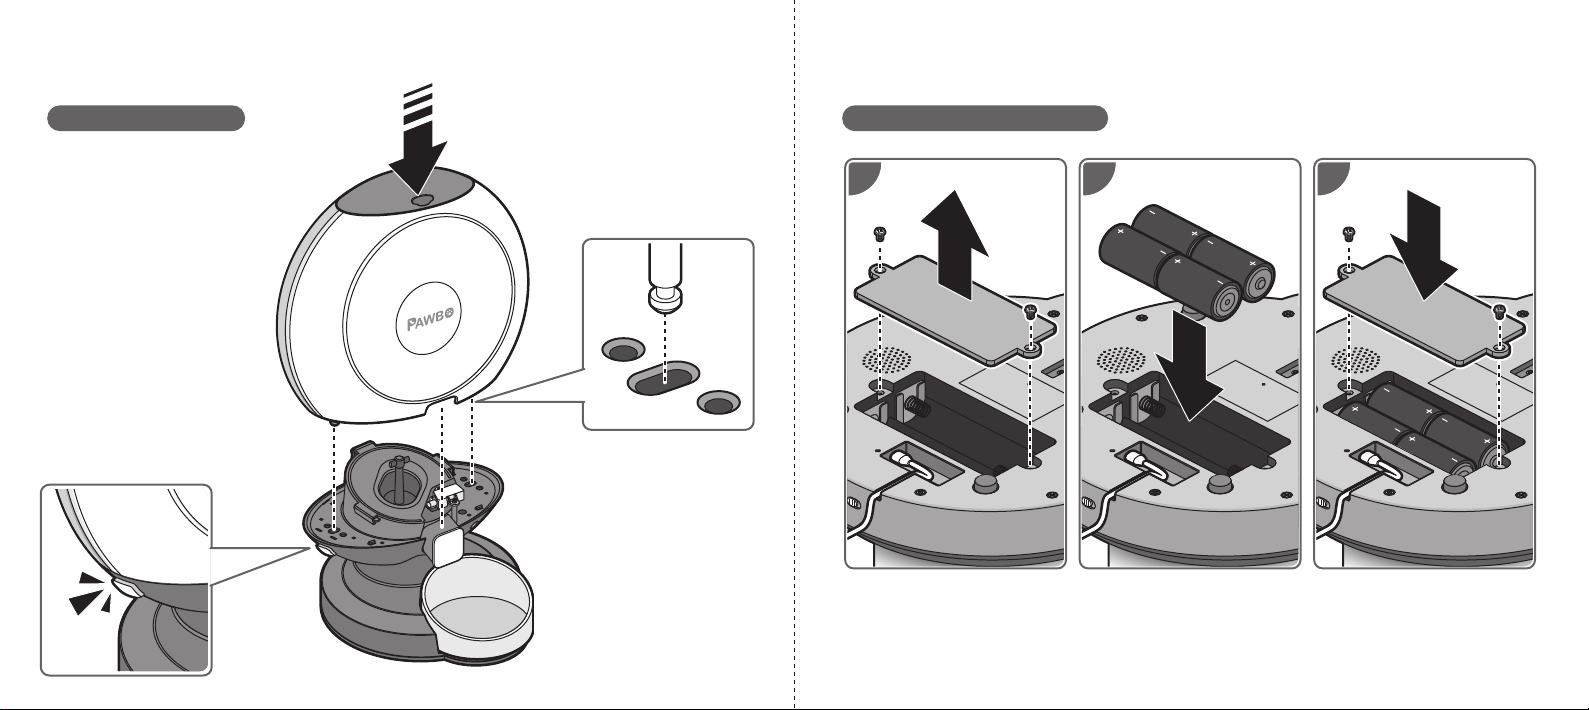
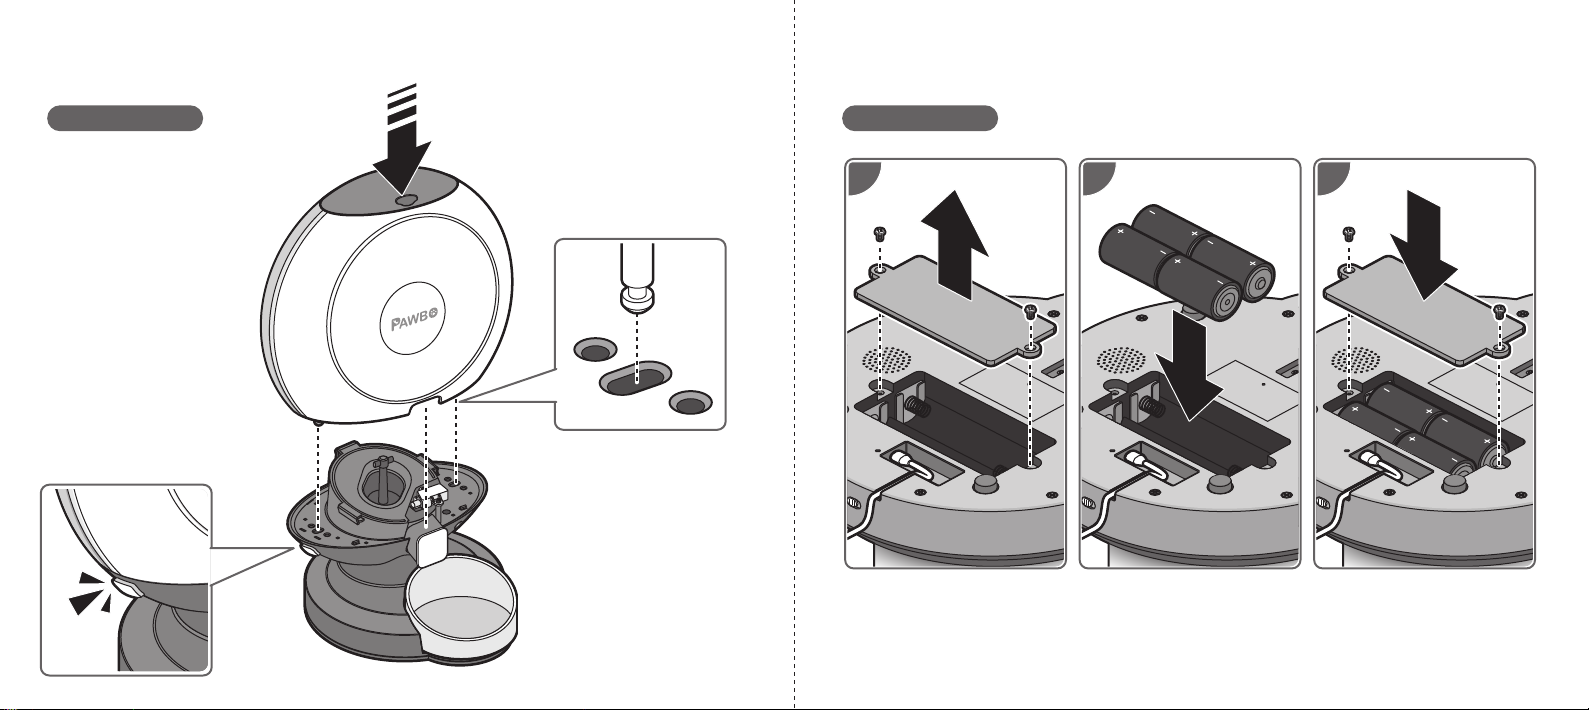
Installing Backup BatteriesCrunchy Assembly
Food pads are precision
weight sensors.
Must install on smooth firm
surface to ensure scale accuracy.
1 32
If battery replacement is required:
1. First turn off Crunchy.
2. After replacing, turn on Crunchy and re-calibrate to ensure the scale is set to zero.
1 2
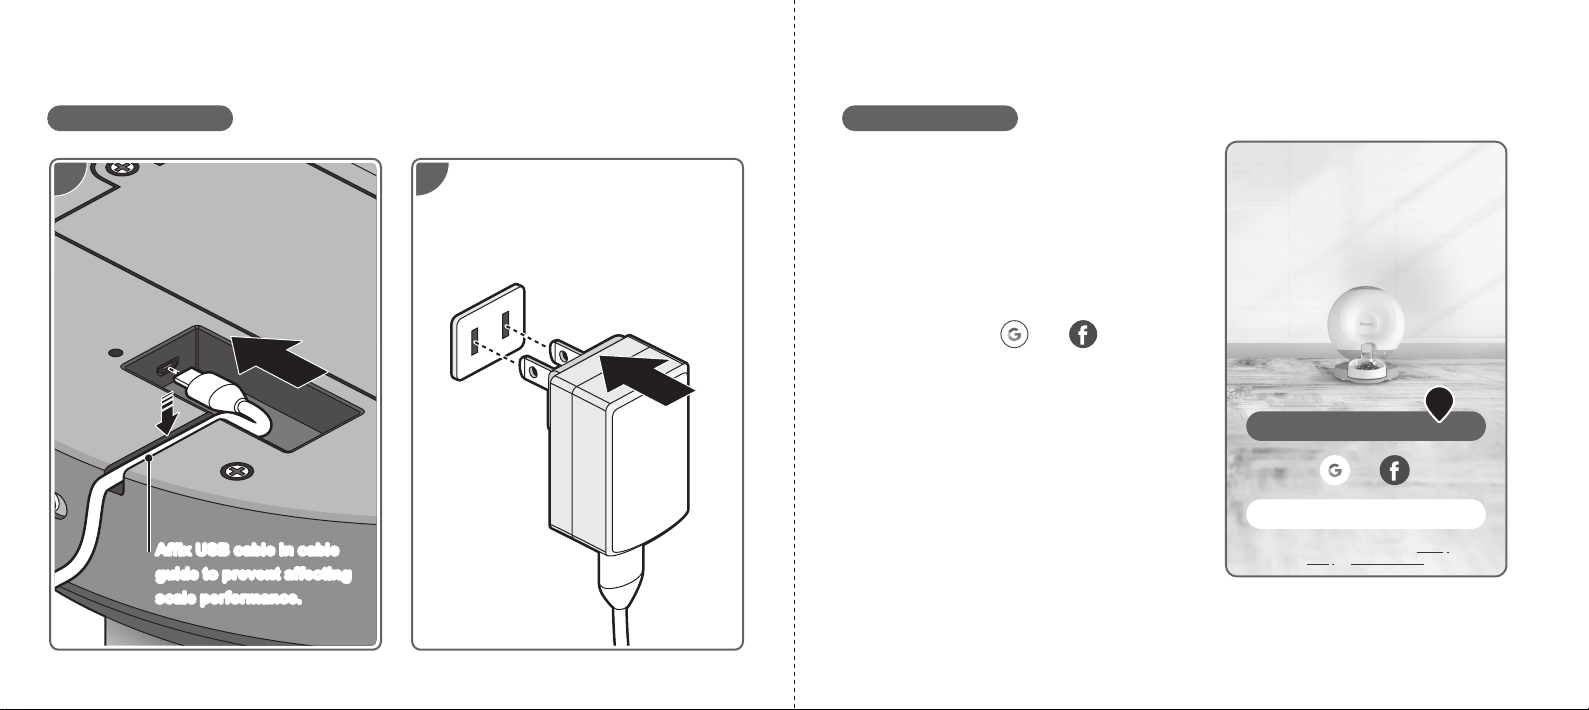
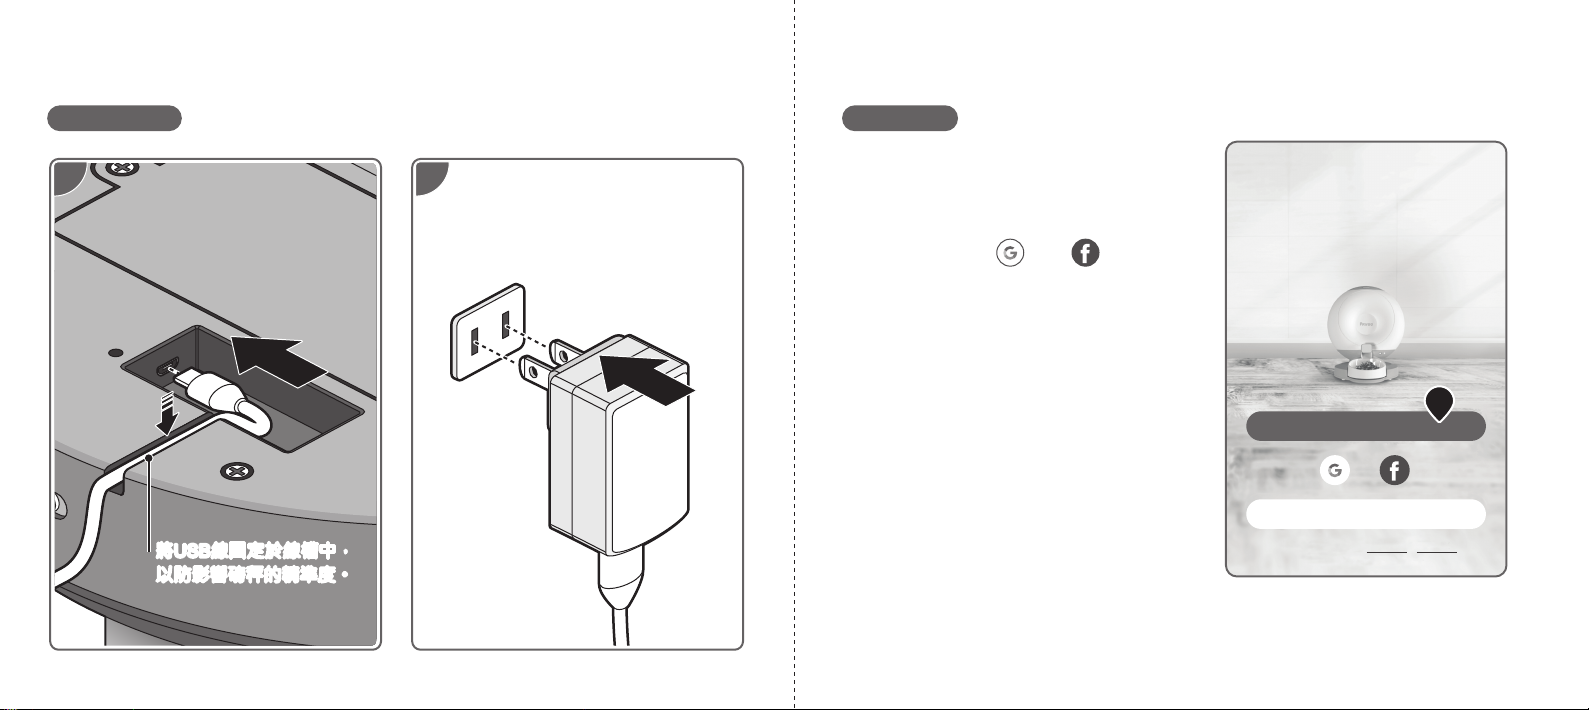
Affix USB cable in cable
guide to prevent affecting
scale performance.
Affix USB cable in cable
guide to prevent affecting
scale performance.
Installing Adapter Adding a Device
1. Tap Register to create a user profile.
Upon registration success, a verification
email is sent to complete and activate the
profile.
Once activated, tap Log In to use the
profile.
Alternatively, tap ( ) or ( ) for
cloud-based accounts.
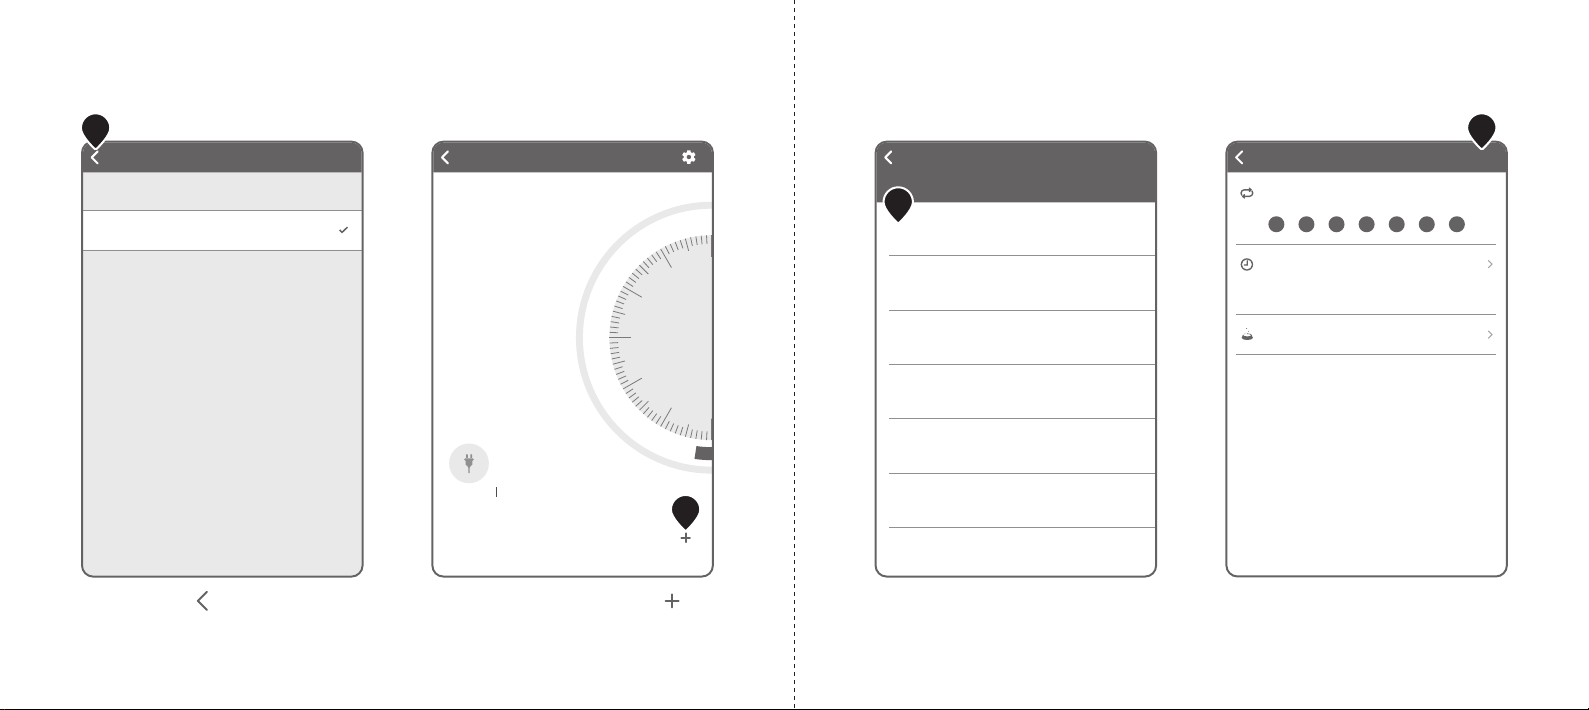
First time users, tap Country/Region then
make a selection. Tap OK then Done to
complete the logging in process. Log In
Register
By logging in you agree to our Privacy
PolicyandTerms of Service
1
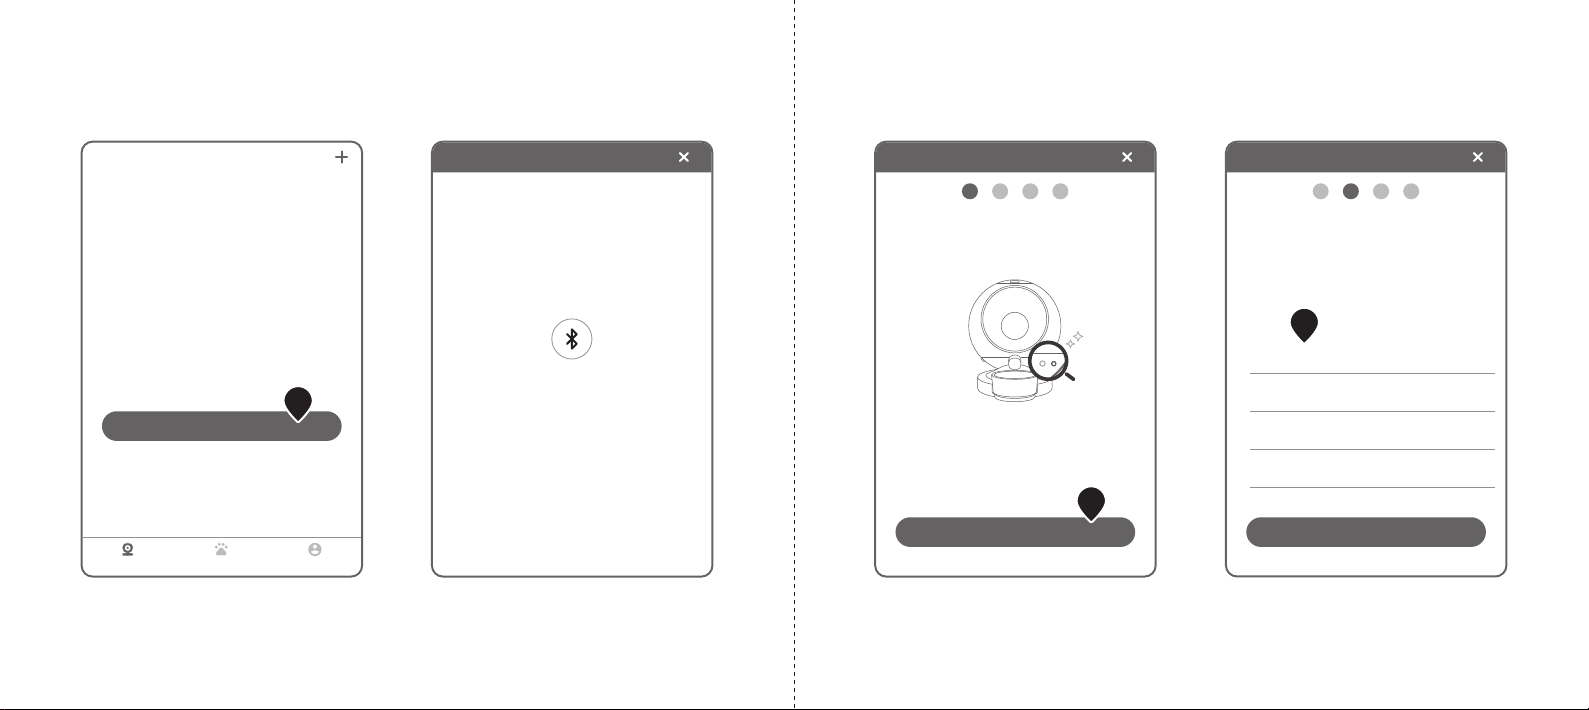
Device List
Add Device
Device Pet User
Add Device
Phone Bluetooth disabled. Please enable
Bluetooth first.
2. Click Add Device 3. Enable Bluetooth on the smart phone.
2
Add Device
1 2 3 4
Search again
Pair Device
Please keep your phone close to the device when...
PAWBO Smart Feeder
XX:XX:XX:XX:XX:XX
Available Bluetooth devices nearby
Add Device
1 2 3 4
Next
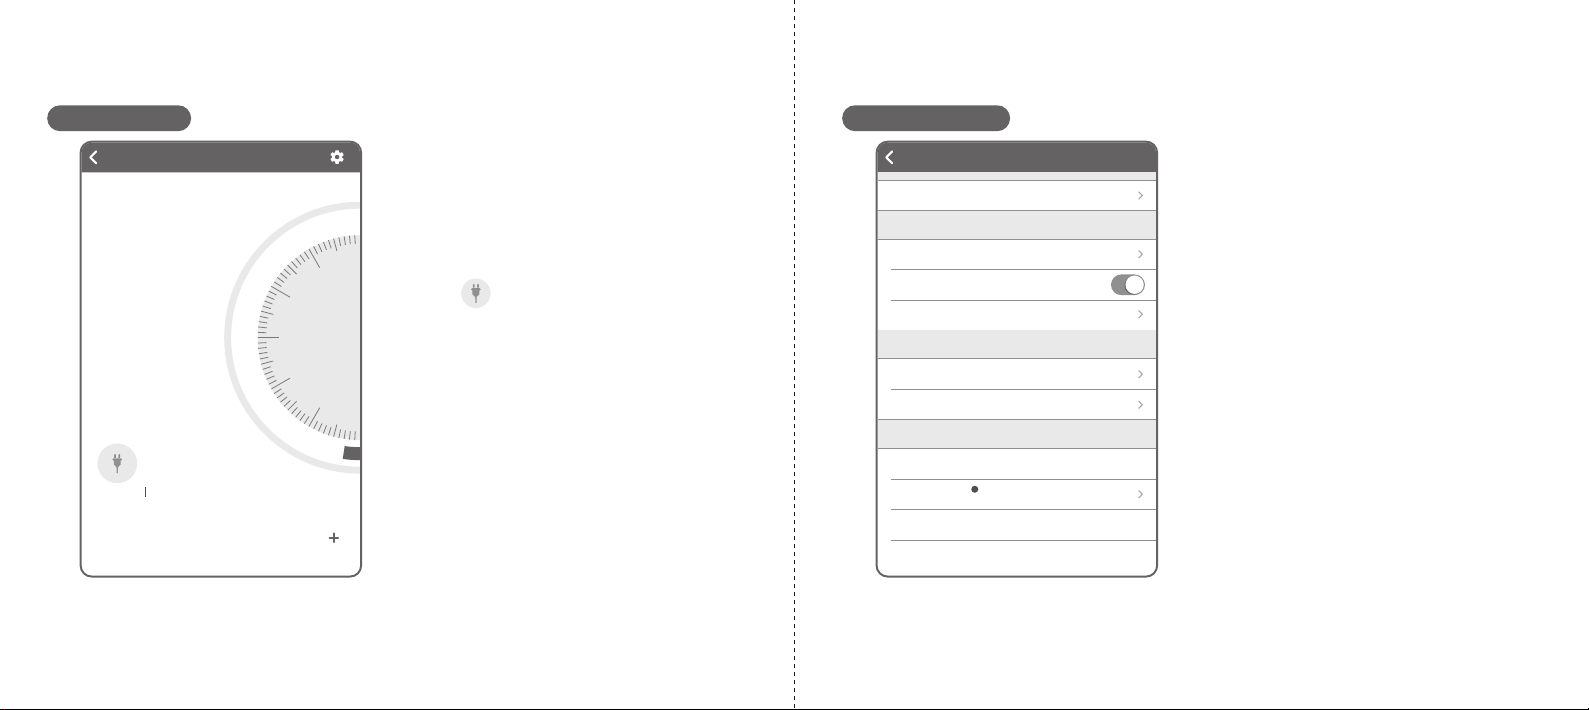
Power On the Device
Plug in the power cable and press the Bluetooth
button. Wait for a flashing blue light, then touch [...
No flashing blue light?
5
4. Power on the device. The LED button
flashes blue, press the button to pair it.
Tap Next to pair.
4
5. Tap the discovered device.
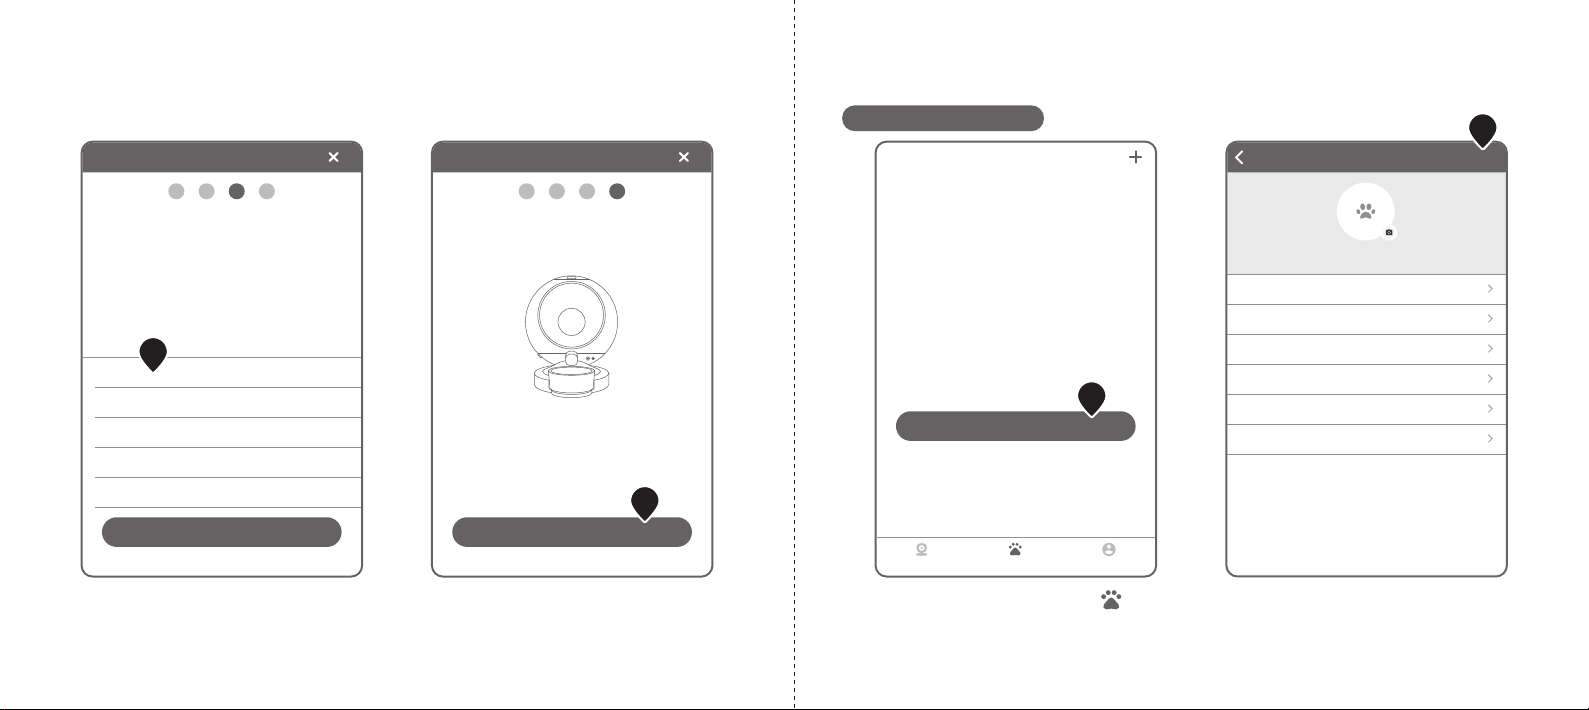
Setting Up a Device
Add Device
1 2 3 4
Device Initialization
This device has been added successfully.
Done
Add Device
1 2 3 4
Configure Wi-Fi Network
Device only supports 2.4GHz Wi-Fi.
Select network
Wi-Fi C
Wi-Fi A
Wi-Fi B
Wi-Fi D
Wi-Fi E
Search again
6. Select the discovered Wi-Fi network. 7. Once paired, the device successfully
initializes. The device is now added.
6
7
Add Pet Save
Nickname
Birthday
Sex
Neutered?
Breed
Weight
Socks
2006/06/23
Male
Neutered
Dachshund
8.3kg
Pet List
Add Pet
Device Pet User
2
1. From Device List, tap Pet ( ).
Tap Add Pet.
1
2. Enter your pet information.
Tap Save to return to the main menu.
Device Settings
GENERAL SETTINGS
Device name FEEDER
Wi-Fi
Scale calibration
Status indicator
dlink
Sounds
To be played when dispensing None
Pair to pet Not paired to pet
Product serial number yo_67573
System version 1.0.4.191004
Delete device
DISPENSE SETTINGS
DEVICE INFORMATION
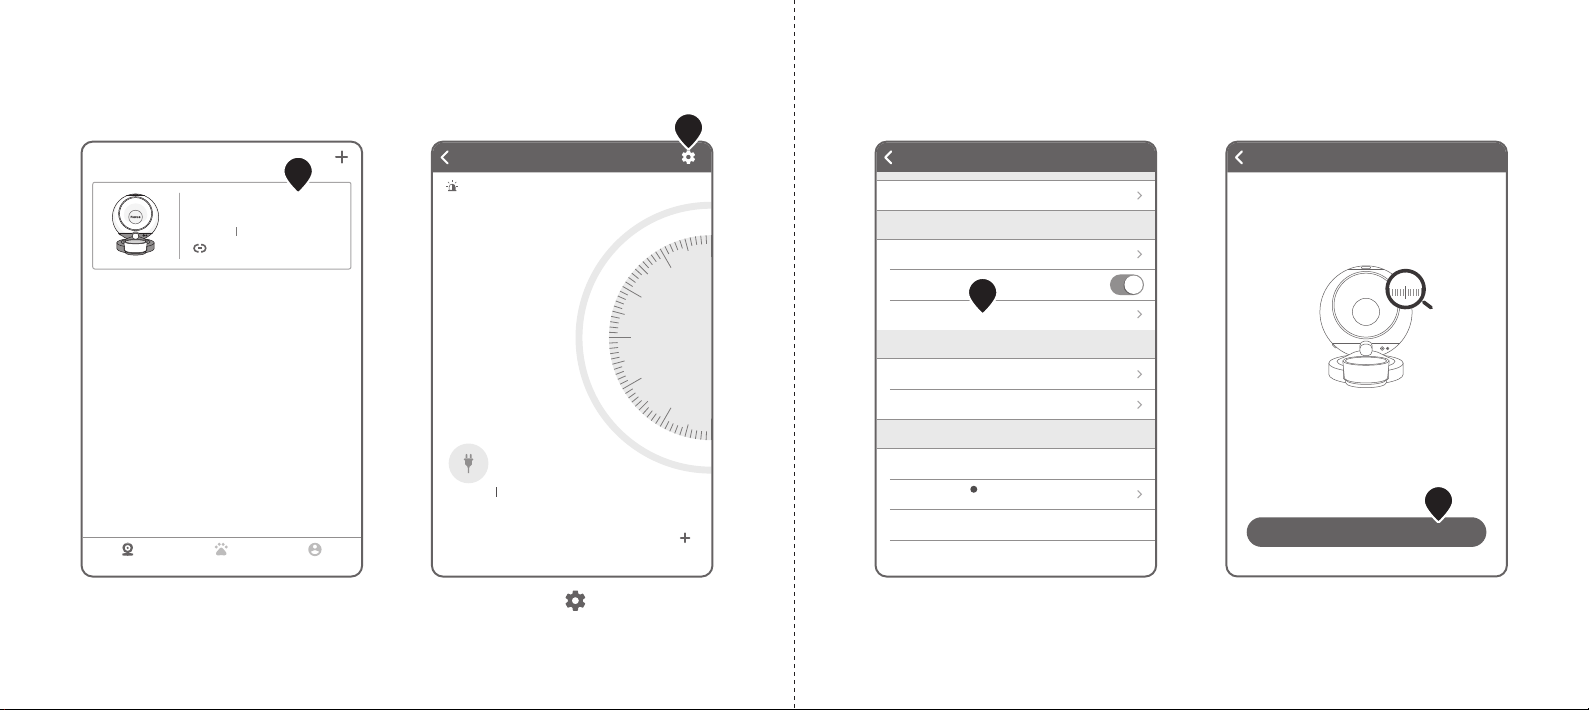
Scale calidration
Start Calibration
0
If the container is empty, but the amount
remaining value shown for the food is not zero,
please make sure:
1. Desiccant is loaded correctly
2. Bowl is loaded correctly
3. Start calibration
5
5. Tap Scale calibration.
6
6. Tap Start Calibration.
FEEDER
ONLINE
Please check if the food container is loaded c...
day(s)
Food will last
0
Amount remaining
Food info settings
g
0
Plugged in Battery power 0%
Not configured
Dispense Settings
5,000
1,000
3,000
Device List
Device Pet User
ONLINE
Smart Feeder
FEEDER
Plugged in Battery power 0%
Not paired to pet
3. From Device List, tap the device to
set up.
4. Tap Settings ( ).
3
4
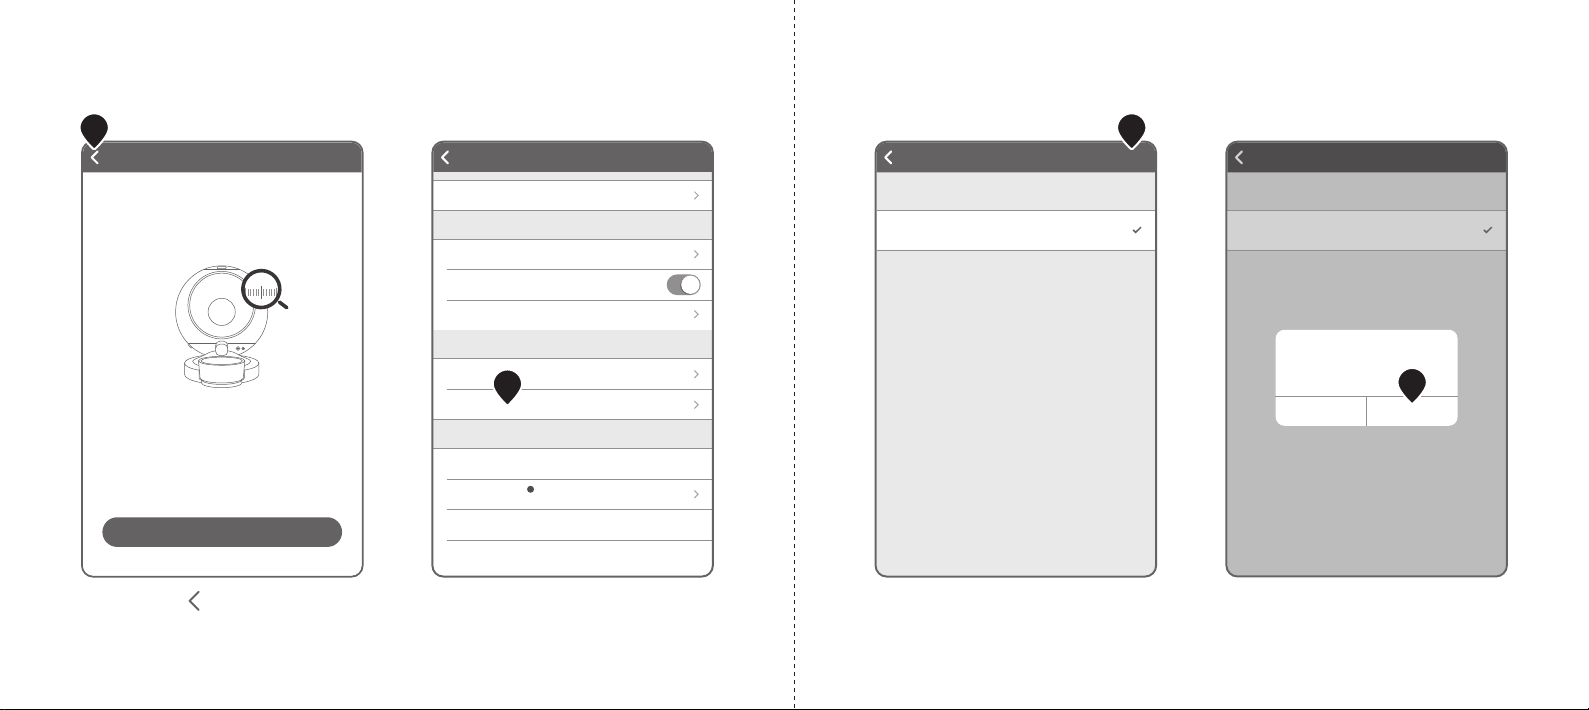
Pair to pet Save
PET LIST
Socks
Not paired
Each device pairs to one pet. Selecting an already paired pet
will automatically cancel the original pairing.
Pair to pet Save
PET LIST
Socks
Not paired
Each device pairs to one pet. Selecting an already paired pet
will automatically cancel the original pairing.
Pair to pet
Are you sure you want to pair device
FEEDER to your pet Socks
Cancel OK
10
9. From Pet List, select your pet.
Tap Save.
9
10. Tap OK to confirm pairing.
Device Settings
GENERAL SETTINGS
Device name FEEDER
Wi-Fi
Scale calibration
Status indicator
dlink
Sounds
To be played when dispensing None
Pair to pet Not paired to pet
Product serial number yo_67573
System version 1.0.4.191004
Delete device
DISPENSE SETTINGS
DEVICE INFORMATION
8
7. Tap Back ( ) to return to the Device
Menu.
Now load the hopper with food.
8. Tap Pair to Pet.
7
Scale calidration
Start Calibration
0
If the container is empty, but the amount
remaining value shown for the food is not zero,
please make sure:
1. Desiccant is loaded correctly
2. Bowl is loaded correctly
3. Start calibration
7
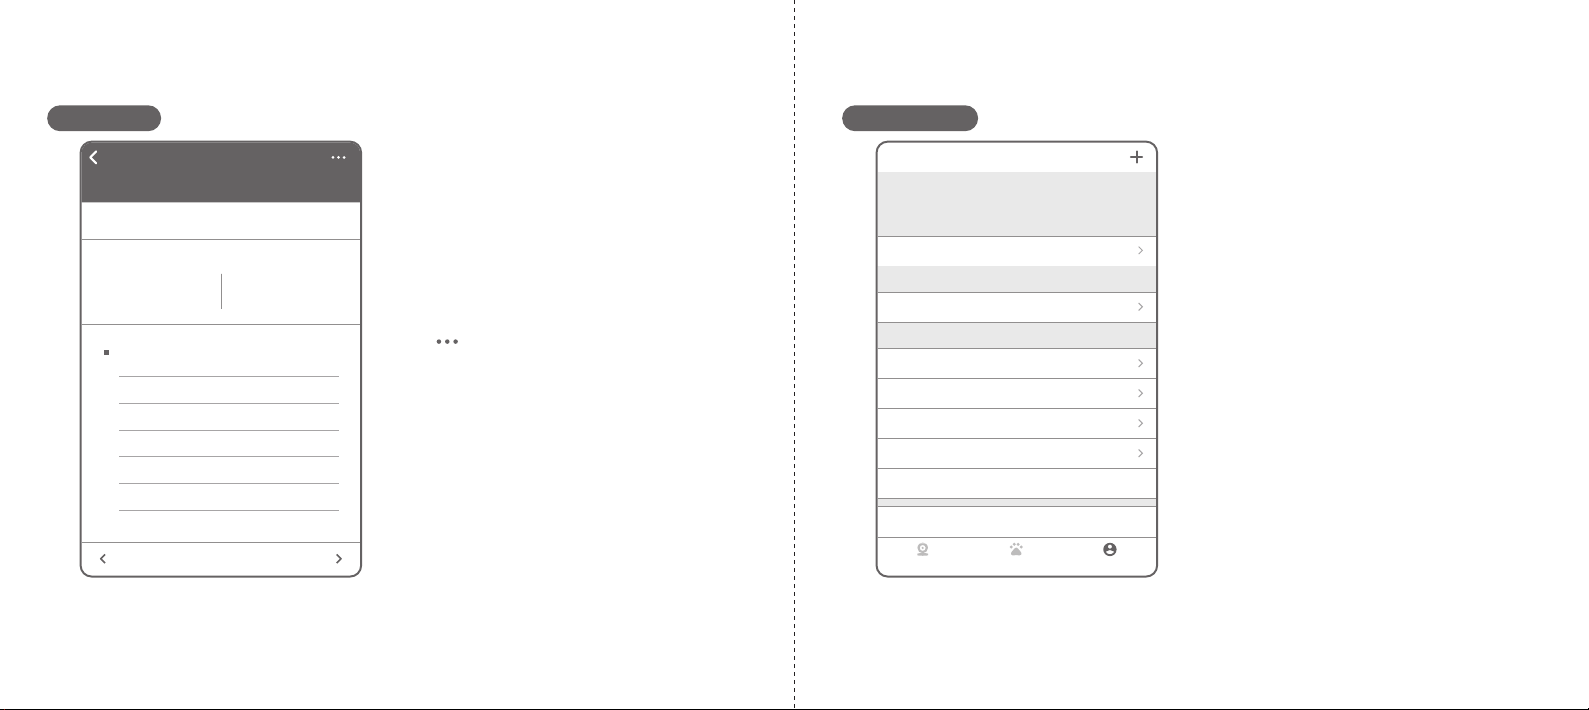
Dispense Settings
Manual dispense Auto dispense
New
Add new auto dispense
Amount to dispense 20g
Time PM 03:26
Day
S M T W T F S
Save
Dispensing takes about 30 seconds to complete. To avoid
dispensing the wrong quantity, do not put weight on the
device.
This device does not support Daylight Saving Time.
14
13. In Dispense Settings, tap New.
13
14. To define the dispense schedule, tap
the Day, the Time, and the Amount
to dispense (grams). Tap Save.
FEEDER
ONLINE
Food will last
day(s)Over 30
Amount remaining
Food info settings
g
247
Plugged in Battery power 0%
Not configured
Dispense Settings
5,000
1,000
3,000
Pair to pet Save
PET LIST
Socks
FEEDER(currently paired)
Each device pairs to one pet. Selecting an already paired pet
will automatically cancel the original pairing.
11. Tap Back ( ) to return to the Device
Menu.
12. In Dispense Settings, tap ( ).
11
12
FEEDER
ONLINE
Food will last
day(s)Over 30
Amount remaining
Food info settings
g
247
Plugged in Battery power 0%
Not configured
Dispense Settings
5,000
1,000
3,000
Device Menu
Food will last:
Indicates the remaining number of days
for the food supply.
Amount remaining:
Indicates the remaining amount in grams
for the current food supply.
Battery ( ):
Indicates power source and remaining
battery life.
Dispense Settings:
See “Setting Up a Device” for more
information.
Dispense History:
Tap to view a history of the dispensed
schedule.
Device Settings
GENERAL SETTINGS
Device name FEEDER
Wi-Fi
Scale calibration
Status indicator
dlink
Sounds
To be played when dispensing None
Pair to pet Not paired to pet
Product serial number yo_67573
System version 1.0.4.191004
Delete device
DISPENSE SETTINGS
DEVICE INFORMATION
Device Settings
Device name:
Tap to customize the device name.
Wi-Fi:
Tap to configure Wi-Fi settings. The
Bluetooth on the paired device must be
enabled.
Status indicator:
Tap to enable or disable the device status LED.
Scale calibration:
See “Setting Up a Device” for device
calibration.
Sounds:
Tap to define the audible notification and
volume level (Options: None, cat meowing,
dog barking, bird chirping, custom sound).
Pair to pet:
Tap to view paired and available pets.
Product serial number:
Displays device serial number.
System version:
Displays device firmware version.
Delete device:
Tap to delete device from app.
Socks
History Statistics
Taurine
Taurine(g)
Crude fiber
2019/10/13 - 2019/10/19
2019/10/13 - 2019/10/19
0.0g
Average per day
0.0g
Accumulated total
10
8
6
4
2
010/13 10/14 10/15 10/16 10/17 10/18 10/19
Pet Menu
History:
Tap a date to view food dispensed
information.
Statistics:
Tap to view statistical information based
on: times fed, total portions, calories,
crude protein, crude fat, crude fiber,
taurine.
Edit ( ):
Tap to edit or delete the pet profile.
User
Device Pet User
Help
Contact Us
Privacy Policy
Terms of Service
Version
Log Out
1.03.01
OTHER
Edit profile
ACCOUNT
Push notifications
NOTIFICATIONS
Pet Owner
User Profile
Edit profile:
Tap to edit the profile name, country/region.
Email is defined through login process.
Change password:
Tap to edit the password (local profiles only).
Push notifications:
Tap to enable or disable: battery power lower
than 20%, switching to battery power, dispense
failure results, food running out notification
(2 days prior), complete missing food details
notification, and other announcements. Tap
Save to confirm settings.
Help:
Tap to view a summary of tips and support
information.
Contact Us:
Tap to submit an Email to Pawbo.
Private Policy:
Tap to read the privacy policy for use with the app.
Terms of Service:
Tap to read the Pawbo Website Terms of Service.
Version:
Displays the current app version.
Log Out:
Tap to log the current profile out.
Note: All define data will be removed from
the smart phone.
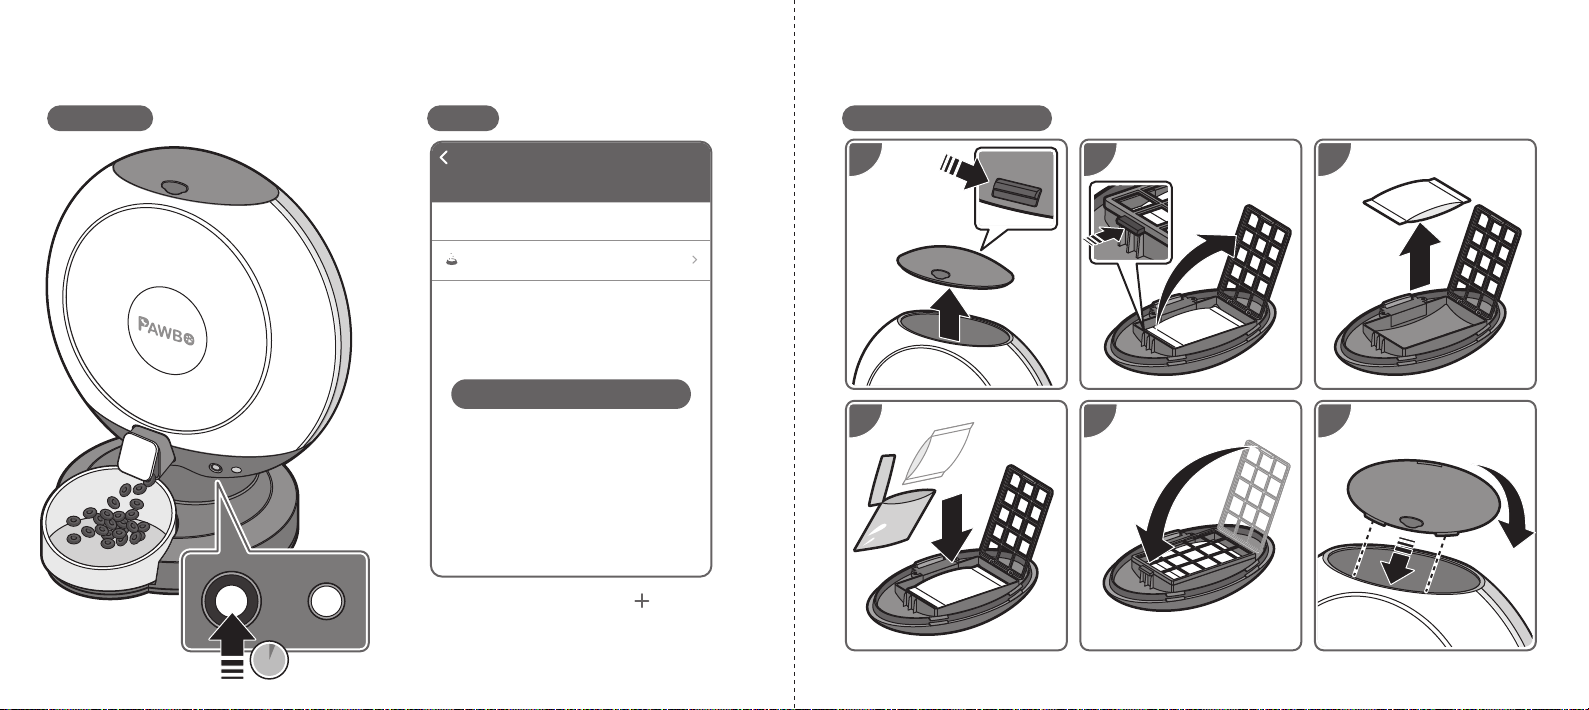
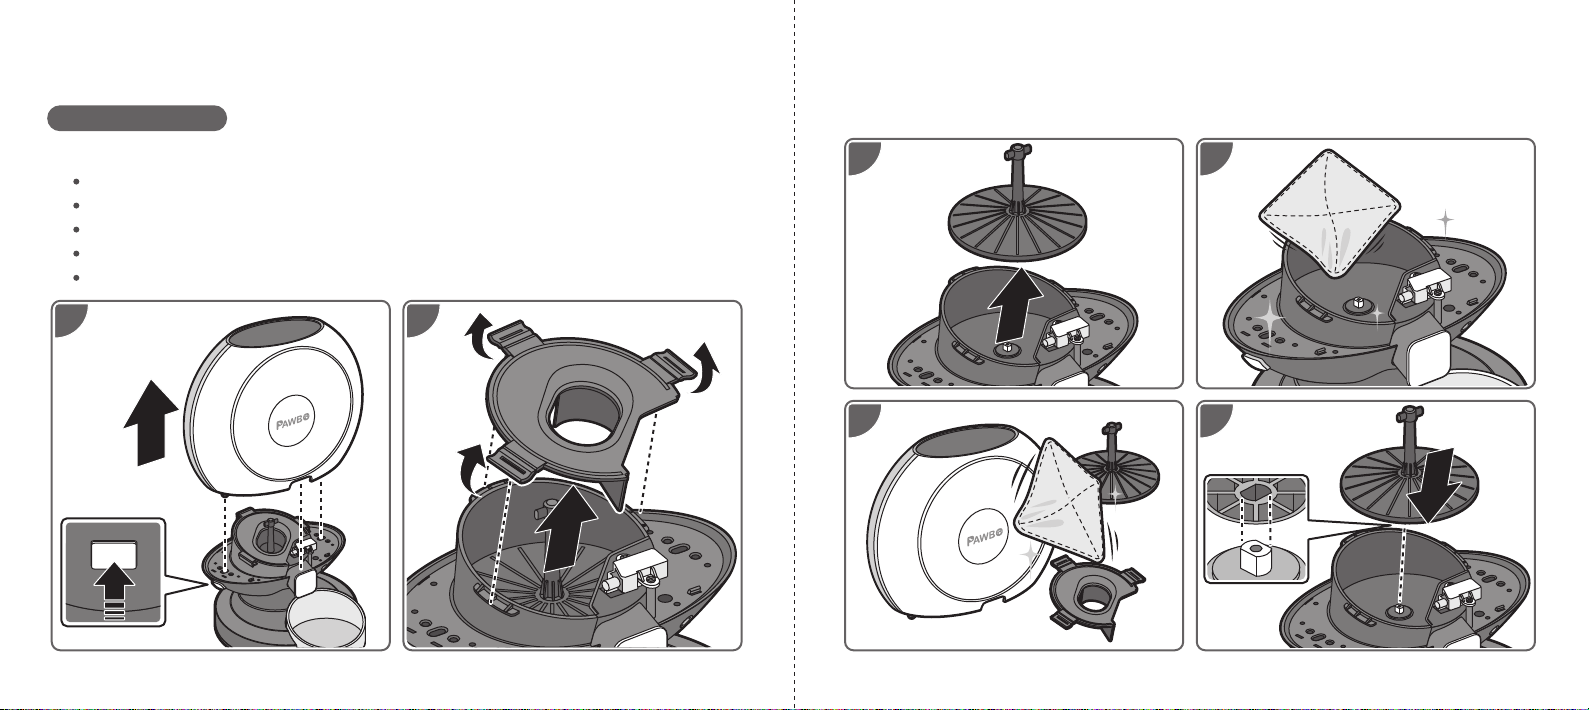
Replacing Desiccant
1
4
3
6
2
5
Crunchy APP
Dispense Settings
Manual dispense Auto dispense
DISPENSE IMMEDIATELY AFTER SETUP
Amount to dispense
Dispensing takes about 30 seconds to complete. To avoid
dispensing the wrong quantity, do not put weight on the
device.
20g
Dispense Now
In Dispense Settings, tap ( ).
Tap Manual dispense.
To set an amount, tap Amount to dispense.
Then tap Dispense Now to start.
2S
5 6
3 4
1 2
CAUTION:
Power off and unplug the device before cleaning.
Clean the unit with a damp cloth rather than a soaked cloth.
The hopper and bowl can be removed for washing or cleaning.
Do not immerse the base in water at any time to prevent device short-circuit.
Wipe clean and completely dry before refilling the food.
Cleaning Hopper
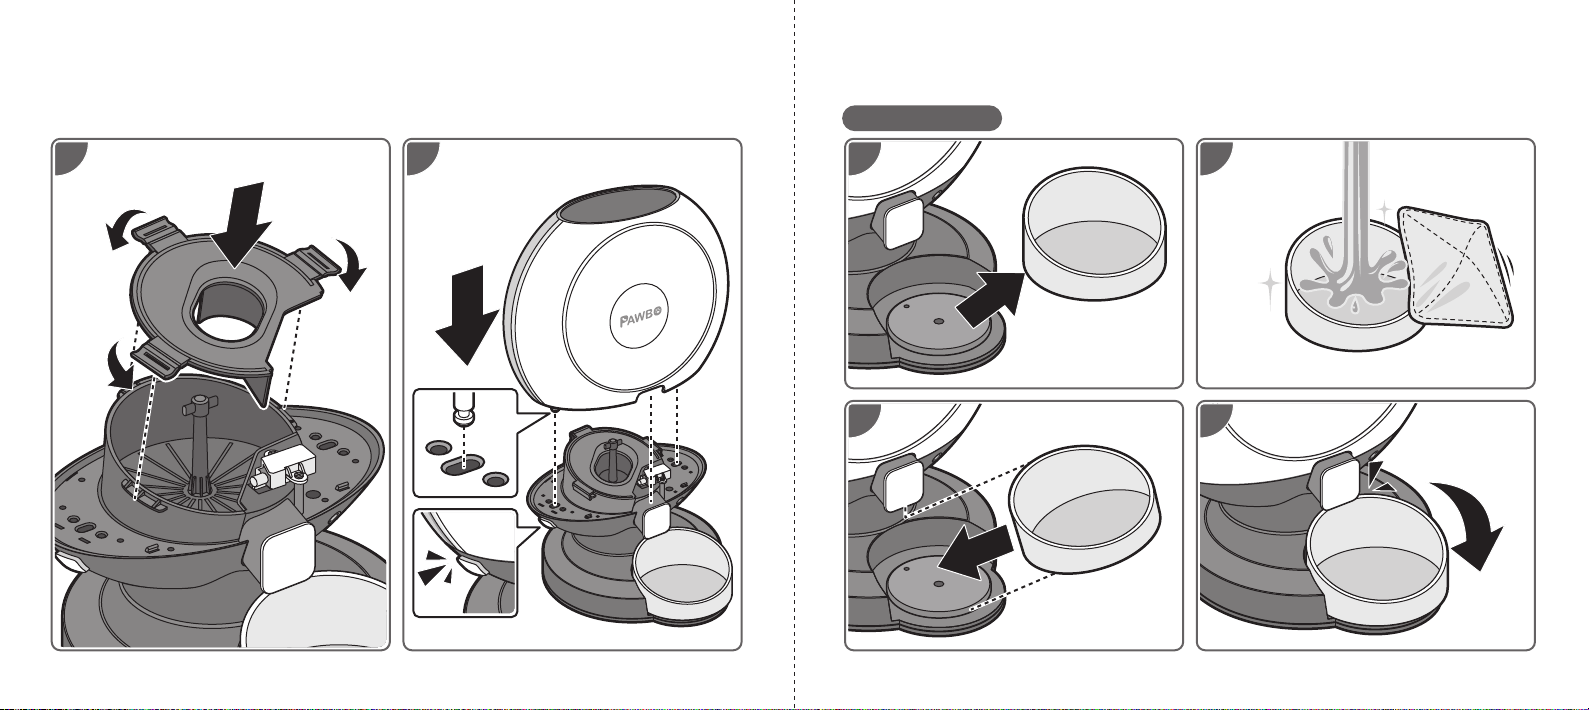
Cleaning Bowl
3 4
1 27 8
This warranty is limited from the original date of purchase (invoice date) for 1 year period.
Any receipts or proof of purchase must be included for all repairs/services request by
Consumer. For further details, please refer to www.pawbo.com
If you require support for your Pawbo Chrunchy, please visit our website at www.pawbo.com
to contact customer service ([email protected]). Looking for other interesting
remote interactive toys? Our website is the place to go!
快速指南
包裝內容
Crunchy本體(上蓋/餵食碗/乾燥劑)
Micro USB傳輸線
電源轉換器
規格
容量:6公升
餵食碗容量:120g(4.23 oz)
功能鍵:餵食鍵、重置鍵、電源鍵、藍牙鍵
LED燈號:電源(紅色)、藍牙(藍色)、Wi-Fi(白色)
重量感測器:本體 x 4,餵食碗 x 1
Wi-Fi:2.4G(802.11 b/g/n)
藍牙:v4.2 BR/EDR,配有低功耗藍牙信標
電源轉換器:5V/2A
喇叭:8Ω/1W
尺寸(寬 x 高 x 長 ):361 x 422 x 328公厘(14.2 x 16.6 x 12.9 英寸)
重量:2.3 kg(5.1 lbs)
設備需求
使用iOS 8.0或以上版本/
Android 4.4或以上版本的智慧型手機
安全資訊
請勿將任何異物放入Crunchy本體中。
本產品限於室內家用,請勿在戶外使用。
請勿將設備用於其指定用途以外的其他用途。
禁止兒童於Crunchy附近玩耍。
除本快速指南中說明的零件外,請勿自行拆解Crunchy。
請勿將Crunchy安裝或存放於室外或-20°C(-4°F)以下溫度的環境。
禁止將底座浸於水中,以免損壞其電子零件。
請勿將Crunchy用於幼犬、幼貓、身有殘疾或無法自行進食的犬貓。
若設備電源線或插頭損壞、設備故障或遭破壞,請勿再行操作或使用,並應立即聯絡客服以取得進
一步的指示。
請勿讓寵物咀嚼或吞嚥任何零件,若顧慮電源線,請自行購買並加裝電源線絕緣套(硬塑料保護套)。
請勿試圖自行修理Crunchy。
重要安全資訊
請視需求使用合適額定值的延長線。
請勿將寵物餵食器用於非指定用途。非製造商建議或販售的配件可能會造成使用上的危險。
請勿以上蓋、本體、餵食碗或碗架將Crunchy提起,應使用雙手自底座將Crunchy提起與移動,同
時保持直立。
Crunchy限用乾糧。切勿使用濕軟或罐頭食物。
為避免絆倒,請時時將電源線放置於日常動線以外的地方。
若本產品的插頭碰水,請關閉該使用之牆上插座的電源,切勿嘗試拔插頭。
請於完成安裝後,詳細檢查本產品,若電源線或插頭上有水,切勿插電。
為降低受傷的風險,在設備使用中,應嚴密監督在旁或在附近玩耍的兒童。
使用電源線時,切勿將其電源線或插頭放入水或其他液體中。
請妥善處理所有包材。部分內容物可能裝在塑膠袋中,這些袋子可能會造致窒息,應遠離兒童與寵物。
產品介紹
線槽電源燈
電池蓋
喇叭
腳墊/重量感測器
重置鍵
Micro USB插槽
控制面板 LED燈號說明
上蓋開啟卡榫
上蓋(附有乾燥劑放置處)
飼料箱
鬆開鍵
飼料箱
底座
餵食碗 線槽 電源開關
控制面板
出糧槽
餵食鍵/LED燈 藍牙鍵
藍燈閃爍:啟動中/藍牙狀態/配對中
藍燈恆亮:藍牙已連接
白燈閃爍:Wi-Fi設置中
白燈恆亮:Wi-Fi已啟用
紅燈閃爍:重置中
紅燈恆亮:偵測到故障
具精準重量感測器的腳墊。
若Crunchy遭受劇烈搖晃或
過大加壓時,建議清空飼料
箱並重新校正。
安裝
安裝備用電池
具精準重量感測器的腳墊。
必須安裝於平滑牢固的表面上,
以確保精準測量。
1 32
更換電池時需:
1. 先將Crunchy關機。
2. 更換電池後,將Crunchy開機並重新校正,以確保磅秤的設置為零。
Crunchy組件
初次設定
1 2
將USB線固定於線槽中,
以防影響磅秤的精準度。
安裝電源線 新增裝置
1. 點擊註冊建立一個新的帳戶。
註冊成功後,以驗證email完成並啟
用帳戶,啟用後,點擊登入開始使用
帳戶,或點擊( )或( )選用雲
端帳戶。
首次註冊:點擊國家/區域選擇符合
項目後,點擊OK與完成以完成登入
流程。
登入
註冊
登入後即代表您同意隱私政策與服務條款
1
Table of contents


