Paxar Monarch 917 User manual
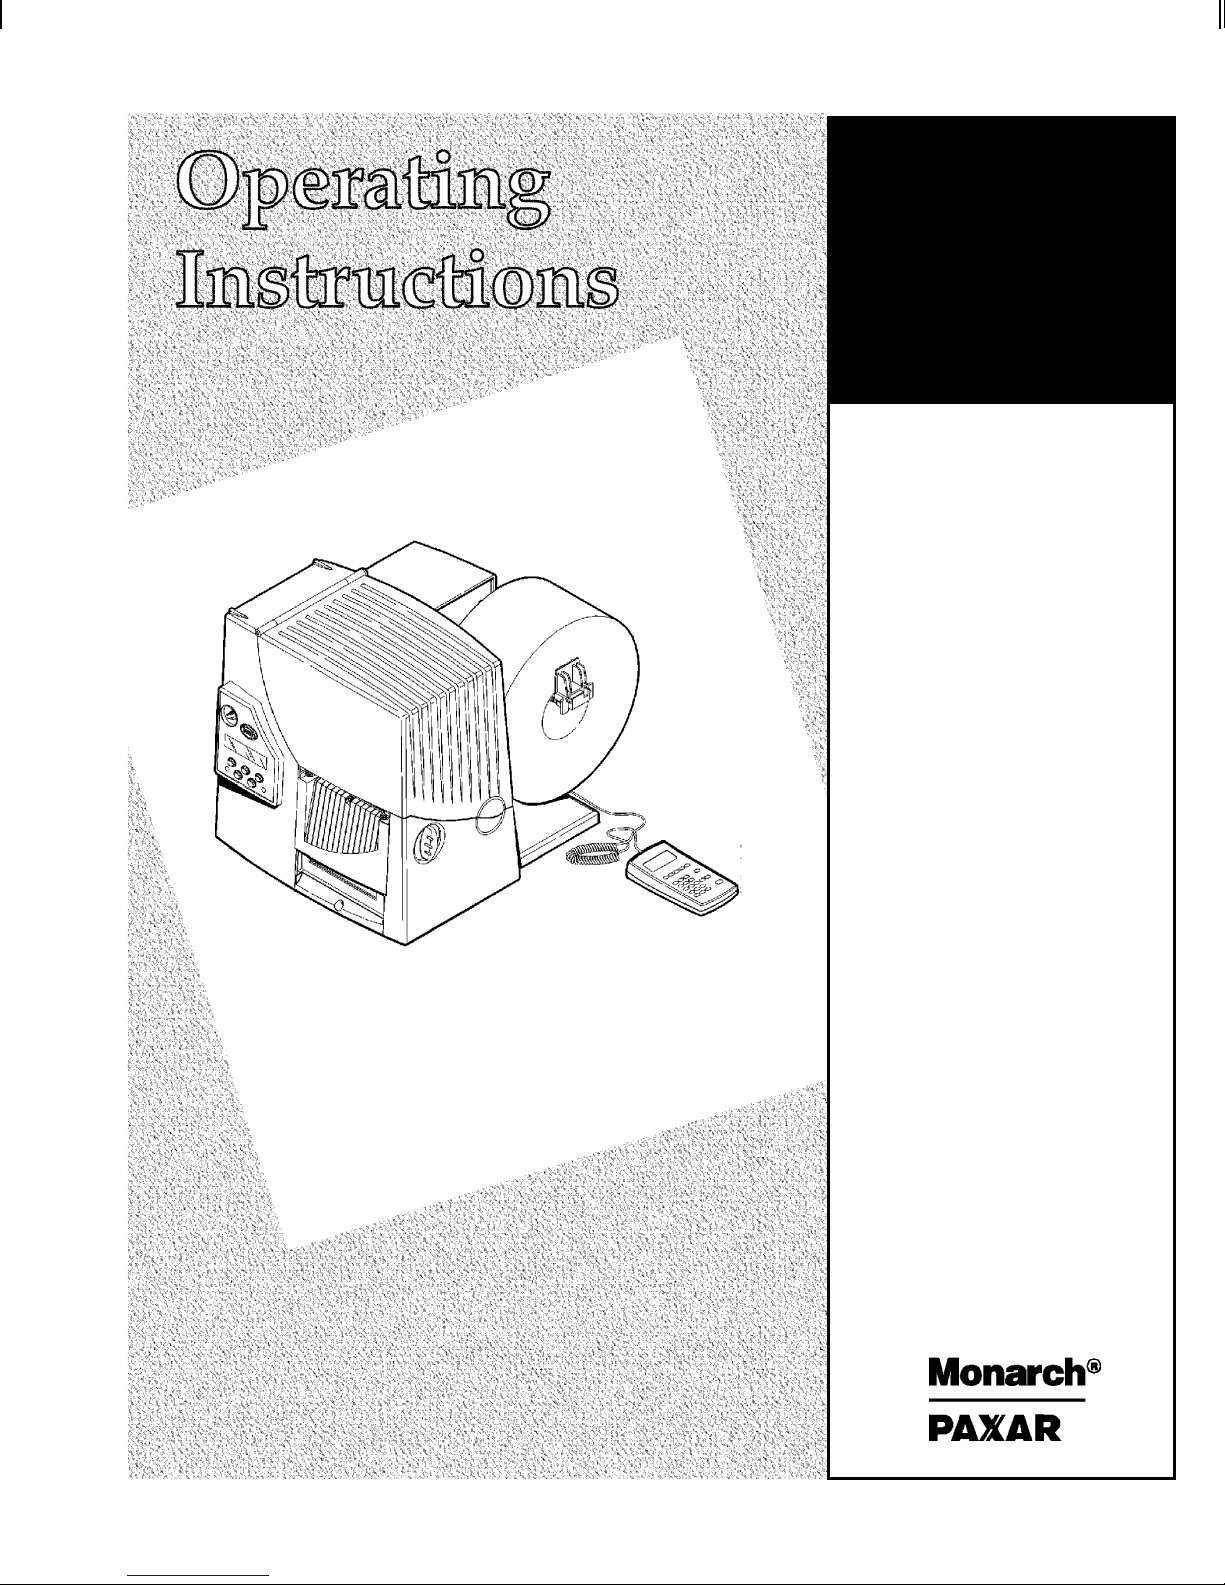
Monarch
917Keypad
TC0917OI Rev. AA 1/01 ©1997 Monarch Marking Systems, Inc. All rights reserved.

Each product and program carries a respective written warranty, the only
warranty on which the customer can rely. Monarch reserves the right to make
changes in the product, the programs, and their availability at any time and
without notice. Although Monarch has made every effort to provide complete
and accurate information in this manual, Monarch shall not be liable for any
omissions or inaccuracies. Any update will be incorporated in a later edition of
this manual.
©1997 Monarch Marking Systems, Inc. All rights reserved. No part of this
publication may be reproduced, transmitted, stored in a retrieval system, or
translated into any language in any form by any means, without the prior
written permission of Monarch Marking Systems, Inc.
WARNING
This equipment has been tested and found to comply with the limits for a Class A digital
device, pursuant to Part 15 of the FCC Rules. These limits are designed to provide
reasonable protection against harmful interference when the equipment is operated in a
commercial environment. This equipment generates, uses, and can radiate radio frequency
energy and, if not installed and used in accordance with the instruction manual, may cause
harmful interference to radio communications. Operation of this equipment in a residential
area is likely to cause harmful interference in which case the user will be required to correct
the interference at his own expense.
CANADIAN D.O.C. WARNING
This digital apparatus does not exceed the Class A limits for radio noise emissions from
digital apparatus set out in the Radio Interference Regulations of the Canadian Department
of Communications.
Le présent appareil numérique n’émet pas de bruits radioélectriques dépassant les limites
applicables aux appareils numériques de la classe A prescrites dans le Réglement sur le
brouillage radioélectrique édicte par le ministère des Communications du Canada.
Trademarks
MONARCH, 917, 9403, 9446, 9835, 9840, and 9850 are trademarks of Monarch Marking Systems, Inc.
Paxar is a trademark of Paxar Corporation.
Monarch Marking Systems
P.O. Box 608
Dayton, Ohio 45401

Table of Contents
GETTING STARTED . . . . . . . . . . . . . . . . . . . . . . . . . . . . . . . . . . . . . . . . . . . . . . . . . . . . 1-1
Connecting the Cable. . . . . . . . . . . . . . . . . . . . . . . . . . . . . . . . . . . . . . . . . . . . . 1-2
Using the Keypad . . . . . . . . . . . . . . . . . . . . . . . . . . . . . . . . . . . . . . . . . . . . . . . . 1-3
Control Keys. . . . . . . . . . . . . . . . . . . . . . . . . . . . . . . . . . . . . . . . . . . . . 1-3
Selecting a Function . . . . . . . . . . . . . . . . . . . . . . . . . . . . . . . . . . . . . . . . . . . . . . 1-4
Exiting an Option . . . . . . . . . . . . . . . . . . . . . . . . . . . . . . . . . . . . . . . . . . . . . . . . 1-5
SETTING SUPPLY OPTIONS . . . . . . . . . . . . . . . . . . . . . . . . . . . . . . . . . . . . . . . . . . . . . 2-1
Ribbon . . . . . . . . . . . . . . . . . . . . . . . . . . . . . . . . . . . . . . . . . . . . . . . . . . . . . . . . 2-2
Batch Separators . . . . . . . . . . . . . . . . . . . . . . . . . . . . . . . . . . . . . . . . . . . . . . . . 2-2
Feed Mode . . . . . . . . . . . . . . . . . . . . . . . . . . . . . . . . . . . . . . . . . . . . . . . . . . . . . 2-4
Print Position. . . . . . . . . . . . . . . . . . . . . . . . . . . . . . . . . . . . . . . . . . . . . . . . . . . . 2-4
Supply Position. . . . . . . . . . . . . . . . . . . . . . . . . . . . . . . . . . . . . . . . . . . . . . . . . . 2-5
Margin Position. . . . . . . . . . . . . . . . . . . . . . . . . . . . . . . . . . . . . . . . . . . . . . . . . . 2-6
Cut Position . . . . . . . . . . . . . . . . . . . . . . . . . . . . . . . . . . . . . . . . . . . . . . . . . . . . 2-8
Supply Type . . . . . . . . . . . . . . . . . . . . . . . . . . . . . . . . . . . . . . . . . . . . . . . . . . . . 2-9
Speed . . . . . . . . . . . . . . . . . . . . . . . . . . . . . . . . . . . . . . . . . . . . . . . . . . . . . . . . 2-10
Backfeed. . . . . . . . . . . . . . . . . . . . . . . . . . . . . . . . . . . . . . . . . . . . . . . . . . . . . . 2-11
Verifier. . . . . . . . . . . . . . . . . . . . . . . . . . . . . . . . . . . . . . . . . . . . . . . . . . . . . . . . 2-12
COMMUNICATION VALUES . . . . . . . . . . . . . . . . . . . . . . . . . . . . . . . . . . . . . . . . . . . . . . 3-1
Baud Rate. . . . . . . . . . . . . . . . . . . . . . . . . . . . . . . . . . . . . . . . . . . . . . . . . . . . . . 3-2
Word Length . . . . . . . . . . . . . . . . . . . . . . . . . . . . . . . . . . . . . . . . . . . . . . . . . . . . 3-2
Stop Bits . . . . . . . . . . . . . . . . . . . . . . . . . . . . . . . . . . . . . . . . . . . . . . . . . . . . . . . 3-3
Parity. . . . . . . . . . . . . . . . . . . . . . . . . . . . . . . . . . . . . . . . . . . . . . . . . . . . . . . . . . 3-3
Flow Control . . . . . . . . . . . . . . . . . . . . . . . . . . . . . . . . . . . . . . . . . . . . . . . . . . . . 3-4
Reset to Default Values . . . . . . . . . . . . . . . . . . . . . . . . . . . . . . . . . . . . . . . . . . . 3-4
Parallel Communications . . . . . . . . . . . . . . . . . . . . . . . . . . . . . . . . . . . . . . . . . . 3-5
Table of Contents i

SETTING CONTRAST. . . . . . . . . . . . . . . . . . . . . . . . . . . . . . . . . . . . . . . . . . . . . . . . . . . 4-1
SETTING DEFAULTS . . . . . . . . . . . . . . . . . . . . . . . . . . . . . . . . . . . . . . . . . . . . . . . . . . . 5-1
Monetary Sign . . . . . . . . . . . . . . . . . . . . . . . . . . . . . . . . . . . . . . . . . . . . . . . . . . 5-2
Secondary Sign . . . . . . . . . . . . . . . . . . . . . . . . . . . . . . . . . . . . . . . . . . . . . . . . . 5-3
Decimal Places . . . . . . . . . . . . . . . . . . . . . . . . . . . . . . . . . . . . . . . . . . . . . . . . . 5-4
Slashed Zero . . . . . . . . . . . . . . . . . . . . . . . . . . . . . . . . . . . . . . . . . . . . . . . . . . . 5-4
Power-Up Mode . . . . . . . . . . . . . . . . . . . . . . . . . . . . . . . . . . . . . . . . . . . . . . . . . 5-5
Prompt Set. . . . . . . . . . . . . . . . . . . . . . . . . . . . . . . . . . . . . . . . . . . . . . . . . . . . . 5-6
SETTING FORMAT OPTIONS . . . . . . . . . . . . . . . . . . . . . . . . . . . . . . . . . . . . . . . . . . . . 6-1
PRINTING. . . . . . . . . . . . . . . . . . . . . . . . . . . . . . . . . . . . . . . . . . . . . . . . . . . . . . . . . . . . . 7-1
Pausing a Batch. . . . . . . . . . . . . . . . . . . . . . . . . . . . . . . . . . . . . . . . . . . . . . . . . 7-2
Restarting a Batch . . . . . . . . . . . . . . . . . . . . . . . . . . . . . . . . . . . . . . . . . . . . . . . 7-2
Canceling a Paused Batch. . . . . . . . . . . . . . . . . . . . . . . . . . . . . . . . . . . . . . . . . 7-3
Repeating a Batch . . . . . . . . . . . . . . . . . . . . . . . . . . . . . . . . . . . . . . . . . . . . . . . 7-5
Offline Printing . . . . . . . . . . . . . . . . . . . . . . . . . . . . . . . . . . . . . . . . . . . . . . . . . 7-6
Entering Numbers . . . . . . . . . . . . . . . . . . . . . . . . . . . . . . . . . . . . . . . . 7-6
Entering Letters. . . . . . . . . . . . . . . . . . . . . . . . . . . . . . . . . . . . . . . . . . 7-7
Entering Symbols . . . . . . . . . . . . . . . . . . . . . . . . . . . . . . . . . . . . . . . . 7-8
Using Bar Code 128 . . . . . . . . . . . . . . . . . . . . . . . . . . . . . . . . . . . . . . 7-9
Entering and Changing Data. . . . . . . . . . . . . . . . . . . . . . . . . . . . . . . . 7-9
Types of Data Entry . . . . . . . . . . . . . . . . . . . . . . . . . . . . . . . . . . . . . . 7-10
Entering a Batch . . . . . . . . . . . . . . . . . . . . . . . . . . . . . . . . . . . . . . . . 7-12
Printing Tags Without Cutting . . . . . . . . . . . . . . . . . . . . . . . . . . . . . . 7-16
Using Print Multiple with Inc/Dec Fields . . . . . . . . . . . . . . . . . . . . . . 7-18
Examples. . . . . . . . . . . . . . . . . . . . . . . . . . . . . . . . . . . . . . . . . . . . . . 7-19
DIAGNOSTICS. . . . . . . . . . . . . . . . . . . . . . . . . . . . . . . . . . . . . . . . . . . . . . . . . . . . . . . . . 8-1
Factory Set Password . . . . . . . . . . . . . . . . . . . . . . . . . . . . . . . . . . . . . . . . . . . . 8-1
Checking the Software Version . . . . . . . . . . . . . . . . . . . . . . . . . . . . . . . . . . . . . 8-1
Printing a Test Label. . . . . . . . . . . . . . . . . . . . . . . . . . . . . . . . . . . . . . . . . . . . . . 8-2
Checking Supply Quality . . . . . . . . . . . . . . . . . . . . . . . . . . . . . . . . . . . . . . . . . . 8-3
ii Table of Contents

Using Password Protection . . . . . . . . . . . . . . . . . . . . . . . . . . . . . . . . . . . . . . . . 8-4
Enabling the Password (System Administrators only). . . . . . . . . . . . . 8-4
Deleting Formats, Graphics or Fonts. . . . . . . . . . . . . . . . . . . . . . . . . . 8-5
Deleting Formats If Password Protection Is Disabled . . . . . . . . . . . . . 8-7
Service Diagnostics . . . . . . . . . . . . . . . . . . . . . . . . . . . . . . . . . . . . . . . . . . . . . . 8-8
CHARACTER SETS. . . . . . . . . . . . . . . . . . . . . . . . . . . . . . . . . . . . . . . . . . . . . . . . . . . . . A-1
Character Sets . . . . . . . . . . . . . . . . . . . . . . . . . . . . . . . . . . . . . . . . . . . . . . . . . . A-1
Uppercase Letters . . . . . . . . . . . . . . . . . . . . . . . . . . . . . . . . . . . . . . . . . . . . . . . A-3
Lowercase Letters . . . . . . . . . . . . . . . . . . . . . . . . . . . . . . . . . . . . . . . . . . . . . . . A-3
Currency Symbols . . . . . . . . . . . . . . . . . . . . . . . . . . . . . . . . . . . . . . . . . . . . . . . A-4
Punctuation and Symbols. . . . . . . . . . . . . . . . . . . . . . . . . . . . . . . . . . . . . . . . . . A-4
International Characters. . . . . . . . . . . . . . . . . . . . . . . . . . . . . . . . . . . . . . . . . . . A-5
Code 128 Function Codes . . . . . . . . . . . . . . . . . . . . . . . . . . . . . . . . . . . . . . . . . A-6
Table of Contents iii

iv Table of Contents

GETTING STARTED 1
The Monarch917keypad allows you to easily configure the
printer and enter data offline for formats.
This chapter includes information about
uconnecting the power cable.
uusing the keypad.
Each chapter of this manual has one or more charts showing the
printer’s menu structure. For example:
uNormal border boxes show the menu options.
uHeavy border boxes show the selections to get to the functions.
uBlack background boxes show the functions.
uThe black boxes show where you are; the bordered boxes show how you
got there.
SUPPLY CONTRAST DEFAULTS PORT
SETTINGS
MAIN MENU
CANCEL
ALL PRINT
MODE REPEAT
BATCH SETUP DIAG.
BATCH
ENTRY FORMAT
OPTIONS
Getting Started 1-1

Connecting the Cable
To connect the cable:
CAUTION
The printer power switch must be off while you
connect the keypad cable.
1. Plug the keypad cable into the keypad. Plug the other end of
the cable into the printer.
2. Turn on the printer. Press (I) to turn on and (O) to turn off the
printer.
After you turn on the printer, you will see:
PRINT MODE
Ready
1-2 Getting Started

Using the Keypad
You can control printer operation and enter data offline using the
keypad.
The keypad has 24-keys allowing offline data entry. This keypad
includes 7 function keys, 10 numeric keys, and 5 symbol keys.
Control Keys
PInterrupts printing.
Enters an international character for printing
when you enter Pplus a three-digit code.
See Appendix A for more information.
eReturns the display to the next higher menu,
when you press e once.
FFeeds a blank label if there is no print job.
Prints a label in the on-demand mode.
cCuts the supply.
{Clears an error.
RDisplays the next menu item.
LDisplays the previous menu item.
ESelects the displayed menu item.
Use the alpha numeric keys to enter batch data. To switch
between characters and numbers, press |.
Getting Started 1-3

Selecting a Function
The Main menu has several functions (operating modes). These
functions are shown in the chart below.
If the printer displays PRINT MODE Ready
when you turn it on, press eto display the
Main menu.
To display menu options, press Lor R.
uWhen the screen displays a right arrow, press Rto display
more options.
MAIN MENU
Cancel All r
uWhen the screen displays a left arrow, press Lto display
more options.
MAIN MENU
lDiagnostics
uWhen the screen displays a left and a right arrow, press either
Lor Rto display more options.
MAIN MENU
lPrint Mode r
uWhen you see the menu option you want, press Eto select
it.
MAIN MENU
CANCEL
ALL PRINT
MODE REPEAT
BATCH SETUP DIAG.
BATCH
ENTRY FORMAT
OPTIONS
1-4 Getting Started
The Main Menu controls the printer’s setup and operation.
Through the Setup Menu, you can select a sub-menu for the
supply, contrast, default, or port settings. Each of those
sub-menus have several selections, such as ribbon, speed,
monetary symbols, and baud rate.
1. From the Main Menu, press Lor Runtil you see
MAIN MENU
lSetup r
2. Press E. You will see
SETUP
Supply r
3. Press E. You will see the following option:
SUPPLY
Ribbon r
Exiting an Option
To exit an option, press eonce. You will exit to the next
higher menu.
If you press efrom a menu, your settings
are not saved. Your settings are only saved
when you press E from a menu.
Getting Started 1-5

1-6 Getting Started

SETTING SUPPLY OPTIONS 2
This chapter explains how to select a ribbon, separators, feed
mode, print position, supply position, margin position, cut position,
supply type, speed, backfeed, and verifier options.
You may need to set supply options when you change supplies.
The options are listed in the table below.
Option Choices Default
Ribbon No/Yes/High Energy Yes
Separators No/Yes/Long No
Feed Mode Continuous/On-Demand Continuous
Print Position -99 to +99 0
Supply Position -300 to +300 0
Margin Position -99 to +99 0
Cut Position -300 to +300 0
Supply Type Aperture/Die Cut/Black
Mark/Continuous Die Cut
Speed 2.5/4.0/6.0/8.0/10.0/Default Default
Backfeed Off/On/Extended Off
Verifier Disabled/Enabled Disabled
SUPPLYCONTRAST DEFAULTS PORT
SETTINGS
RIBBON
MAIN MENU
MARGIN
POS
PRINT
POS SUPPLY
POS
CANCEL
ALL PRINT
MODE REPEAT
BATCH SETUP DIAG.
BATCH
ENTRY
CUT
POSITION
SEPARAT-
ORS FEED
MODE SUPPLY
TYPE
FORMAT
OPTIONS
SPEED BACKFEED VERIFIER
Setting Supply Options 2-1

To exit an option without changing the setting, press e.
Ribbon
You have to tell the printer if your supplies require a ribbon. To
change the setting, from the Main Menu, select Setup, then
Supply. Then, follow these steps.
1. Press Lor Runtil you see
SUPPLY
Ribbon r
2. Press Eto set the ribbon option. You will see the current
setting, for example:
RIBBON
lYes r
3. Press Lor Rto see the other options. After you display the
option you want, press E. Press etwice to exit to the
Main menu.
If you set the Ribbon option to Yes, install a
ribbon before printing.
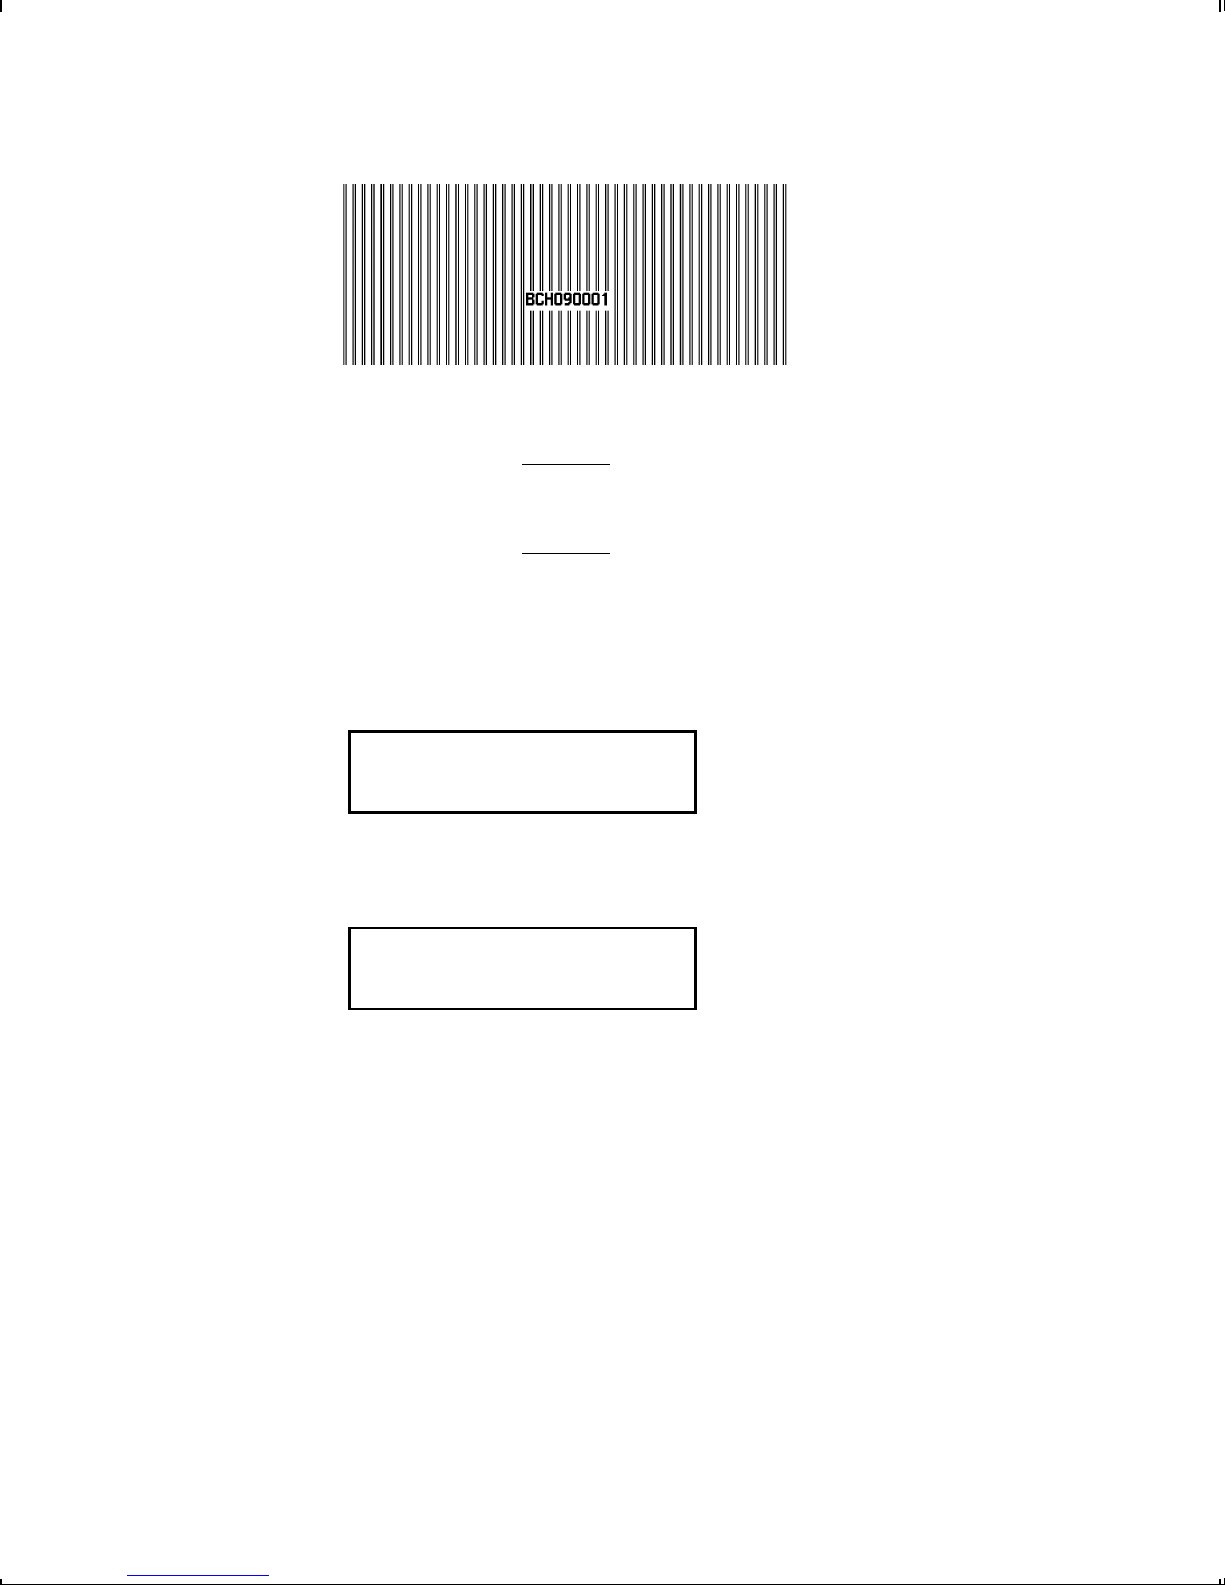
Batch Separators
A batch separator is an extra tag with a pinstripe pattern. It is
printed between batches to make batches easier to find. If you
select "Long" for the separator, a double-length (two tags)
separator prints.
2-2 Setting Supply Options
Changing this setting only affects new
formats sent to the printer.
To change the setting, from the Main Menu, select Setup, then
Supply. Then, follow these steps.
1. Press Lor Runtil you see
SUPPLY
lSeparators r
2. Press Eto set the batch separators option. You will see
the current setting, for example:
SEPARATORS
Off r
3. Press Lor Rto see the other option. After you display the
option you want, press E. Press etwice to exit to the
Main menu.
Batch Separator
Setting Supply Options 2-3

Feed Mode
You can use continuous or on-demand printing. On-demand
printing allows you to remove a label before printing the next one.
To change the setting, from the Main Menu, select Setup, then
Supply. Then, follow these steps.
1. Press Lor Runtil you see
SUPPLY
lFeed Mode r
2. Press Eto set the supply type option. You will see the
current setting, for example:
SUPPLY TYPE
Continuous r
3. Press Lor Rto see the other option. After you display the
option you want, press E. Press etwice to exit to the
Main menu.
Print Position
This function adjusts where data prints vertically on the supply.
Adjust the print if it is too close to the top or bottom of the supply,
or overtypes the pre-printed area. One dot is 0.0049 inch.
uIf the data is too close to the bottom, increase the number.
uIf the data is too close to the top, decrease the number.
Changing this setting only affects new
formats sent to the printer.
2-4 Setting Supply Options

To change the setting, from the Main Menu, select Setup, then
Supply. Then, follow these steps.
1. Press Lor Runtil you see
SUPPLY
lPrint Pos r
2. Press E. You will see the current setting, for example:
Enter print pos
[-99/99]: +0
3. Press Lor R to change the print position. Pressing L
decreases the value (moves the image down); Rincreases it
(moves the image up).
4. Press Ewhen the number you need appears. Press e
twice to exit to the Main menu.
Supply Position
This function adjusts how much supply feeds out of the exit chute.
You may need to adjust the supply in or out to allow
utags and labels to be removed.
udie cut labels to be removed easily.
The adjustments are in dots (0.0049 inch).
Setting Supply Options 2-5

uIncrease the number to feed more supply out of the chute.
uDecrease the number to feed less supply out of the chute.
This option takes effect on the next label or tag printed.
Changing supply position may also affect print position.
To change the setting, from the Main Menu, select Setup, then
Supply. Then, follow these steps.
1. Press Lor Runtil you see
SUPPLY
lSupply Pos r
2. Press E. You will see the current setting, for example:
Enter supply pos
[-300/300]: +0
3. Press Lor Rto change the supply position. Pressing L
decreases the value (feeds less supply); Rincreases it
(feeds more supply).
4. Press Ewhen the number you need appears. Press e
twice to exit to the Main menu.
Margin Position
This function adjusts where the format prints horizontally on the
supply. The adjustments are in dots (0.0049 inch), which is the
smallest measurement the printer recognizes.
The width of the print area depends on your supply size.
Maximum width is four inches. When you move the image to the
right or left on the supply, avoid moving the image too close to
either edge, because it may not print.
2-6 Setting Supply Options

Print too far to the left. Print too far to the right.
uIf the data is too close to the left side, increase the number.
uIf the data is too close to the right side, decrease the number.
Changing this setting only affects new
formats sent to the printer.
To change the setting, from the Main Menu, select Setup, then
Supply. Then, follow these steps.
1. Press Lor Runtil you see
SUPPLY
lMargin Pos r
2. Press E. You will see the current setting, for example:
Enter margin pos
[-99/99]: +0
3. Press Lor R to change the margin position. Pressing L
decreases the value (moves the image toward the left side of
the supply); Rincreases it (moves the image toward the right
side of the supply).
Setting Supply Options 2-7

4. Press Ewhen the number you need appears. Press
etwice to exit to the Main menu.
Cut Position
This function adjusts where the tag is cut. The printer adjusts the
cut position according to the black marks on the supply. You may
need to adjust for aperature supplies. Increase to move the cut
up; decrease to move the cut down.
To change the setting, from the Main Menu, select Setup, then
Supply. Then, follow these steps.
1. Press Lor Runtil you see
SUPPLY
lCut Pos r
2. Press E. You will see the current setting, for example:
Enter knife adj
[-300/300]: +0
3. Press Lor Rto change the cut position. Pressing L
decreases the value (moves the cut down); Rincreases it
(moves the cut up).
4. Press Ewhen the number you need appears. Press
eto exit to the Setup menu.
2-8 Setting Supply Options
Table of contents
Popular Keypad manuals by other brands


Risco
Risco RP432KP02 Installation and user guide

urmet domus
urmet domus mikra 1086 Installation handbook

NetworX
NetworX NX-8V2 user manual

Philips
Philips 103-000023-00 installation instructions

Overhead door
Overhead door CodeDodger 2 operating instructions

Crestron
Crestron C2N-DB12 Operations & installation guide


