PBM HAV Series Owner's manual

PBM SUPPLY & MFG., INC
SINCE 1969
OWNER’S / OPERATOR’S MANUAL
P/N: HAV-OM
Eective: March 16, 2020
Read the Operator’s Manual entirely. When you see
this symbol, the subsequent instructions and
warnings are serious - follow without exception.
Your life and the lives of others depend on it!
California Proposition 65 Warning
WARNING: This product contains chemicals known to
the state of California to cause cancer, and birth defects
or other reproductive harm.
www.p65warnings.com
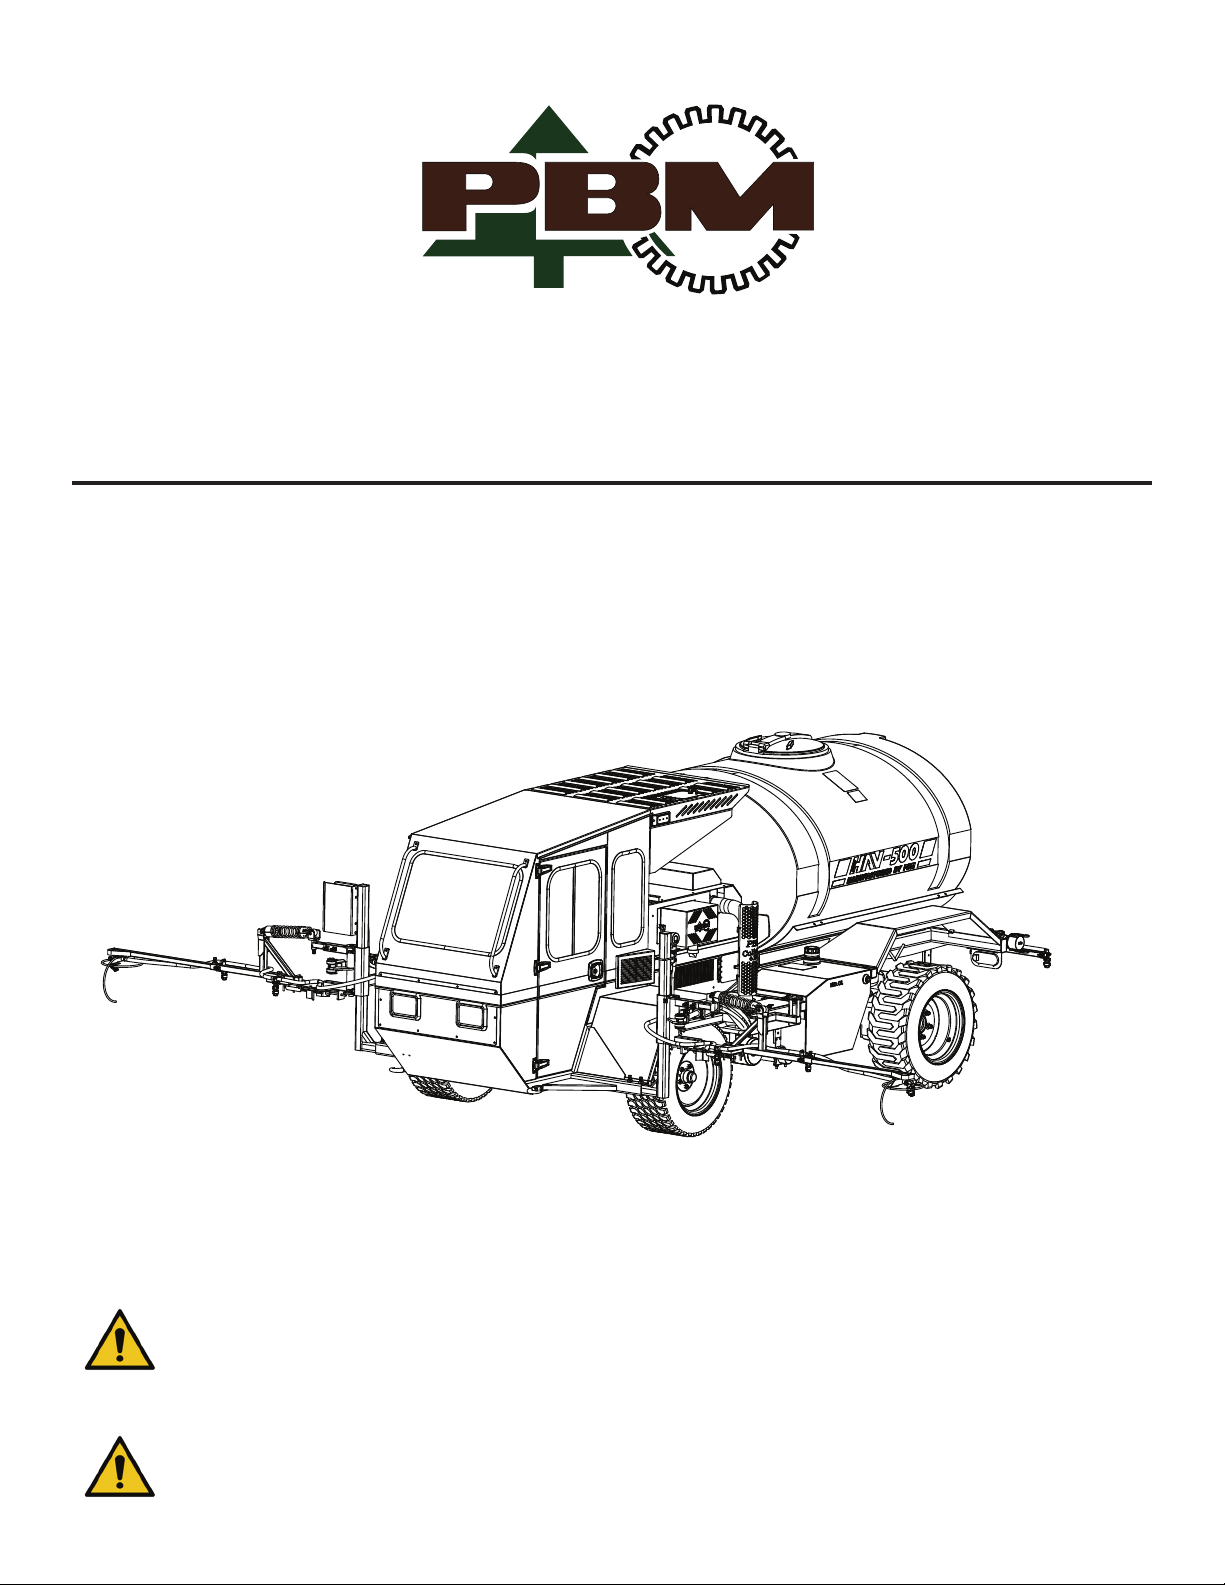
Tier 4 HAV Self-Propelled Sprayer

PBM SUPPLY & MFG., INC
SINCE 1969
2
Table Of Contents
PBM Supply & MFG., Inc. www.pbmsprayers.com
324 Meyers St. Chico CA 95928 1-800-688-1334
Table Of Contents
Introduction.................................................... 3
Application..................................................... 3
Identication .................................................. 3
Booms & Accessory Identication:......................... 3
Equipment Record: ................................................... 3
Important Safety Information ....................... 4
Safety Alert Symbol .................................................. 4
Signal Words ............................................................. 4
Safety Precautions.................................................... 4
Operational Safety Precautions............................ 4
Safety Precautions for Children ........................... 5
Sprayer Shutdown & Storage Safety ................... 5
Tire Safety............................................................... 5
Transport Safety..................................................... 6
Maintenance Safety ............................................... 6
Be Prepared For An Emergency ........................... 6
Proper Personal Protective Equipment (PPE)..... 7
Use Seat belts ........................................................ 7
Keep Riders o of Machinery ............................... 7
Read Chemical Labels Before Use....................... 7
Safe Working Capacity .......................................... 7
Safety Labels ................................................. 8
Applying Safety Labels............................................. 8
Safety Label Locations.......................................... 8
Operating Instructions................................ 13
Dashboard Controls ............................................... 13
Control Lever Controls ........................................... 14
Engine Display ........................................................ 14
Gauge Post .............................................................. 14
Preparing To Operate The HAV Sprayer ............... 15
Setting The Boom Height .................................... 15
Setting The Boom Width ..................................... 16
Testing the Spray System ...................................... 18
Self Test & Visual Inspection .............................. 18
Flushing the Pump ................................................. 19
Emergency Stopping .............................................. 19
Transportation ......................................................... 20
Trailer Transportation.......................................... 20
Roadway Transportation..................................... 20
Jump Starting The HAV .......................................... 21
Maintenance ................................................ 22
Break-in Period........................................................ 22
Service Schedule .................................................... 23
Service Procedures................................................. 24
Re-torquing The Rear End Suspension Bolts ... 24
Changing Hydraulic Oil ....................................... 24
Checking The Spray System............................... 25
Checking The Engine Oil Level .......................... 25
Checking The Coolant Level............................... 25
Changing Radiator Coolant ................................ 26
Checking Radiator Hoses ................................... 26
Checking The Air Filter........................................ 27
Draining The Fuel-Water Separator.................... 28
Inspecting The Crank Case Breather Tube........ 28
Flushing The Spray System................................ 28
Inspecting Fuel Lines ......................................... 28
Checking The Hydraulic Oil Level ...................... 28
Changing Engine Oil............................................ 29
Changing Engine Oil Filters................................ 29
Inspecting Wheel Bearings ................................. 29
Removing Sediment From The Fuel Tank ......... 29
Replacing The Fuel-Water Separator ................. 30
Replacing The Fuel Filter .................................... 30
Replacing Fuel Pipes And Clamps ..................... 31
Inspecting The Battery And Cables.................... 31
Replacing The Battery ......................................... 31
Draining The Air Tank.......................................... 31
Replacing The Air Tank ....................................... 32
Greasing Front End Components ...................... 32
Inspecting The Air Conditioning Unit................. 32
Preparing The HAV For Storage ......................... 33
Troubleshooting ...................................................... 33
Common Replacement Parts ................................. 34
Front End Replacement Parts ............................... 35
Warranty ....................................................... 36
Vehicle Specications................................. 37
Vehicle................................................................... 37
Hydraulic Drive System....................................... 37
Auxiliary Hydraulic System................................. 37
Spray System ....................................................... 37
Service Records .......................................... 38

PBM SUPPLY & MFG., INC
SINCE 1969
3
Introduction
PBM Supply & MFG., Inc. www.pbmsprayers.com
324 Meyers St. Chico CA 95928 1-800-688-1334
Introduction
Congratulations on the purchase of your new PBM sprayer. We are condent that you will be satised with
the build quality and performance of your sprayer. e purpose of this manual is to instruct operators how to
safely operate and maintain the sprayer so that it will last for years to come.
Application
PBM sprayers are designed to meet the requirements needed for many dierent types of spraying. Sprayers
can be paired with approved PBM accessories such as spray booms for spraying crop care chemicals, spray
wands or spray guns for spot treatments and tree spraying, or set up with water nozzles for dust suppression or
ground coverage.
Identication
HAV sprayers are identied by a serial number label attached to the inside the drivers side of the cab near the
operators seat. Refer to this number when calling for service or technical support.
Booms & Accessory Identication:
HAV sprayers are congured with dierent boom and accessory options for certain applications. Because these
dierences may eect how the machine is operated, it is important to understand their dierences and limita-
tions. A copy of the original work order is supplied with the documentation of each HAV sprayer. is docu-
ment will list the options and accessories supplied with your sprayer.
Equipment Record:
Record your machine details in the log below. If you replace this manual, be sure to transfer the information to
the new manual.
Model Number
Serial Number
Purchase Date
Dealer Name
Dealer Contact
Accessory 1
Accessory 2
Accessory 3
Accessory 4

PBM SUPPLY & MFG., INC
SINCE 1969
4
Important Safety Information
PBM Supply & MFG., Inc. www.pbmsprayers.com
324 Meyers St. Chico CA 95928 1-800-688-1334
Important Safety Information
It is important to carefully read and understand this manual and any included manuals prior to operating PBM
equipment.
Safety Alert Symbol
e safety alert symbol indicates there is a potential hazard to personal safety involved and extra safety
precaution must be taken. When you see this symbol, be alert and carefully read the message that follows it. In
addition to design and conguration of equipment, hazard control, and accidental prevention are dependent
upon the awareness, concern, prudence, and proper training of personnel involved in the operation, transport,
maintenance, and storage of equipment.
Signal Words
Be aware of signal words.
Signal words are used to designate the level of seriousness that a hazard may produce.
DANGER - Indicates a hazardous situation that if not avoided, will result in death or
serious injury.
WARNING - Indicates a hazardous situation that if not avoided, could result in death or
serious injury.
CAUTION - Indicates a hazardous situation that if not avoided, may result in minor or
moderate injury
Safety Precautions
Operational Safety Precautions
Careful operation is the best preventative measure against accidents. All operators should read this manual and
any associated manuals before operating this machine.
• oroughly read and understand the “Safety Label” section of this manual. Read all instructions noted on
Safety Labels.
• Do not operate the equipment while under the inuence of drugs or alcohol as they impair the ability to
safely and properly operate equipment.
• e operator should be familiar with all functions of the vehicle and implement, and be able to handle
emergencies quickly.
• Make sure all guards and shields appropriate for the operation are in place and secured before operating

PBM SUPPLY & MFG., INC
SINCE 1969
5
Important Safety Information
PBM Supply & MFG., Inc. www.pbmsprayers.com
324 Meyers St. Chico CA 95928 1-800-688-1334
equipment.
• Never run the sprayer in high range with chemical in the tank.
• Keep all bystanders away from equipment and work area.
• Start sprayer from drivers seat with hydraulic controls in neutral.
• Operate sprayer controls from the driver’s seat only.
• Never dismount from a moving vehicle or leave engine running.
• Do not allow anyone to stand between sprayer and spray booms.
• Keep hands, feet, and clothing away from power-driven parts.
• While transporting or operating equipment, watch out for objects overhead or along side such as fences,
trees, buildings, wires, etc.
• Do not turn vehicle so tight as to cause hitched equipment to contact the vehicle.
• Store sprayer in an area where children normally do not play. Secure equipment with blocks.
Safety Precautions for Children
Tragedy can occur if the operator is not alert to the presence of children. Children generally are attracted to
implements and their work.
• Never assume children will remain where you last saw them.
• Keep children out of the work area and under the watchful eye of a responsible adult.
• Be alert and shutdown the sprayer if children enter the work area.
• Never carry children on the sprayer. ere is not a safe place for them to ride. ey may fall of and be sub-
ject to injury, or impede the control of the implement/vehicle.
• Never allow children to operate the machine, even under adult supervision.
• Never allow children to play on the equipment.
• Use extra caution while backing up. Before the vehicle starts to move, make sure the area is clear.
Sprayer Shutdown & Storage Safety
• Park on solid, level ground and close spray booms. Secure spray booms with the supplied pins or chains.
• Put the vehicle in park or set the brake, turn o engine, and remove the switch key to prevent unautho-
rized starting.
• Relieve all pressure to hydraulic auxiliary lines.
• Wait for all components to stop before leaving the operators seat.
• Use steps, grab handles, and anti-slip surfaces when stepping on and o of the vehicle.
• Detach and store implements in areas where children normally do not play. Secure implements using
blocks and supports.
Tire Safety
• Changing tires can be dangerous and must be performed by trained personnel using the appropriate tools
and equipment.
• Always maintain correct tire pressure. Do not inate tires above the recommended pressure.

PBM SUPPLY & MFG., INC
SINCE 1969
6
Important Safety Information
PBM Supply & MFG., Inc. www.pbmsprayers.com
324 Meyers St. Chico CA 95928 1-800-688-1334
• When inating tires, use a clip on chuck and extension hose long enough to allow you to stand to the side
and NOT in front of the tire assembly.
• Securely support the implement when changing a wheel.
• When removing and installing wheels, use wheel handling equipment adequate for the weight involved.
• Make sure wheel bolts have been tightened to the specied torque.
Transport Safety
• Comply with Federal, State, and Local Laws.
• Use towing vehicle and trailer of adequate size and capacity. Secure equipment towed on a trailer with tie
downs and/or chains rated for the load.
• Sudden braking can cause a towed trailer to swerve and upset. Reduce speed if towed trailer is not
equipped with brakes.
• Avoid contact with any overhead utility lines or electrically charged conductors.
• Always drive straight up and straight down trailer ramps.
• Engage park brake of tow vehicle when parked on an incline.
• Do not exceed the maximum safe towing or load capacity of your tow vehicle or trailer.
• Slow moving tractors, self propelled machines, and towed equipment can create hazards when driven on
public roads. ey can be dicult to see, especially at night. Flashing warning lights, turn signals and slow
moving vehicle signs are recommended if driving on public roads.
Maintenance Safety
• Understand procedure before doing work. Refer to the operator’s manual for additional information.
• Work on a level surface in a clean dry area with good lighting.
• Do not work under hydraulically supported equipment. Always use Jack stands or blocks designed for sup-
porting equipment.
• Use properly grounded electrical outlets and tools.
• Use correct tools and equipment for the job.
• Allow equipment to cool before working on it.
• Disconnect power supply before servicing or adjusting electrical systems.
• Inspect all parts. Make sure parts are in good condition and installed properly.
• Replace parts with genuine parts from the original manufacturer.
• Do not grease or oil the equipment while it is in operation.
• Remove buildup of grease, oil, or debris.
• Dispose of used grease, oil, or lubricants properly.
• Make sure all tools have been removed front he equipment and workspace before operation.
Be Prepared For An Emergency
• Be prepared if a re starts.
• Keep a rst aid kit and re extinguisher easily accessible while operating equipment.

PBM SUPPLY & MFG., INC
SINCE 1969
7
Important Safety Information
PBM Supply & MFG., Inc. www.pbmsprayers.com
324 Meyers St. Chico CA 95928 1-800-688-1334
• Keep emergency numbers for doctor, ambulance, hospital and re department near your work area.
Proper Personal Protective Equipment (PPE)
• Wear protective clothing and equipment appropriate for the job such as safety shoes, chemical aprons, safe-
ty glasses, respirator, gloves, etc.
• Clothing should t snug without fringes and pull strings to avoid entanglement with moving parts.
• Consult the chemical container of the products you will be using in your sprayer. Adhere to all safety warn-
ings and recommendations.
Use Seat belts
• PBM recommends the use of a seat belt. Using a seat belt will reduce the risk of serious injury or death if
the vehicle rolls.
Keep Riders o of Machinery
• Never carry riders on sprayer or implement.
• Riders obstruct the operator’s view and interfere with control of the machine.
• Riders can be struck by objects or thrown from equipment.
Read Chemical Labels Before Use
• Complete and fulll all state, and/or local pesticide applicator license requirements for the area you are
spraying.
• Read each chemical label’s instructions before handling the chemical.
• Refer to the chemical label for proper handling and clean up of the chemical.
• Follow all the instructions on the chemical label.
Safe Working Capacity
Tank capacity IS NOT the same as safe working capacity. e safe working capacity of sprayers are determined
by the weight of the material being handled and environmental conditions. Dierent spray materials weigh
dierent amounts per gallon. Do not exceed the recommended weight capacity of the sprayer, tractor or tow
vehicle.

PBM SUPPLY & MFG., INC
SINCE 1969
8
Safety Labels
PBM Supply & MFG., Inc. www.pbmsprayers.com
324 Meyers St. Chico CA 95928 1-800-688-1334
Safety Labels
Your sprayer will come equipped with all of its safety labels in place. Safety labels are designed to help opera-
tors safely use the equipment.
• DO NOT remove or obstruct safety labels.
• Inspect equipment for safety label legibility. Keep labels clean and legible.
• Replace damaged or worn safety labels.
• Refer to this section for proper label placement. Order new labels from your closest PBM dealer, or contact
the nearest PBM Supply & MFG., Inc. location.
• New accessories and/or repair items may require safety labels to be applied to them. Be sure to apply the
proper safety labels if replacing components.
Applying Safety Labels
To install new labels:
• Clean the surface area where the label will be placed.
• Remove the backing lm from the label and place the label in the location specied in this manual.
Safety Label Locations
Part Number: WARNING HOT EXHAUST
WARNING
P/N: WARNING HOT EXHAUST
HOT EXHAUST
Keep away to prevent serious
injury or burns.
Description: Hot Exhaust.
Symbol Explanation: is symbol represents that a surface is hot to touch. Observe caution around this area.
Part Number: SW1
Description: Read the operator’s manual before operation.
Symbol Explanation: is symbol represents the need to read an understand the operator’s manual prior to
operation.

PBM SUPPLY & MFG., INC
SINCE 1969
9
Safety Labels
PBM Supply & MFG., Inc. www.pbmsprayers.com
324 Meyers St. Chico CA 95928 1-800-688-1334
Part Number: SW4
Description: Read the operator’s manual before operation.
Part Number: SW501
Description: Explosion Hazard
Symbol Explanation: is symbol represents the need to keep open ames away from the area.
Part Number: NOTICE STOP LAMP
NOTICE
P/N: NOTICE STOP LAMP
SHUT DOWN ENGINE IMMEDI-
ATELY IF LAMP IS ILLUMINATED
APAGUE EL MOTOR INMEDIAT-
AMENTE SI LA LÁMPARA ESTÁ
ILUMINADA
Description: Engine Fault Lamp Instructions
Symbol Explanation: is is the engine fault lamp. If illuminated, a serious engine fault has been detected. Shut
down the engine immediately.

PBM SUPPLY & MFG., INC
SINCE 1969
10
Safety Labels
PBM Supply & MFG., Inc. www.pbmsprayers.com
324 Meyers St. Chico CA 95928 1-800-688-1334
Part Number: SW500
Description: Explosion Hazard
Symbol Explanation: is symbol represents the need for proper training prior to service.
Part Number: SW900
Description: Toxic Chemical Hazard
Symbol Explanation: Wear Rubber Gloves, Don’t Breather Vapor, Don’t Ingest Chemical
Part Number: WARNING LOAD CAP
WARNING
P/N: WARNING LOAD CAP
Maximum Load
Capacity 4200 LBS
Do not exceed the maximum load
capacity, serious damage or injury
may occur.
Description: Maximum load capacity
Symbol Explanation: is symbol represents the risk of damage or injury due to overloading.

PBM SUPPLY & MFG., INC
SINCE 1969
11
Safety Labels
PBM Supply & MFG., Inc. www.pbmsprayers.com
324 Meyers St. Chico CA 95928 1-800-688-1334
Part Number: SW901
Description: Agricultural chemicals can be dangerous.
Part Number: WARNING ROLL OVER HAZARD
WARNING
P/N: WARNING ROLL OVER HAZARD
ROLL OVER HAZARD
To avoid serious injury or death,
avoid abrupt manouvers and
excessive speed.
Description: Roll over hazard
Symbol Explanation: is symbol represents that there is a risk of roll over.
Part Number: HAV PUMP DECAL
NOTICE
P/N: HAV PUMP DECAL
DO NOT RUN PUMP DRY,
DAMAGE WILL RESULT
Description: Do not run pump dry.

PBM SUPPLY & MFG., INC
SINCE 1969
12
Safety Labels
PBM Supply & MFG., Inc. www.pbmsprayers.com
324 Meyers St. Chico CA 95928 1-800-688-1334
Part Number: NOTICE AIR BAG
NOTICE
P/N: NOTICE AIR BAG
AIR BAG PRESSURE
35 PSI MINIMUM
95 PSI MAXIMUM
Description: Air Bag Pressures
Symbol Explanation: is symbol represents the air ride pressure gauge.
Part Number: SW65
Description: CA Prop 65 Warning
Part Number: HAVWARNINGDIESEL
Description: Diesel Engine Exhaust Danger

PBM SUPPLY & MFG., INC
SINCE 1969
13
Operating Instructions
PBM Supply & MFG., Inc. www.pbmsprayers.com
324 Meyers St. Chico CA 95928 1-800-688-1334
Operating Instructions
Sprayer setup and operation will be covered in this section. Refer to the following diagrams for the location of
controls .
1
2
34
8
7
6
5
910
11 12 13 14
15
16
17
18
19
Dashboard Controls
1. Backup camera display
2. Raven spray console
3. Ignition switch
4. Air ride compressor switch
5. Air ride pressure gauges (le and right)
6. Air ride pressure release buttons (le and right)
7. Low pressure alarm
8. Fan control switch (rotate clockwise for more ow)
9. Air conditioning temperature knob (rotate clock-
wise for cool air)
10. Steering wheel
11. Engine display module (use up/down arrows to
control engine rpm)
12. Pump control switch
13. Head light on/o switch
14. Boom light on/o switch
15. Parking brake indicator light
16. High/Low hydraulic range switch
17. Heater control (Turn A/C control knob counter
clockwise to disengage cool air and pull this knob
to engage the heater)
18. Parking brake switch
19. Boom control foot switch

PBM SUPPLY & MFG., INC
SINCE 1969
14
Operating Instructions
PBM Supply & MFG., Inc. www.pbmsprayers.com
324 Meyers St. Chico CA 95928 1-800-688-1334
20
23
22
24
21
26
25
Control Lever Controls
Control lever switch positions may dier slightly depending upon
the boom type the sprayer is congured with. (Combination boom
with boomless nozzle shown).
20. Le boom up/down, or accessory boomless nozzle
21. Right boom up/down, or accessory, or unused
22. Le boom in/out
23. Right boom in/out
24. Hydrostatic wheel locker on/o
25. Hydrostatic drive lever
26. Boomless nozzle (located in this position with combination
booms)
32
31
29 30
33 34
35 36
Engine Display
27. Engine Alarm/Fault Lamp - STOP & SHUT DOWN MOTOR
IMMIDIATLY IF ILLUMINATED
28. Engine Warning Lamp - Illuminated when an issue has been
detected. Resolve the issue when safe and convenient.
29. Engine Temperature
30. Engine RPM
31. Oil Pressure
32. Battery Voltage
33. Fuel Level (Percentage)
34. Hour Counter
35. RPM Adjustment Up
36. RPM Adjustment Down
37
38
Gauge Post
37. Spray Pressure Gauge
38. Pressure Gauge Flush Valve
27 28

PBM SUPPLY & MFG., INC
SINCE 1969
15
Operating Instructions
PBM Supply & MFG., Inc. www.pbmsprayers.com
324 Meyers St. Chico CA 95928 1-800-688-1334
Preparing To Operate The HAV Sprayer
• Conduct all safety checks.
• Adjust the operator / driver seat for easy reach of all controls.
• Fasten the seat belt.
• Check that the hydraulic control is in the neutral position.
• Insert the key into the ignition.
• Start the engine.
• Adjust the throttle using the up and down arrows on the engine display unit.
• Check the gauges.
• Select low gear-range for chemical application, or if there is a load in the tank. Do not run the machine
in high gear if there is a load in the tank. Only change the gear range from high to low with the machine
stopped and parking brake engaged. e sprayer can be shied from low to high gear while moving if there
is no load in the tank.
• Release the parking brake.
• Move the hydrostatic lever forward (“F”) to achieve forward direction speed control. Pull the lever back
(“R”) to reverse the direction and control speed. Wait for the sprayer to come to a complete stop in the neu-
tral (“N”) position before changing directions.
• Pay attention to all warning lights on the engine display module. If the red Engine Alarm/Fault Lamp
turns on, shutdown the vehicle immediately and resolve the issue before continuing operation, otherwise
engine damage will occur. If the yellow Engine Warning Lamp turns on, extra care must be given. Perform
an inspection and correct the issue as soon as possible.
Sprayer Setup
Proper sprayer conguration is critical to the performance of the HAV sprayer. e sprayer conguration is
determined by the product that you will be spraying and may be inuenced by your specic application. is
section will go over how to set up your sprayer to perform well for your application.
Setting The Boom Height
Dierent chemicals may recommend specic spray tips and congurations. It is very important that you follow
the recommendations of your chemical container, Pest Control Advisor, and Regulating authorities while set-
ting up your sprayer to apply chemicals.
1. Refer to your nozzle manufacturers documentation to determine the appropriate distance from the spray
target. (HAV Booms come standard with Greenleaf® TurboDrop® TDXL 11002 spray tips. ese tips are
designed to be set at 20” above the spray target.)
2. Support your front spray booms and loosen the adjustment nuts on the front boom hangers (shown below,
7/16” square nuts) to set the boom at the appropriate height from the spray target. Tighten nuts to secure
the new boom position.

PBM SUPPLY & MFG., INC
SINCE 1969
16
Operating Instructions
PBM Supply & MFG., Inc. www.pbmsprayers.com
324 Meyers St. Chico CA 95928 1-800-688-1334
3. e front booms have boom leveling adjustments. Loosen the 7/16” square nuts on the upper shock sup-
port tube and set the boom angle so that the le and right booms are at and even. Secure the adjustment
nuts.
4. Support the rear boom and remove the height adjustment bolts from the rear hanger. Adjust the rear boom
height to match the height set for the front boom hangers. If the sprayer is equipped with an ALCOV rear
hanger, use the jack handle to adjust the spray height.
Setting The Boom Width
Setting the appropriate boom width is critical to producing even coverage when spraying in tree rows. HAV
booms come with tapered fan center nozzles and double swivels equipped with oset spray nozzles on the
ends. e double swivels and oset nozzles allow for material application in areas where trees would block a
boom from passing. Refer to your nozzle manufacturer’s documentation for appropriate spacing and adjust the
spray boom accordingly.
1. e diagram below shows an example of how an unmodied spray boom will come congured from PBM.
e outer most nozzle should be 30” from the center of the tree or the end of the oset spray pattern.

PBM SUPPLY & MFG., INC
SINCE 1969
17
Operating Instructions
PBM Supply & MFG., Inc. www.pbmsprayers.com
324 Meyers St. Chico CA 95928 1-800-688-1334
20”
Center Of Tree
Eective Spray Pattern
20”
20”
30”
20”
2. For spraying the strips of an orchard, you will use only the outer most spray nozzles on the outside boom
arms. To set the boom width, loosen the adjustment screw and slide the boom arm outward to adjust the
boom to the appropriate distance from your tree centers. Cap any nozzles on the spray section that do not
match the strip width of your crops.
3. For broadcast spraying (full spray application) you will want to adjust the booms to have 20” between all
nozzles to create an even spray pattern. e outer most nozzles may need to be capped for proper t in
your orchard, or to avoid overlaps.

PBM SUPPLY & MFG., INC
SINCE 1969
18
Operating Instructions
PBM Supply & MFG., Inc. www.pbmsprayers.com
324 Meyers St. Chico CA 95928 1-800-688-1334
Testing the Spray System
It is VERY important to test the sprayer with plain water before any chemical is added to the tank. is will al-
low the operator to check the sprayer for leaks or damage and make any necessary repairs before adding spray
chemicals to the system.
Self Test & Visual Inspection
1. Fill the tank 1/2 full with water. Make sure the tank is clean and that any residual chemicals have been
neutralized.
2. Open the tank shuto valve located under the tank.
3. Open the rear bypass agitation valve(le arrow) and close the front bypass agitation valve completely (right
arrow).
4. With the parking brake engaged and the spray system o, start the HAV’s engine and use the up arrow on
the engine controller to adjust the RPM’s to highest setting.
5. Unpin the boom arms and move the booms to operating position.
6. Turn on the power to the Raven spray controller.
7. Select the boom sections that you would like to test by putting the boom switches in the UP position.
8. Press the SELF TEST button to begin the self-test function.
9. Press ENTER, the computer will prompt you to enter the simulated spray speed. Use the key pad to enter
the MPH that you will be spraying at, press ENTER aer you have entered the speed.
10. Select the rate that you would like to test by putting the ow control rate switch into RATE 1 or RATE 2
positions.
11. Turn on the MASTER switch or press the foot switch to begin spraying water from the selected boom sec-
tions.
12. Visually inspect spray components for leaks or damage. Replace components as needed prior to spraying.
13. Use a catch cup and stopwatch to make sure that you are putting out the appropriate amount of chemical
for the speed you entered into the spray controller and rate you selected. (is information can be found in
your nozzle supplier’s tabulation charts). Replace worn or damaged tips prior to spraying.
14. Turn o the MASTER and POWER switches and shut down the sprayer. e spray system test is complete.

PBM SUPPLY & MFG., INC
SINCE 1969
19
Operating Instructions
PBM Supply & MFG., Inc. www.pbmsprayers.com
324 Meyers St. Chico CA 95928 1-800-688-1334
Flushing the Pump
HAV sprayers are tted with a 3-way valve on the rear of the sprayer to allow the operator to shut o the supply
of material from the tank and ush the pump and spray lines with fresh water from the garden hose connec-
tion.
Emergency Stopping
HAV sprayers are equipped with fail safe parking brakes that can be applied to bring the sprayer to an abrubt
halt in an emergency situation. e brake is spring applied and pressure released so in the event of power loss
or hose failure, the brake will set. e brakes will automatically set when the machine is turned o.
• First, attempt to bring the sprayer to a stop by bringing the F-N-R control lever to the N position.
• If it becomes apparent that the machine is not going to stop in a safe distance, ip the parking brake switch
to engage the mechanical parking brakes and instantly apply 100% stopping force to the brakes.
Engaging the parking brake while moving is considered an emergency procedure and should not be
engaged during normal operation. e sprayer will be brought to an abrubt stop and the operator may be jolted
forward. A brake inspection and service should be completed immediatly following an event where the emergency
brake was applied while the machine was moving.

PBM SUPPLY & MFG., INC
SINCE 1969
20
Operating Instructions
PBM Supply & MFG., Inc. www.pbmsprayers.com
324 Meyers St. Chico CA 95928 1-800-688-1334
Transportation
Trailer Transportation
HAV sprayers are designed with tie down hooks for transport on trailers. Chain binders and suciently rated
chains should be used when securing the sprayer for transport. HAV sprayers should only be transported on
trailers with their sprayer tank EMPTY. e diagrams below show the locations of the tie-down points.
• Only transport the sprayer with booms secured in the closed position using the supplied chains or clips.
• If loading an HAV sprayer equipped with an ALCOV covered rear boom onto a trailer, it may be necessary
to raise the rear boom for proper ground clearance while loading.
Roadway Transportation
HAV sprayers can be put into high range to achieve higher speed while transporting the sprayer from eld to
eld. Always check with your local jurisdictions to see if there are any limitations or requirements for driving
farm equipment on roadways. (A SMV (slow moving vehicle) sign, or ashing light may be required for road-
way transit.)
Table of contents
Other PBM Paint Sprayer manuals