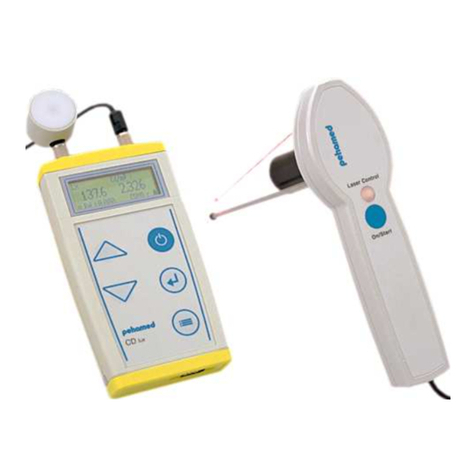
Pehamed CD mon User manual

p e h a m e d
Instruction Manual
CD mon
Digital Luminance/
Illuminance Meter

pehamed
______________________________________________________________________________________________________________
Instruction Manual for the following device:
CD mon
Digital Luminance / Illuminance Meter
Firmware 2.01
PEHA med. Geräte GmbH
Mühlstraße 38
DE - 65843 Sulzbach, Germany
Tel.: +49 6196 500 40 30
Fax: +49 6196 500 40 50
E-mail: info@pehamed.de
Web: www.pehamed.de
Date of Issue: June 2017

pehamed
______________________________________________________________________________________________________________
Table of Contents
General Information ........................................................................5
Scope of Delivery.............................................................................6
Laser Classification...........................................................................6
Handling and Safety Information for the LiPo Rechargeable
Battery................................................................................................7
Prior to Start-Up.................................................................................9
Device Description.........................................................................10
Keypad ............................................................................................11
Quick Start.......................................................................................12
Zeroing .............................................................................................14
CD mon Measurement Modes.....................................................15
Switching-off ...................................................................................16
Positioning the Device...................................................................16
Menu ................................................................................................17
Measurement of Image Display Devices ...................................21
Measurement of Maximum Contrast..........................................22
Luminance Variations within an Image......................................23
Measurement of Viewing Devices ..............................................24
Retrieving Stored Values ...............................................................26
Measurement of Ambient Brightness..........................................28
Technical Specifications ...............................................................29
Complaint Handling ......................................................................30

pehamed
______________________________________________________________________________________________________________
CD mon Instruction Manual Edition: June 2017 Page 4 of 31
Dear valued Customer,
Congratulations on your decision to purchase a high quality
product manufactured by pehamed in state-of the-art
production facilities. This product’s design and features fully
comply both with the applicable national as well as
international standards.
Our Quality Management System that is based upon and
certified according to the ISO 9001 standard ensures that our
products, if they are used properly, have an optimum useful
service life.
As with all high quality products, you must strictly follow the
operating instructions given in this document to ensure long-
term, trouble-free and reliable performance.
The CD mon Luminance/ Illuminance Meter is a universal,
compact light meter designed for quality control of viewing
boxes and image display devices.

pehamed
______________________________________________________________________________________________________________
CD mon Instruction Manual Edition: June 2017 Page 5 of 31
General Information
With the CD mon Luminance/ Illuminance Meter, you can
perform the tests required according to DIN 6868 Part 157:
“Acceptance Testing of Image Display Devices” as well as the
corresponding constancy tests.
The device can also be used for testing viewing devices in
accordance with DIN 6856 Part 1 and 2.
The device fulfils the requirements set forth therein for a
luminance/illuminance meter according to DIN 5032 Class B.
By using the spacer leg included with the CD mon device, you
can include reflected ambient light in the measurements.
Contact measurement is also possible.
Two integrated lasers enable you to precisely aim the device
at the measurement point. The laser beams are aligned in
such a way that the laser points overlap each other when the
device is held at the proper distance (ca. 50 cm) from the
monitor.

pehamed
______________________________________________________________________________________________________________
CD mon Instruction Manual Edition: June 2017 Page 6 of 31
Scope of Delivery
Please check to be sure the product shipment is
complete. If the shipment is incomplete, please contact
the dealer from whom you purchased the product.
The CD mon product shipment consists of the following
components:
•CD mon measurement device
•5 Volt USB rechargeable battery charger
•USB data / recharger cable
•3.7 V LiPo rechargeable battery (mounted in the device)
•Driver CD for connection to the USB port
•1 protective cap
•Spacer leg
•Contact tube
•Instruction Manual
Laser Classification
The lasers used in the CD mon device to target the
measurement point are classified in Laser Class 2 according
to VDE 0837 and IEC 825.
The permissible radiated power of a
continuously operated laser of this class is
limited to a maximum of 1 milliwatt (1 mW).
The wink reflex ensures adequate eye
protection. That means that eye injuries are
only possible if someone deliberately looks
into the laser beam for several seconds while
suppressing the wink reflex.
Laser Radiation
Wavelength - 400-700 nm.
Don’t look into the laser
beam!
Laser Class 2

pehamed
______________________________________________________________________________________________________________
CD mon Instruction Manual Edition: June 2017 Page 7 of 31
Handling and Safety Information for the Lithium Polymer
(LiPo) Rechargeable Battery!
IMPORTANT! Please read the following section before
using the device for the first time!
General Information
A modern LiPo (“LiPo” = lithium polymer) rechargeable battery is used
in the PEHAMED CD mon device. These rechargeable batteries not
only have a significantly higher capacity than NiMH and NiCd
rechargeable batteries, they are also much lighter in weight. These
advantages make this type of rechargeable battery particularly suited
for use in highly mobile measurement devices such as the CD mon.
WARNING! Despite the fact that we only use highest quality, brand
name LiPo rechargeable batteries in the PEHAMED CD mon device, a
slight residual risk of the formation of smoke, fire, serious personal injury
or property damage always remains.
LiPo cells and LiPo rechargeable battery packs can explode or catch
fire if they are improperly handled or damaged.
For these reasons, only trained users may use, recharge and discharge
LiPo rechargeable batteries. Users must inform themselves about
measures to be taken in case a hazardous situation develops.
By purchasing the PEHAMED CD mon device, buyer assumes full
responsibility for all risks that may arise from the use, operation,
charging and discharging of the LiPo rechargeable battery.
Exclusion of Liability
PEHAMED cannot control and ensure the proper charging and use of
the LiPo rechargeable battery in the CD mon device, and therefore
cannot be held liable for possible accidents, personal injuries or
property damage that could result from the use of this product with
LiPo rechargeable battery.
First Charging
At the time of shipment, the LiPo rechargeable battery installed in the
CD mon device has been factory loaded to ca. 50% of its capacity.
For that reason, please recharge the LiPo rechargeable battery to full
capacity before using the unit.
New LiPo rechargeable batteries require up to twelve or more char-
ging / discharging cycles before they provide optimum performance.

pehamed
______________________________________________________________________________________________________________
CD mon Instruction Manual Edition: June 2017 Page 8 of 31
Charging the Rechargeable Battery
Use the USB cable included in the delivery to charge the rechargeable
battery of the PEHAMED CD mon device. The charging voltage can be
supplied either directly from a computer USB socket or via the
pluggable power supply with USB socket supplied with the device.
NOTE! Only use the USB cable and pluggable power supply supplied
by PEHAMED that were specially designed for use with the LiPo
rechargeable batteries utilized in the CD mon device!
If you use other pluggable power supplies or USB cables, this could
damage the device and/or the LiPo rechargeable battery and cause
smoke or fire to develop!
If you use a different USB cable or pluggable power supply, this will
immediately void the CD mon guarantee!
LiPo rechargeable batteries are particularly sensitive against total
discharge and overcharging. This can immediately and permanently
damage such batteries. For this reason, the LiPo rechargeable battery
integrated in the CD mon device is equipped with a special electronic
protection module. This protection module prevents total discharging
or overcharging of the LiPo cells.
Always charge such rechargeable batteries only on a fireproof surface
and far away from combustible materials! Never recharge the device
on inflammable materials.
Always store a chemical fire extinguisher nearby in case of fire.
Never leave the CD mon device unattended during the recharging
process so that you can react quickly in case a problem occurs.
Before starting the recharging process, always first plug the pluggable
power supply into the wall socket or the “wide” USB plug into the USB
socket of the computer. Only after doing so, plug the mini USB plug into
the charging socket of the CD mon device.
Before disconnecting the device from the power supply, always first
remove the mini USB plug from the device.
During the charging process of the switched-off device, the display will
show the message “CHARGING”. In case you recharge the unit while
making measurements, the display will show the info “chrg” in the
lower right section next to the battery symbol.
As soon as the CD mon LiPo rechargeable battery has been
completely recharged, the device electronics will recognize this, the
recharging process will be automatically switched off and the
messages will disappear from the display.

pehamed
______________________________________________________________________________________________________________
CD mon Instruction Manual Edition: June 2017 Page 9 of 31
Economic Operation
Avoid regularly totally discharging the LiPo rechargeable battery.
Frequent partial discharges followed by complete recharging are
easier on the rechargeable battery than routine complete
discharging.
LiPo rechargeable batteries do not have a memory effect and
therefore can and should be fully recharged regardless of the battery
charge level. In doing so, we do not recommend discharging the
rechargeable battery prior to recharging. The usable service life of
rechargeable batteries is usually reduced by exposure to excessively
high temperatures (for example, by storing the device in a hot
automobile in summer) and by total discharging.
Fire Extinguishing Information
If a LiPo rechargeable battery should catch fire, you should extinguish
the fire using fire extinguishing powder, sand or similar fire extinguishing
material.
Never use water to extinguish the fire, as it can react with the lithium
contained in the rechargeable battery! This would then cause an
explosion like when you try to extinguish a grease fire with water.
Disposal / German Battery Decree
Batteries and rechargeable batteries must not be disposed of with
household waste!
According to German statutory regulations, the end user is obligated
to return all used batteries and rechargeable batteries.
For that reason, you can return the rechargeable batteries to
PEHAMED or drop them off directly at our facility. You can also return
used rechargeable batteries, free of charge, to the public collection
points in the communities and at local authorities.
German Waste Electrical and Electronic Equipment Ordinance (EAR)
Once the CD mon device has reached the end of its useful service life
and can no longer be used, PEHAMED and/or your local public waste
disposal authority would be happy to provide you with information on
how to properly dispose of the device.
As is the case with all other kinds of electronic products, you should
never dispose of the CD mon device with household waste. You can
return your old, used electronic products at no charge to PEHAMED or
the public collection points of your community.
In accordance with the EAR Ordinance, PEHAMED is a registered
manufacturer with WEEE Registration No. DE 94334983.

pehamed
______________________________________________________________________________________________________________
CD mon Instruction Manual Edition: June 2017 Page 10 of 31
Device Description
Lasers for Aiming at
Measurement Point
Threaded Socket
for Spacer Leg
Optical System for Lumi-
nance Measurement
CD mon Front View
Optical System for
Luminance Measurement
Keypad
Connection for USB Data
and Recharging Cable
Lux Measurement
Sensor
Backlit Display
(Display data is automatically inverted
when device is turned upside down.)
Contact tube for contact
measurement
automatic switch for contact
measurement

pehamed
______________________________________________________________________________________________________________
CD mon Instruction Manual Edition: June 2017 Page 11 of 31
Keypad
On/Off/Zero
To switch on or zero the
device, press button for ca. 2
seconds until you hear an
acoustical signal. To switch
off the device, press the
button for about 5 seconds.
Enter/OK/Memory/Reset
•To confirm a selected menu
item, press button.
•To save a luminance detector
measurement value , briefly
press button.
•To delete measurement value
memory contents, press
button for ca. 5 seconds.
Menu/Store/Result
Press button for ca. 2 seconds to
open the Settings Menu. To store
selected menu items, briefly
press button. To call up stored
data, press button for ca. 5
seconds until “Calculate”
appears in the display.
“UP” and “DOWN”
To select a menu item, briefly
press one of these buttons.
Start
To switch on both lasers for
aiming at the measurement
point, press and hold down
the button. Release button to
start the measurement.

pehamed
______________________________________________________________________________________________________________
CD mon Instruction Manual Edition: June 2017 Page 12 of 31
Prior to Start-up
Recharge the rechargeable battery with the power supply
supplied with the device or with a computer.
Remove the protective foil from the display.
Quick Start
To make a precise measurement at the measurement point,
screw the spacer leg into the threaded socket or mount the
device onto a camera tripod (The tripod threaded socket is
located on the underside of the device).
Use the USB cable to connect device to a computer or
monitor, as desired.
Press the On/Off/Zero button to switch on the device.
Device name and software version are displayed.
A hardware and software self-test will then run.
Then the device will automatically perform a synchronization
measurement and the first measurement. If both sensors have
been activated (See menu item “cd/lx meas.”), a luminance
value (cd/m²) and an illuminance value (lx) will be displayed.
Then, the CD mon measurement device is ready for
operation.

pehamed
______________________________________________________________________________________________________________
CD mon Instruction Manual Edition: June 2017 Page 13 of 31
In “Continuous Mode”, the device continuously performs new
measurements (Please also see “CD mon Measurement
Modes”).
By pressing and holding down the start button, you can
interrupt the measurements, activate the lasers and aim at
the measurement point. To precisely aim at the measurement
point from the correct distance, you must center the two laser
points over one another at the measurement point. By
releasing the start button, you can restart the measurements.
If you are using the “Trigger Mode”, also press and hold
down the start button to aim at the measurement point.
To start the measurement, release the start button. After
completion of the measurement, the measurement
values are displayed, and the device waits for you to
press the start button again to perform a new
measurement.
You can switch off the CD mon device by pressing the
On/Off/Zero button for ca. 5 seconds (For details, please see
“Switch-off”).
You can recharge the rechargeable battery using the USB
power supply supplied by PEHAMED or via connection to a
computer USB socket (For details, please see “Charging the
Rechargeable Battery”).

pehamed
______________________________________________________________________________________________________________
CD mon Instruction Manual Edition: June 2017 Page 14 of 31
Zeroing
You can manually zero the luminance measurement with this
device.
The device has been zeroed and calibrated during factory
calibration. Normally, the stored zero value does not shift.
However, we recommend zeroing the unit before measuring
very small measurement values (<1cd/m²). Wait at least ca. 2
minutes after switching on the device before zeroing it.
Perform the zeroing process as follows:
•Switch-on the device by pressing the On/Off/Zero button.
•Wait until the self-test has been completed. Then press
the menu button until you hear an acoustical signal.
•Then select the “Zero enable – on” menu item by
pressing the enter button and then exit the menu by
pressing the menu button (You must complete these
steps each time before you zero the device).
•
Important! Before zeroing, you must always cover the
optical measurement system with the protective cap
supplied with the device.
•Perform a measurement by pressing the start button.
•Press the On/Off/Zero button until you hear an acoustical
signal.
•
The display will now show:
You have now completed the zeroing process, and the
measurement value display will reappear.

pehamed
______________________________________________________________________________________________________________
CD mon Instruction Manual Edition: June 2017 Page 15 of 31
CD mon Measurement Modes
The CD mon measurement device has two measurement
modes:
“Continuous” and “Trigger”.
In the “Continuous” measurement mode, the device
continuously makes and displays measurements.
By pressing and holding down the start button, you can
interrupt the measurements to aim at the measurement point.
When you release the start button, the device will continue its
measurements.
In the “Trigger” measurement mode, a measurement will be
performed and displayed only after you press the start button.
To switch between measurement modes, use the menu item
“measure – cont/trig” in the Menu (See “Menu”).
Switching-off
Switch off the CD mon device by pressing the On/Off/Zero
button for ca. 5 seconds.
The display will show the following during switch-off:
If the “PWR Off” function has been enabled (“enable”), the
device will automatically switch off after ca. 5 minutes.
If the “PWR OFF” function has been disabled (“disable”) or
the device has been set to the “Continuous” measurement
mode, you must manually switch off the device.

pehamed
______________________________________________________________________________________________________________
CD mon Instruction Manual Edition: June 2017 Page 16 of 31
Positioning the Device
You can position the device freehand, using the spacer leg or
with a tripod.
While performing measurements, make sure that both laser
points overlap one another at the measurement point.
(To activate the lasers, press and hold down the start button.
Release the button to perform a measurement.).
Also ensure that the device is positioned as perpendicular as
possible to the monitor surface during measurements. You can
perform the most precise measurements by using the spacer
leg or a tripod.
If you are making freehand measurements, always try to
support your arm or hand.
To mount the spacer leg, screw it into the threaded socket
between the two lasers on the front of the device.
The threaded socket for the tripod is located on the underside
of the device.

pehamed
______________________________________________________________________________________________________________
CD mon Instruction Manual Edition: June 2017 Page 17 of 31
Menu
The CD mon device has a number of setting options that are
listed in a separate menu.
You can open the menu at any time by pressing the menu
button. However, after switching on the device, you must
wait for the self-test to be completed.
You can scroll through the menu by pressing the Up or Down
arrow buttons.
An arrow symbol () shown in the display marks the current
position in the menu.
Briefly press the enter button to set the respective menu item.
A check mark () will appear next to the selected menu
item to confirm your selection.
Once all of the required menu items have been set, store
these by pressing the menu button and you will return to the
measurement mode. The display will show: “Saving…”.
All settings remain active also after switch-off and switch-on
of the device.
The settings are also maintained if the rechargeable battery
is removed.

pehamed
______________________________________________________________________________________________________________
CD mon Instruction Manual Edition: June 2017 Page 18 of 31
The following menu items can be selected:
ZERO ON
ZERO OFF
Here, you can activate zeroing of the luminance detector.
After you exit the menu, you can now perform the zeroing
process by pressing the On/Off/Zero button.
After the zeroing process has been completed, the menu
item will automatically switch back to “Zero Off”.
IMPORTANT!
Always perform the zeroing process with the protective cap
in place covering the optical measurement system!
measure - cont.
measure - trig
Here, you can switch the measurement method.
cont. = “Continuous Mode”
The detector continuously measures and displays
new measurement values.
trig = “Trigger Mode”
A measurement is made only after you press the start
button. The measurement value will be displayed
until you perform a new measurement.

pehamed
______________________________________________________________________________________________________________
CD mon Instruction Manual Edition: June 2017 Page 19 of 31
Beep - ON
Beep - OFF
With this function, you can turn the acoustical signal on or
off. The signal is emitted when you press keypad buttons
and, for example, at the end of a measurement.
PWR-Off - enable
PWR-Off - disable
With this function, you can activate or deactivate the
automatic device switch-off (that takes place after ca. 5
minutes).
This function is useful if you wish to make continuous
measurements, but be sure to manually switch-off the unit
after completing your work.
Displ - dont-Swap
Displ - Auto-Swap
With the “Auto-Swap” function, the display characters are
automatically inverted (turned upside down) when the
device is used upside down. You can switch off this function
with the “don’t swap” setting.
Displ - not inv.
Displ - inverted
With the not inverted (“not inv.”) setting, bright characters will
be shown on a dark background. With the “inverted” setting,
dark characters will be shown on a bright background.

pehamed
______________________________________________________________________________________________________________
CD mon Instruction Manual Edition: June 2017 Page 20 of 31
cd meas. - enable
cd meas. - disable
With this function, you can switch the luminance
measurement on (“enable”) or off (“disable”).
The display will then show “cd/m² is disabled”.
lx meas. - enable
lx meas. - disable
With this function, you can switch the illuminance
measurement on (“enable”) or off (“disable”).
The display will then show “lx is disabled”.
9-p.mem. - enable
9-p.mem. - disable
You should activate this menu item if you wish to perform
measurements on viewing devices. Then, you can store
multiple measurement values (using the enter button) and
calculate the variation versus a reference value. The
respective latest measurement value is displayed in the lowest
line of the display (For more detailed information, see
“Measurement of Viewing Devices”).
Table of contents
Other Pehamed Measuring Instrument manuals
Popular Measuring Instrument manuals by other brands

Victron energy
Victron energy ET112 manual

MULTI MEASURING INSTRUMENTS CO.,LTD.
MULTI MEASURING INSTRUMENTS CO.,LTD. HCL-9000S instruction manual

Nippon
Nippon EMP-3 Service manual

horiba
horiba 9680-10D instruction manual

Hanna
Hanna HI 9835 instruction manual

General Homeline
General Homeline THE-1 instruction manual