Penguin TM5X8200 User manual

ABRI UTILITAIRE
UTILITY SHELTER
MANUEL D’INSTRUCTIONS
INSTRUCTION MANUAL
sku: TM5X8200

ÉTAPES
1. Assemblez les arches 06-403 et 06-405. Pour les deux arches du bout assemblez les arches 06-402
et 06-403 avec des boulons 1¾”. Placez 4 crochets M sur chaque rail de porte 06-369 et attachez les rails
aux arches du bout avec des boulons 1¾” et des noix papillon.
2. Assemblez les arches avec les tuyaux de connexion 06-371 et 06-374, utilisant les boulons 2½" et noix papillon.
3. Insérer les pattes 06-401 dans les arches 06-405 en procédant un côté à la fois, et puis les pattes 06-400
dans 06-402.
4. Connectez les pattes 06-400 et 06-401 avec les tuyaux 06-371 et 06-374, utilisant les boulons 2½".
5. Attachez les diagonales 06-369 entre deux pattes, à l’intérieur de l’abri, en utilisant les boulons 1¾”.
(Voir schéma)
6. Avant d’installer la toile, assurez-vous que les distances entre les pattes (AC, BD) sont de 5 pieds, tuyaux
inclus. Vérifier que les distances diagonaux AD et BC soient égales, et de même pour les longueurs AB et CD.
7. Placez la toile sur la structure de l’abri en vous assurant que le triangle soit à l’avant. Attachez toutes
les courroies autour des tuyaux en faisant le tour complet de l’abri. Serrer les ganses fermement à l’intérieur
des arches.
8. Placer l’abri à l’endroit désiré et fermez la porte avant d’ancrer votre structure au sol avec les crochets
d’ancrage K et clous J. L’abri doit être ancré sur une surface solide et de niveau. Ex.: asphalte, béton, etc.
Les ancrages supplémentaires ne seront pas compris.
9. La porte doit être attachée avec les élastiques et les crochets en S.
ÉTAPE 6
ÉTAPE 8
ÉTAPE 7
ÉTAPE 9
A C
B D

STEPS
1. Assemble arches 06-403 and 06-405. For the arches at each end, assemble arches 06-402 and 06-403
with 1¾” screws. Place 4 hooks M on each door rail 06-369 and attach the rails to end arches with 1¾”
screws and wing nuts.
2. Assemble arches with connecting pipes 06-371 and 06-374, using 2½” screws and wing nuts.
3. Insert legs 06-401 into arches 06-405 one side at a time, and then legs 06-400 into arches 06-402.
4. Connect legs 06-400 and 06-401 with the connecting pipes 06-371 and 06-374 using 2½” screws.
5. Attach the diagonals 06-369 between two legs, on the inside of the shelter, using 1¾” screws. (See schema)
6. Before you install the roof, make sure the distances between the legs (AC, BD) are 5 feet wide, including
the legs. Also verify that diagonal distances AD and BC are equal, and lengths AB and CD are equal.
7. Place cover over the completed structure making sure that the triangle is at the front of the shelter. Attach all
the straps inside of the roof to the structure poles going completely around the garage. Tie firmly the inside
ties to bars.
8. Place your shelter where you want to install it and close the door before anchoring the structure to the ground
with the brackets K and nails J. The structure has to be anchored on a flat leveled surface as asphalt,
concrete, etc. Additionnal anchors are not included.
9. Door has to be attached with elastics and S hooks.
STEP 6
STEP 8
STEP 7
STEP 9
A C
B D

SCHÉMA - SCHEMA

LISTE DE PIÈCES - PARTS LIST
Pièce # Part Description QTÉ/QTY
06-400 Patte 2 trous 1¼" x 52 5/8" Leg 2 Holes 2
06-401 Patte 1 trou 1¼" x 52 5/8" Leg 1 Hole 4
06-402 Coin d’arche 3 trous 1¼" x 52 5/8"
Corner Arch 3 Holes 4
06-403 Arche centrale 1¼" x 27" Center Arch 3
06-369 Diagonale + rail de porte 1" x 59¾"
Diagonal + Door Rail 4
06-405 Coin d’arche 2 Trous 1¼" x 52 5/8"
Corner Arch 1 Hole 2
06-371 Tuyau de connection 1" x 50½"
Connecting Pipe 5
06-374 Tuyau de connection 1" x 48"
Connecting Pipe 5
LElastique + crochet en S
Elastic + S-Hook
6
JClou
Nail 8
KCrochet de plancher
Floor Bracket 4
M-4 Crochet pour rail de porte (paquet de 6)
Door Rail Hook (set of 6 pcs)
8
O Boulon 1¾" Bolt
14

LISTE DE PIÈCES - PARTS LIST
Pièce # Part Description QTÉ/QTY
P Boulon 2½" Bolt 17
QNoix papillon
Wing Nut 29
Câble guide
Cable guide 1
Toit
Roof 1

GARANTIE
Inspectez soigneusement le contenu de l’emballage afin de vérifier si certaines composantes sont manquantes ou endommagées.
Advenant que certaines pièces soient manquantes ou endommagées, ne retournez pas le produit à l’endroit où vous l’avez acheté;
contactez plutôt le département d’expérience client de Gazebo Penguin
Montréal: (514) 276-5643
Ailleurs au Canada et États-Unis: 1-800-737-7174
info@gazebopenguin.com
Ce produit a été conçu et fabriqué afin de répondre aux normes les plus exigeantes en matière de qualité et de durabilité. Sous réserve
des sections « conditions d’application de la garantie » et des « limitations à la garantie » ci-dessous, il est garanti contre les défauts matériels
ou de fabrication:
• 1 AN SUR LES FENÊTRES
• 2 ANS SUR LA TOILE
• 5 ANS SUR LA STRUCTURE
Advenant que le produit soit endommagé ou que la période de garantie soit expirée, veuillez contacter le département d’expérience client
de Gazebo Penguin afin d’obtenir une liste complète des pièces de remplacement et des prix.
LIMITATIONS ET EXCLUSIONS À LA GARANTIE
1. Ce produit n’est pas garanti contre les dommages causés par le vent, la chute d’objets, le feu, les animaux, la végétation, le vandalisme
et les conditions climatiques extrêmes
2. Les effondrements d’abris causés par une accumulation de neige, de glace et de vents
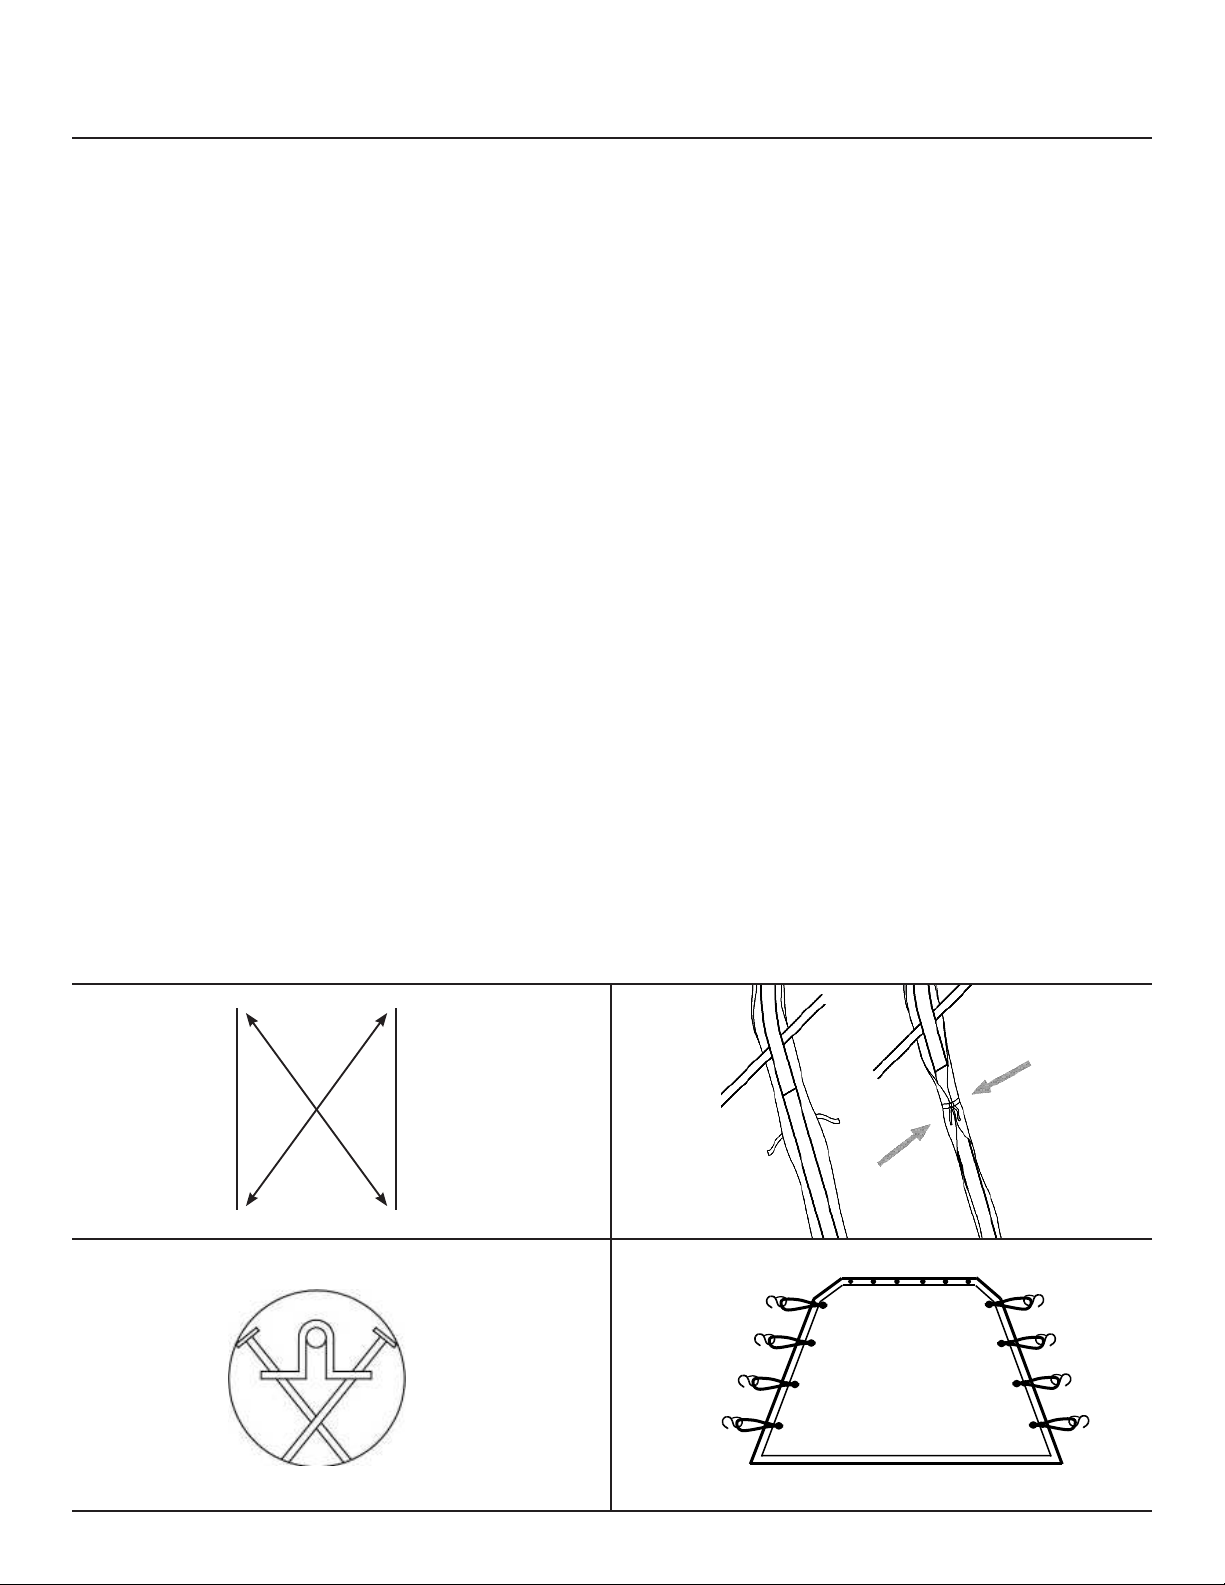
3. Le toit doit être maintenu libre en tout temps d’accumulation de neige et de glace.
4. Tous les dommages pouvant être causés par des accumulations de neige et de glace ne sont pas couverts par la garantie. La neige et la glace doivent
être enlevées du toit, de la droite vers la gauche, par sections de cinq pieds (5) à la fois.
5. L’enlèvement de la neige et de la glace du produit fait par l’intérieur peut endommager ledit produit et de plus causer possiblement des blessures
graves a la (aux) personnes(s) impliquée(s) a l’enlèvement question.
6. Il est fortement recommandé que le produit ne soit pas placé de manière adjacente à un immeuble ou des arbres, car la neige ou la glace peut glisser
sur le toit. Advenant que le produit soit placé de manière adjacente à un immeuble ou an arbre, des précautions supplémentaires doivent être prise afin
de s’assurer qu’il n’y a aucune accumulation de neige ou de glace pouvant causer un poids excessif au produit.
7. Le produit ne sera garanti que s’il est installé conformément aux instructions écrites de Gazebo Penguin incluses avec le produit.
8. Le produit n’est pas garanti s’il a été ancré incorrectement. En particulier, les câbles guides doivent être installés tel qu’illustré. Les ancrages ne sont
pas inclus pour ces câbles guides et ils dépendent du sol sur lequel l’abri est installé.
9. Advenant que le sol ne soit pas gelé lors de l’installation du produit, en plus des crochets de plancher et clous, des poids (non inclus) d’au moins 300
livres pour chaque zone de 11’ x 16’ doivent être installés.
10. L’infiltration d’eau par les coutures n’est pas considérée comme un défaut manufacturier.
11 . Ce produit n’est pas garanti contre la condensation, laquelle peut se produire si le produit n’est pas installé sur de l’asphalte et que le sol n’est pas
complètement gelé à l’installation.
12. Le toit doit être gardé à l’intérieur si la température extérieure chute sous +45°F/+7°C et ce, jusqu’à ce qu’il soit placé sur le châssis. Sinon, les fenêtres
peuvent briser et de tels bris ne seront pas couverts par la garantie.
13. Le matériel de couverture de cette unité a été traité pour résister aux dommages causés par les rayons ultraviolets du soleil. Cependant, il est
obligatoire que ce produit soit démonté et entreposé pendant les mois d’été dans le but de prolonger la durée de ce produit.
14. La toile doit être propre et sèche avant le remisage. Nous recommandons fortement que le carton d’emballage original dans lequel le produit a été
livré soit conservé pour l’entreposage hors-saison.
15. La décoloration et l’usure normale de la toile. La couleur du matériel peut naturellement changer avec le temps.
AVERTISSEMENT
Les portes de l’unité doivent être gardées fermées en tout temps, sauf si un moteur est en opération, puisqu’il existe alors un danger d’asphyxie.

WARRANTY
Carefully inspect the contents of the package to check if any components are missing or damaged. In the event that any parts
are missing or damaged, do not return the product to the place of purchase; instead, contact Gazebo Penguin’s Customer
Experience Department.
Montreal: (514) 276-5643
Elsewhere in Canada and the United States: 1-800-737-7174
info@gazebopenguin.com
This product has been designed and manufactured to meet the highest standards of quality and durability. Subject to the «Warranty Terms»
and «Warranty Limitations» sections below, it is warranted against defects in material or workmanship:
• 1 YEAR FOR THE WINDOWS
• 2 YEARS FOR THE CANVAS
• 5 YEARS FOR THE STRUCTURE
In the event that the product is damaged or the warranty period has expired, please contact Gazebo Penguin’s Customer Experience
Department for a complete list of replacement parts and prices.
WARRANTY LIMITATIONS AND EXCLUSIONS
1. This product is not warranted against damage caused by wind, falling objects, fire, animals, vegetation, vandalism and extreme weather conditions.
2. Collapsed shelter caused by snow, ice and wind accumulation
3. The roof must be kept free of snow and ice accumulation at all times.
4. Any damage that may be caused by snow and ice build-up will not be covered by the warranty. Snow and ice must be removed from the roof, from
right to left, in five-foot (5) sections at a time.
5. Removal of snow and ice from the roof must be done from the outside of the car shelter. Doing so from the inside may damage the product and may
cause serious injury to the person(s) involved in the removal.
6. It is strongly recommended that the product not be placed adjacent to buildings or trees as snow or ice may slide off the roof. In the event that the
product is placed adjacent to a building or tree, additional precautions must be taken to ensure that there is no accumulation of snow or ice that could
cause excessive weight to the product.
7. The product is warranted only if installed in accordance with Gazebo Penguin’s written instructions included with the product.
8. The product is not warranted if it has been improperly anchored. In particular, the guide wires must be installed as shown. Anchors are not included
for these guide wires and are dependent on the soil on which the shelter is installed.
9. In the event that the ground is not frozen when the product is installed, in addition to the floor hooks and nails, weights (not included) of at least
300 pounds for each 11’ x 16’ area must be installed.
10. Water infiltration through seams is not considered a manufacturing defect.
11 . This product is not warranted against condensation, which may occur if the product is not installed on asphalt and the ground is not completely frozen
at installation.
12. The cover/roof must be kept indoors if the outside temperature drops below +45°F/+7°C until it is placed on the frame. Otherwise, the windows may
break and such breakage will not be covered by the warranty.
13. The covering material of this unit has been treated to resist damage from the sun’s ultraviolet rays. However, it is mandatory that this product be
disassembled and stored during the summer months in order to extend the life of this product.
14. The cover/roof must be clean and dry before storage. We strongly recommend that the original box in which the product was delivered be kept
for off-season storage.
15. Discoloration and normal wear and tear of the cover/roof. The color of the material may naturally change over time.
WARNING
Car shelter doors should be kept closed at all times, except when an engine is running, as there is a risk of asphyxiation.
Table of contents
Languages:
Other Penguin Tent manuals
Popular Tent manuals by other brands

Ozark Trail
Ozark Trail WMT922.4A Assembly instructions

Skandika
Skandika Kalmar Setup & maintenance

DREMCOR
DREMCOR Titan Series Instructions and owner's manual

B.toys
B.toys Starry Sky Tent instructions

Treasure Garden
Treasure Garden AG28 Series Assembly and operation guide

PERCo
PERCo RTC-15.3 Assembly and Operation Manual Warranty Card