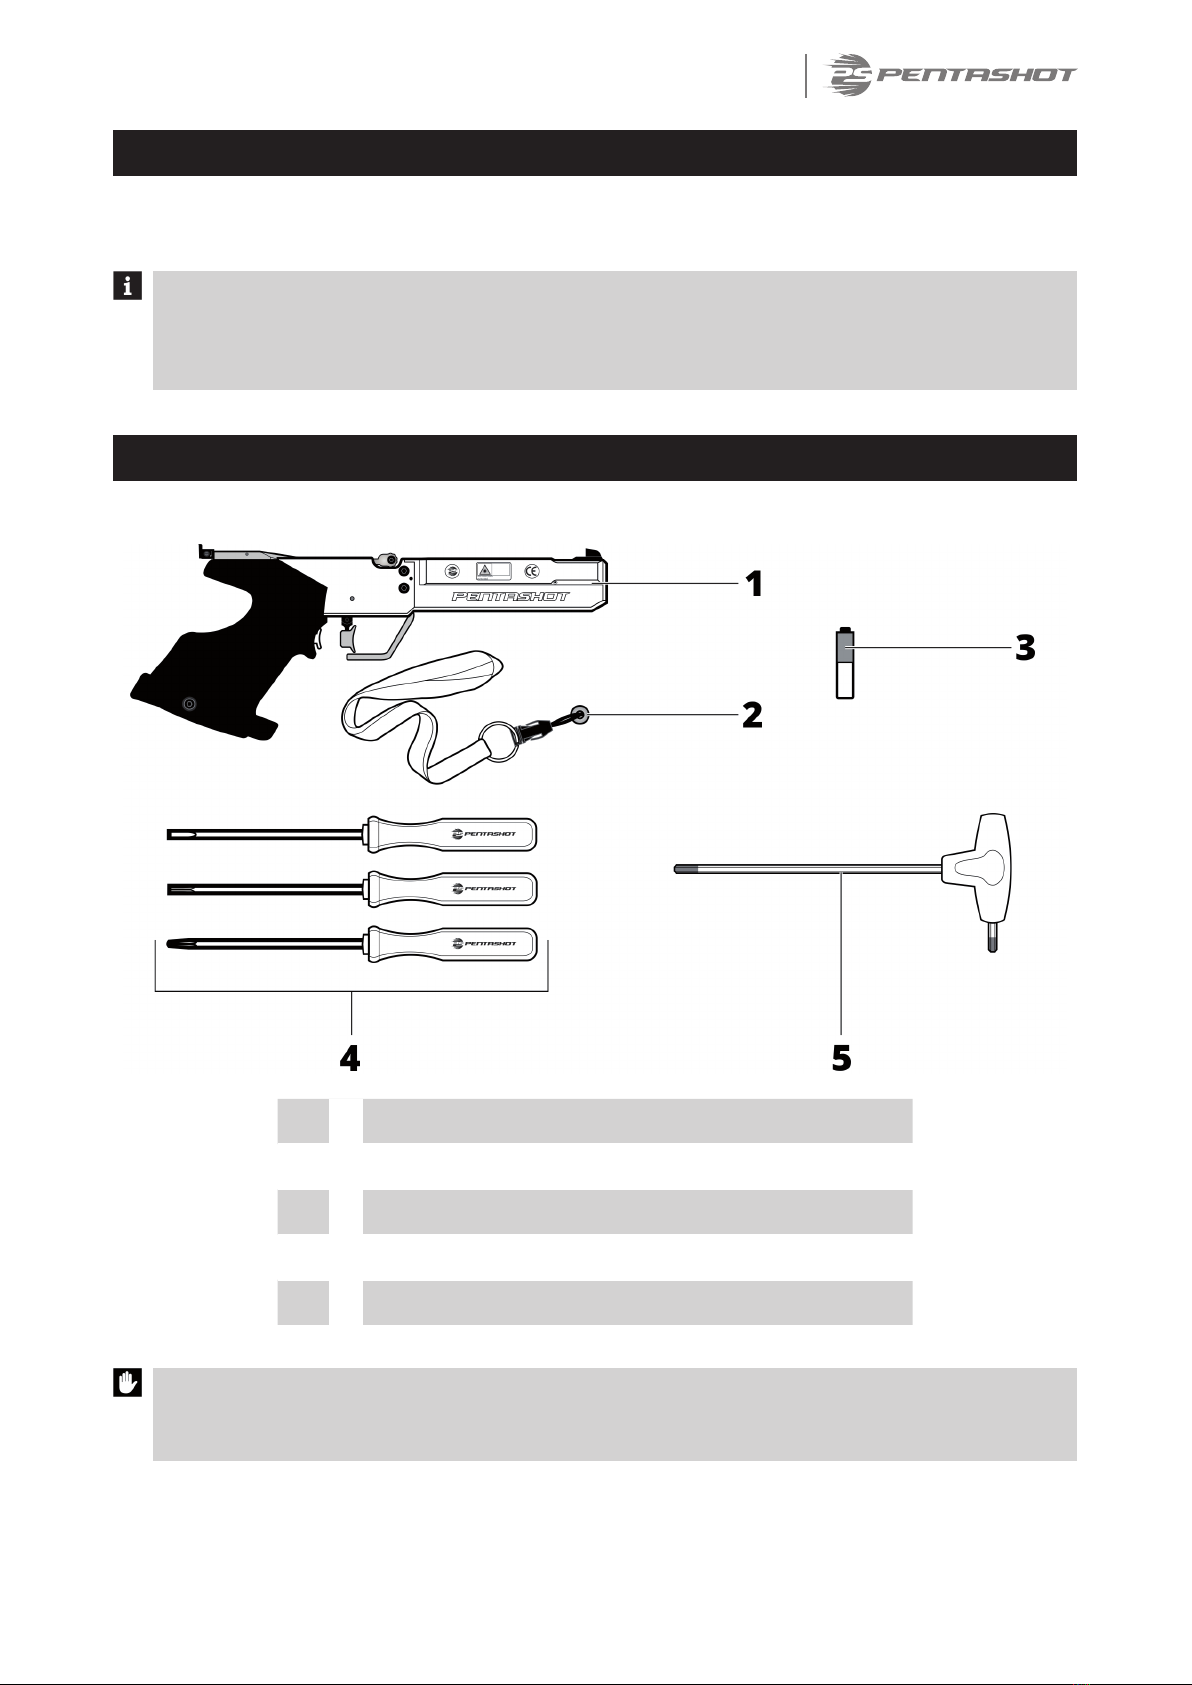
Pentashot FLP 15 User manual

www.pentashot.eu
FLP 15 Laser Simulator
OPERATING INSTRUCTIONS


Complete solution
3
PREFACE
Before using the laser simulator, study the manual carefully. The manual must be considered an
inseparable part of the product. For this reason, store it for future use.
The illustrations used in this manual may not correspond to the actual product. They are used
solely to describe the main principles of the equipment and its settings. The texts, drawings,
photographs and other elements are protected by copyright. Abusing them or copying them
without authorization is subject to prosecution.
CONTENT OF SUPPLY AND UNPACKING
The laser simulator and its parts are supplied in an original case, containing the following:
1 Laser simulator
2 Starting magnet
3 Battery AAA (1pc)
4 Set of screwdrivers
5 Hexagonal key
Upon delivery or purchase, immediately check whether the product is damaged and whether it is
the type you ordered. If it is the wrong product or is damaged, contact your seller immediately. If
the claim isn’t filed on time, it cannot be honoured.
If the case has been packed, ensure proper disposal and recycling. Dispose of it according to the
waste legislation applicable in the product user’scountry.

4
Complete solution
INTRODUCTION
The FLP 15 laser simulator is designed for use at instructional courses, trainings or modern
pentathlon competitions. It is intended for laser beam shooting initiated by atrigger.
The FLP 15 laser simulator employs the FLPM20 laser module with a15.6 ms code as an emitter.
The code is fully compatible with the International Modern Pentathlon Union (UIPM) standards.
1 Front sights
2 Battery cover / battery
3 Loading lever
4 Rear sights
5 Anatomical grip*
6Trigger
7 Weight area (with two weights á 40 grams each)
8 Starting magnet
* Universal grip is also available

Complete solution
5
TECHNICAL DATA
SIMULATOR
Simulator type Single shot laser simulator
Dimensions 355 mm x 150 mm x 50 mm
Weight
with universal grip 780 g
with anatomical grip 830 g (with 2 pcs weight á 40g)
Recommended shooting distance up to 10 m
LASER
Laser module type PENTASHOT FLPM20
Laser class
I.
(in accordance with EN 60825
- 1:2014 standard)
Wavelength 650 nm
Laser beam diameter 4 mm ±5% / 10 m
Laser coding 15,6 ms UIPM laser signal
Laser class certificate No.: 1140735 (ELECTROTECHNICAL TESTING
INSTITUTE, Prague, CZECH REPUBLIC)
Minimum laser peak value (empty battery) 2,5 mW
Maximum laser peak value (full battery) 3,2 mW
OPERATION
Operating conditions +10° C to +50° C; IP 52
Emitter power supply 1,5V AAA Alcaline battery
Number of shots made with 1 pc AAA type
battery min. 50 000 / at 20° C

6
Complete solution
SWITCHING ON/OFF
SWITCHING ON
Attach the chip (8) to the simulator body and move it from right to left. This will switch simulator ON
and the LED (9) will flash. The number of flashes indicates the battery status:
• 5 flashes – the battery is 100% full
• 4 flashes – the battery is at 75% charge level
• 3 flashes – the battery is at 50% charge level
• 2 flashes – the battery is at 25% charge level
• 1 flash – the battery is discharged, replace it.
After the battery test, the LED light remains constantly blue to indicate the laser is on and ready for
use.
The LED flashing continuously blue means the battery is discharged and it should be immediately
replaced.
SWITCHING OFF
The laser container will switch off approximately 20 minutes after the last shot. In case you need to
switch it off immediately, remove the battery from the simulator body.

Complete solution
7
SETTINGS
The user can only set or maintain the following:
• set the simulator sights (the laser dot)
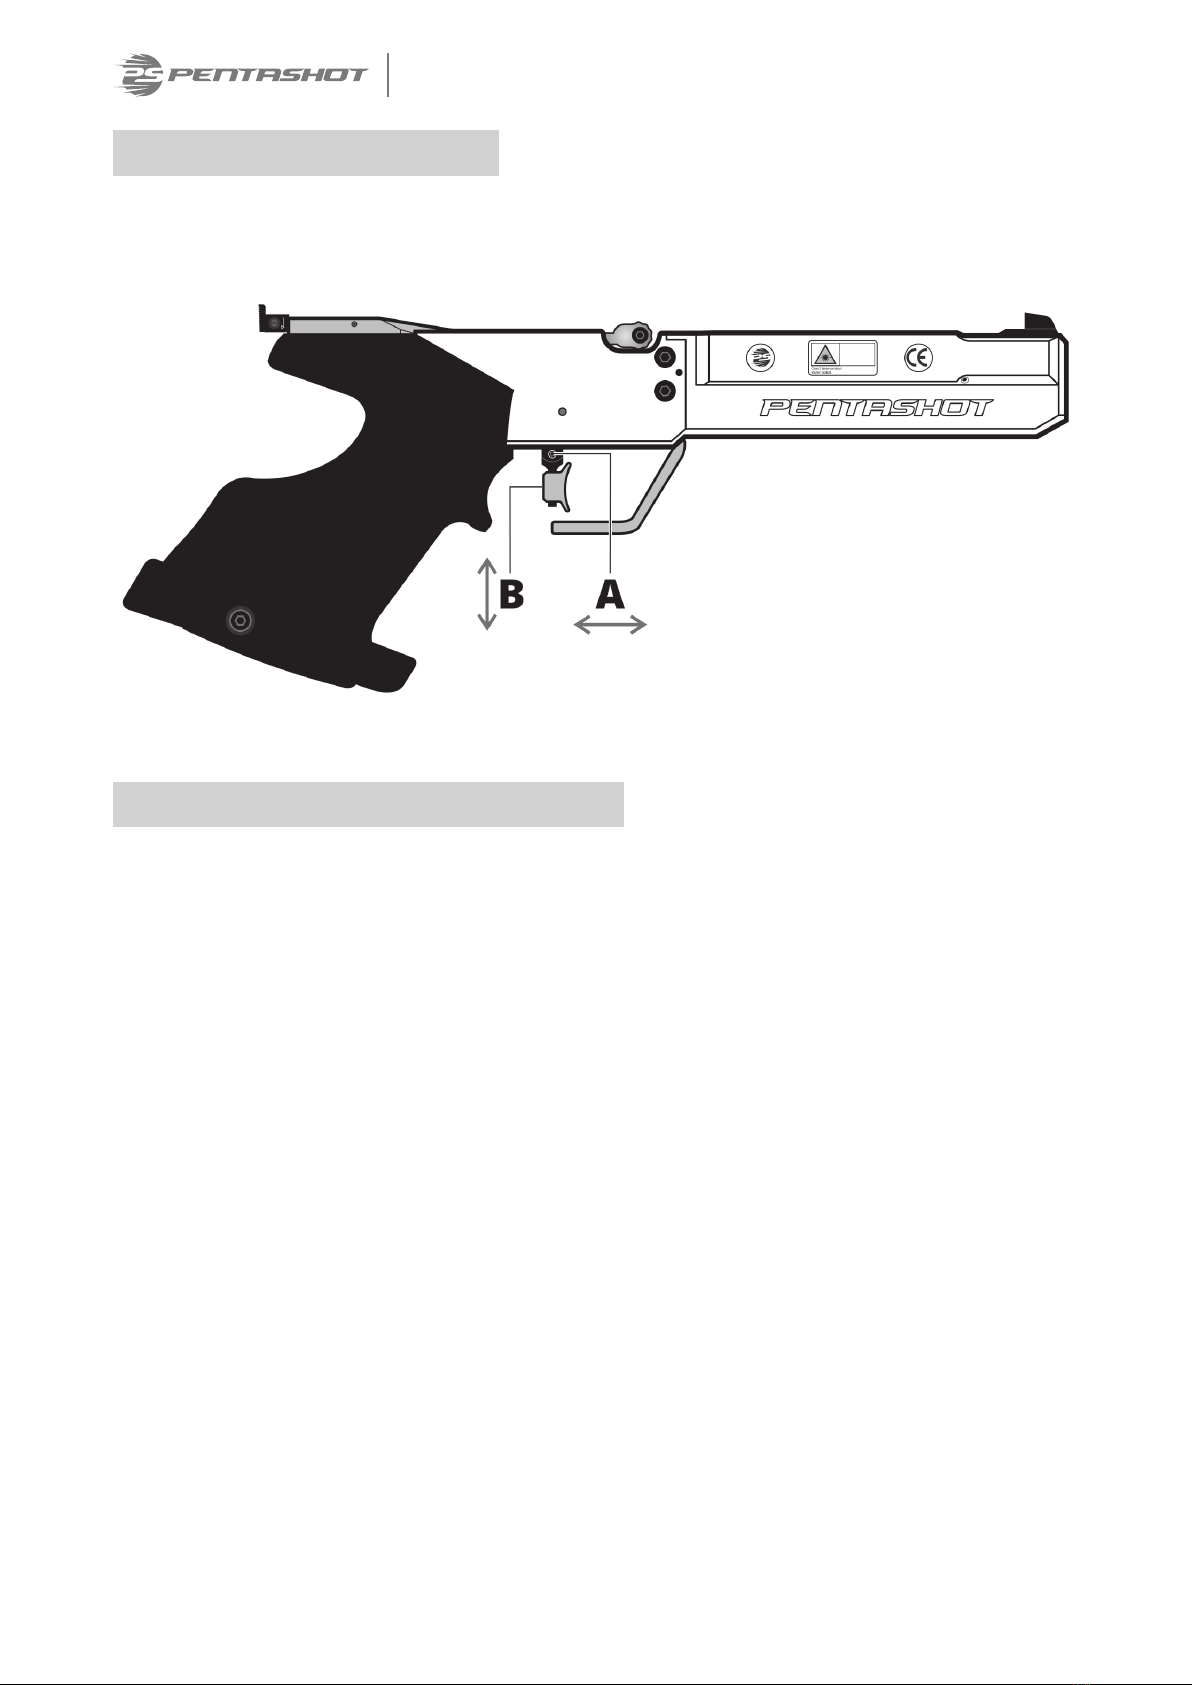
• set the trigger position, weight and travel
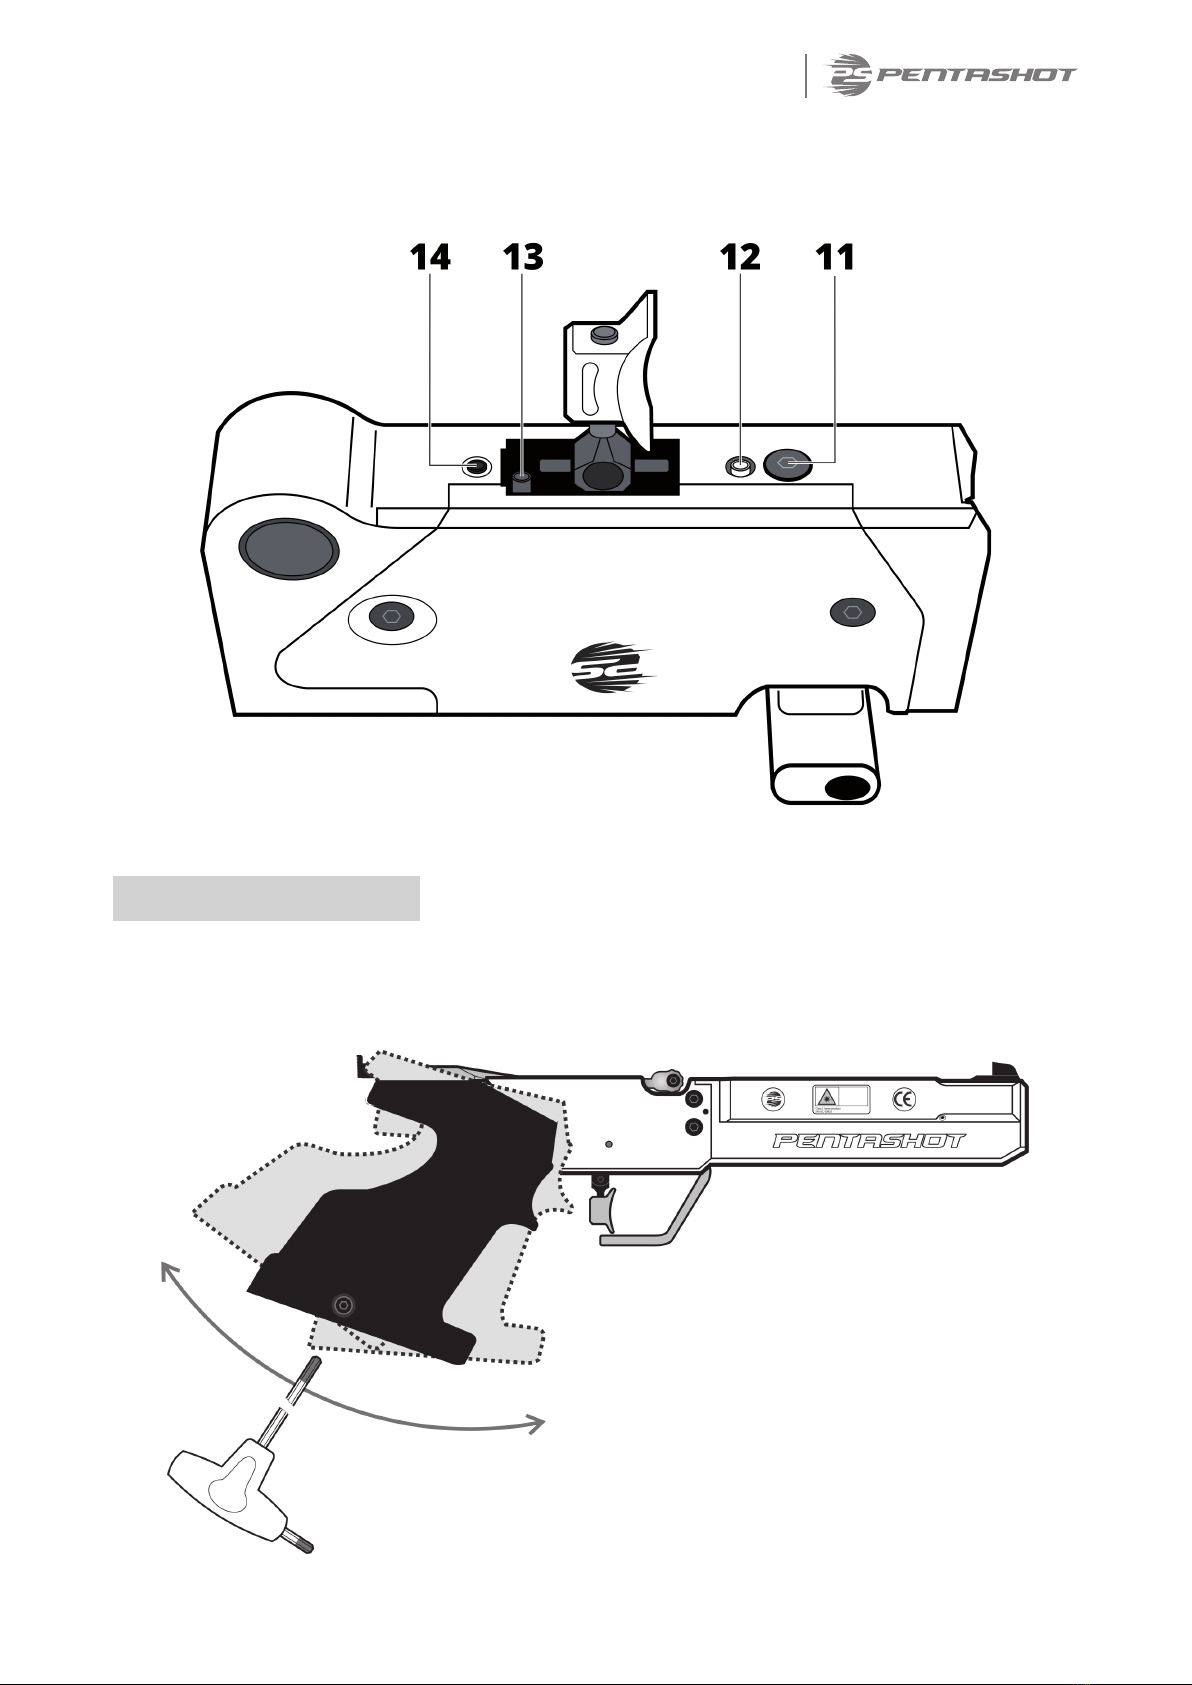
• set the grip angle
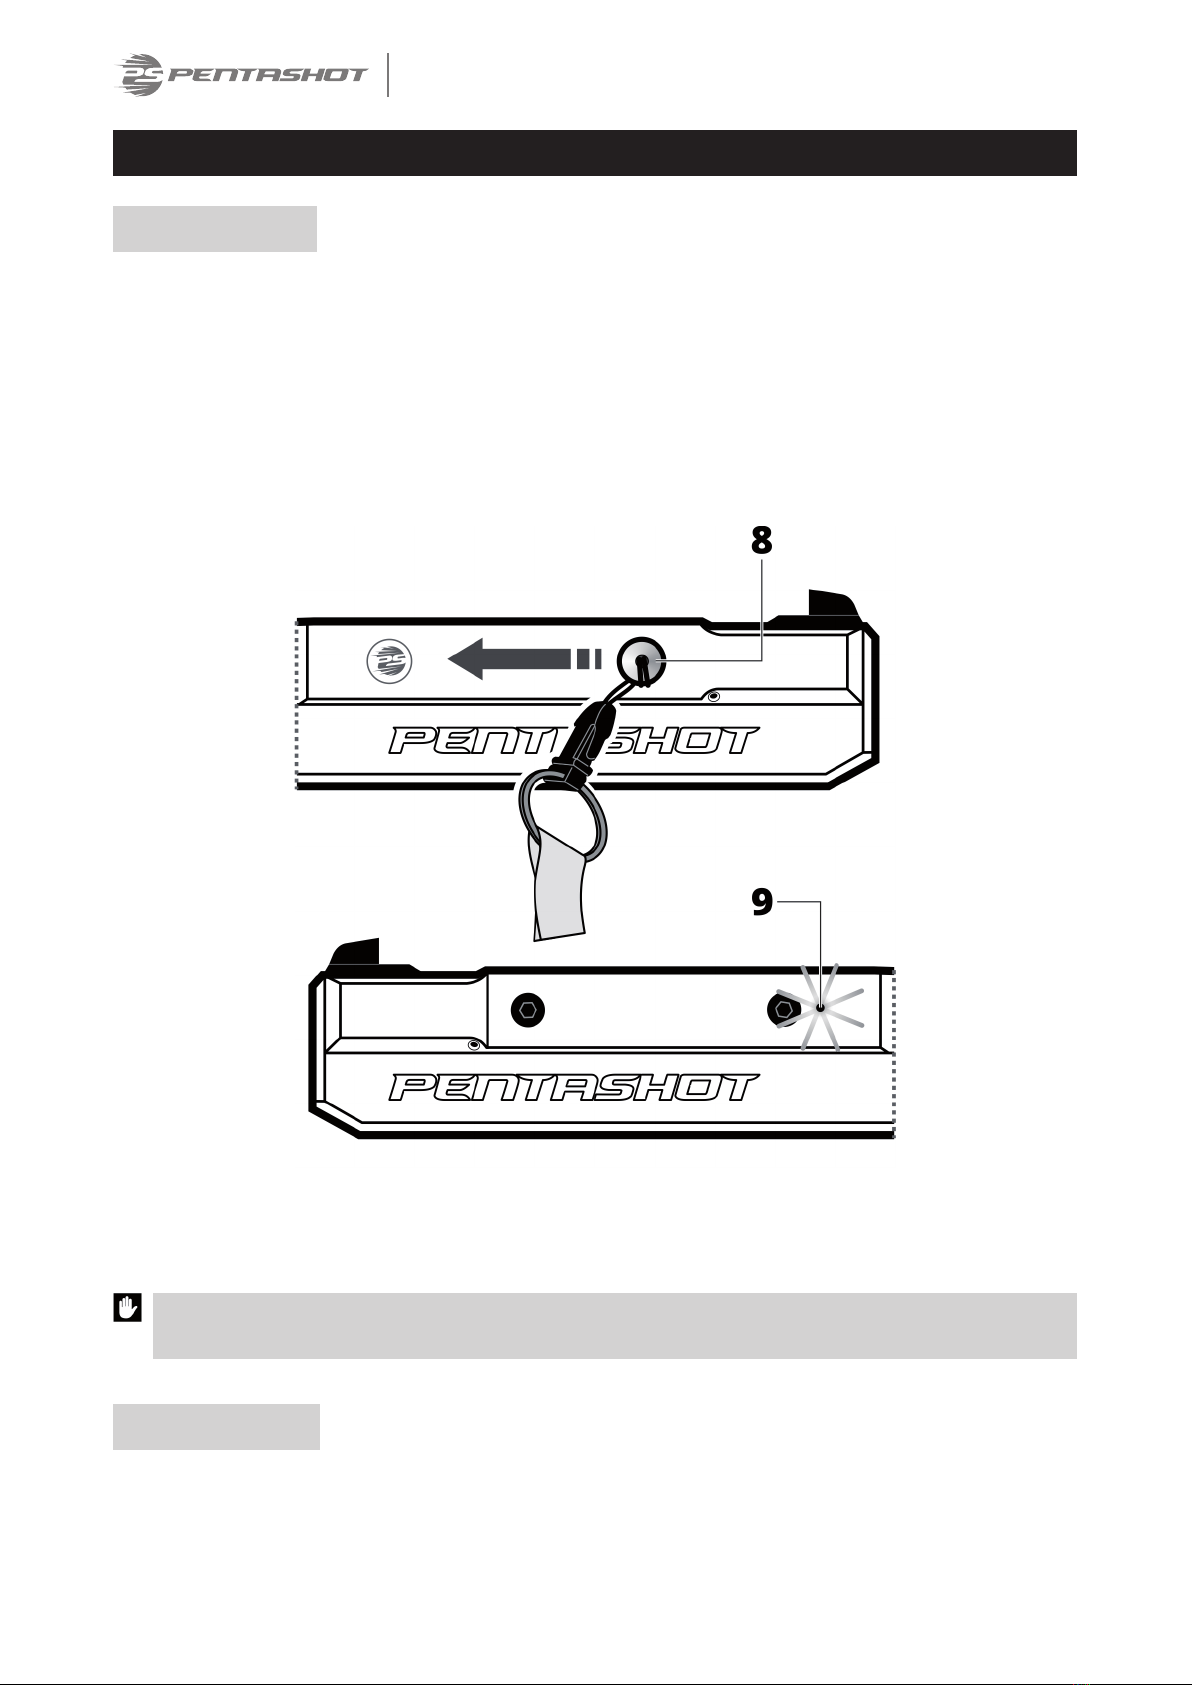
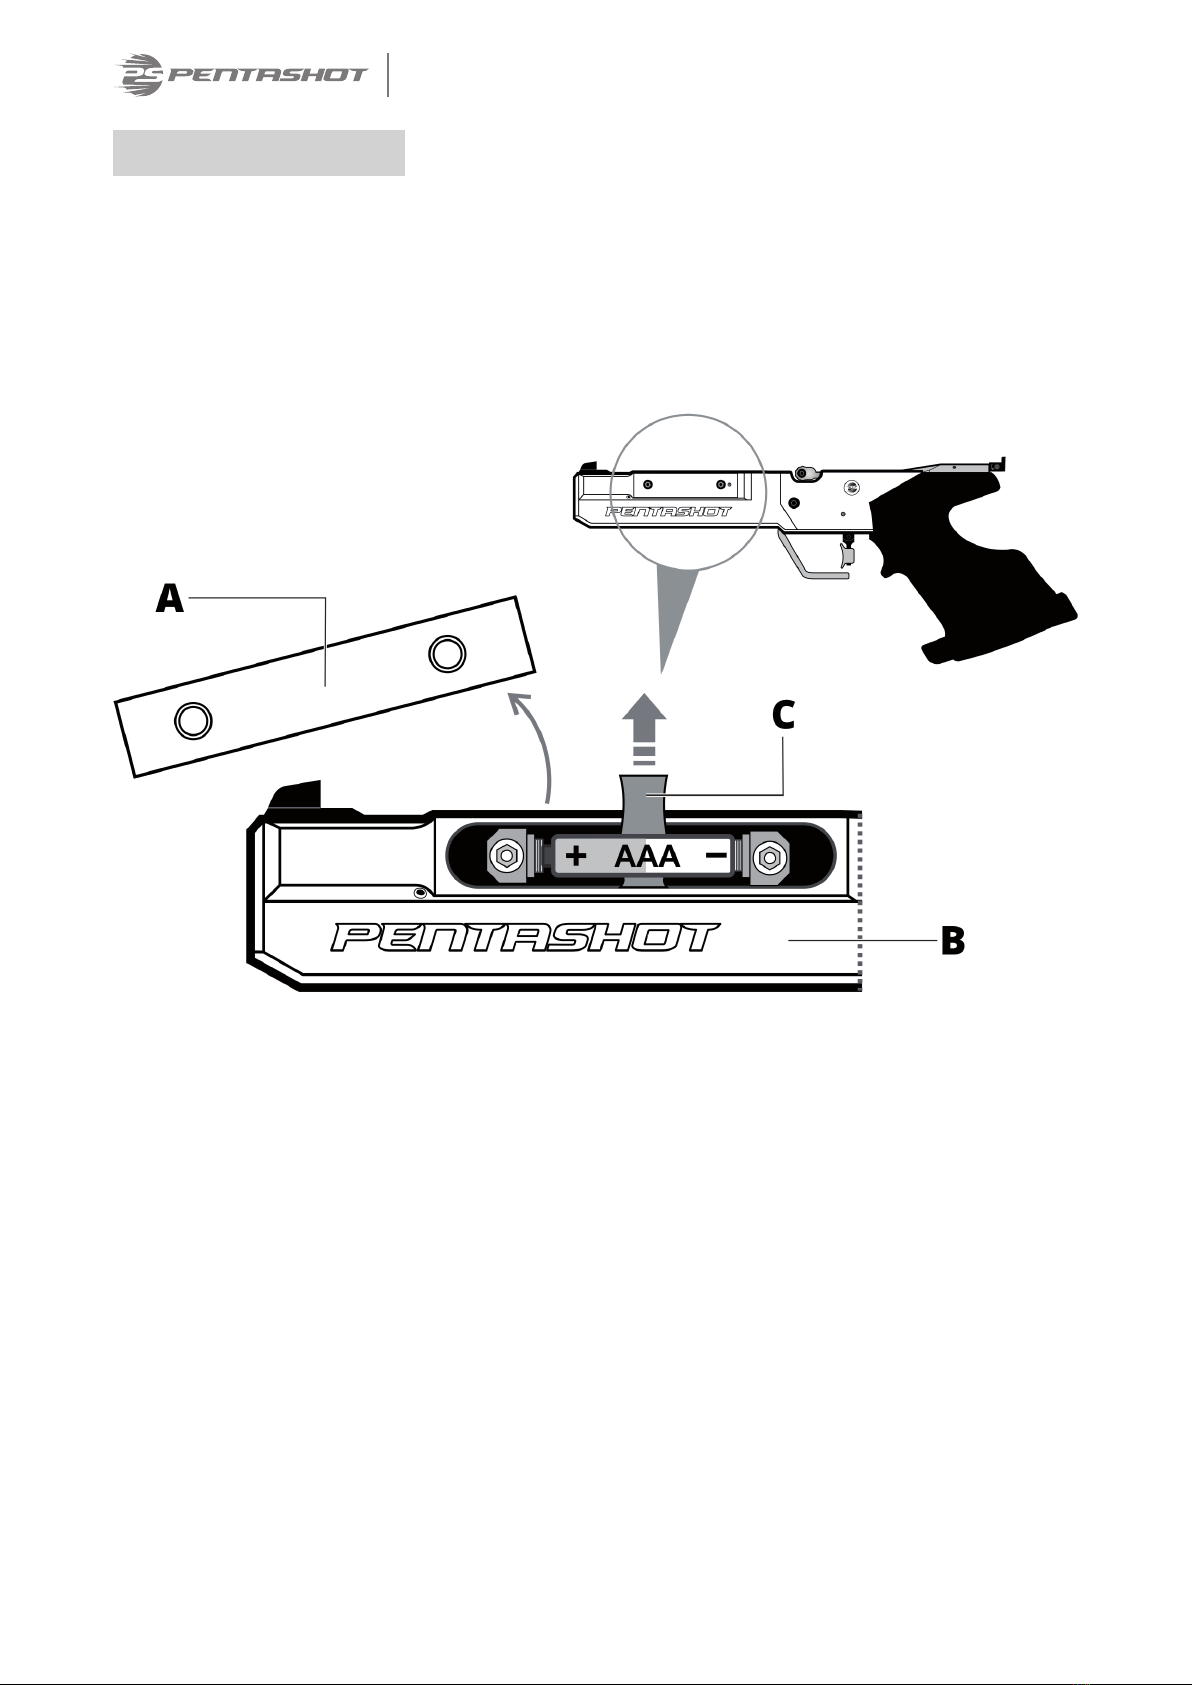
• change the battery
• change the simulator stock
It is forbidden to open or modify the laser simulator, with the exception of changing the battery
or grip. The Laser beam parameters can only be changed by the manufacturer or an authorized
person. The simulator owner must confirm his consent to the change in writing. The manufacturer
does not assume responsibility for any damage that would arise from the change.
SETTING THE SIGHTS (ALIGNING THE LASER DOT)
To adjust the simulator sights, aim at awhite wall or awhite object from adistance of 10 meters
and check the alignment of the red laser dot and simulator sights. If necessary, use the adjusting
screws to align the laser dot:
• Turning the screw (10a) clockwise – laser dot moves to the right
• Turning the screw (10a) counterclockwise – laser dot moves to the left
• Turning the screw (10b) clockwise – laser dot goes downward
• Turning the screw (10b) counterclockwise – laser dot goes upward
IMPORTANT: The movement of the adjusting screws must be very small.

8
Complete solution
SETTING THE TRIGGER POSITION
After loosening the screw (A) you can change the position of the trigger forward or backward.
After loosening the screws (B) you can change the position of the trigger upwards or downwards.
SETTING THE TRIGGER WEIGHT AND TRAVEL
Second stage weight
The second stage weight is already exactly adjusted by the manufacturer and it is not recommended
to change it. In case you still need to change its setting, carry out the following:
• Turn the screw (11) counterclockwise by one turn.
• Load the simulator by means of the lever.
• Turn the screw (11) very slowly clockwise untill simulator shoots by itself.
• Turn the screw (11) counterclockwise by one ¼ turn.
By this, the second stage weight is set. Check the correct function by few shots.
First stage weight
Turning the screw (12) clockwise increases the first stage trigger weight. Turning the screw (12)
counterclockwise reduces the first stage trigger weight.
First stage travel weight
Turning the screw (13) clockwise increases the first stage travel weight. Turning the screw (13)
counterclockwise reduces the first stage travel weight.

Complete solution
9
First stage travel
Turning the screw (14) clockwise reduce the first stage travel. Turning the screw counterclockwise
(14) increases the first stage travel.
SETTING THE GRIP ANGLE
Use the supplied hexagonal key to loosen the small screw on the simulator grip bottom. Set anew
position of the grip and fix it by tightening the small screw.

10
Complete solution
BATERRY REPLACEMENT
When the LED indicator flashes once or is constantly flashing, replace the battery.
• Unscrew the battery cover (A) from the simulator body (B).
• Remove the discharged battery using the ribbon (C) and insert a new one (AAA 1,5V).
Pay attention to the correct polarity of battery!
• Reinstall the cover (A).

Complete solution
11
SAFE USAGE
BEFORE USAGE
• The simulator must be used in accordance with these Instructions only. Never use the simulator
for purposes other than those for which it is designed. Failure to follow these instructions may
expose the user to dangerous laser radiation.
• Do not break the security stamp, otherwise you will lose the warranty on the product.
• Use alkaline AAA batteries only. However, never use rechargeable AAA batteries.
• When in public, carry the simulator in its original case or in abag. Persons not familiar with this
type of simulators may mistake it for aregular weapon and alarm the police.
DURING USAGE
• Never aim at people, animals or uncontrolled areas.
• While handling the simulator, observe the general rules for manipulation with areal weapon.
• Do not look into the laser beam directly or through any optical device.
LASER RADIATION
DO NOT LOOK DIRECTLY INTO THE LASER BEAM!
CLASS I. LASER DEVICE
AFTER USAGE
• After use, store the simulator in its original case.
• Protect the simulator against direct sunlight and rain in accordance with the UIPM Rules.
WARNING!
Failure to follow the above stated instructions may expose the user to dangerous laser radiation.
TROUBLESHOOTING
The laser beam trace is barely visible or
not visible at all. Replace the battery.
The detector (ascanning device) does not
react to the shot.
Check the target´spower supply or replace
the battery.
The laser beam impact is evaluated
anywhere else but not where the simulator
aims.
Adjust the laser dot.
Check correct function of the target.

12
Complete solution
SAFE USAGE
Keep the emitters clean by wiping the dust out of them with adry cloth. Never use any cleaning
agents, solvents or chemical preparations. Do not push the emissive hole optic with any object.
Regularly check the condition of the battery inside the simulator body to make sure it does not
corrode or leak.
If you will not be using the simulator for more than one week, you must remove the battery. Also
remove the battery before traveling by plane.
STORAGE
It is very important to store the laser simulator under the correct conditions to keep it in good,
reliable condition. Always do the following:
• Before storing the simulator for an extended time, always remove the battery. This prevents
internal damage to the simulator if the battery leaks.
• Store the simulator in the original packaging (case) in adry, dark place out of reach of children.
• Do not place any heavy objects on the case, or items that may leak fluids.
• Protect the simulator from weather, including frost and moisture. The optimal storage
temperature is between +5 and +30° C. The storage location’sair humidity must not exceed
60%. Do not store the simulator in adamp environment where there is high risk of corrosion.
SPARE PARTS
The following replacement parts are available for the simulator:
• front sights
• rear sights
• stock
• plumb
• trigger
and dealers. Alist of them can be found at www.pentashot.eu.
Only the manufacturer or an authorized individual has the right to replace the simulator’smain
parts (optics and electronics, including parts of the trigger mechanism).

Complete solution
13
WARRANTY
Awarranty repair shall apply exclusively to defects that have provably arisen during the effective
warranty period, namely as aresult of amaterial defect or amanufacturing defect. Defects arising
in such a manner may be remedied only by the manufacturer or an authorized maintenance
and service center. The buyer can make aclaim under the warranty against the manufacturer or
authorized dealer, as the case may be.
The warranty period shall become effective on the day of purchase or delivery of the Goods to the
Buyer, and the warranty remains valid for 24 months.
In particular, the following cases are excluded from the warranty repair:
• The product has not been returned to the dealer/manufacturer with the proof of purchase.
• Wear and tear due to the use of the product or damage to the product (incl. damage caused by
unskilled installation, improper commissioning, non-compliance with the procedures defined in
the instructions for use, etc.).
• Damage to the product caused by contamination, an accidental or disaster event or occurring as
aresult of natural or external events such as astorm, fire, water, excessive heat or chill, ingress
of aliquid, etc.
• Mechanical damage to the product (e.g. caused by fall, breaking, etc.) or damage arising during
the transportation.
• Damage, unauthorized design modifications, improper modification of the product or any other
interventions in the product conducted by unauthorized persons or maintenance and service
centers.
DISPOSAL
Once the laser simulator ends its lifetime, do not dispose of it along with other
household waste. Take it to awaste disposal site of raw materials or let it be
disposed at aspecialized company capable of recycling such amaterial.
The used battery must not be thrown into astandard dustbin. Collect all used
the batteries and dispose them at specialized collection points.

14
Complete solution
NOTES


www.pentashot.eu
Address: PENTASHOT EU s.r.o.
Zámecká 2315/9
70200 Ostrava
E-mails: [email protected]
Delivery address: PENTASHOT EU s.r.o.
Kosmova 1090/11
70200 Ostrava
Phone numbers: +420 605 252 433
+420 773 002 110
+420 607 056 112
Table of contents
Popular Accessories manuals by other brands

CHICAGO
CHICAGO 47423 Set up and operating instructions

Me
Me inertialSENSOR ACC5703 operating instructions

Lightolier
Lightolier Compact Fluorescent Frame-In Kit instructions

Bozz
Bozz Party cooler BWC31B-1 manual

Rivers Edge
Rivers Edge LANDMARK LM601 Operator's manual

PCB Piezotronics
PCB Piezotronics 105 Series Installation and operating manual

Honeywell
Honeywell DC515 Series Operation guide

ALPATEC
ALPATEC AF 04 L user manual

AQUANTIS
AQUANTIS MICROFREEZE user guide

Hamilton Beach
Hamilton Beach 74250 - ELECTRIC KNIFE COLOR manual

Panasonic
Panasonic MA2Z7850G Specification sheet

Evolution
Evolution PURE MINERALS LS70 Installation and operation manual