Pentruder 3P8 User manual

Operator’s manual
Pentruder®3P8 High frequency wire saw and
Pentpak®High frequency power pack

Operator’s manual Pentruder®3P8 HF-wire saw and Pentpak - Original instructions 2
Operator’s manual for
Pentruder® 3P8 High Frequency Wire Saw and
Pentpak®high frequency power pack
Version: 7 Date: 2019-02-19
Support & Service document
Original instructions
Copyright © 1997-2019 Tractive AB.
Pentruder and Pentpak are registered trademarks belonging to Tractive AB.
Contents
1Introduction .............................................................................................................................. 3
Validity of this operator’s manual................................................................................................... 3
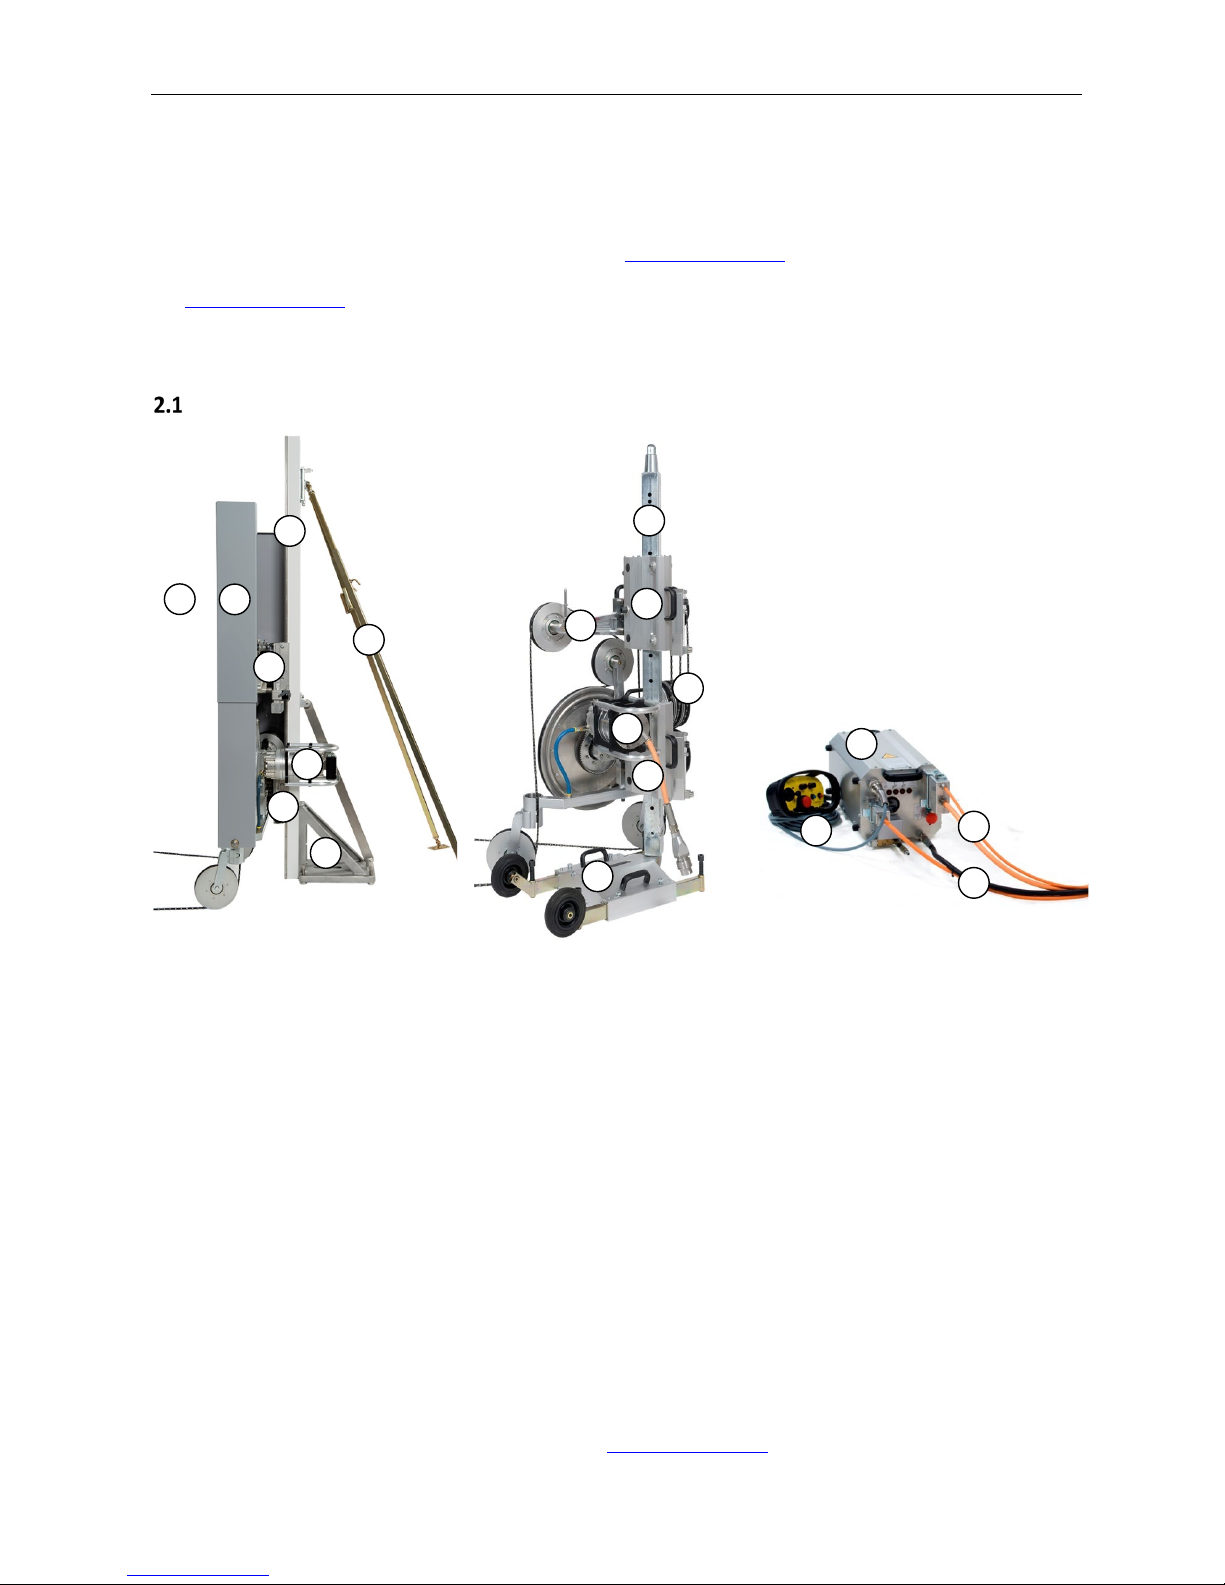
2Description of the machine ....................................................................................................... 4
List of complete machine................................................................................................................ 4
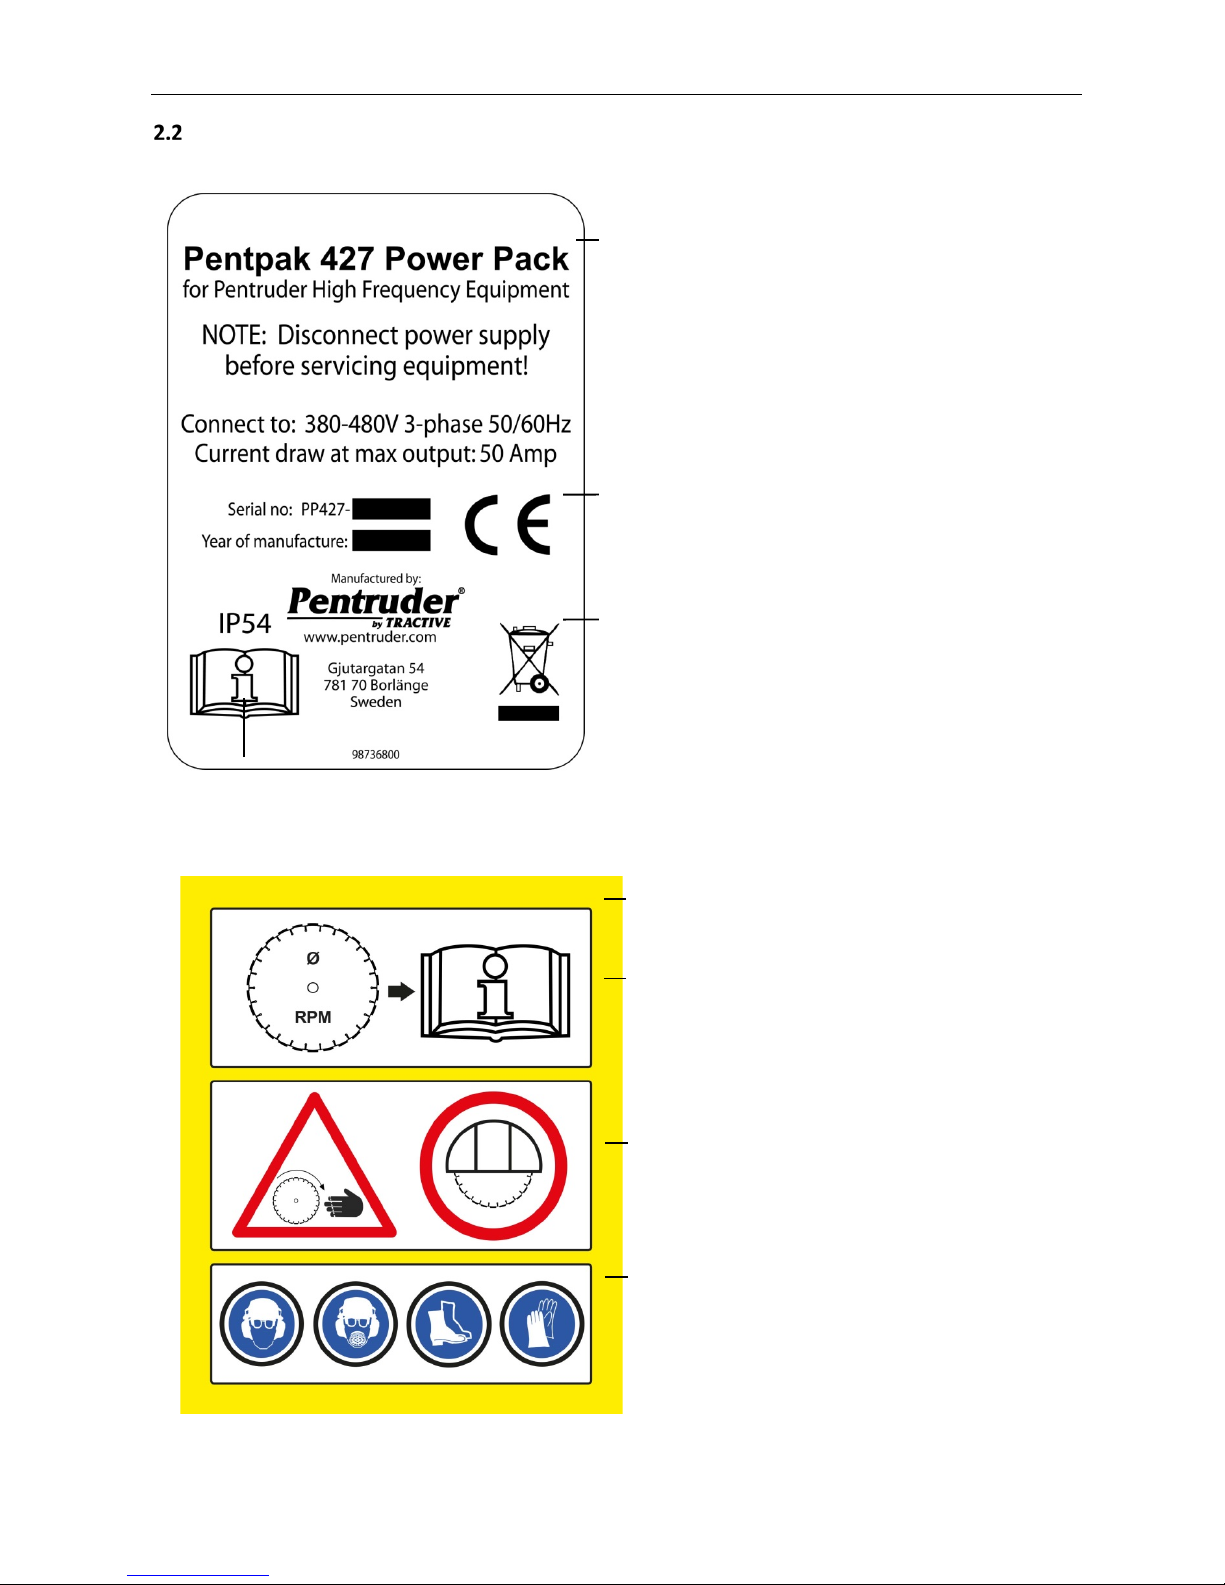
Signs and data plates on the machine............................................................................................. 5
3Safety instructions .................................................................................................................... 6
Safety instructions which are used in this operator’s manual.......................................................... 6
Intended use of the machine .......................................................................................................... 6
General safety instructions............................................................................................................. 7
Safety precautions at site ............................................................................................................... 8
4Preparations and mounting .................................................................................................... 11
Advice about the positioning of the Pentruder 3P8 wire saw........................................................ 11
Mounting the base plate .............................................................................................................. 11
Mounting 3P8 HF-wire saw with column system with cone coupling ............................................ 12
Mounting 3P8 HF-wire saw with with TS track ............................................................................. 16
Mounting the 3P8 wire saw modules............................................................................................ 21
Assembly of HF-motor, cords and hoses ....................................................................................... 24
Attach guards ............................................................................................................................... 25
Preparing the power pack............................................................................................................. 26
5Cutting.................................................................................................................................... 31
Preparations before starting to cut............................................................................................... 31
5.2 Starting the HF-machine ............................................................................................................... 32
6Troubleshooting...................................................................................................................... 38
Check list...................................................................................................................................... 38
LED type warning lights on the power pack .................................................................................. 39
7Maintenance........................................................................................................................... 42
Every day / week maintenance..................................................................................................... 42
Maintenance which should be performed by Pentruder authorized technician............................. 44
Transport and storage of the machine .......................................................................................... 44
8Technical Data Pentruder Modular Rig System ....................................................................... 45
Declaration of conformity ............................................................................................................. 46
Technical Director.......................................................................................................................... 46
Installation Certificate................................................................................................................... 47
Appendix for Wireless Remote Control: Hectronic User’s Manual

Operator’s manual Pentruder®3P8 HF-wire saw and Pentpak - Original instructions 3
1Introduction
Thank you very much for your confidence in our product! You have chosen to invest in a product which will give you
many years of efficient and profitable production. The Pentruder 3P8 HF-wire saw has been developed based on over 30
years of experience in this specialized field. With correct handling it offers outstanding performance, safety and
reliability.
It is essential that all personnel working with or in close proximity of the machine
have read and understood the contents of this manual, including the Appendix for
Wireless Remote Control: Hectronic User’s Manual, before commencing
operations. Please take careful note of the Safety Precautions.
The operator’s manual should be kept where the machine is.
To avoid serious or even fatal injury to the operator and persons in close proximity
of the machine, it is important that the machine always is operated by trained,
responsible personnel.
By reading and understanding the manual the operator will be able to take advantage of the many features and benefits
of the Pentruder 3P8 HF-wire saw.
We are confident that your investment in this equipment and its many design features will enhance your business
competitive edge and profitability!
Validity of this operator’s manual
This operator’s manual is only valid for the Pentruder 3P8 HF-wire saw as described in Chapter 2. Tractive AB always
strives to improve the products. Therefore we reserve the right to make technical changes without previous information.
In the following operator’s manual, “the machine”, “wire saw” or “Pentruder 3P8” is used to refer to the complete
machine as listed in Chapter 2.
Should questions arise, please contact our sales distributor. The address can be found at www.pentruder.com.
Product Description Serial number
Category: High Frequency Wire Saw
Make and type: Pentruder 3P8 _______________
Drive system: Pentpak High Frequency Power Pack
Type of drive system: 427 / 422 / 418 / 222 / 218 / 200 _______________
Drive motor: HF-motor
Type of drive motor: 18, 22 or 27 kW HF-motor _______________
Accessories: As listed in Chapter 2.
Remote control: Cable or Wireless Remote Control _______________
Manufacturer: Pentruder Distributor
Tractive AB
Gjutargatan 54
S-781 70 Borlänge
Sweden
Phone: +46 (0)243 - 22 11 55
Fax: +46 (0)243 - 22 11 80
E-mail: [email protected]
Web: www.tractive.se

Operator’s manual Pentruder®3P8 HF-wire saw and Pentpak - Original instructions 4
2Description of the machine
The Pentruder 3P8 HF-wire saw combines low weight with very high power and suits both small and big jobs.
The 3P8 HF-wire saw is driven by a powerful HF-motors. See www.pentruder.com for available HF-motors. The 3P8 HF-
wire saw is built up by modules which are fitted on a rig, either built on the TS track or on a column with cone coupling.
See www.pentruder.com for more information on the rig.
Wire tensioning is fully automatic, with some exceptions. The tensioning of the wire is governed by software and a
microprocessor / digital servo amplifier driven electric feed motor. The storage capacity is about 20 meters depending
on what combination of columns/track is used. A rear support should be used.
List of complete machine
A Pentruder 3P8 HF-wire saw is comprised of the following modules:
Wire saw modules
1. A 3P8-DP-HF, 3P8 Drive pulley electric
2. A 3P8-UA, 3P8 Upper assembly
3. A 3P8-LA, 3P8 Lower assembly
Guards
4. A 3P8-LMG, 3P8 Telescoping magazine guard
5. A 3P8-TG, 3P8 Top guard
6. A 3P8-DPG, 3P8 Drive pulley guard
7. A 3P8-SSG, 3P8 Slack side telescoping guard
HF-drive system
8. A Pentpak high frequency power pack
9. An HF-motor
10. A High voltage cable
11. A Low voltage cable with water hose
12. A Remote control
Rig
13. A track or column
14. A base plate
15. Two carriages
16. A rear support
Documentation
17. Pentruder 3P8 HF Operator’s manual
(not pictured)
18. Appendix for Wireless Remote Control:
Hetronic User’s Manual (not pictured)
as described in this Operator’s manual and on our website www.pentruder.com. Please note that a Pentruder 3P8 is not
complete without the modules listed in this paragraph. For accessories, see www.pentruder.com
1
13
15
2
3
9
14
14
8
12
11
10
14
15
15
16
7
4 -
13
9

Operator’s manual Pentruder®3P8 HF-wire saw and Pentpak - Original instructions 5
Signs and data plates on the machine
It is essential that all personnel working with, or in close proximity of the machine have read and understood the
contents of this manual before commencing operations. Please take careful note of the Safety Precautions.
This product is in accordance with applicable
EC-directives.
This sign is placed on the Pentpak and gives
information about the complete machine as
described in Chapter 2.
The trash bin symbol is an environmental marking and
indicates that this machine contains electrical/electronical
equipment which should be recycled.
Please contact your Pentruder Distributor for more
information.
This sign is placed on the Pentpak and gives
information about the complete machine as
described in Chapter 2.
On the wire saw, the wire can be run in both directions.
Please refer to the Operator’s manual for wire speed.
Caution, risk of cutting!
Always use the guard on the machine.
All persons working with, or in the proximity of the
machine should wear safety equipment, i.e.
protection helmet, protection shoes, gloves, eye and
ear protectors.
Find out what material is cut and wear appropriate
dust mask or respiratory protection if necessary.

Operator’s manual Pentruder®3P8 HF-wire saw and Pentpak - Original instructions 6
3Safety instructions
Safety instructions which are used in this operator’s manual
Note! This sign indicates technical specifics and methods which will facilitate the job.
!
Important! Here we inform about risks connected with use of the machine, and, if the safety
precautions are not respected, can result in damage to property and persons in
close proximity to the machine.
WARNING! Here we inform about risks connected with use of the machine, and, if the safety
precautions are not respected, can result in serious injury and even to fatal injuries
to persons in close proximity to the machine.
Intended use of the machine
It is of paramount importance that the operator has full knowledge and understanding of the Safety instructions.
This wire saw may not be used unless the operator is fully familiar with the contents of this Operator’s manual and has
been trained in its operation by an authorized distributor of Tractive AB’s products. If using a WRC Wireless Remote
Control, the operator must also be fully familiar with the contents of the Appendix for Wireless Remote Control:
Hetronic User’s Manual. The operator is fully responsible for the manner in which the machine is operated. It is the
responsibility of the purchaser that the operator has received the information needed to operate and handle the
machine in a safe a correct way.
Good working practice should always be used along with common sense. Tractive cannot foresee every possible
situation and this manual is not a substitute for professional skills and experience.
The Pentruder 3P8 HF-wire saw is intended to be used together with a Pentpak HF-power pack. The Pentruder 3P8
cannot be used with any other type of power pack. The Pentpak HF-power pack may only be used to power Pentruder
HF-machines.
The Pentruder 3P8 HF-wire saw may only be used for cutting of
•Concrete
•Stone material
•Masonry
It is our expressed recommendation that the machine may only be used for cutting in these materials.
The base plate must be mounted on a stable structure, not on a mobile device.
Other use is non-intended and therefore to refrain from.
Always use a diamond wire suited for the power of the machine. Follow the diamond wire manufacturer’s
recommendations.
WARNING! Do not use the machine for cutting other materials than listed or on loose masonry.
The safe fastening of the base plate cannot be guaranteed.
!Important!
Please observe that Tractive’s responsibility as a manufacturer can only be accepted
when the wire saw, Pentruder 3P8, is used together with power packs and
accessories described in this Operator’s manual. If the machine is used with non-
original equipment the warranty and Tractive’s CE-marking will be void.

Operator’s manual Pentruder®3P8 HF-wire saw and Pentpak - Original instructions 7
General safety instructions
WARNING!
WARNING - DANGER OF LIFE!
Cutting in a power line which is energized can result in serious injury and even to
fatal injuries. The wall saw can get energized. A circuit breaker cannot protect
against this danger.
WARNING!
•The machine is state of the art and follows the present regulations.
However, incorrect handling of the machine can lead to serious or even
fatal injury to the operator and persons in proximity to the machine.
•All persons which are operating or in any way working on the wire saw
has to
read and understand the whole operator’s manual and
especially the safety instructions, before any work is commenced. If
using a WRC Wireless Remote Control, the operator must also be fully
familiar with the contents of the Appendix f
or Wireless Remote
Control: Hetronic User’s Manual. It is the obligation of the buyer to
make sure that the operator really has received the information
necessary to operate and take care of the machine in a correct and safe
way.
•Good working practice should always be used along with common
sense. Tractive cannot foresee every possible situation and this manual
is not a substitute for professional skills and experience.
•The machine may only be operated and serviced by authorized and
trained personnel. The p
ersonnel should be trained by personnel
authorized by Tractive.
•A Pentruder machine used in the correct way is a safe and efficient
tool. If the machine is used improperly this can expose the operator
and other persons staying in the same area to extreme danger or even
risk of fatal injuries.
•The user is liable that the wire saw is in faultless condition and that all
functions are in order before work is commenced.
•To maintain the level of safety inherent in the design of this machine,
only Tractive original spare parts may be fitted. Tractive AB disclaims all
responsibility for damages occurring as a result of use of non-original
parts.
•Modifications or changes on machine are not allowed.
•All warranty claims are void if non original spare parts are used.
•Before any kind of service or mounting on the machine is commenced,
the machine must always be disconnected from the electric power
supply.
•The machine may not be used in an environment where explosion
protected equipment is demanded.
•Tractive AB disclaims all responsibility for damages to persons and / or
property resulting from use of the machine, whether they are caused
by faulty handling or from damages that have occurred as a
consequence of negligent or faulty maintenance, or as a consequence
of failure to check and control the machine with regard to damages
and / or faults.

Operator’s manual Pentruder®3P8 HF-wire saw and Pentpak - Original instructions 8
Safety precautions at site
Wire sawing can be a very dangerous exercise! All possible safety precautions must be taken to avoid accidents from
happening.
WARNING
BEFORE CUTTING
Before cutting is commenced, make sure that;
•There are no power lines, gas or piping which can be damaged by the
machine.
•The statics of the building are not compromised because of the cut
openings.
•Check with the foreman responsible that all necessary precautions
have been performed before commencing work. Await the approval of
the safety precautions and mounting position of the machine from the
foreman before work is commenced.
•Safety and health regulations at the work place must be followed.
•No work should be commenced which cannot be judged to be safe.
Always use common sense and good working practice.
•Always check that the machine and diamond wire
is in faultless
condition and that all functi
ons are in order before work is
commenced.
•Never use a diamond wire for material which it is not intended for.
•Before cutting is commenced all persons involved must know how the
emergency stop buttons are working.
•Follow the instructions in 5.2 Startin the HF-machine, to make sure the
diamond wire will not start at and/or cut at a too high speed.
WEAR SAFETY EQUIPMENT
•All persons working with, or in the proximity of the machine should
wear safety equipment, i.e. protection helmet, protection shoes,
gloves, eye and ear protectors. The noise level during cutting might
lead to permanent hearing disorders if not ear guards are worn.
•Find out what material is cut and wear appropriate dust mask or
respirator protection if necessary.
MOUNT ACCORDING TO THE INSTRUCTIONS
•Before any kind of service or mounting on the machine is commenced,
the machine must always be disconnected from the electric power
supply.
•The base plate may only be mounted according to the instructions
given in this manual.
•Make sure a guard always is properly fitted during the cutting process
as well as deflectors to protect the free wire to and from the cut.
•The power or force applied on the wire in the 3P8 is higher than on any
other commercially available electrically driven compact (non quarry
type) wire saw. Therefore it is important to splice the wire carefully.
LIFTING AND TRANSPORTING
•Always lift the machine ergonomically correct and in a safe way.
•Should the machine need to be lifted with a crane, this should only be
done after permission and instructions have been given by a person
responsible for safety on the site.

Operator’s manual Pentruder®3P8 HF-wire saw and Pentpak - Original instructions 9
WARNING!
RISK AREA
•The operator shall keep a minimum safety margin of 1.5 m to all
working and moving parts during the operation. Should the machine
fall down from the wall or ceiling it could cause severe injuries. There is
always a danger of wire tear and thereby connected
wire lash.
Deflectors may be necessary in addition to the machine guard.
•The operator should have good supervision over the machine from
each control position.
•The risk area must be roped off and the operator must make sure that
no unauthorized persons are within the risk area.
•Clear the working area and make sure no unauthorized persons are
within the risk area, see drawing below, before the machine is allowed
to be started.
•All guards must be fitted on the machine and properly locked while it is
running and the wire must be protected by deflectors over its whole
free length, as well and to the cut object.
•Never stand in line with the cut line.
•Remember always to cover cut openings so that no person falls down
and hurts himself.
•Secure the concrete before starting work to make sure there is no
possibility that concrete blocks may fall down causing injury or damage
to persons or property.
•Concrete blocks which are cut free may not be allowed to fall freely as
this could compromise the safety of the machine and/or diamond tool.
For drawings of the Machine’s Risk area, see next page.
!Important!
•
The power pack is water cooled and must be drained from water when
the ambient temperature is in the proximity of or below 0 degrees
Celsius. See 4.9.3 Connection to water supply.
•The water supply may only be connected to the short hose on the water
ON/OFF-valve on the power pack. The quick disconnect couplings may
not be replac
ed with couplings that are not fully open when
disconnected.
•The transistor power modules in the power pack are water cooled and
the water pressure must therefore be limited to max 5 bar.
•The power pack should preferably only be operated when it is put on its
back with the warning triangle upwards.
•Connect the HF-power pack only to Pentruder HF-wall saws, Pentruder
HF-Wire Saws, HF-drill motors or any Pentruder equipment which has
been manufactured or approved by Tractive AB.

Operator’s manual Pentruder®3P8 HF-wire saw and Pentpak - Original instructions 10
3.4.1 The machine’s risk area
Nobody is permitted to be within the machine’s risk area when work is underway. This also applies for the operator.
Wall cutting with satellite pulley Cutting with additional satellite pulleys
Floor cutting or direct cutting of wall
(A
max
) Largest free running wire section (A
1
-A
4
)
1. Risk area
2. Risk area of the horizontal projection of the wire
towards the operator
3. Recommended operator position
4. Power pack
5. Wire drive unit
6. Wire guard
7. Pulley wheel
(A
max
) Largest free running wire section (A
1
-A
3
)
1. Risk area
2. Risk area of the horizontal projection of the wire
towards the operator
3. Recommended operator position
4. Power pack
5. Wire drive unit
6. Wire guard
7. Pulley wheels
(A
x
) Largest free running wire section
1. Risk area
2. Recommended operator position
3. Wire drive unit
4. Power pack
5. Wire guard

Operator’s manual Pentruder®3P8 HF-wire saw and Pentpak - Original instructions 11
4Preparations and mounting
Advice about the positioning of the Pentruder 3P8 wire saw
•When setting up the base plate, pay attention to the positioning of the wire going out from and back to the
machine. Try to plan the set-up so that satellite wheels are not needed.
•The 3P8 can most often be mounted directly on the cut object. If this is possible, it is called a direct cut.
A direct cut is preferable as extra satellite pulleys steal power.
•Naturally, in some instances satellite wheels must be used. If this is the case, try to avoid using satellite on
the slack side. This is where the wire goes out from the machine and where the RH swivel wheel is. The RH
side if you stand in front of the main drive pulley.
•Try to position the base plate so that the wire goes back in to the concrete or the cut object with the wire
running over the RH swivel wheel when cutting starts.
•What we are after with these recommendations is to create as little friction as possible on the slack side.
Then the cutting will go faster and the feed regulation will work best.
•Normally, corners will NOT have to be broken off or chamfered before commencing a cut. Maximum torque
is available from 0 motor speed, and the wire can be started smoothly. Note, a new wire with sharp bead
edges is much harder to start over sharp corners than only an ever so slightly used wire. With a new wire, it
may be necessary to chamfer edges on the object to be cut.
Mounting the base plate
The surface where the base plate is fastened should be stable, free of obstacles and adequately lit. The base plate should
be mounted in such a way that it cannot become detached when the machine is working, or at sudden changes in load
on the anchor bolts.
For safety reasons it is very important that the base plate is properly fastened. If mounted on brick or porous concrete
the base plate must be bolted down with M16 / 5/8” through bolts. Use only high quality anchors and bolts.
WARNING!
•If the base plate is not securely fastened to a solid foundation, the very high
forces applied on the wire by the tractive power will cause instability and will
lead to unforeseen events that can lead to serious or fatal injury.
•
If HKD anchors or other high quality expansion anchors cannot be fixed
securely, the base plate must be securely fixed with through bolts and large
washers to achieve the required level of safety.
•Do not use the machine if the base plate cannot be fastened properly.

Operator’s manual Pentruder®3P8 HF-wire saw and Pentpak - Original instructions 12
Mounting 3P8 HF-wire saw with column system with cone coupling
4.3.1 Measurements for positioning – 70 mm column system
The wire cut line will be as shown in the following drawings.
Note: The column can rotate around its own axis, and be locked in any position. Therefore you may prefer to
measure your anchor position from the center of the column.
Meausurements for positioning of wire saw – 70 mm column system with BFC5 base plate - view from top
Meausurements for positioning of wire saw – 70 mm column system with BE1/BE2 base plate (old type)– view from top
355 mm
14 inches
240 mm
9.45 inches
460 mm
1
8
inches
240 mm
9.45 inches

Operator’s manual Pentruder®3P8 HF-wire saw and Pentpak - Original instructions 13
4.3.2 Mounting sequence for wire saw built on column system with cone coupling
1. Base plate
2. Column or columns
3. Lower carriage
4. Upper carriage
5. Mount pivoting head in some setups (accessory)
1. Mount the base plate
a. Bolt the base plate to a solid object . See 4.2 Mounting the base plate.
b. Adjust the leveling screws.
c. Level the base plate using the four leveling screws.
BE2 base plate and column-CN 0.5 F/M-70.
2. Mount the columns or columns
a. The column is locked by turning the eccentric bolt Clockwise.
b. To release the column, the eccentric bolt is turned Counter Clockwise until it lifts from the cone.
c. To remove the eccentric bolt, turn it slightly Clockwise again until the load on the bolt is gone, and then pull
out the bolt, and the column can be removed.
!
Important! •Do not insert your fingers in the bolt hole.
4 x leveling screws
Eccentric bolt

Operator’s manual Pentruder®3P8 HF-wire saw and Pentpak - Original instructions 14
3. Mount the lower carriage on the column
a. Loosen the socket on the friction clutch one turn. (19
mm / 3/4” spanner)
b. Slide the carriage over the column, with the correct
side up.
c. Adjust the height of the carriage by turning the feed
shaft socket with a ratchet or knuckle bar.
d. Tighten the friction clutch socket.
Note! Tighten moderately to 20-25 Nm / 15-18 ft-lbs.
Do not over tighten.
The friction brake should be only moderately tightened so it will
allow the carriage to slide upwards in the event of an abrupt
jamming of the wire. The normal pulling force in the wire is about
100 kg’s for a 22 kW HF-motor. Due to the amplifying effect of the
forces, through the 3 loops in the magazine, the force applied on
the carriages is 6 fold and can be in excess of 1000 kg during an
abrupt jamming of the wire.
4. Mount the upper carriage on the column
a. Loosen the socket on the friction clutch one turn.
e. Slide the carriage over the column, with the feed unit pointing
downward.
b. Adjust the height of the carriage by turning the feed shaft
socket with a ratchet or knuckle bar.
c. Tighten the friction clutch socket.
Note! Tighten firmly, but do not over tighten!
Upper carriage
5. Mount rear support
A rear support is recommended to increase stability. For The RST-CN-M and RST-CN-U Rear supports can both
be adjusted between 2.1 and 3.2 meters.
The RST-CN-U rear support can be fastened on any side of the column as there are two openings for the rack
and the clamp can be turned upside down as well. This is the recommended rear support. See picture below.
The RST-CN-M is fastened on the male cone coupling on the top of the column. See picture below.
RST-CN-M Rear support RST-CN-U Rear support
Lower carriage
This side up
This side up

Operator’s manual Pentruder®3P8 HF-wire saw and Pentpak - Original instructions 15
6. Mount a Pivoting head - PD1 (accessory)
Pivoting head-PD1 with column.
In many cases a universal pivoting head can be used to simplify set-up and to add versatility to the system. The Pivoting
Head can for example be fitted on a vertical column and a horizontal column fitted to the Pivoting Head conical quick
coupling.
To use the pivoting head
a. Mount the pivoting head on the column
b. Adjust height and tighten the clamp screws slightly.
c. Use a ratchet or knuckle bar to move the pivoting head to the desired position on the column.
d. Lock the pivoting head with the clamp screws.
e. To mount the second column on the pivoting head, align bolt hole with pull stud hole in the male conical
coupling, insert an eccentric bolt and tighten hard, clockwise, with a ½” knuckle bar or ratchet.
f. Now you can mount the carriages on the horizontal column, see mounting of carriage.
!Important!
•
Be observant so that the eccentric bolt doesn’t slip out of the column when the
column is mounted on the conical coupling on the pivoting head. It MUST be
completely flush with the column side face.
•Before tightening the adjustable male-coupling please make sure the face
teeth are correctly in mesh.
•When the eccentric bolt is removed, do NOT put your fingers in the bolt hole.
•When the pivoting head is mounted, be sure that the locking screws are
tightened to give enough friction between column and pivoting head, to keep
the pivoting head from sliding down the column in an uncontrolled way.
Clamp screw
Socket on
pinion
Face tooth
coupling, 5°
increments
Columns can be rotate
around its
’ own axis,
and locked in any
position
Eccentric cam
lock bolt

Operator’s manual Pentruder®3P8 HF-wire saw and Pentpak - Original instructions 16
Mounting 3P8 HF-wire saw with with TS track
4.4.1 Measurements for positioning – TS track
The wire cut line will be as shown in the drawing below.
Measurements for positioning of wire saw – TS Track

Operator’s manual Pentruder®3P8 HF-wire saw and Pentpak - Original instructions 17
Stroke of carriage – Measurements – TS Track

Operator’s manual Pentruder®3P8 HF-wire saw and Pentpak - Original instructions 18
4.4.2 Standard mounting sequence with TS track
1. Track on base plate
2. Lower carriage
3. Upper carriage (with feed motor)
1. Mounting the track on the base plate
We recommend to assemble the base plate on the track first, and then fastening the assembled rig on the concrete.
c. Tighten the two bolts on the lower clamp.
d. Tighten the upper bolt loosely.
a. Slide the upper clamp in to the track. Older tracks
with only one rack can be used. In this case make
sure the rack is on the left side seen from the rack
side of the track.
b. Slide the lower clamp in to the track.
!
Important! Rack on this
side, if there is only one
rack on the track.
e. When the track is in the right position,
tighten the bolt properly.

Operator’s manual Pentruder®3P8 HF-wire saw and Pentpak - Original instructions 19
f. Next tighten the upper bolt on the back brace. g. Tighten the lower bolt on the back brace.
2. Mount the lower carriage on the track
a. Open the three clamp nuts.
b. Put the carriage on the track as shown in the
picture and align the feed gear with the rack on the
track.
b. Tighten all three clamp nuts firmly first by hand and
then with a 19 mm spanner to be firmly tightened,
but not solid.
Note! Tighten moderately to 20-25 Nm / 15-18 ft-
lbs. Do not over tighten.

Operator’s manual Pentruder®3P8 HF-wire saw and Pentpak - Original instructions 20
3. Mount the upper carriage on the track
a. Open the three clamp nuts.
b. Put the carriage on the track as shown in the
picture and align the feed gear with the rack on
the track.
c. Tighten all three clamp nuts firmly first by hand
and then with a 19 mm spanner to be firmly
tightened, but not solid.
Note! Tighten moderately to 20-25 Nm / 15-18
ft-lbs. Do not over tighten.
It must be possible for the upper carriage to glide
upwards during cutting.
Note! The liners on the track and the liners in the
upper carriage must be clean before starting to
cut. Please also smear the liners in the upper
carriage lightly with some grease or oil.
4. Mount rear support
A rear support is recommended to increase stability.
The rear support for the saw track, RST-TS1 (Rear Support for TS1 track), can be fastened anywhere along the
track and the length can be adjusted between 2.1 and 3.2 meters.
There is a bracket for straps on the clamp.
RST-TS1 Rear support for TS track
This manual suits for next models
1
Table of contents
Other Pentruder Saw manuals