PERDIX Pro BolyGuard MG984G-36M User manual

BOLYGUARD MG984G-36M 4G CAMERA
This camera is powered by 8 AA batteries. All types of
batteries (Lithium, Alkaline and Rechargeable (NiMH)
can be used in the cameras. For best performance, we
recommend using quality NiMH rechargeable batteries
or Energizer Ultimate Lithium batteries. The power port
can also be used to connect an external 6V battery
(cable not included).
POWER
SETTINGS INTERFACE & DISPLAY
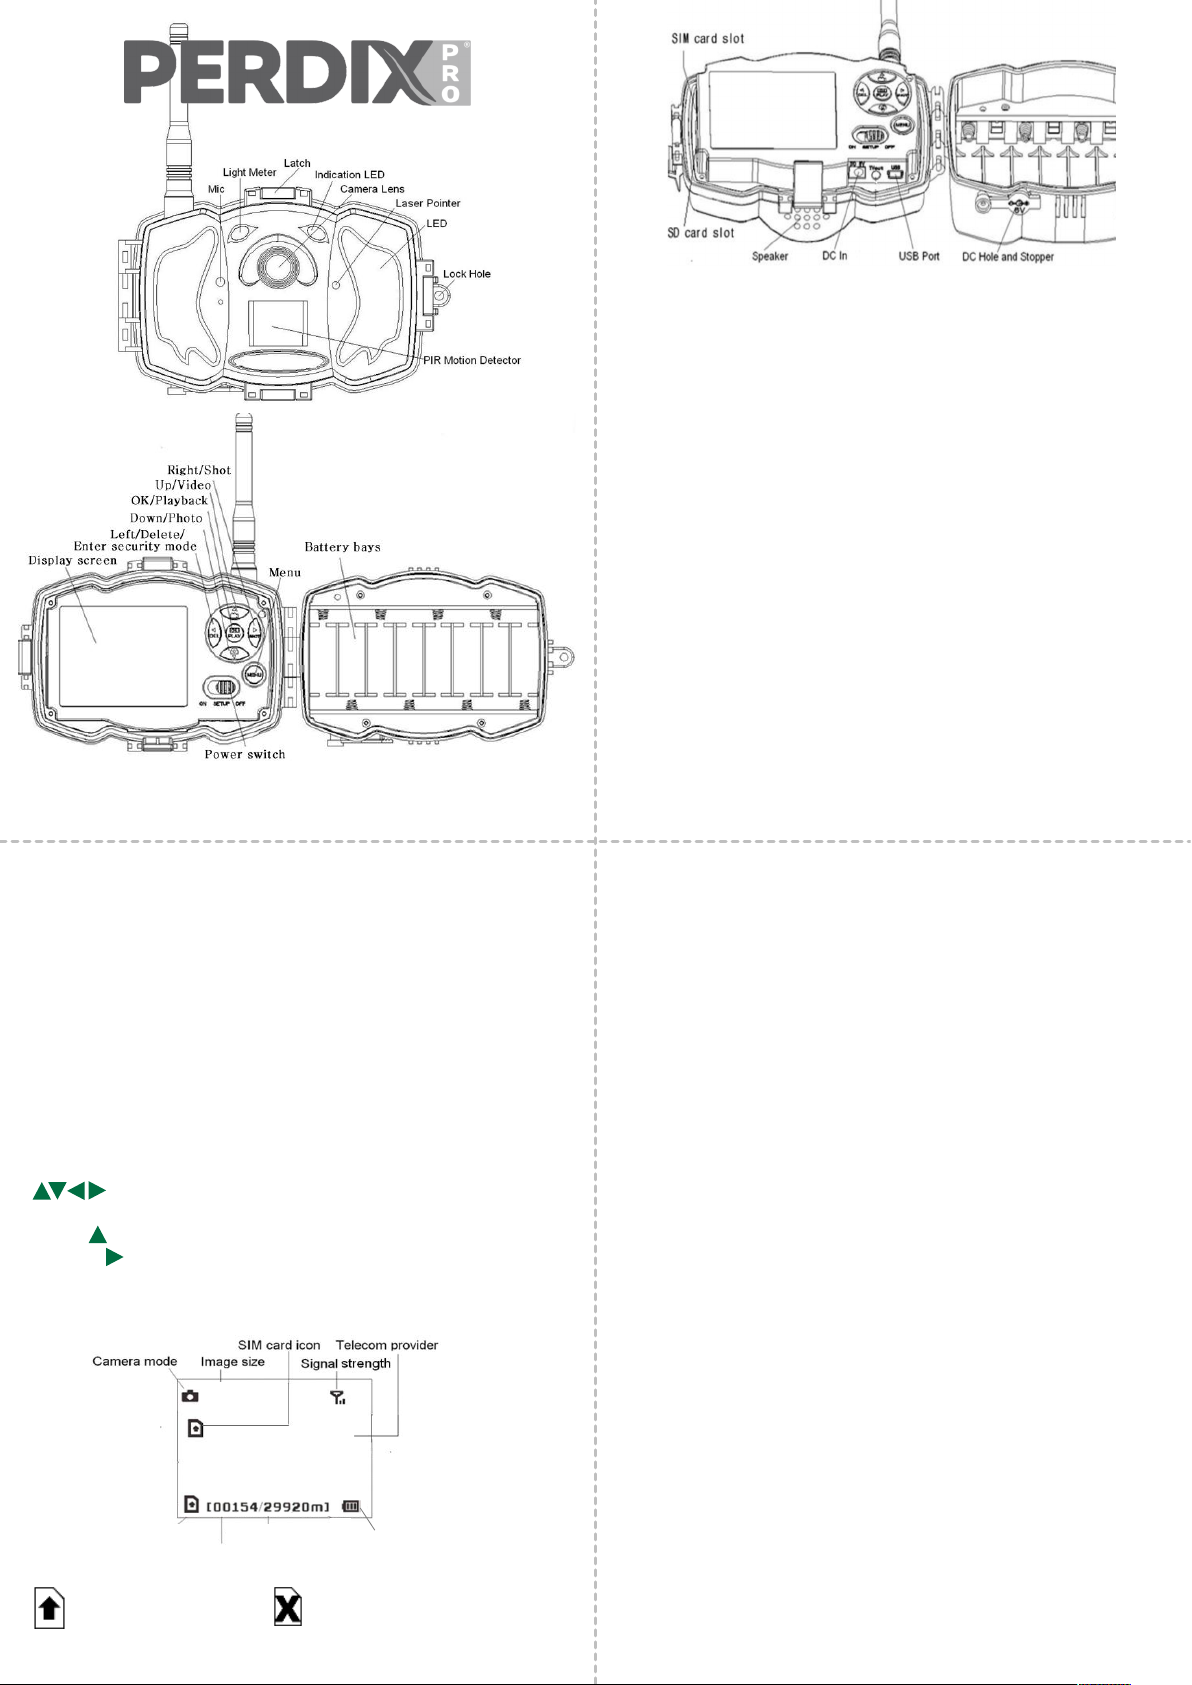
Place the power switch to the TEST/SETUP position.
To navigate the menus, utilise the following built-in
buttons:
MENU: Enter the program menu in Preview Mode
: Move between menu options (OK to select)
OK / PLAY: Save parameter settings and play videos
DEL / : Delete an image/video when viewing them
SHOT / : Capture a photo or record a video manually
When the camera is in TEST/SETUP Mode, the screen will
activate and display the following:
Vodafone
SDcard icon Available space Battery level
Numberof image
36M
Indicates the SIM card is
recognised by the
camera.
Indicates the SIM card is not
recognised by the camera or the
SIM card is not working due to
connection/activation issues.
QUICK START
Your PerdixPro enabled camera is supplied with pre-
installed SIM and SD cards. To begin using your camera,
please follow these steps:
1. Setup your PerdixPro account to begin receiving
images. See PerdixPro Media Tool Setup for further
instructions.
2. Attach the aerial to the brass connector on top of
the camera.
3. Install 8 x AA batteries. We recommend using
Energizer Ultimate Lithium or high quality NiMH
batteries.
4. Turn the power switch to SETUP and wait for the
camera to connect to a network. This may take a
few minutes.
5. Once connected, turn the power switch to ON.
Images will start being taken (when PIR activated)
after the red LED on the front of the camera stops
ashing.
6. Images taken should now be shown in your
PerdixPro Portal and App.
NB: The camera is set to send low resolution photos by
default. This can be changed within the menu settings
but will reduce the number of images that can be
uploaded monthly.
Camera mode
Choose between capturing photo’s, video or both. When
set to Pic+Video, only the photo is sent to your PerdixPro
account. The video is saved to the SD card.
Photo size
Choose between 14, 25 or 36 megapixels. These original
sized images are stored on the SD card for along with a
lower resolution copy. The size of image sent to your
PerdixPro account is dependent on the Attachment Size
setting.
Photo burst
Choose between 1-3 photo’s to be taken per trigger
event. Only the rst photo is sent to your PerdixPro
account. Others are saved to SD card.
Video size
Choose between VGA, 720P or 1080P. When sending
video to your PerdixPro account, the setting should be
VGA. Video is sent in its original size and so uses
considerably more upload allowance than photos. Also
see Video Length settings below.
Video length
Choose a video length between 5 and 180 seconds.
When sending video to your PerdixPro account, the
video length should be set to no more than 10 seconds.
Video lengths above this create le sizes too large to be
sent.
CAMERA MODES

Picture Resolution 14/25/36MP
Video Resolution 1920x1080, 1280x720 or 640x480
Video Length 5 to 180 Sec
Detection Range 100Ft.
LED Type 940Nm
LED Number 44Pcs
Illumination Distance 90Ft.
Image Sensor 14MP Colour CMOS
Aperture ƒ/ 2.4
Field of View 60 Degrees
Trigger Time < 1.0 Sec
Memory Card 32GB Max
Display Screen Built-In 2.3" LCD
Sound Recording Yes
Operating Ambient
Temperature -20℃to + 60℃
Non-Operating
Temperature -30℃to + 70℃
Relative Humidity 5% to 90% Noncondensing
Dimensions 147x96x79 Mm
Unit Weight ~ 0.30Kg
Power Supply 8AA batteries or 6V,
2A external power supply
Standby Power
Consumption <0.3mA(<7mAh/Day)
Compliances FCC, CE, RoHS
PERDIX Wildlife Supplies.
Unit 1 Hatton Rock Business Park,
Hatton Rock, Stratford-Upon-Avon, CV37 0BX. UK
Tel: +44 (0)1789 336123
www.perdixwildlifesupplies.com
Clock
Set the cameras date and time. The date format is
month/day/year. But this can be changed. Date and
time stamp appears on photo’s and video.
Time-lapse
In time-lapse mode, the camera will activate at the set
time interval regardless of motion detection. Intervals
range from 5 minutes to 8 hours. Both PIR activation
and time-lapse can be on at the same time.
PIR trigger
In trigger mode, the camera will activate when motion is
detected. PIR sensitivity can be adjusted here. If PIR
trigger is OFF, the camera will not respond to any motion
within the camera’s trigger detection range. NOTE: If PIR
trigger and time-lapse options are both OFF, the camera
will not capture any photos or videos.
PIR interval
The PIR sensor can be disabled after each camera
triggering. During this time the PIR sensor will not react
to any detected motion or scheduled timer functions.
The PIR interval can be set between 0 and 60 seconds.
Work day
Choose specic days of the week when you want the
camera to be active. The camera works on all days by
default.
Work hour
Choose the hours of the day when you want the camera
to be active. The camera works at all hours by default.
Send mode
This should be set to instant to receive images directly
to your PerdixPro portal. The amount of images sent
daily can the limited. Default setting is unlimited.
SMS control
This should be ON if you wish to send SMS commands
from PerdixPro to the camera e.g. Take Snapshot. If not
required, turning OFF will improve battery life.
Attachment size
This is size of image sent to your PerdixPro account. The
default is Low and . When set to High, the original sized
image is sent. Please note: Changing attachment size
from Low will reduce the number images that can be
uploaded per month.
Select network
This should be kept on Auto to ensure best network
coverage. PerdixPro SIMs are 2, 3 and 4G enabled and
will roam across networks to nd best signal.
Automatic deletion
Select ON if your require images to be deleted from the
SD card after being sent. Images that cannot be sent
due to signal etc, will not be deleted.
ADDITIONAL SETTINGS
Additional settings can be found in the fourth menu
section. This includes setting up and PIN for the camera
and adding a name stamp to the images.
CAMERA MODES PERDIXPRO UPLOAD SETTINGS
Other PERDIX Scouting Camera manuals