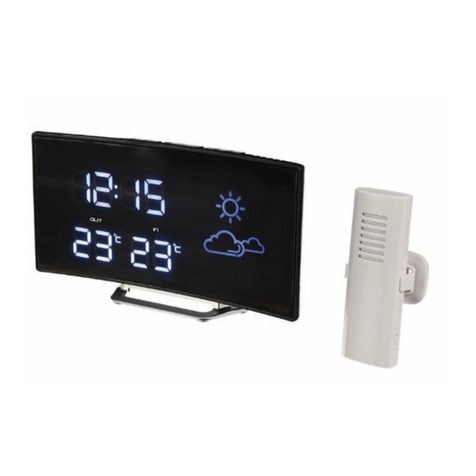
Perel WC221 User manual

WC221
V. 01 –12/12/2019 2 ©Velleman nv
front view –vooraan –avant –frontal –Vorderansicht –widok z przodu –frontal
rear view –achteraan –arrière –posterior –Hinteransicht –widok z tyłu – traseiro

WC221
V. 01 –12/12/2019 3 ©Velleman nv
USER MANUAL
1. Introduction
To all residents of the European Union
Important environmental information about this product
This symbol on the device or the package indicates that disposal
of the device after its lifecycle could harm the environment. Do
not dispose of the unit (or batteries) as unsorted municipal
waste; it should be taken to a specialized company for recycling.
This device should be returned to your distributor or to a local
recycling service. Respect the local environmental rules.
If in doubt, contact your local waste disposal authorities.
Thank you for choosing Perel! Please read the manual thoroughly
before bringing this device into service. If the device was
damaged in transit, do not install or use it and contact your
dealer.
2. Safety Instructions
Read and understand this manual and all safety signs before
using this appliance.
Indoor use only.
•This device can be used by children aged from 8 years and
above, and persons with reduced physical, sensory or
mental capabilities or lack of experience and knowledge if
they have been given supervision or instruction concerning
the use of the device in a safe way and understand the
hazards involved. Children shall not play with the device.
Cleaning and user maintenance shall not be made by
children without supervision.
•This product is exclusively intended for the field of
application described in this manual. This product should
only be used as described within these instructions.
•Do not expose the appliance to extreme temperatures,
vibration or shock.
•The outdoor transmitter is not watertight. Choose a dry and
shady installation spot for the transmitter.

WC221
V. 01 –12/12/2019 4 ©Velleman nv
3. General Guidelines
•Refer to the Velleman®Service and Quality Warranty on the
last pages of this manual.
•All modifications of the device are forbidden for safety
reasons. Damage caused by user modifications to the device
is not covered by the warranty.
•Only use the device for its intended purpose. Using the
device in an unauthorised way will void the warranty.
•Damage caused by disregard of certain guidelines in this
manual is not covered by the warranty and the dealer will
not accept responsibility for any ensuing defects or
problems.
•Nor Velleman nv nor its dealers can be held responsible for
any damage (extraordinary, incidental or indirect) –of any
nature (financial, physical…) arising from the possession,
use or failure of this product.
•Keep this manual for future reference.
4. Overview
Refer to the illustrations on page 2 of this manual.
front view
1
indoor temp
7
outdoor humidity
2
weather
8
alarm 1 + 2
3
weather trend
9
time
4
outdoor temp
10
date/month
5
battery level
11
indoor humidity
6
channel
rear view
1
snooze/light
6
down/°C-°F
2
up/channel
7
batteries
3
set/alarm set
8
reset
4
alarm on-off
9
stand recess
5
max/min
10
power input

WC221
V. 01 –12/12/2019 5 ©Velleman nv
5. Installation
Powering the Weather Station
The weather station requires three AAA/R03 batteries as back-up
power in case of power interruption. Open the battery
compartment of the weather station. Insert the batteries
observing the correct polarity and re-insert the battery door.
Connect the weather station to the mains using the included
power adapter or an exact equivalent.
Installing the Outdoor Transmitter
Open the battery compartment of the transmitter and make sure
the channel selector is set at position 1. Insert two AAA batteries
observing the correct polarity and re-insert the battery door.
Hold the transmitter close to the weather station. The weather
station will receive data from the transmitter within a few
seconds.
Insert the holder to the bottom of the transmitter for desktop
use, or insert it to the back for wall-mount use.
Now, install the transmitter in a dry and shady spot, away from
direct sunlight or rain.
Temperature readings will become stable and more accurate
after around 30 minutes.

WC221
V. 01 –12/12/2019 6 ©Velleman nv
Setting the Antenna
Fully extend the FM antenna and vary the direction for optimum
FM reception. Do not strip, alter or connect to other antennas.
6. Settings
6.1 General Settings
Setting the Time, Date and Snooze Duration
1. Press and hold SET. The digits will flash. Set the time
format with or .
2. Press SET again. The hour digits will flash. Set the hour
with or .
3. Press SET again. The minute digits will flash. Set the hour
with or .
4. Press SET again. The year digits will flash. Set the hour
with or .
5. Press SET again. The month digits will flash. Set the hour
with or .
6. Press SET again. The date digits will flash. Set the hour
with or .
7. Press SET again. The digits will flash. Set the date format
with or .
8. Press SET again. The SN digits will flash. Set the snooze
duration with or from 5 to 60 minutes.
9. Press SET again to confirm and to return to normal mode.
Setting the Alarm
1. Press SET once to select alarm 1.
2. Press and hold SET. The A1 alarm hour will flash. Set the
hour with or .
3. Press SET again. The alarm minutes will flash. Set the
minutes with or .
4. Press SET again to confirm and to return to normal mode.
5. Press SET twice to select alarm 2.
6. Press and hold SET. The A2 alarm hour will flash. Set the
hour with or .
7. Press SET again. The alarm minutes will flash. Set the
minutes with or .
8. Press SET again to confirm and to return to normal mode.

WC221
V. 01 –12/12/2019 7 ©Velleman nv
Switching the Alarm On/Off
1. Press AL1/2 once to switch on alarm 1.
2. Press AL1/2 twice to switch on alarm 2.
3. Press AL1/2 three times to switch on alarm 1 and 2.
4. Press AL1/2 a fourth time to switch off alarm 1 and 2.
Using the Snooze Alarm
1. When the alarm rings, press the snooze button once to
enter the snooze mode.
2. Press AL1/2 once to deactivate the alarm. The set alarm
will ring the next day.
Setting the Display Brightness
At normal time display, press the snooze button to set the
display brightness.
Selecting the Temperature Unit
At normal time display, press to select the temperature unit.
6.2 Weather Forecast
Synchronizing the Station and the Outdoor Unit
This weather station computes weather forecast based on
changes in air pressure. Using this set for the first time, it may
take up to 12 hours of collecting information before receiving
accurate forecasts.
1. At normal time display, press and select the same
channel as the outdoor unit’s.
2. Press and hold . The icon will flash to indicate the
station is synchronizing with the outdoor unit. Wait for the
synchronization to finish.
When the outdoor temperature and humidity digits show ---, the
wireless transmission is either interrupted or lost. Press and hold
again to re-synchronize the units.
Reading the Max/Min Temperature and Humidity
1. Press MEM once to display the maximum recorded
temperature and humidity.
2. Press MEM once again to display the minimum recorded
temperature and humidity.
3. Press and hold MEM to reset the recorded values.
Displaying the Air Pressure Readout
At normal time display, press and hold MEM until the calendar
displays the air pressure readout in hPa. Press and hold again to
revert to normal time display.

WC221
V. 01 –12/12/2019 8 ©Velleman nv
Weather Icons
sunny
partly cloudy
cloudy
rainy
stormy
frost alert
Air Pressure Icons
increasing
decreasing
stable
Moving the weather station may affect the accuracy. After
moving it, allow 12 hours for the readings to get stable and
accurate again.
7. Troubleshooting
Problem
Possible solution
No indication on the display
Ensure correct battery polarity
Change the batteries
No transmitter reception
Check the batteries on the
transmitter
Remove the power supply of
the weather station and
transmitter, wait a few
minutes and reconnect power
Install the transmitter closer
to the weather station
Check for any interference
source
Incorrect display
Change the batteries

WC221
V. 01 –12/12/2019 9 ©Velleman nv
8. Care and Maintenance
Cleaning
•Before starting any cleaning or maintenance activities,
unplug the appliance from its power source.
•Wipe all exterior surfaces of the appliance clean with a soft
cloth dampened with a soap and water solution. Do not
immerse or submerge any part of the appliance in water or
any other liquid. Never use solvents or cleaning agents
containing petroleum (petrol, kerosene, oil), paint thinner,
turpentine, alcohol, or ammonia.
Maintenance
•This appliance does not need any maintenance. Do not open
exterior casing of the appliance. There are no user-
serviceable parts inside. Opening or visible attempts to open
or repair the appliance may void any guarantee and/or
cause damage to the product or personal injury.
Storage
•Store the appliance and its accessories in its original
package in a clean and dry area.
9. Technical Specifications
temperature
indoor range .................................................. 0 °C to 50 °C
outdoor range ............................................. -50 °C to 70 °C
indoor accuracy..................................................... +/- 2 °C
outdoor accuracy................................................... +/- 2 °C
humidity
indoor range .........................................................20-95 %
outdoor range .......................................................20-95 %
indoor accuracy..................+/- 5 % (30-65 %), 8 % (others)
outdoor accuracy................+/- 5 % (30-65 %), 8 % (others)
wind
speed range.....................................................................-
speed accuracy ................................................................-
air pressure range ............................................. 850-1050 hPa
measuring interval ...........................................................30 s
transmission distance................................. ± 60 m (open area)
dimensions
main unit................................................ 200 x 97 x 18 mm
sensor......................................................32 x 97 x 18 mm

WC221
V. 01 –12/12/2019 10 ©Velleman nv
weight
main unit.................................................................. 188 g
sensor........................................................................30 g
power supply main unit
power adapter (incl.) .......................................5 VDC, 1.2 A
battery (not incl.) ................................................. 3 x LR03
power supply sensor
battery (not incl.) ................................................. 2 x LR03
frequency
weather station ................................................ 433.92 MHz
FM radio..........................................................................-
DCF .................................................................... 77.5 kHz
max. RF power transmission ..................................< 20 mW
Use this device with original accessories only. Velleman nv
cannot be held responsible in the event of damage or
injury resulting from (incorrect) use of this device. For
more info concerning this product and the latest version of
this manual, please visit our website www.hqpower.eu.
The information in this manual is subject to change
without prior notice.
RED Declaration of Conformity
Hereby, Velleman NV declares that the radio equipment type
WC221 is in compliance with Directive 2014/53/EU.
© COPYRIGHT NOTICE
The copyright to this manual is owned by Velleman nv. All
worldwide rights reserved. No part of this manual may be
copied, reproduced, translated or reduced to any electronic
medium or otherwise without the prior written consent of the
copyright holder.

WC221
V. 01 –12/12/2019 11 ©Velleman nv
HANDLEIDING
1. Inleiding
Aan alle ingezetenen van de Europese Unie
Belangrijke milieu-informatie betreffende dit product
Dit symbool op het toestel of de verpakking geeft aan dat, als
het na zijn levenscyclus wordt weggeworpen, dit toestel schade
kan toebrengen aan het milieu. Gooi dit toestel (en eventuele
batterijen) niet bij het gewone huishoudelijke afval; het moet bij
een gespecialiseerd bedrijf terechtkomen voor recyclage. U moet
dit toestel naar uw verdeler of naar een lokaal recyclagepunt
brengen. Respecteer de plaatselijke milieuwetgeving.
Hebt u vragen, contacteer dan de plaatselijke autoriteiten
betreffende de verwijdering.
Bedankt voor uw aankoop! Lees deze handleiding grondig door
voor u het toestel in gebruik neemt. Werd het toestel beschadigd
tijdens het transport, installeer het dan niet en raadpleeg uw
dealer.
2. Veiligheidsvoorschriften
Lees en begrijp deze handleiding en de veiligheidsinstructies vóór
ingebruikname.
Uitsluitend voor gebruik binnenshuis.
•Dit toestel is geschikt voor gebruik door kinderen vanaf
8 jaar, door personen met fysieke, zintuiglijke of
verstandelijke beperkingen, of door personen met gebrek
aan ervaring en kennis, op voorwaarde dat dit onder
toezicht gebeurt van een persoon die verantwoordelijk is
voor hun veiligheid of hun aanwijzingen heeft gegeven, hoe
zij het toestel moeten gebruiken en zich bewust zijn van de
risico's die het gebruik van het toestel met zich meebrengt.
Kinderen mogen niet met het toestel spelen. De reiniging en
het onderhoud van het toestel mogen niet worden
uitgevoerd door kinderen, tenzij ze onder toezicht staan.
•Dit toestel is enkel bestemd voor het toepassingsgebied
beschreven in deze handleiding. Gebruik dit toestel enkel
zoals beschreven in deze handleiding.
•Stel het toestel niet bloot aan extreme temperaturen,
trillingen of schokken.

WC221
V. 01 –12/12/2019 12 ©Velleman nv
•De buitensensor is niet waterdicht. Kies een droge en
schaduwrijke plaats uit voor de zender.
3. Algemene richtlijnen
•Raadpleeg de Velleman® service- en kwaliteitsgarantie
achteraan deze handleiding.
•Om veiligheidsredenen mag u geen wijzigingen aanbrengen.
Schade door wijzigingen die de gebruiker heeft aangebracht
aan het toestel valt niet onder de garantie.
•Gebruik het toestel enkel waarvoor het gemaakt is. De
garantie vervalt automatisch bij ongeoorloofd gebruik.
•De garantie geldt niet voor schade door het negeren van
bepaalde richtlijnen in deze handleiding en uw dealer zal de
verantwoordelijkheid afwijzen voor defecten of problemen
die hier rechtstreeks verband mee houden.
•Noch Velleman nv noch zijn verdelers kunnen aansprakelijk
gesteld worden voor schade (buitengewoon, incidenteel of
onrechtstreeks) –van welke aard dan ook (financieel,
fysisch…) voortvloeiend uit het bezit, gebruik of falen van dit
product.
•Bewaar deze handleiding voor verdere raadpleging.
4. Omschrijving
Raadpleeg de afbeeldingen op pagina 2 van deze handleiding.
voorzijde
1
weergave binnentemperatuur
7
luchtvochtigheid
buitenshuis
2
weersvoorspelling
8
alarm 1 + 2
3
weertendens
9
uur
4
buitentemperatuur
10
datum/maand
5
batterijniveau
11
luchtvochtigheid
binnenshuis
6
kanaal
achterzijde
1
sluimerfunctie/achtergrondverlichting
6
waarde
verlagen/°C-°F
2
waarde verhogen/kanaal
7
batterijen
3
instellen/alarm instellen
8
resetknop
4
alarm aan-uit
9
uitsparing voor
houder
5
max/min
10
voedingsingang

WC221
V. 01 –12/12/2019 13 ©Velleman nv
5. Installatie
Het weerstation inschakelen
Bij stroomuitval werkt het toestel met drie AAA/R03-batterijen
als noodbatterij. Open het batterijvak. Plaats de batterijen met
de juiste polariteit en sluit het batterijvak.
Sluit het toestel aan op het lichtnet met de meegeleverde
voedingsadapter of een gelijkwaardige adapter.
De buitensensor installeren
Open het batterijvak van de sensor en zet de
kanaalselectieschakelaar op 1. Plaats twee AAA-batterijen met de
juiste polariteit en sluit het batterijvak.
Houd de sensor naast het toestel. Na enkele seconden ontvangt
het toestel data van de sensor.
Bevestig de houder aan de onderkant van de sensor om op uw
bureau te plaatsen of aan de achterkant om aan een muur te
bevestigen.
Plaats de sensor op een droge en schaduwrijke plaats, buiten het
bereik van direct zonlicht of regen.
De weergave van de buitentemperatuur wordt na ongeveer 30
minuten stabiel.

WC221
V. 01 –12/12/2019 14 ©Velleman nv
De antenne instellen
Trek de FM-antenne volledig uit en verander de richting voor de
beste FM-ontvangst. U mag de antenne niet strippen, veranderen
of aansluiten op andere antennes.
6. Instellingen
6.1 Algemene instellingen
De tijd, datum en sluimertijd instellen
1. Houd SET ingedrukt. De weergave knippert. Stel het
tijdsformaat in met of .
2. Druk nogmaals op SET. De uurweergave knippert. Stel het
uur in met of .
3. Druk nogmaals op SET. De minutenweergave knippert. Stel
het uur in met of .
4. Druk nogmaals op SET. De jaarweergave knippert. Stel het
uur in met of .
5. Druk nogmaals op SET. De maandweergave knippert. Stel
het uur in met of .
6. Druk nogmaals op SET. De datumweergave knippert. Stel
het uur in met of .
7. Druk nogmaals op SET. De weergave knippert. Stel het
weergaveformaat van de datum in met of .
8. Druk nogmaals op SET. Het symbool SN knippert. Druk op
of om de sluimertijd in te stellen tussen 5 en 60
minuten.
9. Druk nogmaals op SET om te bevestigen en om terug te
keren naar de normale weergavemodus.
Het alarm instellen
1. Druk op SET om alarm 1 te selecteren.
2. Houd SET ingedrukt. De alarmtijd A1 knippert. Stel het uur
in met of .
3. Druk nogmaals op SET. De alarmminuten knipperen. Stel
de minuten in met of .
4. Druk nogmaals op SET om te bevestigen en om terug te
keren naar de normale weergavemodus.
5. Druk tweemaal op SET om alarm 2 te selecteren.
6. Houd SET ingedrukt. De alarmtijd A2 knippert. Stel het uur
in met of .
7. Druk nogmaals op SET. De alarmminuten knipperen. Stel
de minuten in met of .
8. Druk nogmaals op SET om te bevestigen en om terug te
keren naar de normale weergavemodus.

WC221
V. 01 –12/12/2019 15 ©Velleman nv
Het alarm in-/uitschakelen
1. Druk op AL1/2 om alarm 1 te activeren.
2. Druk tweemaal op AL1/2 om alarm 2 te activeren.
3. Druk driemaal op AL1/2 om de alarmen 1 en 2 te
activeren.
4. Druk viermaal op AL1/2 om de alarmen 1 en 2 te
deactiveren.
Het sluimeralarm gebruiken
1. Wanneer het alarm afgaat, druk op SNOOZE om naar de
sluimermodus te schakelen.
2. Druk op AL1/2 om het alarm te deactiveren. Het alarm zal
de volgende dag afgaan op hetzelfde tijdstip.
De helderheid van het scherm instellen
In normale weergavemodus, druk op SNOOZE om de helderheid
van het scherm in te stellen.
De temperatuureenheid selecteren
In normale weergavemodus, druk op om de gewenste
temperatuureenheid te selecteren.
6.2 Weersvoorspelling
Het weerstation en de buitensensor synchroniseren
Dit toestel maakt een weersvoorspelling op basis van de gemeten
veranderingen in de luchtdruk. Bij de eerste ingebruikname kan
het 12 uur duren om nauwkeurige weersvoorspellingen weer te
geven.
1. In normale weergavemodus, druk op en selecteer
hetzelfde kanaal als het kanaal van de buitensensor.
2. Blijf drukken op . Het symbool knippert om aan te
geven dat het weerstation aan het synchroniseren is met de
buitensensor. Wacht totdat de synchronisatie is voltooid.
Wanneer de waarden voor de buitentemperatuur en -vochtigheid
--- weergeven, dan is de draadloze verbinding onderbroken of
verdwenen. Druk opnieuw op om de toestellen te
synchroniseren.
De max/min temperaturen en -vochtigheid visualiseren
1. Druk op MEM om de opgeslagen maximumtemperatuur en
-vochtigheid weer te geven.
2. Druk nogmaals op MEM om de opgeslagen
minimumtemperatuur en -vochtigheid weer te geven.

WC221
V. 01 –12/12/2019 16 ©Velleman nv
3. Houd MEM ingedrukt om de opgeslagen waarden te
resetten.
De luchtdruk weergeven
In normale tijdsweergave, houd MEM ingedrukt totdat de
kalender de luchtdruk weergeeft in hPa. Druk opnieuw om naar
de normale tijdsweergave terug te keren.
Weersymbolen
zonnig
zonnig en bewolkt
bewolkt
regenachtig
storm
vorst
Indicatoren luchtdruktendens
stijgend
dalend
stabiel
Wanneer u het weerstation verplaatst, dan kan dit de
nauwkeurigheid beïnvloeden. Als u het toestel verplaatst, zal het
12 uur duren om te stabiliseren en opnieuw nauwkeurig te zijn.
7. Problemen en oplossingen
Probleem
Mogelijke oplossing
Geen weergave op het scherm
Respecteer de polariteit
Vervang de batterijen
Geen ontvangst van de
buitensensor
Controleer de batterijen van
de sensor
Ontkoppel de voeding van het
weerstation en de sensor,
wacht enkele minuten en sluit
de voeding opnieuw aan
Plaats de sensor dichter bij het
weerstation
Controleer of er geen
storingsbron is
Onjuiste weergave
Vervang de batterijen

WC221
V. 01 –12/12/2019 17 ©Velleman nv
8. Reiniging en onderhoud
Reiniging
•Trek de trekker uit het stopcontact voor elke reiniging en
onderhoud.
•Reinig de behuizing met een zachte doek die licht
bevochtigd is met een milde zeepoplossing. Dompel het
toestel nooit onder in water of andere vloeistoffen. Gebruik
nooit oplosmiddelen of reinigingsmiddelen die petroleum
(benzine, kerosine, olie), verfverdunner, wasbenzine,
alcohol of ammoniak bevatten.
Onderhoud
•Het toestel heeft geen speciaal onderhoud nodig. Open nooit
de behuizing van het toestel. De gebruiker mag geen
onderdelen vervangen. Het openen of zichtbare pogingen tot
het openen of het repareren van het toestel kan leiden tot
het vervallen van de garantie en/of schade aan het toestel
of letsels.
Opslag
•Bewaar het toestel in de oorspronkelijke verpakking op een
droge en propere plaats.
9. Technische specificaties
temperatuur
binnenshuis .................................................. 0 °C tot 50 °C
buitenshuis................................................-50 °C tot 70 °C
resolutie binnenshuis .............................................+/- 2 °C
resolutie buitenshuis.............................................. +/- 2 °C
vochtigheid
binnenshuis ..........................................................20-95 %
buitenshuis...........................................................20-95 %
resolutie binnenshuis .........+/- 5 % (30-65 %), 8 % (andere)
resolutie buitenshuis..........+/- 5 % (30-65 %), 8 % (andere)
wind
windsnelheid....................................................................-
resolutie windsnelheid.......................................................-
luchtdruk .......................................................... 850-1050 hPa
meetinterval ...................................................................30 s
bereik ...................................................± 60 m (open ruimte)
afmetingen
hoofdeenheid .......................................... 200 x 97 x 18 mm
sensor......................................................32 x 97 x 18 mm

WC221
V. 01 –12/12/2019 18 ©Velleman nv
gewicht
hoofdeenheid ............................................................ 188 g
sensor........................................................................30 g
voeding hoofdeenheid
voedingsadapter (meegelev.)............................5 VDC, 1.2 A
batterij (niet meegelev.) ............................ 3 x LR03-batterij
voeding sensor
batterij (niet meegelev.) ............................ 2 x LR03-batterij
frequentie
weerstation...................................................... 433.92 MHz
FM-radio..........................................................................-
DCF .................................................................... 77.5 kHz
max. RF-vermogen ..............................................< 20 mW
Gebruik dit toestel enkel met originele accessoires.
Velleman nv is niet aansprakelijk voor schade of
kwetsuren bij (verkeerd) gebruik van dit toestel. Voor
meer informatie over dit product en de laatste versie van
deze handleiding, zie www.hqpower.eu. De informatie in
deze handleiding kan te allen tijde worden gewijzigd
zonder voorafgaande kennisgeving.
RED-conformiteitsverklaring
Hierbij verklaart Velleman nv, dat dit type radioapparatuur
WC221 conform is met richtlijn 2014/53/EU.
© AUTEURSRECHT
Velleman nv heeft het auteursrecht voor deze handleiding.
Alle wereldwijde rechten voorbehouden. Het is niet
toegestaan om deze handleiding of gedeelten ervan over te
nemen, te kopiëren, te vertalen, te bewerken en op te slaan op
een elektronisch medium zonder voorafgaande schriftelijke
toestemming van de rechthebbende.

WC221
V. 01 –12/12/2019 19 ©Velleman nv
MODE D'EMPLOI
1. Introduction
Aux résidents de l'Union européenne
Informations environnementales importantes concernant
ce produit
Ce symbole sur l'appareil ou l'emballage indique que l’élimination
d’un appareil en fin de vie peut polluer l'environnement. Ne pas
jeter un appareil électrique ou électronique (et des piles
éventuelles) parmi les déchets municipaux non-sujets au tri
sélectif ; une déchetterie traitera l’appareil en question.
Renvoyer l'appareil à votre fournisseur ou à un service de
recyclage local. Respecter la réglementation locale relative à la
protection de l’environnement.
En cas de questions, contacter les autorités locales pour
élimination.
Nous vous remercions de votre achat ! Lire attentivement le
présent mode d'emploi avant la mise en service de l’appareil. Si
l'appareil a été endommagé pendant le transport, ne pas
l’installer et consulter votre revendeur.
2. Consignes de sécurité
Lire et comprendre ce mode d'emploi et toutes les consignes de
sécurité avant d'utiliser l'appareil.
Utiliser cet appareil uniquement à l'intérieur.
•Cet appareil peut être utilisé par des enfants âgés de 8 ans
et plus et des personnes manquant d’expérience et de
connaissances ou dont les capacités physiques, sensorielles
ou mentales sont réduites, si elles ont été formées et
encadrées quant à l'utilisation de l'appareil d'une manière
sûre et connaissent les risques encourus. Ne pas laisser les
enfants jouer avec l'appareil. Le nettoyage et l'entretien ne
doivent pas être effectués par des enfants sans surveillance.
•Ce produit ne convient qu'au domaine d'application décrit
dans ce manuel. N'utiliser ce produit que de la manière
décrite dans ce mode d'emploi.
•Ne pas exposer l'appareil à des températures extrêmes, des
vibrations, etc.

WC221
V. 01 –12/12/2019 20 ©Velleman nv
•L’émetteur extérieur n'est pas étanche. Choisir un
emplacement à l'ombre et protégé de la pluie pour l'émetteur.
3. Directives générales
•Se référer à la garantie de service et de qualité Velleman®
en fin de ce mode d'emploi.
•Toute modification est interdite pour des raisons de sécurité.
Les dommages occasionnés par des modifications par le
client ne tombent pas sous la garantie.
•N’utiliser l'appareil qu’à sa fonction prévue. Un usage
impropre annule d'office la garantie.
•La garantie ne se s’applique pas aux dommages survenus en
négligeant certaines directives de ce mode d'emploi et votre
revendeur déclinera toute responsabilité pour les problèmes
et les défauts qui en résultent.
•Ni Velleman SA ni ses distributeurs ne peuvent être tenus
responsables des dommages exceptionnels, imprévus ou
indirects, quelles que soient la nature (financière,
corporelle, etc.), causés par la possession, l’utilisation ou le
dysfonctionnement de ce produit.
•Garder ce mode d'emploi pour toute référence ultérieure.
4. Description
Se référer aux illustrations en page 2 de ce mode d'emploi.
vue frontale
1
température intérieure
7
humidité
extérieure
2
prévisions météo
8
alarmes 1 + 2
3
tendance météo
9
heure
4
température extérieure
10
date/mois
5
niveau de pile
11
humidité
intérieure
6
canal
vue arrière
1
fonction de
répétition/rétroéclairage
6
diminuer la
valeur/°C-°F
2
augmenter la
valeur/canal
7
piles
3
bouton de
réglage/réglage
d'alarme
8
bouton de
réinitialisation
4
alarm on-off
9
trou pour support
5
max/min
10
entrée
d'alimentation
Table of contents
Languages:
Other Perel Weather Station manuals
Popular Weather Station manuals by other brands

Explore Scientific
Explore Scientific WSX1001 instruction manual

2measure
2measure 170605 Operation manual

La Crosse Technology
La Crosse Technology WS-7034U instruction manual

Hama
Hama EWS-840 operating instructions

TFA
TFA 30.5010 Klima Guard operating instructions

Oregon Scientific
Oregon Scientific EW92 user manual