Perel WHW420 User manual

WHW420
V. 01 –11/04/2014 2 ©Velleman nv

WHW420
V. 01 –11/04/2014 3 ©Velleman nv
A
138 mm
B
153 mm
C
89 mm
D
52 mm
E
240 mm
F
223 mm
G
12 mm

WHW420
V. 01 –11/04/2014 4 ©Velleman nv
USER MANUAL
1. Introduction
Thank you for choosing Perel! Please read the manual thoroughly before
bringing this device into service. If the device was damaged in transit, do
not install or use it and contact your dealer.
2. Safety Instructions
Warning!
Read all instructions carefully. Failure to follow the
instructions may result in serious damage and severe injury.
Do not remove or obscure the warning tags on the winch. An
operator may need to see them to understand the proper operation
of the winch.
Keep this manual for future reference.
Safety Instructions for Installation
Prevent entanglement during installation and operation. Do not wear
loose clothing or jewellery, and restrain long hair. They can be
caught in moving parts and cause severe injury.
It is recommended to wear non-skid footwear.
Wear safety goggles and heavy-duty leather gloves during
installation.
Before installing, make sure that the mounting location is clear of fuel lines,
brake lines, electrical wiring, gas tanks, and any other component that can
be damaged by drilling mounting holes.
The mounting structure and hardware must be able to support the winch
and the load. Do not attach the winch to objects of unknown carrying
capacity. The winch may break loose during operation and cause severe
damage and injury.
Obtain the line manufacturer's recommendations for suitable line sizes and
types. Do not use a thinner or longer line than recommended. Do not link
multiple lines together.
Use underwinding (bottom winding) when installing the line: the line must
enter and exit the winch at the bottom of the drum.

WHW420
V. 01 –11/04/2014 5 ©Velleman nv
Safety Instructions for Operation
Do not load the winch beyond its rated capacity. The capacity is based on
one layer of line around the drum. As the line builds on the drum, the
capacity decreases.
Be aware of dynamic loads! Sudden movements may create brief excessive
loads that can cause product failure.
If any part of the winch starts to bend, deform, or show any signs of
damage, stop using the winch immediately.
Use the winch only for hauling or pulling loads. Do not use the winch for
lifting loads vertically. Do not use the winch for moving people.
Prevent entanglement during installation and operation. Do not wear
loose clothing or jewellery, and restrain long hair. They can be
caught in moving parts and cause severe injury.
It is recommended to wear non-skid footwear.
Wear safety goggles and heavy-duty leather gloves during
operation.
Never try to guide the line while winching. Broken cable strands are sharp.
Never slide cable through your hands, even if you are wearing gloves.
Keep away from the winching area during operation. If the line slips or
breaks, it may whip back, which can cause damage and severe injury.
Place a heavy blanket or rug (not incl.) over the line. The weight of the
cloth acts as a damper and prevents the broken line from whipping.
Do not step over the line with a load attached. Do not push against a load-
bearing line; this may overload the line and cause it to break.
Do not allow people to stand on or behind the load.
Examine the device for safe operation before each use. Make sure that all
nuts and bolts are tight.
Salts, chemicals, and rust can affect components. Do not use if you notice
damaged or loose parts, structural cracks, bends, or any other condition
that may affect the safe operation of the winch. Do not use the winch even
if only minor damage appears.
If the spring is broken or the locking system fails, stop using the winch
immediately and contact your dealer for repair.

WHW420
V. 01 –11/04/2014 6 ©Velleman nv
Do not operate the winch if the line is knotted, twisted, kinked, frayed,
corroded, or shows any sign of weakening. As soon as a loop starts to form
in the line, stop the winch and straighten the loop. If you notice any
damage to the line, replace it immediately.
Note that a kink permanently weakens a steel cable, even after you
straighten it. Kinked cable can suddenly fail even before it reaches its load
capacity. Never use cable that has been kinked.
Secure the load after moving. Winches are not designed to secure loads.
Use tie-down ropes or straps to secure the load.
Warning! Never fully extend the line while under load.
Always keep at least 4 full turns of line on the drum to supply friction for
proper anchoring. If not, the line may pull loose from the drum. Keep the
line properly aligned on the drum.
Do not winch at an angle. This may
damage the winch drum and the line. The
recommended maximum winching angle
is 4°, both horizontally and vertically.
Do not operate the winch with other than manual power.
Never release the handle while winching a load. The handle may spin
violently and cause serious injury. Never try to stop a spinning handle.
Boat trailers not equipped with keel and side hull rollers are designed to be
submerged in the water when the boat is loaded; this means that the boat
is "floated" onto the trailer. If the trailer is not submerged, attempts to
drag the boat onto the trailer can cause winch failure and possible injury.
Keep hands and fingers clear of the winch and line during operation.
Always check the correct rotation direction before using the winch.
If used on a vehicle, do not move the vehicle to assist the winch. The
combination of the winch and vehicle pulling together can overload the line.
Never hook the line back onto itself. This creates an unacceptable strain on
the line. Do not loop the line around the load.
The ambient operating temperature is between –10 °C and +50 °C. Do not
operate outside of these specifications.

WHW420
V. 01 –11/04/2014 7 ©Velleman nv
Safety Instructions for Servicing
Wear safety goggles and heavy-duty leather gloves during
maintenance.
When replacing a line, do not use a thinner or longer line than
recommended by the manufacturer. Do not link multiple lines together.
Have the device repaired by a qualified service person using only identical
replacement parts. This ensures that the safety of the device is maintained.
3. General Guidelines
Refer to the Velleman® Service and Quality Warranty on the last pages
of this manual.
Familiarise yourself with the functions of the device before actually
using it.
All modifications of the device are forbidden for safety reasons. Damage
caused by user modifications to the device is not covered by the
warranty.
Only use the device for its intended purpose. Using the device in an
unauthorised way will void the warranty.
Damage caused by disregard of certain guidelines in this manual is not
covered by the warranty and the dealer will not accept responsibility for
any ensuing defects or problems.
Keep this manual for future reference.
4. Features
solid gear construction
black electrostatic discharge coating finish against rusting
internally lubricated drum and pinion gear bushings
moulded handle for smooth rotation
formed reinforcements in frame for added strength.
5. Overview
Refer to the illustrations on page 2 of this manual.
1
frame
4
drum
2
pawl
5
handle
3
shaft
6
mounting surface

WHW420
V. 01 –11/04/2014 8 ©Velleman nv
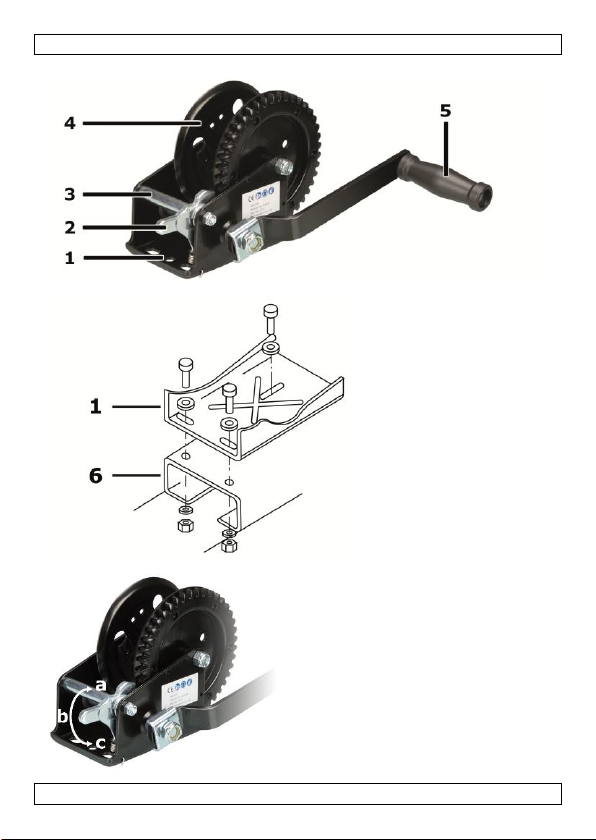
Pawl Positions
The pawl has three positions:
a
reeling in: turn the handle clockwise to reel in the line.
b
free spooling: turn the handle in any direction to reel in or out.
c
reeling out: turn the handle counter-clockwise to reel out the line.
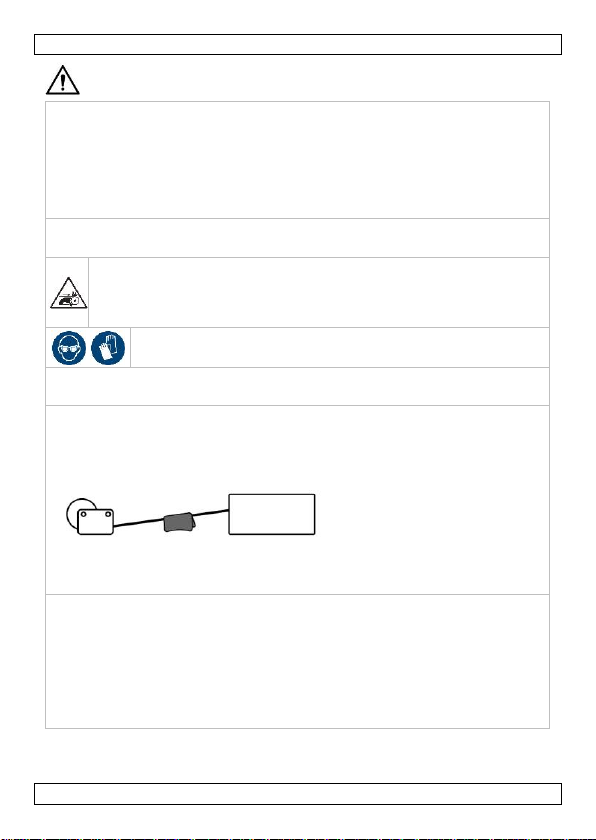
Warning! If a load is attached to the line, keep a firm grip on the handle
when switching the pawl position or when using free spooling.
6. Installation
Read the entire safety instructions at the beginning of this manual
before installing the device.
1. Choose a suitable mounting location. Take care of the following points:
oThe mounting structure and hardware must be able to support the
winch and the load without damage or weakening. If necessary, use
steel reinforcement plates or additional bracing.
oMake sure that the handle [5] can rotate freely by 360°.
2. Place the winch on the mounting surface [6] and mark the location of
the mounting holes.
3. Before drilling, verify that there are no hidden parts or structural pieces
in the mounting area that can be damaged.
4. Drill the holes at the marked locations.
5. Use three 3/8" (M10) bolts, washers, and lock nuts (not incl.) to fix the
winch frame [1] on the mounting surface [6].
7. Installing the Winch Line
Make sure that the line is strong enough to move the load. Obtain
the line manufacturer's recommendations for suitable line sizes
and types. Use an appropriate end connection to attach the hook
to the line. (Cable, rope, hook, and hardware for attaching are not
included.) Always follow the line manufacturer's safety and
operation instructions.
You can use the winch either with a rope or with a steel cable (wire rope).
The attachment method differs depending on the type of line.
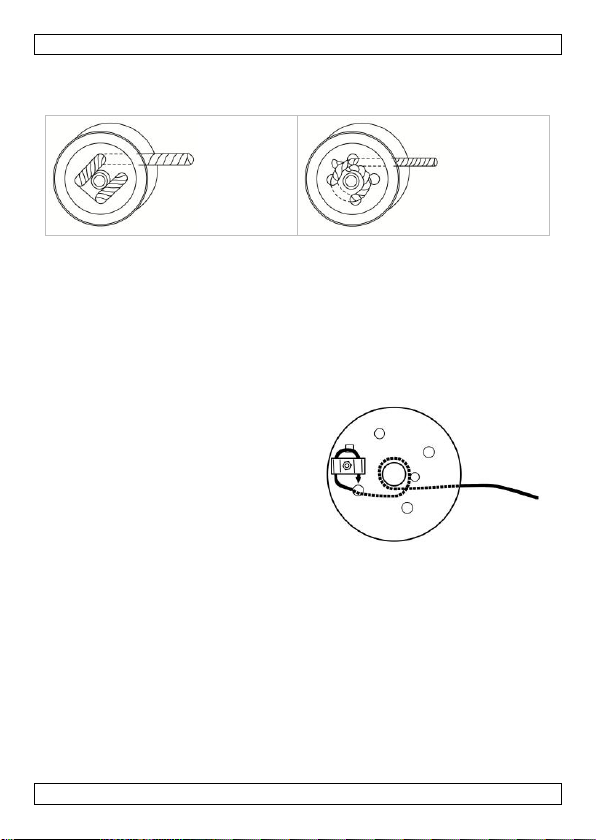
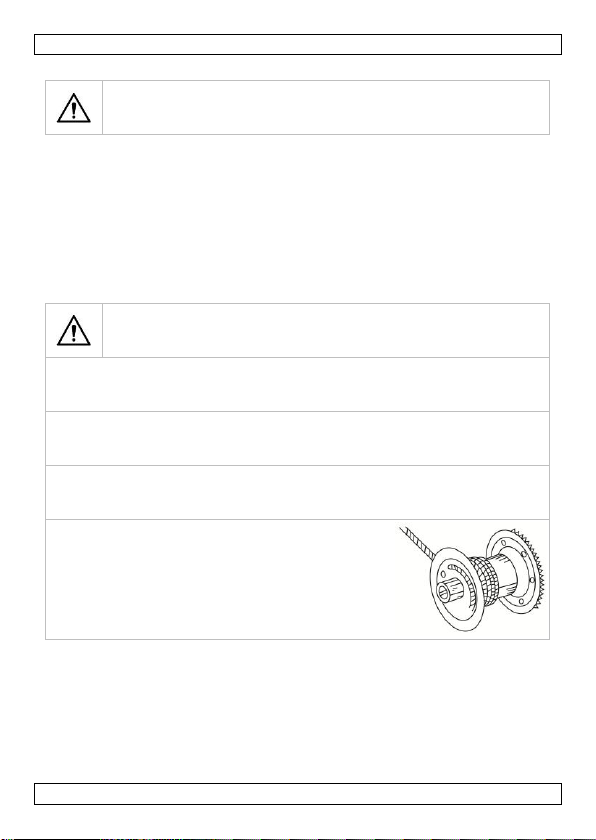
7.1 Rope
Attaching a rope to the winch drum requires no bolts, nuts, or rope clamp.
1. Place the pawl [2] in the free-spooling position [b] so that it is
disengaged from the gear and the drum can rotate freely.
2. Guide the rope end under the hub of the drum [4].

WHW420
V. 01 –11/04/2014 9 ©Velleman nv
3. Thread the rope through the round holes in the drum’s side. There are
two methods, depending on the weight of the line. See the illustration
below for instructions.
heavy line
light line
4. Place the pawl [2] in the reel-in position [a].
5. Turn the handle clockwise to reel in the rope. Pack the coils tightly side
by side, so that the next layers cannot slip between the coils.
6. When you have reeled in the rope, attach the hook to the shaft [3] to
prevent that the rope unwinds.
7.2 Cable
Attaching a Cable
Attaching cable requires a cable clamp
(not incl.). To attach a cable to the
winch drum, proceed as follows:
1. Place the pawl [2] in the free-
spooling position [b] so that it is
disengaged from the gear and the
drum can rotate freely.
2. Attach the clamp with the bolt
through the square hole in the
drum’s side. The bolt goes on the
inside, the locking nut and washer
on the outside. Do not tighten the
nut yet.
3. Guide the cable end under the hub of the drum [4].
4. Thread the cable through a round hole in the drum's side.
5. Thread the cable further through the clamp and make sure that the
end protrudes about 1" (2.5 cm).
6. Tighten the nut firmly.
7. Place the pawl [2] in the reel-in position [a].
8. Turn the handle clockwise to reel in the cable. Pack the coils tightly
side by side, so that the next layers cannot slip between the coils.
Warning! Prevent kinks in the cable.
9. When you have reeled in the cable, attach the hook to the shaft [3] to
prevent that the cable unwinds.

WHW420
V. 01 –11/04/2014 10 ©Velleman nv
Detaching a Cable
Warning! Be very careful when you detach an old cable. The cable
clamp holds the cable under tension, and the cable may spring
back forcefully.
To detach an old cable, proceed as follows:
1. Detach any load from the cable.
2. Place the pawl [2] in the reel-out position [c].
3. Turn the handle counter-clockwise to reel out the entire cable.
4. Loosen the clamp nut and remove the cable from under the clamp.
5. Inspect all parts of the drum and clamp before installing a new cable.
8. Operation
8.1 Precautions
Warning! Read all instructions carefully. Failure to follow
the instructions may result in serious damage and severe
injury.
Warning! To prevent serious injury from winch failure, do not use
damaged equipment. If you observe any abnormal noise or vibration, stop
using the device immediately and have it serviced by a qualified technician.
Before use, make sure that the load is within the rated capacity.
If any part of the winch starts to bend, deform, or show any signs of
damage, stop using the winch immediately.
Warning! Do not let go of the handle when the pawl is in the unlocked
position while there is a load on the winch. The handle can spin violently
and cause serious injury. Never try to stop a spinning handle.
Never unwind the line fully when pulling a
load. Always keep 4 to 6 complete turns of line
around the drum; otherwise, the line may come
loose from the drum.
8.2 Winching
To winch a load, proceed as follows:
1. Before connecting the line to the load, make sure that the winch and
line are capable of pulling the load.
2. Place the pawl [2] in the reel-out position [c].

WHW420
V. 01 –11/04/2014 11 ©Velleman nv
3. Detach the hook from the shaft and turn the handle counter-clockwise
to reel out the line. The line and hook must be routed under the
shaft [3].
Warning! Make sure that the line does not get knotted, twisted,
kinked or damaged.
Warning! Leave at least 4 full turns of line on the drum.
4. Attach the line to the load. For this purpose, carefully follow the
instructions of the line/hook manufacturer.
5. Place a heavy blanket or rug (not incl.) over the line.
Warning! Keep all bystanders away from the winch, the line, and the
load.
6. Place the pawl [2] in the reel-in position [a].
7. Turn the handle clockwise to reel in the load.
When winding the line on the drum, pack the coils tightly side by side,
so that the next layers cannot slip between the coils.
8. When the load is reeled in, secure it.
9. When the load is secured, place the pawl in the reel-out position [c]
and turn the handle counter-clockwise to release the strain on the line.
10. Remove the blanket or rug, and detach the line from the load.
11. Place the pawl back in the reel-in position [a] and turn the handle
clockwise to wind the line on the drum.
12. Attach the hook to the shaft.
9. Inspection and Maintenance
Only perform the maintenance as described in this manual. Any
other repair or maintenance must be performed by a qualified
service person using only identical replacement parts. This ensures
that the safety of the device is maintained.
Before Each Use
Salts, chemicals, and rust can affect components. Before each use, inspect
the general condition of the winch and line. Check for the following aspects:
All hardware is tightly fixed.
Moving parts are properly aligned and free to move.
Parts are not broken or cracked.
The line is not frayed, kinked, or damaged in any other way.
Check for any other condition that may affect safe operation.
After Each Use
After use, wipe the external surfaces of the winch clean with a cloth.

WHW420
V. 01 –11/04/2014 12 ©Velleman nv
Periodical Maintenance
Periodically, lubricate the steel cable with a light oil.
Lubricate the gear with gear grease.
10. Technical Specifications
gear ratio
4.3:1
working capacity
420 kg
dimensions: see illustration on page 2
body thickness
3.5 mm
gear thickness
8.0 mm
weight
2760 g
Use this device with original accessories only. Velleman nv cannot
be held responsible in the event of damage or injury resulting from
(incorrect) use of this device.
For more info concerning this product and the latest version of this
manual, please visit our website www.perel.eu.
The information in this manual is subject to change without prior
notice.
© COPYRIGHT NOTICE
The copyright to this manual is owned by Velleman nv. All
worldwide rights reserved. No part of this manual may be copied,
reproduced, translated or reduced to any electronic medium or otherwise
without the prior written consent of the copyright holder.

WHW420
V. 01 –11/04/2014 13 ©Velleman nv
GEBRUIKERSHANDLEIDING
1. Inleiding
Dank u voor uw aankoop! Lees deze handleiding grondig voor u het toestel
in gebruik neemt. Werd het toestel beschadigd tijdens het transport,
installeer het dan niet en raadpleeg uw dealer.
2. Veiligheidsinstructies
Waarschuwing!
Lees alle instructies zorgvuldig door. Het niet-naleven van de
instructies kan leiden tot materiële schade en ernstige letsels.
Verwijder of verberg de waarschuwingsstickers op de lier niet. Deze
moeten zichtbaar zijn voor de gebruiker om de werking van de lier te
begrijpen.
Bewaar deze handleiding voor verdere raadpleging.
Veiligheidsinstructies voor installatie
Voorkom verstrikking tijdens de installatie en bediening. Draag geen
loszittende kledij of juwelen en laat lang haar nooit los hangen. Deze
kunnen verstrikt raken in de bewegende onderdelen en ernstige
letsels veroorzaken.
Draag slipvrij schoeisel.
Draag een veiligheidsbril en stevige lederen
werkhandschoenen tijdens de installatie.
Controleer voor de installatie of de brandstof- en remleidingen, de
elektrische bedrading, de brandstoftanks en andere onderdelen niet kunnen
beschadigd raken tijdens het boren.
Het montageoppervlak en de onderdelen moeten de lier en de last kunnen
dragen zonder beschadigd te raken of te verzwakken. Bevestig de lier niet
aan voorwerpen waarvan de draagkracht onbekend is. Tijdens de bediening
zou de lier kunnen losbreken en ernstige schade en letsels veroorzaken.
Raadpleeg de instructies van de fabrikant voor meer informatie over het
type en maat van de lijn. Gebruik geen dunnere of langere lijn dan
aanbevolen. Koppel geen lijnen aan elkaar.
Voor het oprollen van de lijn: wikkel de lijn op en af van de lier vanaf de
onderkant van de trommel.

WHW420
V. 01 –11/04/2014 14 ©Velleman nv
Veiligheidsinstructies voor gebruik
Overschrijd nooit de maximale capaciteit van de lier. De capaciteit is
gebaseerd op de eerste laag lijn rond de trommel. De capaciteit neemt af
naarmate er meer lagen worden gewikkeld rond de trommel.
Opgelet voor dynamische lasten! Plotse bewegingen kunnen de lier
overbelasten en storingen veroorzaken.
Gebruik de lier niet wanneer een onderdeel van de lier begint door te
buigen, te vervormen of enige beschadiging vertoont.
Gebruik de lier alleen om lasten te takelen of te trekken. Gebruik de lier
niet om lasten verticaal te takelen. Gebruik de lier nooit om personen te
verplaatsen.
Voorkom verstrikking tijdens de installatie en bediening. Draag geen
loszittende kledij of juwelen en laat lang haar nooit los hangen. Deze
kunnen verstrikt raken in de bewegende onderdelen en ernstige
letsels veroorzaken.
Draag slipvrij schoeisel.
Draag een veiligheidsbril en stevige lederen
werkhandschoenen tijdens het gebruik.
Raak de lijn nooit aan tijdens het gebruik van de lier. Gebroken
kabelstrengen zijn scherp. Laat de kabel nooit door uw handen glijden,
zelfs al draagt u handschoenen.
Houd afstand van de lier tijdens de bediening. Als de lijn loskomt of breekt,
dan kan deze terugslaan en leiden tot materiële schade en ernstige letsels.
Hang een zwaar deken of tapijt (niet meegelev.) over de lijn. Het gewicht
van de stof heeft een dempende werking en voorkomt dat de gebroken lijn
terugslaat.
Stap niet over de lijn waaraan een last is bevestigd. Duw niet tegen een
lastdragende lijn; dit kan leiden tot overbelasting en ervoor zorgen dat de
lijn breekt.
Laat niemand op of achter de last staan.
Controleer voor elk gebruik of het toestel veilig werkt. Draai alle moeren en
bouten stevig vast.
Zouten, chemicaliën en roest kunnen de onderdelen aantasten. Gebruik het
toestel niet in geval van beschadigde of losse onderdelen, een geknikte of
beschadigde kabel, of andere omstandigheden die een invloed kunnen

WHW420
V. 01 –11/04/2014 15 ©Velleman nv
hebben op een veilige bediening van de lier. Gebruik de lier niet, zelfs bij
de minste beschadiging.
Is de veer gebroken of functioneert het vergrendelingssysteem niet,
gebruik de lier niet en neem contact op met uw verdeler.
Gebruik de lier niet als de lijn gedraaid, geknikt, gerafeld, verroest of
beschadigd is. Gebruik de lier niet van zodra er zich een lus vormt in de lijn
en trek de lus recht. Vervang een beschadigde lijn onmiddellijk.
Een knik verzwakt een staalkabel, zelfs na het rechttrekken. Een geknikte
kabel kan plots afbreken zelfs voor het takelvermogen bereikt is. Gebruik
nooit een geknikte kabel.
Bevestig de last na het verplaatsen. Lieren zijn niet geschikt om lasten vast
te zetten. Gebruik spanriemen of spanbanden om de last te bevestigen.
Waarschuwing! Rol de lijn nooit volledig af bij belasting.
Laat altijd minstens 4 volledige windingen op de trommel voor voldoende
wrijving. Is dit niet het geval, dan kan de lijn van de trommel afrollen.
Houd de lijn strak uitgelijnd op de trommel.
Gebruik de lier niet onder een hoek. Dit
zou de liertrommel en de lijn kunnen
beschadigen. De aanbevolen maximale
lierhoek bedraagt 4°, zowel horizontaal
als verticaal.
Bedien de lier alleen handmatig.
Laat de lierkruk nooit los tijdens het takelen van een last. De lierkruk kan
hevig draaien en ernstige letsels veroorzaken. Probeer nooit om een
draaiende lierkruk te stoppen.
Boottrailers die niet voorzien zijn van kiel- en zijrollen, zijn ontworpen om
in water ondergedompeld te worden wanneer de boot geladen is. Dit
betekent dat de boot onder water op de trailer gezet wordt. Indien de
trailer niet ondergedompeld wordt, dan kunnen pogingen om de boot op de
trailer te slepen leiden tot materiële schade en letsels.
Houd handen en vingers uit de buurt van de lier en de lijn tijdens
gebruik.
Controleer altijd de correcte draairichting voor u de lier gebruikt.
Bij gebruik op een voertuig, verplaats het voertuig niet om de lier te
helpen. Het gebruik van de lier en de auto kan de lijn overbelasten.

WHW420
V. 01 –11/04/2014 16 ©Velleman nv
Haak de lijn nooit vast op zichzelf. Dit zorgt voor een onaanvaardbare
spanning op de lijn. Wikkel de lijn nooit rond de last.
De omgevingstemperatuur ligt tussen –10 °C en +50 °C. Gebruik de lier
niet buiten de opgegeven specificaties.
Veiligheidsinstructies voor onderhoud
Draag een veiligheidsbril en stevige lederen
werkhandschoenen tijdens het onderhoud.
Gebruik bij het vervangen van een lijn nooit een dunnere of langere lijn
dan aanbevolen door de fabrikant. Koppel geen lijnen aan elkaar.
Laat het toestel onderhouden door een erkende installateur en gebruik
alleen identieke reserveonderdelen. Dit zorgt ervoor dat de veiligheid van
het toestel wordt gewaarborgd.
3. Algemene richtlijnen
Raadpleeg de Velleman® service- en kwaliteitsgarantie achteraan deze
handleiding.
Leer eerst de functies van het toestel kennen voor u het gaat gebruiken.
Om veiligheidsredenen mag u geen wijzigingen aanbrengen aan het
toestel. Schade door wijzigingen die de gebruiker heeft aangebracht aan
het toestel, valt niet onder de garantie.
Gebruik het toestel enkel waarvoor het gemaakt is. De garantie vervalt
automatisch bij ongeoorloofd gebruik.
De garantie geldt niet voor schade door het negeren van bepaalde
richtlijnen in deze handleiding en uw dealer zal de verantwoordelijkheid
afwijzen voor defecten of problemen die hier rechtstreeks verband mee
houden.
Bewaar deze handleiding voor verdere raadpleging.
4. Eigenschappen
solide tandwielconstructie
zwarte elektrostatische coating om roestvorming te voorkomen
trommel en tandwiel zijn intern gesmeerd
ergonomisch gevormde slinger voor een soepele draaibeweging
versterkt frame voor extra stevigheid.

WHW420
V. 01 –11/04/2014 17 ©Velleman nv
5. Omschrijving
Raadpleeg de afbeeldingen op pagina 2 van deze handleiding.
1
frame
4
trommel
2
pal
5
lierkruk
3
as
6
montageoppervlak
Palposities
De pal heeft 3 posities:
a
oprollen: draai de lierkruk in wijzerzin om de last te takelen.
b
vrijloop: draai de lierkruk in willekeurige richting om op- of af te rollen.
c
afrollen: draai de lierkruk in tegenwijzerzin om de lijn af te rollen.
Waarschuwing! Houd de lierkruk stevig was bij het veranderen van de
palpositie of bij gebruik in vrijloop.
6. Installatie
Lees alle veiligheidsinstructies in deze gebruikshandleiding
zorgvuldig door voordat u het toestel installeert.
1. Kies een geschikte montageplaats. Let op de volgende punten:
oHet montageoppervlak en de onderdelen moeten de lier en de last
kunnen dragen zonder beschadigd te raken of te verzwakken. Indien
nodig, gebruik stalen verstevigingsplaten of extra ondersteuning.
oZorg ervoor dat de lierkruk [5] 360° kan draaien.
2. Plaats de lier op het montageoppervlak [6] en markeer de positie van
de montagegaten.
3. Controleer voor het boren of er geen verborgen of structurele
onderdelen zijn in het montageoppervlak die beschadigd kunnen raken.
4. Boor de gaten op de gemarkeerde posities.
5. Gebruik drie 3/8" (M10) bouten, dichtingsringen en borgmoeren (niet
meegelev.) om het frame [1] aan het montageoppervlak [6] te
bevestigen.
7. De lierlijn installeren
Controleer of de lijn sterk genoeg is om de last te verplaatsen.
Raadpleeg de instructies van de fabrikant voor meer informatie
over het type en maat van de lijn. Bevestig de lierhaak aan een
geschikt ankerpunt. (Kabel, touw, lierhaak en bevestigingen zijn
niet meegeleverd.) Respecteer altijd de veiligheids- en
gebruiksinstructies van de fabrikant.
U kunt de lier met een touw of met een staalkabel gebruiken. De
bevestiging is afhankelijk van het type lijn die u gebruikt.

WHW420
V. 01 –11/04/2014 18 ©Velleman nv
7.1 Touw
Voor het bevestigen van een touw aan de lier hebt u geen bouten, moeren
of touwklemmen nodig.
1. Plaats de pal [2] in vrijloop [b] zodat deze vrijkomt uit het tandwiel en
de trommel vrij kan draaien.
2. Schuif het uiteinde van het touw onder de trommelnaaf [4].
3. Haal het touw door de ronde openingen in de zijkant van de trommel.
Dit kan op 2 manieren, afhankelijk van het gewicht van de lijn. Voor
instructies, zie afb.
zware lijn
lichte lijn
4. Plaats de pal [2] in de takelpositie [a].
5. Draai de lierkruk in wijzerzin om het touw op te rollen. Zorg ervoor dat
de windingen stevig tegen elkaar liggen zodat de volgende lagen niet
tussen de windingen kunnen glijden.
6. Bevestig na het oprollen, de lierhaak aan de as [3] om te voorkomen
dat het touw afrolt.
7.2 Kabel
Een kabel bevestigen
Voor het bevestigen van een kabel hebt
u een kabelklem (niet meegelev.)
nodig. Om een kabel aan de
liertrommel te bevestigen, gaat u als
volgt te werk:
1. Plaats de pal [2] in vrijloop [b]
zodat deze vrijkomt uit het
tandwiel en de trommel vrij kan
draaien.
2. Bevestig de klem met de bout
door de vierkante opening in de
zijkant van de trommel. Plaats de
bout aan de binnenkant van de
opening, de borgmoer en
dichtingsring aan de buitenkant.
Span de moer nog niet aan.
3. Schuif het kabeluiteinde onder de trommelnaaf [4].
4. Haal de kabel door een ronde opening in de zijkant van de trommel.

WHW420
V. 01 –11/04/2014 19 ©Velleman nv
5. Haal de kabel verder door de klem en zorg ervoor dat het uiteinde
ongeveer 1" (2,5 cm) uitsteekt.
6. Draai de moer stevig vast.
7. Plaats de pal [2] in de takelpositie [a].
8. Draai de lierkruk in wijzerzin om de kabel op te rollen. Zorg ervoor dat
de windingen stevig tegen elkaar liggen zodat de volgende lagen niet
tussen de windingen kunnen glijden.
Waarschuwing! Vermijd knikken in de kabel.
9. Bevestig na het oprollen, de lierhaak aan de as [3] om te voorkomen
dat de kabel afrolt.
Een kabel losmaken
Waarschuwing! Wees voorzichtig bij het losmaken van een oude
kabel. De kabelklem houdt de kabel onder spanning en de kabel
kan hard terugslaan bij het afbreken.
Om een oude kabel los te maken, gaat u als volgt te werk:
1. Koppel alle lasten van de kabel los.
2. Plaats de pal [2] in de vierpositie [c].
3. Draai de lierkruk in tegenwijzerzin om de volledige kabel af te rollen.
4. Draai de klemmoer los en verwijder de kabel vanonder de klem.
5. Controleer alle onderdelen van de trommel en de klem voor u een
nieuwe kabel installeert.
8. Gebruik
8.1 Instructies
Waarschuwing! Lees alle instructies zorgvuldig door. Het
niet-naleven van de instructies kan leiden tot materiële
schade en ernstige letsels.
Waarschuwing! Gebruik de lier niet als een onderdeel beschadigd is of
niet goed werkt, om ernstige letsels te vermijden. Als u een abnormaal
geluid of abnormale trillingen waarneemt, gebruik het toestel dan niet en
laat het controleren door een erkend vakman.
Zorg voor gebruik dat het maximale vermogen niet overschreden wordt.
Gebruik de lier niet wanneer een onderdeel van de lier begint door te
buigen, te vervormen of enige beschadiging vertoont.
Waarschuwing! Laat de lierkruk niet los wanneer de pal in vrijloop staat
en er een last aan de lier bevestigd is. De lierkruk kan hevig draaien en
ernstige letsels veroorzaken. Probeer nooit om een draaiende lierkruk te
stoppen.

WHW420
V. 01 –11/04/2014 20 ©Velleman nv
Rol de lijn nooit volledig af bij het takelen
van een last. Laat altijd 4 tot 6 volledige
windingen rond de trommel; zo niet kan de lijn
loskomen van de trommel.
8.2 Takelen
Om een last te takelen, gaat u als volgt te werk:
1. Controleer of de lier en de lijn de last kunnen dragen, voordat u de lijn
aan de last bevestigt.
2. Plaats de pal [2] in de vierpositie [c].
3. Maak de lierhaak van de as los en trek aan de lijn om deze van de
trommel af te wikkelen. Leid de lijn en de lierhaak onder de as [3].
Waarschuwing! Zorg ervoor dat de lijn niet gedraaid, geknikt of
beschadigd raakt.
Waarschuwing! Laat minstens 4 volledige windingen rond de
trommel.
4. Bevestig de lijn aan de last. Volg hiervoor de instructies van de
fabrikant.
5. Hang een zwaar deken of tapijt (niet meegelev.) over de lijn.
Waarschuwing! Houd toeschouwers op een veilige afstand van de
lier, de lijn en de last.
6. Plaats de pal [2] in de takelpositie [a].
7. Draai de lierkruk in wijzerzin om de last te takelen.
Zorg bij het oprollen van de lijn op de trommel dat de windingen stevig
tegen elkaar liggen zodat de volgende lagen niet tussen de windingen
kunnen glijden.
8. Bevestig de last na het takelen.
9. Wanneer de last bevestigd is, druk dan de pal naar beneden [c] en
draai de lierkruk in tegenwijzerzin, om de spanning op de lijn te
verminderen.
10. Verwijder het deken of tapijt en ontkoppel de lijn van de last.
11. Plaats de pal terug in de takelpositie [a] en draai de lierkruk in
wijzerzin om de lijn op de trommel te winden.
12. Bevestig de haak aan de as.
Table of contents
Languages:
Other Perel Winch manuals