Performance In Lighting A+ 100 User manual

1
3111435 | ED. 01 | 01 - 2021
IT IMPORTANTE : Per garantire il buon
funzionamento e la sicurezza dell’apparecchio
è necessario che l’installazione sia eseguita
a regola d’arte da personale qualificato,
rispettando le istruzioni seguenti. Prima
di eventuali manutenzioni togliere sempre
tensione con un interruttore bipolare. Le
istruzioni devono essere conservate. Per ogni
ulteriore istruzione (collegamento elettrico,
montaggio, manutenzione, etc.) fare riferimento
al foglio istruzione del proiettore. Modifiche o
manomissioni del prodotto senza l’autorizzazione
del costruttore, comportano il decadimento
della garanzia e della responsabilità della
PERFORMANCE iN LIGHTING S.p.A. Vietata la
riproduzione, anche parziale, senza l’autorizzazione
scritta di PERFORMANCE iN LIGHTING S.p.A.
EN IMPORTANT : In order to ensure optimum
performance and safety, the fitting must be
correctly installed by qualified personnel, in
compliance with the following instructions.
Before performing any maintenance, always
remove the voltage with a bipolar switch. The
following instructions must be kept in a safe
place. For any further instruction (electrical
connection,mounting, maintenance, etc.)
refer to floodlight instructions paper. Any
misuse or any modification of the product not
expressly authorised by the manufacturer is
hazardous and makes the warranty nil and
void. Any reproduction of the contents of
this sheet without prior written consent of
PERFORMANCE iN LIGHTING S.p.A. is prohibited.
DE WICHTIG : Zur Gewährleistung der
einwandfreien Funktionsweise und Sicherheit der
Leuchte muss die Installation sachgemäß durch
Fachpersonal erfolgen und dabei die folgenden
Anleitungen beachtet werden. Vor eventuellen
Instandhaltungsarbeiten mit dem zweipoligen
Schalter immer die Spannung abtrennen. Die
Anleitungen sind aufzubewahren. Fuer jede
weitere Anweisung (elektrischer Anschluss,
Montage, Instandhaltung usw.) beziehen sie
sich auf das technische Anweisungsblatt des
Strahlers. Änderungen oder Manipulationen
am Produkt ohne Genehmigung des Herstellers
haben den Verfall der Garantie und der Haftung
von PERFORMANCE iN LIGHTING S.p.A. zur
Folge. Jede - auch teilweise - Vervielfältigung
ohne vorherige schriftliche Genehmigung durch
PERFORMANCE iN LIGHTING S.p.A. ist untersagt.
FR IMPORTANT : Cela implique, afin
de garantir son bon fonctionnement et la
sécurite de celui-ci, que son installation et
son raccordement soient effectués par du
personnel qualifié. Avant d'éventuelles
opérations d'entretien, toujours couper la
tension à l'aide d'un interrupteur bipolaire. Les
instructions doivent etre absolument conservees
apres l’installation des produits. Pour toute
information complémentaire (branchement
électrique, montage, entretien, etc.), veuillez vous
référer à la feuille d’instruction du projecteur.
Les modifications ou altérations du produit
sans l'autorisation du fabricant comportent
l'expiration de la garantie et de la responsabilité
de la société PERFORMANCE iN LIGHTING S.p.A.
La reproduction, même partielle, est
interdite sans l'autorisation écrite de
PERFORMANCE iN LIGHTING S.p.A.
ES IMPORTANTE : Para garantizar el buen
funcionamiento y la seguridad de la luminaria
es necesario que su instalación sea realizada a la
perfección por personal especializado, respetando
las siguientes instrucciones. Antes de cualquier
tipo de mantenimiento, cortar siempre la tensión
con el disyuntor bipolar. Las instrucciones
deberán ser guardadas. Para más información
(conexiones eléctricas, montaje, mantenimiento,
etc.) utilizar el manual de instrucciones del
proyector. Modificaciones o alteraciones del
producto, sin la autorización del fabricante,
anularán la garantía y la responsabilidad de la
PERFORMANCE iN LIGHTING S.p.A. Está prohibida
la reproducción, incluso parcial, sin la autorización
por escrito de PERFORMANCE iN LIGHTING S.p.A.
NL BELANGRIJK : Om een goede werking en
de veiligheid van de armatuur te garanderen is het
daarom noodzakelijk dat de installatie vakkundig
wordt uitgevoerd, door gekwalificeerd personeel
en met inachtneming van de montage-instructies.
Voordat men eventueel onderhoud gaat
uitvoeren moet men altijd de stroom uitschakelen
met een bipolaire schakelaar. De instructies
moeten bewaard worden. Voor verdere
instructies (elektrische aansluiting, montage,
onderhoud, enz.) de montagehandleiding van
de schijnwerper raadplegen. Modificaties
of verkeerde behandeling van het product
zonder toestemming van de constructeur
laten de garantie vervallen en ontheft
PERFORMANCE iN LIGHTING S.p.A. van iedere
aansprakelijkheid. Vermenigvuldiging, ook van
gedeelten, zonder schriftelijke toestemming van
PERFORMANCE IN LIGHTING S.p.A. is verboden.
PT IMPORTANTE : Para garantir o bom
funcionamento e a segurança do aparelho,
é necessário que a instalação seja executada
de acordo com as boas práticas por pessoal
qualificado, respeitando as instruções seguintes.
Antes de eventuais manutenção, desligar
sempre a tensão com um interruptor bipolar. As
instruções devem ser conservadas. Para cada
instrução adicional (ligação elétrica, montagem,
manutenção, etc.), consultar a folha de instruções
do projetor. Modificações ou alterações do
produto sem autorização do fabricante implicam
a anulação da garantia e da responsabilidade da
PERFORMANCE iN LIGHTING S.p.A. Proibida a
reprodução, total ou parcial, sem utorização por
escrito da PERFORMANCE iN LIGHTING S.p.A.
DK VIGTIGT : Beslaget skal installeres
korrekt af kvalificeret personale for optimal
ydelse og sikkerhed. Før enhver form for
vedligeholdelse, slukkes for strømmen på
on/off kontakten. Følgende vejledning skal
følges nøje. For yderligere information,
omkring installation og vedligehold, henvises
til installations vedledning for projektør.
Enhver ændring eller misbrug af produktet
uden producentens tilladselse, medfører
bortfald af garantien og ethvert ansvar for
PERFORMANCE iN LIGHTING S.p.A. Reproduktion
- også kun delvis - er forbudt uden skriftlig
tilladelse fra PERFORMANCE iN LIGHTING S.p.A.
CZ DŮLEŽITÉ : Pro zajištění správné činnosti a
bezpečnosti zařízení je nutné, aby instalaci provedl
odborným způsobem kvalifikovaný personál,
který dodržuje dále uvedené pokyny. Před
každou údržbou vždy vypněte napětí pomocí
dvoupólového vypínače. Pokyny se musí uložit.
Pro případné další pokyny (elektrické zapojení,
montáž, údržba atd.) si přečtěte návod k použití
svítdla. Úpravy nebo zásahy do výrobku bez
souhlasu výrobce mají za následek zánik záruky a
odpovědnosti PERFORMANCE iN LIGHTING S.p.A.
Zákaz jakéhokoliv, byť i částečného
rozmnožování bez písemného svolení výrobce
PERFORMANCE iN LIGHTING S.p.A.
PL WAŻNE : Aby zagwarantować prawidłowe
funkcjonowanie i bezpieczeństwo urządzenia,
konieczne jest, by instalacja została wykonana
przez wykwalifikowany personel, przestrzegający
następujących instrukcji. Przed rozpoczęciem
ewentualnej konserwacji, należy odciąć
napięcie przy pomocy dwubiegunowego
wyłącznika. Należy przechowywać instrukcję.
W celu uzyskania dodatkowych instrukcji
(podłączenie elektryczne, montaż, konserwacja,
itp.) należy odnieść się do instrukcji reflektora.
Modyfikacje produktu bez wcześniejszej
zgody producenta spowodują wygaśnięcie
gwarancji oraz odpowiedzialności firmy
PERFORMANCE iN LIGHTING S.p.A. Zabrania się
powielania, również częściowego, bez pisemnej
zgody firmy PERFORMANCE iN LIGHTING S.p.A.
RU ВАЖНО : Для обеспечения правильной
работы и безопасности прибора установка
должна быть выполнена квалифицированным
персоналом в соответствии со следующими
инструкциями. Перед техобслуживанием
всегда отключать напряжение посредством
двухполюсного выключателя. Инструкции
следует сохранить. Для получения
дополнительных указаний (электрическое
соединение, монтаж, техобслуживание и
т.д.) обращаться к листку с инструкциями
прожектора. Модификации или
нарушение конструкции прибора без
разрешения изготовителя вызывают отмену
гарантии и снимают ответственность
с PERFORMANCE iN LIGHTING S.p.A.
Запрещено воспроизведение, в том числе
частичное, без письменного разрешения
PERFORMANCE iN LIGHTING S.p.A.
SI POMEMBNO : Za zagotovitev pravilnega
delovanja in varnosti naprave, je treba slednjo
pravilno montirati, kar mora opraviti usposobljeno
osebje in pri tem upoštevati naslednja navodila.
Pred morebitnim vzdrževanjem z dvopolnim
stikalom vedno odklopite napetost. Navodila
se mora shraniti. Za vsa nadaljnja navodila (o
električni povezavi, montaži, vzdrževanju itd.)
glejte list z navodili za svetilo. Spremembe ali
posegi na proizvodu brez dovoljenja proizvajalca
imajo za posledico razveljavitev garancije in
odgovornosti PERFORMANCE iN LIGHTING S.p.A.
Reproduciranje, tudi delno, brez pisnega
dovoljenja PERFORMANCE iN LIGHTING S.p.A. je
prepovedano
GR ΣΗΜΑΝΤΙΚΟ : Για να εξασφαλίσετε τη
σωστή λειτουργία και την ασφάλεια της συσκευής
η εγκατάσταση πρέπει να γίνει από ειδικευμένο
προσωπικό, τηρώντας τις ακόλουθες οδηγίες.
Πριν εκτελέσετε οποιαδήποτε συντήρηση,
πάντα να αφαιρείτε την τάση με ένα διπολικό
διακόπτη. Οι οδηγίες πρέπει να τηρούνται. Για
οποιεσδήποτε άλλες οδηγίες (ηλεκτρολογική
σύνδεση, συναρμολόγηση, συντήρηση,
κλπ.) ανατρέξτε στις οδηγίες του προβολέα.
Οποιαδήποτε λάθος χρήσης ή τροποίηση του
προϊόντος που δεν είναι ρητά εξουσιοδοτημένη
από τον κατασκευαστή, είναι επικίνδυνη και
καθιστά άκυρη την εγγύηση. Οποιαδήποτε
αναπαραγωγή των περιεχομένων αυτού του
φυλλαδίου χωρίς προηγούμενη συναίνεση της
PERFORMANCE iN LIGHTING S.p.A. απαγορεύεται
SK DÔLEŽITÉ : Na zaistenie správneho
fungovania a bezpečnosti zariadenia je
nevyhnutné, aby ho nainštaloval kvalifikovaný
personál za dodržania všetkých požiadaviek
platných noriem, pokynov a predpisov. Pred
vykonávaním akejkoľvek údržby odpojte napätie
dvojpólovým vypínačom. Nasledujúci návod
si musíte odložiť. Ďalšie pokyny (o elektrickom
zapojení, montáži, údržbe a pod.) nájdete v
návode na použitie reflektora. Akékoľvek
zneužitie alebo zmena výrobku, ktoré nie sú
výslovne povolené výrobcom, je nebezpečné a
má za následok stratu záruky a odstúpenie od
zmluvy. Akékoľvek kopírovanie obsahu tohto
listu bez predchádzajúceho písomného súhlasu
spoločnosti PERFORMANCE IN LIGHTING S.p.A je
zakázané.
FI TÄRKEÄÄ: - Laitteiston asianmukaisen
ja varman toiminnan takaamiseksi alan
ammattilaisen täytyy suorittaa asennus
seuraavien asennusohjeiden mukaisesti. - Ennen
mahdollisia huoltotoimenpiteitä, kytke virta
aina pois päältä kaksinapaisella katkaisimella..
- Ohjeita on säilytettävä. - Ylimääräisiä ohjeita
varten (sähköliitäntä, asennus, huolto jne.) viittaa
valonheittimeen kuuluvaan ohjelehtiseen. -
Tuotteeseen tehdyt muutokset tai peukaloinnit
ilman siihen saatua valmistajan lupaa mitätöivät
takuun ja PERFORMANCE iN LIGHTING S.p.A.
antaman vastuun. - Myös osittainen kopiointi on
kielletty ilman PERFORMANCE iN LIGHTING S.p.A:n
kirjallista lupaa
םיילמיטפוא םיעוציב תחטבהל ‐ : בושח IL
ותבכרהל גואדל שי הרואתה ףוג לש תוחיטבו
קתנל שי ‐ .ךמסומ עוצקמ שיא ידי לע הניקתה
לכ ינפל יבטוק וד קספמ תרזעב ישארה םרזה תא
לע לועפל דיפקהל שי ‐ .איהש הקוזחת תולועפ
ירוביח) תופסונ תויחנהל ‐.תואבה תוארוהה יפ
ףדב ןייעל אנ ('וכו הקוזחת ,הבכרה ,למשח
וא הערל שומיש לכ ‐ .הרואתה ףוש לש תוארוהה
ןרציה ידי לע רשואמ וניאש רצומה לש יוניש לכ
ןכות תקתעה ‐ .תוירחאה תא לטבמו ןכוסמ אוה
לש שארמ המכסהו רושיא אלל יחכונה ןוילגה לש
הרוסא .PERFORMANCE iN LIGHTING S.p.A
.טלחהב
ﻞﻜﺸﺑ تاﺰﻴﻬﺠﺘﻟا ﺐﻴﻛﺮﺗ ﻢﺘﻳ نأ ﺐﺠﻳ ‐ ماه SA
ﻞﺜﻣﻷا ءادﻷا ﻖﻴﻘﺤﺘﻟ ﻦﻴﻠﻫﺆﻣ ﻦﻴﻔﻇﻮﻣ ﻞﺒﻗ ﻦﻣ ﺢﻴﺤﺻ
جودﺰﻣ حﺎﺘﻔﻤﻟﻼﺧ ﻦﻣ ﺔﻴﻄﻟﻮﻔﻟا ﺎ ًﻤﺋاد ﻞﺼﻓا ‐ .ﺔﻣﻼﺴﻟاو
ماﺰﺘﻟﻻا ﺐﺠﻳ ‐ .ﺔﻧﺎﻴﺻ ﺔﻴﻠﻤﻋ يﺄﺑ مﺎﻴﻘﻟا ﻞﺒﻗ ﺔﻴﺒﻄﻘﻟا
ﻦﻣ ﺪﻳﺰﻣ ﻰﻠﻋ لﻮﺼﺤﻠﻟ ‐.مرﺎﺻ ﻞﻜﺸﺑ ﺔﻴﻟﺎﺘﻟا تادﺎﺷرﻹﺎﺑ
ﻰﻟإ ،ﺔﻧﺎﻴﺼﻟاو ﺐﻴﻛﺮﺘﻟاو ﻲﺋﺎﺑﺮﻬﻜﻟا ﻞﻴﺻﻮﺘﻟا) تﺎﻣﻮﻠﻌﻤﻟا
يأ نإ ‐ .ﺔﻔﺷﺎﻜﻟا ءاﻮﺿﻷا تﺎﻤﻴﻠﻌﺗ ﺔﻗرو ﻊﺟار ،(ﻚﻟذ ﺮﻴﻏ
ﺢﻳﺮﺼﺗ نود ﻪﻴﻓ ﻞﻳﺪﻌﺘﻟا وأ ﺞﺘﻨﻤﻟا ماﺪﺨﺘﺳا ءﻮﺴﻟ ﺔﻟﺎﺣ
اًﺮﻴﻄﺧ اًﺮﻣأ ﺪﻌُﻳ ﺔﻌﻨﺼﻤﻟا ﺔﻛﺮﺸﻟا ﻦﻣ ﻚﻟﺬﺑ ﺢﻳﺮﺻ
ﺔﻴﻠﻤﻋ يﺄﺑ مﺎﻴﻘﻟا ﻊﻨﻤُﻳ ‐ .ٍغﻻو ًﻼﻃﺎﺑ نﺎﻤﻀﻟا ﻞﻌﺠﻳو
ﻦﻣ ﺔﻴﻄﺧ ﺔﻘﻓاﻮﻣ نود ﺔﻗرﻮﻟا هﺬﻫ تﺎﻳﻮﺘﺤﻤﻟ ﺦﺴﻧ
.PERFORMANCE iN LIGHTING S.p.A ﺔﻛﺮﺷ
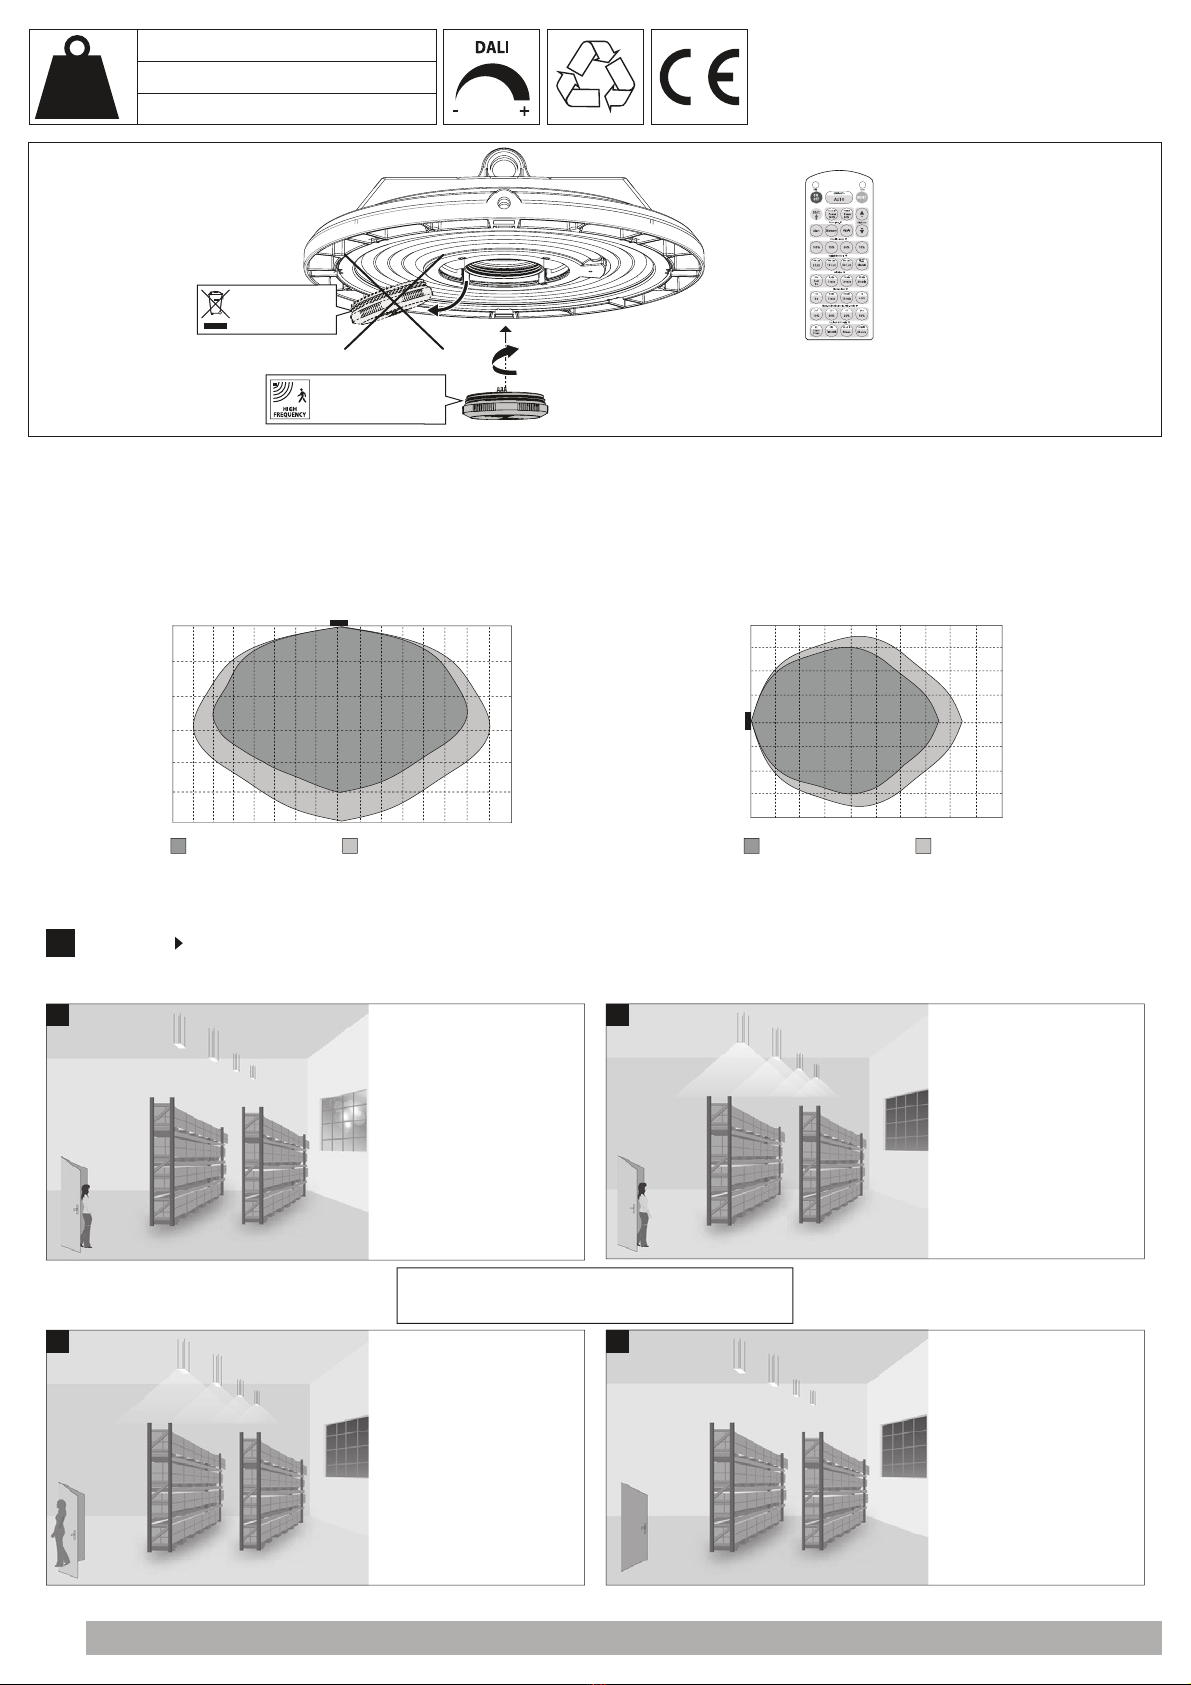
MICROWAVE MOTION SENSOR A+ 100 / A+ 150 / A+ 200
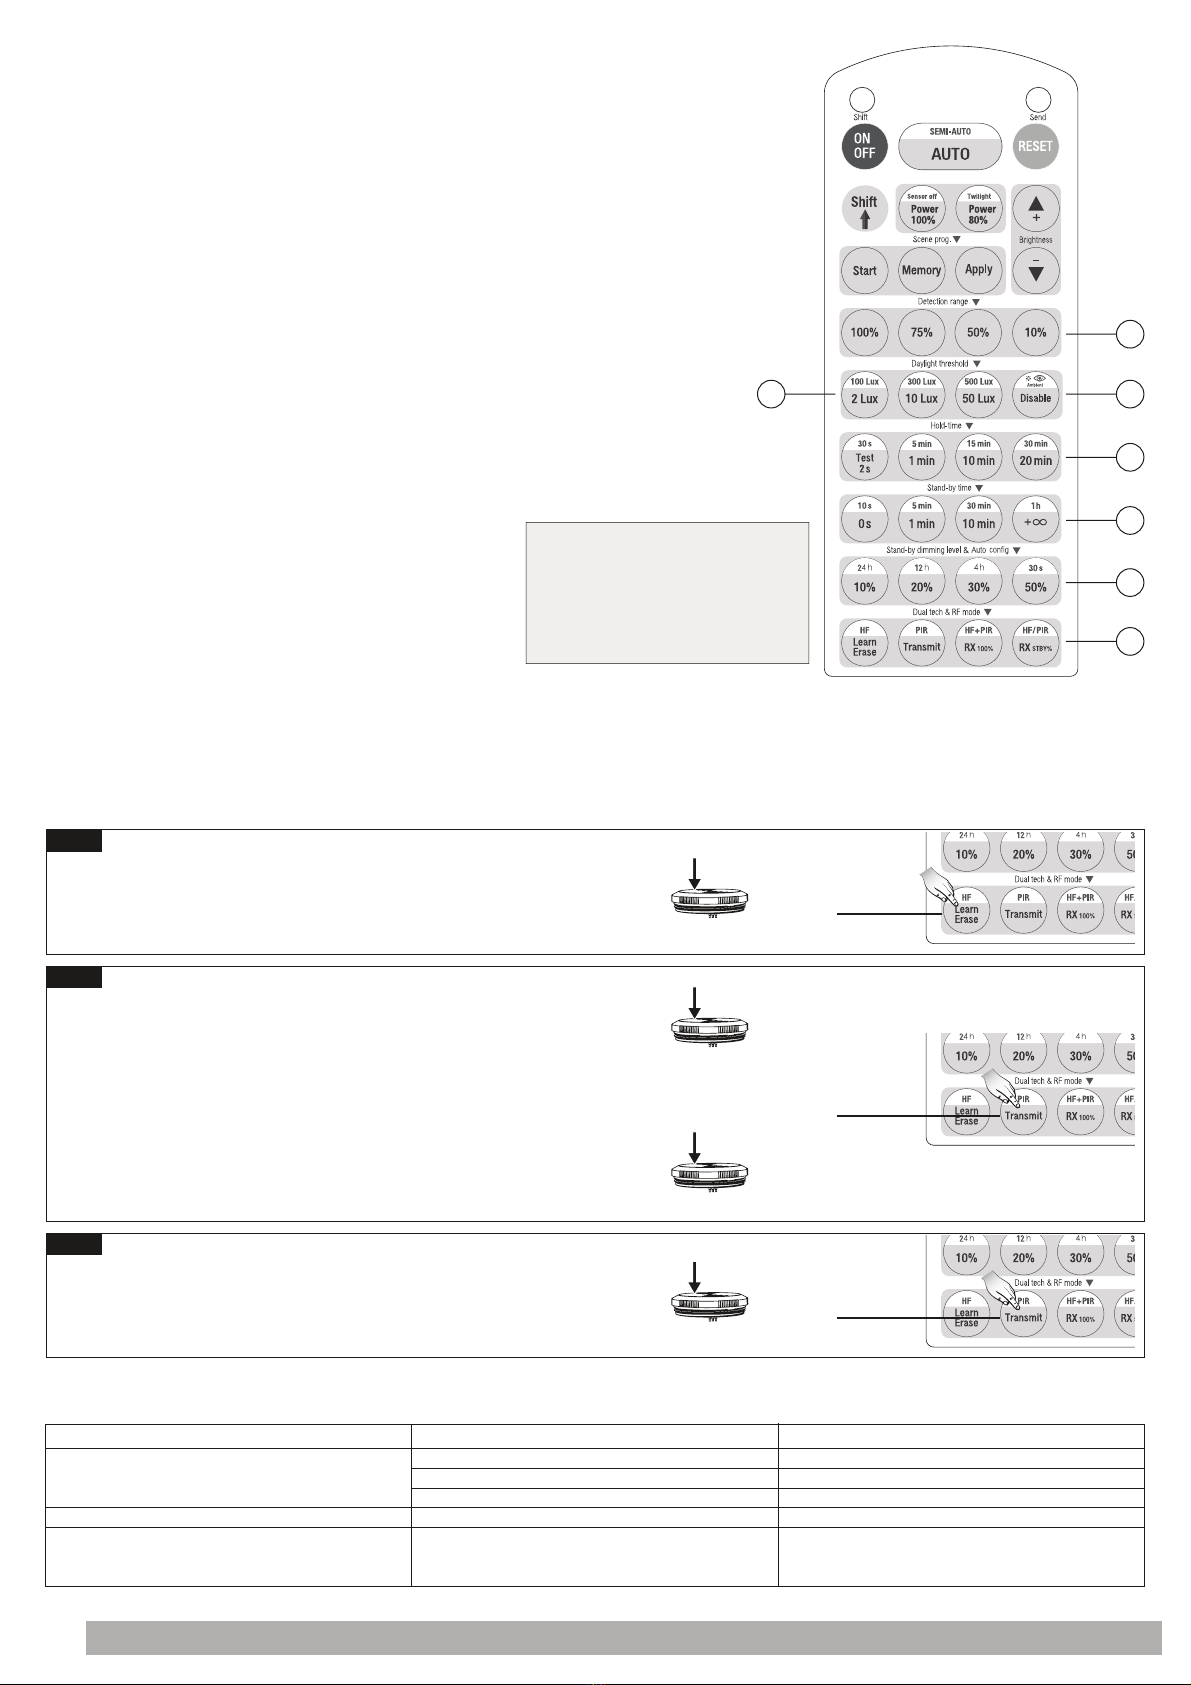
REMOTE CONTROL A+ 100 / A+ 150 / A+ 200
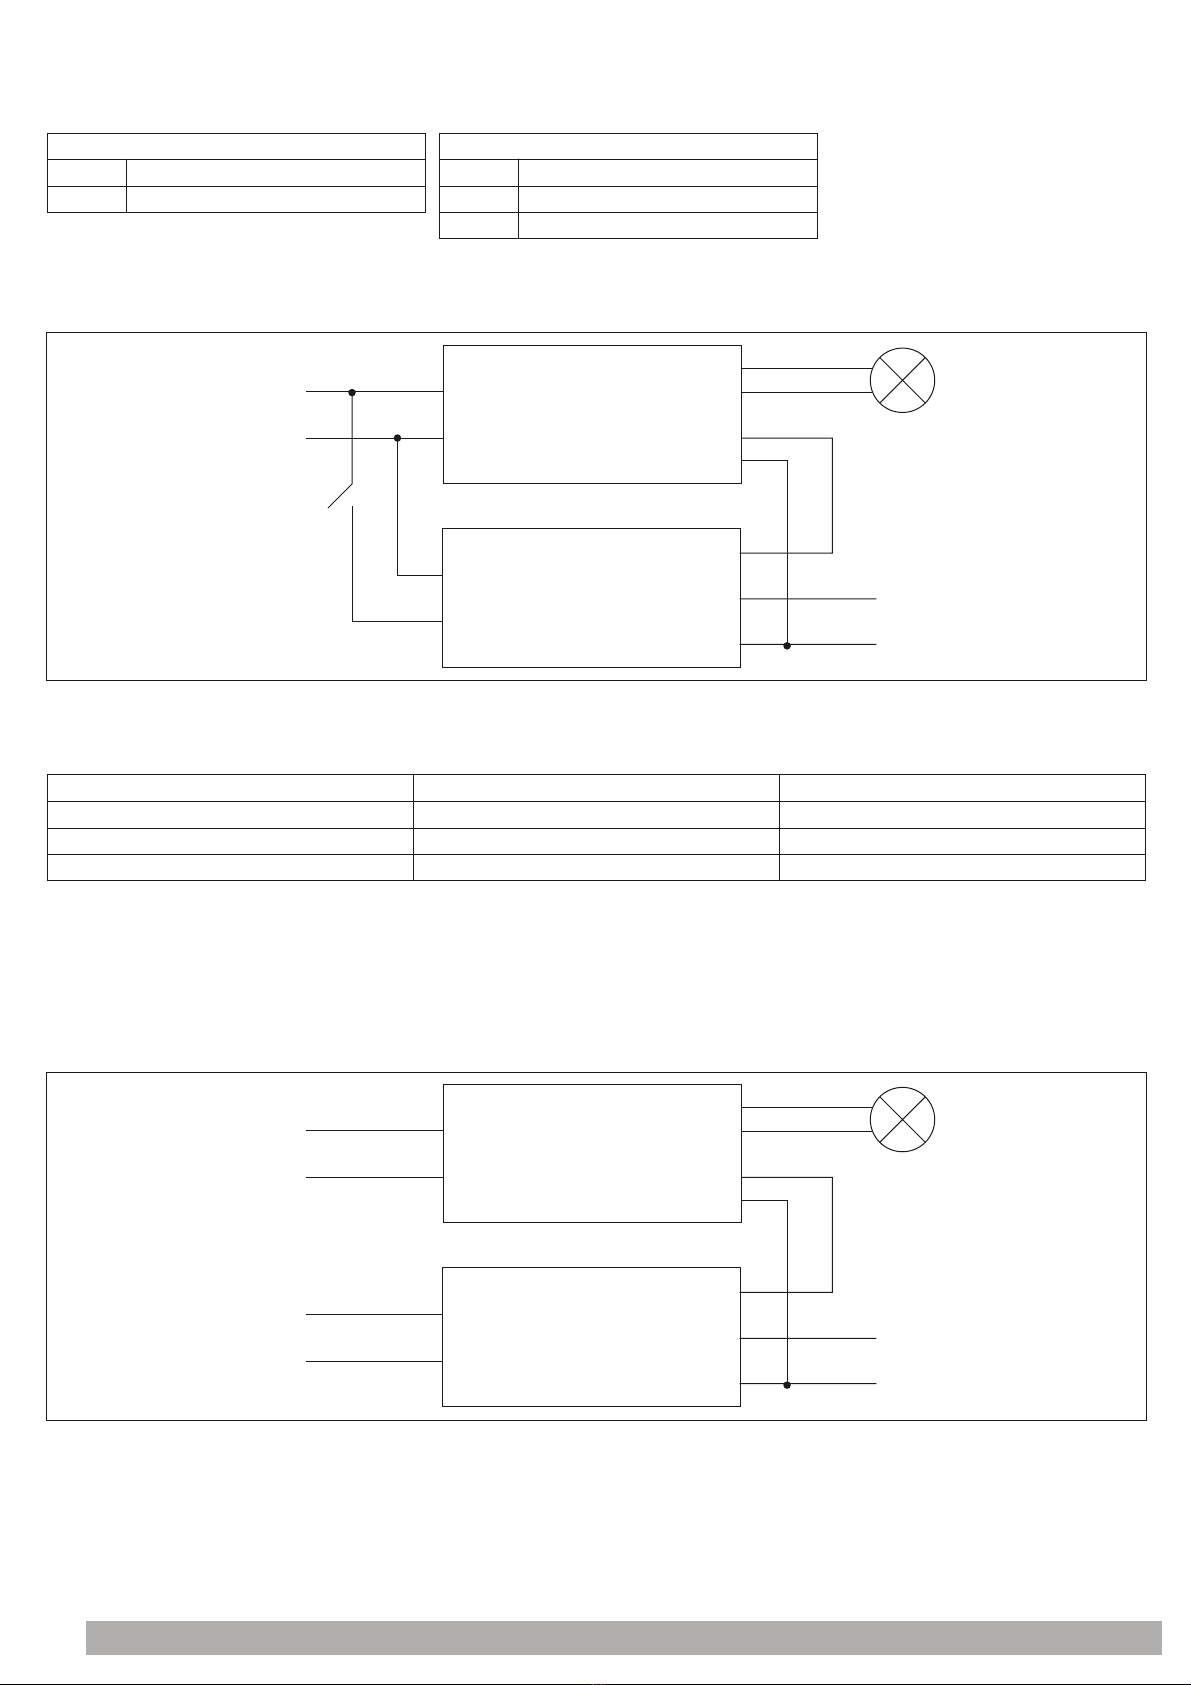
DALI CONVERTER A+ 100 / A+ 150 / A+ 200

23111435 | ED. 01 | 01 - 2021
MICROWAVE
MOTION SENSOR
REMOTE CONTROL
THE UNIT CAN ONLY PAIR UP TO 30 UNITS
BATTERIES NOT INCLUDED N°2 AAA 1.5V
REMOVE
PLASTIC CAP
3
6
9
12
15
1 12 23 35 4 47 6
85 76 8
Height (m)
High sensitivity area
Ceiling mounting (m)
Low sensitivity area
22 646 88
2 4 6 8 10 12 14 16 18 20
Height (m)
Wall mounting (m)
High sensitivity area Low sensitivity area
4
ULTRANIK HF motion detector
A
Daylight Harvest
The motion detector can turn on the light based on movement. With this detector built in, light is automatically on when needed and dimmed to preset level before it is totally off.
The light keeps off during daytime even
when movement is detected. (Ambient
lux level is above preset daylight
threshold)
With movement and insufficien
tambient lux level, the light is
triggered on 100% by the detector.
The light turns off automatically after
stand-by time.
If there is no more movement, the light
dims to stand-by dimming level after
hold-time.
SECTION 1 : TYPICAL APPLICATIONS
DETECTION PATTERN
12
4
3
The sensor highbay turns on at full or dims to maintain the lux level.
The light output regulates according to level of natural light available
MICROWAVE MOTION SENSOR A+ 0.03 Kg
REMOTE CONTROL A+ 0.04 Kg
DALI CONVERTER A+ 0.07 Kg
MICROWAVE MOTION SENSOR A+ / REMOTE CONTROL A+

3
3111435 | ED. 01 | 01 - 2021
ULTRANIK HF motion detector
B
For staircase and corridor (master and slave)
SECTION 2 : REMOTE CONTROL
While the 1st sensor detects motion on the 1st floor, it switches the light on at 100% and sends signal to all
slave units. All slaves on the 1st floor turn on and the sensor highbay on the 2nd floor switches on at
stand-by level.
The person walks to the 2nd floor, the 2nd Sensor highbay switches the light on at 100%. All slaves on the
2nd floor turn the light on and the Sensor highbay on the 3rd floor switches on at stand-by level.
10%OFFOFF
100% 100% 100%
OFFOFFOFF
OFFOFFOFF
MASTERSLAVE
CORRIDOR
100%100%100%
100% 100%
10%
OFFOFF
OFFOFFOFF
CORRIDOR
MASTERSLAVE
The person walks to the 3rd floor, the 3rd sensor highbay switches the light on 100%. All slaves on the 3rd
floor turn the light on and the Sensor highbay on the 4th floor switches onat stand-by level. Meanwhile,
the lights on the 1st floor are dimmed to stand-by level after hold-time.
The person walks to the 4th floor, the 4th sensor highbay switches the light on at 100%. All slaves on the
4th floor turn the light on Meanwhile, all sensors on the 1st floor turn the light off after stand-by period,
and all lights on the 2nd floor dim to stand-by level after hold-time.
PERMANENT ON/OFF
( button
1
)
Press button
1
, to select permanent ON or permanent OFF mode.
* Press button
2
/
4
to resume automatic operation.
The mode will change to AUTO Mode after power failure.
RESET
( button
2
)
Press button
2
, all settings go back to the default settings :
Detection range: 100% Hold time: 1min Stand-by period: 5min Stand-by dimming level: 20% Daylight sensor: LUX disable
SHIFT
( button
3
)
Press button
3
, the LED on the top left corner will flash to indicate mode selection. All values / settings in RED are valid for 20 seconds.
AUTO MODE
( button
4
)
Press button
4
, to initiate automatic mode. The sensor starts working and all settings remain as before the light was switched ON/OFF.
SEMI-AUTO MODE
( button
3 & 4
)
1. Press button
3
Shift (the red LED is on for indication)
2. Press button
4
to initiate semi-auto mode. The fixture is manually on by push-switch and automatically off in semi-auto mode.
POWER OUTPUT
( button
5
)
Press button
5
, the light output shifts between 80% and 100%.
Note: the function of “Sensor off” and “Twilight” are disabled.
BRIGHTNESS +/-
( button
6
)
Press button
6
to adjust the light brightness between 10%~100% .
SCENE PROGRAM
( zone
7
) (One-key-commissioning)
1. Press button “start” to program.
2. Select the buttons in
8
“Detection range”,
9
/
10
“Daylight hreshold”,
11
“Hold time”,
12
“Stand-by time”,
13
“Stand-by dimming
level” to set all parameters.
3. Press button “Memory” to save all the settings programmed in the remote control.
4. Press button “Apply” to set the settings to each sensor unit(s). For example, to pre-set detection range 100%, daylight threshold Disable,
hold time 5min, stand-by time +∞, stand-by dimming level 30%, the steps should be as follows: Press button
7
Start, button
8
100%,
10
Disable,
3
Shift,
11
5min,
3
Shift,
12
+∞,
13
30%,
7
Memory. By pointing to the sensor unit(s) and pressing
7
Apply, all
settings are passed on the sensor(s).
1
3
100%100%
10% 10% 10%
100%
100%100%
10%OFFOFF
CORRIDOR
MASTERSLAVE
10% 10%10%
OFF OFF OFF
100%100%
100%100%100%
CORRIDOR
MASTERSLAVE
HRC-11
Note: the red LED indicator flash one time when RC
receives signal successfully
7
3
1
6
5
2
4
4
2

43111435 | ED. 01 | 01 - 2021
DETECTION RANGE
( zone
8
)
Press buttons in zone
8
to set detection range at 100% / 75%/ 50% / 10%.
DAYLIGHT THRESHOLD
( zone
9
)
Press buttons in zone
9
to set the daylight sensor at 2Lux / 10Lux / 50Lux / 100Lux / 300Lux / 500Lux or Disable.
Note: To set daylight sensor at 100Lux / 300 Lux / 500Lux, press button
3
Shift at first.
AMBIENT DAYLIGHT THRESHOLD
( button
10
)
1. Press button
3
Shift, the red LED is on for indication.
2. Press button
10
, the ambient lux level is sampled and set as the new daylight threshold.
HOLD TIME
( zone
11
)
Press buttons in zone
11
to set the hold time at 2s / 30s / 1min / 5min / 10min / 15min / 20min / 30min.
Note:
1. To set hold-time at 30s / 5min / 15min / 30min, press button
3
Shift at first.
2. 2s is for testing purpose only, stand-by period and daylight sensor settings are disabled in this mode.
*To exit from Test mode, press button
2
or any button in zone
11
.
STAND-BY TIME
( zone
12
)
Press buttons in zone
12
to set the stand-by period at 0s / 10s / 1min / 5min / 10min / 30min / 1h / +∞.
Note: “0s” means on/off control; “+∞” means bi-level control, 100% on when motion is detected, and remains at the stand-by dimming
level when no presence is detected after hold-time.
STAND-BY DIMMING LEVEL
( zone
13
)
Press buttons in zone
13
to set the stand-by dimming level at 10% /20% / 30% / 50%.
Note: 24h / 12h / 4h / 30s are disabled.
DUAL TECH & RF MODE
( zone
14
)
1. HF, PIR, HF+PIR, HF/PIR are disabled.
2. For RF grouping, please see below.
SECTION 3 : TROUBLESHOOTING
Sensor setting go back to default setting as followed,
after press reset:
- Detection range: 100%
- Hold time: 5min
- Stand-by time: 10min
- Stand-by dimming level: 10%
- Daylight threshold: 300LUX
HRC-11
Note: the red LED indicator flash one time when RC
receives signal successfully
14
9
13
12
11
10
8
MALFUNCTION CAUSE REMEDY CAUSE REMEDY
The fixture does not light up
The fixture is always on
The fixture is on when it should not
Incorrect daylight threshold setting
Continuos movement in the detection zone
Sudden change in temperature due to weather (wind,
rain, snow) or air expelled from fans, or open windows
Faulty fixture
No power supply
Adjust daylight threshold setting
Check detection area setting
Adjust zone, change installation site
Replace fixture
Check power to sensor
RF GROUPING
Short press “Learn/Erase” button on RC to activate pairing mode, and the receiver unit will flash
once every second for 3min.
Note: the unit can only pair up to 30 units.
STEP 1
Red LED indicator is on for 3min
The receiver unit (slave unit)
Short press
“Learn / Erase”
button
Short press “Transmit” button on RC, the commander unit (master unit) will flash one time to send
the transmission signal.
Upon receiving the trasmission signal, the receiver unit (slave unit) will rapidly flash 3 times in 1 to
indicate the succes of pairing. Repeat this step to pair more units. One more short press on “Learn /
Erase” button to the receiver unit to complete the pairing process, the receiver unit will quit the
pairing mode.
Note:
Press button RX 100%, the light on receiver unit is 100% on upon receiving RF on signal;
Press RX STBY% button, the light(s) goes to preset stand-by dimming level directly.
STEP 2
Short press
“Transmit”
button
The red LED indicator flash one time.
The commander unit ( master unit)
The red LED indicator flash rapidly
when RF signal is received
The receiver unit (slave unit)
Erase:
ong press “Learn/Erase” button for 3s to the sensor unit.
The red LED indicator rapidly flash for about 5s. all commands it has received before will be erased.
STEP 3
Red LED indicatoron is on
The receiver unit (slave unit)
Short press
“Transmit”
button

5
3111435 | ED. 01 | 01 - 2021
DALI CONVERTER A+
DIM
REMOVE
3 x
DISCONNECT
MAIN VOLTAGE
OPEN
2 x
1 2
1-10V WIRING
0-10V
+12V
1-10V (-)
GRAY
1-10V (+)
PURPLE
12 V
WHITE BLACK
GND
3x 0,75÷1,5 mm
Ø5÷8 mm
14÷16 mm
4÷6 mm
3 PIN POWER SOCKET/PLUG
1-10V WIRING
GND +12V0-10V
3
2.8 3.7 Nm
CONNECT
MAIN VOLTAGE
CLOSE
2 x
4
DISCONNECT
MAIN VOLTAGE
OPEN
2 x
DA1
DALI 2
DALI 1
DA2
2x 0,75÷1,5 mm
Ø5÷8 mm
14÷16 mm
4÷6 mm
2 PIN POWER SOCKET/PLUG
DA2DA1
1 2
DALI WIRING
2.8 3.7 Nm
CONNECT
MAIN VOLTAGE
CLOSE
2 x
3

63111435 | ED. 01 | 01 - 2021
DIMMING INSTRUCTION
DA1
INPUT
DA2
DA2 and push dimming input terminal
DA1 and push dimming input terminal
0-10V
OUTPUT
+12V
12v power supply input terminal +
The earth wire
0-10V signal output terminal +
GND
Descriptional of terminals
- Pressing the button for less than 0.05 second will not trigger any response.
- The minimum dimming depth of push dimming is 10%.
- The push dimming mode has power-failure memory function. Re-power on the driver and the light will recover to the state before power failure.
- In push dimming mode, the dimming direction of each pressing is the opposite of the previous direction.
OPERATION LASTING TIME FUNCTION
0.1 - 0.5 S
0.6 - 5 S
>9 S
LED light on / off
Dim up / down
Reset to 50% luminance of push setting
SHORT PRESS
LONG PRESS
RESET PRESS
Instruction of Push Dimming
Wiring diagram of Push Dimming
LED +
AC-L
AC-N
DA1 / PUSH
DA2 / PUSH
AC input
push switch
12VDC input
LED -
0-10V dimmable
LED driver
LF-SCD010B
DIM +
0-10V
+12V
GND
DIM -
Wiring diagram of DALI Dimming
LED +
AC-L
AC-N
DA1 / PUSH
DA2 / PUSH
AC input
DALI input
12VDC input
LED -
0-10V dimmable
LED driver
LF-SCD010B
DIM +
0-10V
+12V
GND
DIM -

7
3111435 | ED. 01 | 01 - 2021
- Do not reversely connect the 12V power supply or the GND wire to the 0-10V terminal.
- The product is compatible with push dimming mode.
- Due to the diameter differences of the cables used by customers, there may be gaps between nuts and studs during assembly. It’s a normal phenomenon. To ensure the waterproof function, please make sure the torque is
within 2.8-3.7N/m.
- Use this product according to the specifications, please. Otherwise there may be malfunction.
- Use luminaires that have not been certified or are not compatible with the drivers may cause fire, explosion or other hazards.
- Man-made damage is not covered by warranty.
ATTENTION
- The default setting is 10V , the maximum output.
- Connect the DALI signal to DA1 and DA2 terminals.
- The DALI protocol includes 16 groups and 64 IP addresses.
- The minimum dimming depth of the DALI dimming is 10%.
- The DALI dimming function and push dimming function cannot be used at the same time, otherwise the DALI dimmer will be damaged.
Instruction of DALI Dimming
ouput
voltage
(V)
ouput
voltage
(V)
DALI logarithmic dimming curve DALI linear dimming curve
DALI instruction DALI instruction
- The wire outlets are compatible with two-core or three-core cables of 22# to 16# rubber or sheathed wires. (Expose 4mm to 6mm wire core. Peel 14mm to 16mm sheath. Use cables with the diameter of 5mm to 8mm.)
Structure & Dimension (unit: mm)
Ø 30
111 (Max)
Ø 30
Label

3111435 | ED. 01 | 01 - 2021
8PERFORMANCE iN LIGHTING S.p.A.
Viale del Lavoro 9/11 - 37030 Colognola ai Colli (VR) Italia
Tel: +39.045.61.59.211 - Fax: +39.045.61.59.292
www.performanceinlighting.com
IT Pulire regolarmente il vetro/diffusore del
proiettore, utilizzando un panno morbido. - Non
utilizzare sostanze chimiche per pulire il vetro/
diffusore del proiettore.
EN Regularly clean the glass/diffuser diffusor
of the spotlight with a soft cloth. - Do not use
chemicals for cleaning the glass/diffuser diffusor
of the luminaire.
DE Das Glas/den Diffusor des Strahlers
regelmäßig mit einem weichen Tuch reinigen.
- Keine chemischen Stoffe zur Reinigung des
Glases/Diffusors des Strahlers verwenden.
FR Nettoyez régulièrement le verre/diffuseur
du projecteur à l'aide d'un chiffon doux. - Ne pas
utiliser de substances chimiques pour nettoyer le
verre/diffuseur du projecteur.
ES Limpie regularmente el vidrio/difusor del
proyector, utilizando un paño húmedo. - No
utIlizar sustancias químicas para limpiar el vidrio/
difusor del proyector.
NL Maak de glazen van de schijnwerper
regelmatig schoon, gebruik een zachte doek. -
Gebruik geen chemicaliën om het glas/de diffusor
van de schijnwerper schoon te maken.
PT Limpar regularmente o vidro/difusor do
projetor, utilizando um pano macio. - Não utilizar
substâncias químicas para limpar o vidro/difusor
do projetor.
DK RengØr jævnligt glasset med en blØd klud.
- Undgå at anvende kemikalier til rengøring af
belysningsarmaturets glas/spredeglas.
CZ Aby se nepoškodily elektrické součástky, je
nutné ihned vyměnit nefunkční světelné zdroje po
ukončení jejich životnosti - Nepoužívejtna k čištění
skla/difuzéru u promítačky chemické látky.
PL Czyścić regularnie szkło/dyfuzor projektora,
używając miękkiej szmatki. - Nie stosować
substancji chemicznych do czyszczenia szkła/
klosza w projektorze.
RU Регулярно очищать стекло/рассеиватель
прожектора мягкой салфеткой. - Не
использовать химические вещества для чистки
стекла/рассеивателя прожектора.
SI Steklo/difuzor žarometa redno čistite z mehko
krpo. - Ne uporabljajte kemičnih snovi za čiščenje
stekla/difuzorja projektorja.
GR Να καθαρίζετε τακτικά το τζάμι/διαχύτη
του προβολέα με ένα μαλακό πανί. - Μη
χρησιμοποιείτε χημικά για να καθαρίσετε τo
γυάλινο στοιχείο/ διαχύτη του προβολέα.
SK Pravidelne čistite sklo reflektora mäkkou
tkaninou. - Nepoužívejtna k čistenie skla/difuzéra u
premietačky chemické látky.
FI Puhdista säännöllisesti valonheittimen lasi/
hajotin käyttämällä pehmeää liinaa. - Älä käytä
kemiallisia aineita valaisimen lasin/diffuusorin
puhdistamisessa.
סנפה לש תיכוכזה תא עובק ןפואב תוקנל שי IL
םיימיכ יוקינ ירמוחב שמתשהל ןיא - .הכר תילטמ םע
הרואתה ףוג לש רואה רזפמ/תיכוכזה יוקינל
ةرﻮﺼﺑ سﻮﻧﺎﻔﻟا ةﺮﺷﺎﻧ/جﺎﺟز ﻒﻴﻈﻨﺗ ﻰﺟﺮُﻳSA
مﺪﺨﺘﺴﺗ ﻻD - .ﺔﻤﻋﺎﻧ شﺎﻤﻗ ﺔﻌﻄﻗ ماﺪﺨﺘﺳﺎﺑ ﺔﻤﻈﺘﻨﻣ
.ةءﺎﺿﻹا عزﻮﻣ/جﺎﺟﺰﻟا ﻒﻴﻈﻨﺗ ﻲﻓ ﺔﻴﺋﺎﻴﻤﻴﻜﻟا داﻮﻤﻟا
IT Per preservare l’ambiente, a fine vita, non
gettare questo apparecchio nella normale raccolta
dei rifiuti, ma portarlo in uno dei punti di raccolta
autorizzati.
EN In respect and compliance to environmental
standars at the end of life do not dispose of as
standard waste, this must be taken to one of the
authorised collection points.
DE Zum Schutz der Umwelt darf diese Leuchte
nach dem Ende ihrer Lebensdauer nicht mit dem
normalen Hausmüll entsorgt werden, sondern
muss bei den vorgesehenen Annahmestellen
abgegeben werden.
FR Pour préserver l'environnement, en fin de vie,
ne pas jeter cet appareil dans la poubelle normale,
mais l'emmener dans l'un des centres de collecte
autorisés.
ES Para proteger el medio ambiente, al final de
la vida útil, no arroje esta luminaria en la recogida
de residuos común; llévelo a uno de los puntos de
recogida autorizados.
NL Gooi, om het milieu te beschermen, de
armatuur niet bij het gewone afval, maar breng
het naar een geautoriseerd inzamelingspunt.
PT Para preservar o ambiente, no final da sua
vida útil, não deitar este aparelho junto com os
resíduos domésticos. Leve-o até um ponto de
recolha autorizado.
DK Vis miljØhensyn og smid ikke dette
apparat efter endt levetid væk med det normale
husholdningsaffald, men aflever det til en
godkendt genbrugsstation.
CZ V souladu s normami na ochranu životního
prostředí nevyhazujte výrobek do komunálního
odpadu, ale odevzdejte jej v pověřených sběrných
dvorech.
PL W celu ochrony środowiska, urządzenie
nie może zostać utylizowane z normalnymi
odpadami, lecz musi zostać oddane do
autoryzowanego punktu zbiórki odpadów
specjalnych.
RU В целях охраны окружающей среды
в конце срока службы сдать прибор на
утилизацию в один из уполномоченных
пунктов сбора отходов.
SI Za varovanje okolja, ob koncu življenjske
dobe aparat ne odstranite kot navaden odpadek,
oddajte ga pooblaščenemu zbirnemu centru.
GR Σύμφωνα και με σεβασμό στα
περιβαλλοντικά πρότυπα, στο τέλος της ζωής
τους μην τις πετάτε όπως τα συνήθη απόβλητα,
πρέπει να τις πηγαίνετε σε κάποιο από τα
εξουσιοδοτημένα σημεία συλλογής.
SK V súlade s normami na ochranu
životného prostredia nevyhadzujte výrobok
do komunálneho odpadu, odovzdajte ho do
povolených zberných miest.
FI Ympäristön suojaamiseksi, älä heitä tätä
laitetta sen käyttöiän lopussa yhdyskuntajätteiden
mukana vaan vie se yhteen valtuutetuista
keräyspisteistä.
םותב ךילשהל ןיא הביבסה תוכיא ןקתל םאתהב IL
ףוסיא תודוקנב אלא לוקת רצומה רשאכ וא שומיש
.לוקת רצומל תדעוימה תלוספ
،ﺎﻬﻟ لﺎﺜﺘﻣﻻاو ﺔﻴﺌﻴﺒﻟا ﺮﻴﻳﺎﻌﻤﻟا ماﺮﺘﺣا ﻰﻠﻋ ﺎ ً
ﺻﺮﺣ SA
ﺺﻠﺨﺘﻟا مﺪﻋ ﻰﺟﺮُﻳ ،سﻮﻧﺎﻔﻠﻟ ﻲﺿاﺮﺘﻓﻻا ﺮﻤﻌﻟا ﺔﻳﺎﻬﻧ ﺪﻌﺑ
ﻖﻳﺮﻃ ﻦﻋ ﻪﻨﻣ ﺺﻠﺨﺘﻟا ﺐﺠﻳ ﺎﻤﻧإو ,تﺎﻳﺎﻔﻨﻛ ﻪﻨﻣ
.ﻚﻟﺬﺑ ﺎﻬﻟ حﺮﺼﻤﻟا ﻊﻴﻤﺠﺘﻟا ﺰﻛاﺮﻣ ﺪﺣأ ﻰﻟإ ﻪﻤﻴﻠﺴﺗ
This manual suits for next models
2
Table of contents