PetRun PR 700 User manual

User Manual
PR 700
Small
/ normal
PR 710 F
Medium
/ foldable
PR 720 F
Large
/ foldable
PR 720 E
Large
/ inclinable
PR 725N
E tra Long
/ inclinable
PR 730
E tra Large
/ inclinable
Notice
• For your safety, please read this User Manual carefully before using your PetRun
treadmill or attempting any maintenance of your treadmill.
• This machine is only for use by dogs. Use by people is strictly prohibited.
• Children are not allowed to operate this machine.
• Copyright of this User Manual belongs to Iwate International eveloping Co., Ltd.
• Iwate International eveloping Co., Ltd. has the rights to change the components without
advance notification.
Inde
Symbol efinitions ------------------------------------------------------------------------------------------1
Warning --------------------------------------------------------------------------------------------------------1
aily maintenance ------------------------------------------------------------------------------------------2
Prohibitions ---------------------------------------------------------------------------------------------------2
Warranty -------------------------------------------------------------------------------------------------------2
oggy size / Model ------------------------------------------------------------------------------------------2
Owner guide --------------------------------------------------------------------------------------------------3
Medical Observations --------------------------------------------------------------------------------------3
Component Identification-----------------------------------------------------------------------------------3、4、5
Accessory parts ----------------------------------------------------------------------------------------------5、6
Manual control button & Power switch illustration ---------------------------------------------------7
IR remote control instruction manual -------------------------------------------------------------------7
Infrared rays receiving range------------------------------------------------------------------------------8
Remote control operation ----------------------------------------------------------------------------------8
Manual control console -------------------------------------------------------------------------------------9
Control console operation ----------------------------------------------------------------------------------9
Assembly procedure -----------------------------------------------------------------------------------------10、11
To Start ----------------------------------------------------------------------------------------------------------12
Running belt adjustment ------------------------------------------------------------------------------------12
Rear rubber feet adjustment -------------------------------------------------------------------------------12
Folding storage ------------------------------------------------------------------------------------------------13
Unfolding --------------------------------------------------------------------------------------------------------13
Moving -----------------------------------------------------------------------------------------------------------13
Incline ------------------------------------------------------------------------------------------------------------14
Specification ----------------------------------------------------------------------------------------------------15

• Please read this User Manual carefully before using the PetRun treadmill and comply with all
instructions for safety reasons.
Symbol Definitions:
Warning/ Important Note
Prohibited
Routine Maintenance
Caution before use
• Before plugging in to power source, ensure that the voltage is correct.
• Ensure that the power cord, plug and outlet are not damaged or loose before use.
• o not position the treadmill in any place with high temperatures or humidity, nor near any
other electrical equipment.
• Always place the treadmill on a flat floor, ensuring sufficient space for dogs to exercise
and run on the treadmill.
• Place slip proof mat under the treadmill to prevent scratches to the floor.
• o not use when dogs are sick or appear unwell.
• ogs should never wear any clothes/other garments when exercising to preclude any
possibility of accident.
Caution during use
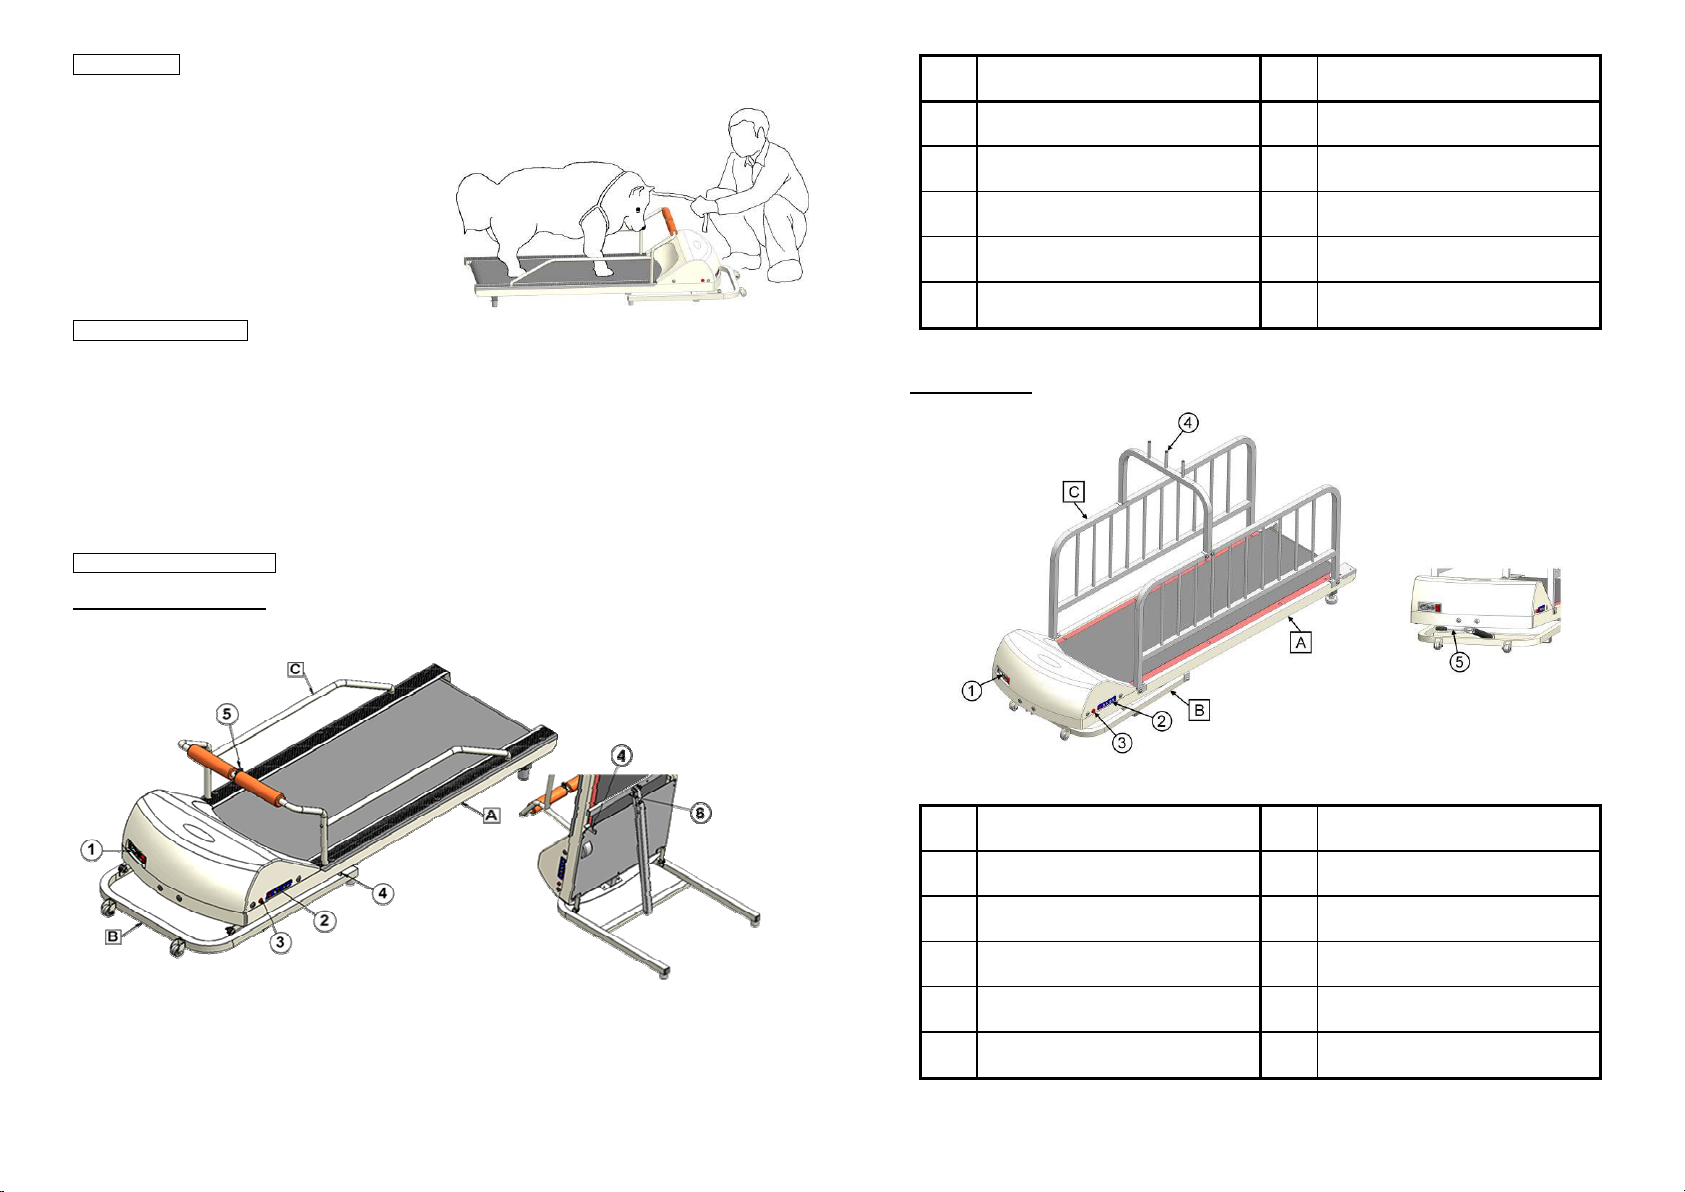
• Introduce the dog to the treadmill by having it stand on the running belt before starting the
treadmill.
• Have the owner stand in front of the machine and adjust the speed according to dog's
condition.
• Slowly adjust the speed, step by step.
• To avoid any injury or accident, do not allow the dog to jump on the treadmill while the
belt is in motion.
• Recommended usage is once or twice a day for approximately 10 to 15 minutes each
time.
• Stop the machine immediately if the dog seems unwell, such as if it appears breathless.
• If the running belt appears to slant to one side or the other and noise occurs, stop using
immediately. You will need to adjust the running belt to move it back to the middle
position for using again. (Refer to page 12).
• If you notice any unusual noise, burning smell, motor cover damage, or any parts coming
out or loose, immediately stop using the treadmill and unplug it. Contact your local
distributor for further assistance.
Caution after use
• Always unplug when the treadmill is not in use.
• Clean while the treadmill is unplugged by first removing any dog hair on the running belt
first, then wiping the treadmill with a damp cloth. ( ilute gentle detergent with lukewarm
water, soak the cloth then wring any excess water from the cloth before wiping the
machine.)
• o not use any detergent containing methylbenzene as it will damage the treadmill.
1.
Warning
Other
• Ensure that your hands are not wet when plugging or unplugging the machine to avoid
any possibility of accident, electric shock, arcing or fire.
• o not remove the power plug by pulling on the cord itself to avoid electrical shock, short
circuiting or any other electrical hazard. Grip the plug, not the cord, to remove from the
power receptacle.
• o not cut or twist the cord to avoid accidents, electric shock, arcing or fire.
Daily Maintenance
• Always unplug the treadmill from its power source when not in use.
• o not allow children or pets to play near the treadmill.
• If the running belt slants to one side or the other after using for a period of time, adjust the
running belt to move it back to the middle position. (Refer to page 12 )
• o not disassemble, or attempt to maintain or modify the PetRun yourself to prevent
damage to the treadmill or any other accidents from happening.
• o not splash water or any other liquids on the treadmill.
Warranty
• The warranty period is in accordance with the guarantee.
• amages caused by unexpected natural or artificial disaster are excluded from warranty.
• Any user modifications of the treadmill void this warranty.
• Any damages or injury caused by improper use are excluded from this warranty.
Doggy size / Model
Small
under 60 cm
20 Kgs
Middle
under 80 cm
40 Kgs
Large
under 100 cm
60 Kgs
Long
under 130 cm
80 Kgs
E tra Large
under 150 cm
120 Kgs
PR700
PR710F
PR720F/PR720E
PR725
PR730
2
Prohibitions

Owner guide
※ Note:Allow your dog to drink sufficient water before and after exercise.
• Soothe, encourage and praise your dog
before starting exercise.
• Allow your dog to stand on the running
belt before turning on the power.
• Increase the speed step by step, guided
by your observation of your dog's
response and condition.
• Gradually decrease the speed step by
step while finishing exercise. o not stop
the treadmill suddenly.
Medical Observations
Guided by a Veterinary Science Study performed over the course of PetRun usage for one month,
and based on an average speed of 5.5km/h, exercising twice a day for 10 minutes each time, the
following medical data points were observed :
• Weight decrease : Maximum approximately 14%; average approximately 8%
• Pulse decrease : Maximum approximately 16%; average approximately 13%
• Temperature : Young dogs: 38.5 to 39.0 ℃,
Adult dogs: 7.5 to 38.5 ℃
• Rate of Breathing: 10 to 30 times per minute.
• Pulse rate: Young dogs: about 80 to 120 beats per minute,
Adult dogs: about 70 to 80 beats per minute.
Component Identification
PR700 / PR710F / PR720F
3
No.
Parts Name No.
Parts Name
□
A
Body
○
3
Infrared Rays Receiver (Left, Right)
□
B
Folding Base
○
4
Slide Locker
□
C
Fence
○
5
Chain Ring
○
1
Power Switch/Electric Current
Protector/Outlet
○
6
Lock Pin
○
2
Manual Control Button
PR720E / PR725
No.
Parts Name No.
Parts Name
□
A
Body
○
3
Infrared Rays Receiver (Left,Right)
□
B
Incline Base
○
4
Rope Hanger
□
C
Fence
○
5
Incline Adjust Lever
○
1
Power Switch/Electric Current
Protector/Outlet
○
2
Manual Control Button
4

PR730
No.
Parts Name No.
Parts Name
□
A
Body
○
3
Chain Ring
□
B
Incline Base
○
4
Anti-Slippery Pad
□
C
Fence
○
5
Incline Adjust Lever
○
1
Power Switch/Electric Current
Protector/Outlet
○
2
Control Console
Accessory parts
PR700 / PR710F / PR720F
5
No.
Accessory Parts Name
Q’ty
【1】
Front fence 1
【2】
Left & Right fence 1 EA.
【3】
Power Cable 1
【4】
Screw M6x18L (short)
4
【5】
Screw M6x35L (long)
2
【6】
L-Wrench_4mm 1
【7】
T-Wrench_5mm 1
【8】
Remote Controller 1
【1】
【2】
【3】
【4】
【6】
【7】
【5】
【8】
PR720E / PR725
PR730
※ Please ensure all quantities of accessory parts are correct before assembly.
6
No.
Accessory Parts Name
Q’ty
No.
Accessory Parts Name
Q’ty
【1】
Left Fence 1
【7】
L-Wrench_5mm 1
【2】
Right Fence 1
【8】
T-Wrench_5mm 1
【3】
Rope Hanger 1
【9】
Remote Controller 1
【4】
Power Cable 1
【5】
Screw M8x15L 12
【6】
Washer M8x1.6T 12
No.
Accessory Parts Name
Q’ty
【1】
Front fence 1
【2】
Rear fence 1
【3】
Side Fence 8
【4】
Control Console 1
【5】
Power Cable 1
【6】
Screw M6x40L 2
【7】
Screw M8x40L 16
【8】
Screw M8x25L 4
【9】
Screw M4x8L 8
【10】
L-Wrench_4mm 1
【11】
L-Wrench_5mm 1
【12】
T-Wrench_6mm 1
【13】
Bushing 2
【11】
【10】
【1】
【2】
【3】
【5】
【6】
【8】
【4】
【7】
【9】
【1】
【2】
【3】
【4】
【5】
【8】
【9】
【6】
【12】
【7】
【13】

Outlet / Electric Current Protector / Power Switch
Manual Control Button
Manual control button & Power switch illustration
IR remote control instruction manual
Remote control button key illustration
7
E.SW
Stop motor emergent. Turn on
power switch to restart the
machine.
START
To start the machine
STOP To stop the machine
SPEED UP
Speed up set up(1-12Km)
SPEED
DOWN
Speed down set up(12-1Km)
Outlet Input AC Power
Electric
Current
Protector
Cut off the AC Power while over
current
Power
Switch
[ O ]=Power OFF, [ | ]=Power ON
No.
Name Definition
1
Red LE Light
Infrared signal light
2
[ RESET ] Stop machine and go back to set up
mode
3
LC Window
Time: count up/down 00 ~ 99 min.
Speed: up/down 00.0 ~ 99.9 km/h
(Imperial system will not shown)
4
IR transmitter
Infrared rays transmittance
5
[ TM ] To set up time
6
[ CLR ] Clear time setting, and
back to set up
mode
7
[ START ] Start the machine
8
[ STOP ] Stop the machine
9
[ MO E ] Speed / istance display exchange
10
[ SP ] Speed setting
11
[ S.KEY ] Push [S.KEY] + [MO E] to set up
remote control channel
Electric Saving Mode
The LC display will access into
electric saving mode if no setting
over 1 minute. Push any key to go
back the normal display besides
[RESET] key
Battery NO. 4 1.5V Alkaline Battery x 2 pcs
Infrared rays receiving range
IR receiving range achieved 180∘
both left and right sides.
Remote control operation
8
[START]
[
SPD]
Speed Setting
(1.0~12.0Km)
[STOP]
Stop automatically
when time reached
99:59 min.
[
TM]
Time Setting
(00:00~99:00min.)
[START]
[
CLR
]
Time resetting
Regular Mode
(W/O Time Setting)
Time Setting Mode
[
RESET
]
[
RESET
]
After p
ush [STOP] key, the long beep
sound will come out after 3-
6 seconds.
Then you can restart the machine.
[
SPD
]
Speed Setting
(1.0~12.0Km)
[STOP]
Stop automatically
when time reache
s
00:00 min.
After p
ush [STOP] key, the long beep
sound will come out after 3-
6 seconds.
Then you can restart the machine.

Manual control console ––for PR730 only
No.
Name Definition
1
LE Window Time: count up/down 00:00 ~ 99:59 Min. (Imperial system unit will not shown)
2
Time Up/ own Time setting
3
Emergency Stop
To stop machine emergency
4
Speed Knob Speed setting
Control console operation ––for PR730 only
9
Regular
Mode
[E.STOP] – Stop PetRun treadmill immediately. Push again to reset
START
[
Spe
ed Up/Down
]
Speed Setting
(1.0~16.0Km)
Stop automatically
when time reache
s
99:59 min.
.
[
Time
Up/Down
]
Time Setting
(1.0~99.0Min.)
Assembly Procedure
PR700/PR710F/PR720F
PR720E/PR725
10
[
step
1]
Insert front fence
[step 2]
Upright the PetRun,then fasten screw
(M6x18L) by L-wrench_4mm。
[
step
3]
Insert both left & right fence
[
step
4]
Fasten screw (M6x18L) by
L-wrench_4mm
[
step
5]
Fasten screw (M6x35L) by
L-wrench_4mm
[
step
1]
Use L-wrench_5mm, screw(M8x15
L)and
washer(M8x1.6T)
to fasten both left and
right fences on the side rail.

PR730
11
[
step
2
]
Use L-wrench_5mm, screw(M8x15L)
and washer(M8x1.6T) to fasten the rope
hanger on the top of both side fences.
[
step
3
]
Use L-wrench_5mm and screw (M8x40L) to
fasten the side fences.
[
step
2
]
Fasten screw (M8x25L)
by L-Wrench_5mm
[
step
4
]
Use L-wrench_4mm, bushing and screw
(M6x40L) to fasten the plate of control
c
onsole on the left side of
front
fence
.
[
step 6
]
Plug the cable connector.
[
step
1
]
Insert both front fence
and rear fence.
[
step 5
]
Plug the cable connector and use Phillips
screw (M4x8L) to fasten the control
console.
To Start
1. Plug the power cord into the correct voltage outlet.
2. Turn on the power switch (the power switch light will turn on)
3. Allow the dog to stand on the running belt.
4. Push [START] button on begin exercise, and gradually adjust speed at a pace suitable for your
dog.
5. Push [STOP] button to stop when finished exercising.
Suggestion:Gradually decreasing speed will allow your dog sufficient time to calm down
(e.g., 6 Km-3 Km-Stop
6. Refer to page 3 for additional notes.
Running belt adjustment
• If the running belt slants to one side or the other after a period of usage, it will need to be
adjusted to move it back to the middle position.
1. Turn on the power switch.
2. Increase the speed to 4 km/hr and maintain that speed for 2~3 minutes, then start to adjust.
12
If the running belt moves to the
left side, please use attached
6mm T wrench to adjust the left
side screw, turning clockwise,
by 1/4 turn each time, until the
running belt moves to and
remains in the middle.
If the running belt moves to the
right side, please use attached
6mm T wrench to adjust the
right side screw, turning
anticlockwise, by 1/4 turn each
time, until the running belt
moves to and remains in the
middle.
If the running belt is loosen,
please use attached 6mm
T wrench to adjust both the left
and right side screws, turning
clockwise, by 1/4 turn each time
until the running belt is tight and
remains is the middle.
Rear rubber feet adjustment
If the floor do not flat, adjust the rubber feet by turn
anticlockwise until whole machine stable.

[
S
tep 1]
Lift up the machine from end side by both hands
[Step 2]
Pull out the lock pin from position B and
then insert it into position A.
Folding storage ––for PR710F/PR720F only
Unfolding ––for PR710F/PR720F only
13
Moving ––for PR710F/PR720F only
[Step1]
Have the machine in level position, and
switch the fixing locker to position [Lock].
[Step 2]
Lift up the machine at end side by
both hands and it will be easy to
move.
[Step
1
]
Pull out the lock pin from position A and
then
insert it into position B.
[Step
2
]
Pull down the machine, and it will drop to
level position automatically.
Incline ––for PR720E/PR725/PR730 only
PR720E/PR725 PR730
PR720E/PR725 PR730
14
[Step
1
]
P
ull
out
the
incline adjust lever.
[Step
2
]
Adjust the
height by keep pull out the adjust lever, and release the lever at required position.
(Stepless)

Specification
Specification Unit
PR700
PR710F
PR720F
PR720E
PR725
PR730
Horse Power HP 1 HP 1.25 HP
1.5 HP
Input Voltage V 100 / 110 / 200 / 220 VAc (Choose one)
Max Input Current A 10 A (max)
oggy Length limit
Cm
60 80 100 100 130 150
oggy Weight limit
Kgs
20(max)
40(max)
60(max)
60(max)
80(max)
120(max)
Running Zone Cm
41x73.5
41x107
41x132.5
41x132.5
41x182.5
65x232
Running Speed Km/Hr
1~12 1~16
Foldable Function No Yes Yes No No No
Incline Function No No No Yes Yes Yes
Remote Control Yes (Infrared Rays) No
oggy Chain Holder
Yes
Safety evice Emergency Switch/Safety Locker (Foldable model only)
Control isplay LC LE
Operation Switch E.SW / START / STOP / SPEE (Up/ own)
Model Size Cm
53x110x38
(W) (L) (H)
53x156x41
(W) (L) (H)
53x183x41
(W) (L) (H)
53x170x103
(W) (L) (H)
53x220x121
(W) (L) (H)
84x251x136
(W) (L) (H)
Cm
63x119x27
(W) (L) (H)
63x164x30
(W) (L) (H)
63x191x30
(W) (L) (H)
63x178x39
(W) (L) (H)
63x228x39
(W) (L) (H)
92x260x40
(W) (L) (H)
Packaged Size
Cu.Ft.
7.15 10.95 12.75 15.44 19.78 33.79
Net Weight Kgs
28.5 37.5 45 54 62 124
Gross Weight Kgs
37 50 60 67 79 155
Safety Standard CE Certification
Warranty year
1 year
Manufacturer:
IWATE INTERNATIONAL DEVELOPING CO., LTD.
6-29, Sec.2, ah Fuh Road, Tan-Tzu ist, Taichung City, Taiwan, R.O.C.
E-mail: iwate.head@msa.hinet.net Website: www.petrun.com.tw
TEL: 886-4-2534-2823 FAX: 886-4-2534-2824
15
This manual suits for next models
5
Table of contents
Popular Treadmill manuals by other brands

NordicTrack
NordicTrack T15.0 Treadmill Manuel de l'utilisateur

Eurosport Fitness
Eurosport Fitness Runfit 99 owner's manual

Weslo
Weslo CADENCE 850 WETL85061 user manual

Landice
Landice L Series instructions

Christopeit Sport
Christopeit Sport TM 1 Go Assembly and exercise instructions

NordicTrack
NordicTrack C1800S NTTL99120 user manual