Pharmanex S3 User manual

BIOPHOTONIC SCANNER
User Manual

BIOPHOTONIC SCANNER
Table of Contents
SAFETY INFORMATION
IMPORTANT TO KNOW
SETUP YOUR S3
THE S3 SCANNER APP
SCAN TAB
RECORDS TAB
REPORTS TAB
SUPPORT TAB
VARIABILITY
TIPS AND TRICKS
FAQ
TECHINCAL SPECS

HANDLING
Warning: Failure to follow these safety instructions could result in fire, electric shock, other injuries,
or cause damage to the S3. Read the entire manual and all safety instructions before using the S3
to ensure safe and proper use.
This Scanner is a highly sensitive scientific quantification instrument. Always handle it with care.
ELECTRICAL WARNINGS
Water and Moisture: To reduce the risk of electric shock, do not expose the S3 to rain or moisture.
Do not use the S3 near water sources such as bathtubs, wash bowls, sinks, laundry machines, wet
basements, swimming pools, or other receptacles that contain liquids. Unplug the device from
the electrical outlet immediately if liquids are spilled on or near the S3 while it is connected to its
power cord. If water damage is present, please contact Technical Support. If the S3 is not plugged
in but is operating on battery power, do not touch the device and contact Technical Support for
instruction.
Servicing: Do not remove the display cover or bottom of the S3 or attempt to repair the device
yourself. Disassembling the device may damage it or cause injury to you. There are no user-
serviceable parts inside. Only qualified Pharmanex technicians should perform service on the
Scanner.
Power Cords and Power Supplies: Do not plug any other power cord or power supply into the
S3 except those provided with this unit. Do not overload wall outlets or extension cords. The
grounding-type power plug will only fit into a grounding-type outlet with matching openings. Use
only grounding type extension cords with the S3. Only use factory supplied power cords.
Temperature: The S3 should never be placed near or over a radiator, heat register, or any other
heat source. Avoid leaving the device in an overly hot or cold environment for prolonged periods
of time. The optimal storage temperature range for the device is between 5 and 40 degrees
Celsius (40 to 110 Fahrenheit).
GENERAL WARNINGS
Eye Safety: The S3 uses LEDs (Light Emitting Diodes) as a source of light. LEDs are found in
household lighting, electronics, and common flashlights. While they are not generally thought of
as harmful to the eye, you should avoid staring directly at LEDs or any bright source of light at
close range for prolonged periods of time.
Safety Information
SAFETY INFORMATION

Sensitive Optical Components: The optical components of the S3 can be damaged if exposed
to excessively bright light. Do not scan reflective surfaces such as mirrors or metallic objects that
might reflect light back into the S3. Do not scan any bright objects of any kind. Do not point the
S3 at bright room lights or the sun. Cover the Scanner nose with the dark cap when the device
is going to be located in a brightly lit area, and any time the device is not in use for an extended
period of time. Ignoring these recommendations can damage the sensitive optical components
inside the S3.
Choking Hazard/Small Parts: The S3 comes with two small caps to protect the sensitive optical
components. These small parts could represent a potential choking hazard. Please keep the S3 out
of the reach of children.
Usage Limitations: The unit must not be used or operated in any manner other than that specified
by Nu Skin. Failure to operate the unit under these conditions may impair the device’s safety
features.
SERVICING
Scanner operators and unapproved third parties should never service the S3. The S3 should never
be opened or disassembled except by trained Pharmanex technicians. If the S3 enclosure ever
cracks or breaks, do not attempt to access the internal components or circuitry. Exposure to the
circuitry could increase the risk of fire or electric shock. To avoid any risk of shock, turn o the
Scanner, disconnect the unit from any power source immediately (if applicable) and return the S3
to Nu Skin for servicing.
NOTE: If the enclosure has been tampered with in any way, any part of the enclosure has been
deliberately removed, or there is evidence of attempts to remove the enclosure, the S3 warranty will be
void. The Scanner lease holder will also be held responsible for the full cost of the S3.
Conditions Requiring Service: If any of the following conditions occur, turn o and unplug the S3
from the wall outlet (if applicable) and call Technical Support.
• The power supply cord or plug is damaged.
• Liquid has been spilled on, or objects have fallen on (or into) the device.
• The Scanner is damp or wet from condensation or exposure to rain or water.
• The S3 does not operate normally when you follow regular operational instructions.
• The Scanner has been dropped or the cover has been damaged.
• The S3 exhibits a distinct change in performance, such as the inability to perform basic functions.
• The Scanner displays an error code or graphic even after rebooting several times.
• The S3 Scanner app instructs you to call Technical Support.
SAFETY INFORMATION

Important to Know
PURPOSE
The Pharmanex BioPhotonic Scanner S3 is an instrument that quantifies carotenoid levels in the
skin. It is not intended to be used for medical purposes. It is not a medical device or a medical
diagnostic tool of any kind and is not intended to diagnose, treat, mitigate, cure, or prevent any
disease or condition or to aect the structure or function of any part of the body.
CALIBRATION
All precision scientific instruments require calibration. Most are calibrated daily and some are
calibrated after each quantification. The first time you connect the app to the S3, the device will
perform a self-executing calibration scan. Once the calibration scan is complete, you will be able
to use the device normally. The S3 will need to perform a self-calibration scan once every 24 hours.
Refer to the “Connect to the S3 Scanner App” section for more information about calibration
scans.
OPERATING TEMPERATURE
The environmental conditions in which you store and operate the Scanner can aect the device.
The Scanner is designed to work in ambient temperatures between 10 and 35°C. The optimal
scanning temperature is 20 to 25°C. The S3 should not be stored or transported in temperatures
greater than 40°C or lower than 5°C. Leaving the S3 in a car on a warm or cold day can aect its
performance or damage the device.
If the Scanner has been stored at a temperature dierent than the operating conditions described
above (such as a car overnight), you must allow sucient time for the S3 to acclimate to the
correct operating environment before setup and calibration. Please allow about 30 minutes for the
S3 to adjust to the scanning environment before plugging it into a power outlet or attempting to
calibrate it.
TRAVELING WITH THE S3
When traveling with the Scanner, make sure to store it in the the factory provided case or a similarly
padded and secure case. If transporting the S3 by air, bring it along as carry-on luggage. This
minimizes the potential for added shock, jarring, and exposure to extreme temperatures associated
with checked baggage. Temperature extremes freezing or above 40°C will damage the fragile
electronics contained in the Scanner. Remember that the S3 is an extremely sensitive scientific
device and should always be treated carefully.
IMPORTANT TO KNOW

CHARGE THE SCANNER
The Scanner should be plugged into a grounded electrical outlet and charged using the included power supply for
at least 1 hours before you attempt to operate the S3.
Plug one end of the S3 power cord into the back of the Scanner and plug the other end into a grounded outlet. The
power charging LED light on the back of the Scanner will illuminate green, indicating that the S3 is charging. The
Scanner will perform up to 600 scans on a full charge.
INSTALL THE S3 SCANNER APP
In order to use the S3 BioPhotonic Scanner, you will need to install the S3
Scanner App on an iPad, iPhone, or Android phone (coming soon). The app
can be found in the Apple Store or the Google Play store by searching for
“S3 Scanner”, “Pharmanex Scanner”, or “Biophotonic Scanner”. The S3 Scanner
App is not designed to work with Android tablets. Install the S3 app on your
device and agree to give the app permissions.
An internet connection is needed for the app’s many new features. The device
you use with the S3 app should be connected to the internet either by a cellular
data plan or by Wi-Fi. If the app is not connected to the internet, then you will
not be able to log in. Follow the instructions that came with your device to make
sure there is an internet connection before trying to log in to the S3 app.
LAUNCH THE S3 SCANNER APP
After the S3 app has finished installing, load the app by tapping on the S3
Scanner App icon. The icon should be located on your device’s main page, or
in the app list.
Setup Your S3
POWER
BLUETOOTH RESET
POWER INLET
Check the contents of the S3 box
and ensure there is:
An S3 Biophotonic Scanner
A black charging cable
(2) Caps
1
1
3
2
3
2
SETUP YOUR S3

LOG IN TO AN EXISTING ACCOUNT
The S3 app requires a user to log in. Users can log in using an existing NSE
account. If a new account is needed, please visit www.nuskin.com. To log in,
simply input the account email/ID and password into the text fields and then
tap the button.
v INTO THE APP?
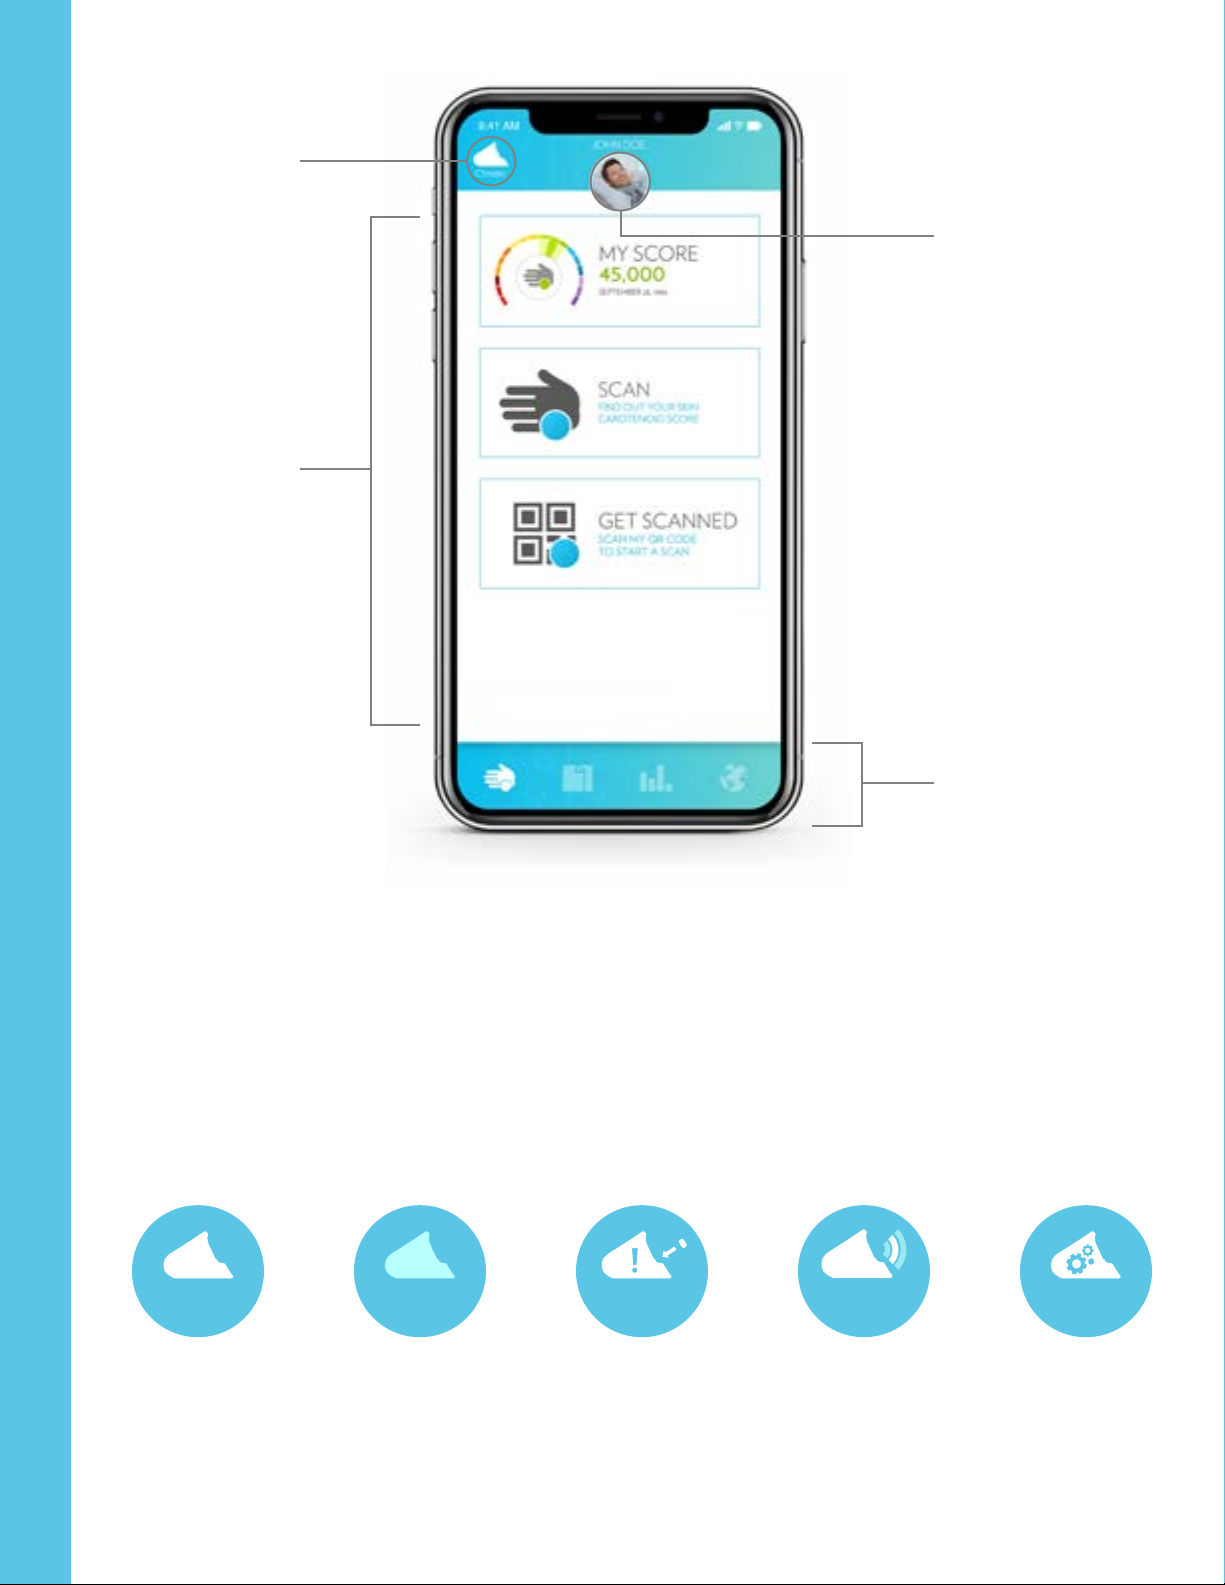
People who log into the S3 Scanner App will generally fall into two categories:
1) S3 Scanner operators and 2) individuals that have been scanned (scanees).
The S3 Scanner operator is the primary leaser/owner of the S3 Scanner device.
When scan operators log into the app, they will be able to scan individuals
and access a range of reports and tools related to the Scanner program.
Scanees are individuals who want more details about their carotenoid
score and who may want to purchase products. They must have an existing
customer/distributor account in order to log into the app and access their
scan data. A scanee who logs in with an account can use the app to rescan,
track their score over time, make dynamic score comparisons, and purchase
Scanner certified products.
Scanees do not necessarily need to create an account to be scanned by the
BioPhotonic Scanner, however having an account helps scanees track their
score progress and makes scanning each month more convenient.
POWER ON THE S3
The S3 operates using its rechargeable battery. Once the battery is charged, the S3 can be unplugged from the
power supply and be used as a stand-alone device for several hours of constant use.
Power on the S3 by pushing the power button on the back of the Scanner. The S3 should briefly show a blue power-
up icon, and then the “S3” icon.
WARNING: Make sure that the cap is covering the S3 nose before turning on the S3. The S3 will not fully activate
unless it detects the cap.
ACTIVATE BLUETOOTH
Press and hold the Bluetooth button on the back of the Scanner (to the right of the power button) for three
seconds until it starts to blink. The blinking blue LED indicates the S3 is now broadcasting a Bluetooth signal so
it can connect to other devices. The next time you turn on the Scanner, you do not have to press the Bluetooth
button again. It is no longer necessary for subsequent connections.
CONNECT TO THE S3 SCANNER APP
The app will prompt the user to connect to the Scanner via Bluetooth when trying to perform any Scanner functions.
The app will display a page that says, “Connect to a Scanner” with arrows beneath.
Make sure the Bluetooth button on the S3 is blinking and then drag down the arrows on the touchscreen of the app.
This tells the app to search for S3 Bluetooth signals.
SETUP YOUR S3

SETUP YOUR S3
If the CS number of your S3 is not listed, pull down the arrows again.
Interference may sometimes prevent initial detection.
The app will display a list of detected Scanners. Tap on the S3’s CS number
to connect. A small white icon of the Scanner and its CS number should
now be visible in the upper left corner of the app. The S3 and the app are
now linked.
NOTE: The first time you connect to your Scanner, the S3 will perform a short
calibration scan. The Scanner icon in the app will show that it is working, and
the back of the S3 display will show the remaining duration of the calibration.
The Scanner will perform similar calibration scans once every 24 hours when
connecting to the app.
After the S3 and the app have been linked, they will automatically try to
detect and communicate with each other when activated unless they are
disconnected in the app.
IMPORTANT: Only one S3 can be linked to the app at a time.
SOME INFORMATION ABOUT BLUETOOTH
Bluetooth and Wi-Fi enable dierent fuctions. Wi-Fi allows a device to
access the internet. Bluetooth is a local signal between two devices.
The Bluetooth link between the S3 and the app will have a maximum range
of about 50 meters. Interference from various sources can decrease the range of a Bluetooth connection. If the S3
and the app are too far away from each other, the connection will fail, and they will need to be reconnected.
TURN OFF THE S3
To turn o the S3 Scanner, do the following:
1. Exit the app by tapping the phone or iPad’s home button.
2. Turn o the S3 by pressing the power button on the back. Do not press the Bluetooth button when powering
down. It is no longer necessary.
3. Place the dark cap on the nose to prevent damage to the electronics.
4. Store the S3 in its carrying case when it is not in use.

The ScannerApp
INTRODUCTION
The S3 Scanner App is the primary interface through which operators will use the S3. The app contains many useful
and convenient features and was designed to be as simple as possible. Please read these instructions carefully for
more information about this powerful app.
COMMON APP FEATURES
There are several features in the S3 app that can be found on multiple screens.
BACK ARROW
Tap a back arrow icon to
return to a previous screen
SHARE
Tap to share information
on a social media account
PROFILE
Tap your profile to view
user profile information
NOTES
Tap to create or edit notes
on a scan or account
INFORMATION
Tap to receive instructions
or training in the app
THE SCANNER APP
THE LANDING PAGE
After logging in and connecting to the S3, the app will take the user to the main page with several tabs along the
bottom. By default, the app will start with the Scan Tab active. There are some common elements accross all the
tabs in the app:

SCANNER ICON
USER MODULES
USER ACCOUNT
HOME TAB BAR
Each tab of the app will show dierent user modules in the main window, but the options at the top and bottom
will stay the same.
THE SCANNER ICON
The SCANNER ICON shows the current status of the S3 along with the CS number of the Scanner that is
currently connected to the device. Tapping on this icon opens a screen that allows you to either disconnect from
the Scanner, or to perform a 30-second calibration scan. Scanner status indicators can include the following states:
CONNECTED
The app is
connected to the
S3 Scanner
DISCONNECTED
The app is
disconnected from
the S3 Scanner
PLACE CAP ON
Place the dark cap
on the probe to
calibrate S3 Scanner
CONNECTING
The app is trying to
connect to the S3
Scanner
CALIBRATING
The Scanner is
performing a
calibration scan
THE SCANNER APP
CS70001 CS70001 CS70001 CS70001

THE USER ACCOUNT ICON
The user icon shows which account is currently logged into
the app. The account dictates who receives credit for scans
that are performed with the S3, whose purchased scan credits
are used for scanning, and which account the scores are
recorded into.
Tapping on the user account icon opens a menu that allows
the user to customize their user profile, set the app’s language,
change their notification options, or log out of the app.
User Profile
The User Profile option opens a screen with a
grid of demographic descriptions. Tap on each
of the options to fill out the profile information.
These data are anonymously contributed to
the Scanner’s database. The knowledge in the
database allows the app to perform dynamic
comparisons, score reports, and many other
useful features. The more information, the
better the app gets!
Options that do not have information will be
grey. Options which have been filled out will
be displayed in blue. Tap the back button after
entering all the profile information.
Language
Tapping the Language icon allows you to select
the language that the app communicates in.
Log Out
Tap the Log Out option to disconnect the current account from the app, or to log in with a dierent
account.
THE SCANNER APP

THE SCANNER APP
THE HOME BAR
The bottom of the app window shows a series of four icons in a bar. These include the Scan Tab, the Records Tab,
the Reports Tab, and the Support Tab. Tapping each of these dierent tabs will open a new set of user modules
in the main window of the app. The Home Bar will be your primary method of navigating the app’s functions and
using your S3.
SCAN
TAB
RECORDS
TAB
REPORTS
TAB
SUPPORT
TAB

THE SCAN TAB
The Scan Tab
The Scan Tab contains the modules that allow you to scan with your S3. It will also allow you to view
your own personal score and scoring history/trend. Tapping on the Scan Tab icon will display the
scanning modules available to you.

MY
SCORE
45
,
000
SEPTEMBER
28
,
208
MY
SCORE
45
,
000
SEPTEMBER
28
,
208
MODULE
The My Score module is where a person goes to see the history of their his/her own personal
scans. This module will not display any content until the user’s account has at least one completed
scan. There are several features in this module:
THE SCAN TAB
My Score
Tapping the My Score module takes the user to the “My Last Score” screen. The user’s last score is displayed
on the Scanner scale in the center of the screen. The section of the scale with the user’s last result is
highlighted. Other sections of the scale can be highlighted by tapping on them, but the user’s last score will
always be indicated on the scale.
Beneath the factor icons are five buttons that allow you to learn more about the scan.
Compare
The COMPARE button at the bottom takes the user to the dynamic comparison tool. Dynamic comparisons
are a powerful tool which show how the user’s last Scanner score compares to dierent demographic groups.
As more users fill in their profile information, it will become more powerful.
The graph in the main window shows the user’s most recent Scanner score and the date it happened. This
graph can be dynamically changed by adding new parameters using the boxes below. For example, adding
a “Male” parameter box will show the user’s result against the approximate average score for all other male
scans in the database.
Users can stack dierent parameter boxes to obtain more intricate graphs. For example, they could see how
their score compares to female who don’t take dietary supplements and who only eat 2 servings of fruits and
vegetables.
Data is compelling when used correctly. Experiment with the dynamic comparison options to help others
make important decisions that can improve their scores. Tap the back arrow to return to the My Score page.
Trend
Tap the TREND button to view a history of the scanee’s S3 scans. The Scan History is a bar graph that
shows the five most recent scans for the scanee. The scanee can use this to track their progress and watch as
S3 certified products improve their score. Below the Scan History is a Year Trend line graph of the scanee’s
averages over the past 12 months. Tap the BACK ARROW to return to the My Score page.
Scan Number
Tap the SCAN NUMBER button to toggle between showing the factor icons and the scan number.
MY SCORE
45,000
September 29, 2018

Shop
The SHOP button will take the user to a webpage where they can purchase products from Nu Skin Enterprises.
The shop page will vary depending on the requirements of your local market.
Rescan
The user can tap the RESCAN button in the My Score screen to initiate a new scan for themselves and add
it to their Scanner history. Performing a rescan will use a digital scan credit.
THE SCAN TAB
52
,
000
66
,
000
48
,
000
38
,
000
25
,
000
15
,
000
52
,
000
66
,
000
48
,
000
38
,
000
25
,
000
15
,
000

The Scan module is the primary scanning function for most operators. Normal Scans are one-time
events and are appropriate when a user is logged into the app with his/her own account and wish
to store results for rescans and scan groups.
Here you can choose to select a scanee that you’ve previously scanned, to scan another app user’s
QR code, or to create a new scanee.
NOTE: you can purchase additional scan credits by tapping the number in the top right corner and
following the checkout process.
The people in the list shown on this screen are scanees eligible for a rescan. Selecting one will
initiate a scan for that individual. You may also identify the scanee using the following methods:
MODULE
THE SCAN TAB
SCAN
FIND
OUT
YOUR
SKIN
CAROTENOID
SCORE
QR Code ID
The bottom of the screen shows two buttons. The QR Code button will use the device’s camera to
scan a QR code to identify the person being scanned. Each scan account has a QR ID associated
with it and can be accessed by tapping the “Get Scanned” module.
Create a New Scanee Account
Tapping the New Scanee button takes the app to a screen where the operator can input a name
and an email address. Entering this information creates a new account for the scanee, allowing
them to be scanned for the first time.
Scanee accounts created with this button will only have the name and email address at first.
Scanees can add more information to their user profile by logging into the app with his/her own
iPhone or iPad.
After choosing a scanee, the app opens a page where the Scanner is waiting to scan. The Scanner
scale will display in the center of the page, and the app will say that it is “Waiting.”
Remove the cap from the Scanner nose and have the scanee place their palm on the probe. The
Scanner will detect the hand and then say it is “Initializing.”
Once the Scanner it ready, it will start the scan and say “Scanning”. If the user leaves their hand on
the Scanner properly, the S3 will perform the scan and display the result.
SCAN
Find out your Skin
Carotenoid Score

CURRENT SCAN
GROUP
CHANGE SCAN
GROUP
SCANEE PROFILE
During a scan, the operator
can tap on the user’s profile
icon at the top of the screen to
add demographic information
if desired. While entering
demographic information,
the scan’s progress will still be
displayed in a small Scanner
circle in the upper left of the
screen. Tap on the Scanner circle
to return to the scan progress
screen.
The scan result will be accompanied with some
buttons along the bottom. Tapping on the
FACTORS button will briefly discuss the dietary
habits, and supplementation intake that are
generally associated with the Scanner score. You
may also tap within each color zone to see how the
factors compare accross zones.
The COMPARE button takes you to the dynamic
comparison tool to see how this score compares to
certain demographcs.
The TREND button will display the history and
trend graphs.
The SHOP button will take you nuskin.com to start
a purchase.
At this time you may also add notes to the scan
record for reference later. The notes button is
found at the top right corner of the results page.
Tap DONE when you are finished with the session.
THE SCAN TAB

MODULE
DEMO
SCAN
FIND
OUT
YOUR
SCORE
BEFORE
SININ
U
DEMO
Tapping the Demo Scan module will open a screen where the app is waiting to begin a scan.
Demo scans are one-time scans that do not initially record any user information and cannot be
used for rescans. However, Demo Scan results will be added to the current scan group.
After tapping the Demo Scan module, the app will be “Waiting” for a scan to begin. Remove the
cap from the Scanner nose and have the scanee place their palm on the probe. The Scanner will
detect the hand and then conduct a single 30-second scan and display the result.
Once the scan is finished, you can perform another Demo Scan immediately by tapping the Scan
button at the bottom. You can also exit back to the Scan Tab by tapping the check icon.
There is also a “Notes” button which allows you to append a note about a specific scan result.
Notes are useful when someone may be interested in learning more information at another time.
Any notes can be viewed later in the Demo Scans section of the Records tab.
It is also possible to convert a Demo Scan into a full Scan result by tapping the Create Account
button when the demo scan is finished. Doing this will create a new scanee account for the Demo
Scan just as if the scan was performed using the Scan module. This option is useful when a person
begins their scan experience in the Demo Scan module, but desires to buy products or set up an
ADR after the scan.
There is no limit to the number of Demo Scans an operator can perform. Demo Scans are primarily
meant to be used in large group environments when a Scanner owner/operator wishes to scan
people quickly without gathering detailed information about them.
THE SCAN TAB
DEMO SCAN
Find out your Skin
Carotenoid Score

MODULE
The Multi-Scan is a new option for scanees who wish
to obtain a scan result with less variation than is usual
in a normal 30-second scan. Mutli-Scans will perform
a 90-second sequence of three dierent scans which
are averaged. This will generate a score that is less
vulnerable to outliers or normal variation and is therefore
more representative of a person’s “true” carotenoid score.
Tapping on the Multi-Scan module causes the app to
behave just as if a person had tapped on the Scan module.
The user will move to the “Who Are We Scanning” page
to either select from the existing user list, or to create a
new scanee.
Once the app moves to the “Waiting” page, the Scanner
will show a triple set of countdown timers in the center
of the Scanner scale along with three hand icons in the
center. These represent the three scans that the S3 will
perform during the Multi-Scan.
Remove the dark cap and place the scanee’s hand on
the probe normally. However, unlike a normal scan the
subject should KEEP their hand on the S3 until all three
scans are finished. This will take 90 seconds as opposed
to a normal scan which only takes about 30 seconds.
During the Multi-Scan, the operator can tap on the profile icon at the top of the screen to add
demographic information. The scan’s progress will still be displayed in a small Scanner circle in the
upper left of the demographic screen.
Once all three scores are recorded, the app will average the scores to provide a final score. The
user can tap on the three-hand button to see the three individual score results that went into the
calculation of the Multi-Scan score.
Multi-Scan scores are best for people who want a less variable quantification of their carotenoid
values. All scientific quantification contains some inherent variation. The THV scan, combined
with proper scanning methods, will have the lowest amount of variation that the S3 instrument can
achieve outside of lab conditions.
THE SCAN TAB
SCAN
FIND
OUT
YOUR
SKIN
CAROTENOID
SCORE
MULTI-SCAN
Find out your Skin
Carotenoid Score

MODULE
GET
SCANNED
SCAN
MY
QR
CODE
TO
START
A
SCAN
THE SCAN TAB
The Get Scanned module provides an app user with another method of identification while
getting scanned. A scanee can download the app onto their personal device, login with their
account credentials, and then use the Get Scanned module to display a unique QR code to the
operator performing the scan.
The Scanner owner/operator can then scan the scanee’s QR code using the QR SCAN button
when performing a scan.. The app will recognize the code and assign the scan to the account.
The Get Scanned module makes scanning more convenient, completely replacing the use of scan
cards and printed barcodes.
NOTE: Scans performed on an S3 from the Get Scanned module will count towards waivers for the
lease holder of the S3 being used to scan.
GET SCANNED
Scan my QR code
to start a scan
Table of contents
Popular Personal Care Product manuals by other brands

Care of Sweden
Care of Sweden CuroCell IQ Cirrus Instructions for use

Insportline
Insportline Simbora user manual

gk-medizinmechanik
gk-medizinmechanik GK Magic 2000 user manual

Pebble Grey
Pebble Grey Leila 500.50.60 installation guide

REH4MAT
REH4MAT FIX-KD-15 instructions

Herdegen
Herdegen OPEN 3005 Series user manual