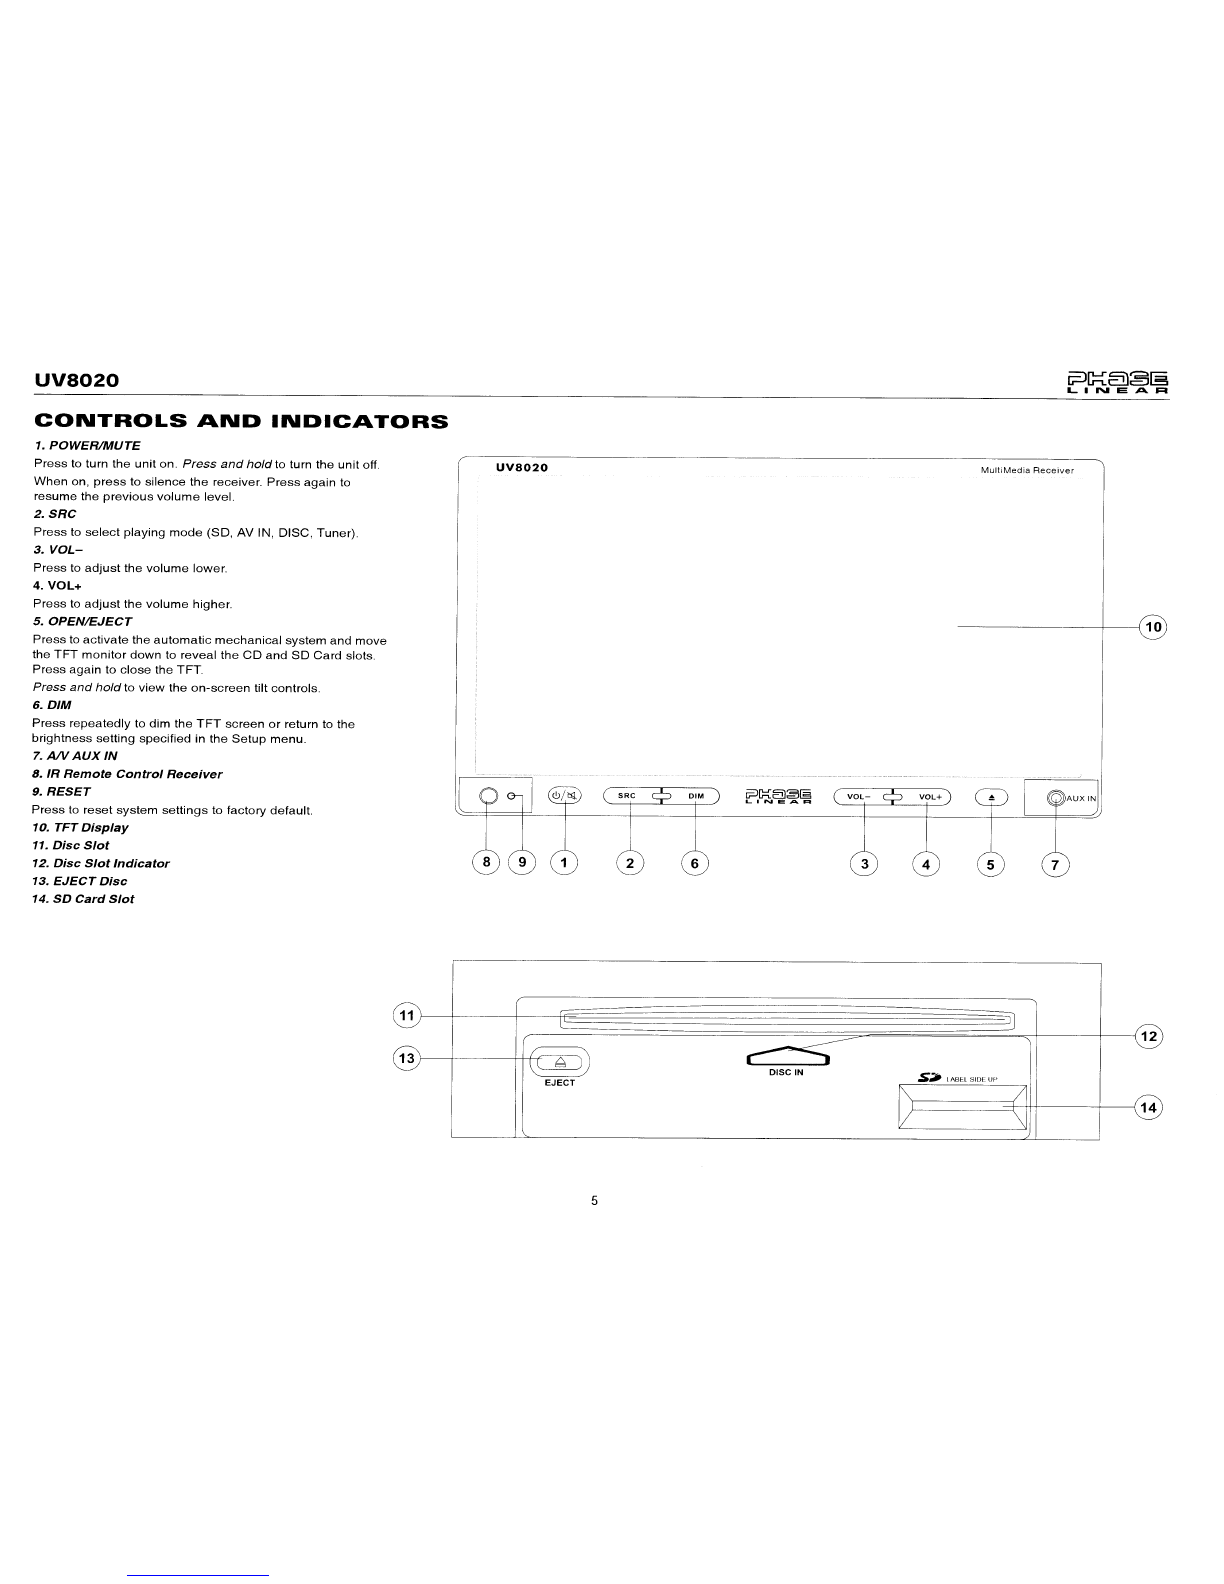
Phase Linear UV8020 User manual

Installation and Operation Manual

CONTENTS
Thank
you
for
choosing
a
Phase
Linear
product.
We
hope
you
will find
the
instructions
in
this
owner's
manual
clear
and
easy
to
follow. If
you
take
afew
minutes
to
look
through
it,
you'll
learn
how
to
use
all
the
features
of
your
new Phase
Linear
UV8020
Mobile
Multimedia
Receiver
for
maximum
enjoyment.
Preparation.................
1
Installation.....
..
2
Controls
and
Indicators...
..
5
Remote
Control.............
..
6
Using
the
TFT
Monitor
..
8
Operating
Instructions....
..
9
DVD
Setup
Menu
11
Tuner
Operation....
.. ..
12
DVDIVCD
Video
Operation
..
13
DVD/CD
Audio
Operation
..
16
MP3/WMA
Operation
..
18
Troubleshooting
..
21
Specifications............
..
23

UV8020
PREPARATION
Congratulations
on
your
purchase
of
the
Phase
Linear
UV8020
Mobile
Multimedia
Receiver.
It's
a
good
idea
to
read
all
of
the
instructions
before
beginning
the
installation.
We
recommend
having
your
Phase
Linear
UV8020
installed
by
a
reputable
installation
shop.
Features
DVD
Aspect
Ratio
-Full
and
Normal
Fast
Forward/Backward
-
2X,
4X,
8X
and
20X
Play,
Pause,
Stop,
Next
Chapter
and
Previous
Chapter
CDIMP31WMA
ID3
Tag
Compatible
Directory
Search
(MP3
/
WMA
Only)
Direct
Track
Access
via
Remote
Control
Burn
up
to
1500
MP3
and
WMA
Files
onto
a
DVD±R
/
RW
Random,
Repeat
and
Intro
Play,
Pause,
Stop,
Next
Track
and
Previous
Track
AM-FM
30
Station
Presets
(18
FM
/12
AM)
Auto
Stereo
/
Mono
Auto
Store
/
Preview
Scan
Auxiliary
Input
Front
Auxiliary
Input
(audio
and
video)
2.5mm
to
3.5mm
AlV
Cable
Included
2.5mm
to
RCA
AlV
Cable
Included
Chassis
2.0
DIN
(Import
/
ISO-DIN
Mountable)
Motorized
Slide
Down
LCD
Screen
7"
TFT
Active
Matrix
LCD
w/
Anti-Glare
Coating
336,960
Sub
Pixels
(1440W
X
234H)
Pixel
Pitch
-
0.107
X
0.370
Screen
Tilt
/
Angle
Adjustment
Beep
Tone
Confirmation
(On-OFF
Option)
General
44-Key
Infrared
Remote
Control
Two
Composite
Video
Outputs
for
Additional
Screens
Three
Preset
EO
Curves
Front,
Rear
and
Subwoofer
Line
Output
Programmable
Volume
Control
Rear
Camera
Input
(Normal
and
Mirror
Image
View)
Touch
Screen
Calibration
Mode
2VRMS
Line
Output
-
All
Channels
What's
in
the
Box
1.
Left
and
Right
Double
DIN
Mounting
Brackets
2.
Double
DIN
Sleeve
3.
Remote
Control
with
Battery
4.
Two
Custom
Cosmetic
Trim
Rings
5.
Screen
Cleaning
Cloth
6.
M5x6
and
M3x4
Screws
to
Mount
Radio
to
Brackets
7.
Speaker
Output
Harness
8.
Power
Input
Harness
9.
2.5mm
to
3.5mm
Accessory
Cable
10.
2.5mm
to
RCA
Accessory
Cable
Tools
and
Supplies
You
will
need
these
tools
and
supplies
to
install
your
UV8020:
Torx
type,
flat-head
and
Philips
screwdrivers
Wire
cutters
and
strippers
Tools
to
remove
existing
radio
(screwdriver,
socket
wrench
set
or
other
tools)
Electrical
tape
Crimping
tool
Volt
meter/test
light
Crimp
connections
18
gauge
wire
for
power
connections
16
-
18
gauge
speaker
wi
re
WARNING!
Only
connect
the
unit
to
a
12-volt
power
supply
with
proper
grounding.
WARNING!
Never
install
this
unit
where
operation
and
viewing
could
interfere
with
safe
driving
conditions.
WARNING!
To
reduce
the
risk
of
a
traffic
accident
(except
when
using
for
rear
view
video
camera)
never
use
the
video
display
function
while
driVing
the
vehicle.
This
is
a
violation
of
federal
law.
WARNING!
Never
disassemble
or
adjust
the
unit.
WARNING!
To
prevent
injury
from
shock
or
fire,
never
expose
this
unit
to
moisture
or
water.
WARNING!
Never
use
irregular
discs.
WARNING!
To
prevent
damage
to
the
mechanism
inside
this
unit,
avoid
impact
to
the
TFT
monitor.
WARNING!
Using
an
improper
fuse
may
cause
damage
to
the
unit
and
result
in
a
fire.
WARNING!
The
monitor
employs
an
automatic
motorized
mechanism.
To
prevent
damage
to
the
core
mechanism,
please
do
not
push,
pUll
or
swivel
the
monitor
manually.
Disconnecting
the
Battery
To
prevent
a
short
circuit,
be
sure
to
turn
off
the
ignition
and
remove
the
negative
(-)
battery
cable
prior
to
installation.
NOTE:
If
the
UV8020
is
to
be
Installed
in
a
car
equipped
with
an
on-board
drive
or
navigation
computer,
do
not
disconnect
the
battery
cable.
If
the
cable
Is
disconnected,
the
computer
memory
may
be
lost.
'!nder
these
conditions,
use
extra
caution
during
installation
to
avoid
causing
a
short
circuit.

INSTALLATION
ISO
DIN
Installation
This
unit
is
designed
to
fit
into
a
2.0
DIN
dashboard
opening,
found
in
many
imported
cars.
The
unit
has
threaded
holes
in
the
chassis
side
panels
which
may
be
used
with
the
original
factory
mounting
brackets
of
some
Toyota,
Nissan,
Mitsubishi,
Isuzu,
Hyundai
and
Honda
vehicles
to
mount
the
radio
to
the
dashboard.
Please
consult
with
your
local
car
stereo
specialty
shop
for
assistance
on
this
type
of
installation.
1.
Remove
the
existing
factory
radio
from
the
dashboard
or
center
console
mounting.
Save
all
hardware
and
brack-
ets
as
they
will
be
used
to
mount
the
new
radio.
2.
Remove
the
four
screws
at
the
front
of
the
radio
that
attach
the
mounting
sleeve
to
the
radio
chassis
(two
at
the
top
and
two
at
the
bottom).
Remove
the
Half
Sleeve.
3.
Remove
the
factory
mounting
brackets
and
hardware
from
the
existing
radio
and
attach
them
to
the
new
radio.
ISO
INSTALLATION
CAUTION:
Do
not
exceed
M5
X
6MM
screw
size.
Longer
screws
may
touch
and
damage
components
inside
the
chassis.
4.
Place
the
radio
in
front
of
the
dashboard
opening
so
the
wiring
can
be
brought
through
the
dash.
Follow
the
wiring
diagram
carefully
and
make
certain
all
connections
are
secure
and
insulated
with
wire
nuts
or
electrical
tape.
After
completing
the
wiring
connections,
plug
the
ISO
connectors
into
the
mating
sockets
on
the
rear
of
the
chassis.
Turn
the
unit
on
to
confirm
operation
(vehicle
ignition
switch
must
be
"on").
If
the
unit
does
not
operate,
re-check
all
wiring
until
the
problem
is
corrected.
5.
Mount
the
new
radio
assembly
to
the
dashboard
or
center
console
using
the
reverse
procedure
in
step
1.
CAUTION:
For
proper
operation
of
the
CD
player,
the
chassis
must
be
mounted
within
30°
of
horizontal.
Make
sure
the
unit
is
mounted
within
this
limitation.
NOTE:
It
is
the
end-users
responsibility
to
install
and
operate
this
unit
in
a
manner
In
accordance
with
loeal,
state
and
federal
laws.
The
PARKING
BRAKE
wire
MUST
BE
CONNECTED
as
directed
in
the
manual.
Installation
Using
Mounting
Sleeve
1.
Press
the
metal
levers
on
both
sides
to
remove
the
mounting
sleeve
from
the
radio.
2.
Install
the
sleeve.
a.
Install
adapter
if
necessary
(optional).
b.
Install
sleeve
into
adapter
or
dashboard
(use
only
the
supplied
screws).
Do
not
force
the
sleeve
into
the
opening
or
cause
it
to
bend
or
bow.
INSTALL
HALF
SLEEVE
c.
Locate
the
series
of
bend-tabs
along
the
top,
bottom
and
sides
of
the
mounting
sleeve.
With
the
sleeve
fully
inserted
into
the
dashboard
opening,
bend
as
many
of
the
tabs
outward
as
necessary
so
that
the
sleeve
is
firmly
secured
to
the
dashboard.
2
UV8020
DASHBOARD
3.
Use
the
M5
x 6
screws
(provided)
to
install
the
mounting
brackets
to
each
side
of
the
radio
using
the
holes
indicated
below.
NT
TO
N
~,@
.@
T N
TNN T
~,@
0
.@
T N
Install
Bracket
Here
"'6~"'''''''''':
Non-Deslgn!ne
:
~
SCrew
PrOh!?!~~
•••••••••
":
BRACKET
4.
Place
the
radio
in
front
of
the
dashboard
opening
so
the
wiring
can
be
brought
through
the
mounting
sleeve.

UVS020
CAUTIONI
Be
careful
not
to
damage
the
car
wiring.
The
4
tabs
on
the
trim
ring
will
snap
into
lour
holes
on
top
and
bottom
of
the
mounting
sleeve.
5.
Complete
wiring
as
illustrated
in
the
wiring
diagram
on
page
3.
Once
the
wiring
is
complete,
reconnect
the
battery
negative
terminal.
If
there
is
no
ACC
available,
connect
the
ACC
lead
to
the
power
supply
with
a
switch.
tS!J
:
.....
::··
r·····\
.-"
Replacing
the
Fuse
The
fuse
is
located
next
to
the
wiring
harness.
When
replacing
the
fuse,
use
a
new
15A
replacement
fuse.
Using
a
fuse
with
an
improper
rating
could
damage
the
unit
and
cause
afire.
•.•••••.•
't>
.............
MOUNTING
SLEEVE
.........
~
M3x4
SCREW
After
completing
the
wiring
connections,
turn
the
unit
on
to
confirm
operation
(ignition
switch
must
be
on).
If
unit
does
not
operate,
recheck
all
wiring
until
problem
is
corrected.
Once
proper
operation
is
achieved,
turn
off
the
ignition
switch
and
proceed
with
final
mounting
of
the
chassis.
1.
Connect
wiring
adapter
to
existing
wiring
harness.
2.
Connect
antenna
lead.
3.
Carefully
slide
the
radio
into
the
sleeve,
making
sure
it
is
right-side-up,
until
it
is
fully
seated
and
the
spring
clips
lock
it
into
place.
Using
the
Cosmetic
Trim
Ring
Two
cosmetic
trim
rings
are
packaged
with
the
UV8020
for
installation
flexibility.
The
UV8020
will
fit
into
most
import
dashes
with
little
or
no
modification
to
the
dash
board/caVity.
Some
US
domestic
vehicle
dashes
will
accept
a
Double-DIN
chassis,
but
there
is
usually
a
small
gap
between
the
radio
and
dash
piece
after
installation
is
complete.
In
this
case,
use
the
appropriate
trim
ring
to
conceal
any
gaps
that
may
be
present.
3

~L!J
Z:rt:
mlW
)(!n)
DIiil
~
1!!
2
"
2
)I
"
;:c
)I
s:
o
@
o
@
@
@
[
'"
..
'"
....
..
..
~
i
~
~
..
'¥G~EEN'(:)
WHITEIBLACK(-)
i
GREENIBLACK(-)
§~
m
~0
l!
BLACK
.l>-
@ @ @ @
,;§0
=
GREENlWHITE
(+)
!REVERSE[
m
l~&
··_···_·"
"~.
~
i~
~
D;
",
.J
~.
BLUE
RED
WHITE
RED
WHITE
~
DI
"'''",00'
v'=w
in
_i
~
IRearVideo2
~
i
D
YELLOW
1OlI_
~
~=W
1_
...
__
.1 c
<
ClO
o
N
o

UV8020
CONTROLS
AND
INDICATORS
1.
POWERIMUTE
Press
to
turn
the
unit
on.
Press
and
hold
to
turn
the
unit
off.
When
on,
press
to
silence
the
receiver.
Press
again
to
resume
the
previous
volume
level.
2.SRC
Press
to
select
playing
mode
(SO,
AV
IN,
DISC,
Tuner).
3.
VOL-
Press
to
adjust
the
volume
lower.
4.
VOL+
Press
to
adjust
the
volume
higher.
5.
OPENIEJECT
Press
to
activate
the
automatic
mechanical
system
and
move
the
TFT
monitor
down
to
reveal
the
CD
and
SO
Card
slots.
Press
again
to
close
the
TFT.
Press
and
hold
to
view
the
on-screen
tilt
controls.
6.
DIM
Press
repeatedly
to
dim
the
TFT
screen
or
return
to
the
brightness
setting
specified
in
the
Setup
menu.
7.ANAUXIN
8.
IR
Remote
Control
Receiver
9.
RESET
Press
to
reset
system
settings
to
factory
default.
10.
TFT
Display
11.
Disc
Slot
12.
Disc
Slot
Indicator
13.
EJECT
Disc
14.
SD
Card
Slot
UV8020
2 6
MultiMedia
Receiver
--------+---{
10
11
~
I-
,--~
12
13
\t....iLJ
DISC
IN
S;IiI
lABE.l
SIDE
UP
EJECT
~
/1
14
\J
5

UV8020
REMOTE
CONTROL
Table
1:
Remote
Control
Functions
+--t--{
5
,~-----------------
~
800
271--+-----10
0 0
(3
0000
NOTE:
Your
remote
control
may
differ
slightly
from
the
one
pictured
here.
The
above
diagram
is
for
Illustrative
purposes
only.
Button
Function
Name
Ref#
DVD
VCD
TUNER
CD/MP3
MENU
1
Enters
the
main
menu
of
the
disc
TITLE
2
Enters
the
title
menu
of
the
disc
MUTE
3Toggles
audio
output
on/off
Toggles
audio
output
on/off
Toggles
audio
output
on/off
Toggles
audio
output
on/off
POWER/<!>
4
Turns
the
power
on/off
Turns
the
power
on/off
Turns
the
power
on/off
Turns
the
power
on/off
AUDIO
5
Changes
the
audio
lan-
Select
STEREO,
MONO
L
guage
for
disc
playback
or
MONO
R
output
REPT
A-B
6
Setup
to
repeat
playback
Setup
to
repeat
playback
Setup
to
repeat
playback
from
time
frame
A
to
time
from
time
frame
Ato
time
from
time
frame
Ato
time
frame
B
frame
B
frame
B
REPT
7
Repeats
playback
of
cur-
Repeats
playback
of
cur-
Repeats
playback
of
cur-
rent
title/chapter
rent
title/chapter
rent
track/album/directory
SRC
8
Selects
playing
mode
Selects
playing
mode
Selects
playing
mode
Selects
playing
mode
SUBTITLE
9
Selects
subtitle
language,
if
available
OSD
10
Displays
playing
informa-
Displays
playing
informa-
Displays
playing
informa-
Display
playing
information
tion tion tion
ANGLE
11
Plays
back
disc
in
differ-
Plays
back
Picture
CD
with
ent
angle
for
a
scene
different
angle
of
picture
displayed
MODE
12
Displays
SOURCE
Menu
Displays
SOURCE
Menu
Displays
SOURCE
Menu
Displays
SOURCE
Menu
SEL
13
Displays
Audio/Display
Displays
Audio/Display
Displays
Audio/Display
Displays
Audio/Display
Menu
Menu Menu Menu
•
14
Stops
playback
Stops
playback
Stops
playback
VOL-
15
Decreases
volume
Decreases
volume
Decreases
volume
Decreases
volume
VOL
+
16
Increases
volume
Increases
volume
Increases
volume
Increases
volume
I+lII
17
Selects
the
previous
chap-
Selects
the
previous
chap-
Searches
an
available
Selects
the
previous
track
ter
for
playback,
press
and
ter for
playback,
press
and
radio
station
by
decreasing
for
playback,
press
and
hold
for
fast
reverse
hold for
fast
reverse
tuning
frequency
hold
for
fast
reverse
~
18
Selects
the
next
chapter
Selects
the
next
chapter
Searches
an
available
Selects
the
next
track
for
for
playback,
press
and
for
playback,
press
and
radio
station
by
increasing
playback,
press
and
hold
hold
for
fast
forward
hold
for
fast
forward
tuning
frequency
for
fast
forward
~/II
19
Pauses
playback/starts
Pauses
playback/starts
Pauses
playbaCk/starts
playback playback playback
GOTO
20
Enter
chapter
directly
Enter
track
directly
Enter
track
directly
ZOOM
21
Zooms
in/out
on
an
image
Zooms
in/out
on
an
image
BAND
22
Selects
AM/FM
Band
EJECT
23
Opens
Front
Panel
Opens
Front
Panel
Opens
Front
Panel
Opens
Front
Panel
6

UV8020
Table 1:
Remote
Control
Functions
Button
Function
Name
Ref#
DVD
VCD
TUNER
CD/MP3
~
24
Decreases
monitor tilt
Decreases
monitor
tilt
Decreases
monitor
tilt
Decreases
monitor tilt
angle
angle angle angle
/It
25
Increases
monitor
tilt
angle
Increases
monitor
tilt
angle
Increases
monitor
tilt angle Increases monitor tilt
angle
OK
26
Confirms
Entry Confirms Entry
Confirms
Entry Confirms Entry
1,2,3,4,5,
27
Directly
accesses
chapter Directly accesses
track
6,7,8,9,0,
(press
10+
to
move
for- (press
10+
to
move
for-
10+
ward
in increments
of
ten
ward
in increments
of
ten
(Numeric
and then press asingle and then press a
single
Keypad)
number
for
the
final digit)
number
for the final digit)
TIME
28
Displays
clock
on
TFT
Displays clock on
TFT
Displays
clock
on
TFT
Displays clock on
TFT
DVD
29
Displays
DVD
Setup
menu Displays
DVD
Setup
menu
Displays
DVD
Setup
menu
SETUP
~
30
Navigates
on-screen
menu Navigates
on-screen
menu
Navigates
on-screen
menu Navigates on-screen
menu
....
31
Navigates
on-screen
menu Navigates on-screen
menu
Navigates
on-screen
menu
Navigates
on-screen
menu
...
32
Navigates
on-screen menu Navigates
on-screen
menu
Navigates
on-screen
menu
Navigates
on-screen menu
...
33
Navigates
on-screen
menu
Navigates
on-screen
menu
Navigates
on-screen,menu Navigates on-screen menu
PROG
34
Displays
Programmed
Displays
Programmed
Displays Programmed
Playback
Screen
Playback Screen Playback Screen
7

USING
THE
TFT
MONITOR
Open/
Close
TFT
Monitor
Open
TFT
Monitor
Press
the
EJECT
button
on
the
front
panel
(5)
or
remote
control
(23)
to
slide
the
monitor
panel
down
and
reveal
the
disc
and
SD
card
slots.
Close
TFT
Monitor
Press
the
EJECT
button
on
the
front
panel
(5)
or
remote
control
(23)
to
close
the
monitor
panel.
Monitor
Tilt
Angle
Adjustment
A
known
characteristic
of
LCD
panels
is
the
quality
of
the
display
in
relationship
to
the
viewing
angle.
The
monitor
angle
can
be
adjusted
for
optimum
viewing
using
one
of
the
following
methods.
Step
by
Step
Angle
Adjustment
Press
the
(
~)
or
(¥)
button
on
the
remote
control
(25,
24)
to
adjust
the
tilt
angle
of
the
screen
one
step
at
a
time.
Continuous
Angle
Adjustment
Press
and
hold
the
(
~
)
or
(¥ )
button
on
the
remote
control
to
adjust
the
tilt
angle
in
a
continuous
motion.
On-Screen
Panel
Controls
Press
and
hold
the
~
IEJECT
button
(5)
on
the
control
panel
to
display
the
on-screen
tilt
control
menu.
TILT+:
Touch
repeatedly
to
tilt
the
bottom
of
the
screen
outward.
TILT-:
Touch
repeatedly
to
tilt
the
bottom
of
the
screen
inward.
EXIT:
Touch
to
exit
the
on-screen
tilt
control
menu.
Reverse
Driving
Use
If
a
review
video
camera
is
connected,
the
monitor
automatically
switches
to
CAMERA
mode
when
the
vehicle
is
put
into
reverse.
When
the
vehicle
is
taken
out
of
reverse.
the
monitor
returns
to
the
source
in
use
preViously.
Image
Setting
Table
2
shows
the
video
output
mode
for
each
playing
source.
Table
2:
Video
Output
Modes
Playing
Source
Video
Output
Modes
AM/FM
TUNER
RGB
Mode
DVD
RGB
Mode
AUXIN
CVBS
Mode
·CVBS
-
Composite
Video
Baseband
Signal
Parking
Brake
Inhibit
When
the
pink"
Parking"
wire
is
connected
to
the
vehicle
brake
switch,
the
front
TFT
monitor
will
display
video
only
when
the
parking
brake
is
engaged.
8
UV8020

UV8020
OPERATING
INSTRUCTIONS
Power
On
/
Off
Press
the
<!>/hil
button
(1)
on
the
unit
(or
the
<!>
button
(4)
on
the
remote
control)
to
turn
the
unit
on.
Press
and
hold
the
<!>
button
to
power
off
the
unit.
The
monitor
is
drawn
back
into
the
main
compartment
(if
the
Tilt
function
is
in
use).
Audible
Beep
Confirmation
An
audible
beep
tone
confirms
each
function
selection.
The
Beep
tone
can
be
disabled
through
the
Setup
menu.
Mute
Press
the
<!>/hil
button
(1)
on
the
front
panel
or
the
MUTE
button
(3)
on
the
remote
to
mute
the
volume
from
the
unit.
MUTE"
is
displayed
on
the
screen.
Press
the
<!>/hil
button
again
to
restore
the
volume.
"
Adjusting
the
volume
or
using
any
of
the
audio
setup
features
cancels
the
mute
function.
Playing
Source
Selection
Press
the
SRC
button
(2)
on
the
front
panel
or
the
SRC
button
(8)
on
the
remote
to
change
between
available
playing
sources
in
the
following
order:
SD,
AUX
(AV-IN),
DISC
and
BAND
(Radio).
The
playing
mode
is
displayed
on
the
TFT
screen.
Source
Menu
You
can
also
use
the
touch
screen
to
change
the
source
through
the
SOURCE
MENU.
To
access
the
SOURCE
MENU,
touch
the top
left
corner
of
the
screen
(or
press
the
MODE
button
(12)
on
the
remote
control).
Touch
the
SD,
AUX,
DISC
or
BAND
button
to
select
the
corresponding
source.
External
Devices
External
peripheral
devices,
including
a
game
console,
camcorder,
navigation
unit,
iPod,
Zune,
etc.
can
be
connected
to
the
front
of
this
unit
using
one
of
the
AlV
Media
Adapter
Cables
(included).
Select
"AUX"
mode
to
access
aUXiliary
devices.
You
cannot
directly
control
external
devices
connected
to
the
AUX
IN
inputs.
NOTE:
External
sources
will
be
displayed
incorrectly
if
the
MIRROR
function
is
activated.
To
correct
this
problem,
access
the
setup
menu
and
set
the
MIRROR
function
to
"OFF".
Volume
Adjustment
To
increase
or
decrease
the
volume
level,
press
the
VOL-I+
buttons
on
the
unit
(3, 4)
or
on
the
remote
control
(15,
16).
When
the
volume
level
reaches
"0"
or
"40", a
beep
sounds,
indicating
that
the
adjustment
limit
has
been
reached.
The
volume
ranges
from
"0"
to
"40".
The
TFT
screen
displays
the
volume
level
for
3
seconds.
Audio/
Display
Menu
The
Audio/Display
menu
feature
allows
you
to
easily
adjust
your
audio
system
to
meet
the
acoustical
characteristics
of
your
vehicle,
which
vary
depending
on
the
type
of
vehicle
and
its
measurements.
Proper
setting
of
the
Fader
and
Balance
boosts
the
effects
of
the
cabin
equalizer.
Press
the
SEL
button
on
the
remote
control
(13)
or
on
screen
(or
touch
the
bottom
left
corner
of
the
screen)
to
view
the
audio
menu.
To
adjust
an
audio
feature:
Use
the
arrow
keys
on
the
remote
control
to
move
left!
right
to
select
an
option
or
up/down
to
modify
settings
for
the
selected
option.
Touch
the
arrows
on
the
TFT
screen
at
the
top
or
bottom
of
each
option
to
adjust
the
settings.
Table
3:
Audio
Adjustments
Audio
Function
Adjustable
Range
I
EO
(graphic
equalizer)
I
User
Flat
Clas
(classical)
Pop
Rock
BAS
(bass)
-7
to
+7
TRE
(treble)
-7
to
+7
FAD
(fader)
F7
to
R7
BAL
(balance)
L7
to
R7
BRI
(brightness)
-8
to
+8
CON
(contrast)
-8
to
+8
COL
(color)
-8
to
+8
SUB
(subwoofer
volume)
33
to
0
NOTE:
The
EO
mode
will
automatically
change
to
"USER"
when
individual
audio
functions
are
adjusted.
If
the
USER
settings
correspond
with
a
preset
curve,
that
EO
option
will
be
displayed.
9
The
Audio
menu
will
automatically
exit
after
a
few
seconds
of
inactivity.
To
exit
quickly,
touch
the
bottom
left
corner
of
the
screen.
Setup
Menu
(SET)
To
access
the
Setup
Menu,
touch
the
top
left
corner
of
the
screen
to
view
the
SOURCE
menu,
and
then
select
the
"SET"
option.
The
SET
menu
options
are
as
follows:
LOUD
OFF/ON:
When
listening
to
music
at
low
volumes,
this
feature
will
boost
the
bass
and
treble
ranges
to
compensate
for the
characteristics
of
human
hearing.
Touch
the
arrows
to
turn
LOUD
OFF/ON.
BEEP
OFF/ON:
Touch
the
arrows
to
turn
the
audible
BEEP
confirmation
OFF/ON.
24
HOURS/12
HOURS:
Select
12
or
24-hour
clock
display.
Clock:
Touch
the
left
arrow
to
set
the
hour
and
the
right
arrow
to
set
the
minutes.
SUB
OFF/ON:
Select
"ON"
if
an
external
subwoofer
is
connected.
CAMERA
OFF/ON:
When
a
rear-view
camera
is
properly
installed,
the
System
will
automatically
display
the
rear
camera
image
when
the
vehicle
is
placed
in
reverse
gear.
To
view
the
camera
image
regardless
of
the
gear
setting,
select
"ON".
MIRROR
OFF/ON:
Select
"ON"
to
reverse
the
screen
image
for
rear
view
camera
use.
LCD
CALIBRATE:
Touch
and
hold
to
initiate
screen
calibration.
Touch
the
+
marks
when
prompted.
VOL
LAST/ADJUST
VOL
LAST:
When
turned
on,
the
unit
will
resume
the
same
volume
level
that
was
set
when
the
unit
was
last
turned
off.
VOL
ADJUST:
Select
this
option
if
you
want
to
set
a
turn-on
volume
(A-VOL)
regardless
of
the
volume
setting
prior
to
turning
the
unit
off.
A
VOL:
Touch
the
arrows
to
set
the
desired
turn-on
volume
when
VOL
ADJUST
is
selected.
US
BAND/EURO
BAND:
Touch
and
hold
to
select
"EURO
BAND".
The
unit
will
automatically
turn
off
and
re-boot
when
the
tuner
band
is
changed.
System
Reset
To
correct
a
system
halt
or
other
~
[RESET]
Button
illegal
operation,
use
the
tip
of
a
pen
"'0
to
press
the
reset
button
(9)
located
on
the
front
bottom-left
corner
of
the
unit.
After
a
system
reset,
the
unit
restores
all
factory
default
settings.

NOTE:
If
the
unit
is
reset
while
a
DVD
is
playing,
the
DVD
resumes
play
once
the
reset
is
complete.
10
UV8020

UV8020
DVD
SETUP
MENU
During
disc
play,
press
the
DVD
SETUP
button
(29)
on
the
remote
control
to
access
the
SYSTEM
SETUP
menu.
SYSTEM
LANGUAGE
VIDEO
Use
the
...
,
~,
...
or
~
cursor
buttons
to
choose
between
SYSTEM,
LANGUAGE,
or
VIDEO
setup
options.
Table 4:
System
Setup
Menu
SYSTEM
SETUP
VIDEO
FOR-
NTSC
The
color
signals
MAT
are
output
in
the
standard
NTSC
format.
PAL
The
color
signals
are
output
in
the
standard
PAL
for-
mat.
AUTO
The
color
signal
output
is
switched
automatically
based
on
the
cur-
rent
video
input
signal
-
NTSC
or
PAL.
Table
4:
System
Setup
Menu
ASPECT
RATIO
4: 3
PS
With
16:9
display,
the
left
and
right
sides
are
cut
off.
4:3
LB
With
16:9
display,
the top
and
bot-
tom
are
cut
off.
16:9
Image
is
pre-
sented
in
wide
view
with
a
16:9
aspect
ratio.
PASSWORD
----
Enter
a
4-digit
password
to
acti-
vate
the
"Rating"
feature.
The
origi-
nal
password
is
"8888".
RATING
1
KID
SAFE
Select
the
appro-
2G
priate
rating level
for
the
intended
3
PG
audience.
4
PG13
You
may
override
higher
ratings
by
5
PG-R
using
your
pass-
word.
6R
7
NC-17
8
ADULT
DEFAULT
RESTORE
Select
"Reset"
to
restore
the
fac-
tory
default
set-
tings
for the
Rating
system
only.
LANGUAGE
SETUP
OSD
LAN-
ENGLISH
Select
the
appro-
GUAGE
priate
on-screen
GERMAN
language
for
the
SPANISH
DVD
FRENCH
11
Table 4:
System
Setup
Menu
AUDIO
LAN-
ENGLISH
Choose
from
GUAGE
audio
languages
FRENCH
contained
on
the
SPANISH
DVD
If
you
are
watching
a
disc
PORTUGUESE
recorded
in
multi-
ple
languages
GERMAN
NOTE:
Lan-
guages
are
DVa
dependent
and
not
aI/languages
may
be
supported.
SUBTITLE
ENGLISH
Choose
the
lan-
LANG
guage
you
would
FRENCH
like
subtitles
to
SPANISH
agpear
in
(if
avail-
aIe)
PORTUGUESE
NOTE:
Subtitles
GERMAN
are
DVD
depen-
dent
and
not
aI/
languages
may
be
supported.
OFF
Turn
subtitles
off
MENU
LANG
ENGLISH
Select
the
default
FRENCH
language
in
which
you
would
like
the
SPANISH
DVD
menu
(if
applicable)
to
be
PORTUGUESE
displayed.
GERMAN
VIDEO
SETUP
BRIGHTNESS
12
- 0
Use
the
....
1
~
cur-
CONTRAST
12 - 0
sor
buttons
to
set
the
video
output
HUE
+6
to-6
options
SATURATION
12 - 0
SHARPNESS
8-0
EXIT
SETUP

TUNER
OPERATION
Tuner
TFT
Display
4}--+-------H1i-
0--+---
1.
Current
radio
band
indicator
2.
Radio
frequency
indicator
3.
Clock
4.
Preset
radio
stations:
Touch
to
recall
preset
stations
5.
Current
Equalizer
Mode
6.
1«
Touch
to
seek
backward
7.
»1:
Touch
to
seek
forward
8.
Touch
to
tune
forward
one
step
9.
Touch
to
tune
backward
one
step
10.
AS:
Touch
to
automatically
store
stations
11.
PS
(Preset
Scan):
Touch
to
scan
all
stored
preset
stations,
stopping
for
5
seconds
at
each
and
continuing
until
a
station
is
selected
12.
BAND:
Touch
to
change
between
AM/FM
bands
13.
Touch
to
adjust
Equalizer/Audio
and
Display
settings
14.
Touch
to
view
the
SOURCE
menu
and
select
a
new
playback
source
15.
Current
preset
station
indicator
Switching
to
Radio
Tuner
Source
Touch
the top
left
corner
of
the
screen
(SRC),
or
press
the
MODE
button
(12)
on
the
remote
control,
to
view
the
SOURCE
menu.
Touch
"BAND".
Press
the
SRC
button
(2)
on
the
front
panel
or
remote
control
(8)
to
switch
to
the
AM/FM
or
RADIO
source.
Selecting
F
M/
AM
Band
Touch
the
BAND
button
(22)
on
the
screen
or
remote
control
(18)
to
change
between
the
following
bands:
FM
1,
FM2,
FM3,
AM1,
and
AM2.
Seek
Tuning
To
seek
the
next
higher
station:
Touch
the
»1
button
on
screen.
Press
the
»1
button
(18)
on
remote
control.
To
seek
the
next
lower
station:
Touch
the
1«1
button
on
screen.
Press
the
1«
button
(17)
on
the
remote
control.
Manual
Tuning
To
increase
or
decrease
the
tuning
frequency
one
step:
Press
the
1\
or
V
buttons
on
screen.
Press
and
hold
the
1«
or
»1
button
on
the
screen
or
remote
control
(17,
18).
Using
Preset
Stations
Six
numbered
preset
buttons
store
and
recall
stations
for
each
band.
All
six
stored
stations
(P1-P6)
for
the
current
band
appear
on
the
screen.
Storing
a
Station
1.
Select
a
band
(if
needed),
then
select
a
station.
2.
Press
and
hold
the
preset
station
position
1-6
on
the
screen
(4)
or
press
and
hold
the
number
1-6
button
(27)
on
the
remote
control.
1n
87.50
2"'LJI01.10
3
98.90
4
106.70
5
107.90
6
104.10
3.
The
new
preset
station
(4)
appears
highlighted
and
the
preset
station
indicator
(15)
displays
the
new
current
preset
position.
12
UV8020
Recalling
a
Station
1.
Select
a
band
(if
needed).
2.
Touch
an
on-screen
preset
button
(4)
to
select
the
corresponding
stored
station.
1n
87.50
2
"'LJI
01
.10
3
98.90
4
106.70
15
107.90
6
104.10
Auto
Store
(AS)
To
select
six
strong
stations
and
store
them
in
the
current
band:
1.
Select
a
band
(if
needed).
2.
Touch
AS
button
on
the
screen
(10)
for
to
activate
the
Auto
Store
function.
The
new
stations
replace
stations
already
stored
in
that
band.
Preset
Scan
(PS)
Touch
the
PS
button
(11)
on
screen
to
scan
all
stored
preset
stations,
stopping
for
5
seconds
at
each
and
continuing
until
a
station
is
selected.
Touch
again
to
stop
preview
scan.

UV8020
DVDIVCD
VIDEO
OPERATION
also
change
the
source
by
touching
the
top
left
corner
to
display
the
"SOURCE"
menu.
Select
"DISC"
to
access
DVD
mode.
Controlling
Disc
Playback
During
DVDNCD
playback,
press
the
center
of
the
screen
to
display
the
on-screen
playback
controls.
Stopping
Playback
Touch
the.
button
on
screen
or
on
the
remote
control
(14)
to
stop
disc
play.
To
resume
playback,
touch
the
~/II
button
on
screen
or
on
the
remote
control
(19).
Pausing
Playback
Touch
the
~/II
button
on
screen
or
on
the
remote
control
(19)
to
suspend
or
resume
disc
play.
Moving
Through
Tracks
Press
the
»1
button
on
the
remote
control
(18)
or
on
screen
to
advance
to
the
next
chapter
on
the
disc.
Press
the
1«
button
on
the
remote
control
(17)
or
on
screen
to
move
to
the
previous
chapter.
Fast
ForwardlReverse
Press
and
hold
the
»1
or
1«
buttons
on
the
remote
control
or
on
screen
to
fast
forward
or
fast
reverse.
Press
and
hold
once
for
X2.
Press
and
hold
additional
times
for
X4, X8, X
20
or
PLAY.
Press
the
play/pause
>/11
button
to
end
fast
forward
or
reverse
and
resume
normal
playback.
Repeat
ChapterlTitle
(REPT)
Press
the
AEPT
button
(7)
on
the
remote
control
multiple
times
during
playback
to
select
from
the
following
repeat
play
options:
VCD:
REP
ONE
(track),
REP
ALL
(disc),
REP
OFF
DVD:
REP
Chapter,
REP
Title,
REP
OFF
Repeat
Section
(REPT
A-B)
To
repeat
a
specified
section
of
a
track
(chapter),
perform
the
following
steps:
Press
the
A->B
button
on
the
remote
control
(6)
to
select
the
starting
poin
t.
The
display
will
show
"REPEAT
A·".
Press
A->B
when
you
reach
the
desired
ending
point.
The
display
shows
"REPEAT
A-B"
and
the
selected
section
will
play
repeatedly.
To
cancel
section
repeat,
press
the
A->B
button
again.
"A-B
CANCEL"
appears
on
the
display.
DVD
Playback
Features
The
following
remote
control
features
are
available
during
DVD
playback:
AUDIO:
Press
to
choose
an
alternate
audio
language,
if
available.
SUBTITLE:
Press
to
select
an
alternate
subtitle
language,
if
available.
•
~/"
UR
ISUBTITLEI
INT
I
AUDIO
I
SEL
SAC:
Touch
to
view
the
SOURCE
menu
and
select
a
new
playback
source.
INT:
During
VCD
playback,
touch
to
play
the
first
15
seconds
of
each
track.
When
a
desired
track
is
reached,
press
the
INT
button
again
to
cancel
the
function
and
play
the
selected
track.
&:
No
function.
LJA:
During
VCD
playback,
touch
to
choose
between
Mono
Left
Channel,
Mono
Right
Channel,
and
Stereo.
.:
Press
to
stop
and
retain
playback
position.
Press
again
to
stop
and
return
to
beginning
of
disc.
I~:
Touch
to
move
to
the
previous
track.
~I:
Touch
to
move
to
the
next
track.
SEL:
Touch
to
adjust
Equalizer/Audio
and
Display
settings.
AUDIO:
Touch
to
choose
an
alternate
audio
language,
if
available.
,,:
No
function.
SUBTITLE:
Touch
to
activate
subtitles,
change
subtitle
language
or
disable
subtitles,
if
available.
~/II:
Touch
to
suspend
playback.
Touch
again
to
resume
playback.
I
SRC
NOTE:
INT
and
UR
are
only
available
for
VCDs.
You
cannot
insert
a
disc
if
there
is
already
a
disc
in
the
unit
or
if
the
power
is off.
NOTE:
The
unit
is
designed
for
play
of
standard
5"
(12
em.)
discs
only.
Do
not
attempt
to
use
3"
(8
em.)
CD
singles
in
this
unit,
either
with
or
without
an
adaptor,
as
damage
to
the
player
and/or
the
disc
may
occur.
Such
damage
will
not
be
covered
by
the
warranty
on
this
product.
NOTE:
DVD-R
and
DVD-RW
will
not
play
unless
the
recording
session
is
finalized
and
the
DVD
is
closed.
NOTE:
If
Parental
Lock
(Rating)
is
activated
and
the
disc
inserted
is
not
authorized,
the
4-digit
code
must
be
entered
and/or
the
disc
must
be
authorized
(see
"System
Setup
Menu"
on
page
11).
NOTE:
If
you
do
not
insert
a
disc
or
SD
card,
you
must
press
the
EJECT
button
to
close
the
control
panel.
NOTE:
When
properly
installed,
DVD
video
cannot
be
displayed
on
the
main
TFT
screen
unless
the
parking
brake
is
applied.
If
you
attempt
to
playa
DVD
while
the
vehicle
is
moving,
the
TFT
screen
displays
"DO
NOT
WATCH
VIDEO
WHILE
DRIVING"
with
a
black
background.
Rear
video
screens,
if
applicable,
will
operate
normally.
Inserting
a
Disc
To
insert
a
disc,
you
must
first
press
the
~
/EJECT
button
(5)
on
the
control
panel
or
remote
control
(23)
to
reveal
the
disc
slot
(11).
Insert
a
disc,
label
side
up,
into
the
disc
slot.
The
front
panel
will
close
automatically
and
disc
play
begins.
Ejecting
a
Disc
To
eject
a
disc,
you
must
first
press
the
~
/EJECT
button
(5)
on
the
control
panel
or
remote
control
(23)
to
reveal
the
disc
slot
(11).
Press
the
~
/EJECT
button
(13)
behind
the
TFT
panel
to
eject
the
disc.
The
unit
automatically
reverts
to
Tuner
mode.
Accessing
DVD
Mode
To
switch
to
DVD
mode
when
a
disc
is
already
inserted,
press
the
SAC
button
(2)
on
the
front
panel
or
remote
control
(8)
until
"READ"
appears
near
the top
of
the
screen.
You
can
a
13

UV8020
TT
S/8
-"S /
8"
indicates
the
fifth
of
8
titles
on
the
DVD
is
currently
playing.
CH
2/16
-
"2
/16"
indicates
that
the
second
of
16
titles
on
the
DVD
is
currently
playing.
Press
OSD
repeatedly
to
view
the
following
information:
for
elapsed/remaining
playing
time:
E!)
00:02:
18
-
total
elapsed
playing
time
for
disc
C
-00
:34 :37
-
remaining
playing
time
T
00:02:
18
-
total
elapsed
playing
time
for
current
track
C
-00
:34 :37
-
remaining
playing
time
for
current
track
a1/S
ENG
-
English
is
the
selected
audio
language
out
of
S
possible
choices
c:r:::::J
S.1
CH
-
The
current
language
is
recorded
in
S.1
surround
sound
To
delete
the
list,
highlight
"CLEAR"
and
then
press
OK.
Press
PROG
to
exit
the
programmed
playback
screen
.
Remote
Control
Direct
Track
Entry
To
select
a
track
directly,
use
the
number
pad
on
the
remote
control
(27).
For
single
digit
entries,
press
the
corresponding
number.
For
two
digit
entries,
press
the
10+
button
followed
by
the
last
digit
(i.e.,
for
track
16,
press
10+
and
then
6).
GOTO
Direct
Track/
Chapter
Access
Use
the
GOTO
function
to
access
a
track
(chapter)
directly.
1.
Press
the
GOTO
button
(20)
on
the
remote
control.
The
On
Screen
Display
information
will
appear
with
the
track
number
highlighted.
2.
Use
the
number
keys
on
the
remote
control
to
enter
the
3-digittrack
number
directly
(i.e.
for
track
10,
enter
"010".
3.
Press
the
OK
button
to
confirm
and
begin
playback.
Playback
Information
During
DVD
and
VCD
playback,
press
the
OSD
button
(10)
on
the
remote
control
to
display
playback
information
on
the
screen,
including
the
media
playing
and
current
playback
time.
Continue
pressing
the
OSD
button
to
display
additional
information,
as
indicated
below.
DVD
Playback
Information
The
following
information
is
displayed
at
the top
of
the
screen
during
DVD
playback:
~
e:>
-00
:33
:34
TRK
1/18
Table
5:
Disc
Properties
TRK
##/##
-
"1/18"
indicates
the
first
of
18
tracks
on
the
VCD
is
currently
playing.
c::2S::.
-
"X"
indicates
repeat
play
is
OFF,
"1"
indicates
repeat
track,
"D"
indicates
repeat
directory,
and
"A"
indicates
repeat
disc.
Press
OSD
repeatedly
to
view
the
following
information:
for
elapsed/remaining
playing
time:
E!)
00:02:18
-
total
elapsed
playing
time
for
disc
C
-00
:34
:37
-
remaining
playing
time
T
00:02:
18
-
total
elapsed
playing
time
for
current
track
C
-00
:34
:37
-
remaining
playing
time
for
current
track
Ivco
General
Disc
Information
Q
1/4
ENG
-
English
is
the
selected
subtitle
language
out
of
4
possible
choices
5
OFF
-
There
are
no
alternate
angles
recorded
for
this
scene
VCD
Playback
Information
The
following
information
is
displayed
at
the top
of
the
screen
during
VCD
playback:
Symbol
12cm
Disc
Properties
Max
Play
Time
~
Single
side
single
layer
(MPEG
2
(DVD-S)
Method)
VI050
Single
side
double
layer
133
minutes
DYD
(DVD-9)
242
minutes
-
Double
side
single
layer
266
minutes
(DVD-10)
484
minutes
Double
side
double
layer
(DVD-18)
diSC
Single
side
single
layer
(MPEG
1
(VCD)
Method)
~
74
minutes
~
Single
side
single
layer
74
minutes
e:>
-00
:33
:34
Q
1/4
ENG
CH
2116
IX)
5.1
CH
5/8
TT
lovo
10»1/5
ENG
TITLE:
Press
to
display
the
title
or
chapter
list.
Use
the
... ,
T,
...
or
~
cursor
buttons
or
the
numeric
buttons
to
enter
a
title
or
chapter
number,
and
then
press
OK
to
play.
ANGLE:
Press
to
select
an
alternate
viewing
angle,
if
available.
ZOOM:
Press
to
zoom
the
picture
at
ZOOM
2,
ZOOM
3,
ZOOM
4,
ZOOM
1/2,
ZOOM
1/3
or
ZOOM
1/4,
or
select
OFF
to
return
to
normal
view.
PLAY
CLEAR
Programmed
Playback
1.
Press
the
PROG
button
(34)
on
the
remote
control
to
access
the
programmed
playback
screen:
NOTE:
Feature
availability
Is
dependent
upon
DVD
embedded
information.
2.
Use
the
...
,
T,
...
or
~
cursor
buttons
to
access
the
fields
on
the
"PROG"
screen.
3.
Use
the
number
buttons
on
the
remote
control
to
enter
a
track
number
in
each
field.
4.
Press
the
>/11
button
(19)
on
the
remote
control
or
highlight
"PLAY"
on
screen
and
then
press
OK
to
begin
playback
in
the
numbered
order
indicated.
14

UV8020
Table
6:
Disc
Symbols
Symbol
Meaning
@))
Number
of
voice
languages
recorded.
The
number
inside
the
icon
indicates
the
number
languages
on
the
disc
(maximum
of
8).
c.~.J
Number
of
subtitle
languages
available
on
the
disc
(maximum
of
32).
EB
Number
of
angles
provided
(maximum
of
9).
116:91
LB
1
Aspect
ratios
available.
"LB"
stands
for
Let-
ter
Box
and
"PS"
stands
for
Pan/Scan.
In
the
example
on
the
left,
the
16:9
video
can
be
converted
to
Letter
Box
video.
~
Indicates
the
region
code
where
the
disc
can
be
played.
·
Region
1:
USA,
Canada,
East
Pacific
Ocean
Islands
·
Region
2:
Japan,
Western
Europe,
Northern
Europe,
Egypt,
South
Africa,
Middle
East
·
Region
3:
Taiwan,
Hong
Kong,
South
Korea,
Thailand,
Indonesia,
South-East
Asia
·
Region
4:
Australia,
New
Zealand,
Middle
and
South
America,
South
Pacific
Ocean
Islands/Oceania
·
Region
5:
Russia,
Mongolia,
India,
Middle
Asia,
Eastern
Europe,
North
Korea,
North
Africa,
North-West
Asia
·
Region
6:
Mainland
China
·
ALL:
All
regions
15

UV8020
DVD/CD
AUDIO
OPERATION
SRC:
Touch
to
view
the
SOURCE
menu
and
select
a
new
playback
source.
INT:
Touch
to
play
the
first
15
seconds
of
each
track.
When
a
desired
track
is
reached,
press
the
INT
button
again
to
cancel
the
function
and
play
the
selected
track
.
...
:
No
function.
.:
Press
to
stop
playback.
I~:
Touch
to
move
to
the
previous
track.
~I:
Touch
to
move
to
the
next
track.
SEL:
Touch
to
adjust
Equalizer/Audio
and
Display
settings
RPT:
Touch
to
activate/deactivate
Repeat
play
mode
,.:
No
function.
Programmed
Playback
1.
Press
the
PROG
button
(34)
on
the
remote
control
to
access
the
programmed
playback
screen:
3.
Use
the
number
buttons
on
the
remote
control
to
enter
a
track
number
in
each
field.
4.
Press
the
~
II
button
(19)
on
the
remote
control
or
highlight
"PLAY"
on
screen
and
then
press
OK
to
begin
playback
in
the
numbered
order
indicated.
To
delete
the
list,
highlight
"CLEAR"
and
then
press
OK.
Press
PROG
to
exit
the
programmed
playback
screen.
Remote
Control
Direct
Track
Entry
To
select
a
track
directly,
use
the
number
pad
on
the
remote
control
(27).
For
single
digit
entries,
press
the
corresponding
number.
For
two
digit
entries,
press
the
10+
button
followed
by
the
last
digit
(I.e.,
for
track
16,
press
10+
and
then
6).
GOTO
Direct
Trackl
Chapter
Access
Use
the
GOTO
function
to
access
a
track
(chapter)
directly.
1.
Press
the
GOTO
button
(20)
on
the
remote
control.
The
On
Screen
Display
information
will
appear
with
the
track
number
highlighted.
2.
Use
the
number
keys
on
the
remote
control
to
enter
the
3-digit
track
number
directly
(I.e.
for
track
10,
enter
"010".
3.
Press
the
OK
button
(26)
to
confirm
and
begin
playback.
2.
Use
the
...
,
",
....
or
~
cursor
buttons
to
access
the
fields
on
the
"PROG"
screen.
NOTE:
CD-R
and
CD-RW
will
not
play
unless
the
recording
session
Is
finalized.
ROM:
Touch
to
activate/deactivate
Random
play
mode.
~/II:
Touch
to
suspend
playback.
Touch
again
to
resume
playback.
Controlling
Playback
Stopping
Playback
Touch
the.
button
on
screen
or
on
the
remote
control
(14)
to
stop
disc
play.
To
resume
playback,
touch
the
~/II
button
on
screen
or
on
the
remote
control
(19).
Pausing
Playback
Touch
the
~/II
button
on
screen
or
on
the
remote
control
(19)
to
suspend
or
resume
disc
play.
Moving
Through
Tracks
Press
the
»1
button
on
the
remote
control
(18)
or
on
screen
to
advance
to
the
next
track
on
the
disc.
Press
the
1«
button
on
the
remote
control
(17)
or
on
screen
to
move
to
the
previous
track.
Repeat
Chapterffitle
(REPT)
Touch
the
RPT
button
on
screen
or
press
the
REPT
button
(7)
on
the
remote
control
multiple
times
during
playback
to
select
from
the
following
repeat
play
options:
REP
ONE
(track),
REP
ALL
(disc),
REP
OFF.
Repeat
Section
(REPT
A-B)
To
repeat
a
specified
section
of
a
track
(chapter),
perform
the
following
steps:
Press
the
A->B
button
on
the
remote
control
to
select
the
starting
point.
The
display
will
show
"REPEAT
A-".
Press
A->B
when
you
reach
the
desired
ending
point.
The
display
shows
"REPEAT
A-S"
and
the
selected
section
will
play
repeatedly.
To
cancel
section
repeat,
press
the
A->B
button
again.
"A-S
CANCEL"
appears
on
the
display.
Fast
Forwardl
Reverse
Press
and
hold
the
»1
or
1«
buttons
on
the
remote
control
(18,
17)
or
on
screen
to
fast
forward
or
fast
reverse.
Press
and
hold
once
for
X2.
Press
and
hold
additional
times
for
X
4,
X8, X
20
or
PLAY.
Press
the
play/pause
~/II
button
to
end
fast
forward
or
reverse
and
resume
normal
playback.
•
MI
IROM I
INT
I
RPT
SEL
SRC
Instructions
for
TFT
control
and
InserVEject
are
the
same
for
DVD
and
CD
operation.
Please
see
the
DVD/Disc
Video
Operation
section
for
information
about
these
topics.
The
UV8020
will
play
music
or
other
audio
files
from
the
following
disc
media:
CD-DA
CD-RlRW
DVD
DVD+RlRW
DVD-RlRW
SO
Card
(see
"MP3/WMA
Operation"
on
page
18)
Upon
inserting
a
disc,
the
TFT
screen
will
close
automatically
and
the
track
number
and
elapsed
playing
time
will
appear
at
the
top
of
the
screen
(see
"CD
Playback
Information"
on
page
17).
CD
Player
User
Interf
ace
The
on-screen
indicators
and
touch
key
areas
for
CD
playback
are
outlined
below.
16

UV8020
CD
Playback
Information
The
following
information
is
displayed
at
the top
of
the
screen
during
CD
playback:
CD
TRK
1/18
'<1ft
~
(2)
00
:03 :26
TRK
##/##
-
"1/18"
indicates
the
first
of
18
tracks
on
the
CD
is
currently
playing.
~
-"X"
indicates
repeat
play
is
OFF,
"1"
indicates
repeat
track,
and
"A"
indicates
repeat
disc.
Press
OSD
repeatedly
to
view
the
following
information:
for
elapsed/remaining
playing
time:
~
00:02:
18
-
total
elapsed
playing
time
for
disc
C
-00
:34
:37
-
remaining
playing
time
T
00:02:18
-
total
elapsed
playing
time
for
current
track
C
-00
:34
:37
-
remaining
playing
time
for
current
track
17

MP3/WMA
OPERATION
Instructions
for
TFT
control
and
Insert/Eject
are
the
same
for
DVD
and
MP3
operation.
Please
see
the
DVD/Disc
Video
Operation
section
for
information
about
these
topics.
Media
and
File
Requirements
This
player
allows
you
to
play
back
MP3
and
WMA
files
recorded
onto
CD-RlRWs,
DVD+RlRWs,
DVD-RlRWs
and
SD
cards.
For
CD-RW
discs,
please
make
sure
it
is
formatted
using
the
full
method
and
not
the
quick
method
to
prevent
illegal
disc
operation.
Up
to
1500
songs/files
can
be
burned
onto
a
disc/card
for
a
MEGA
DVD
music
mix.
Do
not
exceed
this
number
of
songs/
files
or
readability
problems
may
occur.
MP3
Format
Compatibility
The
file
naming
formats
listed
below
are
compatible
with
this
unit:
ISO
9660
-file
name:
12
characters,
file
extension:
3
characters
ISO
9660
-file
name:
31
characters,
file
extension:
3
characters
Joliet
-
64
characters
If
the
file
or
folder
name
does
not
conform
to
ISO
9660
file
system
standards,
it
may
not
be
displayed
or
played
back
correctly.
Use
the
follOWing
settings
when
compressing
audio
data
for
your
MP3
disc:
Transfer
Bit
Rate:
128kbps
Sampling
Frequency:
48kHz
When
recording
MP3
up
to
the
maximum
disc
capacity,
disable
additional
writing.
For
recording
on
an
empty
disc
up
to
maximum
disc
capacity,
use
the
"Disc
at
once"
setting.
MP3
Playing
Order
When
selected
for
play,
files
and
folders
(Folder
Search,
File
Search
or
Folder
Select)
are
accessed
in
the
order
they
were
written
by
the
CD
writer.
As
aresult,
the
order
in
which
they
are
expected
to
be
played
may
not
match
the
order
in
which
they
are
actually
played.
You
may
be
able
to
set
the
order
in
which
MP3/WMA
files
are
to
be
played
by
writing
them
onto
a
medium
such
as
a
CD-R
with
their
file
names
beginning
with
play
sequence
numbers
such
as
"01"
to "99".
For
example,
a
medium
with
the
following
folder/file
hierarchy
is
subject
to
Folder
Search,
File
Search
or
Folder
Select,
as
shown
below.
(OJ)
2
l'
"
1's,
D
Folder
1'~'
.J>
File
J'>'"
@
Root
Level
1
Level
3
Level 2
Level
4
The
UV8020
player
will
only
recognize
three
folder
levels
and
does
not
display
folders
containing
only
other
folders.
In
the
example
above,
the
unit
will
display
folders
3, 4, 6,
and
8,
but
not
2
and
7
since
they
do
not
contain
any
tracks
directly.
Folder
5
is
not
recognized
at
all
since
it
is
at
the
fourth
level.
18
UV8020
Loading
an
SO
Card
To
Insert
an
SD
card,
you
must
first
press
the
~
/EJECT
button
on
the
control
panel
(5)
or
remote
control
(23)
to
reveal
the
SD
card
slot
(14).
Insert
the
SD
card
into
the
card
slot
and
the
unit
will
read
the
audio
media
files
on
the
card
automatically.
To
remove
the
card,
first
press
the
SRC
button
(6)
to
switch
to
another
mode
and
stop
SD
playback.
Push
in
and
release
to
pop
the
card
out.
Grasp
the
SD
card
and
pull
it
straight
out.
Most
cards
have
a
thin
recess
that
helps
with
removal.
Other manuals for UV8020
1
Table of contents
Other Phase Linear Car Receiver manuals

Phase Linear
Phase Linear UMP401 - Phase Linear Radio User manual

Phase Linear
Phase Linear Phase Linear BT1613 User manual

Phase Linear
Phase Linear BT1611I - Phase Linear Radio User manual

Phase Linear
Phase Linear UMP301 User manual

Phase Linear
Phase Linear PCD161 User manual

Phase Linear
Phase Linear UCD300 User manual

Phase Linear
Phase Linear PCD160U User manual

Phase Linear
Phase Linear Phase Linear UDV7 User manual

Phase Linear
Phase Linear BT1611I - Phase Linear Radio User manual

Phase Linear
Phase Linear MP1311 User manual