JVC KD-S33 User manual

ENGLISH
ESPAÑOL
CD RECEIVER KD-S33
RECEPTOR CON CD KD-S33
For canceling the display demonstration, see page 7.
Para cancelar la demostración en pantalla, consulte la página 7.
For installation and connections, refer to the separate manual.
Para la instalación y las conexiones, refiérase al manual separado.
INSTRUCTIONS
MANUAL DE INSTRUCCIONES
For customer Use:
Enter below the odel
No. and Serial No. which
are located on the top or
bottom of the cabinet. Retain
this information for future
reference.
odel No.
Serial No.
GET0401-001A
[J]
Cover_KD-S33[J]f.indd 2Cover_KD-S33[J]f.indd 2 6/26/06 1:59:16 PM6/26/06 1:59:16 PM
All manuals and user guides at all-guides.com
all-guides.com

2
ENGLISH
Thank you for purchasing a JVC product.
Please read all instructions carefully before operation, to ensure your complete understanding and to obtain the best
possible performance from the unit.
INFORMATION (For U.S.A.)
This equipment has been tested and found to comply with the limits for a Class B digital de ice, pursuant to Part
15 of the FCC Rules. These limits are designed to pro ide reasonable protection against harmful interference in
a residential installation. This equipment generates, uses, and can radiate radio frequency energy and, if not
installed and used in accordance with the instructions, may cause harmful interference to radio communications.
Howe er, there is no guarantee that interference will not occur in a particular installation. If this equipment does
cause harmful interference to radio or tele ision reception, which can be determined by turning the equipment
off and on, the user is encouraged to try to correct the interference by one or more of the following measures:
– Reorient or relocate the recei ing antenna.
– Increase the separation between the equipment and recei er.
– Connect the equipment into an outlet on a circuit different from that to which the recei er is connected.
– Consult the dealer or an experienced radio/TV technician for help.
Caution:
Changes or modifications not appro ed by JVC could oid the user’s authority to operate the equipment.
IMPORTANT FOR LASER PRODUCTS
1. CLASS 1 LASER PRODUCT
2. CAUTION: Do not open the top co er. There are no user ser iceable parts inside the unit; lea e all ser icing to
qualified ser ice personnel.
3. CAUTION: (For U.S.A.) Visible and/or in isible class II laser radiation when open. Do not stare into beam.
(For Canada) Visible and/or in isible class 1M laser radiation when open. Do not iew directly with
optical instruments.
4. REPRODUCTION OF LABEL: CAUTION LABEL, PLACED OUTSIDE THE UNIT.
[European Union only]
Warning:
If you need to operate the unit while dri ing, be
sure to look ahead carefully or you may be in ol ed
in a traffic accident.
For saf ty...
• Do not raise the olume le el too much, as this will
block outside sounds, making dri ing dangerous.
• Stop the car before performing any complicated
operations.
T mp ratur insid th car...
If you ha e parked the car for a long time in hot or cold
weather, wait until the temperature in the car becomes
normal before operating the unit.
EN02-05_KD-S33[J]f.indd 2EN02-05_KD-S33[J]f.indd 2 6/26/06 1:59:29 PM6/26/06 1:59:29 PM
All manuals and user guides at all-guides.com

ENGLISH
3
Th following marks ar us d to indicat ...
: Built-in CD player operations.
: External CD changer operations.
: Indicator displayed for the
corresponding operation.
How to r s t your unit
• Your preset adjustments will also be erased.
• If a disc is loaded, it will eject. Be careful not to drop the
disc.
How to forcibly j ct a disc
• If this does not work, reset your unit.
• Be careful not to drop the disc when it ejects.
How to us th MODE button
If you press MODE, the unit goes into functions mode,
then the number buttons and 5/∞ buttons work as
different function buttons.
Ex.: When number button 2 works as
MO (monaural) button.
To us th s buttons for th ir original functions
again aft r pr ssing MODE, wait for 5 seconds
without pressing any of these buttons until the
functions mode is cleared or press MODE again.
CONTENTS
Control pan l ................................. 4
R mot controll r — RM-RK50 ............ 5
G tting start d ............................... 6
Basic operations ................................................. 6
Radio op rations ............................ 7
Disc op rations ............................... 8
Playing a disc in the unit ................................... 8
Playing discs in the CD changer ......................... 9
Sound adjustm nts ......................... 11
G n ral s ttings — PSM ................. 12
Sat llit radio op rations ................ 15
iPod®/D. play r op rations .............. 18
Oth r xt rnal compon nt op rations
... 20
Mor about this unit ....................... 20
Maint nanc .................................. 23
Troubl shooting ............................. 24
Sp cifications ................................. 27
D taching th control pan l
Attaching th control pan l
Time countdown indicator
EN02-05_KD-S33[J]f.indd 3EN02-05_KD-S33[J]f.indd 3 6/26/06 1:59:31 PM6/26/06 1:59:31 PM
All manuals and user guides at all-guides.com

4
ENGLISH
1 4 /¢ buttons
2 (standby/on attenuator) button
3 5 (up) / ∞ (down) buttons
4 Loading slot
5 Display window
6 0 (eject) button
7 EQ (equalizer) button
8 Remote sensor
DO NOT e pose the remote sensor to strong light
(direct sunlight or artificial lighting).
9 SRC (source) button
p BAND button
q Control dial
w SEL (select) button
e MO (monaural) button
r SSM (Strong-station Sequential Memory) button
t Number buttons
y RPT (repeat) button
u RND (random) button
i MODE button
o DISP (display) button
; (control panel release) button
a Disc information indicators—TAG (ID3 Tag),
(folder), (track/file)
s Disc type indicators—WMA, MP3
d Playback source indicators—
CH: Lights up only when CD-CH is selected as the
playback source.
DISC: Lights up for the built-in CD player.
f Playback mode / item indicators— RND (random),
(disc), (folder), RPT (repeat)
g LOUD (loudness) indicator
h EQ (equalizer) indicator
j Sound mode (C-EQ: custom equalizer) indicators—
JAZZ, CLASSIC, HIP HOP, POPS, ROCK, USER
k Tr (track) indicator
l Source display / Volume le el indicator
/ Main display
z Tuner reception indicators—ST (stereo),
MO (monaural)
Parts id ntification
Display window
Control panel
EN02-05_KD-S33[J]f.indd 4EN02-05_KD-S33[J]f.indd 4 6/26/06 1:59:32 PM6/26/06 1:59:32 PM
All manuals and user guides at all-guides.com

ENGLISH
5
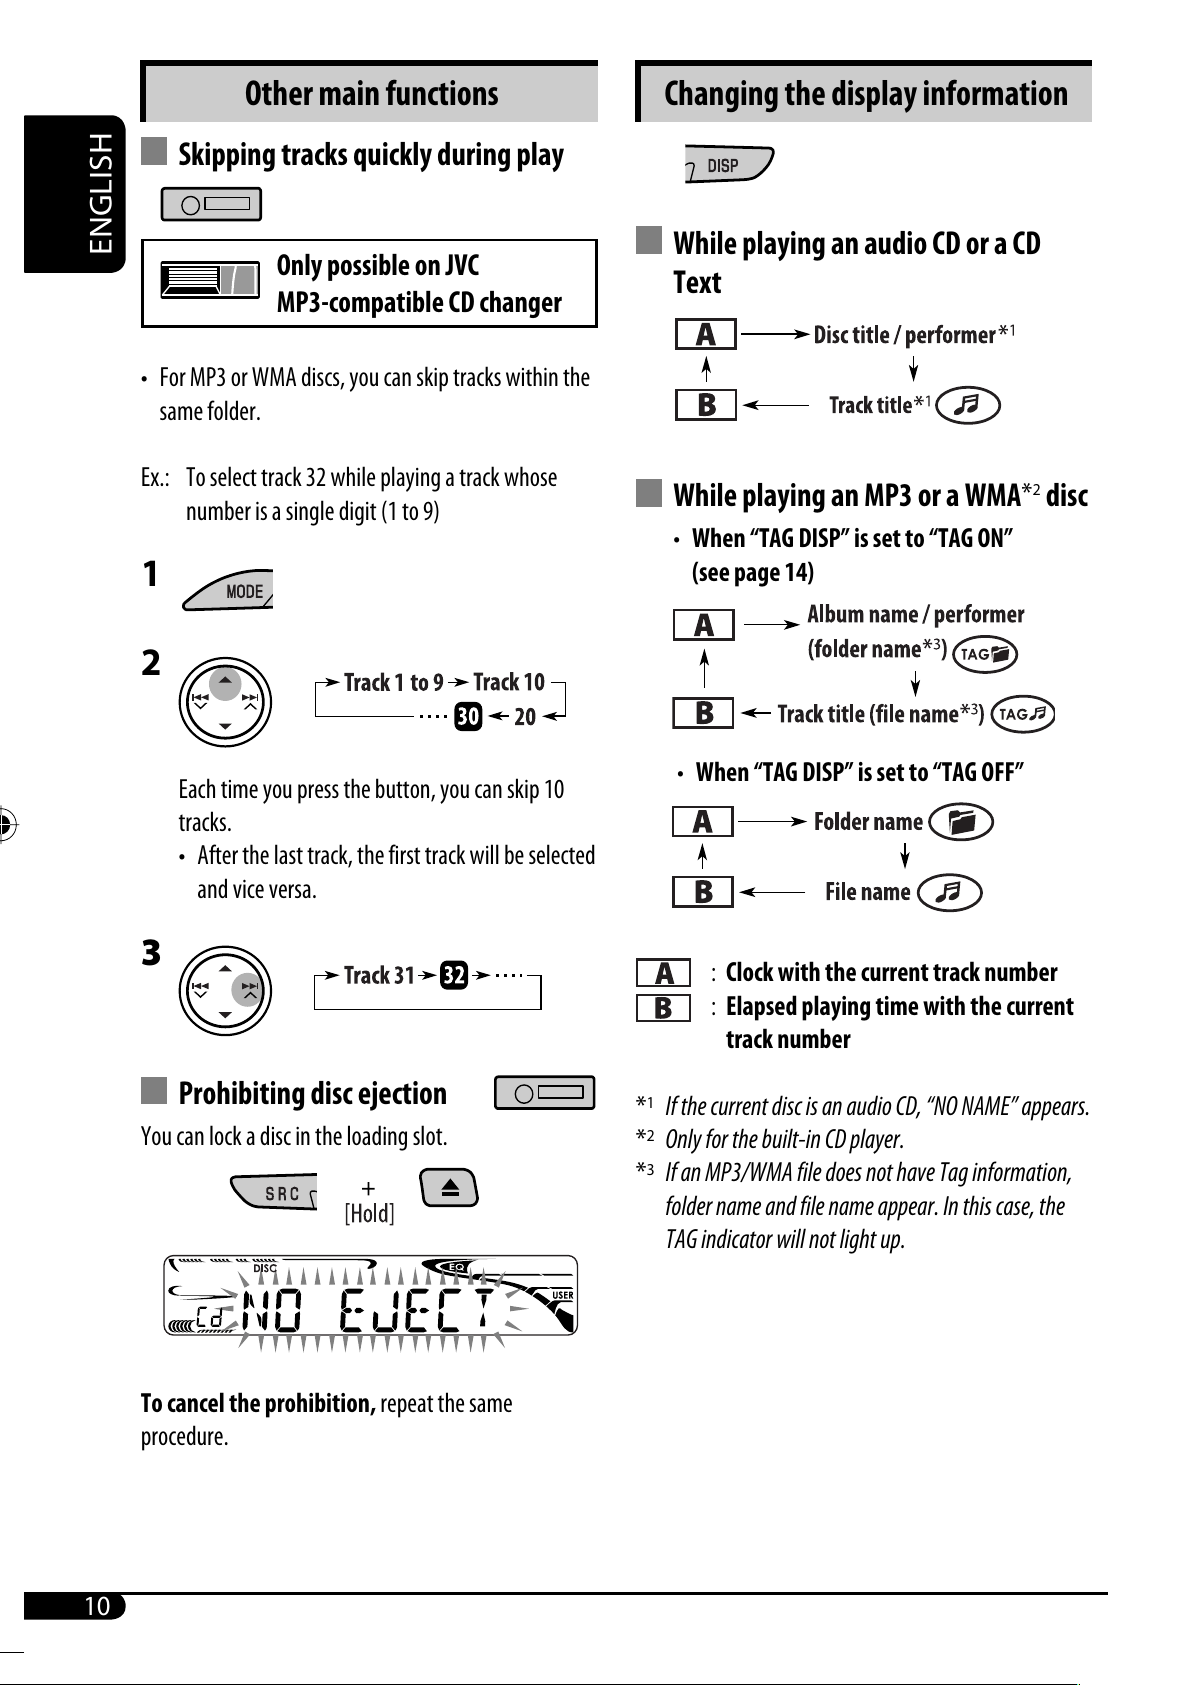
Remote controller — RM-RK50
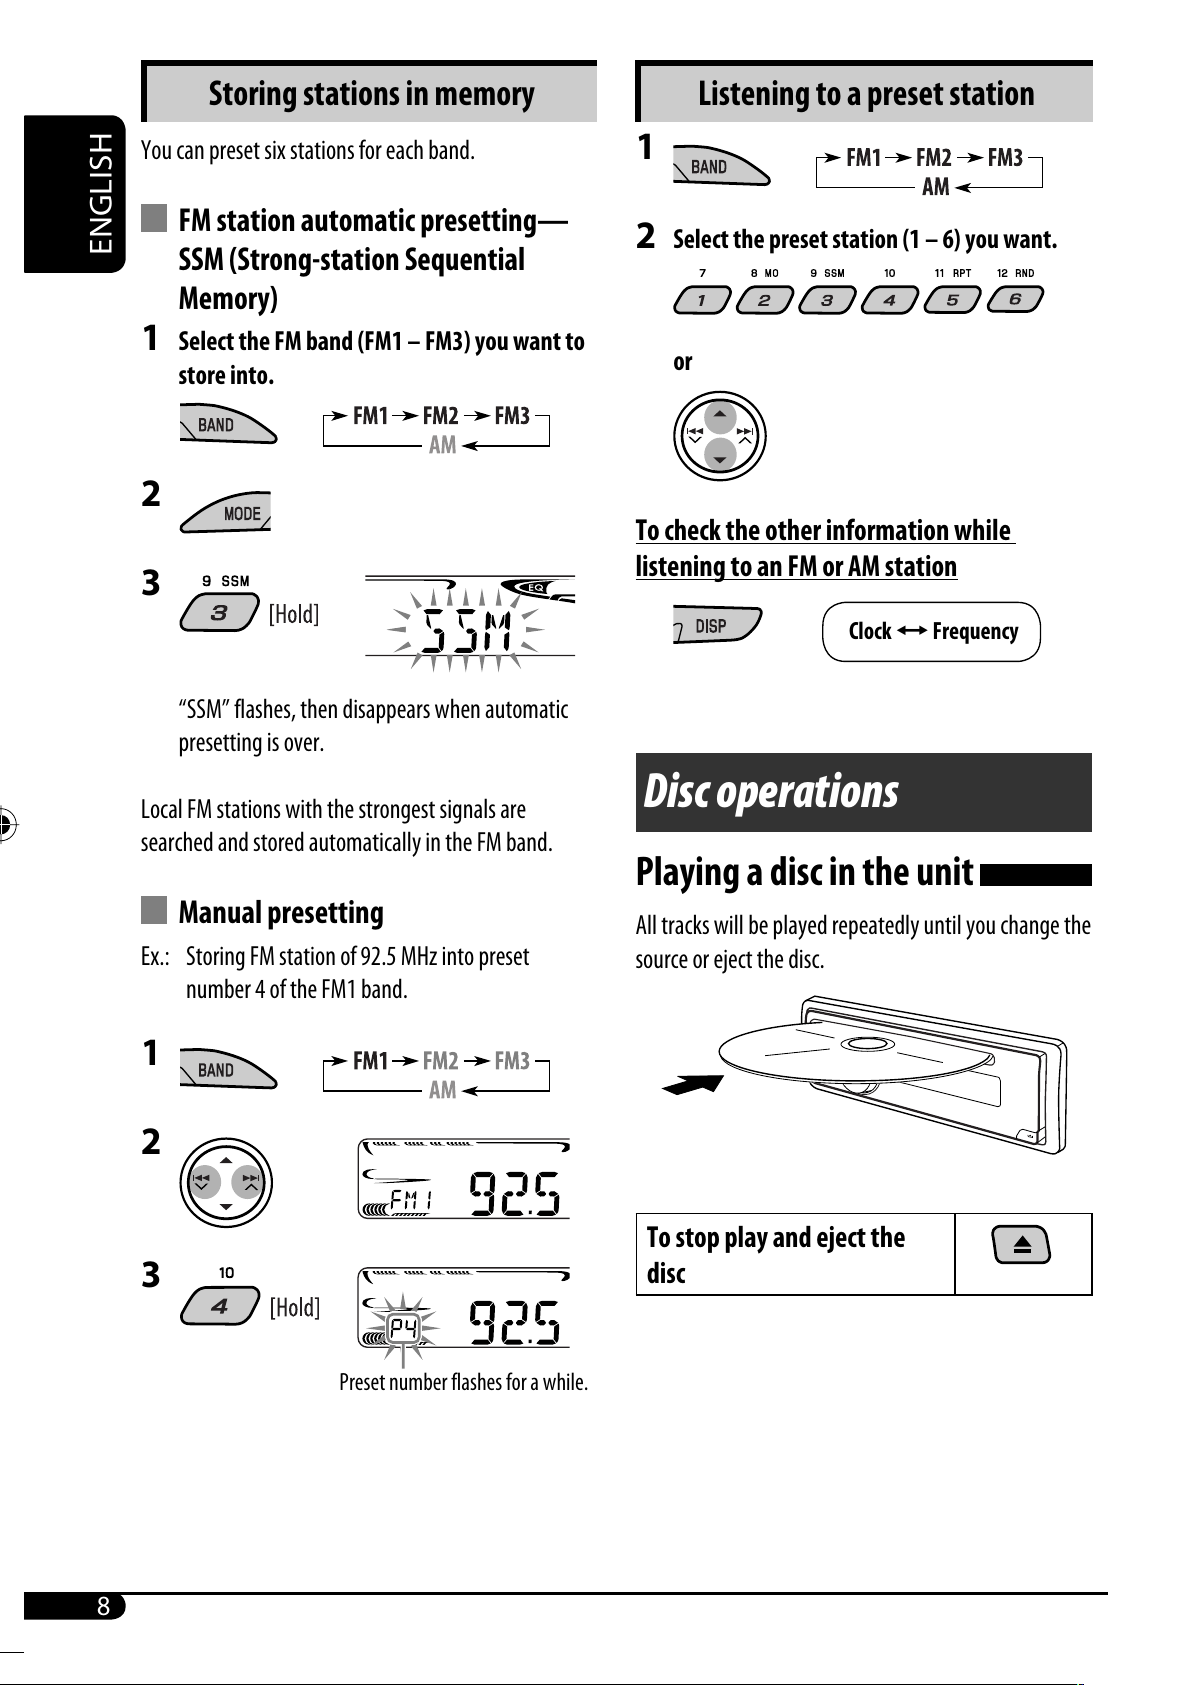
Installing th lithium coin batt ry
(CR2025)
For USA-California Only:
This product contains a CR Coin Cell Lithium Battery
which contains Perchlorate Material—special
handling may apply.
See www.dtsc.ca.go /hazardouswaste/perchlorate
Aim th r mot controll r dir ctly at th r mot
s nsor on th unit. Mak sur th r is no obstacl
in b tw n.
Warning:
• Do not install any battery other than CR2025 or
its equi alent; otherwise, it may explode.
• Do not lea e the remote controller in a place
(such as dashboards) exposed to direct sunlight
for a long time; otherwise, it may explode.
• Store the battery in a place where children
cannot reach to a oid risk of accident.
• To pre ent the battery from o er-heating,
cracking, or starting a fire:
– Do not recharge, short, disassemble, heat the
battery, or dispose of it in a fire.
– Do not lea e the battery with other metallic
materials.
– Do not poke the battery with tweezers or similar
tools.
– Wrap the battery with tape and insulate when
throwing away or sa ing it.
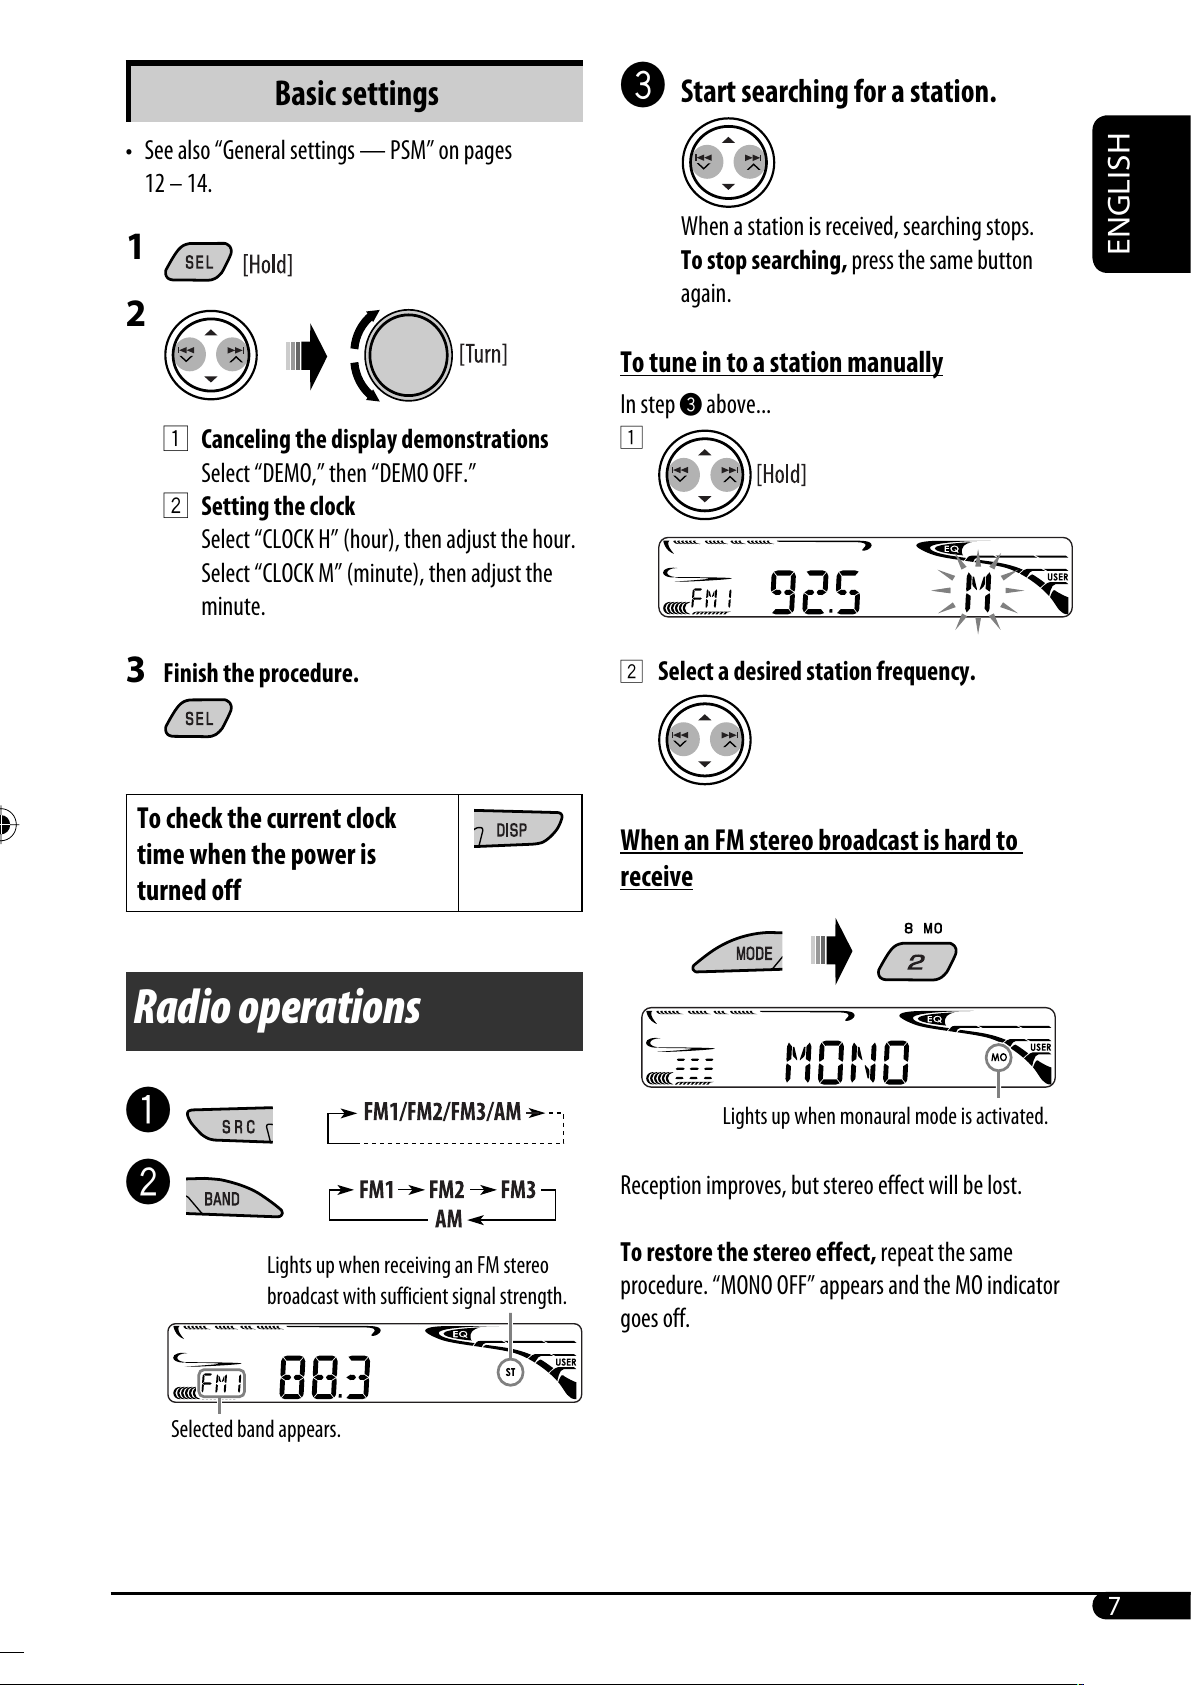
Main l m nts and f atur s
1 (standby/on/attenuator) button
• Turns the power on if pressed briefly or
attenuates the sound when the power is on.
• Turns the power off if pressed and held.
2 5 U (up) / D (down) ∞ buttons
• Changes the FM/AM bands with 5 U.
• Changes the preset stations with D ∞.
• Changes the folder of the MP3/WMA discs.
• While playing an MP3 disc on an
MP3-compatible CD changer:
– Changes the disc if pressed briefly.
– Changes the folder if pressed and held.
• While listening to the satellite (SIRIUS or XM)
radio:
– Changes the categories.
• While listening to an Apple iPod® or a JVC
D. player:
– Pauses/stops or resumes playback with D ∞.
– Enters the main menu with 5 U.
(Now 5 U/D ∞/2 R/F 3 work as the menu
selecting buttons.)*
3 VOL – / VOL + buttons
• Adjusts the olume le el.
* 5 U : Returns to the previous menu.
D ∞ : Confirms the selection.
Continued on the ne t page
EN02-05_KD-S33[J]f.indd 5EN02-05_KD-S33[J]f.indd 5 6/26/06 1:59:32 PM6/26/06 1:59:32 PM
All manuals and user guides at all-guides.com

6
ENGLISH
!
• For FM/AM tuner
• For SIRIUS radio
• For XM radio
⁄ Adjust the volume.
@ Adjust the sound as you want. (See
pages and 2.)
Caution on volume setting:
Discs produce very little noise compared with other
sources. Lower the volume before playing a disc
to avoid damaging the speakers by the sudden
increase of the output level.
To drop the volume in a
moment (ATT)
To restore the sound, press it
again.
To turn off the power
Volume level indicator
Volume level appears.
4 S UND button
• Selects the sound mode (C-EQ: custom
equalizer).
5 S URCE button
• Selects the source.
6 2 R (reverse) / F (forward) 3 buttons
• Searches for stations if pressed briefly.
• Fast-forwards or reverses the track if pressed and
held.
• Changes the tracks if pressed briefly.
• While listening to the satellite radio:
– Changes the channels if pressed briefly.
– Changes the channels rapidly if pressed and
held.
• While listening to an iPod or a D. player (in menu
selecting mode):
– Selects an item if pressed briefly. (Then, press
D ∞ to confirm the selection.)
– Skips 10 items at a time if pressed and held.
Getting started
Basic operations
~ Turn on the power.
Ÿ
* You cannot select these sources if they are not
ready or not connected.
EN06-11_KD-S33[J]f.indd 6EN06-11_KD-S33[J]f.indd 6 6/26/06 1:59:40 PM6/26/06 1:59:40 PM
All manuals and user guides at all-guides.com
all-guides.com

7
ENGLISH
Basic settings
• See also “General settings — PSM” on pages
12 – 14.
1
2
1 Canceling the display demonstrations
Select “DEM ,” then “DEM FF.”
2 Setting the clock
Select “CL CK H” (hour), then adjust the hour.
Select “CL CK M” (minute), then adjust the
minute.
3 Finish the procedure.
To check the current clock
time when the power is
turned off
Radio operations
~
Ÿ
Lights up when receiving an FM stereo
broadcast with sufficient signal strength.
Selected band appears.
! Start searching for a station.
When a station is received, searching stops.
To stop searching, press the same button
again.
To tune in to a station manually
In step ! above...
1
2 Select a desired station frequency.
When an FM stereo broadcast is hard to
receive
Reception improves, but stereo effect will be lost.
To restore the stereo effect, repeat the same
procedure. “M N FF” appears and the M indicator
goes off.
Lights up when monaural mode is activated.
EN06-11_KD-S33[J]f.indd 7EN06-11_KD-S33[J]f.indd 7 6/26/06 1:59:42 PM6/26/06 1:59:42 PM
All manuals and user guides at all-guides.com

8
ENGLISH
Listening to a preset station
1
2 Select the preset station ( – 6) you want.
or
To check the other information while
listening to an FM or AM station
Disc operations
Playing a disc in the unit
All tracks will be played repeatedly until you change the
source or eject the disc.
To stop play and eject the
disc
Storing stations in memory
You can preset six stations for each band.
FM station automatic presetting —
SSM (Strong-station Sequential
Memory)
1 Select the FM band (FM – FM3) you want to
store into.
2
3
“SSM” flashes, then disappears when automatic
presetting is over.
Local FM stations with the strongest signals are
searched and stored automatically in the FM band.
Manual presetting
Ex.: Storing FM station of 92.5 MHz into preset
number 4 of the FM1 band.
1
2
3
Clock Ô Frequency
Preset number flashes for a while.
EN06-11_KD-S33[J]f.indd 8EN06-11_KD-S33[J]f.indd 8 6/26/06 1:59:43 PM6/26/06 1:59:43 PM
All manuals and user guides at all-guides.com

9
ENGLISH
Playing discs in the CD changer
All discs in the magazine will be played repeatedly until
you change the source.
• Ejecting the magazine will also stop playing.
~
* If you have changed the external input setting
to “EXT IN” (see page 1 ), you cannot select the
CD changer.
Ÿ Select a disc.
For disc number from 01 – 06:
For disc number from 07 – 12:
About MP3 and WMA discs
MP3 and WMA “tracks” (words “file” and “track” are
used interchangeably) are recorded in “folders.”
About the CD changer
It is recommended to use a JVC MP3-compatible CD
changer with your unit.
• You can also connect other CH-X series CD changers
(except CH-X99 and CH-X100). These units are not
compatible with MP3 discs.
• You cannot play any WMA disc in the CD changer.
• You cannot use the KD-MK series CD changers with
this unit.
• Disc text information recorded in the CD Text can be
displayed when a JVC CD Text compatible CD changer
is connected.
• For connection, see Installation/Connection Manual
(separate volume).
To fast-forward or reverse the track
To go to the next or previous tracks
To go to the next or previous folders (only for
MP3 or WMA discs)
For MP3 discs:
For WMA discs:
To locate a particular track (for CD) or folder
(for MP3 or WMA discs) directly
To select a number from 01 – 06:
To select a number from 07 – 12:
• To use direct folder access on MP3/WMA discs, it
is required that folders are assigned with 2-digit
numbers at the beginning of their folder names—
01, 02, 03, and so on.
To select a particular track in a
folder (for MP3 or WMA discs):
EN06-11_KD-S33[J]f.indd 9EN06-11_KD-S33[J]f.indd 9 6/26/06 1:59:44 PM6/26/06 1:59:44 PM
All manuals and user guides at all-guides.com

10
ENGLISH
Changing the display information
While playing an audio CD or a CD
Text
While playing an MP3 or a WMA*2 disc
• When “TAG DISP” is set to “TAG ON”
(see page 4)
• When “TAG DISP” is set to “TAG OFF”
: Clock with the current track number
: Elapsed playing time with the current
track number
*1 If the current disc is an audio CD, “NO NAME” appears.
*2 Only for the built-in CD player.
*3 If an MP3/WMA file does not have Tag information,
folder name and file name appear. In this case, the
TAG indicator will not light up.
Other main functions
Skipping tracks quickly during play
Only possible on JVC
MP3-compatible CD changer
• For MP3 or WMA discs, you can skip tracks within the
same folder.
Ex.: To select track 32 while playing a track whose
number is a single digit (1 to 9)
1
2
Each time you press the button, you can skip 10
tracks.
• After the last track, the first track will be selected
and vice versa.
3
Prohibiting disc ejection
You can lock a disc in the loading slot.
To cancel the prohibition, repeat the same
procedure.
EN06-11_KD-S33[J]f.indd 10EN06-11_KD-S33[J]f.indd 10 6/26/06 1:59:45 PM6/26/06 1:59:45 PM
All manuals and user guides at all-guides.com

11
ENGLISH
Selecting the playback modes
You can use only one of the following playback modes
at a time.
1
2 Select your desired playback mode.
7 Repeat play
Mode Plays repeatedly
TRK RPT : The current track.
FLDR RPT*1 : All tracks of the current folder.
DISC RPT*2 : All tracks of the current disc.
RPT OFF : Cancels.
7 Random play
Mode Plays at random
FLDR RND*1 : All tracks of the current folder,
then tracks of the next folder and
so on.
DISC RND : All tracks of the current disc.
MAG RND*2 : All tracks of the inserted discs.
RND OFF : Cancels.
*1 Only while playing an MP3 or a WMA disc.
*2 Only while playing discs in the CD changer.
Continued on the next page
Sound adjustments
You can select a preset sound mode suitable to the
music genre (C-EQ: custom equalizer).
Indication (For)
BAS TRE LOUD
(bass) (treble) (loudness)
USER
(Flat sound) 00 00 FF
ROCK
(Rock or disco music) +03 +01 N
CLASSIC
(Classical music) +01 –02 FF
POPS
(Light music) +04 +01 FF
HIP HOP
(Funk or rap music) +02 00 N
JAZZ
(Jazz music) +02 +03 FF
Adjusting the sound
You can adjust the sound characteristics to your
preference.
1
Preset values
Ex.: When “R CK” is selected
EN06-11_KD-S33[J]f.indd 11EN06-11_KD-S33[J]f.indd 11 6/26/06 1:59:45 PM6/26/06 1:59:45 PM
All manuals and user guides at all-guides.com
all-guides.com

12
ENGLISH
General settings — PSM
You can change PSM (Preferred Setting Mode) items
(except “SID”) listed in the table that follows
1
2 Select a PSM item.
3 Adjust the PSM item selected.
4 Repeat steps 2 and 3 to adjust other PSM
items if necessary.
5 Finish the procedure.
2
Indication [Range]
BAS*1 (bass)
Adjust the bass [–06 to +06]
RE*1 (treble)
Adjust the treble [–06 to +06]
FAD*2 (fader)
Adjust the front and rear speaker balance [R06 to F06]
BAL*3 (balance)
Adjust the left and right speaker balance
[L06 to R06]
LOUD*1 (loudness)
Boost low and high frequencies to produce a well-
balanced sound at low volume level [LOUD ON or
LOUD OFF]
SUB.W*4 (subwoofer)
Adjust the subwoofer output level [00 to 08]
VOL (volume)
Adjust the volume [00 to 30 or 50*5]
*1 When you adjust the bass, treble, or loudness, the
adjustment you have made is stored for the currently
selected sound mode (C-EQ) including “U ER.”
*2 If you are using a two-speaker system, set the fader
level to “00.”
*3 This adjustment cannot affect the subwoofer output.
*4 This takes effect only when a subwoofer is connected.
Displayed only when “L/O MODE” is set to “WOOFER”
(see page 14).
*5 Depending on the amplifier gain control setting. ( ee
page 14 for details.)
Ex : When “DIMMER” is selected
EN12-17_KD-S33[J]f.indd 12EN12-17_KD-S33[J]f.indd 12 6/26/06 1:59:54 PM6/26/06 1:59:54 PM
All manuals and user guides at all-guides.com

ENGLISH
13
Indication Item
( : Initial)
Setting, [reference page]
DEMO
Display demonstration
• DEMO ON
• DEMO OFF
: Display demonstration will be activated automatically if no
operation is done for about 20 seconds, [7]
: Cancels
CLOCK H
Hour adjustment
1 – 1 [Initial: 1 (1:00)], [7]
CLOCK M
Minute adjustment
00 – 59 [Initial: 00 (1:00)], [7]
CLK ADJ*1
Clock adjustment
• AUTO
• OFF
: The built-in clock is automatically adjusted using the clock data
provided via the satellite radio channel
: Cancels
T-ZONE*1, *2
Time zone
EASTERN,
ATLANTIC,
NEWFOUND,
ALASKA, PACIFIC,
MOUNTAIN,
CENTRAL
Select your residential area from one of the following time zones for
clock adjustment
DST*1, *2
Daylight savings time
• ON
• OFF
: Activates daylight savings time if your residential area is subject
to DST
: Cancels
SID*3
SIRIUS ID
—The 12-digit SIRIUS identification number scrolls on the display
5 seconds after “SID” is selected, [15]
• Press SEL to resume the previous display
DIMMER
Dimmer
• ON
• OFF
: Dims the display illumination
: Cancels
SCROLL*4
Scroll
• ONCE
• AUTO
• OFF
: Scrolls the disc information once
: Repeats scrolling (at 5-second intervals)
: Cancels
• Pressing DISP for more than one second can scroll the display
regardless of the setting
*1 Displayed only when SIRIUS Satellite radio or XM Satellite radio is connected.
*2 Displayed only when “CLK ADJ” is set to “AU O.”
*3 Displayed only when SIRIUS Satellite radio is connected.
*4 Some characters or symbols will not be shown correctly (or will be blanked) on the display.
Continued on the next page
EN12-17_KD-S33[J]f.indd 13EN12-17_KD-S33[J]f.indd 13 6/30/06 2:10:15 PM6/30/06 2:10:15 PM
All manuals and user guides at all-guides.com

14
ENGLISH
Indication Item
( : Initial)
Settings, [reference page]
WOOFER*5
Subwoofer cutoff
frequency
• LOW
• MID
• HIGH
: Frequencies lower than 90 Hz are sent to the subwoofer
: Frequencies lower than 135 Hz are sent to the subwoofer
: Frequencies lower than 180 Hz are sent to the subwoofer
EXT IN*6
External input
• CHANGER
• EXT IN
: To use a JVC CD changer, [9], a JVC compatible satellite (SIRIUS/
XM) tuner, [15], an Apple iPod or a JVC D player, [18]
: To use any other external component than the above, [20]
L/O MODE
Line output mode
• REAR
• WOOFER
: Select if the both LINE OUT terminals are used for connecting the
speakers (through an external amplifier)
: Select if the REAR LINE OUT terminals are used for connecting a
subwoofer (through an external amplifier)
TAG DISP
Tag display
• TAG ON
• TAG OFF
: Shows the Tag information while playing MP3/WMA tracks, [10]
: Cancels
AMP GAIN
Amplifier gain control
• LOW PWR
• HIGH PWR
: VOL 00 – VOL 30 (Select this if the maximum power of the
speaker is less than 50 W to prevent them from being damaged )
: VOL 00 – VOL 50
AREA
Tuner channel interval
• AREA US
• AREA SA
• AREA EU
: When using in North/Central/South America AM/FM intervals are
set to 10 kHz/200 kHz
: When using in South American countries where FM interval is
100 kHz AM interval is set to 10 kHz
: When using in any other areas AM/FM intervals are set to
9 kHz/50 kHz (100 kHz during auto search)
*5 Displayed only when “L/O MODE” is set to “WOOFER.”
*6 Displayed only when one of the following sources is selected—FM, AM, or DISC.
EN12-17_KD-S33[J]f.indd 14EN12-17_KD-S33[J]f.indd 14 6/30/06 2:10:17 PM6/30/06 2:10:17 PM
All manuals and user guides at all-guides.com

ENGLISH
15
Satellite radio operations
This unit is satellite (SAT) Radio Ready—compatible
with both SIRIUS Satellite radio and XM Satellite radio
Before operating your satellite radio:
• For connection, see Installation/Connection Manual
(separate volume)
• Refer also to the Instructions supplied with your
SIRIUS Satellite radio or XM Satellite radio
• “ IRIU ” and the IRIU dog logo are registered
trademarks of IRIU atellite Radio Inc.
• XM and its corresponding logos are registered
trademarks of XM atellite Radio Inc.
• “ AT Radio,” the AT Radio logo and all related marks
are trademarks of IRIU atellite Radio Inc., and XM
atellite Radio, Inc.
Listening to the satellite radio
Connect either one of the following (separately
purchased) to the CD changer jack on the rear of this
unit
• JVC SIRIUS radio DLP—Down Link Processor, for
listening to the SIRIUS Satellite radio
• XMDirect M Universal uner Box using a JVC
Smart Digital Adapter—XMDJVC100 (not
supplied), for listening to the XM Satellite radio
GCI (Global Control Information) update:
• If channels are updated after subscription, updating
starts automatically
“UPDATING” flashes and no sound can be heard
• Update takes a few minutes to complete
• During update, you cannot operate your satellite
radio
Activate your SIRIUS subscription after
connection:
1
2
JVC DLP starts updating all the SIRIUS channels
Once completed, JVC DLP tunes in to the preset
channel, CH184
3 Check your SIRIUS ID, see page 13.
4 Contact SIRIUS on the internet at <http://
activate.siriusradio.com/> to activate your
subscription, or you can call SIRIUS toll-free
at 1-888-539-SIRIUS (7474).
“SUB UPDT PRESS ANY KEY” scrolls on the display
once subscription has been completed
Activate your XM subscription after
connection:
• Only Channel 0, 1, and 247 are available before
activation
1
2
XMDirectTM Universal Tuner Box starts updating
all the XM channels “Channel 1” is tuned in
automatically
3 Check your XM Satellite radio ID labelled on
the casing of the XMDirect M Universal uner
Box, or tune into “Channel 0” (see page 17).
4 Contact XM Satellite radio on the internet
at <http://xmradio.com/activation/> to
activate your subscription, or you can call 1-
800-XM-RADIO (1-800-967-2346).
Once completed, the unit tunes in to one of the
available channels (Channel 4 or higher)
EN12-17_KD-S33[J]f.indd 15EN12-17_KD-S33[J]f.indd 15 6/26/06 1:59:59 PM6/26/06 1:59:59 PM
All manuals and user guides at all-guides.com

16
ENGLISH
Searching for category/channel
You can search for programs by category (Category
Search) or channel number (Channel Search)
• In Category Search, you can tune in to the channels
of the selected category Category Search begins from
the currently selected channel The selected channel
number flashes on the display
• In Channel Search, you can tune in to all channels
(including non-categorised channels)
1 Select a category (Category Search).
• For Channel Search, skip this step
2 Select a channel for listening.
If no operation is done for about 15 seconds,
Category Search is canceled
In Channel Search, channel name and channel
number appear on the display during search
• While searching, invalid and unsubscribed channels
are skipped
Listening to the SIRIUS Satellite radio
1
2
3 Select a category.
You can tune in to all the channels of every
category by selecting “ALL ”
Selecting a particular category (SPORTS,
ENTERTAINMENT, etc ) allows you to enjoy only the
channels from the selected category
4 Select a channel for listening.
Holding the button changes the channels rapidly
• When changing the category or channel, invalid and
unsubscribed channels are skipped
Listening to the XM Satellite radio
1
2
3 Select a channel for listening.
Holding the button changes the channels rapidly
Ex : When you select “COUNTRY” for Category Search
Current channel number
EN12-17_KD-S33[J]f.indd 16EN12-17_KD-S33[J]f.indd 16 6/26/06 2:00:00 PM6/26/06 2:00:00 PM
All manuals and user guides at all-guides.com
all-guides.com

ENGLISH
17
Listening to a preset channel
1 Select either SIRIUS Satellite radio or XM
Satellite radio.
2
3 Select the preset channel (1 – 6) you want.
o change the display information while
listening to a channel
Clock = Category name = Channel name =
Artist name = Composer name* = Song/
program name/title = (back to the beginning)
* Only for IRIU atellite radio.
Checking the XM Satellite radio ID
While selecting “XM1,” “XM2,” or “XM3,” select
“Channel 0.”
The display alternately shows “RADIO ID” and the
8-digit (alphanumeric) ID number
o cancel the ID number display, select any channel
other than “Channel 0 ”
Storing channels in memory
You can preset six channels for each band
Ex : Storing a channel into preset number 4
1 une in to a channel you want.
2
Preset number flashes for a while
EN12-17_KD-S33[J]f.indd 17EN12-17_KD-S33[J]f.indd 17 6/26/06 2:00:01 PM6/26/06 2:00:01 PM
All manuals and user guides at all-guides.com

18
ENGLISH
⁄ Adjust the sound as you want. (See
pages 11 and 12.)
• Make sure the equalizer on the iPod or D.
player is deactivated.
To pause*1 or stop*2
playback
To resume playback, press it
again.
To fast-forward or reverse
the track
To go to the ne t or
previous tracks
*1 For iPod
*2 For D. player
Selecting a track from the menu
1 Enter the main menu.
No the 5/∞/4 /¢ buttons ork as
the menu selecting buttons*3.
2 Select the desired menu.
For iPod:
PLAYLIST Ô ARTISTS Ô ALBUMS Ô SONGS
Ô GENRES Ô COMPOSER Ô (back to the
beginning)
For D. player:
PLAYLIST Ô ARTIST Ô ALBUM Ô GENRE
Ô TRACK Ô (back to the beginning)
iPod ®/D. player operations
This unit is ready for operating an Apple iPod or a JVC
D. player from the control panel.
Before operating your iPod or D. player:
Connect either one of the follo ing (separately
purchased) to the CD changer jack on the rear of this
unit.
• Interface adapter for iPod®—KS-PD100 for
controlling an iPod.
• D. player interface adapter—KS-PD500 for
controlling a D. player.
• For connection, see Installation/Connection Manual
(separate volume).
• For details, refer also to the manual supplied ith the
interface adapter.
Caution:
Make sure to turn off this unit or turn off the
vehicle’s ignition s itch before connecting or
disconnecting the iPod or D. player.
Preparations:
Make sure “CHANGER” is selected for the external input
setting, see page 14.
~
Ÿ
Playback starts automatically from here it has
been paused*1 or stopped*2 previously.
! Adjust the volume.
EN18-23_KD-S33[J]f.indd 18EN18-23_KD-S33[J]f.indd 18 7/3/06 4:38:29 PM7/3/06 4:38:29 PM
All manuals and user guides at all-guides.com

ENGLISH
19
7 Random play
ALBM RND*4
Functions the same as “Shuffle Albums” of the
iPod.
SONG RND/RND ON
Functions the same as “Shuffle Songs” of the iPod
or “Random Play = On” of the D. player.
RND OFF
Cancels.
*4 For iPod: Only if you select “ALL” in “ALBUMS” of the
ain “MENU.”
To check other information while listening
to an iPod or a D. player
3 Confirm the selection.
To move back to the previous
menu, press 5.
• If a track is selected, playback starts
automatically.
• If the selected item has another layer, you ill
enter the layer. Repeat steps 2 and 3 until the
desired track is played.
• Holding 4 /¢ can skip 10 items at
a time.
*3 The enu selecting ode will be canceled:
– If no operations are done for about 5 seconds.
– When you confir the selection of a track.
Selecting the playback modes
1
2 Select your desired playback mode.
7 Repeat play
ONE RPT
Functions the same as “Repeat One” of the iPod or
“Repeat Mode = One” for the D. player.
ALL RPT
Functions the same as “Repeat All” of the iPod or
“Repeat Mode = All” for the D. player.
RPT OFF
Cancels.
EN18-23_KD-S33[J]f.indd 19EN18-23_KD-S33[J]f.indd 19 6/26/06 2:00:14 PM6/26/06 2:00:14 PM
All manuals and user guides at all-guides.com

20
ENGLISH
Other external component
operations
You can connect an external component to the
CD changer jack on the rear using the Line Input
Adapter—KS-U57 (not supplied) or AUX Input
Adapter—KS-U58 (not supplied).
• For connection, see Installation/Connection Manual
(separate volume).
For listening to the satellite radio, iPod, or D. player,
refer to pages 15 – 19.
~
If “EXT IN” does not appear, see page 14 and
select the external input (“EXT IN”).
Ÿ Turn on the connected component
and start playing the source.
! Adjust the volume.
⁄ Adjust the sound as you want. (See
pages 11 and 12.)
To check the other information while
listening to an e ternal component
Clock Ô EXT IN
More about this unit
Basic operations
Turning on the power
• By pressing SRC on the unit, you can also turn on the
po er. If the source is ready, playback also starts.
Turning off the power
• If you turn off the po er hile listening to a disc, disc
play ill start from here playback has been stopped
previously, next time you turn on the po er.
Tuner operations
Storing stations in memory
• During SSM search...
– All previously stored stations are erased and
stations are stored ne ly.
– Received stations are preset in No. 1 (lo est
frequency) to No. 6 (highest frequency).
– When SSM is over, the station stored in No. 1 ill
be automatically tuned in.
• When storing a station manually, the previously
preset station is erased hen a ne station is stored
in the same preset number.
Disc operations
Caution for DualDisc playback
• The Non-DVD side of a “DualDisc” does not comply
ith the “Compact Disc Digital Audio” standard.
Therefore, the use of Non-DVD side of a DualDisc on
this product may not be recommended.
General
• This unit has been designed to reproduce CDs/CD
Texts, and CD-Rs (Recordable)/CD-RWs (Re ritable)
in audio CD (CD-DA), MP3 and WMA formats.
• When a disc had been loaded, selecting “DISC” for the
playback source starts disc play.
EN18-23_KD-S33[J]f.indd 20EN18-23_KD-S33[J]f.indd 20 6/26/06 2:00:15 PM6/26/06 2:00:15 PM
All manuals and user guides at all-guides.com
Other manuals for KD-S33
2
Table of contents
Other JVC Car Receiver manuals
Popular Car Receiver manuals by other brands

Kenwood
Kenwood KDC-2006 instruction manual

Blaupunkt
Blaupunkt ORLANDO CM127 owner's manual

Boss Audio Systems
Boss Audio Systems MP3-4600R user manual

Pioneer
Pioneer FH-P6600R Operation manual

DELPHI GRUNDIG
DELPHI GRUNDIG CL 210 MP3 instruction manual

Sony
Sony MEX-BT38UW - Bt Slot Usb 1wire Installation/connections