Phase3 rookie User manual

1
OPERATING INSTRUCTIONS
The Rookie is a very small indoor or outdoor radio controlled ying model aircraft. The Rookie is powered by a small electric motor and a
rechargeable Lithium Polymer ight battery. The Rookie's direction is controlled by a magnetic actuator mounted in the tail. Everything is
included for ight except eight AA size Alkaline batteries for the hand-held transmitter.
SECTION 1: PARTS IDENTIFICATION AND REPLACEMENT PARTS
SECTION 2: BECOMING FAMILIAR WITH THE TRANSMITTER/CHARGER
The On/Off switch has three different positions. All the way up is the "ON"
position, in the middle is the "CHARGE" position and all the way down
is the "OFF" position.
●Wing Span: 240mm (9.5 Inches)
●Length: 235 (9.25 Inches)
●Weight RTF: 28.4g (1 Ounce)
● Right/Left Control and Motor
●Ready to Fly - Fly Almost Anywhere
● Flies for Over 6 Minutes on a Single Charge!
● Includes 1 Cell 150mAH Lithium Polymer Battery
●
AvAILABLE REPLACEMENT PARTS
All contents copyright © 2006 Phase 3 Models
Version 1.0 October 2006
● Lithium Polymer
Flight Battery
●Rookie with Motor and
Propeller
● Hand-Held
Transmitter
Upon opening the box, double-check that
you have all of the parts listed below:
Should you require replacement parts, we recommend
ordering them from your local model shop.
If they do not stock Phase 3 Models products,
please contact your local Phase 3 distributor.
●Part No. PH109513 - MotorPH109513 - Motor
●Part No. PH109511 - BatteryPH109511 - Battery
●Part No. PH109512 - AerialPH109512 - Aerial
●Part No. PH109514 - Magnet for Rudder (2)PH109514 - Magnet for Rudder (2)
●Part No. PH109515 - Propeller (4)PH109515 - Propeller (4)
●Part No. PH109516 - Foam Parts (�ing/Body/Fin)PH109516 - Foam Parts (�ing/Body/Fin)

Install 8 fresh AA Alkaline batteries into the transmitter, ensuring that the polarity
is correct for each battery. After double-checking that the batteries are installed
correctly, reinstall the battery cover, making sure that it is rmly seated into
place.
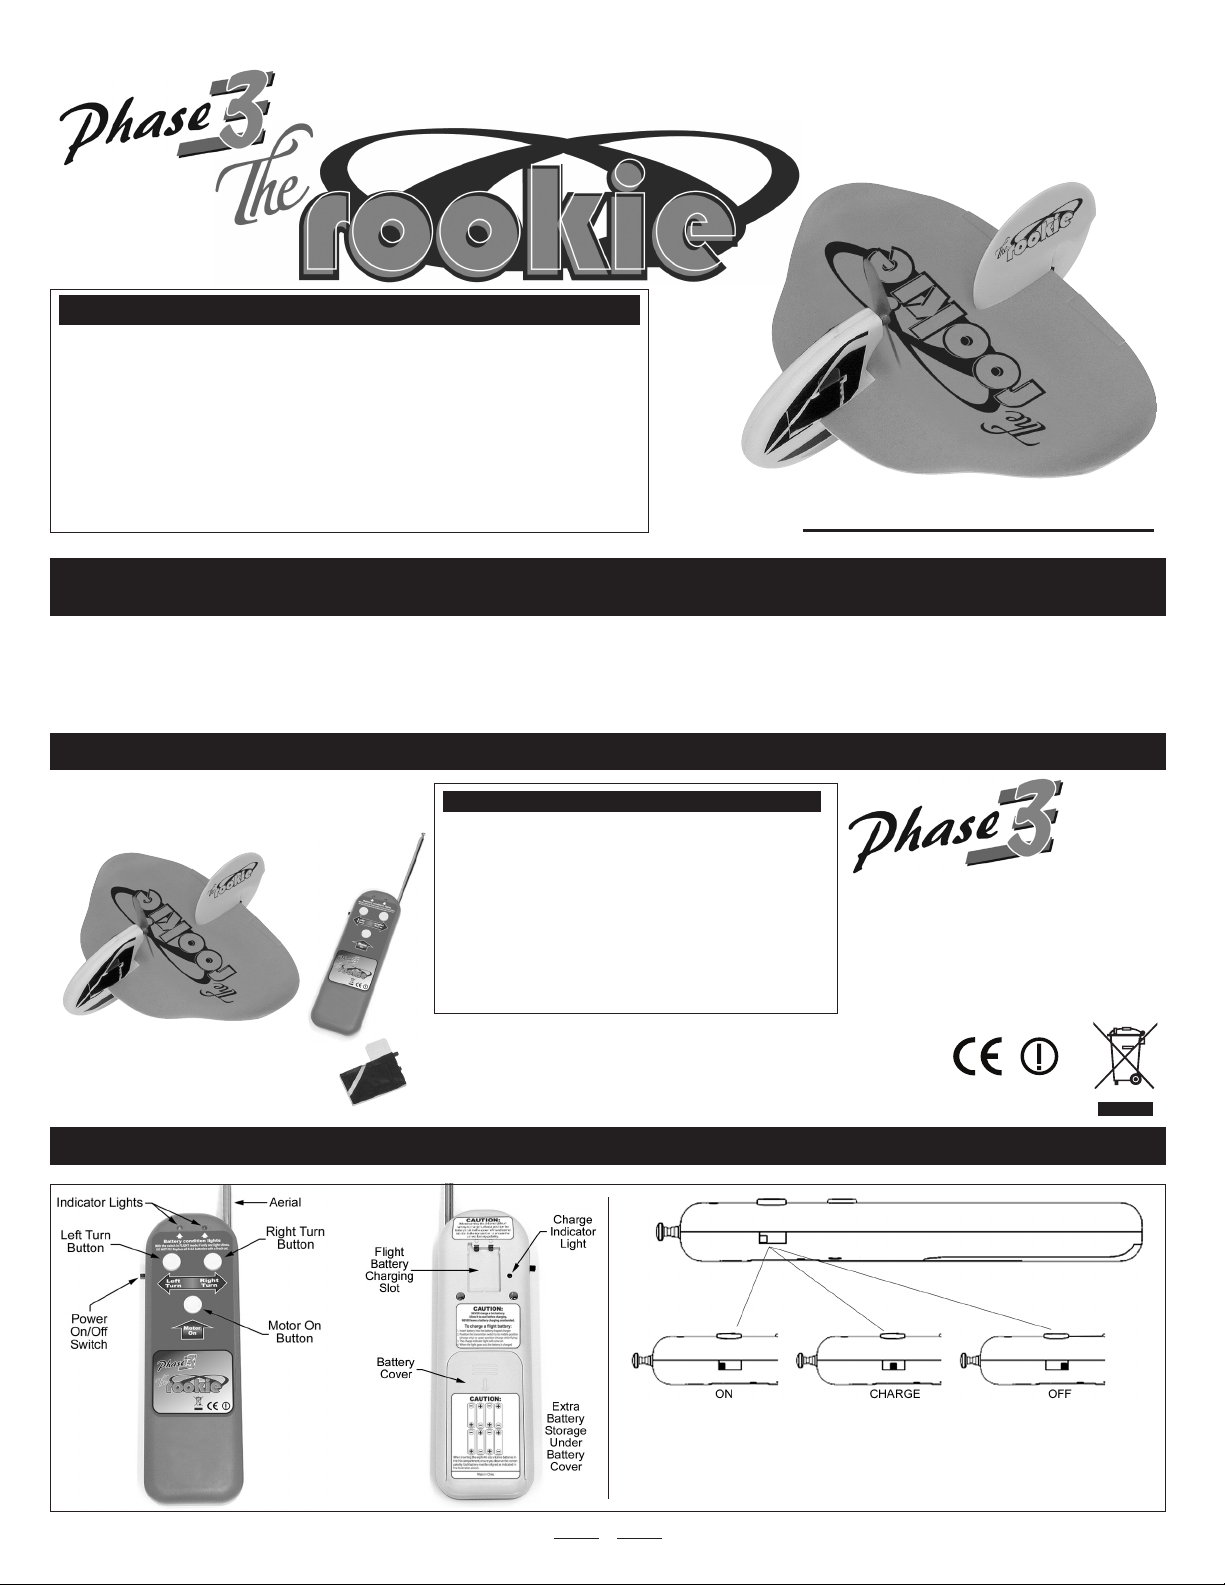
Move the On/Off switch into the "ON" position. Both the red and
green lights on the front of the transmitter should illuminate. The
red light indicates that the power is on and the green light indicates
that the voltage is sufcient to y and/or charge the Lithium ight
battery. If the green light is weak or fails to light, the batteries must
be replaced with new, fresh ones before ying again or charging
the Lithium Polymer ight battery. If neither light is on, double-check
the polarity of the batteries.
SECTION 5: CHARGING THE FLIGHT BATTERY
CHARGING SuGGESTIONS AND WARNINGS
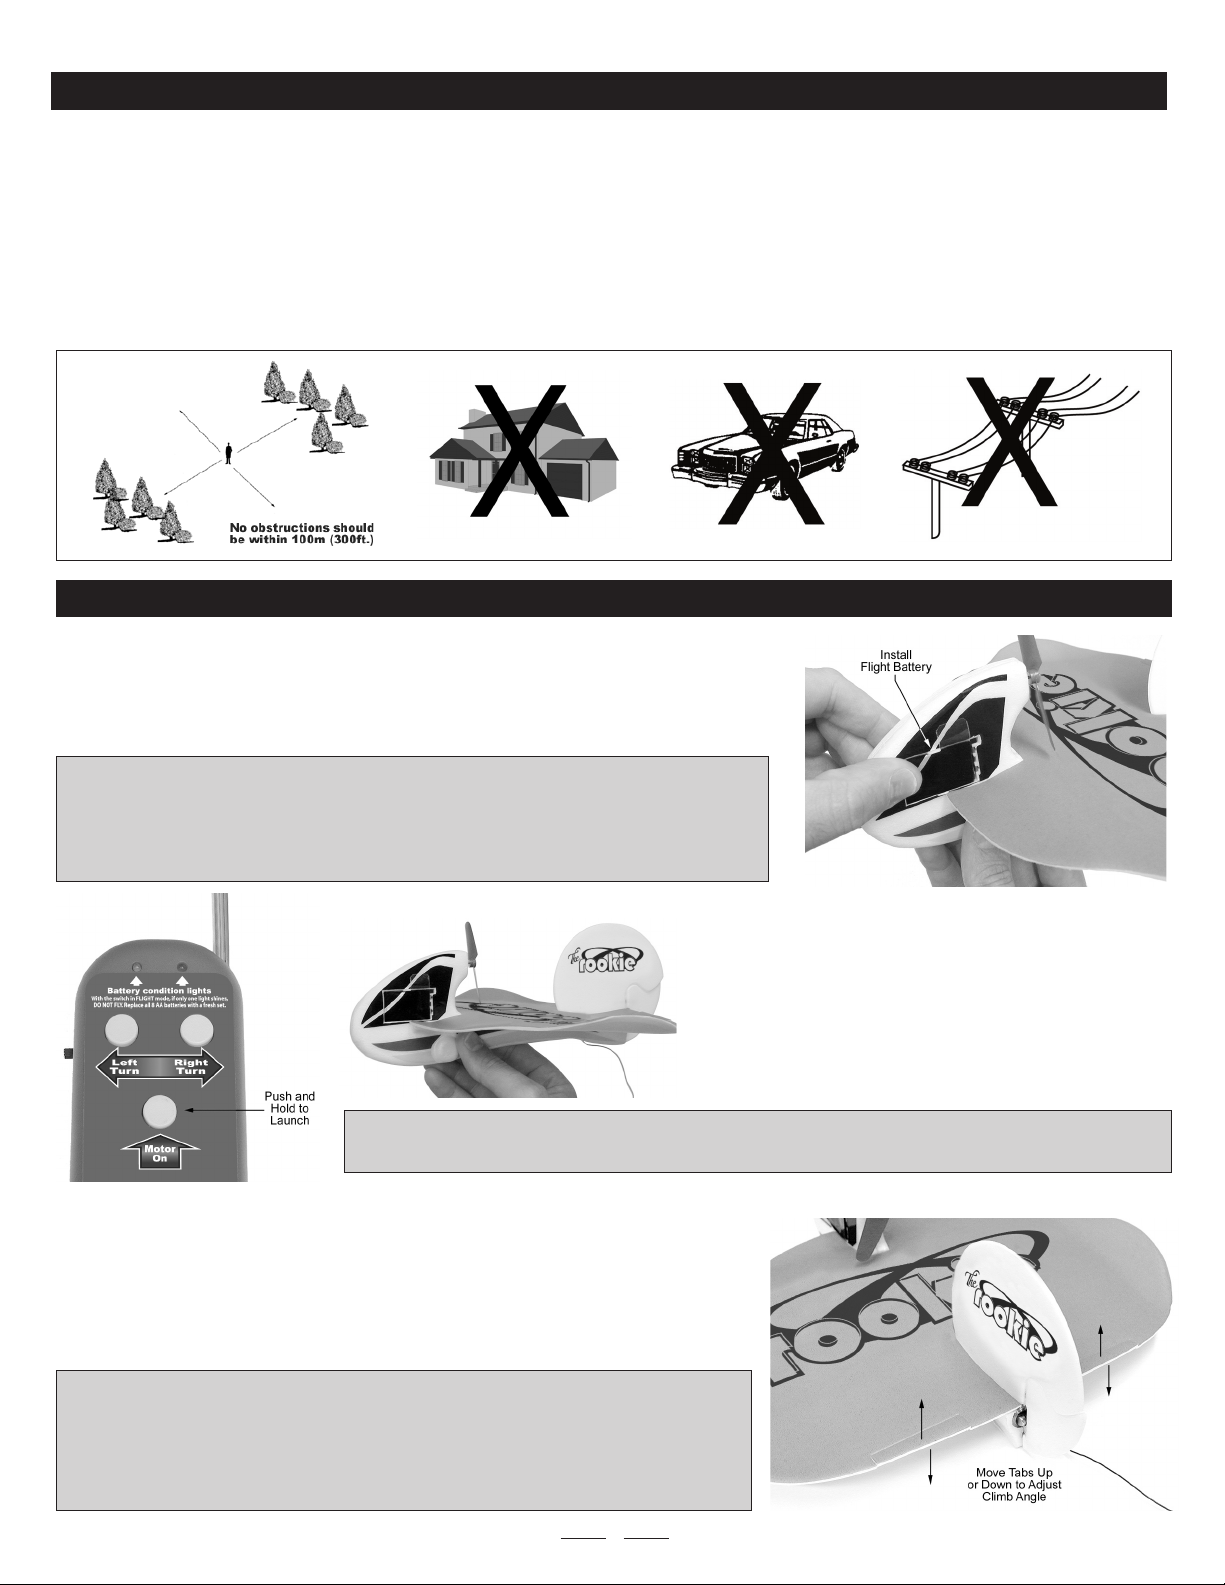
●An extra Lithium Polymer ight battery can be purchased and charged with the transmitter while you are ying. Push the second ight battery into the back of
the transmitter and move the On/Off switch to the "CHARGE" position. �hen you are ready to y The Rookie, move the switch to the "ON" position. Now you
can y The Rookie using the rst ight battery while your extra ight battery is charging.
2
●After 2 -3 ights, the ight performance of The Rookie will improve. This is
because the ight battery will have "cycled" and will therefore produce
more power.
●The ight battery is a Lithium Polymer type battery. Do not use this battery
for any other use than ying The Rookie.
● Always use the transmitter to recharge the ight battery. Never use any other
type of charger to charge the ight battery.
●Do not solder or apply direct heat to the ight battery.
●�hen the batteries in the transmitter are getting low, the charging
process will take much longer than normal. In this case, replace the
transmitter batteries with new fresh ones.
●Do not leave the ight battery in the hot sun or in a hot car.
● Do not use the ight battery if it appears swollen or deformed.
●Do not recharge the ight battery if it is hot. Always allow the ight battery
to cool before recharging it.
●The ight battery charger is built into the back of the transmitter. To charge
the ight battery, make sure that the On/Off switch is in the "OFF" position,
then carefully push the ight battery into the back of the transmitter, making
sure that it is rmly seated. Move the On/Off switch to the "CHARGE"
position. The indicator light on the back of the transmitter will illuminate to
indicate that the ight battery is charging.
●�hile the indicator light on the back of the transmitter is illuminated, the ight
battery is being charged. The indicator light will go out after the charging
process is complete - approximately 40 minutes to 1 hour, depending
on how discharged the ight battery is. If the ight battery is not completely
discharged, the charge time will be shorter.
CHARGING AN EXTRA FLIGHT BATTERY WHILE YOu'RE FLYING
SECTION 3: INSTALLING THE TRANSMITTER AERIAL
Locate the aerial, then push it down into the moulded
hole in the top of the transmitter as shown. Slowly
thread it (clockwise) into place and tighten it until
it stops. Do not force the aerial into place or tighten it
too much. Doing so could cause damage to the aerial
and/or transmitter.

SECTION 6: FLIGHT TIPS AND SAFETY
● Do not y The Rookie if another radio control model is operating on the same radio frequency as you. The Rookie transmits its signal on one
of four frequencies in the 27MHz frequency band, as indicated by the sticker on the front of the transmitter. Before ying, double-check that
nobody else is ying or driving a model car on the same frequency band that your Rookie is on.
● For the best ight environment, we suggest ying in a large indoor area, such as a gymnasium.
● If you want to y outdoors, do not y in winds stronger than 3 miles per hour. The Rookie is very small and extremely light, so winds higher
than 3 miles per hour will make it very difcult to y.
● �hen ying outdoors, you should choose a large, open grass ying eld. There should not be any vehicles, buildings, power lines, trees, large
rocks or anything else that your Rookie can crash into. �e suggest a eld that is at minimum of 100m x 100m (300ft x 300ft).
● After launching The Rookie straight and level, continue to hold the Motor ON Button
down. The motor will run and The Rookie will climb at about a 10 degree angle.
3
IMPORTANT If The Rookie climbs too steeply or if it doesn't climb at all, release the
Motor ON Button and The Rookie will descend and land. Gently bend both of the tabs
on the wing up to make The Rookie climb steeper or bend them down to make The
Rookie climb less steeply. Make sure you bend both tabs equal amounts or The
Rookie may have a tendency to turn right or left without your input.
● Turn on the transmitter by moving the On/Off switch to the "ON" position.
● Carefully install a fully-charged ight battery into The Rookie by pushing it into the mounting
slot in the side of the fuselage. Firmly push the ight battery into place to ensure that it is
securely seated.
IMPORTANT Turn on the transmitter before installing the ight battery into The Rookie.
WARNING To prevent damage to the ight battery, always remove the ight battery from
The Rookie when you are done ying. If you leave the ight battery installed, the battery
will run down completely and damage it.
● Hold The Rookie in your launching hand and the transmitter
in your other hand. �ith The Rookie held at shoulder level,
press and hold the Motor ON Button with your thumb to turn
on the motor. �ith the motor running, gently launch The
Rookie into the wind, straight ahead and level.
ALWAYS LAuNCH INTO THE WIND
IMPORTANT Do not launch The Rookie up or down and don't throw it hard. Launch The Rookie gently,
straight ahead and level. If ying outside, always launch The Rookie directly into the wind.

● Once The Rookie has climbed as high as you want it to, quickly repeatedly tap the Motor ON Button to slow the motor and stop climbing.
You can continue to make right and left turns now without climbing, by ‘tapping’ the right turn and left turn buttons.
● Maintaining ight is a combination of holding down the Motor ON button while "tapping" the Right Turn and Left Turn buttons to "steer" The
Rookie. Level ight is accomplished by holding down the Motor ON button, then repeatedly tapping the Motor ON button to descend, then
by holding the Motor ON button down to climb again.
● Maintaining controlled, level ight is a combination of using the "tapping" method for the Right Turn Button, Left Turn Button and the Motor
ON Button. After a little practice, you should be able to control The Rookie's direction and altitude without much effort.
● �hen you're ready to land The Rookie, let go of the Motor ON Button and make shallow right or left turns so that The Rookie is gliding
towards your landing area. �ith the Motor ON Button released, The Rookie will gradually descend. The Rookie will almost land on its own,
so the only thing you need to do is make sure that it's ying into the wind when beginning your landing approach (if you’re ying outside).
Once The Rookie is near to the ground, release all of the buttons and The Rookie will land by itself.
SECTION 8: IMPORTANT INFORMATION AND MAINTENANCE
● The safe transmitting distance of The Rookie's radio control system is approximately 45m (150ft). If The Rookie ies beyond this range the
power to the motor will cut off automatically and the plane will descend to the ground.
● �hen ying your Rookie, make sure there are no other people nearby.
● Do not attempt to dismantle the transmitter, The Rookie or the Lithium Polymer ight battery. DO NOT CuT THE AERIAL WIRE COMING OuT
● If the propeller breaks during landing or a crash, do not attempt to repair it. �e suggest purchasing a new replacement.
● Do not dispose of the Lithium Polymer ight battery in a re, otherwise the battery will explode.
● After you have nished ying, remove the ight battery from The Rookie.
● Switch off the transmitter, so you don't run down the batteries.
● After landing, check The Rookie carefully to ensure it is not damaged in any way.
● Recharge the ight battery and prepare for your next ight!
4
If The Rookie breaks following a crash, and the damage isn't too bad, it can be repaired. Glue the broken parts together using a thin layer of
5 minute epoxy or white glue, following the directions on the glue bottle. Hold the parts together and in alignment until the glue fully cures.
Apply a strip of clear tape over the seams to strengthen the joint even more.
● �hile The Rookie is climbing, you may want to turn right or left. To turn The Rookie right while climbing,
continue to hold the Motor ON Button down while ‘tapping’ the Right Turn Button with your other thumb.
After The Rookie has turned in the direction you want, simply ‘tap’ the Left Turn button to level The
Rookie.
● To turn The Rookie left while climbing, continue to hold the Motor ON Button down while ‘tapping’ the
Left Turn Button with your other thumb. After The Rookie has turned in the direction you want, tap the
Right Turn button to level The Rookie.
Other Phase3 Toy manuals
Popular Toy manuals by other brands

Eduard
Eduard Blenheim Mk.IF exterior quick start guide

Nickelodeon
Nickelodeon LeapFrog Blue's Clues & You! Really Smart Handy Dandy... Parents' guide

Eduard
Eduard M-106A1 Armoured S.P. Mortar interior quick start guide

Amewi
Amewi RC Magic Traxx Glow instruction manual

SPECIAL HOBBY
SPECIAL HOBBY SH48117 CAC-13 Boomerang Instruction

Trix
Trix KOF II manual

Eduard
Eduard Bf 109G-10 MTT Weekend manual

Pragma
Pragma axi Tom user manual

Fisher-Price
Fisher-Price Little People Airport C4780 instructions

Mattel
Mattel Barbie 29345 instructions

Fleischmann
Fleischmann 7760006 operating manual

ScaleTrains
ScaleTrains KIT CLASSICS HO SCALE CB&Q HAVELOCK SHOPS 52'6... manual